turn signal bulb MERCEDES-BENZ GLA SUV 2013 Owners Manual
[x] Cancel search | Manufacturer: MERCEDES-BENZ, Model Year: 2013, Model line: GLA SUV, Model: MERCEDES-BENZ GLA SUV 2013Pages: 401, PDF Size: 11.9 MB
Page 10 of 401
Changing bulbs
Brake lamps .................................. .131
Cornering light function ................. 130
Dipped-beam headlamps .............. .130
Main-beam headlamps ................... 130
Rear foglamp ................................. 131
Reversing lamps ............................ 131
Turn signals (front) ......................... 130
Turn signals (rear) .......................... 131
Charging
see Charging the high-voltage battery
Child seat
Forward-facing restraint system ...... 64
ISOFIX .............................................. 61
On the front-passenger sea t............ 63
Rearward-facing restraint system .... 64
Recommendations ........................... 68
Suitable positions ............................ 64
Top Tether ....................................... 62
Child-proof locks
Important safety notes .................... 70
Rear doors ....................................... 71
Children
Restraint systems ............................ 60
Cigarette lighter ................................ 310
Cleaning
Trailer tow hitch ............................. 327
Climate control
Air conditioning ............................. 139
Auxiliary heating/ventilation .......... 150
Controlling automaticall y............... 144
Convenience opening/closing
(air-recirculation mode) ................. 148
Cooling with air dehumidification .. 142
Demisting the windows .................. 146
Demisting the windscreen ............. 146
Important safety notes .................. 138
Indicator lamp ................................ 144
Information on using
THERMOTRONIC automatic cli-
mate control .................................. 141
Notes on using the air-condition-
ing system ..................................... 139
Overview of systems ...................... 138
Problem with the rear window
heating .......................................... 148
Problems with cooling with air
dehumidification ............................ 144 Setting the air distribution ............. 145
Setting the air vents ...................... 155
Setting the airflow ......................... 145
Setting the temperature ................ 144
Switching air-recirculation mode
on/of
f............................................ 148
Switching on/of f........................... 142
Switching residual heat on/off ...... 149
Switching the rear window heat-
ing on/of f...................................... 147
Switching the ZONE function on/
off .................................................. 145
THERMOTRONIC (2-zone) auto-
matic climate control ..................... 141
Cockpit
Overview .......................................... 30
see Instrument cluster
COLLISION PREVENTION ASSIST
Activating/deactivating the dis-
tance warning function .................. 244
Display message ............................ 255
Operation/note s.............................. 73
COLLISION PREVENTION ASSIST
PLUS
Activating/deactivating ................. 244
Display message ............................ 262
Operation/note s.............................. 76
COMAND Online
see separate operating instructions
Combination switch .......................... 123
Consumption statistics (on-board
computer) .......................................... 237
Convenience closing feature .............. 99
Convenience opening feature ............ 99
Convenience opening/closing (air-
recirculation mode) ........................... 148
Coolant (engine)
Checking the level ......................... 320
Display message ............................ 272
Important safety notes .................. 390
Temperature (on-board com-
puter) ............................................. 251
Temperature gaug e........................ 234
Warning lamp ................................. 295
Cooling
see Climate control
Copyright ............................................. 27 Index
7
Page 16 of 401
Starting the engine ........................ 160
Key positions (ignition lock) ............ 159
Kickdown
Driving tips .................................... 170
Manual drive progra m.................... 174
Kneebag ............................................... 50 L
Lamps see Warning and indicator lamps
Lane Keeping Assist
Activating/deactivating ................. 245
Display message ............................ 276
Function/information .................... 224
Lane package ..................................... 222
Lap time (RACETIMER) ...................... 251
Lashing eyelets ................................. 306
Licence plate lamp (display mes-
sage) ................................................... 270
Light sensor (display message) ....... 271
Lighting
see Lights
Lights
Activating/deactivating the Intel-
ligent Light System ........................ 247
Activating/deactivating the inte-
rior lighting delayed switch-off ....... 248
Active light function ....................... 124
Automatic headlamp mode ............ 121
Cornering light function ................. 124
Dipped-beam headlamp s............... 121
Display message ............................ 268
Driving abroad ............................... 120
Foglamps ....................................... 121
Foglamps (extended range) ........... 125
Hazard warning lamps ................... 123
Headlamp flashe r........................... 123
Headlamp range ............................ 122
Light switch ................................... 120
Main-beam headlamp s................... 123
Motorway mode ............................. 124
Off-road lights ................................ 125
Parking lamps ................................ 122
Rear foglamp ................................. 122
Setting the ambient lighting
brightness (on-board computer) .... 247
Side lamps ..................................... 122 Switching the daytime driving
lights on/off (on-board com-
puter) ............................................. 246
Switching the daytime driving
lights on/off (switch) ..................... 121
Switching the exterior lighting
delayed switch-off on/off (on-
board computer) ............................ 247
Switching the surround lighting
on/off (on-board computer) .......... 247
Turn signals ................................... 123
see Interior lighting
see Replacing bulbs
LIM indicator lamp
Cruise control ................................ 189
DISTRONIC PLUS ........................... 194
Variable SPEEDTRONIC ................. 191
Limiting the speed
see SPEEDTRONIC
Loading guidelines ............................ 300
Locking
see Central locking
Locking (doors)
Automatic ........................................ 93
Emergency locking ........................... 94
From inside (central locking but-
ton) .................................................. 92
Locking centrally
see Central locking
Locking verification signal (on-
board computer) ............................... 249
Luggage compartment enlarge-
ment ................................................... 304
Important safety notes .................. 304
Notes on use ................................. 305
Luggage compartment floor
Important safety notes .................. 307
opening/closing ............................ 307
stowage well, under ....................... 307
Luggage net ....................................... 303
Lumbar support
Adjusting the 4-way lumbar sup-
port ................................................ 112 M
M+S tyres ........................................... 354 Index
13
Page 22 of 401
Rediallin
g....................................... 242
Rejecting/ending a call ................. 242
Telephone compartment ................ 302
Temperature
Coolant .......................................... 234
Coolant (on-board computer) ......... 251
Engine oil (on-board computer) ...... 251
Outside temperature ...................... 235
Setting (climate control )................ 144
TEMPOMAT
Function/note s............................. 188
Theft-deterrent system
ATA (Anti-Theft Alarm system) ......... 81
Immobiliser ...................................... 81
Through-loading ................................ 303
Time
see Separate Owner's manual
Timing (RACETIMER) ......................... 251
TIREFIT kit .......................................... 335
Top Tether ............................................ 62
Tow-away protection
Activating ......................................... 82
Deactivating ..................................... 82
Function ........................................... 81
Tow-starting
Emergency engine starting ............ 348
Fitting the towing eye .................... 346
Important safety notes .................. 344
Removing the towing eye ............... 346
Towing
Important safety notes .................. 344
Notes for 4MATIC vehicles ............ 347
Towing a trailer
Active Parking Assist ..................... 215
Axle load, permissibl e.................... 394
Bulb failure indicator for LED
lamps ............................................. 230
ESP® (Electronic Stability Pro-
gram) ............................................... 80
Pulling away with a traile r.............. 161
Trailer tow hitch display message .. 286
Towing away
Fitting the towing eye .................... 346
Removing the towing eye ............... 346
With both axles on the ground ....... 347
With front axle raised ..................... 346
Trailer coupling
see Towing a trailer Trailer towing
7-pin connecto r............................. 230
Blind Spot Assist ............................ 224
Cleaning the trailer tow hitch ......... 327
Coupling up a traile r...................... 229
Decoupling a trailer ....................... 229
Driving tips .................................... 225
Folding in the ball coupling ............ 229
Folding out the ball coupling .......... 228
Important safety notes .................. 225
Lights display message .................. 269
Mounting dimensions .................... 393
Parktronic ...................................... 209
Power supply ................................. 230
Trailer load s................................... 394
Transmission
see Automatic transmission
see Manual transmission
Transmission position display
(DIRECT SELECT lever) ...................... 168
Transporting the vehicle .................. 347
Travelling uphill
Brow of hill ..................................... 188
Driving downhill ............................. 188
Maximum gradient-climbing capa-
bility ............................................... 188
Trim pieces (cleaning instruc-
tions) .................................................. 328
Trip computer (on-board com-
puter) .................................................. 237
Trip meter
Calling up ....................................... 237
Resetting (on-board computer) ...... 238
Turn signals
Changing bulbs (front) ................... 130
Changing bulbs (rear) .................... 131
Switching on/of f........................... 123
Two-way radio
Frequencies ................................... 382
Installation ..................................... 382
Transmission output (maximum) .... 382
Type identification plate
see Vehicle identification plate
Tyre pressure
Calling up (on-board computer) ..... 358
Display message ............................ 280
Important safety notes .................. 358
Not reached (TIREFIT) .................... 337 Index
19
Page 132 of 401
If the new bulb still does not light up, consult
a qualified specialist workshop.
Bulbs and lamps are an important aspect of
vehicle safety. You must therefore make sure that these function correctly at all times.
Have the headlamp setting checked regularly. Overview of bulb replacement – bulbs
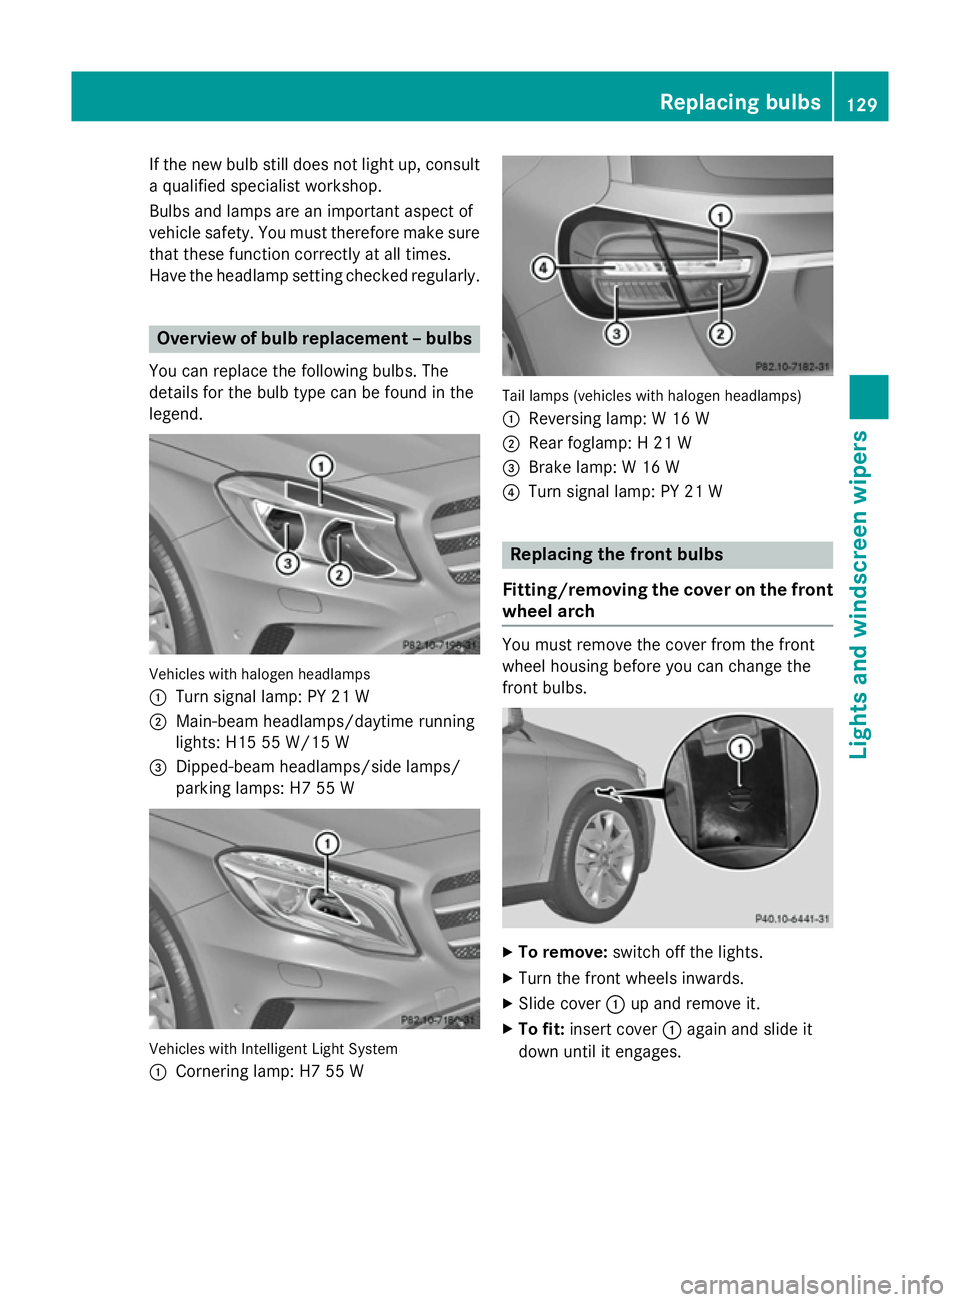
You can replace the following bulbs. The
details for the bulb type can be found in the
legend. Vehicles with halogen headlamps
:
Turn signal lamp: PY 21 W
; Main-beam headlamps/daytime running
lights: H15 55 W/15 W
= Dipped-beam headlamps/side lamps/
parking lamps: H7 55 W Vehicles with Intelligent Light System
:
Cornering lamp: H7 55 W Tail lamps (vehicles with halogen headlamps)
: Reversing lamp: W 16 W
; Rear foglamp: H 21 W
= Brake lamp: W 16 W
? Turn signal lamp: PY 21 W Replacing the front bulbs
Fitting/removing the cover on the front wheel arch You must remove the cover from the front
wheel housing before you can change the
front bulbs.
X
To remove: switch off the lights.
X Turn the front wheels inwards.
X Slide cover :up and remove it.
X To fit: insert cover :again and slide it
down until it engages. Replacing bulbs
129Lights and windscreen wipers Z
Page 133 of 401
Dipped-beam headlamps/side lamps
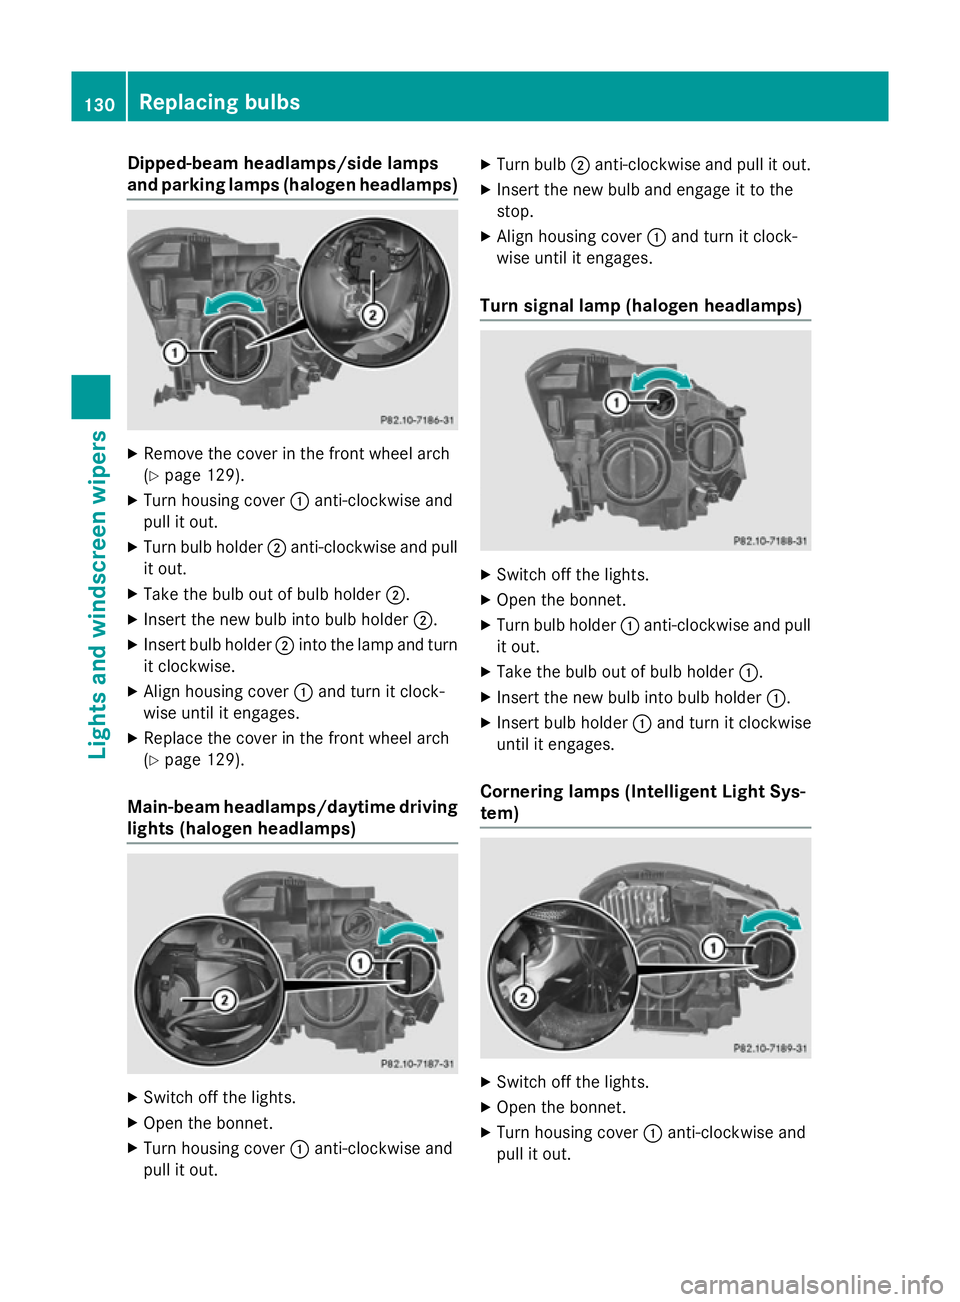
and parking lamps (halogen headlamps) X
Remove the cover in the front wheel arch
(Y page 129).
X Turn housing cover :anti-clockwise and
pull it out.
X Turn bulb holder ;anti-clockwise and pull
it out.
X Take the bulb out of bulb holder ;.
X Insert the new bulb into bulb holder ;.
X Insert bulb holder ;into the lamp and turn
it clockwise.
X Align housing cover :and turn it clock-
wise until it engages.
X Replace the cover in the front wheel arch
(Y page 129).
Main-beam headlamps/daytime driving lights (halogen headlamps) X
Switch off the lights.
X Open the bonnet.
X Turn housing cover :anti-clockwise and
pull it out. X
Turn bulb ;anti-clockwise and pull it out.
X Insert the new bulb and engage it to the
stop.
X Align housing cover :and turn it clock-
wise until it engages.
Turn signal lamp (halogen headlamps) X
Switch off the lights.
X Open the bonnet.
X Turn bulb holder :anti-clockwise and pull
it out.
X Take the bulb out of bulb holder :.
X Insert the new bulb into bulb holder :.
X Insert bulb holder :and turn it clockwise
until it engages.
Cornering lamps (Intelligent Light Sys-
tem) X
Switch off the lights.
X Open the bonnet.
X Turn housing cover :anti-clockwise and
pull it out. 130
Replacing bulbsLigh
ts and windscreen wipers
Page 135 of 401

X
Remove screws =using a screwdriver.
X Remove the bulb holder from the lamp clus-
ter. Bulb holder
?
Turn signals
A Brake lamp
X Turn signal lamp: lightly press the bulb
into the bulb holder, turn it anti-clockwise
and remove it from the bulb holder.
X Insert the new bulb into the bulb holder and
turn it clockwise.
X Brake lamp: remove the corresponding
bulb from the bulb holder.
X Insert the new bulb into the bulb holder.
X Insert the bulb holder into the lamp cluster
and screw it firmly into place using screws =.
X Insert the lamp cluster into the vehicle.
X Tighten wing nut ;and re-establish con-
tact with connector :.
X Close the side trim panel (Y page 131).
Reversing lamp and rear foglamp
Due to their location, have the bulbs in the
reversing lamp and rear foglamp in the tail-
gate (vehicles with halogen headlamps)
changed at a qualified specialist workshop. Windscreen wipers
Switching the windscreen wipers on/
off
! Do not operate the windscreen wipers
when the windscreen is dry, as this could
damage the wiper blades. Moreover, dust
that has collected on the windscreen can
scratch the glass if wiping takes place when the windscreen is dry.
If it is necessary to switch on the wind-
screen wipers in dry weather conditions,
always operate them using washer fluid.
! If the windscreen wipers leave smears on
the windscreen after the vehicle has been
washed in an automatic car wash, this may
be due to wax or other residue. Clean the
windscreen with washer fluid after an auto- matic car wash. Combination switch
1 $ Windscreen wipers off
2 Ä Intermittent wipe, low (rain sensor
set to low sensitivity)
3 Å Intermittent wipe, high (rain sensor
set to high sensitivity)
4 ° Continuous wipe, slow
5 ¯ Continuous wipe, fast
B í Single wipe/ îto wipe the wind-
screen using washer fluid
X Turn the key to position 1or 2in the ignition
lock (Y page 159).
X Turn the combination switch to the corre-
sponding position. 132
Windscreen wipersLights and windscreen wipers
Page 272 of 401
Display messages
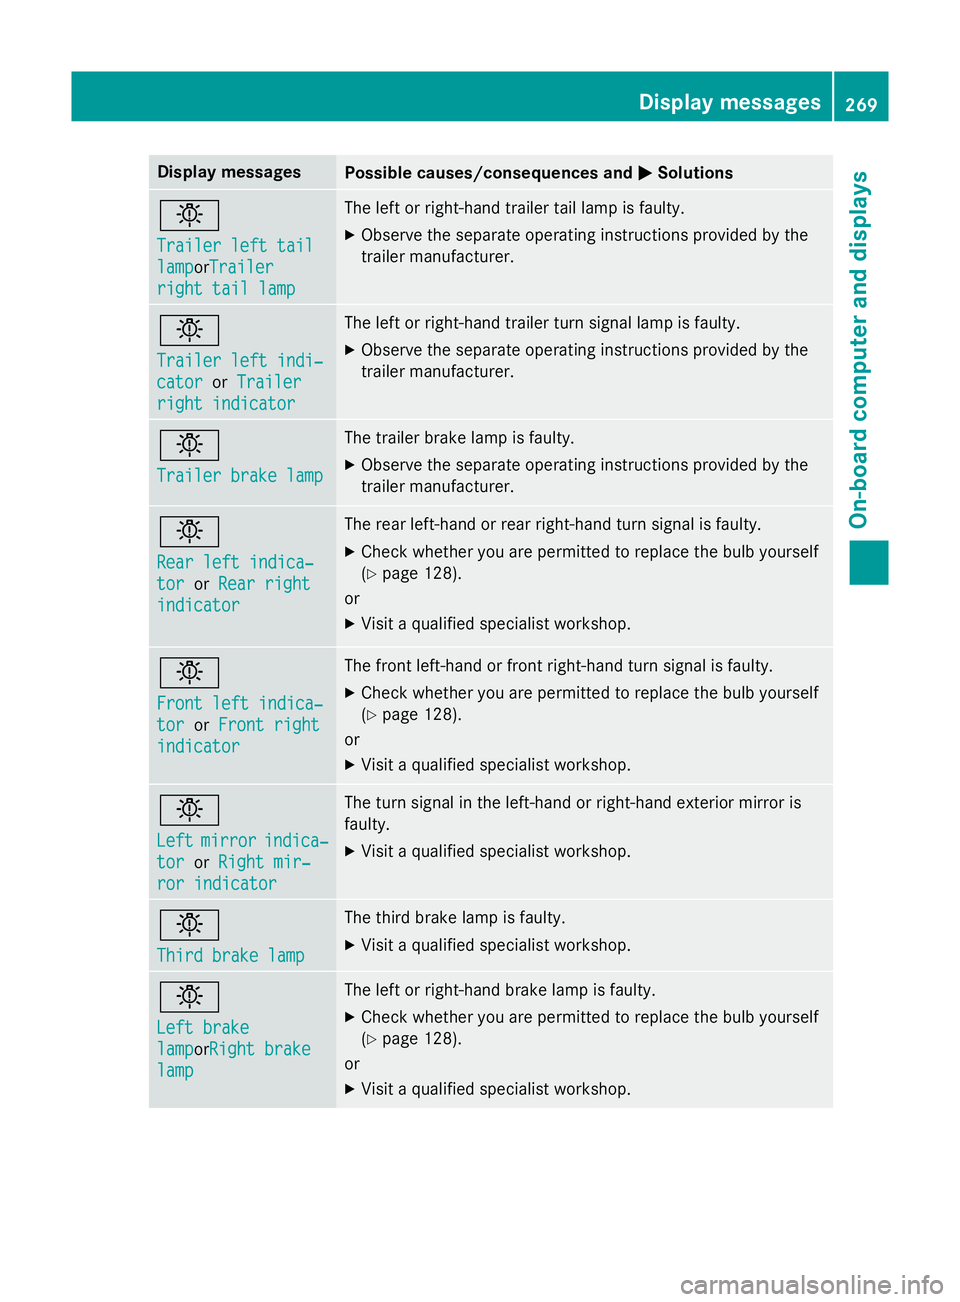
Possible causes/consequences and
M
MSolutions b
Trailer left tail Trailer left tail
lamp lampor
Trailer
Trailer
right tail lamp
right tail lamp The left or right-hand trailer tail lamp is faulty.
X Observe the separate operating instructions provided by the
trailer manufacturer. b
Trailer left indi‐ Trailer left indi‐
cator cator
orTrailer
Trailer
right indicator
right indicator The left or right-hand trailer turn signal lamp is faulty.
X Observe the separate operating instructions provided by the
trailer manufacturer. b
Trailer brake lamp Trailer brake lamp The trailer brake lamp is faulty.
X Observe the separate operating instructions provided by the
trailer manufacturer. b
Rear left indica‐ Rear left indica‐
tor tor
orRear right
Rear right
indicator
indicator The rear left-hand or rear right-hand turn signal is faulty.
X Check whether you are permitted to replace the bulb yourself
(Y page 128).
or
X Visit a qualified specialist workshop. b
Front left indica‐ Front left indica‐
tor tor
orFront right
Front right
indicator
indicator The front left-hand or front right-hand turn signal is faulty.
X Check whether you are permitted to replace the bulb yourself
(Y page 128).
or
X Visit a qualified specialist workshop. b
Left Left
mirror
mirror indica‐
indica‐
tor
tor orRight mir‐
Right mir‐
ror indicator
ror indicator The turn signal in the left-hand or right-hand exterior mirror is
faulty.
X Visit a qualified specialist workshop. b
Third brake lamp Third brake lamp The third brake lamp is faulty.
X Visit a qualified specialist workshop. b
Left brake Left brake
lamp lampor
Right brake
Right brake
lamp
lamp The left or right-hand brake lamp is faulty.
X Check whether you are permitted to replace the bulb yourself
(Y page 128).
or
X Visit a qualified specialist workshop. Display
messages
269On-board computer and displays Z