rear view mirror MERCEDES-BENZ GLA SUV 2017 Owners Manual
[x] Cancel search | Manufacturer: MERCEDES-BENZ, Model Year: 2017, Model line: GLA SUV, Model: MERCEDES-BENZ GLA SUV 2017Pages: 369, PDF Size: 7.56 MB
Page 18 of 369
Switching on/of
f........................... 118
Manual transmission
Drive program ................................ 154
DYNAMIC SELECT button .............. 151
Engaging reverse gear ................... 153
Gear lever ...................................... 153
Pulling away ................................... 146
Shift recommendation ................... 154
Shifting to neutral .......................... 153
Starting the engine ........................ 146
Matt finish (cleaning instructions) .. 309
Memory card (audio) ......................... 224
Memory function ............................... 115
Mercedes-Benz emergency call
system
Switch in the overhead control
panel .............................................. 299
Mercedes-Benz Intelligent Drive
Traffic Sign Assist .......................... 207
Mercedes-Benz Service Centre
see Qualified specialist workshop
Message memory (on-board com-
puter) .................................................. 234
Messages
see Display messages
Mirror turn signal
Cleaning ......................................... 311
Mirrors
see Exterior mirrors
see Rear-view mirror
see Vanity mirror (in sun visor)
Mobile phone
Connecting (Bluetooth ®
inter-
face) .............................................. 280
Connecting (device manager) ........ 282
Connecting the telephone module
with Bluetooth ®
(SAP profile) ......... 284
Frequencies ................................... 350
Installation ..................................... 350
Menu (on-board computer) ............ 225
Notes/placing in the bracket ......... 300
Transmission output (maximum) .... 350
Mobile telephone
Pre-installed bracket ...................... 301
Model type
see Vehicle identification plate
Modifying the programming (key) ..... 81MOExtended tyres
............................. 318
MP3
Operating ....................................... 224
See also Digital Owner's Manua l... 277
Multifunction display
Function/note s............................. 220
Permanent display ......................... 229
Multifunction steering wheel
Operating the on-board compute r..2 18
Overview .......................................... 35
Multimedia system
Switching on and off ..................... .278
Music files
See also Digital Owner's Manual ... 277 N
Navigation Entering a destination .................... 279
Menu (on-board computer) ............ 222
See also Digital Owner's Manual ... 277
Notes on running in a new vehicle .. 143 O
Occupant safety Airbags ............................................ 46
Automatic front-passenger front
airbag deactivatio n.......................... 49
Automatic measures after an acci-
dent ................................................. 56
Belt warning ..................................... 46
Children in the vehicle ..................... 56
Important safety notes .................... 41
PASSENGER AIRBAG indicator
lamp ................................................. 42
Pets in the vehicle ........................... 67
PRE-SAFE ®
(anticipatory occu-
pant protection) ............................... 55
Restraint system introduction .......... 41
Restraint system warning lamp ........ 42
Seat belts ........................................ 43
Odometer ........................................... 221
Off-road driving
Approach/departure angle ............ 359
Checklist after driving off-road ...... 174
Checklist before driving off-road .... 174
General information ....................... 173 Index
15
Page 19 of 369
Important safety notes .................. 173
Maximum gradient climbing abil-
ity .................................................. 359
Travelling uphill .............................. 175
Off-road Program
Driving dynamics display ............... 192
Off-road system
DSR ............................................... 190
Off road drive program .................. 192
Off-road 4ETS .................................. 72
Off-road ABS .................................... 68
Off-road ESP ®
.................................. 74
On-board computer
AMG menu .....................................2 31
Assistance graphic menu .............. .226
Assistance menu ........................... 226
Audio menu ................................... 223
Convenience submenu .................. 231
Display messages .......................... 234
Displaying a service message ....... .307
Factory settings ............................ .231
Heating submenu ........................... 230
Important safety notes .................. 217
Instrument cluster submenu .......... 228
Light submenu ............................... 229
Menu overview .............................. 220
Message memory .......................... 234
Navigation menu ............................ 222
Operating the TV ............................ 224
Operating video DVD ..................... 224
Operation ....................................... 218
RACETIMER ................................... 232
Service menu ................................. 228
Settings menu ............................... 228
Standard display ............................ 221
Telephone menu ............................ 225
Trip menu ...................................... 221
Vehicle submenu ........................... 229
On-board diagnostics interface
see Diagnostics connection
Opening and closing the side trim
panels ................................................. 122
Operating instructions
Vehicle equipment ........................... 27
Operating safety
Declaration of conformity ................ 27
Operating system
see On-board computer Operation
Digital Owner's Manual .................... 25
Outside temperature display ........... 217
Overhead control panel ......................40
Override feature
Rear side windows ........................... 67 P
Paint code .......................................... 351
Paintwork (cleaning instructions) ... 309
Panic alarm .......................................... 41
Panorama sliding sunroof
Important safety information ......... 101
Operatin g ...................................... .102
Operating the roller sunblinds for
the sliding sunroof ......................... 103
Problem (malfunction) ................... 104
Rain-closing feature (when driv-
ing) ................................................ 103
Rain-closing feature (when the
engine is switched off) ................... 103
Reversing feature ........................... 102
Parking
Important safety notes .................. 166
Parking brake ................................ 167
Parking position for the exterior
mirror on the front-passenger
side ................................................ 114
Reversing camera .......................... 200
Parking aid
see Exterior mirrors
see Reversing camera
Parking Assist PARKTRONIC
Deactivating/activating ................. 195
Driving system ............................... 193
Function/notes ............................ .193
Important safety notes .................. 193
Problems (faults) ........................... 195
Sensor range ................................. 193
Warning displa y............................. 194
Parking assistance
see Parking Assist PARKTRONIC
Parking brake
Applying automatically (vehicles
with automatic transmission) ......... 168
Applying automatically (vehicles
with manual transmission) ............. 168 16
Index
Page 21 of 369
Rear window heating
Problem (fault) ............................... 135
Switching on/off ........................... 135
Rear window wiper
Replacing the wiper blad e.............. 126
Switching on/of f........................... 124
Rear-compartment seat belt sta-
tus indicator ........................................ 46
Rear-view mirror
Anti-dazzle mode (automatic) ........ 113
Dipping (manual) ........................... 112
Reflective safety vest ....................... 315
Refuelling
Fuel gaug e....................................... 34
Important safety notes .................. 163
Notes for Mercedes‑ AMG vehi-
cles ................................................ 354
Refuelling process ......................... 164
see Fuel
Remote control
Auxiliary heating/ventilation .......... 138
Changing the batteries (auxiliary
heating) ......................................... 140
Replacing bulbs
Brake lamp .................................... 123
Dipped-beam headlamp s............... 122
Fitting/removing the cover (front
wheel arch) .................................... 121
Important safety notes .................. 120
Main-beam headlamp s................... 122
Overview of bulb types .................. 121
Rear fog lamp ................................ 123
Turn signals (front) ......................... 122
Turn signals (rear) .......................... 123
Replacing the battery (auxiliary
heating remote control) .................... 140
Rescue card ......................................... 30
Reserve (fuel tank)
see Fuel
Reserve fuel
Display message ............................ 251
Warning lamp ................................. 272
Residual heat (climate control) ........ 137
Restraint system
Display message ............................ 243
Introduction ..................................... 41
Warning lamp ................................. 272 Warning lamp (function) ................... 42
Rev counter ........................................ 217
Reverse gear
Engaging (manual transmission) .... 153
Reverse gear (selector lever) ........... 156
Reversing camera
"Reverse parking" function ............ 202
Cleaning instructions ..................... 311
Coupling up a trailer function ........ 203
Display in the multimedia system .. 201
Function/note s............................. 200
General notes ................................ 200
Switching on/of f........................... 201
Reversing feature
Side windows ................................... 98
Tailgate ............................................ 89
Reversing function
Roller sunblind ............................... 103
Reversing lamps
Display message ............................ 247
Roller sunblind
Panorama sliding sunroo f.............. 103
Roof carrier ........................................ 296
Roof lining and carpets (cleaning
instructions) ...................................... 314
Roof load (maximum) ........................ 358
Route guidance
See also Digital Owner's Manua l... 277 S
Safety Children in the vehicle ..................... 56
see Occupant safety
Safety net
Attaching ....................................... 294
Important safety information ......... 294
Safety system
see Driving safety systems
SD card
Inserting ........................................ 286
Inserting/removing ........................ 286
Removing ....................................... 286
SD memory card
See also Digital Owner's Manua l... 277
Seat
Adjusting (Performance Seat) ........ 110
Correct driver's seat position ........ 106 18
Index
Page 43 of 369
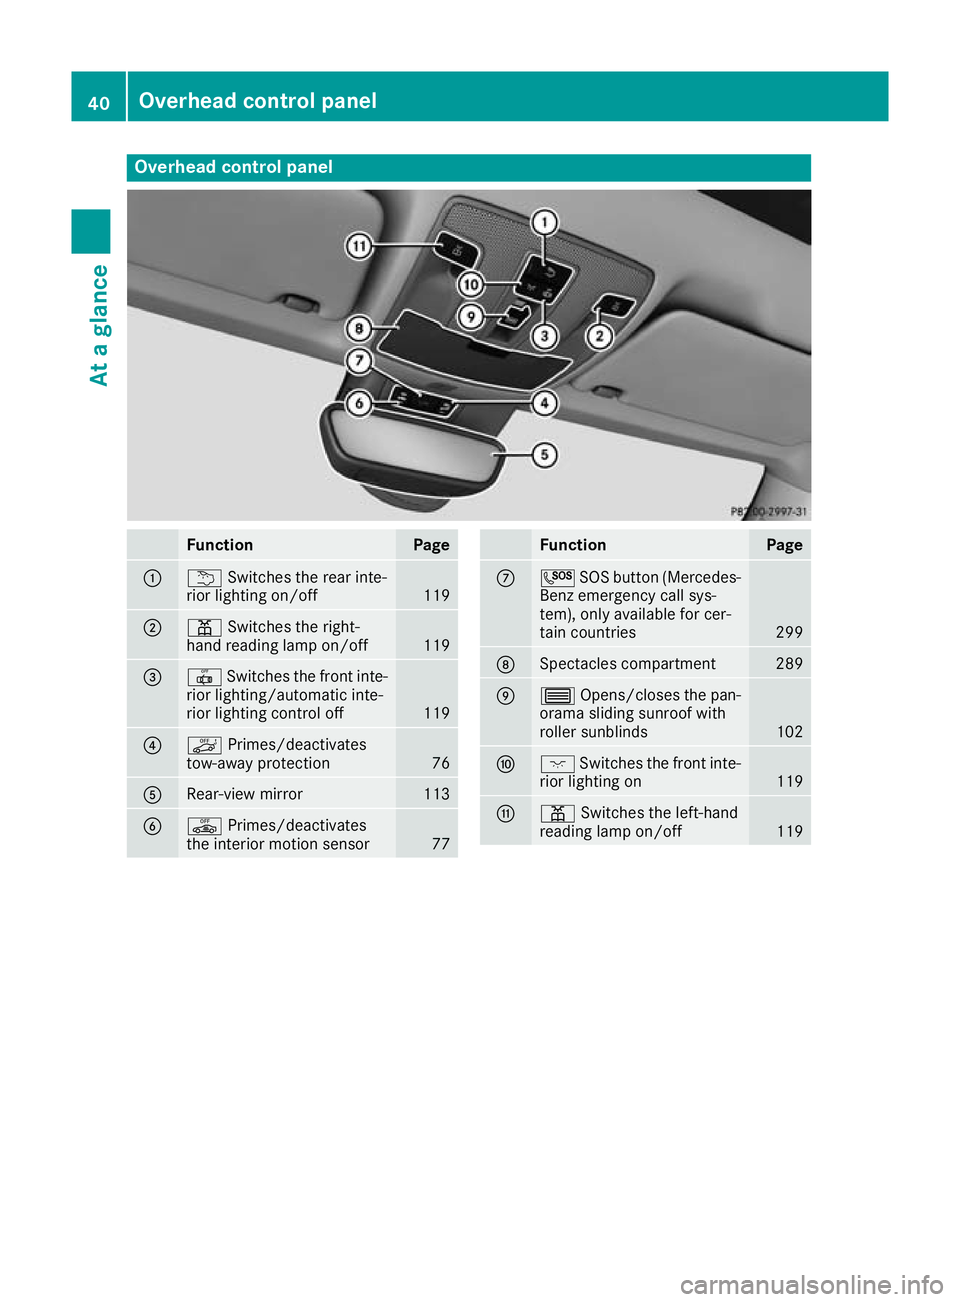
Overhead control panel
Function Page
:
u
Switches the rear inte-
rior lighting on/off 119
;
p
Switches the right-
hand reading lamp on/off 119
=
|
Switches the front inte-
rior lighting/automatic inte-
rior lighting control off 119
?
ë
Primes/deactivates
tow-away protection 76
A
Rear-view mirror 113
B
ê
Primes/deactivates
the interior motion sensor 77 Function Page
C
G
SOS button (Mercedes-
Benz emergency call sys-
tem), only available for cer-
tain countries 299
D
Spectacles compartment 289
E
3
Opens/closes the pan-
orama sliding sunroof with
roller sunblinds 102
F
c
Switches the front inte-
rior lighting on 119
G
p
Switches the left-hand
reading lamp on/off 11940
Overhead control panelAt a glance
Page 80 of 369
R
the doors are closed
R the tailgate is closed
Only then is tow-away protection activated.
X Lock the vehicle with the key or KEYLESS-GO.
Tow-away protection is primed after approx-
imately 60 second s.
Switching off X
Unlo ck the vehicle with the key or KEYLESS-
GO.
or X Insert the key into the ignition lock.
Tow-away protection is switched off automat-
ically.
Deactivating X
Remove the key from the ignition lock.
or X Vehicles with KEYLESS-GO start function
or KEYLESS-GO: switch off the engine using
the Start/Stop button and open the driver's
door.
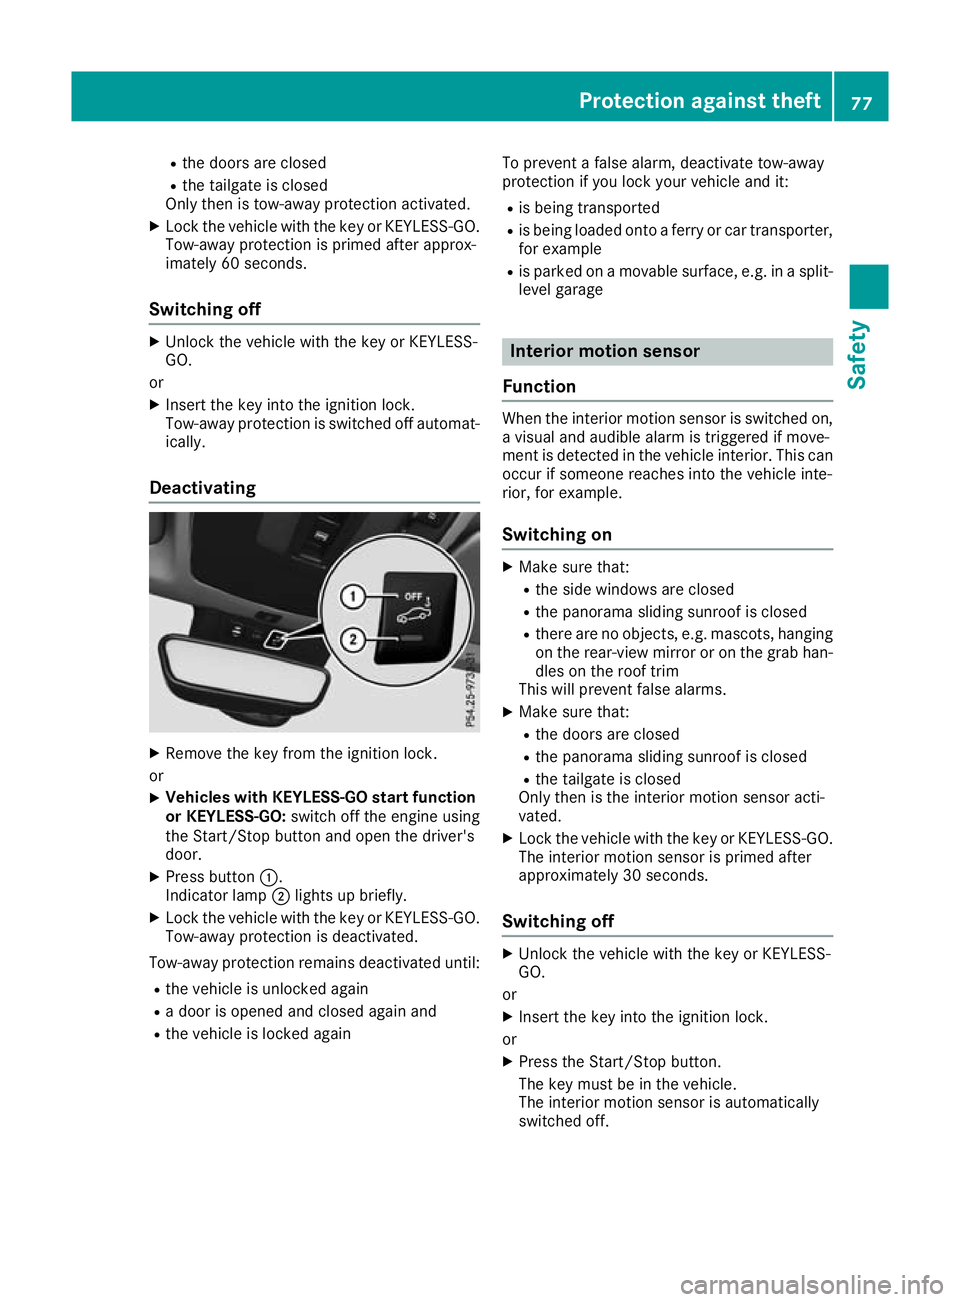
X Press button :.
Indicator lamp ;lights up briefly.
X Lock the vehicle with the key or KEYLESS-GO.
Tow-away protection is deactivated.
Tow-away protection remains deactivated until: R the vehicle is unlocked again
R a door is opened and closed again and
R the vehicle is locked again To prevent a false alarm, deactivate tow-away
protection if you lock your vehicle and it:
R is being transported
R is being loaded onto a ferry or car transporter,
for example
R is parked on a movable surface, e.g. in a split-
level garage Interior motion sensor
Function When the interior motion sensor is switched on,
a visual and audible alarm is triggered if move-
ment is detected in the vehicle interior. This can occur if someone reaches into the vehicle inte-
rior, for example.
Switching on X
Make sure that:
R the side windows are closed
R the panorama sliding sunroof is closed
R there are no objects, e.g. mascots, hanging
on the rear-view mirror or on the grab han-dles on the roof trim
This will prevent false alarms.
X Make sure that:
R the doors are closed
R the panorama sliding sunroof is closed
R the tailgate is closed
Only then is the interior motion sensor acti-
vated.
X Lock the vehicle with the key or KEYLESS-GO.
The interior motion sensor is primed after
approximately 30 seconds.
Switching off X
Unlock the vehicle with the key or KEYLESS-
GO.
or X Insert the key into the ignition lock.
or X Press the Start/Stop button.
The key must be in the vehicle.
The interior motion sensor is automatically
switched off. Protection against theft
77Safety Z
Page 109 of 369
Correct driver's seat position
G
WARNING
You could lose control of the vehicle while
driving if you:
R adjust the driver's seat, steering wheel or
mirrors
R fasten the seat belt
There is a risk of an accident.
Adjust the driver's seat, head restraint, steer-
ing wheel and mirrors and fasten your seat
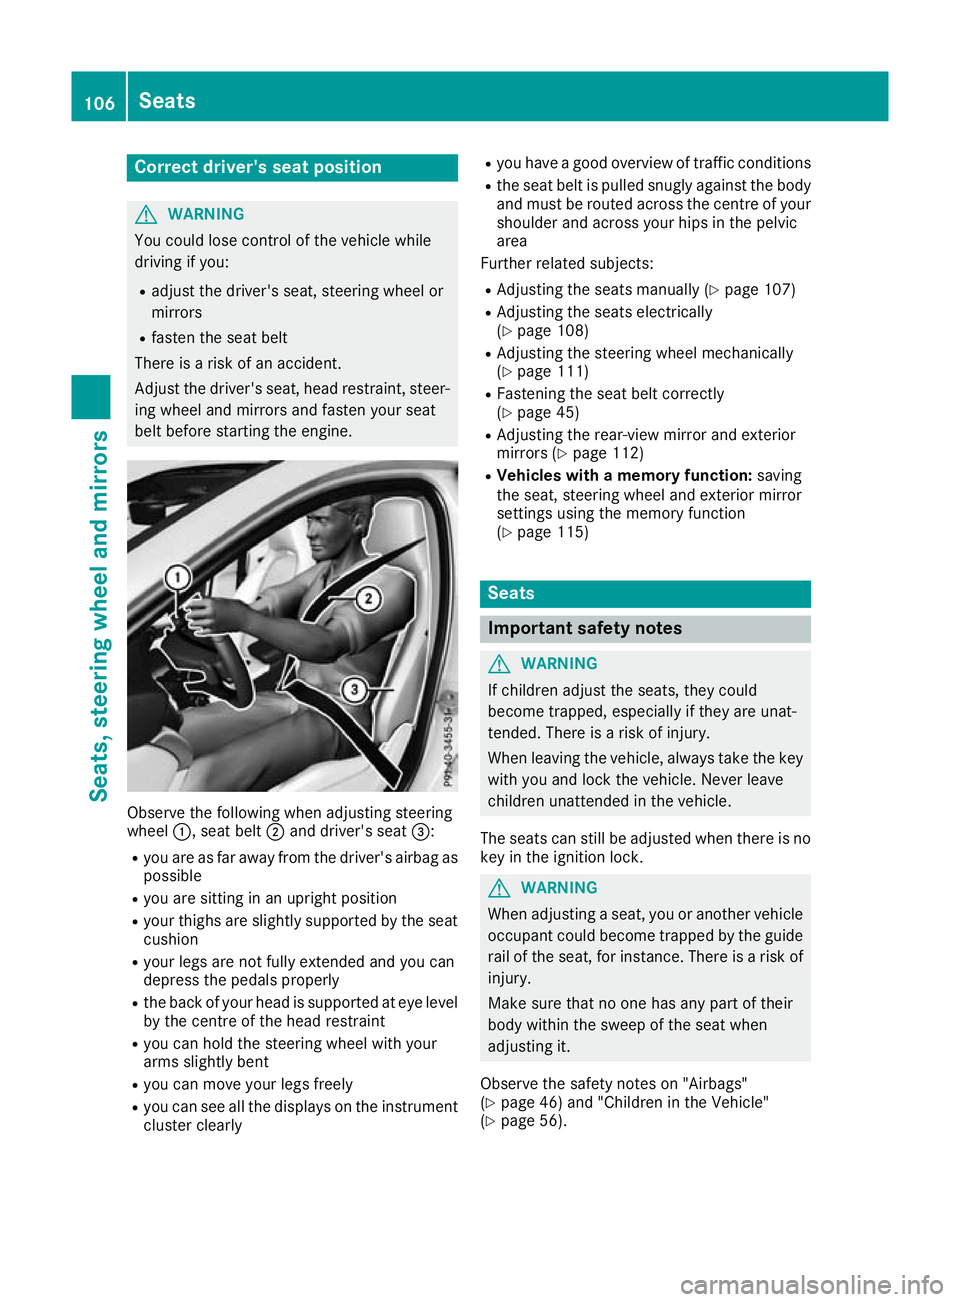
belt before starting the engine. Observe the following when adjusting steering
wheel
:, seat belt ;and driver's seat =:
R you are as far away from the driver's airbag as
possible
R you are sitting in an upright position
R your thighs are slightly supported by the seat
cushion
R your legs are not fully extended and you can
depress the pedals properly
R the back of your head is supported at eye level
by the centre of the head restraint
R you can hold the steering wheel with your
arms slightly bent
R you can move your legs freely
R you can see all the displays on the instrument
cluster clearly R
you have a good overview of traffic conditions
R the seat belt is pulled snugly against the body
and must be routed across the centre of your
shoulder and across your hips in the pelvic
area
Further related subjects:
R Adjusting the seats manually (Y page 107)
R Adjusting the seats electrically
(Y page 108)
R Adjusting the steering wheel mechanically
(Y page 111)
R Fastening the seat belt correctly
(Y page 45)
R Adjusting the rear-view mirror and exterior
mirrors (Y page 112)
R Vehicles with a memory function: saving
the seat, steering wheel and exterior mirror
settings using the memory function
(Y page 115) Seats
Important safety notes
G
WARNING
If children adjust the seats, they could
become trapped, especially if they are unat-
tended. There is a risk of injury.
When leaving the vehicle, always take the key with you and lock the vehicle. Never leave
children unattended in the vehicle.
The seats can still be adjusted when there is no
key in the ignition lock. G
WARNING
When adjusting a seat, you or another vehicle occupant could become trapped by the guiderail of the seat, for instance. There is a risk of
injury.
Make sure that no one has any part of their
body within the sweep of the seat when
adjusting it.
Observe the safety notes on "Airbags"
(Y page 46) and "Children in the Vehicle"
(Y page 56). 106
SeatsSeats, steering wheel and
mirrors
Page 115 of 369
:
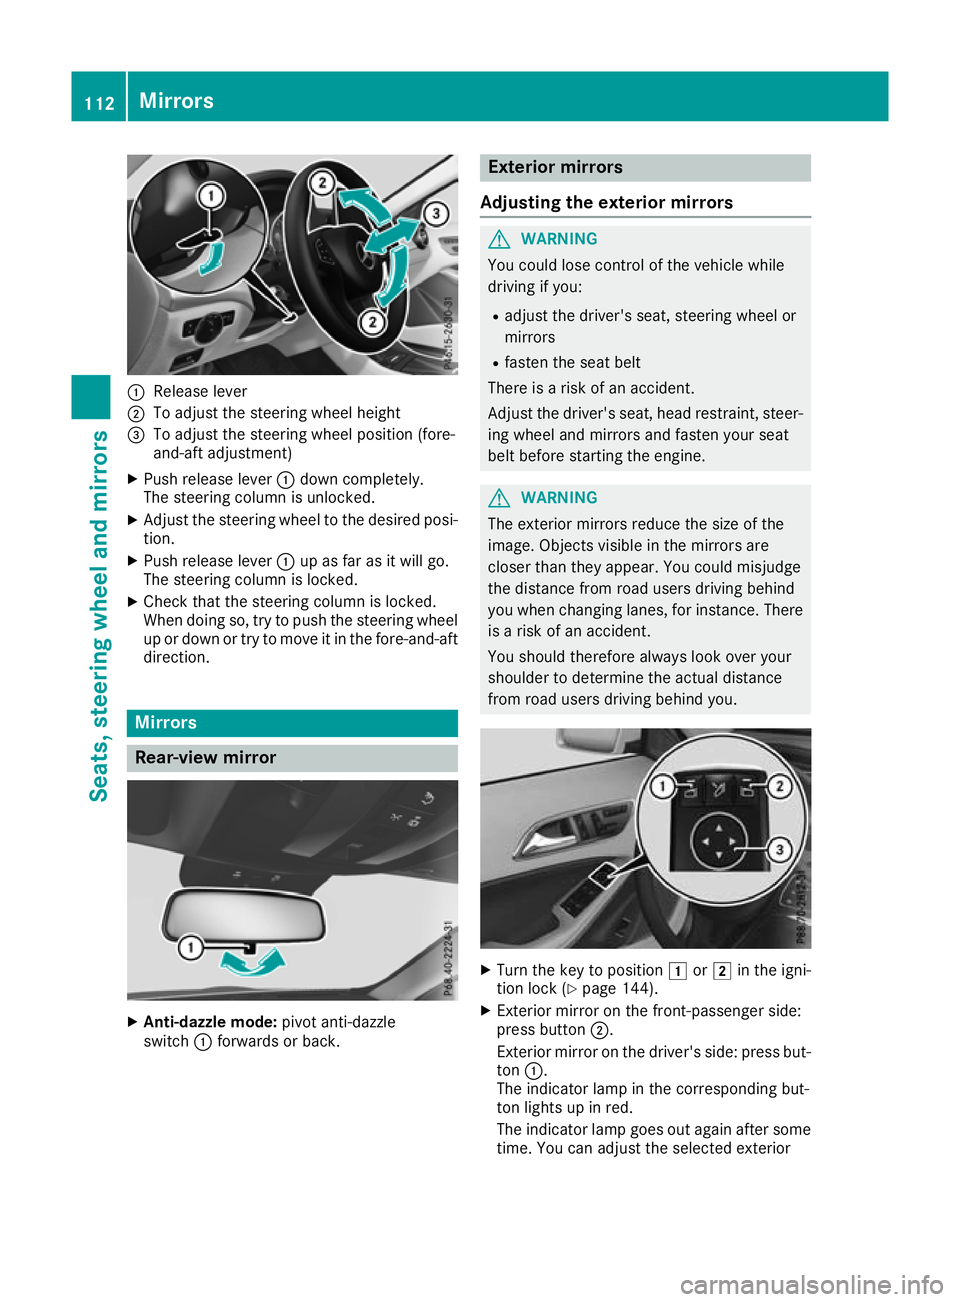
Release lever
; To adjust the steering wheel height
= To adjust the steering wheel position (fore-
and-aft adjustment)
X Push release lever :down completely.
The steering column is unlocked.
X Adjust the steering wheel to the desired posi-
tion.
X Push release lever :up as far as it will go.
The steering column is locked.
X Check that the steering column is locked.
When doing so, try to push the steering wheel
up or down or try to move it in the fore-and-aft
direction. Mirrors
Rear-view mirror
X
Anti-dazzle mode: pivot anti-dazzle
switch :forwards or back. Exterior mirrors
Adjusting the exterior mirrors G
WARNING
You could lose control of the vehicle while
driving if you:
R adjust the driver's seat, steering wheel or
mirrors
R fasten the seat belt
There is a risk of an accident.
Adjust the driver's seat, head restraint, steer-
ing wheel and mirrors and fasten your seat
belt before starting the engine. G
WARNING
The exterior mirrors reduce the size of the
image. Objects visible in the mirrors are
closer than they appear. You could misjudge
the distance from road users driving behind
you when changing lanes, for instance. There is a risk of an accident.
You should therefore always look over your
shoulder to determine the actual distance
from road users driving behind you. X
Turn the key to position 1or2 in the igni-
tion lock (Y page 144).
X Exterior mirror on the front-passenger side:
press button ;.
Exterior mirror on the driver's side: press but-
ton :.
The indicator lamp in the corresponding but-
ton lights up in red.
The indicator lamp goes out again after some
time. You can adjust the selected exterior 112
MirrorsSeats
, steering wheel and mirrors
Page 116 of 369
mirror using button
=as long as the indicator
lamp is lit.
X Press button =up, down, or to the right or
left until you have adjusted the exterior mirror
to the correct position. You should have a
good overview of traffic conditions.
The convex exterior mirrors provide a larger field of vision.
After the engine has been started, the exterior
mirrors are automatically heated at low outside
temperatures. Heating takes a maximum of ten
minutes.
i The exterior mirrors can also be heated
manually by switching on the rear window
heating.
Folding the exterior mirrors in/out elec- trically X
Turn the key to position 1or2 in the igni-
tion lock (Y page 144).
X Briefly press button :.
Both exterior mirrors fold in or out.
i Make sure that the exterior mirrors are
always folded out fully while driving. Other-
wise, they could vibrate.
i If you are driving faster than 47 km/h, you
can no longer fold in the exterior mirrors.
Resetting the exterior mirrors If the battery has been disconnected or com-
pletely discharged, the exterior mirrors must be
reset. The exterior mirrors will otherwise not
fold in when you select the "Fold in mirrors when locking" function in the on-board computer
(Y page 231). X
Turn the key to position 1in the ignition lock
(Y page 144).
X Briefly press button :.
Folding the exterior mirrors in/out
automatically If the "Fold in mirrors when locking" function is
activated in the on-board computer
(Y page 231):
R the exterior mirrors fold in automatically as
soon as you lock the vehicle from the outside
R the exterior mirrors fold out again automati-
cally as soon as you unlock the vehicle and
then open the driver's or front-passenger
door
i If the exterior mirrors have been folded in
manually, they do not fold out.
Exterior mirror pushed out of position If an exterior mirror has been pushed out of
position (forwards or backwards), proceed as
follows:
X Vehicles without electrically folding exte-
rior mirrors: manually move the exterior mir-
ror into the correct position.
X Vehicles with electrically folding exterior
mirrors: press and hold mirror-folding button
(Y page 113) until you hear a click and the
mirror engages audibly into position.
The mirror housing is engaged again and you
can adjust the exterior mirrors as usual
(Y page 112). Automatic anti-dazzle mirrors
G
WARNING
Electrolyte may escape if the glass in an auto- matic anti-dazzle mirror breaks. The electro-
lyte is harmful and causes irritation. It must
not come into contact with your skin, eyes,
respiratory organs or clothing or be swal-
lowed. There is a risk of injury. Mirrors
113Seats, steering wheel and mirrors
Z
Page 117 of 369
If you come into contact with the electrolyte,
observe the following:
R Rinse off the electrolyte from your skin
immediately with water.
R Immediately rinse the electrolyte out of
your eyes thoroughly with clean water.
R If the electrolyte is swallowed, immediately
rinse your mouth out thoroughly. Do not
induce vomiting.
R If electrolyte comes into contact with your
skin or hair or is swallowed, seek medical
attention immediately.
R Immediately change out of clothing which
has come into contact with electrolyte.
R If an allergic reaction occurs, seek medical
attention immediately.
The "Automatic anti-dazzle mirrors" function is
only available if the vehicle is equipped with the
"Mirror package".
The rear-view mirror and the exterior mirror on
the driver's side automatically go into anti-daz-
zle mode if:
R the ignition is switched on and
R incident light from headlamps strikes the sen-
sor in the rear-view mirror
The mirrors do not go into anti-dazzle mode if
reverse gear is engaged or if the interior lighting
is switched on. Parking position of the exterior mirror
on the front-passenger side
Setting and storing the parking position You can adjust the front-passenger-side exterior
mirror such that you can see the rear wheel on
that side as soon as you engage reverse gear.
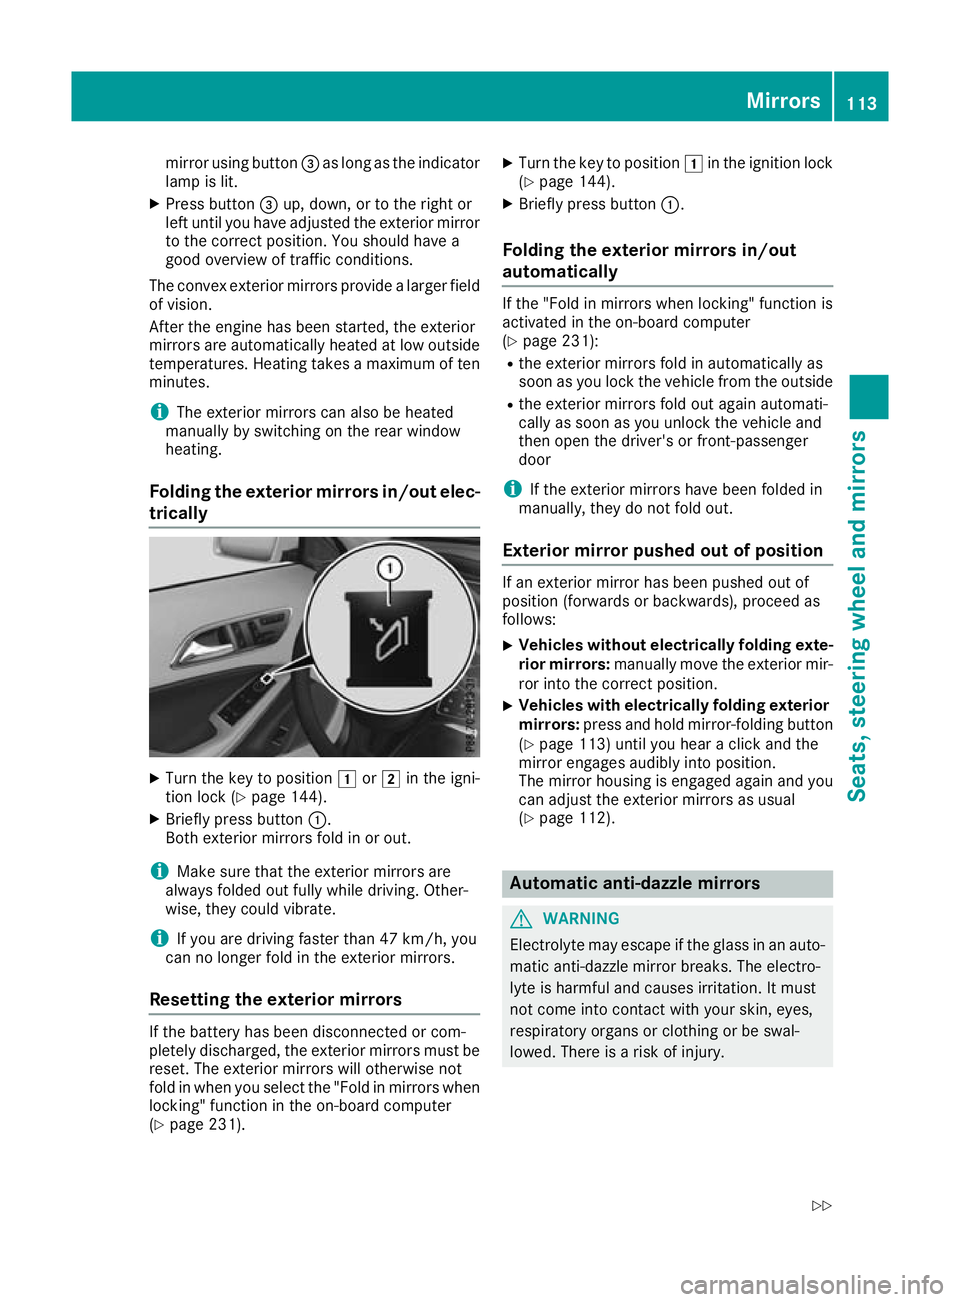
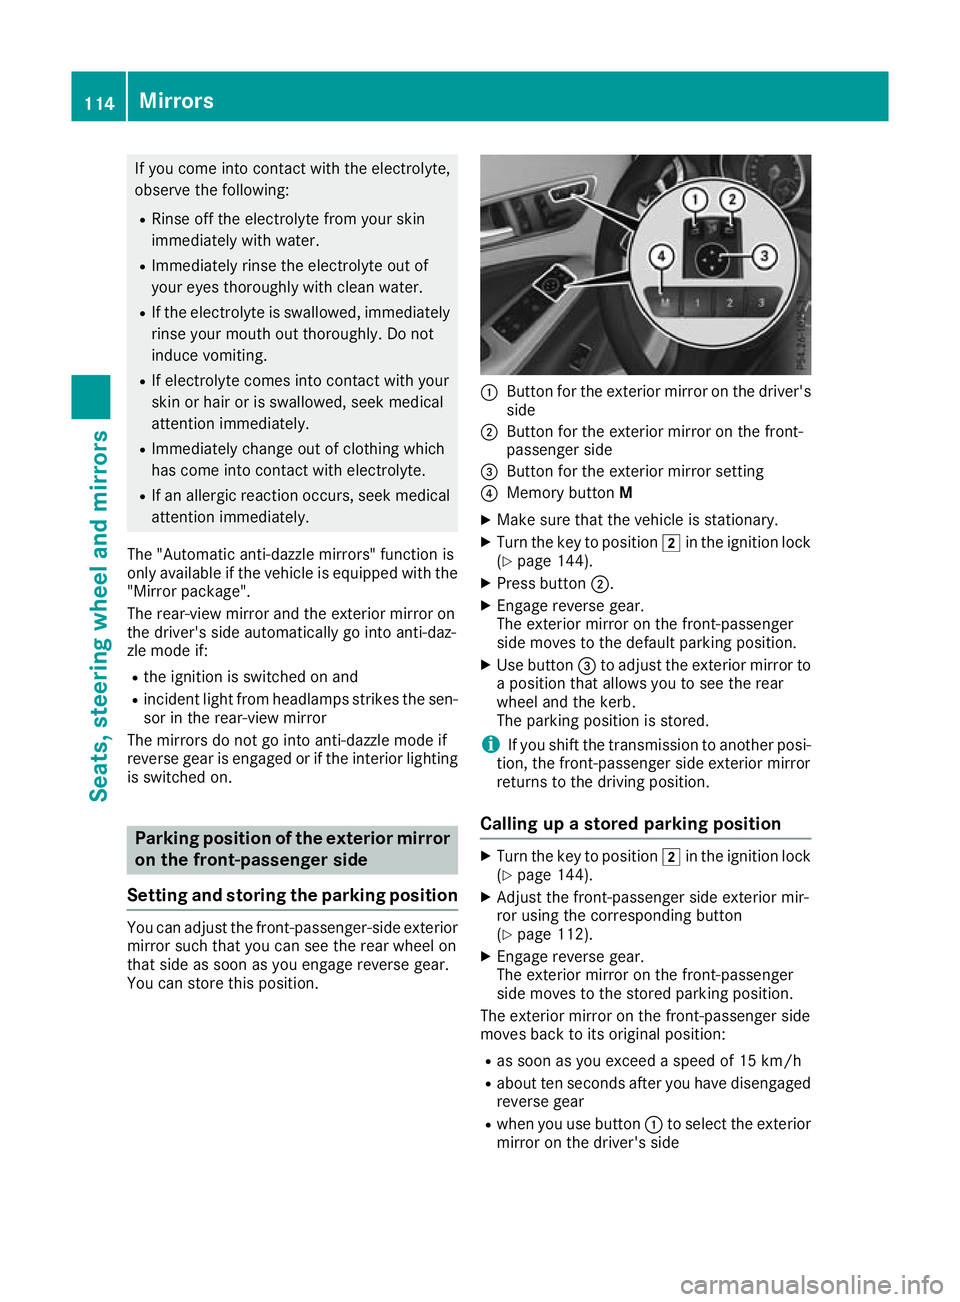
You can store this position. :
Button for the exterior mirror on the driver's
side
; Button for the exterior mirror on the front-
passenger side
= Button for the exterior mirror setting
? Memory button M
X Make sure that the vehicle is stationary.
X Turn the key to position 2in the ignition lock
(Y page 144).
X Press button ;.
X Engage reverse gear.
The exterior mirror on the front-passenger
side moves to the default parking position.
X Use button =to adjust the exterior mirror to
a position that allows you to see the rear
wheel and the kerb.
The parking position is stored.
i If you shift the transmission to another posi-
tion, the front-passenger side exterior mirror
returns to the driving position.
Calling up a stored parking position X
Turn the key to position 2in the ignition lock
(Y page 144).
X Adjust the front-passenger side exterior mir-
ror using the corresponding button
(Y page 112).
X Engage reverse gear.
The exterior mirror on the front-passenger
side moves to the stored parking position.
The exterior mirror on the front-passenger side
moves back to its original position:
R as soon as you exceed a speed of 15 km/h
R about ten seconds after you have disengaged
reverse gear
R when you use button :to select the exterior
mirror on the driver's side 114
MirrorsSeats, steering wheel and mirrors
Page 203 of 369
Cancelling Parking Pilot
X
Stop the movement of the multifunction
steering wheel or steer yourself.
Parking Pilot is cancelled at once. The Park‐ Park‐
ing Pilot cancelled
ing Pilot cancelled message appears in
the multifunction display.
or X Press the PARKTRONIC button (Y page 195).
Parking Assist PARKTRONIC is switched off
and Parking Pilot is immediately cancelled.
The Parking Pilot cancelled
Parking Pilot cancelled message
appears in the multifunction display.
Parking Pilot is cancelled automatically when:
R the electric parking brake is applied
R transmission position jis selected in vehi-
cles with automatic transmission
R parking using Parking Pilot is no longer pos-
sible
R you are driving at a speed greater than
10 km/h
R a wheel spins and ESP ®
intervenes or fails. In
such cases the ÷warning lamp lights up
on the instrument cluster
A warning tone sounds. The parking symbol dis-
appears and the multifunction display shows the
Parking Pilot cancelled
Parking Pilot cancelled message.
When Parking Pilot is cancelled, you must steer and brake again yourself.
If a system malfunction occurs, the vehicle is
braked to a standstill. To drive on, depress the
accelerator pedal again. Rear view camera
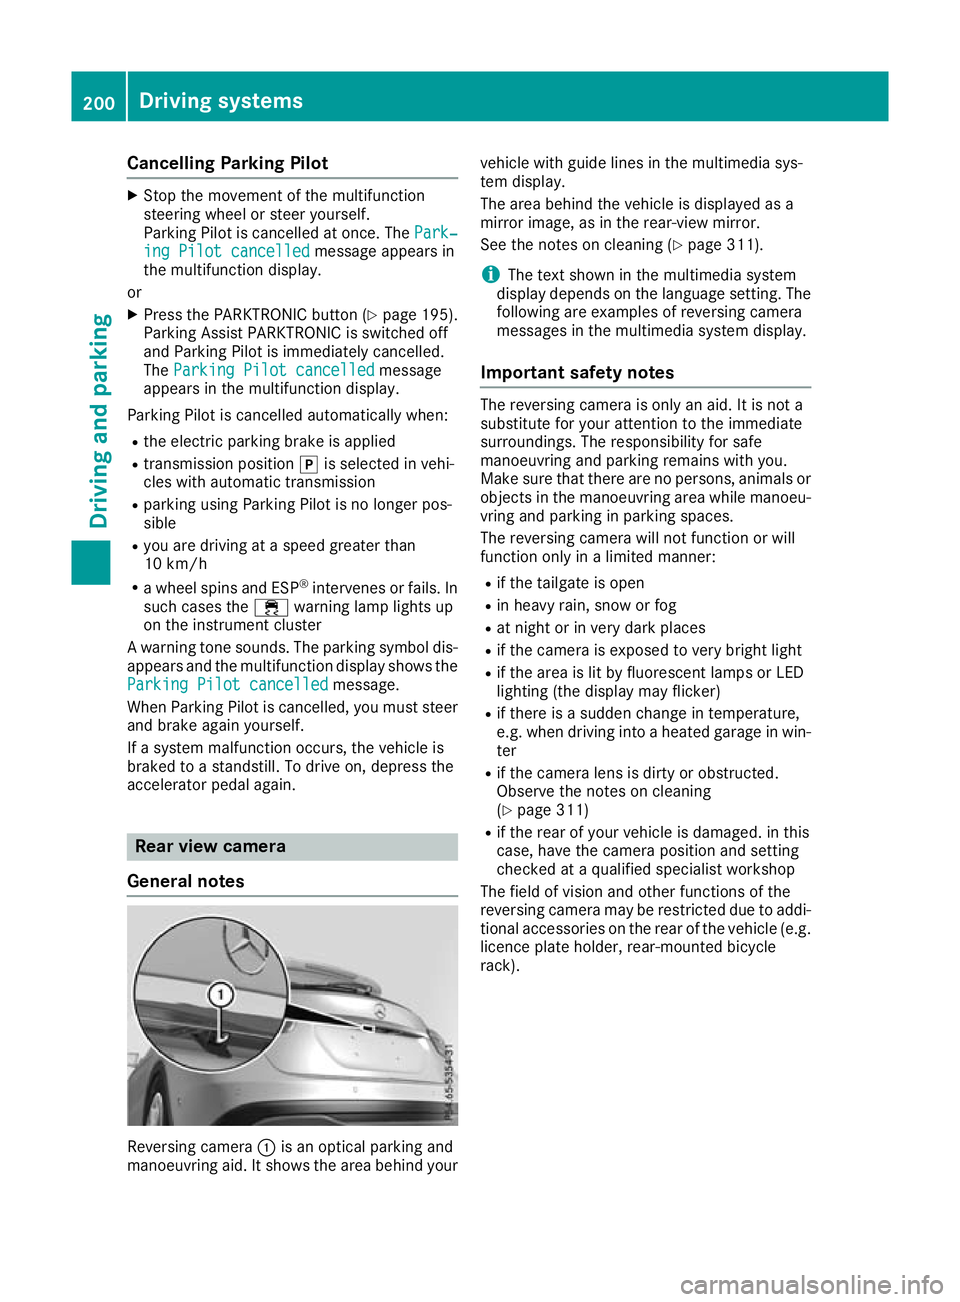
General notes Reversing camera
:is an optical parking and
manoeuvring aid. It shows the area behind your vehicle with guide lines in the multimedia sys-
tem display.
The area behind the vehicle is displayed as a
mirror image, as in the rear-view mirror.
See the notes on cleaning (Y
page 311).
i The text shown in the multimedia system
display depends on the language setting. The following are examples of reversing camera
messages in the multimedia system display.
Important safety notes The reversing camera is only an aid. It is not a
substitute for your attention to the immediate
surroundings. The responsibility for safe
manoeuvring and parking remains with you.
Make sure that there are no persons, animals or
objects in the manoeuvring area while manoeu-
vring and parking in parking spaces.
The reversing camera will not function or will
function only in a limited manner:
R if the tailgate is open
R in heavy rain, snow or fog
R at night or in very dark places
R if the camera is exposed to very bright light
R if the area is lit by fluorescent lamps or LED
lighting (the display may flicker)
R if there is a sudden change in temperature,
e.g. when driving into a heated garage in win-
ter
R if the camera lens is dirty or obstructed.
Observe the notes on cleaning
(Y page 311)
R if the rear of your vehicle is damaged. in this
case, have the camera position and setting
checked at a qualified specialist workshop
The field of vision and other functions of the
reversing camera may be restricted due to addi-
tional accessories on the rear of the vehicle (e.g. licence plate holder, rear-mounted bicycle
rack). 200
Driving systemsDriving and parking