remote start MERCEDES-BENZ GLA SUV 2018 COMAND Manual
[x] Cancel search | Manufacturer: MERCEDES-BENZ, Model Year: 2018, Model line: GLA SUV, Model: MERCEDES-BENZ GLA SUV 2018Pages: 190, PDF Size: 4.48 MB
Page 12 of 190
Rear-compartment screens.............. 171
Receiving vCards ............................... 107
Redialing (telephone) .......................... 95
Remote control
Button lighting ............................... 172
Changing batteries ........................ 175
Rear Seat Entertainment System ... 172
Reserve fuel level
Switching the function on/off in
COMAND ......................................... 54
Resetting (factory settings) ............... 42
Route (navigation)
Selecting an alternative route .......... 73
Setting route options (avoiding:
highways, toll roads, tunnels, fer-
ries) ................................................. 53
Setting the route type (short
route, fast route, dynamic route or
economic route) ............................... 53
Starting calculation .......................... 57
Route guidance
Continue .......................................... 73
Freeway information ........................ 71
General notes .................................. 69
Lane recommendations ................... 70
Off-road ........................................... 75
Traffic reports .................................. 75
S
Safety notesAudio CD and MP3 mode ............... 139
Using the telephone ......................... 89
Satellite radio
Displaying information ................... 136
Overview ........................................ 134
Presets menu view ......................... 135
Registering .................................... 133
Switching to ................................... 134
SatRadio
Channel list updates ...................... 137
Memory functions .......................... 135
Music and sports alerts ................. 136
Notes ............................................. 133
Selecting a category ...................... 134
Selecting a channel ....................... 134
Tagging music tracks ..................... 136 Screen
Selecting for the remote control .... 172
SD card
Inserting ........................................ 143
Inserting/removing ........................ 142
Removing ....................................... 143
Seat cushion
Adjusting (COMAND) ....................... 45
Seats
Active multicontour seat
(COMAND) ....................................... 45
Adjusting the lumbar support
(COMAND) ....................................... 45
Balance (seat heating) ..................... 46
Massage function (COMAND) .......... 45
Massage programs (COMAND) ........ 45
Resetting settings ............................ 46
Seat functions (COMAND) ............... 45
Selecting for adjustment
(COMAND) ....................................... 45
Setting the driving dynamics
(COMAND) ....................................... 45
Selecting stations
Radio ............................................. 131
Sending DTMF tones ...........................96
Setting access data
Online and Internet ........................ 122
Setting the audio format
Rear Seat Entertainment System ... 183
Setting the language
COMAND ......................................... 40
Rear Seat Entertainment System ... 183
Setting the night design ..................... 33
Setting the text reader speed ............ 36
Setting the volume
Telephone calls ................................ 27
Settings
Sound settings ...............................1 59
Short message
see Text messages (SMS)
SIRIUS weather display
5-day forecast .............. .................. 163
Da
ily forecast ................................. 163
Detail information .......................... 164
Information chart ........................... 163
Selecting a location for the
weather forecast ............................ 164
Switching on/off ........................... 163
10Index
Page 149 of 190
The input field appears.
XTo select the required characters: turn and
press the controller for each one (Ypage 28).
Entering just part of the name of a track or
artist is enough. The search result then dis-
plays the entire text.
XSelect ¬.
The search results are displayed.
The numbers behind the results, for example
Artists
(1/0), mean: 1 result that contains
the exact keyword searched for and 0 results
are similar.
XSelect one of the results.
Keywords that have already been searched
for are displayed in the "Search history" with- out having to enter them completely. They
can be accepted directly and displayed in the
search result.
XSelect one entry, e.g. Artists.
The tracks are listed.
XSelect a track.
Playback starts.
iIf available, the album list and covers are
shown.
iThere is a database for iPod®and for each of
the other media sources (CD, USB, SD card).
During the search the relevant database is
accessed depending on the active media
source.
Bluetooth®audio mode
Requirements
The Bluetooth®function must be activated in
the multimedia system (Ypage 40).
Bluetooth®audio mode requires a Bluetooth®-
capable audio device.
Check your Bluetooth
®audio device for the fol-
lowing; see the manufacturer's operating
instructions:
RBluetooth®audio profile
The Bluetooth®audio device must support
the A2DP and AVRCP Bluetooth®audio pro-
files.
RBluetooth®visibility
Certain Bluetooth®audio devices do not just
require activation of the Bluetooth®function. In addition, your device must be made "visi-
ble" to other devices.
RBluetooth®device name
This device name is predetermined but can
usually be changed. For a clear selection of
the Bluetooth device, we recommend that you
customize the device name.
iA2DP ( Advanced AudioDistribution Profile):
Bluetooth®audio profile for audio data trans-
mission
AVRCP (A udioVideo Remote ControlProfile):
Bluetooth
®audio profile for audio data play-
back
iThe Bluetooth®device must be visible to the
multimedia system for authorization. After
authorization, the multimedia system even
finds the Bluetooth
®device when it is not
visible.
General notes
Before using your Bluetooth®audio device with
the multimedia system for the first time, you will
need to authorize it.
When you authorize a new Bluetooth
®audio
device, it is connected automatically. Connec-
tion involves first searching for a Bluetooth
®
audio device and then authorizing it.
You can authorize up to 15 Bluetooth®devices.
iIf you authorize a mobile phone that sup-
ports Bluetooth®audio, the A2DP and AVRCP
Bluetooth®audio profiles are connected
automatically.
The mobile phone is then entered:
Rin the Bluetooth®telephone list
(Ypage 91)
Rin the Bluetooth®audio device list
(Ypage 148)
Mercedes-Benz recommends authorizing a
mobile phone in Bluetooth
®telephony
(Ypage 92).
Bluetooth®audio mode147
Media
Z
Page 174 of 190
The same AUX jacks (AUX drive) can be found in the rear-compartment drive (Ypage 173).
Remote control
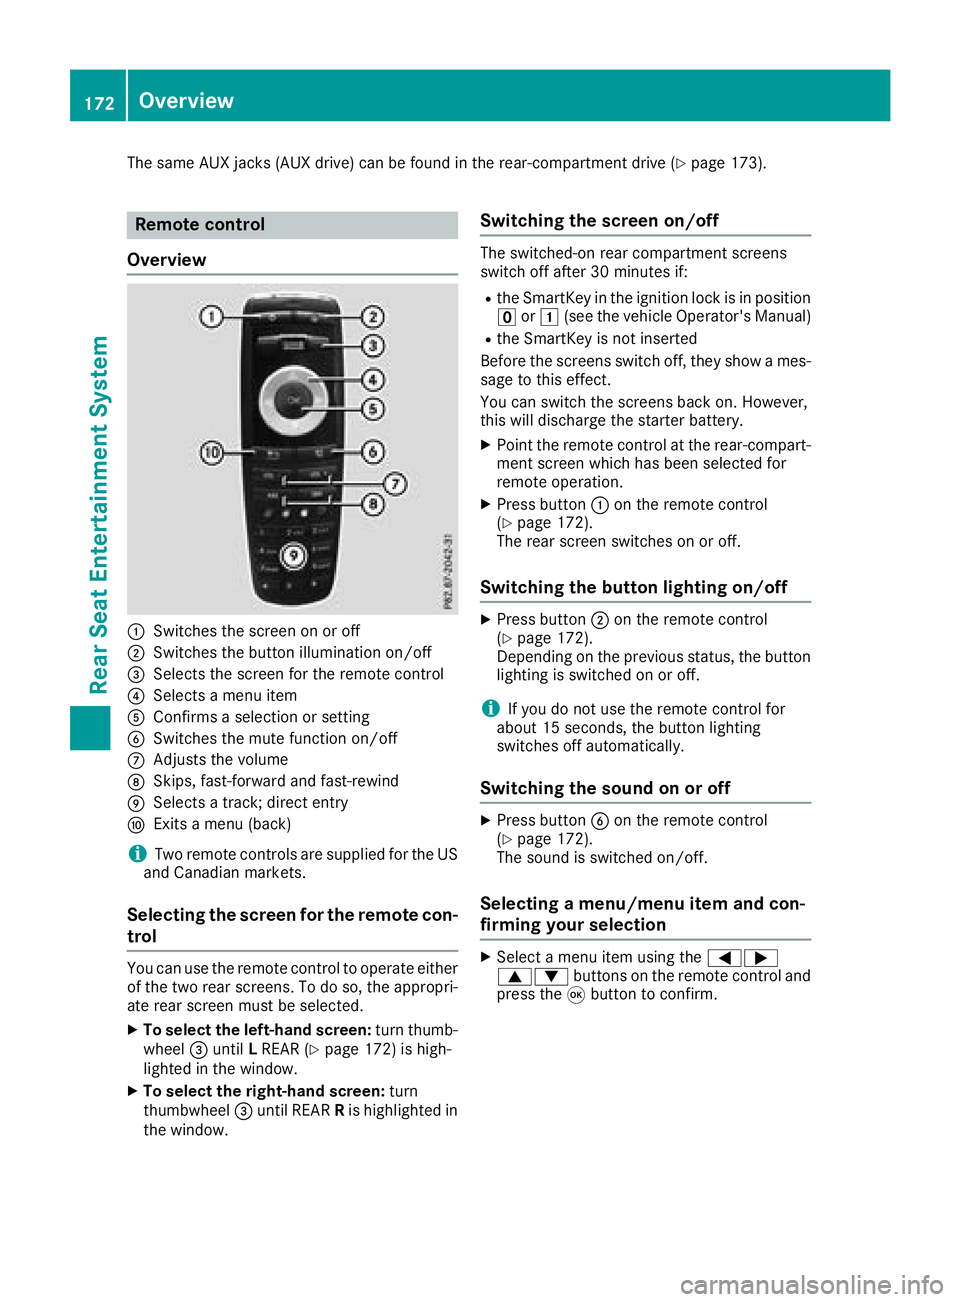
Overview
:Switches the screen on or off
;Switches the button illumination on/off
=Selects the screen for the remote control
?Selects a menu item
AConfirms a selection or setting
BSwitches the mute function on/off
CAdjusts the volume
DSkips, fast-forward and fast-rewind
ESelects a track; direct entry
FExits a menu (back)
iTwo remote controls are supplied for the US
and Canadian markets.
Selecting the screen for the remote con-
trol
You can use the remote control to operate either
of the two rear screens. To do so, the appropri-
ate rear screen must be selected.
XTo select the left-hand screen: turn thumb-
wheel =until LREAR (Ypage 172) is high-
lighted in the window.
XTo select the right-hand screen: turn
thumbwheel =until REAR Ris highlighted in
the window.
Switching the screen on/off
The switched-on rear compartment screens
switch off after 30 minutes if:
Rthe SmartKey in the ignition lock is in position u or1 (see the vehicle Operator's Manual)
Rthe SmartKey is not inserted
Before the screens switch off, they show a mes-
sage to this effect.
You can switch the screens back on. However,
this will discharge the starter battery.
XPoint the remote control at the rear-compart-
ment screen which has been selected for
remote operation.
XPress button :on the remote control
(Ypage 172).
The rear screen switches on or off.
Switching the button lighting on/off
XPress button ;on the remote control
(Ypage 172).
Depending on the previous status, the button
lighting is switched on or off.
iIf you do not use the remote control for
about 15 seconds, the button lighting
switches off automatically.
Switching the sound on or off
XPress button Bon the remote control
(Ypage 172).
The sound is switched on/off.
Selecting a menu/menu item and con-
firming your selection
XSelect a menu item using the =;
9: buttons on the remote control and
press the 9button to confirm.
172Overview
Rear Seat Entertainment System
Page 177 of 190
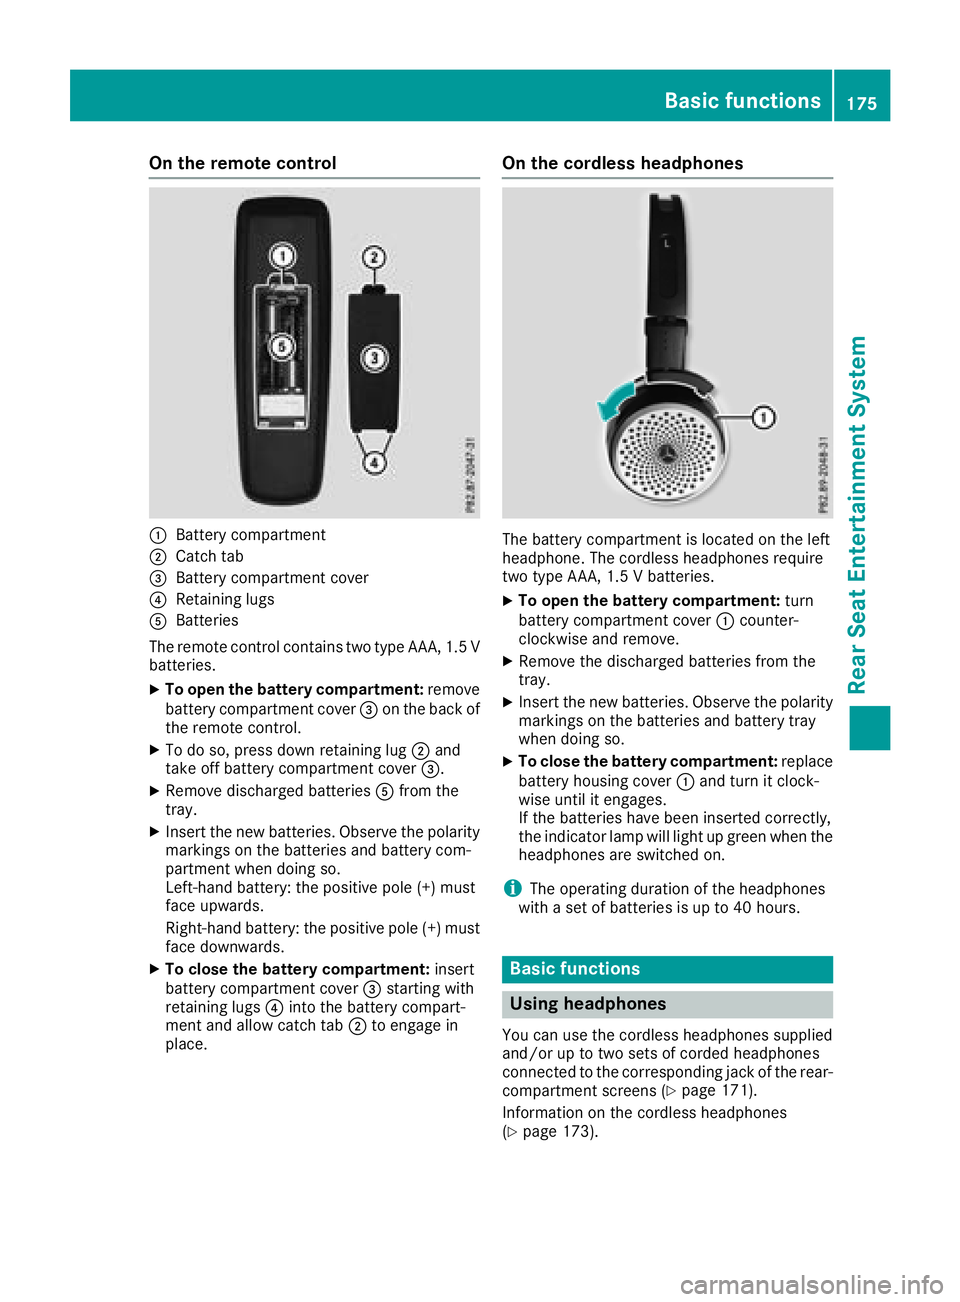
On the remote control
:Battery compartment
;Catch tab
=Battery compartment cover
?Retaining lugs
ABatteries
The remote control contains two type AAA, 1.5 V
batteries.
XTo open the battery compartment: remove
battery compartment cover =on the back of
the remote control.
XTo do so, press down retaining lug ;and
take off battery compartment cover =.
XRemove discharged batteriesAfrom the
tray.
XInsert the new batteries. Observe the polarity markings on the batteries and battery com-
partment when doing so.
Left-hand battery: the positive pole (+) must
face upwards.
Right-hand battery: the positive pole (+) must
face downwards.
XTo close the battery compartment: insert
battery compartment cover =starting with
retaining lugs ?into the battery compart-
ment and allow catch tab ;to engage in
place.
On the cordless headphones
The battery compartment is located on the left
headphone. The cordless headphones require
two type AAA, 1.5 V batteries.
XTo open the battery compartment: turn
battery compartment cover :counter-
clockwise and remove.
XRemove the discharged batteries from the
tray.
XInsert the new batteries. Observe the polarity markings on the batteries and battery tray
when doing so.
XTo close the battery compartment: replace
battery housing cover :and turn it clock-
wise until it engages.
If the batteries have been inserted correctly,
the indicator lamp will light up green when the
headphones are switched on.
iThe operating duration of the headphones
with a set of batteries is up to 40 hours.
Basic functions
Using headphones
You can use the cordless headphones supplied
and/or up to two sets of corded headphones
connected to the corresponding jack of the rear-
compartment screens (
Ypage 171).
Information on the cordless headphones
(
Ypage 173).
Basic functions175
Rear Seat Entertainment System
Z
Page 181 of 190
Selecting a track
Via skip function
XPress the =or; button on the remote
control.
or
XPress the EorF button.
The skip forward function skips to the next
track.
If the elapsed track time has passed 8 sec-
onds, the function skips back to the beginning of the track. If the elapsed time is shorter, it
will skip to the start of the previous track.
If the Random Tracks
orRandom Folderplayback option has been selected, the track
order is random.
Via track list
In CD mode, the track list contains all tracks on
the disc currently playing. In audio DVD mode,
the track list contains all tracks in the currently
active group.
In MP3 mode, the track list shows all tracks in
the currently active folder as well as the folder
structure, allowing you to select any track on the
MP3 CD.
XSelect Tracks(audio CD/DVD mode) or
Folder(MP3 mode) using
the :=; buttons on the remote
control, and confirm by pressing the 9but-
ton.
or
XPress the 9button when the selection win-
dow is active.
The track list appears. The #dot indicates the
current track.
XSelect a track using the 9:buttons
and press the 9button to confirm.
By entering the track number directly
XPress the hbutton on the remote control.
The track entry display appears.
Example: track 2
XPress the ·button. Example: track 23
XPress the
·and¸ buttons in quick
succession.
XWait for approximately three seconds after
making the entry.
You will hear the track which has been
entered. The corresponding basic menu then
reappears.
iIt is not possible to enter numbers that
exceed the number of tracks on the CD or in
the currently active folder.
Fast forwarding/rewinding
XWith the selection window active, press the
= or; button on the remote control
repeatedly until you reach the desired posi-
tion.
or
XPress and hold the EorF button until
the desired position has been reached.
Selecting a folder
This function is available in MP3 mode.
XSelect Folderin MP3 mode using
the :=; buttons on the remote
control and press the 9button to confirm.
or
XPress the 9button when the selection win-
dow is active.
The folder content appears.
XTo switch to the superordinate folder:
select symbol Uusing the 9: but-
tons on the remote control and press the 9
button to confirm.
The display shows the next folder up.
XTo select a folder: select a folder by pressing
the 9: button and confirm by pressing
the 9button.
You will see the tracks in the folder.
XSelect a track using the 9:buttons
and press the 9button to confirm.
The track is played and the selected folder is
now the active folder.
Pause function
This function is available in audio DVD mode.
Audio CD/DVD and MP3 mode179
Rear Seat Entertainment System
Z
Page 182 of 190
XTo pause playback:press the9button in
full-screen mode.
The Ë display changes to Ì.
XSelectËusing the :=; but-
tons on the remote control and confirm with
the 9button.
The Ë display changes to Ì.
XTo continue playback: selectÌand
press the 9button to confirm.
The Ì display changes to Ë.
Stop function
This function is available in audio DVD mode.
XTo interrupt playback: press the9button
in full-screen mode.
XSelect Éusing the :=; but-
tons on the remote control and confirm with
the 9button.
The Ë display changes to Ì.
XTo continue playback: selectÌand
press the 9button to confirm.
Playback continues from the point where it
was interrupted.
XTo stop playback: while playback is inter-
rupted, select Éagain and press the 9
button to confirm.
Playback stops and returns to the beginning
of the DVD. Ìis highlighted.
XTo restart playback: selectÌand press
the 9button to confirm.
Playback starts from the beginning of the
DVD.
Setting the audio format
The content of an audio DVD can be split into a
maximum of nine groups. The availability and
type of group depends on the respective DVD. A
group can contain music of different sound qual-
ities (stereo and multichannel formats, for
example), or bonus tracks.
XIn full-screen mode press the 9button.
XSelect DVD-Ausing the :=; but-
tons on the remote control and press 9to
confirm.
XSelect Groupusing the 9: buttons
and press the 9button to confirm.
The list of available audio formats appears.
The #dot indicates the format currently
selected.
XSelect an audio format using the 9:
buttons and press the 9button to confirm.
XTo exit the menu: press the=or;
button.
Playback options
XSelect CD,DVD-Aor MP3using
the :=; buttons on the remote
control and press the 9button to confirm.
A list appears. The #dot indicates the play-
back option currently selected.
XSelect Normal Track Sequence,RandomTracksor Random Folderusing the
9: buttons and press the 9button to
confirm.
The option is switched on. For all options
except Normal Track Sequence
, you will
see a corresponding display in the selection
window.
iIf you switch the data carrier which you are
currently listening to, the Normal Track
Sequenceoption is activated automatically. If
an option is selected, it remains selected after
the Rear Seat Entertainment System is
switched on or off.
Switching track information on/off
(MP3 mode only)
If the function is switched on, folder and track
names are displayed.
If the function is switched off, disc and file
names are displayed.
XSelect MP3using the :=; buttons
on the remote control and press the 9button
to confirm.
XSelect Display Track Informationusing
the 9: buttons and press the 9but-
ton to confirm.
The function is switched on Oor off ª,
depending on the previous status.
180Audio CD/DVD and MP3 mode
Rear Seat Entertainment System
Page 183 of 190
Video DVD mode
Important safety notes
GWARNING
The CD/DVD drive is a class 1 laser product.
If you open the housing of the CD/DVD drive,
there is a risk of exposure to invisible laser
radiation. This laser radiation could damage
your retina. There is a risk of injury.
Never open the housing. Always have main-
tenance and repair work carried out at a quali- fied specialist workshop.
General notes
DVD playback conditions
Playback problems may occur when playing
copied discs. There is a large variety of discs,
DVD authoring software, writing software and
writers available. This variety means that there
is no guarantee that the Rear Seat Entertain-
ment System will be able to play DVD videos that
you have copied yourself.
Further information (
Ypage 154). Information
regarding the multimedia system also applies to
the Rear Seat Entertainment System.
Function restrictions
Depending on the DVD, it is possible that certain
functions or actions described in this section
will be temporarily blocked or may not function
at all. As soon as you try to activate these func-
tions or actions, you will see the Ksymbol in
the display.
Switching on video DVD mode
XInsert a video DVD (Ypage 178).
The Rear Seat Entertainment System loads
the disc.
If disc mode was the last mode selected, it will
now be active. If it was not, switch on video DVD mode as
described in the following instructions.
XSelect
Discin the menu using the
9=; buttons on the remote con-
trol and confirm by pressing the 9button.
If the DVD video fulfills the playback criteria,
the film either starts automatically or the
menu saved on the DVD appears. If the DVD
menu appears, you must start the film man-
ually.
XSelect the corresponding menu item in the
DVD menu.
A submenu is displayed. If available, addi-
tional options can now be selected.
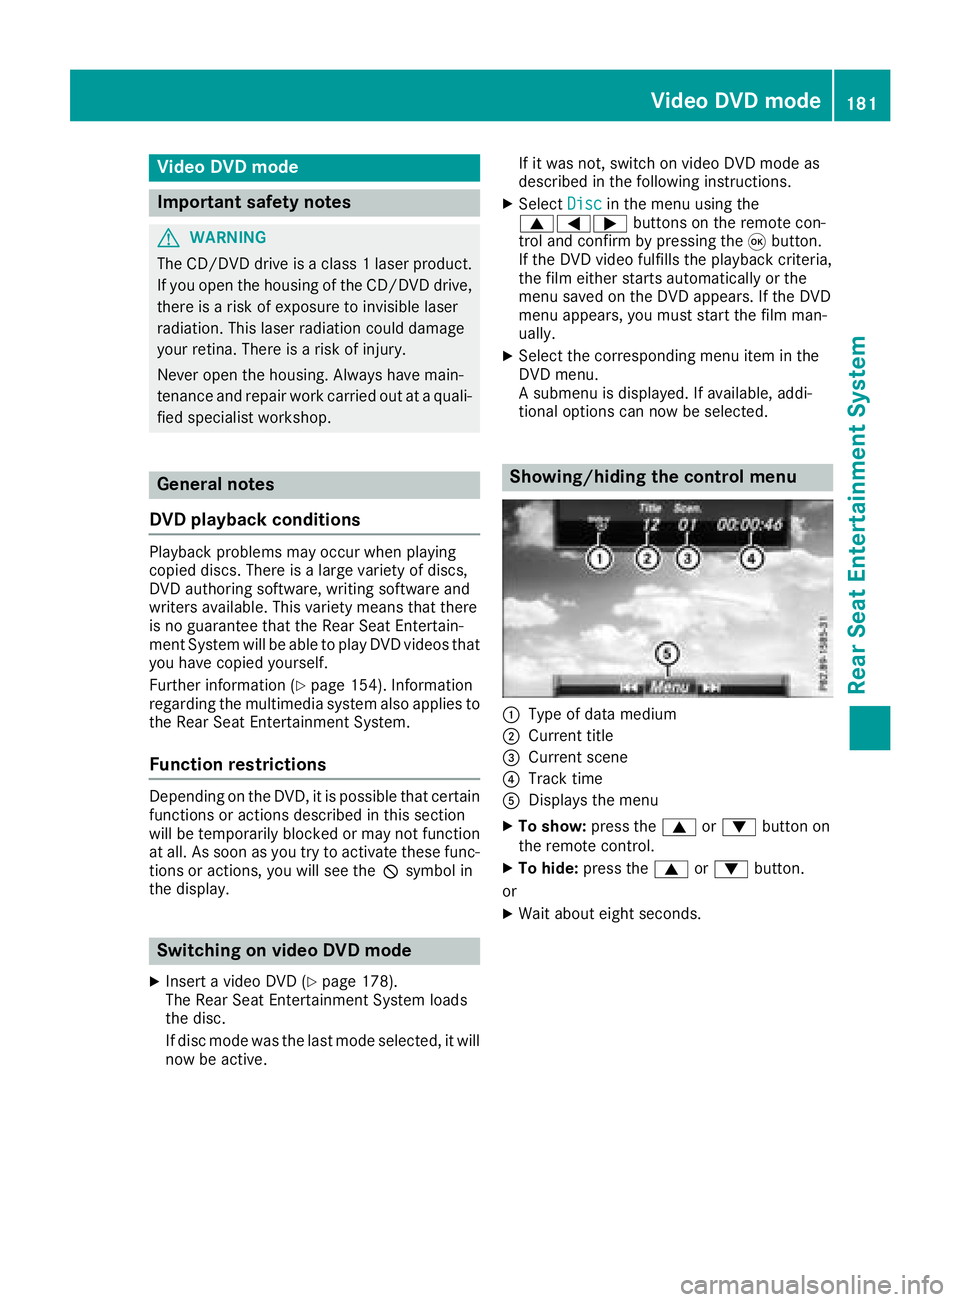
Showing/hiding the control menu
:Type of data medium
;Current title
=Current scene
?Track time
ADisplays the menu
XTo show: press the9or: button on
the remote control.
XTo hide: press the 9or: button.
or
XWait about eight seconds.
Video DVD mode181
Rear Seat Entertainment System
Z
Page 184 of 190
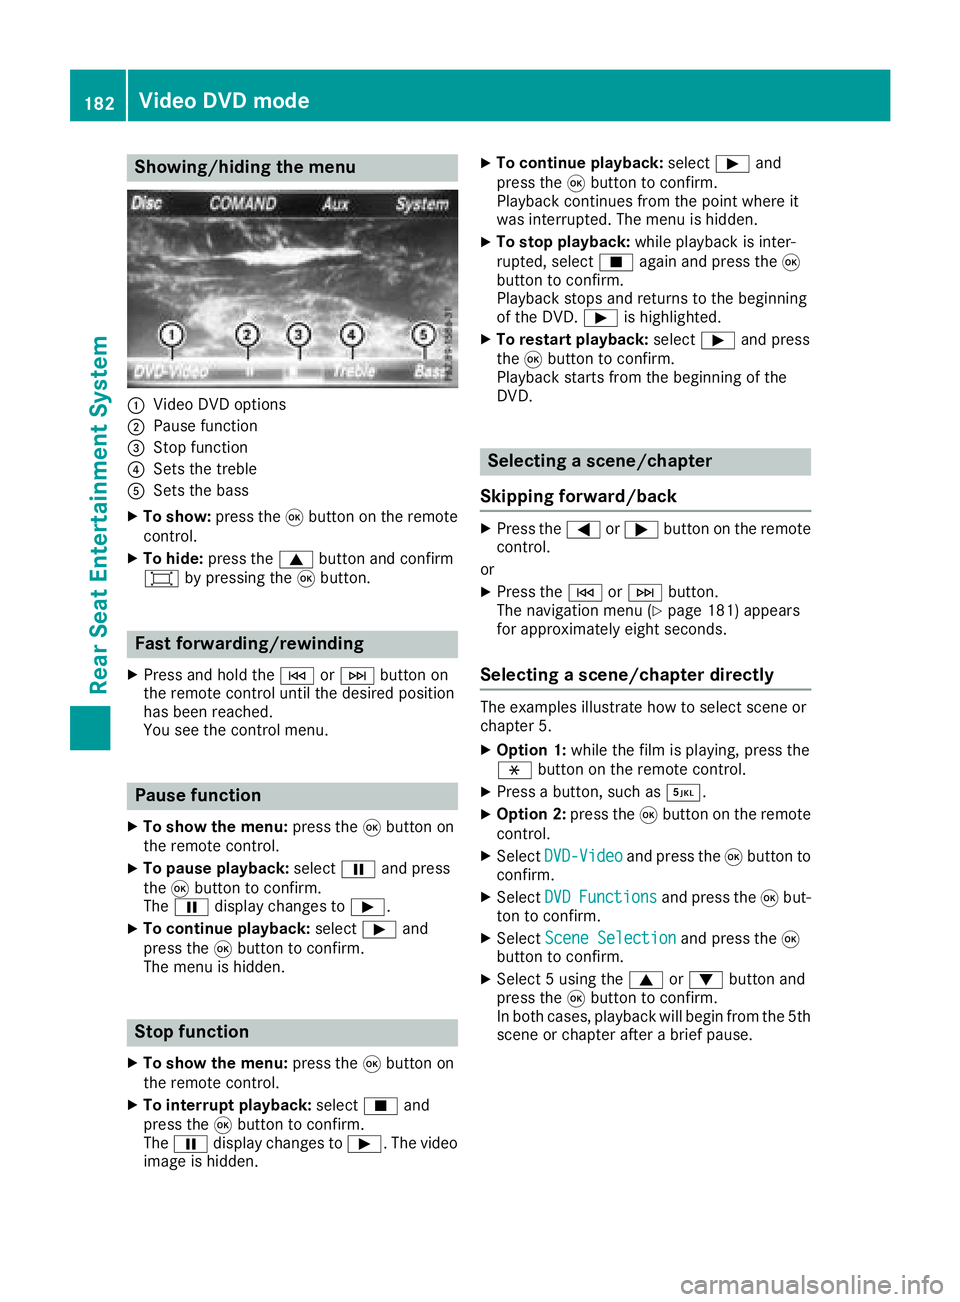
Showing/hiding the menu
:Video DVD options
;Pause function
=Stop function
?Sets the treble
ASets the bass
XTo show:press the9button on the remote
control.
XTo hide: press the 9button and confirm
# by pressing the 9button.
Fast forwarding/rewinding
XPress and hold the EorF button on
the remote control until the desired position
has been reached.
You see the control menu.
Pause function
XTo show the menu: press the9button on
the remote control.
XTo pause playback: selectËand press
the 9button to confirm.
The Ë display changes to Ì.
XTo continue playback: selectÌand
press the 9button to confirm.
The menu is hidden.
Stop function
XTo show the menu: press the9button on
the remote control.
XTo interrupt playback: selectÉand
press the 9button to confirm.
The Ë display changes to Ì. The video
image is hidden.
XTo continue playback: selectÌand
press the 9button to confirm.
Playback continues from the point where it
was interrupted. The menu is hidden.
XTo stop playback: while playback is inter-
rupted, select Éagain and press the 9
button to confirm.
Playback stops and returns to the beginning
of the DVD. Ìis highlighted.
XTo restart playback: selectÌand press
the 9button to confirm.
Playback starts from the beginning of the
DVD.
Selecting a scene/chapter
Skipping forward/back
XPress the =or; button on the remote
control.
or
XPress the EorF button.
The navigation menu (Ypage 181) appears
for approximately eight seconds.
Selecting a scene/chapter directly
The examples illustrate how to select scene or
chapter 5.
XOption 1: while the film is playing, press the
h button on the remote control.
XPress a button, such as ¿.
XOption 2:press the9button on the remote
control.
XSelect DVD-Videoand press the 9button to
confirm.
XSelect DVDFunctionsand press the 9but-
ton to confirm.
XSelect Scene Selectionand press the 9
button to confirm.
XSelect 5 using the 9or: button and
press the 9button to confirm.
In both cases, playback will begin from the 5th
scene or chapter after a brief pause.
182Video DVD mode
Rear Seat Entertainment System
Page 188 of 190
Additional setting option:
XAdjust the sound settings (Ypage 176).
MP3 mode functions
XTo select a track by skipping to a track:
press the=or; button on the remote
control.
or
XPress the EorF button.
The skip forward function skips to the next
track.
If the elapsed track time has exceeded 8 sec-
onds, the function skips back to the beginning
of the track.
If the elapsed track time is less than 8 sec-
onds, the function skips back to the beginning of the previous track.
Additional setting option:
XAdjust the sound settings (Ypage 176).
DVD video mode functions
Hiding the menu:
XPress the 9or: button on the remote
control.
or
XWait about eight seconds.
The menu is hidden.
Additional setting options:
XAdjust the brightness, contrast and color
(Ypage 176).
XChange the picture format (Ypage 177).
XAdjust the sound settings (Ypage 176).
AUX mode
Introduction
You can connect external video sources with a
sound and video signal to the Rear Seat Enter-
tainment System:
Rone external video source to each of the rear screens (AUX display)
Rone external video source to the rear-com-
partment disc drive (AUX drive) Operating the external video source; see the
manufacturer's operating instructions.
For further details about external video sources,
please consult an authorized Mercedes-Benz
Center.
Connecting AUX equipment
AUX drive jacks
The AUX drive jacks are located on the rear-
compartment drive to the right of the þ
(
Ypage 173) button.
AUX display jacks
The AUX display jacks are on the side of the two
rear screens (Ypage 171).
Connecting audio and video cables
XInsert the audio plugs for the left and right
signals into the corresponding Land Rjacks.
XInsert the video plug into the Vjack.
Activating AUX mode
AUX drive
Requirements: the external video source is con-
nected to the rear-compartment drive and play-
back is selected.
XSelect Auxin the menu using the
9=; buttons on the remote con-
trol and press the 9button to confirm.
The AUX menu appears.
XSelect Sourcefrom the AUX menu and press
the 9button to confirm.
XSelect Disc drive Auxand press the 9
button to confirm.
Playback starts. If an external video source
does not provide a video picture, an audio
menu appears.
Displaying AUX
Requirements: the external video source is con-
nected to the rear-compartment screen and
playback is selected.
XSelect a screen using the thumbwheel on the
remote control (Ypage 172) until " LREAR"
186AUX mode
Rear Seat Entertainment System
Page 189 of 190
(left-hand screen) or "RREAR" (right-hand
screen) is highlighted in the window.
XSelect Auxin the menu using the
9=; buttons on the remote con-
trol and press the 9button to confirm.
XSelect Sourcefrom the AUX menu and press
the 9button to confirm.
XSelect DisplayAuxand press the 9button
to confirm.
Playback starts. If an external video source
does not provide a video picture, an audio
menu appears.
Adjusting treble and bass
XSelect TrebleorBassin the AUX menu and
press the 9button on the remote control to
confirm.
A scale appears.
XSelect a setting using the 9or: but-
ton and press the 9button to confirm.
Adjusting the brightness, contrast or
color
XSelect Display AuxorDisc drive Auxin
the AUX menu and press the 9button to
confirm.
XSelect Brightness,Contrastor Colorand
press the 9button to confirm.
A scale appears.
XSelect a setting using the 9or: but-
ton and press the 9button to confirm.
Changing the picture format
XSelect Display AuxorDisc drive Auxin
the AUX menu and press the 9button to
confirm.
XSelect Automatic,16:9 optimize, 4:3or
Zoomusing the 9: buttons and press
the 9button to confirm.
The dot in front of the menu item indicates the
currently selected picture format.
AUX mode187
Rear Seat Entertainment System
Z