lane assist MERCEDES-BENZ GLA SUV 2018 Owner's Manual
[x] Cancel search | Manufacturer: MERCEDES-BENZ, Model Year: 2018, Model line: GLA SUV, Model: MERCEDES-BENZ GLA SUV 2018Pages: 338, PDF Size: 5.59 MB
Page 11 of 338
Opening (from inside) ......................75
Drinking and drivin g........................ .146
Drive program
Automatic transmission ................. 136
Display ...........................................1 34
Display (DIRECT SELECT lever) ...... 132
Driver's door
see Doors
Driver's seat
see Seat
Driving abroad
Mercedes-Benz Service ................. 274
Driving dynamics display
Off-road program ........................... 168
Driving in mountainous terrain
Approach/departure angle ............ 153
Driving off-road
see Off-road driving
Driving on flooded roads .................. 150
Driving safety system
Active Brake Assist .......................... 61
Braking assistance appropriate to
the situation ..................................... 62
Driving safety systems
ABS (Anti-lock Braking System) ....... 60
ADAPTIVE BRAKE .............................6 7
BAS (Brake Assist System) .............. 61
Distance warning function ............... 61
EBD (electronic brake force distri-
bution) ............................................. 67
ESP
®(Electronic Stability Pro-
gram) ............................................... 63
Important safety information ........... 60
Overview .......................................... 60
STEER CONTROL ............................. 67
Driving system
Distance Pilot DISTRONIC ............. 156
Off-road program ........................... 167
Parking assist PARKTRONIC .......... 168
Parking Pilot .................................. 171
RACE START (Mercedes-AMG
vehicles) ........................................ 164
Start-off assist ............................... 163
Driving systems
360°camera .................................. 178
AMG adaptive sport suspension
system ........................................... 165
ATTENTION ASSIST ........................ 180 Blind Spot Assist ............................ 181
Cruise control ................................ 154
Display message ............................ 216
HOLD function ............................... 162
Lane Keeping Assist ...................... 183
Lane Tracking package .................. 181
Rear view camera .......................... 175
Driving tips
Automatic transmissi on ................. 135
Bra
kes ........................................... 148
Break-in period .............................. 123
Checking brake lining thickness .... 149
Distance Pilot DISTRONIC ............. 162
Downhill gradient ........................... 148
Drinking and driving ....................... 146
Driving in winter ............................. 150
Driving on flooded roads ................ 150
Driving on sand .............................. 153
Driving on wet roads ...................... 150
Exhaust check ............................... 146
Fuel ................................................ 146
General .......................................... 146
Hydroplaning ................................. 150
Icy road surfaces ........................... 150
Limited braking efficiency on sal-
ted roads ....................................... 149
Off-road driving .............................. 151
Snow chains .................................. 302
The first 1000 miles (1500 km) ..... 123
Tire ruts ......................................... 153
Traveling uphill ............................... 153
Wet road surface ........................... 148
DSR (Downhill Speed Regulation)
Display message ............................ 216
Function/notes ............................. 166
DVD video
Operating (on-board computer) ..... 192
see also Digital Operator's Man-
ual .................................................. 239
DYNAMIC SELECT button
Climate control (3-zone automaticclimate control) ............................. 117
Climate control (air-conditioning
system) .......................................... 114
DYNAMIC SELECT button (all vehi-
cles except Mercedes-AMG vehi-
cles) .................................................... 130
DYNAMIC SELECT controller ............ 131
Index9
Page 14 of 338
H
Handling control systemsee ESP®(Electronic Stability Program)
HANDS-FREE ACCESS ..........................80
Hazard warning lamps
Display message ............................ 225
Switching on/off ........................... 103
Head restraints
Adjusting .........................................9 3
Adjusting (manually) ........................ 94
Adjusting (rear) ................................ 94
Headlamps
Fogging up .....................................1 04
see Automatic headlamp mode
Heating
see Climate control
High beam flasher .............................1 03
High-beam headlamps
Display message ............................ 212
Replacing bulbs .............................1 06
Switching on/off ........................... 103
Hill start assist .................................. 127
HOLD function
Activating ....................................... 163
Activation conditions ..................... 162
Deactivating ................................... 163
Display message ............................ 216
Function/notes .............................1 62
Home address
see also Digital Operator's Man-
ual ..................................................2 39
Hood
Closing ...........................................2 70
Display message ............................ 225
Important safety notes .................. 269
Opening ......................................... 269
Horn ...................................................... 31
Hydroplaning ..................................... 150
I
Ignition key
see SmartKey
Ignition lock
see Key positions
Immobilizer .......................................... 67 Indicator lamp
Replacing bulbs (rear) .................... 107
Indicator lamps
see Warning and indicator lamps
Indicators
see Turn signals
Instrument cluster
Overview .......................................... 32
Settings ......................................... 195
Warning and indicator lamps ........... 32
Instrument cluster lighting .............. 185
Interior lighting
Control ...........................................1 04
Overview ........................................ 104
Reading lamp ................................. 104
iPod
®
see also Digital Operator's Man-
ual ..................................................2 39
J
Jack
Storage location ............................ 283
Using ............................................. 321
Jump starting (engine) ......................291
K
Key positions
Start/Stop button .......................... 124
KEYLESS-GO
Convenience closing feature ............ 85
Deactivation ..................................... 70
Locking ............................................ 70
Unlocking ......................................... 70
Kickdown
Driving tips ....................................1 36
Manual gearshifting ....................... 140
Knee bag .............................................. 45
L
Lamps
see Warning and indicator lamps
Lane detection (automatic)
see Lane Keeping Assist
Lane Keeping Assist
Activating/deactivating (on-
board computer) ............................ 195
12Index
Page 15 of 338
Display message ............................ 217
Function/information .................... 183
Lane Tracking package ..................... 181
Lap time (RACETIMER) ...................... 198
LATCH-type (ISOFIX) child seat
anchors ................................................ 56
License plate lamp (display mes-
sage) ................................................... 212
Light sensor (display message) ....... 213
Lights
Automatic headlamp mode ............ 101
Cornering light function ................. 103
Fog lamps ...................................... 102
Fogged up headlamps .................... 104
Hazard warning lamps ................... 103
High beam flasher .......................... 103
High-beam headlamps ................... 103
Light switch ................................... 101
Low-beam headlamps .................... 102
Parking lamps ................................ 102
Rear fog lamp ................................ 102
Setting exterior lighting ................. 101
Standing lamps .............................. 102
Switching the daytime running
lamps on/off (on-board com-
puter) ............................................. 196
Turn signals ................................... 103
Loading guidelines ............................ 247
Locking
see Central locking
Locking (doors)
Automatic ........................................ 76
Emergency locking ........................... 77
From inside (central locking but-
ton) .................................................. 75
Locking centrally
see Central locking
Locking verification signal (on-
board computer) ............................... 197
Low-beam headlamps
Display message ............................ 211
Replacing bulbs ............................. 106
Switching on/off ........................... 102
Lubricant additives
see Additives (
engine oil) Lumbar support
Adjusting the 4-way lumbar sup-
port .................................................. 95
M
M+S tires ............................................ 301
Malfunction message
see Display messages
Matte finish (cleaning instruc-
tions) .................................................. 276
mbrace
Call priority .................................... 260
Display message ............................ 206
Downloading destinations
(COMAND) ..................................... 261
Downloading routes ....................... 263
Emergency call .............................. 258
General notes ................................ 257
Geo fencing ................................... 264
Locating a stolen vehicle ............... 262
MB info call button ........................ 260
Remote fault diagnosis .................. 263
Remote vehicle locking .................. 262
Roadside assistance button ........... 259
Search & Send ............................... 261
Self-test ......................................... 257
Speed alert .................................... 263
System .......................................... 257
Triggering the vehicle alarm ........... 264
Vehicle remote unlocking .............. 262
Mechanical key
Function/notes ................................ 71
Inserting .......................................... 72
Locking vehicle ................................ 77
Removing ......................................... 71
Unlocking the driver's door .............. 76
Memory card (audio) ......................... 192
Memory function ................................. 99
Message memory (on-board com-
puter) .................................................. 200
Messages
see Display messages
Mirror turn signal
Cleaning ......................................... 278
Mirrors
see Exterior mirrors
see Rear-view mirror
Index13
Page 62 of 338
Drivingsafet ysystems
Overview of drivin gsafet ysystems
In this section ,you will fin dinformation about
th efollowin gdrivin gsafet ysystems :
RABS (Anti-loc kBrakin gSystem)
(Ypage 60)
RBA S (B rakeAssist System) (Ypage 61)
RActive Brak eAssis t (Ypage 61 )
RESP®(Electronic StabilityProgram)
(Ypage 63)
REB D (Electroni cBrak eforc eDistribution )
(Ypage 67 )
RADAPTIV EBRAKE (Ypage 67 )
RSTEERCONTROL (Ypage 67)
Important safet ynotes
If you fail to adapt your drivin gstyle or if you are
inattentive ,th edrivin gsafet ysystems can nei-
ther reduce th eris kof an acciden tno roverride
th elaws of physics. Driving safet ysystems are
merely aids designed to assist driving.
You are responsible fo rmaintainin gth edistanc e
to th evehicle in front, fo rvehicle speed, fo r
braking in goo dtime, and fo rstayin gin lane.
Always adapt your drivin gstyle to suit th epre -
vailin groad and weather condition sand main -
tain asaf edistanc efrom th evehicle in front.
Drive carefully.
The drivin gsafet ysystems described only wor k
as effectively as possible when there is ade-
quat econtact between th etires and th eroad
surface. Please pay special attention to th e
note son tires ,recommended minimum tire
tread depths, etc. (
Ypage 300).
In wintr ydrivin gconditions, always use winte r
tires (M+ Stires )and if necessary, snow chains.
Only in this way will the driving safety systems
described in this section work as effectively as
possible.
ABS (Anti-lock Braking System)
General information
ABS regulates brake pressure in such a way that
the wheels do not lock when you brake. This
allows you to continue steering the vehicle when
braking. The
! ABS warning lamp in the instrument
cluster lights up when the ignition is switched
on. It goes out when the engine is running.
ABS works from a speed of about 5 mph
(8 km/h), regardless of road-surface conditions.
ABS works on slippery surfaces, even when you
only brake gently.
Important safety notes
iObserve the "Important safety notes" sec-
tion (Ypage 60).
GWARNING
If ABS is malfunctioning, the wheels could
lock when braking. The steerability and brak-
ing characteristics would be severely affec-
ted. There is an increased danger of skidding and accidents.
Drive on carefully. Have ABS checked imme-
diately at a qualified specialist workshop.
When ABS is malfunctioning, other systems,
including driving safety systems, will also
become inoperative. Observe the information
on the ABS warning lamp (
Ypage 230 )and dis-
play messages which may be shown in the
instrument cluster (
Ypage 201).
Braking
XIf ABS intervenes: continue to depress the
brake pedal vigorously until the braking sit-
uation is over.
XTo make a full brake application: depress
the brake pedal with full force.
If ABS intervenes when braking, you will feel a
pulsing in the brake pedal.
The pulsating brake pedal can be an indication
of hazardous road conditions, and functions as a
reminder to take extra care while driving.
Off-road ABS
An ABS system specifically suited to off-road
terrain is activated automatically once the off-
road program is activated (
Ypage 167).
At speeds below 20 mph (30 km/h), the front
wheels lock cyclically during braking. The dig-
ging-in effect achieved in the process reduces
the stopping distance on off-road terrain. This
limits steering capability.
60Driving safety systems
Safety
Page 156 of 338
RAccelerate gently and make sure that the
wheels are gripping.
RAvoid high engine speeds, except when driv-
ing on sandy and muddy routes with high driv-
ing resistance.
RUse the left-hand steering wheel paddle
shifter to shift to a lower gear appropriate to
the gradient.
RUse the left-hand steering wheel paddle
shifter to shift into a lower gear in good time
on long and steep downhill gradients.
Hill start assist will aid you when pulling away on a hill. For further information about hill start
assist, see (
Ypage 127).
Do not shift into transmission position iwhen
driving off-road. You could lose control of the
vehicle if you attempt to brake the vehicle using
the service brake. If the gradient is too steep for
your vehicle, drive back down in reverse gear.
Always observe the approach/departure angle
values (
Ypage 334).
Maximum gradient-climbing capability
Always observe the maximum gradient climbing
ability values (Ypage 334).
Hilltops
When driving up an uphill gradient, slightly
reduce pressure on the accelerator immediately
before reaching the brow of the hill. Make use of
the vehicle's own impetus to travel over the
brow.
This style of driving prevents:
Rthe vehicle from lifting off the ground on the
brow of a hill
Rthe vehicle from traveling too quickly down
the other side
Driving downhill
RDrive slowly.
RDo not drive at an angle down steep inclines.
Steer into the line of fall and drive with the
front wheels aligned straight. Otherwise, the
vehicle could slip sideways, tip and rollover.
RShift to a lower gear using the left-hand steer-
ing wheel paddle shifter before tackling steep
downhill gradients.
RActivate DSR. If this is not sufficient, brake
gently. When doing so, make sure that the vehicle is facing in the direction of the line of
fall.
RCheck that the brakes are working normally
after a long downhill stretch.
Off-road ABS is activated when the off-road pro-
gram is selected.
At speeds below 18 mph (30 km/h), the front
wheels lock cyclically during braking. The dig-
ging-in effect achieved in the process reduces
the stopping distance on off-road terrain. The
steerability of the vehicle is considerably
reduced if the wheels lock.
Driving systems
Cruise control
General notes
Cruise control maintains a constant road speed
for you. It brakes automatically in order to avoid
exceeding the set speed. On long and steep
downhill gradients, especially if the vehicle is
laden, you must select a low gear in good time.
You need to shift manually using the steering
wheel paddle shifters beforehand. By doing so,
you will make use of the braking effect of the
engine. This relieves the load on the brake sys-
tem and prevents the brakes from overheating
and wearing too quickly.
When the engine is running, you can use the
cruise control lever to limit the speed to any
speed between 20 mph (30 km/h) and the tech-
nically permitted maximum speed of the vehicle.
Use cruise control if road and traffic conditions
make it appropriate to maintain a steady speed
for a prolonged period.
The speed indicated in the speedometer may
differ slightly from the speed stored.
Important safety notes
If you fail to adapt your driving style, cruise con-
trol can neither reduce the risk of an accident
nor override the laws of physics. Cruise control
cannot take into account the road, traffic and
weather conditions. Cruise control is only an
aid. You are responsible for the distance to the
vehicle in front, for vehicle speed, for braking in
good time and for staying in your lane.
154Driving systems
Driving an d parking
Page 164 of 338
Tips for driving with Distance Pilot
DISTRONIC
General notes
Pay particular attention in the following traffic
situations:
RCornering, entering and exiting a bend: the
ability of Distance Pilot DISTRONIC to detect
vehicles during cornering is limited. Your vehi-
cle may brake unexpectedly or late.
RDriving on a different line: Distance Pilot
DISTRONIC may not detect vehicles which are
not driving in the middle of their lane. The dis-
tance to the vehicle in front will be too short.
ROther vehicles changing lanes: Distance Pilot
DISTRONIC has not detected the vehicle cut-
ting in yet. The distance to this vehicle will be
too short.
RNarrow vehicles: Distance Pilot DISTRONIC
has not yet detected the vehicle in front on
the edge of the road because of its narrow
width. The distance to the vehicle in front willbe too short.
RObstacles and stationary vehicles: Distance
Pilot DISTRONIC does not brake for obstacles
or stationary vehicles. If, for example, the
detected vehicle turns a corner and an obsta-cle or stationary vehicle is then revealed, Dis-
tance Pilot DISTRONIC will not brake for
them.
RDistance Pilot DISTRONIC may mistakenly
detect vehicles that are crossing your lane. If
you activate Distance Pilot DISTRO
NIC in the
following situations, the vehicle could pull
away unintentionally:
-At traffic lights with crossing traffic, for
example.
-With a vehicle ahead on the other side of an
intersection and the HOLD function active.
In such situations, brake if necessary. Distance
Pilot DISTRONIC will then be deactivated.
HOLD function
General notes
The HOLD function can assist the driver in the
following situations:
Rwhen pulling away, especially on steep slopes
Rwhen maneuvering on steep slopes
Rwhen waiting in traffic The vehicle is kept stationary without the driver
having to depress the brake pedal.
The braking effect is canceled and the HOLD
function deactivated when you depress the
accelerator pedal to pull away.
Important safety notes
GWARNING
If the vehicle is only braked using the HOLD
function, the vehicle may roll away in the fol-
lowing situations when you leave the vehicle:
Rif there is a malfunction in the system or in the voltage supply
Rif the HOLD function is deactivated by
depressing the accelerator pedal or brake
pedal, e.g. by a vehicle occupant
Rif the electrical system in the engine com-
partment, the battery or the fuses are tam-
pered with or the battery is disconnected
There is a risk of an accident.
Always deactivate the HOLD function and
secure the vehicle against rolling away before
you leave it.
!When Distance Pilot DISTRONIC or the
HOLD function is activated, the vehicle
brakes automatically in certain situations.
To avoid damage to the vehicle, deactivate
Distance Pilot DISTRONIC and the HOLD
function in the following or similar situations:
Rwhen towing the vehicle
Rin the car wash
Deactivating the HOLD function (
Ypage 163).
Activation conditions
You can activate the HOLD function if:
Rthe vehicle is stationary
Rthe engine is running or if it has been auto-
matically switched off by the ECO start/stop
function
Rthe driver's door is closed or your seat belt is
fastened
Rthe electric parking brake is released
RDistance Pilot DISTRONIC is deactivated
Rthe transmission is in position h,kori
on vehicles with automatic transmission
162Driving system s
Driving an d parking
Page 168 of 338
DSR
General notes
iDS R(Downhill Speed Regulation )is only
available fo rvehicles wit hth eON&OFFROA D
package.
DS Ris an aid to assist you when drivin gdown -
hill .It keeps th espeed of trave lat th espeed
selecte don th eon-boar dcomputer. The steeper
th edownhill gradient ,th egreater th eDS Rbrak-
in g effect on th evehicle. Whe ndrivin gon fla t
stretches of road or on an uphill gradient ,th e
DS Rbraking effect is minimal or nonexistent.
DS Rcontrols th evehicle’s speed when it is acti-
vated and th etransmissio nis in position h,k
or i .You can drive at ahigher or alowe rspeed
than that set on th eon-boar dcompute rat any
time by acceleratin gor braking .
Important safet ynotes
GWARNING
If th espeed driven and th eset speed deviat e
and you activat eDS Ron aslipper yroad sur -
face, th ewheels may los etraction .There is an
increase ddanger of skidding and accidents .
Before switchin gDS Ron ,please take into
consideration th eroad surfac eand th ediffer-
ence between drivin gspeed and th eset
speed.
If you fail to adapt your drivin gstyle, DS Rcan
neither reduce th eris kof acciden tno roverride
th elaws of physics. DS Rcanno ttake accoun tof
road, weather and traffic conditions. DS Ris only
an aid. You are responsible fo rth edistanc eto
th evehicle in front, fo rvehicle speed, fo rbrak-
in g in goo dtime and fo rstayin gin your lane.
You are always responsible fo rkeepin gcontro l
of th evehicle and fo rassessin gwhether th e
downhill gradient can be managed .DS Rmay no t
always be able to keep to th eset speed, depend -
in gon road surfac eand tire conditions. Selec t a
set speed suitable fo rth eprevailin gcondition s
and when necessary, apply th ebrake smanually.
Further information about "Drivin goff-road"
(
Ypage 151).
Activating/deactivating DSR
If you activat eDS Rand no speed has bee nset ,
th evehicle decelerates to 4mph (Canada:
6 km/h).
You can only activat eDS Rwhen drivin gat
speeds belo w19 mph (Canada: 30 km/h).
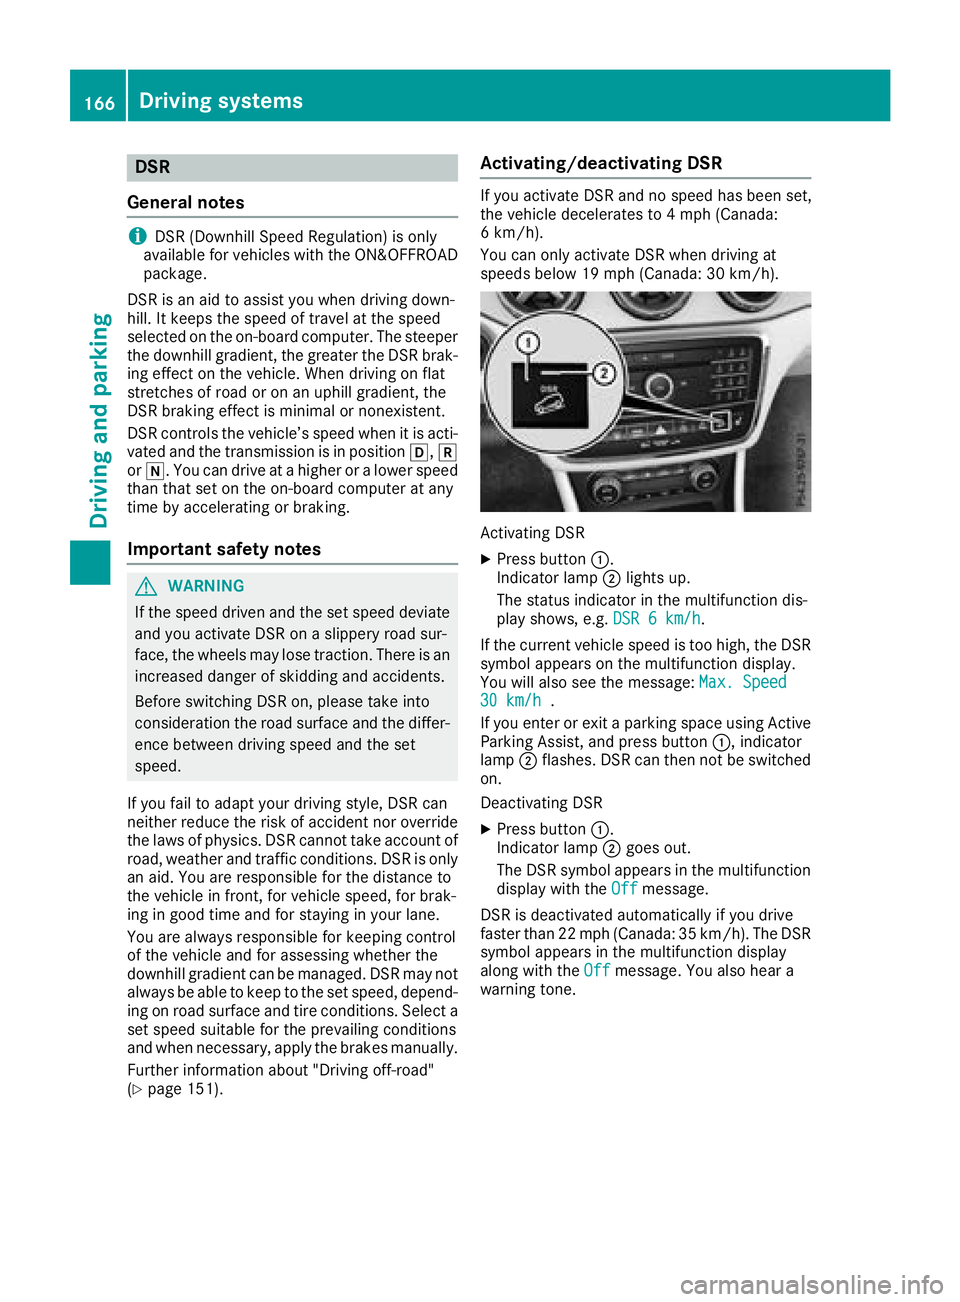
Activatin gDS R
XPress butto n:.
Indicator lamp ;lights up.
The status indicator in th emultifunction dis -
play shows, e.g. DSR6km/ h
.
If th ecurren tvehicle speed is to ohigh, th eDS R
symbol appears on th emultifunction display.
You will also see th emessage: Max.Speed
30 km/ h.
If you ente ror exit aparking spac eusin gActive
Parking Assist, and press butto n:, indicator
lamp ;flashes .DS Rcan then no tbe switched
on .
Deactivatin gDS R
XPress butto n:.
Indicator lamp ;goe sout .
The DS Rsymbol appears in th emultifunction
display wit hth eOff
message.
DS Ris deactivated automatically if you drive
faste rthan 22 mph (Canada: 35 km/h). The DS R
symbol appears in th emultifunction display
alon gwit hth eOff
message. You also hear a
warnin gtone .
166Driving systems
Driving an d parking
Page 173 of 338
Problems with Parking Assist PARKTRONIC
ProblemPossible causes/consequences andMSolutions
Only the red segments in
the Parking Assist
PARKTRONIC warning
displays are lit. You also
hear a warning tone for
approximately two sec-
onds.
Parking Assist
PARKTRONIC is then
deactivated and the indi-
cator lamp on the
PARKTRONIC button
lights up.Parking Assist PARKTRONIC has malfunctioned and has been deacti-
vated.
XIf problems persist, have Parking Assist PARKTRONIC checked at a
qualified specialist workshop.
Only the red segments in
the Parking Assist
PARKTRONIC warning
displays are lit. Parking
Assist PARKTRONIC is
then deactivated.The Parking Assist PARKTRONIC sensors are dirty or there is inter-
ference.
XClean the Parking Assist PARKTRONIC sensors (Ypage 278).
XSwitch the ignition back on.
The problem may be caused by an external source of radio or ultra-
sound waves.
XCheck to see if Parking Assist PARKTRONIC works at a different
location.
Parking Pilot
General notes
Parking Pilot is an electronic parking aid with
ultrasound. It measures the road on both sides
of the vehicle. A parking symbol indicates a suit-
able parking space. Active steering intervention
and brake application can assist you during
parking and when exiting a parking space. Park-
ing Assist PARKTRONIC is also available
(
Ypage 168).
Important safety notes
Parking Pilot is only an aid. It is not a replace-
ment for your attention to your immediate sur-
roundings. You are always responsible for safe
maneuvering, parking and exiting a parking
space. When maneuvering and parking, make
sure that there are no obstacles such as per-
sons, animals or objects in the maneuvering
area.
When Parking Assist PARKTRONIC is deactiva-
ted, Parking Pilot is also unavailable.
GWARNING
While parking or pulling out of a parking
space, the vehicle swings out and can drive
onto areas of the oncoming lane. This could
result in a collision with another road user.
There is a risk of an accident.
Pay attention to other road users. Stop the
vehicle if necessary or cancel the Parking Pilot
parking procedure.
!If they cannot be avoided, drive over obsta-
cles such as curbs slowly and at an obtuse
angle. Otherwise, you may damage the
wheels or tires.
Parking Pilot may also display spaces not suita-
ble for parking, e.g.:
Rwhere parking or stopping is prohibited
Rin front of driveways or entrances and exits
Ron unsuitable surfaces
Driving systems171
Driving and parking
Z
Page 179 of 338
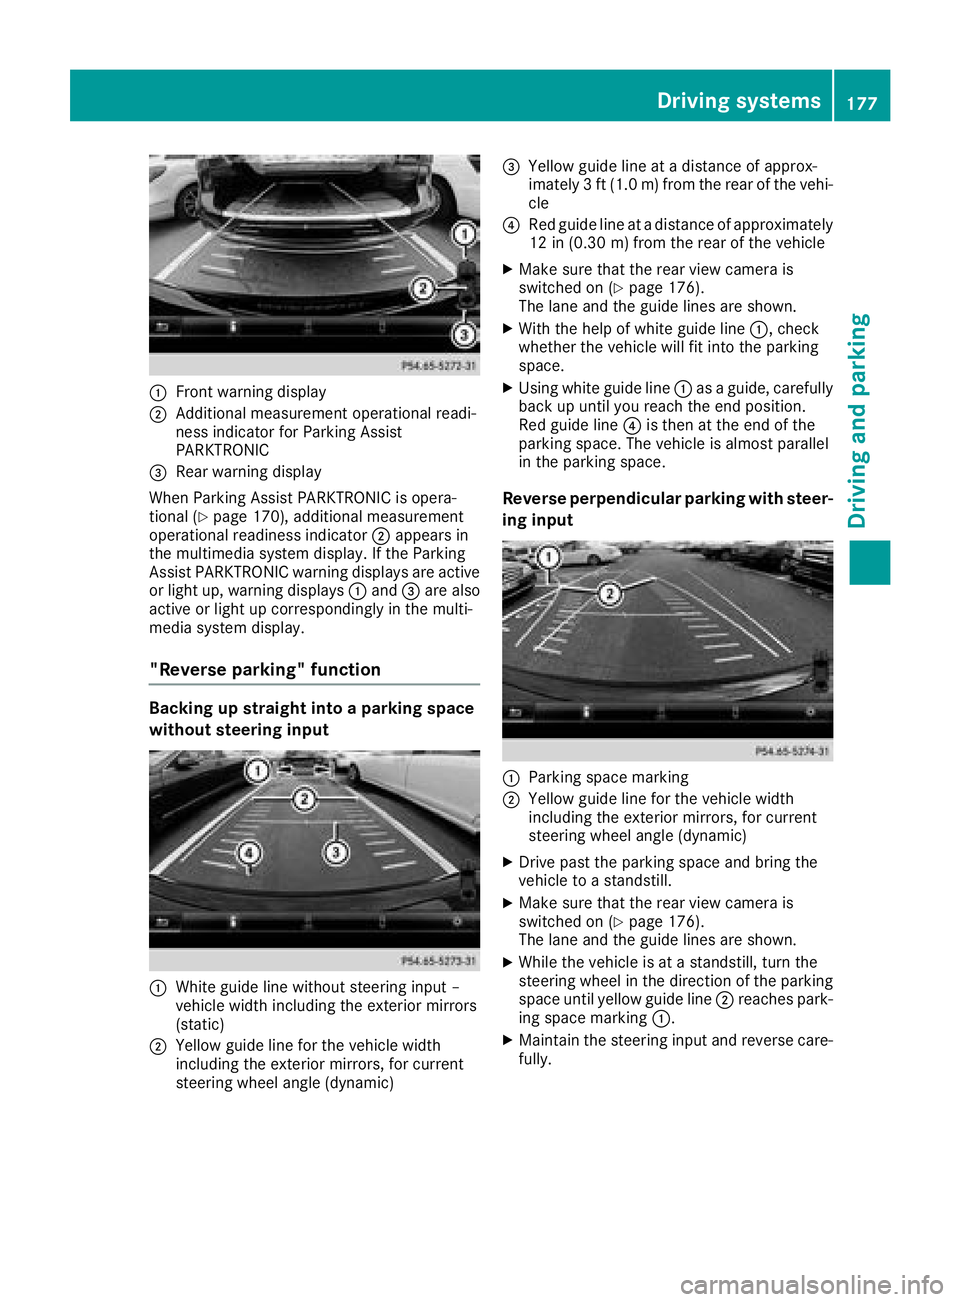
:Front warning display
;Additional measurement operational readi-
ness indicator for Parking Assist
PARKTRONIC
=Rear warning display
When Parking Assist PARKTRONIC is opera-
tional (
Ypage 170), additional measurement
operational readiness indicator ;appears in
the multimedia system display. If the Parking
Assist PARKTRONIC warning displays are active
or light up, warning displays :and =are also
active or light up correspondingly in the multi-
media system display.
"Reverse parking" function
Backing up straight into a parking space
without steering input
:White guide line without steering input –
vehicle width including the exterior mirrors
(static)
;Yellow guide line for the vehicle width
including the exterior mirrors, for current
steering wheel angle (dynamic)
=Yellow guide line at a distance of approx-
imately 3 ft (1.0 m) fromthe rear of the vehi-
cle
?Red guide line at a distance of approximately
12 in (0.30 m) fromthe rear of the vehicle
XMake sure that the rear view camera is
switched on (Ypage 176).
The lane and the guide lines are shown.
XWith the help of white guide line :, check
whether the vehicle will fit into the parking
space.
XUsing white guide line :as a guide, carefully
back up until you reach the end position.
Red guide line ?is then at the end of the
parking space. The vehicle is almost parallel
in the parking space.
Reverse perpendicular parking with steer-
ing input
:Parking space marking
;Yellow guide line for the vehicle width
including the exterior mirrors, for current
steering wheel angle (dynamic)
XDrive past the parking space and bring the
vehicle to a standstill.
XMake sure that the rear view camera is
switched on (Ypage 176).
The lane and the guide lines are shown.
XWhile the vehicle is at a standstill, turn the
steering wheel in the direction of the parking
space until yellow guide line ;reaches park-
ing space marking :.
XMaintain the steering input and reverse care-
fully.
Driving systems177
Driving an d parking
Z
Page 180 of 338
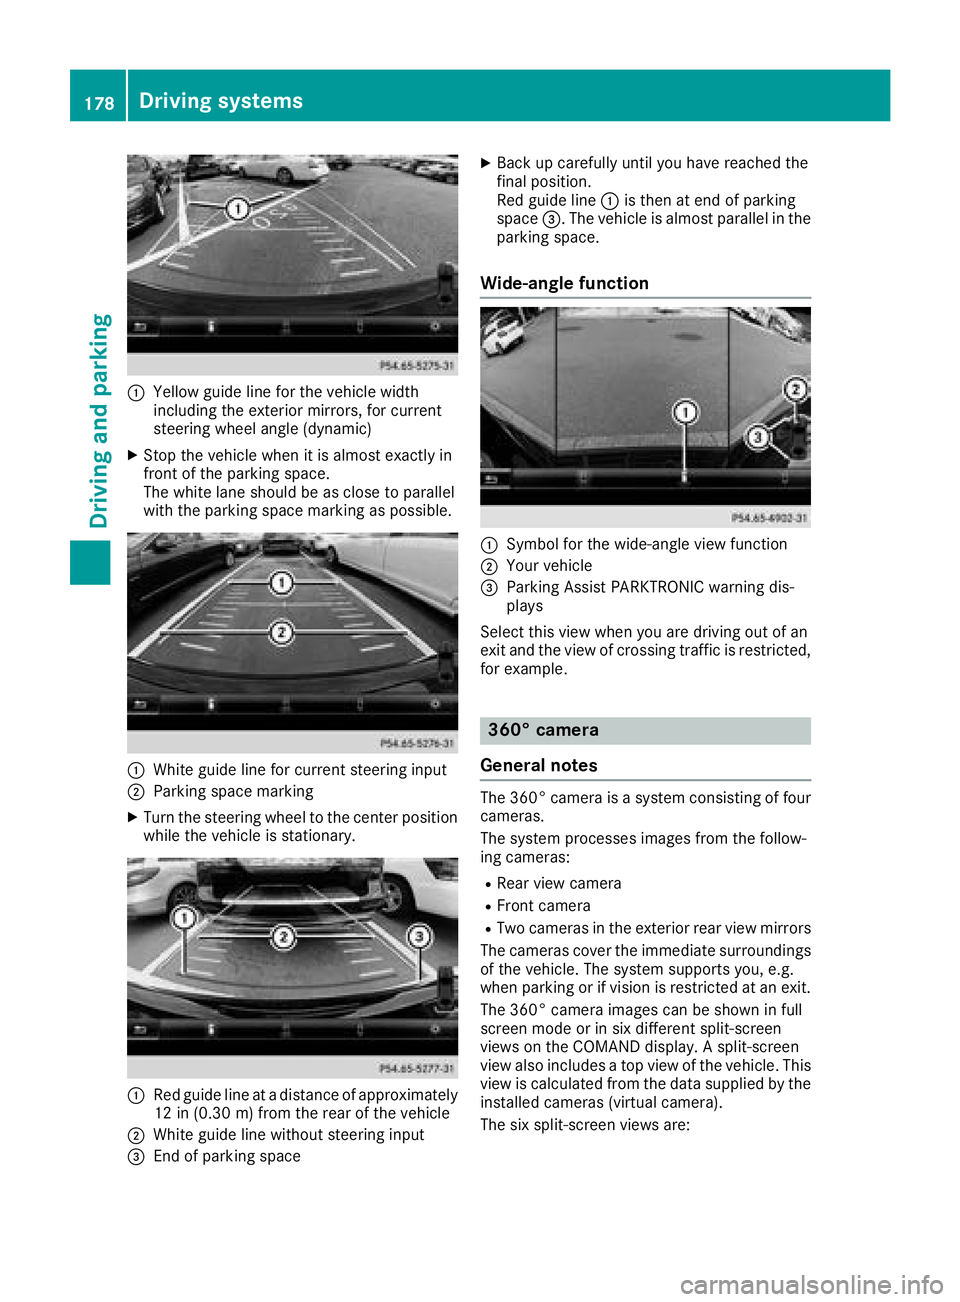
:Yellow guide line for the vehicle width
including the exterior mirrors, for current
steering wheel angle (dynamic)
XStop the vehicle when it is almost exactly in
front of the parking space.
The white lane should be as close to parallel
with the parking space marking as possible.
:White guide line for current steering input
;Parking space marking
XTurn the steering wheel to the center position
while the vehicle is stationary.
:Red guide line at a distance of approximately
12 in (0.30 m) from the rear of the vehicle
;White guide line without steering input
=End of parking space
XBack up carefully until you have reached the
final position.
Red guide line:is then at end of parking
space =. The vehicle is almost parallel in the
parking space.
Wide-angle function
:Symbol for the wide-angle view function
;Your vehicle
=Parking Assist PARKTRONIC warning dis-
plays
Select this view when you are driving out of an
exit and the view of crossing traffic is restricted,
for example.
360° camera
General notes
The 360° camera is a system consisting of four
cameras.
The system processes images from the follow-
ing cameras:
RRear view camera
RFront camera
RTwo cameras in the exterior rear view mirrors
The cameras cover the immediate surroundings
of the vehicle. The system supports you, e.g.
when parking or if vision is restricted at an exit.
The 360° camera images can be shown in full
screen mode or in six different split-screen
views on the COMAND display. A split-screen
view also includes a top view of the vehicle. This
view is calculated from the data supplied by the installed cameras (virtual camera).
The six split-screen views are:
178Driving systems
Driving and parking