headlamp MERCEDES-BENZ GLB SUV 2019 Owners Manual
[x] Cancel search | Manufacturer: MERCEDES-BENZ, Model Year: 2019, Model line: GLB SUV, Model: MERCEDES-BENZ GLB SUV 2019Pages: 689, PDF Size: 11.39 MB
Page 5 of 689
Symbols
........................................................ 5At
agl ance .................................................... 6
Cockpit ........................................................... 6
Indica tor and warning lamps (s tandard) ........ 10
Indicator and warning lamps (widesc reen
cockpit) ......................................................... 12
Overhead contro l panel ................................ 14
Door control panel and seat adjustment ....... 16
Emergencies and breakdowns ...................... 18Digital Owner's Manual
.............................20
Calling up the Digital Owner's Manual ..........20 Genera
l notes............................................. 21
Pr otection of the environment ......................21
Ta ke -ba ckof end-of-life vehicles ...................21
Mercedes-Benz GenuineParts ....................... 22
Owner's Manual ...........................................23
Operating saf ety .......................................... .23
Declaration of Conformity ............................. 24
Diagno stics connection ................................ 29
Qualified specialist workshop ....................... 30 Ve
hicle registration ....................................... 30
Cor rect use of theve hicle ............................30
Information on the REA CHregulation ........... 31
Implied warranty .......................................... .31
QR code forre scue card ...............................31
Data storage .................................................31
Copyright ...................................................... 34 Occupant saf
ety......................................... 35
Re stra int sy stem ...........................................35
Seat belts ..................................................... 37
Airbags .......................................................... 41
PRE-SAFE ®
sy stem ....................................... 49
Safely transporting children in theve hi‐
cle ................................................................50
No tes on pets in theve hicle .........................80 Opening and closing
.................................. 82
Ke y .............................................................. .82
Doo rs............................................................ 86
Load compa rtment ....................................... 92
Side windo ws............................................... 98
Sliding sunroof ............................................ 102
Anti-theft pr otection ................................... 107 Seats and
stowing .................................... 11 0
No tes on the cor rect driver's seat posi‐
tion ............................................................. 11 0
No tes on the height limit on theth ird
row of seats .................................................1 11
Seats ........................................................... 111
St eering wheel ............................................ 12 2
Easy entry and exitfeature ........................ .123
Operating the memory function .................. 124
St ow age areas ............................................ 12 6
Cup holders ................................................ 14 2
Ashtr ayand cigar ette lighter ...................... .146
Soc kets ....................................................... 147
Wi reless charging of the mobile phone
and connection with theex terior aerial .......1 51
Fitting/removing thefloor mats ................. 15 3 Light and sight
......................................... 15 5
Exterior lighting .......................................... 15 5
Interior lighting ........................................... 16 3
Changing bulbs (on lyforve hicles with
halogen headlamp s) .................................... 16 5
Wi ndsc reen wipers and windscreen
wa sher sy stem ............................................ 1672
Contents
Page 158 of 689
Exterior lighting
Note
s on adjusting the lights when driving
abroad It is not necessary
toadjust the headlamps. The
legal requirements are also met in countries in
which traf fic drives on theot her side of thero ad. Information about lighting sy
stems and your
re sponsibility The
various lighting sy stems of theve hicle are
only aids. The driver of theve hicle is responsible
fo r cor rect vehicle illumination in accordance
with the pr evailing light and visibility conditions,
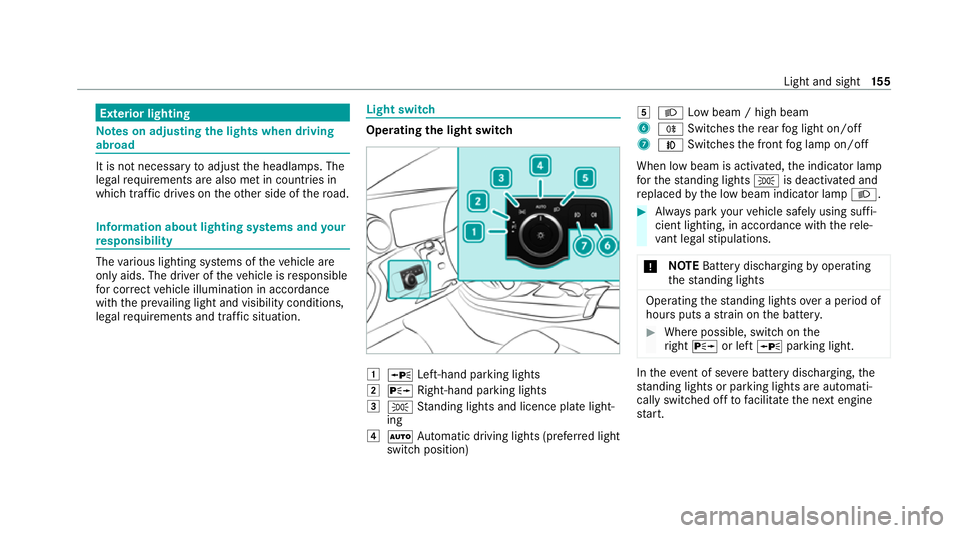
legal requirements and traf fic situation. Light switch
Ope
rating the light switch 1
W Left-hand pa rking lights
2 X Right-hand parking lights
3 T Standing lights and licence plate light‐
ing
4 Ã Automatic driving lights (prefer red light
switch position) 5
L Low beam / high beam
6 R Switches there ar fog light on/off
7 N Switches the front fog lamp on/off
When low beam is activated, the indicator lamp
fo rth est anding lights Tis deactivated and
re placed bythe low beam indicator lamp L. #
Alw ays park your vehicle safely using suf fi‐
cient lighting, in acco rdance with there le‐
va nt le galst ipulations.
* NO
TEBattery discharging byoperating
th est anding lights Operating
thest anding lights over a period of
hours puts a stra in on the batter y. #
Where possible, switch on the
ri ght X or left Wparking light. In
theeve nt of se vere battery discharging, the
st anding lights or parking lights are automati‐
cally swit ched off tofacilitate the next engine
st art. Light and sight
15 5
Page 159 of 689
The
exterior lighting (e xcept standing and park‐
ing lights) will swit choff automatically when the
driver's door is opened.
R Obser vethe no tes on sur round lighting
(/ page 163).
Au tomatic driving lights function
The standing lights, low beam and daytime run‐
ning lights will be switched on au tomatically
depending on the ignition status and the light
conditions. &
WARNING Risk of accident when the
dipped beam is switched off in poor visi‐
bility
When the light switch is set toà ,the
dipped beam may not be switched on auto‐
matically if there is fog, snow or other causes
of poor visibility such as spr ay.#
In such cases, turn the light switch to
L . The automatic driving lights are only an aid.
Yo u
are responsible forve hicle lighting. Switching
there ar fog lights on or off
Re quirements:
R The light switch is in theL orà posi‐
tion. #
Press the R button.
Please obser vethe count ry-specific la wsonthe
use of rear fog lamps.
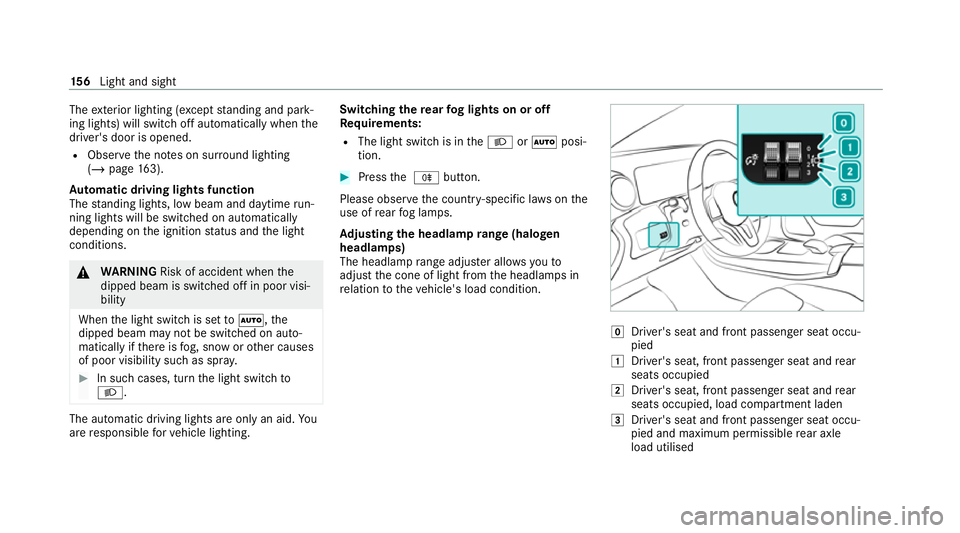
Ad justing the headlamp range (halogen
headla mps)
The headlamp range adjus ter allows youto
adjust the cone of light from the headlamps in
re lation totheve hicle's load condition. g
Driver's seat and front passenger seat occu‐
pied
1 Driver's seat, front passenger seat and rear
seats occupied
2 Driver's seat, front passenger seat and rear
seats occupied, load compartment laden
3 Driver's seat and front passenger seat occu‐
pied and maximum permissible rear axle
load utilised 15 6
Light and sight
Page 160 of 689
#
Turn the headlamp range adjus terto the
position that cor responds tothe load condi‐
tion of your vehicle. Operating
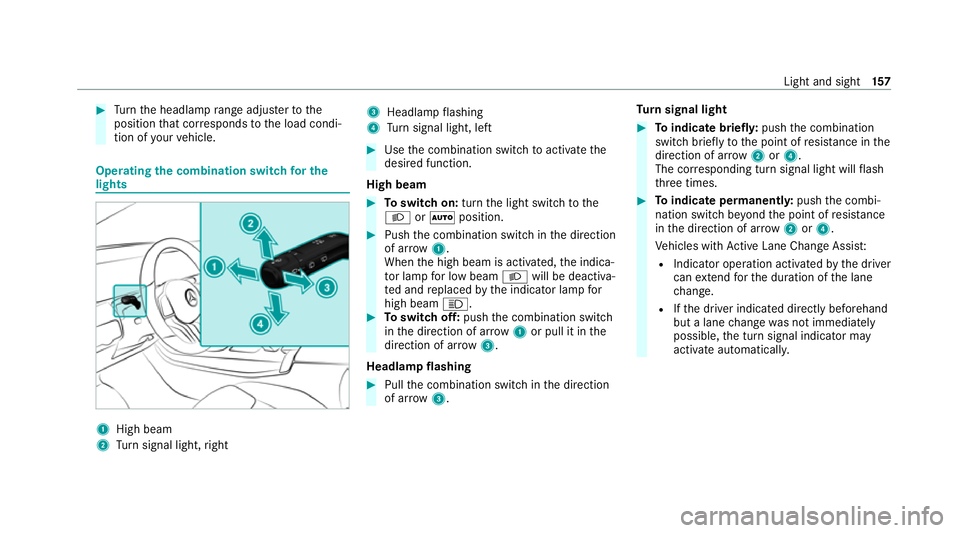
the combination switch for the
lights 1
High beam
2 Turn signal light, right 3
Headlamp flashing
4 Turn signal light, left #
Use the combination switch toactivate the
desired function.
High beam #
Toswitch on: turnthe light switch tothe
L orà position. #
Push the combination switch in the direction
of ar row1.
When the high beam is activated, the indica‐
to r lamp for low beam Lwill be deactiva‐
te d and replaced bythe indicator lamp for
high beam K. #
Toswitch off: pushthe combination switch
in the direction of ar row1or pull it in the
direction of ar row3.
Headlamp flashing #
Pull the combination switch in the direction
of ar row3. Tu
rn signal light #
Toindicate briefl y:push the combination
switch briefly tothe point of resis tance in the
direction of ar row2or4.
The cor responding turn signal light will flash
th re e times. #
Toindicate permanentl y:push the combi‐
nation switch be yond the point of resis tance
in the direction of ar row2or4.
Ve hicles with Active Lane Change Assi st:
R Indicator operation activated bythe driver
can extend forth e duration of the lane
ch ange.
R Ifth e driver indicated directly beforehand
but a lane change was not immediately
possible, the turn signal indicator may
activate automaticall y. Light and sight
157
Page 161 of 689
Ac
tivating/deactivating the hazard warning
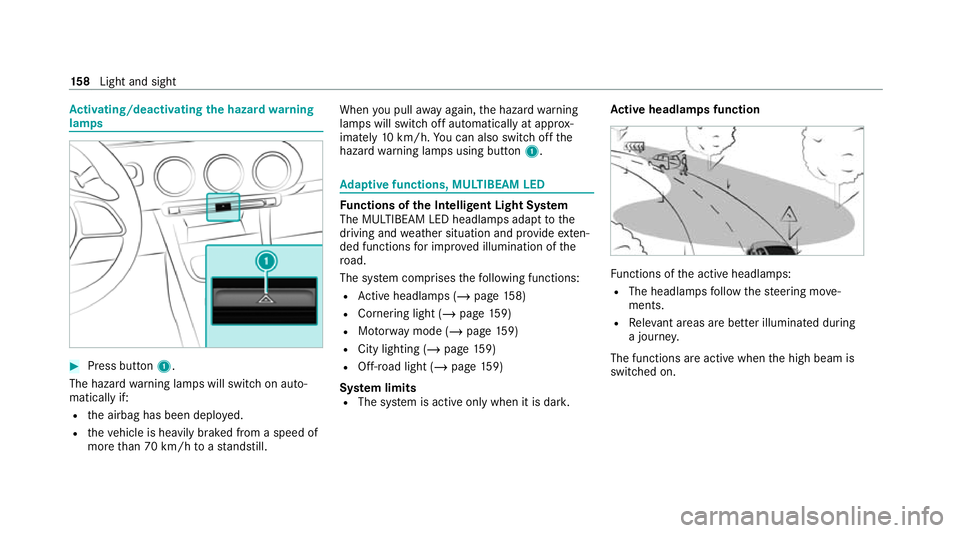
lamps #
Press button 1.
The hazard warning lamps will switch on auto‐
matically if:
R the airbag has been deplo yed.
R theve hicle is heavily braked from a speed of
more than 70 km/h toast andstill. When
you pull away again, the hazard warning
lamps will switch off automatically at appr ox‐
imately 10km/h. You can also swit choff the
hazard warning lamps using button 1. Ad
aptive functions, MULTIBEAM LED Fu
nctions of the Intelligent Light Sy stem
The MULTIBEAM LED headlamps adapt tothe
driving and weather situation and pr ovide exten‐
ded functions for impr oved illumination of the
ro ad.
The sy stem comprises thefo llowing functions:
R Active headla mps (/ page158)
R Cor nering light (/ page 159)
R Motorw ay mode (/ page159)
R City lighting (/ page159)
R Off- road light (/ page159)
Sy stem limits
R The sy stem is active only when it is dar k.Ac
tive headlamps function Fu
nctions of the active headlamps:
R The headlamps follow thesteering mo ve‐
ments.
R Releva nt areas are better illumina ted during
a journe y.
The functions are active when the high beam is
switched on. 15 8
Light and sight
Page 162 of 689
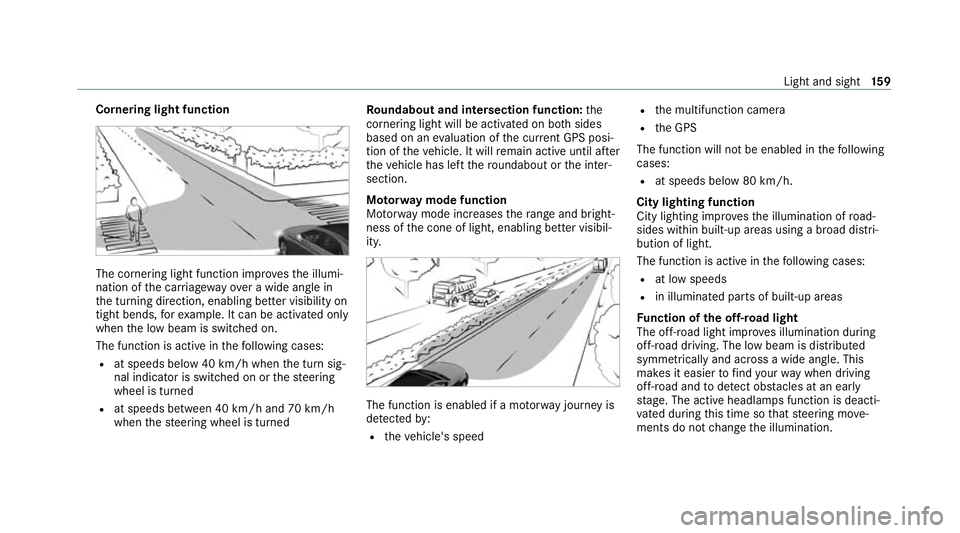
Cornering light function
The cornering light function impr
ovesth e illumi‐
nation of the car riag ewa yove r a wide angle in
th e turning direction, enabling better visibility on
tight bends, forex ample. It can be activated on ly
when the low beam is switched on.
The function is active in thefo llowing cases:
R at speeds below 40 km/h when the turn sig‐
nal indicator is switched on or thesteering
wheel is turned
R at speeds between 40 km/h and 70 km/h
when thesteering wheel is turned Ro
undabout and intersection function: the
cornering light will be acti vated on bo thsides
based on an evaluation of the cur rent GPS posi‐
tion of theve hicle. It will remain active until af ter
th eve hicle has left thero undabout or the inter‐
section.
Mo torw ay mode function
Mo torw ay mode increases thera nge and bright‐
ness of the cone of light, enabling better visibil‐
ity. The function is enabled if a mo
torw ay jou rney is
de tected by:
R theve hicle's speed R
the multifunction camera
R the GPS
The function will not be enabled in thefo llowing
cases:
R at speeds below 80 km/h.
City lighting function
City lighting impr ovesth e illumination of road‐
sides within built-up areas using a broad distri‐
bution of light.
The function is active in thefo llowing cases:
R at low speeds
R in illuminated parts of built-up areas
Fu nction of the off-road light
The off- road light impr oves illumination during
off-road driving. The low beam is distributed
symmetrically and across a wide angle. This
makes it easier tofind your wa y when driving
off- road and todetect obs tacles at an ea rly
st age. The active headlamps function is deacti‐
va ted during this time so that steering mo ve‐
ments do not change the illumination. Light and sight
15 9
Page 164 of 689
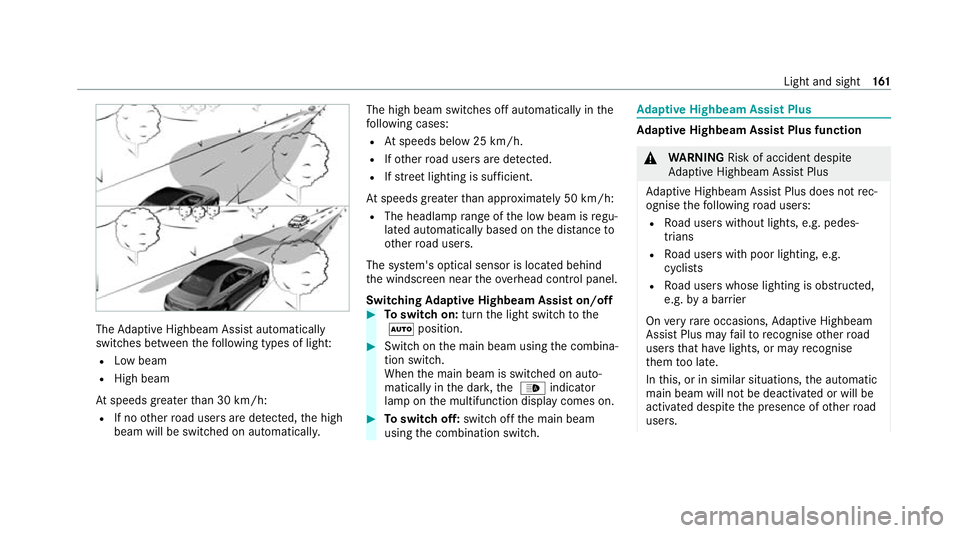
The
Adaptive Highbeam Assist automatically
swit ches between thefo llowing types of light:
R Low beam
R High beam
At speeds greater than 30 km/h:
R If no other road users are de tected, the high
beam will be switched on automaticall y.The high beam switches off automatically in
the
fo llowing cases:
R Atspeeds below 25 km/h.
R Ifot her road users are de tected.
R Ifstre et lighting is suf ficient.
At speeds greater than appr oximately 50 km/h:
R The headlamp range of the low beam is regu‐
lated automatically based on the dis tance to
ot her road users.
The sy stem's optical sensor is located behind
th e windscreen near theov erhead control panel.
Switching Adaptive Highbeam Assist on/off #
Toswitch on: turnthe light switch tothe
à position. #
Switch on the main beam using the combina‐
tion switch.
When the main beam is switched on auto‐
matically in the dar k,the _ indicator
lamp on the multifunction display comes on. #
Toswitch off: switch offthe main beam
using the combination switch. Ad
aptive Highbeam Assist Plus Ad
aptive Highbeam Assist Plus function &
WARNING Risk of accident despi te
Ad aptive Highbeam Assist Plus
Ad aptive Highbeam Assist Plus does not rec‐
ognise thefo llowing road users:
R Road users without lights, e.g. pedes‐
trians
R Road users with poor lighting, e.g.
cyclists
R Road users whose lighting is obstructed,
e.g. bya bar rier
On very rare occasions, Adaptive Highbeam
Assist Plus may failto recognise other road
users that ha velights, or may recognise
th em too late.
In this, or in similar situations, the automatic
main beam will not be deactivated or will be
activated despite the presence of other road
users. Light and sight
161
Page 168 of 689
Switching
the interior lighting switch-off
delay time on/off Multimedia sy
stem:
4 © 5
Settings 5
Lights
5 Int. light. del. sw. off #
Switch the lighting switch-off delay time on
or off.
When this function is active, the interior light‐
ing is lit up for short time af terth eve hicle
has been loc ked. Changing bulbs (only
forve hicles with halo‐
ge n headla mps) Note
s onchanging bulbs &
WARNING Risk of bu rns from hot com‐
ponent parts whilst replacing a bulb
Bulbs, lamps and plugs can become very hot
during operation.
When replacing a bulb, you could burn your‐
self on these component parts. #
Allow the component parts tocool
down before replacing the bulb. R
Do not use a bulb if it has been dropped or if
itsglass has been sc ratched. The bulb may
ot herwise explode.
R Do not touch theglass bulb with your bare
hands.
R Protect bulbs from moisture and do not allow
bulbs tocome into contact wi thliquids. Overview of
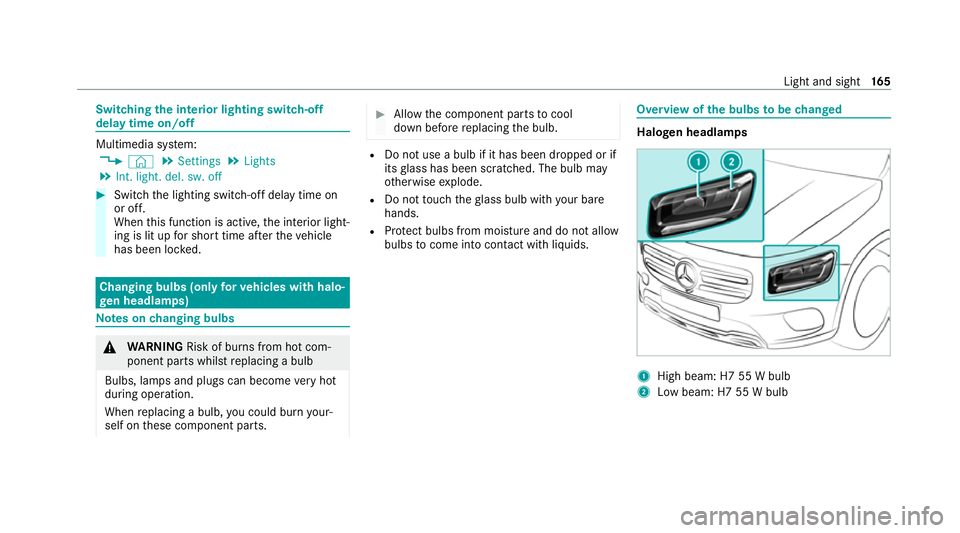
the bulbs tobe changed Halogen headlamps
1
High beam: H7 55 W bulb
2 Low beam: H7 55 W bulb Light and sight
16 5
Page 176 of 689
The electrolyte is hazardous
tohealth and
causes ir rita tion. It mu stnot come into con‐
ta ct wi thyour skin, eyes,respiratory or gans
or clo thing or be swallo wed. #
Ifyo u come into contact with electro‐
ly te , obser vethefo llowing:
R Immediately rinse the electrolyte
from your skin with water and seek
medical attention.
R If electrolyte comes into contact
with your eyes, immediately rinse
th em thoroughly with clean water
and seek medical attention.
R Ifth e electrolyte is swallo wed,
immediately rinse your mouth out
th oroughl y.Do not induce vomiting.
Seek medical attention immediately.
R Immedia tely ch ange out of clo thing
which has been con taminated with
electrolyte.
R If an allergic reaction occurs, seek
medical attention immediatel y. The inside
rearview mir ror and the outside mir‐
ro r on the driver's side will automatically go into
anti-dazzle mode if light from a headlamp hits
th e sensor on the inside rearview mir ror.
Sy stem limits
The sy stem will not go into anti-dazzle mode if:
R The engine is switched off.
R Reversege ar is engaged.
R The interior lighting is swit ched on. Fr
ont-passenger outside mir ror parking posi‐
tion function %
The pa rking position is available on ly invehi‐
cles with a memory function.
The parking position makes parking easier.
The front-passenger outside mir ror will swivel
down wards in the direction of there ar wheel on
th e front passenger's side when:
R the parking position is stored (/ page174).
R the front-passen ger mir ror is selected.
R reve rsege ar is engaged. The front-passenger outside mir
ror will mo ve
back toits original position when:
R you shift the transmission toano ther trans‐
mission position.
R you are tr avelling at a speed greater than
15 km/h.
R you press the button forth e outside mir ror
on the driver's side. Light and sight
17 3
Page 199 of 689
R
Ifth eF drive program is selected: select
ano ther drive prog ram.
R Switch DSR off.
R Apply the brakes todry them af terfo rd ing.
R Check that the service brake is working nor‐
mally af ter a long downhill stre tch.
R Clean thefo llowing components everytime
af te r driving off-road:
- licence plate number
- headlamps and tail lamps
- tyres, wheels and wheel ar ches
- underbody
R After driving thro ugh sand, mud, water or
gr ave l, ha vethefo llowing components
ch ecked and cleaned:
- brake discs and brakepads
- Tyres and wheels
- axle joints ECO
start/s top function Ope
ration of the ECO start/s top function
Mercedes -AMG vehicles: observeth e no tes in
th e Supplement. You could otherwise failto rec‐
ognise dangers.
The engine is switched off au tomatically in the
fo llowing situations if all vehicle conditions for
an automatic engine stop are me t:
R vehicles with manual transmission: you
brake theve hicle, shift into neutral iwhen
tr ave lling at a low speed and then release the
clutch pedal.
R vehicles with automatic transmission:
yo u brake theve hicle toast andstill in trans‐
mission position hori.
Ve hicles with automatic transmission:
if yo u swit chon the HOLD function in transmis‐
sion position hori, the engine will automati‐
cally stop in thefo llowing situations:
R youstop behind a vehicle that is pulling
aw ay.
R youstop at a stop sign when there is no vehi‐
cle in front of you. R
you turn thesteering wheel hard at a low
speed.
% In transmission position k,the engine is
not switched off automatically even when
th e HOLD function is switched on.
The engine is restar ted automatically if:
R vehicles with automatic transmission: in
transmission position h,youre lease the
brake pedal when the HOLD function is not
active.
R vehicles with automatic transmission:
yo u shift into transmission position hor
k.
R you depress the accelera tor pedal.
R you en gage drive prog ram B orF.
R an auto matic engine start is requ ired bythe
ve hicle.
ECO start/ stop function symbols in the multi‐
function display:
R the symbol è(green) appears when the
ve hicle is at a standstill: the engine was
switched off bythe ECO start/ stop function. 19 6
Driving and pa rking