wiper blades MERCEDES-BENZ GLC 2017 Owners Manual
[x] Cancel search | Manufacturer: MERCEDES-BENZ, Model Year: 2017, Model line: GLC, Model: MERCEDES-BENZ GLC 2017Pages: 374, PDF Size: 8.42 MB
Page 9 of 374
General notes ................................ 311
Interior .......................................... .3 16
Matte finish ................................... 314
Paint .............................................. 313
Plastic trim ................................... .3 17
Power washer ................................ 313
Rear view camera .......................... 316
Roof lining ...................................... 318
Seat belt ........................................ 318
Seat cover ..................................... 317
Selector lever ................................ 317
Sensors ......................................... 315
Side running board ........................ 315
Steering wheel ............................... 317
Trim pieces ................................... .3 17
Washing by hand ........................... 312
Wheels .......................................... .3 14
Windows ........................................ 314
Wiper blades .................................. 315
Wooden trim .................................. 317
Cargo compartment
Opening/closing (from outside,
HANDS-FREE ACCESS) .................... 87
Plug-in module (telescopic rods) .... 287
Cargo compartment cover
Important safety notes .................. 285
Notes/how to use ......................... 285
Cargo compartment enlargement ... 281
Cargo compartment floor
Important safety notes .................. 288
Opening/closing ............................ 288
Stowage well (under) ..................... 288
Cargo compartment plug-in mod-
ule (telescope bars) .......................... 287
Cargo net
Attaching ....................................... 286
Important safety information ......... 285
Cargo tie down rings ......................... 284
CD
see also Digital Operator's Man-
ual ................................................. .2 68
CD player (on-board computer) ....... .2 17
Center console
Lower section .................................. 40
Upper secti on
.................................. 38
Central locking
Locking/unlocking (SmartKey) ....... .7 7 Change of address .............................. 29
Change of ownership .......................... 29
Changing the media source ............ .2 16
Charge-air pressure (on-board
computer, Mercedes-AMG vehi-
cles) .................................................... 224
Child
Restraint system .............................. 60
Child seat
Forward-facing restraint system ...... 63
LATCH-type (ISOFIX) child seat
anchors ............................................ 61
On the front-passenger seat ............ 62
Rearward-facing restraint system .... 62
Top Tether ....................................... 61
Child-proof locks
Important safety notes .................... 63
Rear doors ....................................... 64
Children
Special seat belt retractor ............... 59
Children in the vehicle
Important safety notes .................... 59
Cigarette lighter ................................ 292
Cleaning
Mirror turn signal ........................... 315
Trailer tow hitch ............................. 316
Climate control
Control panel for dual-zone auto-
matic climate control ..................... 123
Controlling automatically ............... 125
Cooling with air dehumidification .. 125
Cooling with air dehumidification
(multimedia system) ...................... 273
Defrosting the windows ................. 127
Defrosting the windshield .............. 126
ECO start/stop function ................ 124
General notes ................................ 123
Indicator lamp ................................ 125
Ionization ....................................... 129
Ionization (multimedia system) ...... 273
Notes on using the automatic cli-
mate control .................................. 124
Overview ........................................ 272
Overview of systems ...................... 123
Perfume atomizer .......................... 128
P e rfume atomizer (multimedia
system) .......................................... 272 Index 7
Page 27 of 374
Rear window wiper ........................ 12 0
Replacin g th e wiper blade s ............ 120
Switching on/off ........................... 119
Winter driving
Important safety notes .................. 338
Slippery road surfaces ................... 161
Snow chains .................................. 338
Winter operation
Radiator cover ............................... 307
Summer tires ................................. 338
Winter tires
M+S tires ....................................... 338
Wiper blades
Cleaning ......................................... 315
Important safety notes .................. 120
Replacing ....................................... 120
Replacing (rear window) ................ 121
Replacing (windshield) ................... 120
Without changing gears
Display message ............................ 253
Wooden trim (cleaning instruc-
tions) .................................................. 317
Workshop
see Qualified specialist workshop Index 25
Page 314 of 374
To avoid damage to the vehicle, deactivate
DISTRONIC PLUS and the HOLD function in
the following or similar situations: R
when towing the vehicle R
in the car wash
! Never clean your vehicle in a Touchless
Automatic Car Wash as these use special
cleaning agents. These cleaning agents can
damage the paintwork or plastic parts.
! Make sure that: R
the side windows and sliding sunroof are
closed completely R
the blower is switched off R
the windshield wiper switch is in position 0R
the 360° camera or the rear view camera is
deactivated
The vehicle may otherwise be damaged.
! If the SmartKey is within the rear detection
range of KEYLESS-GO, the following situa-
tions, for example, could lead to the uninten-
tional opening of the tailgate: R
using a car wash R
using a power washer
Make sure that the SmartKey is at least 3 m
away from the vehicle.
! If the SmartKey is within the rear detection
range of KEYLESS-GO, the following situa-
tions, for example, could lead to the uninten-
tional opening of the tailgate: R
using a car wash R
using a power washer
Make sure that the SmartKey is at least 10 ft
(3 m) away from the vehicle.
! Make sure that the automatic transmission
is in neutral position �\\ when washing your
vehicle in a tow-through car wash. The vehicle
may otherwise be damaged. R
Operating with the SmartKey:
Do not remove the SmartKey from the igni-
tion lock. Do not open the driver's door
when the engine is switched off or at very
low speeds. Otherwise, when in transmis-
sion position �[ or �^ , the automatic
transmission will automatically switch to
park position �] and block the wheels.R
Operating with the Start/Stop button:
Do not open the driver's door when the
engine is switched off or at very low speeds. Otherwise, when in transmission
position �[ or �^ , the automatic transmis-
sion will automatically switch to park posi-
tion �] and block the wheels.
Observe the following to make sure that the
automatic transmission stays in neutral position
�\\ :
Operating with the SmartKey and Start/Stop
button: X
Make sure that the ignition is switched on. X
Make sure that the vehicle is stationary. X
Depress and hold the brake pedal.
Operating with the Start/Stop button only: X
Engage park position �] .X
Release the brake pedal. X
Remove Start/Stop button from ignition lock
( Y
page 133). X
Insert the SmartKey into the ignition lock. X
Switch on the ignition. X
Depress and hold the brake pedal.
Operating with the SmartKey and Start/Stop
button: X
Shift to neutral �\\ .X
Release the brake pedal. X
Release the electric parking brake, if neces-
sary. X
Switch off the ignition and leave the SmartKey
in the ignition lock.
You can wash the vehicle in an automatic car
wash from the very start.
If the vehicle is very dirty, pre-wash it before
cleaning it in an automatic car wash.
After using an automatic car wash, wipe off wax
from the windshield and the wiper blades. This
will prevent smears and reduce wiping noises
caused by residue on the windshield.
Washing by hand In some countries, washing by hand is only
allowed at specially equipped washing bays.
Observe the legal requirements in each country. X
Do not use hot water and do not wash the
vehicle in direct sunlight. X
Use a soft sponge to clean. X
Use a mild cleaning agent, such as a car
shampoo approved by Mercedes-Benz.312
Care
Maintenance and care
Page 316 of 374
If water no longer forms "beads" on the paint
surface, use the paint care products recommen-
ded and approved by Mercedes-Benz. This is the
case approximately every three to five months,
depending on the climate conditions and the
care product used.
The cleaning product Paint Cleaner, which has
been recommended and approved by
Mercedes-Benz, should be used when dirt has
penetrated the paint surface.
Also use Paint Cleaner on paint that has become
dull.
Do not use these care products in the sun or on
the hood while the hood is hot. X
Use a suitable touch-up stick, e.g. MB Touch-
Up Stick, to repair slight damage to the paint-
work quickly and provisionally.
Matte finish care
! Never polish the vehicle or the light alloy
wheels. Polishing causes the finish to shine.
! The following may cause the paint to
become shiny and thus reduce the matte
effect: R
strong rubbing of the paintwork with
unsuitable materials R
frequent use of automatic car washes R
washing the vehicle in direct sunlight
! Never use paint cleaner, buffing or polishing
products, or gloss preserver, e.g. wax, for the
purpose of paintwork care. These products
are only suitable for high-gloss surfaces. Their
use on vehicles with matte paintwork leads to
considerable surface damage or, more spe-
cifically, to shiny, spotted areas.
Always have paintwork repairs carried out at a
qualified specialist workshop.
! Do not use wash programs with a hot wax
treatment under any circumstances.
Observe these notes if your vehicle has a clear
matte finish. This will help you to avoid damage
to the paintwork due to incorrect treatment.
These notes also apply to light alloy wheels with
a clear matte finish.
The vehicle should preferably be washed by
hand using a soft sponge, car shampoo and
plenty of water. Use only insect remover and car shampoo from
the range of approved Mercedes-Benz care
products.
Cleaning the vehicle parts
Cleaning the wheels
G WARNING
The water jet from a circular jet nozzle (dirt
blasters) can cause invisible exterior damage
to the tires or chassis components. Compo-
nents damaged in this way may fail unexpect-
edly. There is a risk of an accident.
Do not use power washers with circular jet
nozzles to clean the vehicle. Have damaged
tires or chassis components replaced imme-
diately.
! Do not use acidic wheel cleaning products
to remove brake dust. This could damage
wheel bolts and brake components.
! Do not park your vehicle for a long period of
time directly after cleaning, particularly after
cleaning the wheel rim with wheel cleaner.
Wheel cleaner can lead to the increased cor-
rosion of the brake discs and pads. Therefore,
drive for a few minutes after cleaning. By
heating up the brakes, the brake discs and
pads dry. The vehicle can then be parked for a
long period of time.
Cleaning the windows
G WARNING
You could become trapped by the windshield
wipers if they start moving while cleaning the
windshield or wiper blades. There is a risk of
injury.
Always switch off the windshield wipers and
the ignition before cleaning the windshield or
wiper blades.
! Do not use dry cloths, abrasive products,
solvents or cleaning agents containing sol-
vents to clean the inside of the windows. Do
not touch the insides of the windows with
hard objects, e.g. an ice scraper or ring. There
is otherwise a risk of damaging the windows.314
Care
Maintenance and care
Page 317 of 374
! Clean the water drainage channels of the
windshield and the rear window at regular
intervals. Deposits such as leaves, petals and
pollen may under certain circumstances pre-
vent water from draining away. This can lead
to corrosion damage and damage to elec-
tronic components. X
Clean the inside and outside of the windows
with a damp cloth and a cleaning product that
is recommended and approved by Mercedes-
Benz.
Cleaning wiper blades
G WARNING
You could become trapped by the windshield
wipers if they start moving while cleaning the
windshield or wiper blades. There is a risk of
injury.
Always switch off the windshield wipers and
the ignition before cleaning the windshield or
wiper blades.
! Do not pull the wiper blade. Otherwise, the
wiper blade could be damaged.
! Do not clean wiper blades too often and do
not rub them too hard. Otherwise, the graph-
ite coating could be damaged. This could
cause wiper noise.
! Hold the wiper arm securely when folding
back. The windshield could be damaged if the
wiper arm smacks against it suddenly. X
Fold the windshield wiper arms away from the
windshield ( Y
page 120).X
Carefully clean the wiper blades with a damp
cloth. X
Fold the windshield wiper arms back again
before switching on the ignition.
Cleaning the exterior lighting
! Only use cleaning agents or cleaning cloths
which are suitable for plastic light lenses.
Unsuitable cleaning agents or cleaning cloths
could scratch or damage the plastic light len-
ses. X
Clean the plastic lenses of the exterior light-
ing using a wet sponge and a mild cleaning
agent, e.g. Mercedes-Benz car shampoo or
cleaning cloths. Cleaning the mirror turn signals
! Only use cleaning agents or cleaning cloths
that are suitable for plastic lenses. Unsuitable
cleaning agents or cleaning cloths could
scratch or damage the plastic lenses of the
mirror turn signals. X
Clean the plastic lenses of the mirror turn sig-
nals in the exterior mirror housing using a wet
sponge and mild cleaning agent, e.g.
Mercedes-Benz car shampoo or cleaning
cloths.
Cleaning the side running board
! Do not clean the aluminum inserts of the
side running board with alkaline or acidic
cleaners, such as wheel cleaner. Do not use
acidic wheel cleaners to remove brake dust.
The aluminum inserts could otherwise be
damaged.
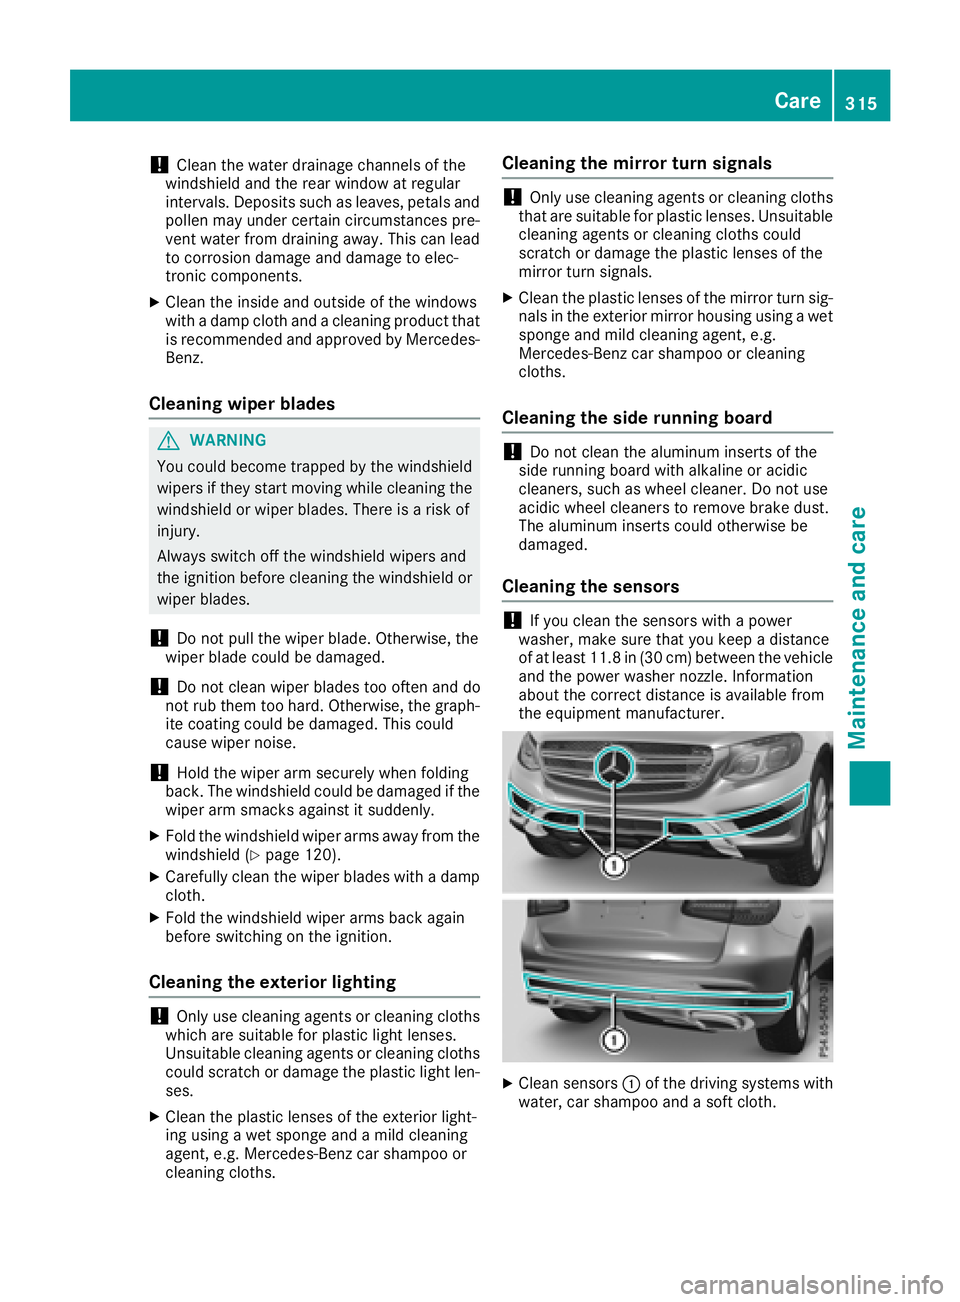
Cleaning the sensors
! If you clean the sensors with a power
washer, make sure that you keep a distance
of at least 11.8 in (30 cm) between the vehicle
and the power washer nozzle. Information
about the correct distance is available from
the equipment manufacturer.
X
Clean sensors �C of the driving systems with
water, car shampoo and a soft cloth. Care 315
Maintenance and care Z