transmission oil MERCEDES-BENZ GLC 2018 Owners Manual
[x] Cancel search | Manufacturer: MERCEDES-BENZ, Model Year: 2018, Model line: GLC, Model: MERCEDES-BENZ GLC 2018Pages: 390, PDF Size: 9.04 MB
Page 7 of 390
Air suspension
see AIR BODY CONTROL
Air vents
Im portant safety notes .................. 133
Rear .............................................. .1 34
Setting .......................................... .1 33
Setting the center air vents ........... 134
Setting the side air vents .............. .1 34
Air-conditioning system
see Climate control
Airbag
Warning lamp ................................. 274
Alarm
ATA (Anti-Theft Alarm system) ......... 77
Switching off (ATA) .......................... 77
Switching the function on/off
(ATA) ................................................ 77
Alarm system
see ATA (Anti-Theft Alarm system)
All-wheel drive
see 4MATIC (permanent four-
wheel drive)
AMG
Switchable performance exhaust
system .......................................... .1 42
AMG menu (on-board computer) ..... 235
Anti-lock braking system
see ABS (Anti-lock Braking System)
Anti-Theft Alarm system
see ATA (Anti-Theft Alarm system)
AppCode
see QR code
Approach/departure angle .............. 168
Armrest
Stowage compartment .................. 291
Ashtray ............................................... 304
Assistance display (on-board com-
puter) ................................................. .2 31
Assistance menu (on-board com-
puter) ................................................. .2 32
ASSYST PLUS
Displaying a service message ....... .3 23
Driving abroad ............................... 323
Hiding a service message .............. 323
Resetting the service interval dis-
play ................................................ 323
Service message ............................ 322 Special service requirements ......... 323
ATA (Anti-Theft Alarm system)
Activating/deactivating ................... 77
Function .......................................... .7 7
Switching off the alarm .................... 77
ATTENTION ASSIST
Activating/deactiva ting ................. 233
Disp lay message ............................ 256
Displaying level .............................. 204
Function/notes ............................. 203
Authorized Mercedes-Benz Center
see Qualified specialist workshop
Authorized workshop
see Qualified specialist workshop
AUTO lights
Display message ............................ 251
see Lights
Automatic car wash (care) ............... 324
Automatic engine start (ECO start/
stop function) .................................... 141
Automatic engine switch-off (ECO
start/stop function) .......................... 141
Automatic headlamp mode .............. 112
Automatic transmission
Accelerator pedal position ............. 149
Changing gear ............................... 149
DIRECT SELECT lever ..................... 146
Display message ............................ 264
Double-clutch function .................. 149
Drive program ................................ 150
Drive program display .................... 148
Driving tips .................................... 149
DYNAMIC SELECT switch .............. 144
Emergency running mode .............. 155
Engaging drive position .................. 147
Engaging neutral ............................ 147
Engaging park position automati-
cally ............................................... 147
Engaging reverse gear ................... 147
Engaging the park position ............ 146
Gearshift recommendation ............ 154
Gliding mode ................................. 149
Kickdown ....................................... 149
Manual shifting .............................. 152
Oil temperature (on-board com-
puter, Mercedes-AMG vehicles) ..... 235
Overview ........................................ 146
Permanent setting ......................... 152 Index 5
Page 24 of 390
Telephone
Accepting a call (multifunction
steering wheel) .............................. 230
Authorizing a mobile phone (con-
necting) ......................................... 288
Connecting a mobile phone
(device manager) ........................... 287
Display message ............................ 267
Introduction ................................... 230
Menu (on-board computer) ............ 230
Number from the phone book ........ 230
Redialing ........................................ 231
Rejecting/ending a call ................. 230
see also Digital Operator's Man-
ual .................................................. 280
see Mobile phone
Temperature
Coolant (display in the instrument
cluster) .......................................... 221
Engine oil (on-board computer,
Mercedes-AMG vehicles) ............... 235
Outside temperature ...................... 221
Setting (climate control) ................ 128
Transmission oil (on-board com-
puter, Mercedes-AMG vehicles) ..... 235
Timing (RACETIMER) ......................... 237
Tire pressure
Calling up (on-board computer) ..... 356
Checking manually ........................ 355
Display message ............................ 262
Maximum ....................................... 355
Not reached (TIREFIT) .................... 337
Notes ............................................. 353
Reached (TIREFIT) .......................... 337
Recommended ............................... 352
Using the TIREFIT kit ...................... 336
Tire pressure loss warning system
General notes ................................ 355
Important safety notes .................. 355
Restarting ...................................... 356
Tire pressure monitor
Checking the tire pressure elec-
tronically ........................................ 358
Function/notes ............................. 356
General notes ................................ 356
Important safety notes .................. 357
Radio type approval for the tire
pressure monitor ........................... 359 Restarting ...................................... 358
Warning lamp ................................. 278
Warning message .......................... 358
Tire pres sure s ensors
Di splay message ............................ 263
Tire-change tool kit ........................... 333
TIREFIT kit
Important safety notes .................. 335
Storage location ............................ 333
Tire pressure not reached .............. 337
Tire pressure reached .................... 337
Using ............................................. 336
Tires
Aspect ratio (definition) ................. 368
Average weight of the vehicle
occupants (definition) .................... 367
Bar (definition) ............................... 367
Changing a wheel .......................... 369
Characteristics .............................. 367
Checking ........................................ 349
Curb weight (definition) ................. 368
Definition of terms ......................... 367
Direction of rotation ...................... 369
Display message ............................ 262
Distribution of the vehicle occu-
pants (definition) ............................ 369
DOT (Department of Transporta-
tion) (definition) ............................. 367
DOT, Tire Identification Number
(TIN) ............................................... 366
GAWR (Gross Axle Weight Rating)
(definition) ..................................... 367
GVW (Gross Vehicle Weight) (def-
inition) ........................................... 368
GVWR (Gross Vehicle Weight Rat-
ing) (definition) .............................. 368
Important safety notes .................. 349
Increased vehicle weight due to
optional equipment (definition) ...... 367
Information on driving .................... 349
Kilopascal (kPa) (definition) ........... 368
Labeling (overview) ........................ 364
Load bearing index (definition) ...... 369
Load index ..................................... 366
Load index (definition) ................... 368
Maximum load on a tire (defini-
tion) ............................................... 36822
Index
Page 26 of 390
Instrument cluster display ............ .2 05
Trailer coupling
see Towing a trailer
Trailer loads and drawbar nose-
weights ............................................... 218
Trailer towing
Active Lane Keeping Assist ............ 214
Blind Spot Assist ............................ 207
Permissible trailer loads and
drawbar noseweights ..................... 218
Transfer case ..................................... 155
Transmission
Display message ............................ 265
see Automatic transmission
Transmission oil
Temperature (on-board computer,
Mercedes-AMG vehicles) .............. .2 35
Transmission position display ......... 148
Transporting the vehicle .................. 346
Traveling uphill
Brow of hill ..................................... 168
Driving downhill ............................ .1 68
Maximum gradient-climbing capa-
bility ............................................... 168
Trim pieces (cleaning instruc-
tions) ................................................. .3 30
Trip computer (on-board com-
puter) ................................................. .2 25
Trip odometer
Calling up ....................................... 224
Resetting (on-board computer) ...... 226
Trunk
see Cargo compartment
Turn signals
Display message ............................ 251
Replacing bulbs (front) ................... 118
Switching on/off ........................... 113
Two-way radio
Frequencies ................................... 375
Installation ..................................... 375
Transmission output (maximum) .... 375
Type identification plate
see Vehicle identification plate
U
Unlocking
Emergency unlocking ....................... 85 From inside the vehicle (central
unlocking button) ............................. 84
USB devices
Connecting to the Media Inter-
face ............................................... 289
V Vanity mirror (in the sun visor) ........ 303
Vehicle
Correct use ...................................... 32
Data acquisition ............................... 33
Display message ............................ 264
Electronics ..................................... 375
Equipment ....................................... 29
Individual settings .......................... 231
Limited Warranty ............................. 33
Loading .......................................... 359
Locking (in an emergency) ............... 85
Locking (SmartKey) .......................... 78
Lowering ........................................ 373
Maintenance .................................... 30
Operating safety .............................. 31
Operation outside the USA/
Canada ............................................ 30
Parking .......................................... 158
Parking for a long period ................ 160
Pulling away ................................... 139
Raising ........................................... 370
Reporting problems ......................... 32
Securing from rolling away ............ 370
Technical data ............................... 375
Towing away .................................. 343
Transporting .................................. 346
Unlocking (in an emergency) ........... 85
Unlocking (SmartKey) ...................... 78
Vehicle data ................................... 382
Vehicle data
Dimensions .................................... 382
Vehicle data (off-road driving)
Approach/departure angle ............ 384
Maximum gradient climbing abil-
ity .................................................. 384
Maximum water depth ................... 383
Vehicle emergency locking ................ 85
Vehicle identification number
see VIN
Vehicle identification plate .............. 37624
Index
Page 80 of 390
SmartKey
Important safety notes
G WARNING
If children are left unsupervised in the vehicle,
they could: R
open the doors, thus endangering other
people or road users. R
get out and disrupt traffic. R
operate the vehicle's equipment.
Additionally, children could set the vehicle in
motion if, for example, they: R
release the parking brake. R
shifting the automatic transmission out of
park position PR
Start the engine.
There is a risk of an accident and injury.
When leaving the vehicle, always take the
SmartKey with you and lock the vehicle. Never
leave children or animals unattended in the
vehicle. Always keep the SmartKey out of
reach of children.
G WARNING
If you attach heavy or large objects to the
SmartKey, the SmartKey could be uninten-
tionally turned in the ignition lock. This could
cause the engine to be switched off. There is a
risk of an accident.
Do not attach any heavy or large objects to the
SmartKey. Remove any bulky key rings before
inserting the SmartKey into the ignition lock.
! Keep the SmartKey away from strong mag-
netic fields. Otherwise, the remote control
function could be affected.
Strong magnetic fields can occur in the vicin-
ity of powerful electrical installations.
Do not keep the SmartKey: R
with electronic devices, e.g. a mobile phone
or another SmartKey. R
with metallic objects, e.g. coins or metal foil. R
inside metallic objects, e.g. a metal case.
This can affect the functionality of the Smart-
Key. Vehicles with KEYLESS-GO start function: do
not keep the SmartKey in the cargo compart-
ment. Otherwise, the SmartKey may not be
detected, e.g. when starting the engine using
the Start/Stop button.
A brief radio connection between the vehicle
and the SmartKey determines whether a valid
SmartKey is in, or in the direct vicinity of, the
vehicle. This occurs, for example: R
when starting the engine R
while driving R
when using HANDS-FREE ACCESS R
when the external door handles are touched R
during convenience closing
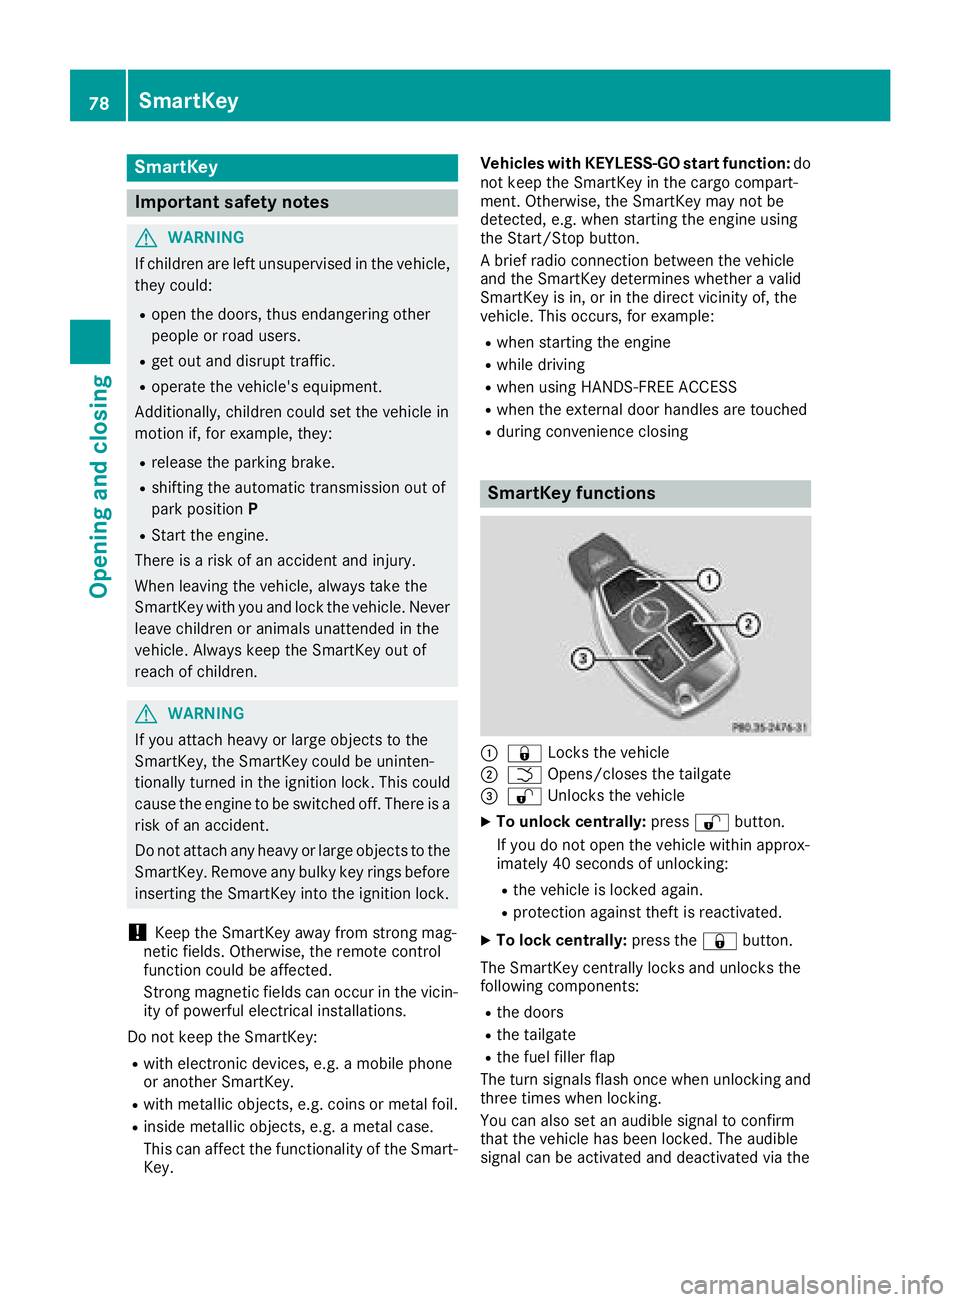
SmartKey functions
C
7 Locks the vehicleD
T Opens/closes the tailgate
Page 138 of 390
G WARNING
If you switch off the ignition while driving,
safety-relevant functions are only available
with limitations, or not at all. This could affect,
for example, the power steering and the brake
boosting effect. You will require considerably
more effort to steer and brake. There is a risk
of an accident.
Do not switch off the ignition while driving.
G WARNING
If the parking brake has not been fully
released when driving, the parking brake can: R
overheat and cause a fire R
lose its hold function.
There is a risk of fire and an accident. Release
the parking brake fully before driving off.
! Do not warm up the engine while stationary.
Pull away immediately. Avoid high engine
speeds and full throttle until the engine has
reached its operating temperature.
In vehicles with automatic transmission,
engage positions P and R only when the vehi-
cle is stationary.
Where possible, avoid spinning the drive
wheels when pulling away on slippery roads.
You could otherwise damage the drive train.
! Mercedes-AMG vehicles: at low engine oil
temperatures below 68 ‡ (+20 †), the max-
imum engine speed is restricted in order to
protect the engine. To protect the engine and
maintain smooth engine operation, avoid driv-
ing at full throttle when the engine is cold.
Hybrid vehicles: be sure to observe the notes
in the Supplement. Otherwise, you may not rec-
ognize dangers. Key positions
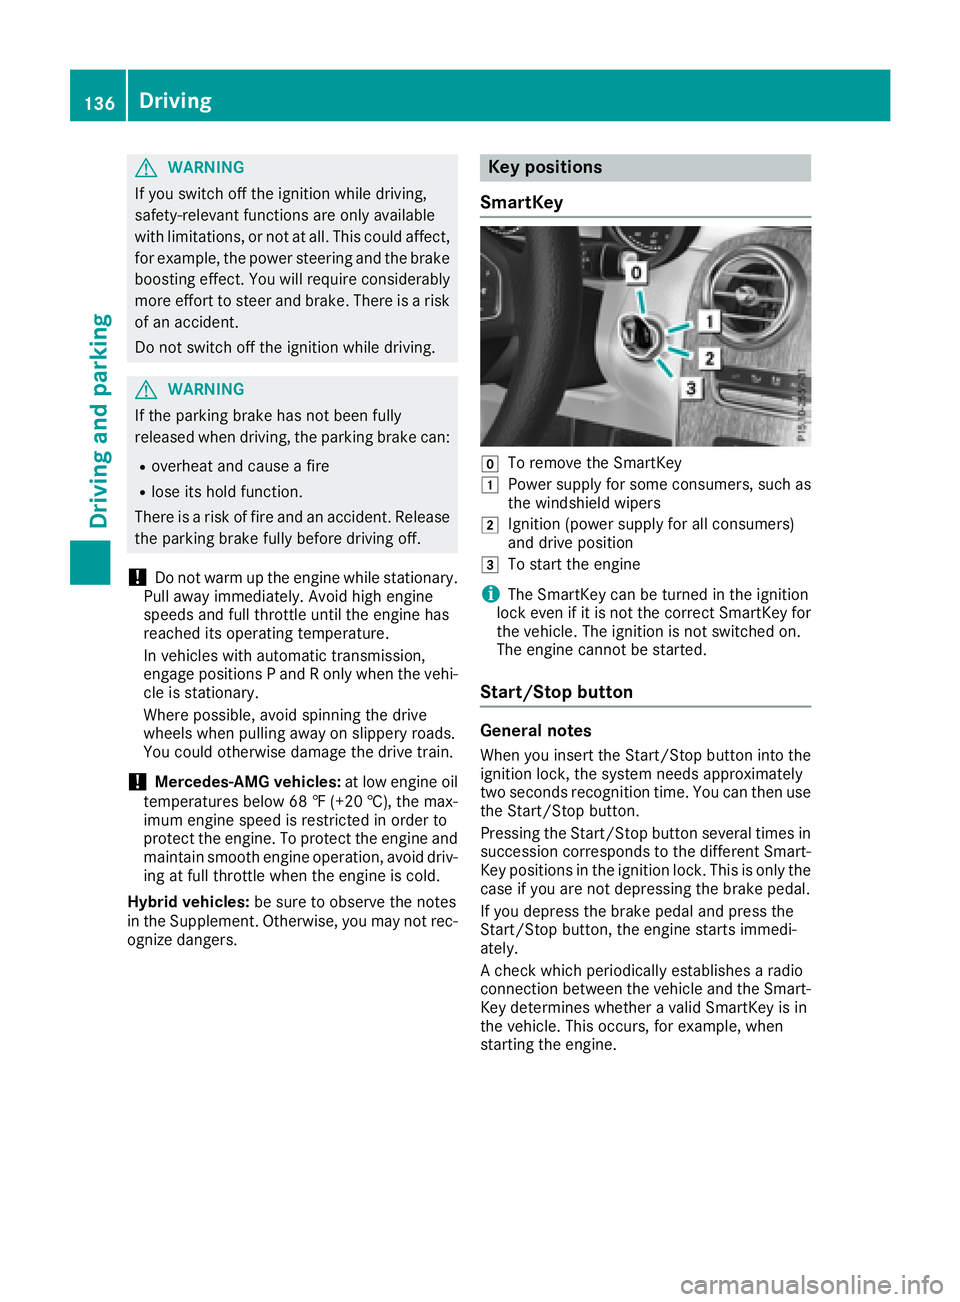
SmartKey
Z
To remove the SmartKey G
Power supply for some consumers, such as
the windshield wipers H
Ignition (power supply for all consumers)
and drive position I
To start the engine
i The SmartKey can be turned in the ignition
lock even if it is not the correct SmartKey for
the vehicle. The ignition is not switched on.
The engine cannot be started.
Start/Stop button
General notes When you insert the Start/Stop button into the
ignition lock, the system needs approximately
two seconds recognition time. You can then use
the Start/Stop button.
Pressing the Start/Stop button several times in
succession corresponds to the different Smart-
Key positions in the ignition lock. This is only the
case if you are not depressing the brake pedal.
If you depress the brake pedal and press the
Start/Stop button, the engine starts immedi-
ately.
A check which periodically establishes a radio
connection between the vehicle and the Smart-
Key determines whether a valid SmartKey is in
the vehicle. This occurs, for example, when
starting the engine.136
Driving
Driving and parking
Page 139 of 390
To start the vehicle without actively using the
SmartKey: R
the Start/Stop button must be inserted in the
ignition lock. R
the SmartKey must be in the vehicle. R
the vehicle must not be locked with the
SmartKey or KEYLESS-GO. ( Y
page 79)
Do not keep the SmartKey: R
with electronic devices, e.g. a mobile phone
or another SmartKey. R
with metallic objects, e.g. coins or metal foil. R
inside metallic objects, e.g. a metal case.
This can affect the functionality of the Smart-
Key.
If you lock the vehicle with the SmartKey remote
control or with KEYLESS-GO, after a short time: R
you will not be able to switch on the ignition
with the Start/Stop button. R
you will no longer be able to start the engine
with the Start/Stop button until the vehicle is
unlocked again.
If you lock the vehicle centrally using the button
on the front door ( Y
page 84), you can continue
to start the engine with the Start/Stop button.
The engine can be switched off while the vehicle
is in motion by pressing and holding the Start/
Stop button for three seconds. This function
operates independently of the ECO start/stop
automatic engine switch-off function.
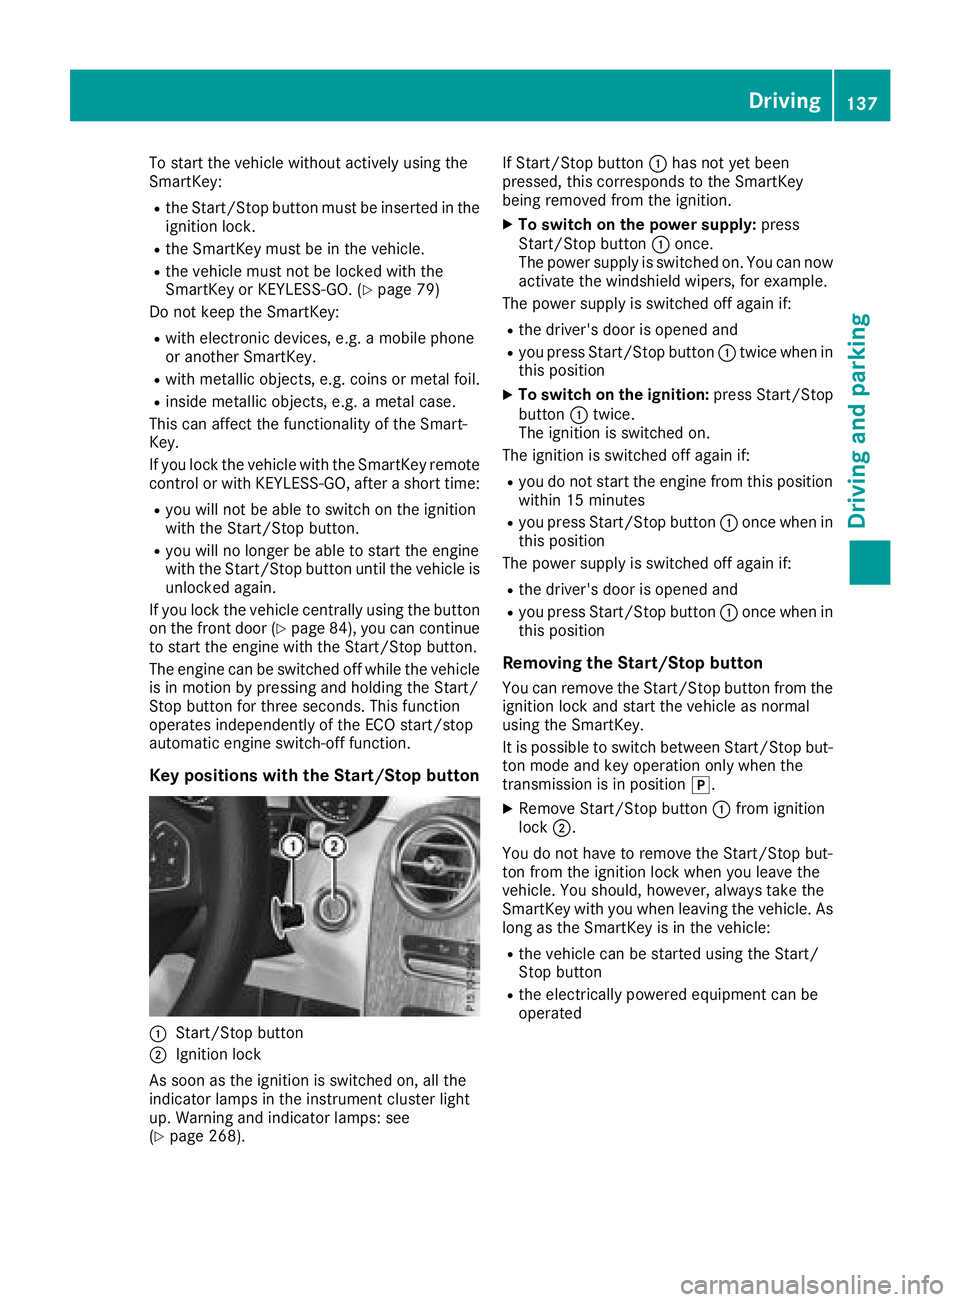
Key positions with the Start/Stop button
C
Start/Stop button
D
Ignition lock
As soon as the ignition is switched on, all the
indicator lamps in the instrument cluster light
up. Warning and indicator lamps: see
( Y
page 268). If Start/Stop button C has not yet been
pressed, this corresponds to the SmartKey
being removed from the ignition. X
To switch on the power supply: press
Start/Stop button C once.
The power supply is switched on. You can now
activate the windshield wipers, for example.
The power supply is switched off again if: R
the driver's door is opened and R
you press Start/Stop button C twice when in
this position X
To switch on the ignition: press Start/Stop
button C twice.
The ignition is switched on.
The ignition is switched off again if: R
you do not start the engine from this position
within 15 minutes R
you press Start/Stop button C once when in
this position
The power supply is switched off again if: R
the driver's door is opened and R
you press Start/Stop button C once when in
this position
Removing the Start/Stop button You can remove the Start/Stop button from the
ignition lock and start the vehicle as normal
using the SmartKey.
It is possible to switch between Start/Stop but-
ton mode and key operation only when the
transmission is in position ] .X
Remove Start/Stop button C from ignition
lock D .
You do not have to remove the Start/Stop but-
ton from the ignition lock when you leave the
vehicle. You should, however, always take the
SmartKey with you when leaving the vehicle. As
long as the SmartKey is in the vehicle: R
the vehicle can be started using the Start/
Stop button R
the electrically powered equipment can be
operated Driving 137
Driving and parking Z
Page 157 of 390
Problems with the transmission Problem
Possible causes/consequences and P Solutions
The transmission has
problems shifting gear. The transmission is losing oil. X
Have the transmission checked at a qualified specialist workshop
immediately.
The acceleration ability
is deteriorating.
The transmission no lon-
ger changes gear. The transmission is in emergency mode.
It is possible to shift to a gear and reverse gear only. X
Stop the vehicle. X
Shift the transmission to position ] .X
Switch off the engine. X
Wait at least ten seconds before restarting the engine. X
Shift the transmission to position [ or ^ .
If [ is selected, the transmission only shifts to one gear; if ^ is
selected, the transmission shifts to reverse gear. X
Have the transmission checked at a qualified specialist workshop
immediately.
Transfer case This section is only valid for vehicles with 4-
wheel drive (4MATIC). Power is always trans-
mitted to both axles.
! Performance tests may only be carried out
on a 2-axle dynamometer. The brake system
or transfer case could otherwise be damaged.
Contact a qualified specialist workshop for a
performance test.
! Since ESP ®
engages automatically, the igni-
tion must be switched off (the SmartKey or
Start/Stop button must be in position Z or
G ) if R
the electrical parking brake is being tested
using a dynamometer R
the vehicle is being towed with only one
axle raised (not permitted for vehicles with
4MATIC)
Otherwise, the brake system can be dam-
aged.
! Vehicles with 4MATIC must not be towed
with either the front or the rear axle raised, as
doing so will damage the transmission. Refueling
Important safety notes
G WARNING
Fuel is highly flammable. If you handle fuel
incorrectly, there is a risk of fire and explo-
sion.
You must avoid fire, open flames, creating
sparks and smoking. Switch off the engine
and, if applicable, the auxiliary heating before
refueling.
G WARNING
Fuel is poisonous and hazardous to health.
There is a risk of injury.
You must make sure that fuel does not come
into contact with your skin, eyes or clothing
and that it is not swallowed. Do not inhale fuel
vapors. Keep fuel away from children.
If you or others come into contact with fuel,
observe the following: R
Wash away fuel from skin immediately
using soap and water. R
If fuel comes into contact with your eyes,
immediately rinse them thoroughly with Refueling 155
Driving and parking Z
Page 168 of 390
flammable material. Contact a qualified spe-
cialist workshop immediately if damage is
detected.
! There is a risk of damage to the vehicle if: R
the vehicle becomes stuck, e.g. on a high
curb or an unpaved road R
you drive too fast over an obstacle, e.g. a
curb, a speed bump or a pothole in the road R
a heavy object strikes the underbody or
parts of the chassis
In situations like this, the body, the under-
body, chassis parts, wheels or tires could be
damaged without the damage being visible.
Components damaged in this way can unex-
pectedly fail or, in the case of an accident, no
longer withstand the loads they are designed
to.
If the underbody paneling is damaged, com-
bustible materials such as leaves, grass or
twigs can gather between the underbody and
the underbody paneling. If these materials
come in contact with hot parts of the exhaust
system, they can catch fire.
In such situations, have the vehicle checked
and repaired immediately at a qualified spe-
cialist workshop. If on continuing your jour-
ney you notice that driving safety is impaired,
pull over and stop the vehicle immediately,
paying attention to road and traffic condi-
tions. In such cases, consult a qualified spe-
cialist workshop.
The vehicle is only designed for easily negotiable
off-road terrain and poor road surfaces.
When driving off-road, substances such as sand,
mud and water or water mixed with oil may get
into the brakes. This could result in a reduced
braking effect or in total brake failure and also in
increased wear and tear. The braking charac-
teristics change depending on the material
entering the brakes. Clean the brakes after driv-
ing off-road. If you detect a reduced braking
effect or gri nding
noises, have the brake system
checked in a qualified specialist workshop as
soon as possible. Adapt your driving style to the
different braking characteristics.
Driving off-road increases the likelihood of dam-
age to the vehicle, which, in turn, can lead to
failure of the mechanical assembly or systems.
Adapt your driving style to suit the terrain con-
ditions. Drive carefully. Have damage to the vehicle rectified immediately at a qualified spe-
cialist workshop.
Do not shift into transmission position \\ when
driving off-road. You could lose control of the
vehicle if you attempt to brake the vehicle using
the service brake. If the gradient is too steep for
your vehicle, drive back down in reverse gear.
General notes
H Environmental note
Protection of the environment is of primary
importance. Treat nature with respect.
Observe all prohibiting signs.
Read this section carefully before driving your
vehicle off-road.
Off-road driving is only possible with the Off-
Road Engineering package ( Y
page 181).
The following driving systems are specially
adapted for driving over easily negotiable off-
road terrain: R
Off-road program ( Y
page 181)R
Off-road 4ETS ( Y
page 70)R
Off-road ESP ®
( Y
page 72)R
DSR (Downhill Speed Regulation)
( Y
page 180)
Observe the following notes: R
Stop the vehicle before starting to drive along
an off-road route. If necessary, activate the
off-road program ( Y
page 181).R
To avoid damaging the vehicle, make sure
there is always sufficient ground clearance. R
Check that items of luggage and loads are
stowed safely and are well secured
( Y
page 295). R
Always keep the engine running and in gear
when driving on a downhill gradient. Activate
DSR ( Y
page 180). R
Drive slowly and evenly, if necessary at a
walking pace. R
Ensure that the wheels are in contact with the
ground at all times. R
Drive with extreme care on unfamiliar off-road
routes where visibility is poor. For safety rea-
sons, get out of the vehicle first and survey
the off-road route. R
Check the depth of water before fording rivers
and streams. R
Watch out for obstacles.166
Driving tips
Driving and parking
Page 327 of 390
Do not open the driver's door when the
engine is switched off or at very low
speeds. Otherwise, when in transmission
position [ or ^ , the automatic transmis-
sion will automatically switch to park posi-
tion ] and block the wheels.
Observe the following to make sure that the
automatic transmission stays in neutral \\ :
Operating with the SmartKey and Start/Stop
button: X
Make sure that the ignition is switched on. X
Make sure that the vehicle is stationary. X
Depress and hold the brake pedal.
Operating with the Start/Stop button only: X
Engage park position ] .X
Release the brake pedal. X
Remove the Start/Stop button from ignition
lock ( Y
page 137).X
Insert the SmartKey into the ignition lock. X
Switch on the ignition. X
Depress and hold the brake pedal.
Operating with the SmartKey and Start/Stop
button: X
Shift to neutral \\ .X
Release the brake pedal. X
Release the electric parking brake, if neces-
sary. X
Switch off the ignition and leave the SmartKey
in the ignition lock.
You can wash the vehicle in an automatic car
wash from the very start.
If the vehicle is very dirty, pre-wash it before
cleaning it in an automatic car wash.
After using an auto matic car wash, wipe off wax
from
the windshield and the wiper blades. This
will prevent smears and reduce wiping noises
caused by residue on the windshield.
Washing by hand
In some countries, washing by hand is only
allowed at specially equipped washing bays.
Observe the legal requirements in each country. X
Do not use hot water and do not wash the
vehicle in direct sunlight. X
Use a soft sponge to clean. X
Use a mild cleaning agent, such as a car
shampoo approved by Mercedes-Benz. X
Thoroughly hose down the vehicle with a gen-
tle jet of water. X
Do not point the water jet directly towards the
air inlet. X
Use plenty of water and rinse out the sponge
frequently. X
Rinse the vehicle with clean water and dry
thoroughly with a chamois. X
Do not let the cleaning agent dry on the paint-
work.
Carefully remove all deposits of road salt as
soon as possible when driving in winter.
Power washers
G WARNING
The water jet from a circular jet nozzle (dirt
blasters) can cause invisible exterior damage
to the tires or chassis components. Compo-
nents damaged in this way may fail unexpect-
edly. There is a risk of an accident.
Do not use power washers with circular jet
nozzles to clean the vehicle. Have damaged
tires or chassis components replaced imme-
diately.
! Always maintain a distance of at least
11.8 in (30 cm) between the vehicle and the
power washer nozzle. Information about the
correct distance is available from the equip-
ment manufacturer.
Move the power washer nozzle around when
cleaning your vehicle.
Do not aim directly at any of the following: R
tires R
door gaps, roof gaps, joints, etc. R
electrical components R
battery R
plug-type couplings R
lights R
seals R
trim R
ventilation slots
Damaged seals or electrical components can
lead to leaks or failures.
! Vehicles with decorative foil: parts of your
vehicle are covered with decorative foil. Main-
tain a distance of at least 27.5 in (70 cm) Care 325
Maintenance and care Z
Page 372 of 390
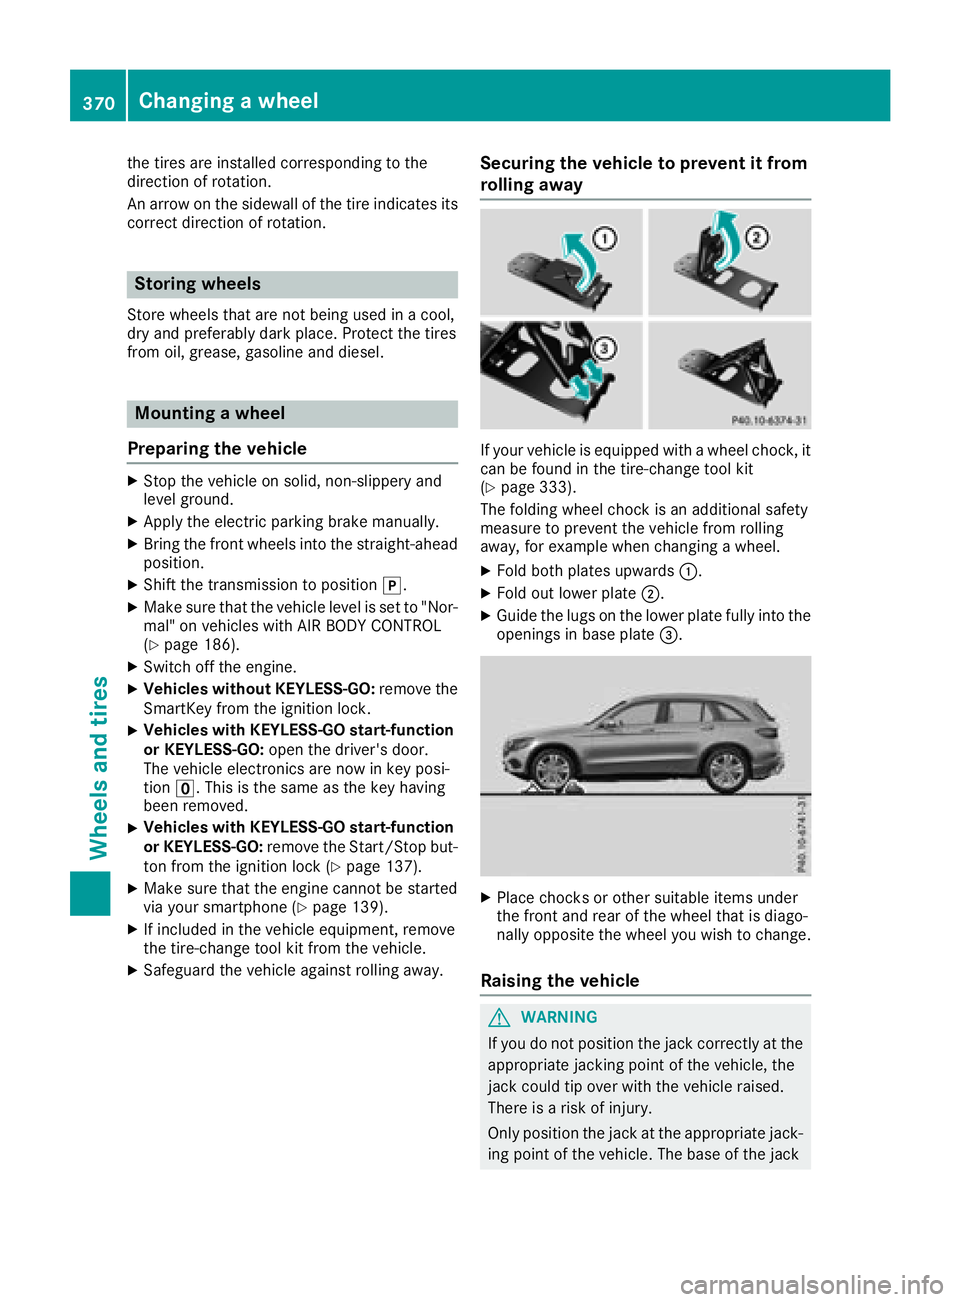
the tires are installed corresponding to the
direction of rotation.
An arrow on the sidewall of the tire indicates its
correct direction of rotation.
Storing wheels Store wheels that are not being used in a cool,
dry and preferably dark place. Protect the tires
from oil, grease, gasoline and diesel.
Mounting a wheel
Preparing the vehicle X
Stop the vehicle on solid, non-slippery and
level ground. X
Apply the electric parking brake manually. X
Bring the front wheels into the straight-ahead
position. X
Shift the transmission to position ] .X
Make sure that the vehicle level is set to "Nor-
mal" on vehicles with AIR BODY CONTROL
( Y
page 186).X
Switch off the engine. X
Vehicles without KEYLESS-GO: remove the
SmartKey from the ignition lock. X
Vehicles with KEYLESS-GO start-function
or KEYLESS-GO: open the driver's door.
The vehicle electronics are now in key posi-
tion