fuel pressure MERCEDES-BENZ GLC 2019 Owners Manual
[x] Cancel search | Manufacturer: MERCEDES-BENZ, Model Year: 2019, Model line: GLC, Model: MERCEDES-BENZ GLC 2019Pages: 370, PDF Size: 19.55 MB
Page 23 of 370
Summer tires
In winter ........................................332
Sun visor............................................ 290
Suspension settings
AIR BODY CONTROL ......................172
Suspension tuning
AMG sports suspension based on
AIR BODY CONTROL ......................174
SETUP (on-board computer,
Mercedes-AMG vehicles) ...............224
Switching air-recirculation mode
on/off................................................. 126
Switching on media mode
Via the device list.......................... 276
T
Tachometer........................................ 209
Tail lamps
Display message ............................ 239
Tailgate
Display message ............................ 254
Emergency unlocking ....................... 89
HANDS-FREE ACCESS ..................... 87
Important safety notes .................... 84
Limiting the opening angle ............... 89
object detection............................... 85
Opening dimensions ...................... 363
Opening/closing (automatically
from inside) ...................................... 88
Opening/closing (automatically
from outside) ................................... 85
Reversing feature ............................. 85
Tank content
Fuel gauge ....................................... 36
Technical data
Capacities ...................................... 358
Drawbar load (maximum) ............... 364
Information .................................... 356
Trailer loads................................... 364
Vehicle data ................................... 363
Telephone
Accepting a call (multifunction
steering wheel) .............................. 218
Authorizing a mobile phone (con-
necting) ......................................... 275
Connecting a mobile phone
(device manager) ........................... 275
Display message ............................ 255
Introduction ................................... 218
Menu (on-board computer) ............ 218
Number from the phone book ........ 218
Redialing ........................................ 219
Rejecting/ending a call ................. 218
see also Digital Operator's Man-
ual .................................................. 268
see Mobile phone
Temperature
Coolant (display in the instrument
cluster) .......................................... 209
Engine oil (on-board computer,
Mercedes-AMG vehicles) ............... 223
Outside temperature ...................... 209
Setting (climate control)................ 123
Transmission oil (on-board com-
puter, Mercedes-AMG vehicles) ..... 223
Timing (RACETIMER)......................... 225
Tire pressure
Calling up (on-board computer) ..... 337
Checking manually ........................ 336
Display message ............................ 250
Maximum ....................................... 336
Not reached (TIREFIT) .................... 318
Notes ............................................. 334
Reached (TIREFIT) .......................... 318
Recommended ............................... 333
Using the TIREFIT kit ...................... 317
Tire pressure loss warning system
General notes ................................ 336
Important safety notes .................. 336
Restarting ...................................... 337
Tire pressure monitor
Checking the tire pressure elec-
tronically ........................................ 339
Function/notes............................. 337
General notes ................................ 337
Important safety notes .................. 338
Radio type approval for the tire
pressure monitor ........................... 340
Restarting ...................................... 339
Warning lamp ................................. 266
Warning message .......................... 339
Tire pressure sensors
Display message ............................ 251
Tire-change tool kit........................... 314
Index21
Page 26 of 370
Data acquisition ............................... 32
Display message ............................ 252
Electronics .....................................356
Equipment ....................................... 28
Individual settings .......................... 219
Limited Warranty .............................32
Loading .......................................... 340
Locking (in an emergency) ............... 84
Locking (SmartKey) .......................... 77
Lowering ........................................ 354
Maintenance .................................... 29
Operating safety .............................. 30
Operation outside the USA/
Canada ............................................ 29
Parking .......................................... 152
Parking for a long period ................ 155
Pulling away................................... 134
Raising ........................................... 351
Reporting problems ......................... 31
Securing from rolling away ............ 351
Technical data ............................... 356
Towing away .................................. 324
Transporting .................................. 326
Unlocking (in an emergency) ........... 84
Unlocking (SmartKey) ...................... 77
Vehicle data ................................... 363
Vehicle data
Dimensions .................................... 363
Vehicle emergency locking................ 84
Vehicle identification number
see VIN
Vehicle identification plate.............. 357
Vehicle level
AIR BODY CONTROL ...................... 173
Display message ............................ 244
Vehicle maintenance
see ASSYST PLUS
Video
Operating the DVD ......................... 217
see also Digital Operator's Man-
ual .................................................. 268
VIN
Seat ............................................... 358
Type plate ...................................... 357
W
Warning and indicator lamps
ABS ................................................ 259
Active Brake Assist ........................ 265
Airbag ............................................ 262
Brakes ........................................... 258
Coolant .......................................... 263
Distance warning ........................... 265
Engine diagnostics ......................... 262
ESP®.............................................. 259
ESP®OFF ....................................... 261
Fuel tank ........................................ 262
General notes ................................ 256
Overview .......................................... 36
Parking brake ................................ 262
PASSENGER AIR BAG ...................... 44
Reserve fuel ................................... 262
Restraint system ............................ 262
Seat belt ........................................ 257
SPORT handling mode ................... 261
Steering ......................................... 267
Tire pressure monitor .................... 266
Warranty.............................................. 28
Washer fluid
Display message ............................ 255
Weather display (COMAND)
see also Digital Operator's Man-
ual .................................................. 268
Wheel and tire combinations
Tires ............................................... 354
Wheel bolt tightening torque........... 354
Wheel chock...................................... 351
Wheels
Changing a wheel.......................... 350
Checking ........................................ 330
Cleaning ......................................... 308
Important safety notes .................. 330
Information on driving .................... 330
Interchanging/changing ................ 350
Mounting a new wheel ................... 353
Mounting a wheel .......................... 351
Removing a wheel.......................... 353
Snow chains .................................. 332
Storing ........................................... 351
Tightening torque ........................... 354
Wheel size/tire size ....................... 354
24Index
Page 29 of 370
Protecting the environment
General notes
HEnvironmental note
Daimler's declared policy is one of compre-
hensive environmental protection.
The objectives are for the natural resources
that form the basis of our existence on this
planet to be used sparingly and in a manner
that takes the requirements of both nature
and humanity into account.
You too can help to protect the environment
by operating your vehicle in an environmen-
tally responsible manner.
Fuel consumption and the rate of engine,
transmission, brake and tire wear are affected
by these factors:
Roperating conditions of your vehicle
Ryour personal driving style
You can influence both factors. You should
bear the following in mind:
Operating conditions:
Ravoid short trips as these increase fuel con-
sumption.
Ralways make sure that the tire pressures
are correct.
Rdo not carry any unnecessary weight.
Rremove roof racks once you no longer need
them.
Ra regularly serviced vehicle will contribute
to environmental protection. You should
therefore adhere to the service intervals.
Ralways have service work carried out at a
qualified specialist workshop.
Personal driving style:
Rdo not depress the accelerator pedal when
starting the engine.
Rdo not warm up the engine when the vehicle
is stationary.
Rdrive carefully and maintain a safe distance
from the vehicle in front.
Ravoid frequent, sudden acceleration and
braking.
Rchange gear in good time and use each gear
only up to�
Page 60 of 370
PRE-SAFE®takes the following measuresdepending on the hazardous situation detected:
Rthe front seat belts are pre-tensioned.
Rif the vehicle skids, the side windows and thesliding sunroof are closed.
Rvehicles with the memory function for thefront-passenger seat: the front-passengerseat is adjusted if it is in an unfavorable posi-tion.
If the hazardous situation passes without result-
ing in an accident, PRE-SAFE®slackens the belt
pre-tensioning. All settings made by PRE-SAFE®
can then be reversed.
If the seat belt pre-tensioning is not reduced:
XMove the seat backrest or seat back slightlywhen the vehicle is stationary.The seat belt pre-tensioning is reduced andthe locking mechanism is released.
The seat-belt adjustment is an integral part of
the PRE-SAFE®convenience function. Informa-tion about the convenience function can befound under "Belt adjustment" (Ypage 47).
PRE-SAFE®PLUS (anticipatory occu-
pant protection system PLUS)
Introduction
PRE-SAFE®PLUS is only available in vehicleswith the Driving Assistance package.
Using the radar sensor system, PRE-SAFE®
PLUS is able to detect that a frontal or rear-endcollision is imminent. In certain hazardous sit-
uations, PRE-SAFE®PLUS takes pre-emptivemeasures to protect the vehicle occupants.
Important safety notes
The intervention of PRE-SAFE®PLUS cannotprevent an imminent collision.
The driver is not warned about the intervention
of PRE-SAFE®PLUS.
PRE-SAFE®PLUS does not intervene:
Rif the vehicle is backing up
Rwhen the vehicle is towing a trailer and thereis a risk of a rear-end collision
When driving, or when parking or exiting a park-ing space using Active Parking Assist, PRE-
SAFE®PLUS will not apply the brakes.
Function
PRE-SAFE®PLUS intervenes in certain situa-tions if the radar sensor system detects animminent frontal or rear-end collision.
PRE-SAFE®PLUS takes the following measuresdepending on the hazardous situation detected:
Rif the radar sensor system detects that ahead-on collision is imminent, the seat beltsare pre-tensioned.
Rif the radar sensor system detects that a rear-end collision is imminent:
-the brake pressure is increased if the driverapplies the brakes when the vehicle is sta-tionary.
-the seat belts are pre-tensioned.
The PRE-SAFE®PLUS braking application is can-celed:
Rif the accelerator pedal is depressed when agear is engaged
Rif the risk of a collision passes or is no longerdetected
Rif Active Distance Assist DISTRONIC indicatesan intention to intervene
If the hazardous situation passes without result-ing in an accident, the original settings arerestored.
Automatic measures after an acci-
dent
Immediately after an accident, the followingmeasures are implemented, depending on thetype and severity of the impact:
Rthe hazard warning lamps are switched on
Rthe emergency lighting is activated
Rthe vehicle doors are unlocked
Rthe front side windows are lowered
Rvehicles with a memory function: the electri-cally adjustable steering wheel is raised whenthe driver's door is opened
Rthe engine is switched off and the fuel supplyis cut off
Rvehicles with mbrace: automatic emergencycall
58Occupant safety
Safety
Page 151 of 370
Shift recommendation
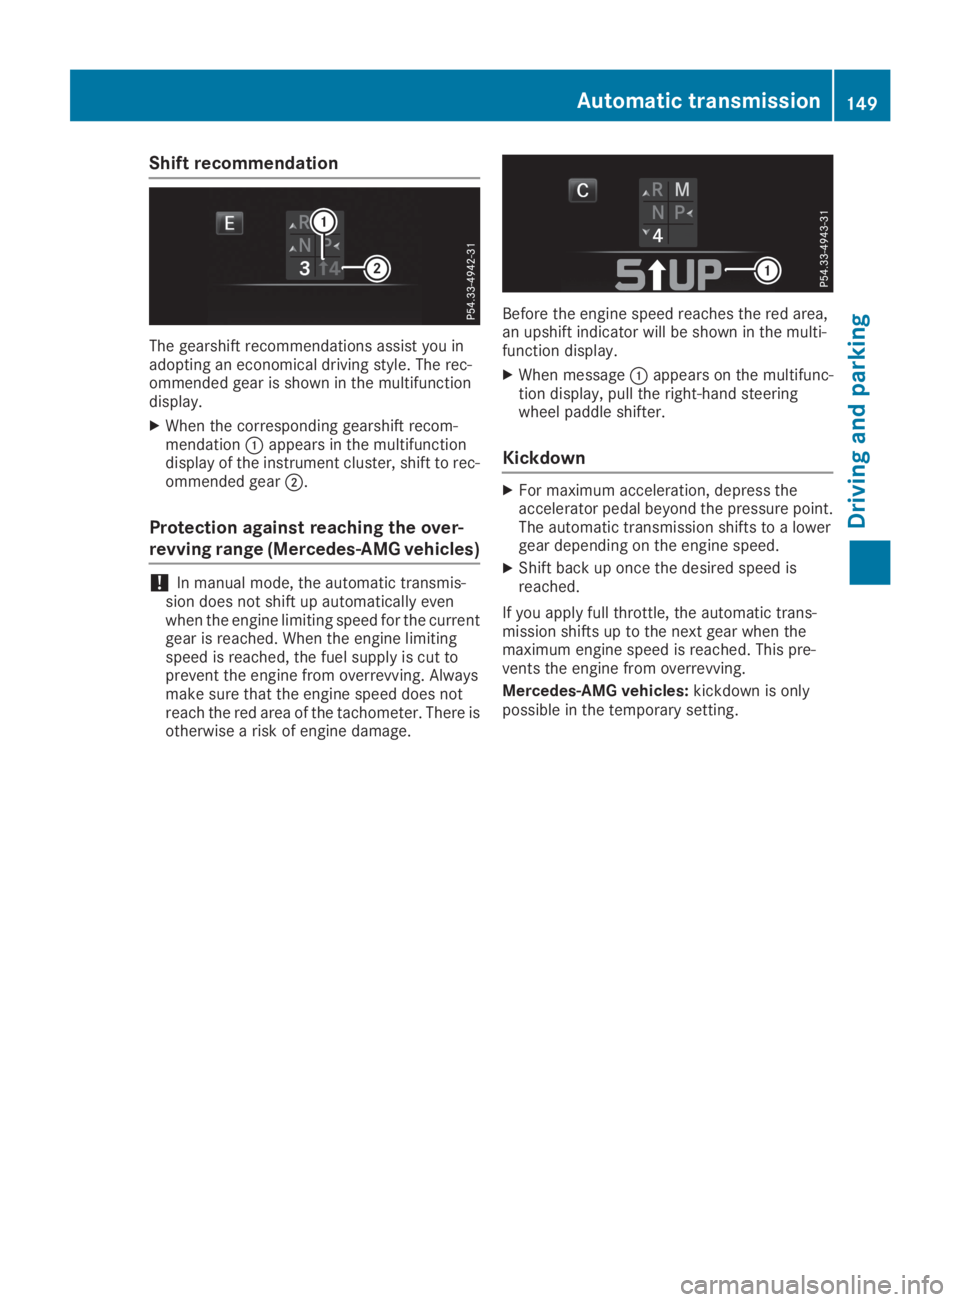
The gearshift recommendations assist you inadopting an economical driving style. The rec-ommended gear is shown in the multifunctiondisplay.
XWhen the corresponding gearshift recom-mendation�Cappears in the multifunctiondisplay of the instrument cluster, shift to rec-ommended gear�D.
Protection against reaching the over-
revving range (Mercedes-AMG vehicles)
!In manual mode, the automatic transmis-sion does not shift up automatically evenwhen the engine limiting speed for the currentgear is reached. When the engine limitingspeed is reached, the fuel supply is cut toprevent the engine from overrevving. Alwaysmake sure that the engine speed does notreach the red area of the tachometer. There isotherwise a risk of engine damage.
Before the engine speed reaches the red area,an upshift indicator will be shown in the multi-function display.
XWhen message�Cappears on the multifunc-tion display, pull the right-hand steeringwheel paddle shifter.
Kickdown
XFor maximum acceleration, depress theaccelerator pedal beyond the pressure point.The automatic transmission shifts to a lowergear depending on the engine speed.
XShift back up once the desired speed isreached.
If you apply full throttle, the automatic trans-mission shifts up to the next gear when themaximum engine speed is reached. This pre-vents the engine from overrevving.
Mercedes-AMG vehicles:kickdown is onlypossible in the temporary setting.
Automatic transmission149
Driving and parking
Z
Page 158 of 370
Bear in mind that at a speed of only 30 mph(approximately 50 km/h), the vehicle covers adistance of 44 ft (approximately 14m)per sec-ond.
Drive sensibly – save fuel
Observe the following tips to save fuel:
XThe tires should always be inflated to the rec-ommended tire pressure.
XRemove unnecessary loads.
XRemove roof racks when they are not needed.
XWarm up the engine at low engine speeds.
XAvoid frequent acceleration or braking.
XHave all maintenance work carried out asindicated by the service intervals in the Main-tenance Booklet or by the service interval dis-play.
Fuel consumption also increases when driving incold weather, in stop-start traffic and in hilly ter-rain.
Drinking and driving
GWARNING
Drinking and driving and/or taking drugs and
driving are very dangerous combinations.
Even a small amount of alcohol or drugs can
affect your reflexes, perceptions and judg-
ment.
The possibility of a serious or even fatal acci-
dent is greatly increased when you drink or
take drugs and drive.
Do not drink or take drugs and drive or allow
anyone to drive who has been drinking or tak-
ing drugs.
Emission control
GDANGER
Combustion engines emit poisonous exhaust
gases such as carbon monoxide. Inhaling
these exhaust gases is hazardous to health
and can result in poisoning. There is a risk of
fatal injury. Therefore, never leave the engine
running an enclosed space without adequate
ventilation.
Certain engine systems are designed to keepthe level of poisonous components in exhaustfumes within legal limits.
These systems only work at peak efficiency ifthey are serviced exactly in accordance with themanufacturer's specifications. Always havework on the engine carried out at a qualifiedspecialist workshop. Mercedes-Benz recom-mends that you use an authorized Mercedes-Benz Center for this purpose. In particular, workrelevant to safety or on safety-related systemsmust be carried out at a qualified specialistworkshop.
The engine settings must not be changed underany circumstances. Furthermore, all specificservice work must be carried out at regularintervals and in accordance with the Mercedes-Benz service requirements. Details can be foundin the Maintenance Booklet.
ECO display
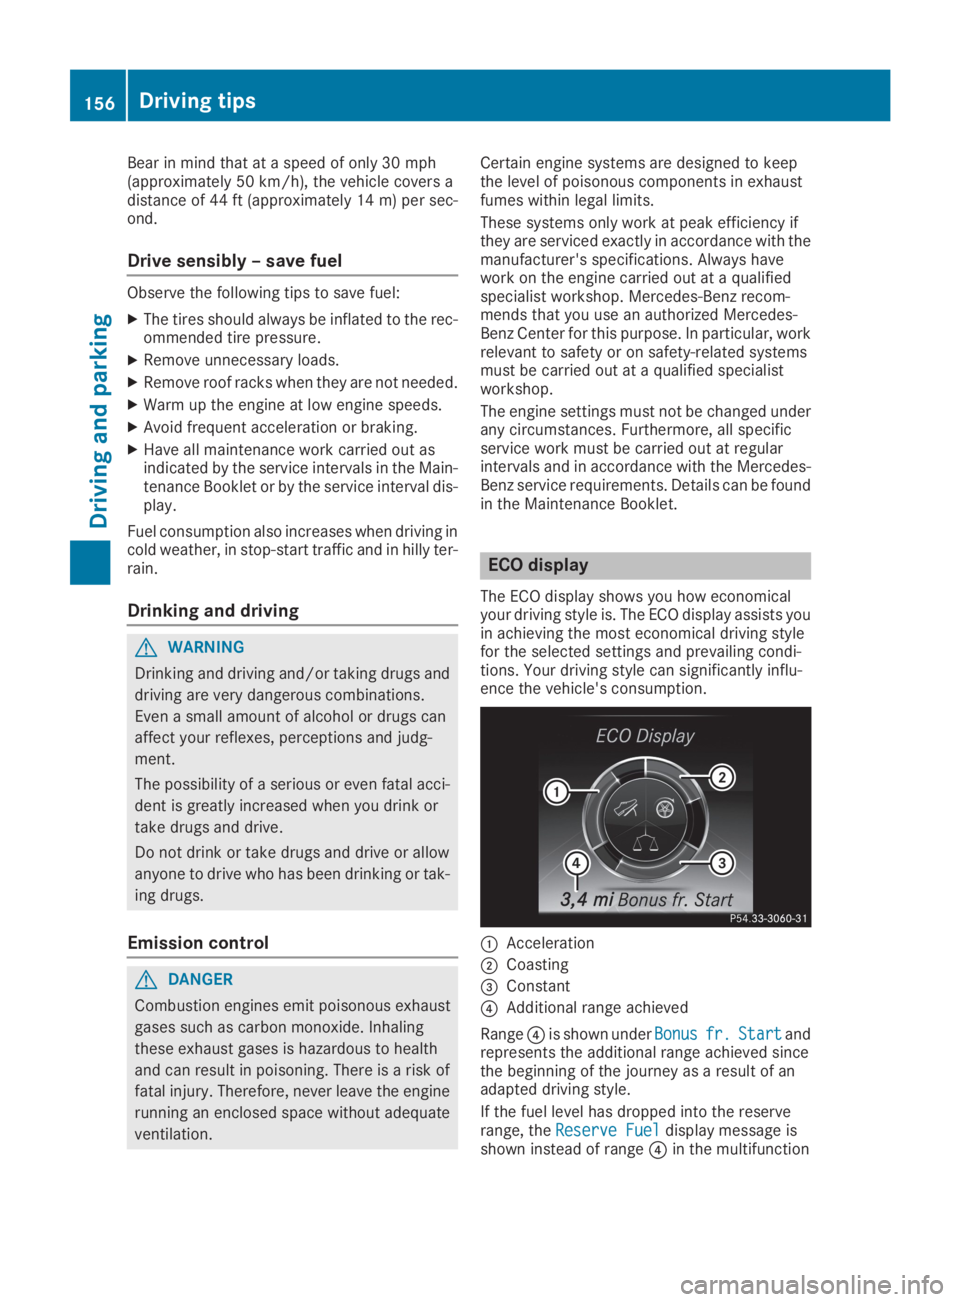
The ECO display shows you how economicalyour driving style is. The ECO display assists youin achieving the most economical driving stylefor the selected settings and prevailing condi-tions. Your driving style can significantly influ-ence the vehicle's consumption.
�CAcceleration
�DCoasting
�
Page 205 of 370
For more information, please contact a qualifiedspecialist workshop.
Please observe the manufacturer's operatinginstructions for the trailer coupling if a detach-able trailer coupling is used.
Couple and uncouple the trailer carefully. If youdo not couple the trailer to the towing vehiclecorrectly, the trailer could become detached.
Make sure that the following values are notexceeded:
Rthe permissible trailer drawbar noseweight
Rthe permissible trailer load
Rthe permissible rear axle load of the towingvehicle
Rthe maximum permissible gross vehicleweight of both the towing vehicle and thetrailer
The applicable permissible values, which mustnot be exceeded, can be found:
Rin the vehicle documents
Ron the type plate for the trailer
Ron the vehicle identification plate
If the values differ, the lowest value applies.
When towing a trailer, your vehicle's handlingcharacteristics will be different in comparisonwith when driving without a trailer.
The vehicle/trailer combination:
Ris heavier
Ris restricted in its acceleration and gradient-climbing capability
Rhas an increased braking distance
Ris affected more by strong crosswinds
Rdemands more sensitive steering
Rhas a larger turning circle
This could impair the handling characteristics.
When towing a trailer, always adjust your speedto the current road and weather conditions. Donot exceed the maximum permissible speed foryour vehicle/trailer combination.
Notes on towing a trailer
General notes
RDo not exceed the maximum permissiblespeed for vehicle/trailer combinations in therelevant country.
This lowers the risk of an accident.
ROnly install an approved trailer coupling onyour vehicle.
Further information on availability and oninstallation is available from any authorizedMercedes-Benz Center.
RThe bumpers of your vehicle are not suitablefor installing detachable trailer couplings.
RDo not install hired trailer couplings or otherdetachable trailer couplings on the bumpersof your vehicle.
RIf you no longer need the ball coupling,remove it from the ball coupling recess. Thiswill reduce the risk of damage to the ball cou-pling.
When towing a trailer, set the tire pressure onthe rear axle of the towing vehicle for a maxi-mum load; see the tire pressure table in the fuelfiller flap (Ypage 348).
Please note that when towing a trailer, the fol-lowing driving systems have limited availabilityor are not available at all:
RPARKTRONIC (Ypage 179)
RBlind Spot Assist (Ypage 193)
RActive Lane Keeping Assist (Ypage 200)
On vehicles without level control, the height ofthe ball coupling will alter according to the loadplaced on the vehicle. If necessary, use a trailerwith a height-adjustable drawbar.
You will find permissible trailer loads under"Technical data" (Ypage 364).
Driving tips
Observe the information on ESP®trailer stabili-zation (Ypage 71) and on pulling away with atrailer (Ypage 135).
The maximum permissible speed for vehicle/trailer combinations depends on the type oftrailer. Before beginning the journey, check thetrailer's documents to see what the maximumpermitted speed is. Observe the maximum per-missible speed in the relevant country.
For certain Mercedes-Benz vehicles, the maxi-mum permissible rear axle load is increasedwhen towing a trailer. See the "Technical data"section to find out whether this applies to yourvehicle (Ypage 365). In the event of increasedrear axle load, the vehicle/trailer combinationmay not exceed a maximum speed of 60 mph(100 km/h) for reasons concerning the operat-ing permit. This also applies in countries in
Towing a trailer203
Driving and parking
Z
Page 320 of 370
have attained a pressure of at least 200 kPa(2.0 bar/29 psi).
If a pressure of 200 kPa (2.0 bar/29 psi) hasbeen attained after five minutes, see "Tire pres-sure reached" (Ypage 318).
If a tire pressure of 200 kPa (2.0 bar/29 psi) hasnot been attained after five minutes, see "Tirepressure not reached" (Ypage 318).
If tire sealant has escaped, clean it off affectedareas as quickly as possible. It is preferable touse clean water.
If your clothes are soiled with tire sealant, havethem cleaned with perchloroethylene at a drycleaner as soon as possible.
Tire pressure not reached
If a tire pressure of 200 kPa (2.0 bar/29 psi) hasnot been attained after ten minutes:
XSwitch off the tire inflation compressor.
XUnscrew the filler hose from the valve of thefaulty tire.Tire sealant may escape when the filler hose isunscrewed.
XVery slowly drive forwards or reverse approx-imately 30 ft (10 m).
XPump up the tire again.
After a maximum of ten minutes, the tire pres-sure must be at least 200 kPa (2.0 bar/29 psi).
GWARNING
If the required tire pressure is not reached
after the specified time, the tire is too badly
damaged. The tire sealant cannot repair the
tire in this instance. Damaged tires and a tire
pressure that is too low can significantly
impair the vehicle's braking and driving char-
acteristics. There is a risk of accident.
Do not continue driving. Contact a qualified
specialist workshop.
Tire pressure reached
GWARNING
A tire temporarily sealed with tire sealant
impairs the driving characteristics and is not
suitable for higher speeds. There is a risk of
accident.
You should therefore adapt your driving style
accordingly and drive carefully. Do not exceed
the specified maximum speed with a tire that
has been repaired using tire sealant.
The maximum permissible speed for a tiresealed with tire sealant is 50 mph (80 km/h).The upper part of the TIREFIT sticker must beaffixed to the instrument cluster in the driver'sfield of vision.
If a tire pressure of 200 kPa (2.0 bar/29 psi) hasbeen attained after ten minutes:
XSwitch off the tire inflation compressor.
XUnscrew the filler hose from the valve of thefaulty tire.Tire sealant may escape when the filler hose isunscrewed.
XStow the tire sealant bottle and the tire infla-tion compressor.
XPull away immediately.
XStop after driving for approximately tenminutes and check the tire pressure with thetire inflation compressor.The tire pressure must now be at least130 kPa (1.3 bar/19 psi).
GWARNING
If the required tire pressure is not reached
after driving for a short period, the tire is too
badly damaged. The tire sealant cannot repair
the tire in this instance. Damaged tires and a
tire pressure that is too low can significantly
impair the vehicle's braking and driving char-
acteristics. There is a risk of accident.
Do not continue driving. Contact a qualified
specialist workshop.
In cases such as the one mentioned above, con-tact an authorized Mercedes-Benz Center. Orcall 1-800-FOR-MERCedes (in the USA) or1-800-387-0100 (in Canada).
XCorrect the tire pressure if it is still at least130 kPa (1.3 bar/19 psi). See the Tire andLoading Information placard on the B-pillar onthe driver's side or the tire pressure table inthe fuel filler flap for values.
XTo increase the tire pressure:switch on thetire inflation compressor.
318Flat tire
Breakdown assistance
Page 332 of 370
Important safety notes
GWARNING
If wheels and tires of the wrong size are used,
the wheel brakes or suspension components
may be damaged. There is a risk of an acci-
dent.
Always replace wheels and tires with those
that fulfill the specifications of the original
part.
When replacing wheels, make sure to use the
correct:
Rdesignation
Rmodel
When replacing tires, make sure to use the
correct:
Rdesignation
Rmanufacturer
Rmodel
GWARNING
A flat tire severely impairs the driving, steer-
ing and braking characteristics of the vehicle.
There is a risk of accident.
Tires without run-flat characteristics:
Rdo not drive with a flat tire.
Rimmediately replace the flat tire with your
emergency spare wheel or spare wheel, or
consult a qualified specialist workshop.
Tires with run-flat characteristics:
Rpay attention to the information and warn-
ing notices on MOExtended tires (tires with
run-flat characteristics).
Accessories that are not approved for your vehi-cle by Mercedes-Benz or are not being used cor-rectly can impair the operating safety.
Before purchasing and using non-approvedaccessories, visit a qualified specialist work-shop and inquire about:
Rsuitability
Rlegal stipulations
Rfactory recommendations
Further information regarding wheels and tirescan be found under "Wheel/tire combinations"(Ypage 354).
You can ask for information regarding permittedwheel-tire combinations at an authorizedMercedes-Benz Center.
Information on tire pressure can be found:
Ron the Tire and Loading Information placardon the B-pillar on the driver's side(Ypage 340)
Rin the tire pressure table in the fuel filler flap(Ypage 333)
Runder "Tire pressure" (Ypage 333)
Operation
Information on driving
Check the tire pressure when the vehicle isheavily laden and adjust prior to a trip.
While driving, pay attention to vibrations, noisesand unusual handling characteristics, e.g. pull-ing to one side. This may indicate that thewheels or tires are damaged. If you suspect thata tire is defective, reduce your speed immedi-ately. Stop the vehicle as soon as possible tocheck the wheels and tires for damage. Hiddentire damage could also be causing the unusualhandling characteristics. If you find no signs ofdamage, have the tires and wheels checked at aqualified specialist workshop.
When parking your vehicle, make sure that thetires do not get deformed by the curb or otherobstacles. If they cannot be avoided, drive overobstacles such as curbs slowly and at an obtuseangle. Otherwise, you may damage the wheelsor tires.
Regular checking of wheels and tires
GWARNING
Damaged tires can cause tire inflation pres-
sure loss. As a result, you could lose control of
your vehicle. There is a risk of accident.
Check the tires regularly for signs of damage
and replace any damaged tires immediately.
Check wheels and tires for damage at least oncea month. Check wheels and tires after driving
330Operation
Wheels and ti res
Page 335 of 370
For safety reasons, Mercedes-Benz recom-mends that you only use snow chains that havebeen specially approved for your vehicle byMercedes-Benz, or are of a correspondingstandard of quality. For more information,please contact a qualified specialist workshop.
If you intend to mount snow chains, please bearthe following points in mind:
RSnow chains may not be mounted on allwheel/tire combinations. Observe the infor-mation regarding permitted wheel/tire com-binations (Ypage 354).
ROnly use snow chains when driving on roadscompletely covered by snow. Remove thesnow chains as soon as possible when youcome to a road that is not snow-covered.
RLocal regulations may restrict the use of snowchains. Observe the appropriate regulations ifyou wish to mount snow chains.
RDo not exceed the maximum permissiblespeed of 31 mph (50 km/h).
ROn vehicles with AIR BODY CONTROL, youmust only drive at raised vehicle level if snowchains have been installed (Ypage 172).
RWhen snow chains are installed, never useActive Parking Assist (Ypage 175).
You may wish to deactivate ESP®when pullingaway with snow chains installed:
RAll vehicles (except Mercedes‑AMG vehicles)(Ypage 69)
RMercedes‑AMG vehicles (Ypage 70)
You can thereby allow the wheels to spin in acontrolled manner, achieving an increased driv-ing force (cutting action).
Tire pressure
Tire pressure specifications
Important safety notes
GWARNING
Underinflated or overinflated tires pose the
following risks:
Rthe tires may burst, especially as the load
and vehicle speed increase.
Rthe tires may wear excessively and/or
unevenly, which may greatly impair tire
traction.
Rthe driving characteristics, as well as steer-
ing and braking, may be greatly impaired.
There is a risk of an accident.
Follow recommended tire inflation pressures
and check the pressure of all the tires includ-
ing the spare wheel:
Rmonthly, at least
Rif the load changes
Rbefore beginning a long journey
Runder different operating conditions, e.g.
off-road driving
If necessary, correct the tire pressure.
The data on the Tire and Loading Informationplacard and tire pressure table shown here areexamples. Tire pressure specifications are vehi-cle-specific and may deviate from the datashown here. The tire pressure specificationsthat are valid for your vehicle can be found onthe Tire and Loading Information placard andtire pressure table on the vehicle.
General notes
The recommended tire pressures for the tiresmounted at the factory can be found on thelabels described here.
Operation with a trailer:the applicable valuefor the rear axle is the maximum tire pressurevalue stated in the table inside the fuel filler flap.
Further information on tire pressures can beobtained at a qualified specialist workshop.
Tire pressure333
Wheels and tires
Z