tow bar MERCEDES-BENZ GLC 2019 Owners Manual
[x] Cancel search | Manufacturer: MERCEDES-BENZ, Model Year: 2019, Model line: GLC, Model: MERCEDES-BENZ GLC 2019Pages: 370, PDF Size: 19.55 MB
Page 9 of 370
BAS .................................................. 66
Brake fluid (notes) ......................... 361
Display message............................ 228
EBD .................................................. 72
Hill start assist ............................... 135
HOLD function ............................... 170
Important safety notes .................. 157
Maintenance .................................. 158
Parking brake ................................ 154
Riding tips ...................................... 157
Warning lamp ................................. 258
Breakdown assistance
Where will I find...? ........................ 313
see Flat tire
see Towing away
Brightness control (instrument
cluster lighting)................................... 35
Buttons on the steering wheel......... 209
C
California
Important notice for retail cus-
tomers and lessees .......................... 28
Calling up a malfunction
see Display messages
Calling up the climate control bar
Multimedia system ........................ 273
Calling up the climate control
menu
Multimedia system ........................ 273
Camera
see 360° camera
see Rear view camera
Car
see Vehicle
Car wash
see Care
Care
360° camera ................................. 309
Car wash ........................................ 305
Carpets .......................................... 312
Display ........................................... 310
Exhaust pipe .................................. 309
Exterior lights ................................ 308
General notes ................................ 305
Interior ........................................... 310
Matte finish ................................... 307
Paint .............................................. 307
Plastic trim .................................... 310
Power washer ................................ 306
Rear view camera .......................... 309
Roof lining ...................................... 312
Seat belt ........................................ 311
Seat cover..................................... 311
Selector lever ................................ 311
Sensors ......................................... 309
Side running board ........................ 309
Steering wheel ............................... 311
Trim pieces .................................... 311
Washing by hand ........................... 306
Wheels ........................................... 308
Windows ........................................ 308
Wiper blades .................................. 308
Wooden trim .................................. 311
Cargo compartment
Opening/closing (from outside,
HANDS-FREE ACCESS) .................... 87
Plug-in module (telescopic rods) .... 286
Cargo compartment cover
Important safety notes .................. 284
Notes/how to use ......................... 284
Cargo compartment enlargement... 281
Cargo compartment floor
Important safety notes .................. 287
Locking and unlocking ................... 288
Opening/closing ............................ 287
Stowage well (under)..................... 287
Cargo compartment plug-in mod-
ule (telescope bars).......................... 286
Cargo tie down rings......................... 283
CD
see also Digital Operator's Man-
ual .................................................. 268
CD player (on-board computer)........ 217
Center console
Lower section (Mercedes-AMG
vehicles) .......................................... 40
Upper section .................................. 38
Central locking
Locking/unlocking (SmartKey)........ 77
Change of address.............................. 29
Change of ownership.......................... 29
Changing the media source............. 216
Index7
Page 25 of 370
Quick access for Audio .................. 271
Switching ....................................... 270
Switching input line ....................... 270
Tow-starting
Emergency engine starting ............ 327
Important safety notes .................. 324
Towing a trailer
Axle load, permissible.................... 365
Cleaning the trailer tow hitch ......... 310
Coupling up a trailer...................... 204
Decoupling a trailer ....................... 206
Driving tips .................................... 203
ESP®(Electronic Stability Pro-
gram) ............................................... 71
Important safety notes .................. 202
Installing the ball coupling ............. 204
Lights display message .................. 239
Power supply ................................. 206
Pulling away with a trailer.............. 135
Removing the ball coupling ............ 206
Trailer loads................................... 364
Towing away
Important safety guidelines ........... 324
Installing the towing eye ................ 325
Notes for 4MATIC vehicles ............ 327
Removing the towing eye ............... 326
Transporting the vehicle ................ 326
With both axles on the ground ....... 326
Towing eye......................................... 314
Traction system
see ETS/4ETS (Electronic Trac-
tion System)
Traffic reports
see also Digital Operator's Man-
ual .................................................. 268
Traffic Sign Assist
Activating/deactivating the warn-
ing function .................................... 220
Display message ............................ 247
Function/notes............................. 193
Important safety notes .................. 193
Instrument cluster display ............. 193
Trailer coupling
see Towing a trailer
Trailer loads and drawbar nose-
weights............................................... 206
Trailer towing
Active Blind Spot Assist ................. 199
Active Lane Keeping Assist ............ 202
Blind Spot Assist ............................ 195
Permissible trailer loads and
drawbar noseweights ..................... 206
Transfer case..................................... 150
Transmission
Display message ............................ 253
see Automatic transmission
Transmission oil
Temperature (on-board computer,
Mercedes-AMG vehicles) ............... 223
Transmission position display......... 142
Transporting the vehicle.................. 326
Trim pieces (cleaning instruc-
tions).................................................. 311
Trip computer (on-board com-
puter).................................................. 213
Trip odometer
Calling up ....................................... 212
Resetting (on-board computer) ...... 214
Trunk
see Cargo compartment
Turn signals
Display message ............................ 239
Replacing bulbs (front) ................... 115
Switching on/off........................... 110
Two-way radio
Frequencies ................................... 356
Installation ..................................... 356
Transmission output (maximum) .... 356
Type identification plate
see Vehicle identification plate
U
Unlocking
Emergency unlocking ....................... 84
From inside the vehicle (central
unlocking button) ............................. 83
USB devices
Connecting to the Media Inter-
face ............................................... 277
V
Vanity mirror (in the sun visor)........ 290
Vehicle
Correct use ...................................... 31
Index23
Page 178 of 370
for safe maneuvering, parking and exiting aparking space. Make sure that no persons, ani-mals or objects are in the path of your vehicle.
When Parking Assist PARKTRONIC is deactiva-ted, Active Parking Assist is also unavailable.
For vehicles with a trailer tow hitch installed, theminimum length for parking spaces is slightlylonger.
If you have attached a trailer to your vehicle, youshould not use Active Parking Assist. Once theelectrical connection is established betweenyour vehicle and the trailer, Active ParkingAssist is no longer available. Parking AssistPARKTRONIC is deactivated for the rear area.
GWARNING
While parking or pulling out of a parking
space, the vehicle swings out and can drive
onto areas of the oncoming lane. This could
result in a collision with another road user.
There is a risk of an accident.
Pay attention to other road users. Stop the
vehicle if necessary or cancel the Active Park-
ing Assist parking procedure.
!If they cannot be avoided, drive over obsta-cles such as curbs slowly and at an obtuseangle. Otherwise, you may damage thewheels or tires.
Active Parking Assist may possibly indicateparking spaces which are not suitable for park-ing, for example:
Rwhere parking or stopping is prohibited
Rin front of driveways or entrances and exits
Ron unsuitable surfaces
Parking tips:
ROn narrow roads, drive as close to the parkingspace as possible
RParking spaces that are littered or overgrownmight be identified or measured incorrectly
RParking spaces that are partially occupied bytrailer drawbars might not be identified assuch or be measured incorrectly
RSnowfall or heavy rain may lead to a parkingspace being measured inaccurately
RPay attention to the warning messages ofParking Assist PARKTRONIC during the park-ing procedure (Ypage 181).
RYou can intervene in the steering procedureto correct it at any time. Active Parking Assistis then deactivated
RWhen transporting a load which protrudesfrom your vehicle, you should not use ActiveParking Assist
Rnever use Active Parking Assist when snowchains are installed
RAlways pay attention to the specified tirepressure for your vehicle. This has a directinfluence on the parking characteristics of thevehicle.
Use Active Parking Assist for parking spaces:
Rparallel or at right angles to the direction oftravel
Ron straight roads, not bends
Ron the same level as the road, e.g. not on thepavement
Detecting parking spaces
Objects located above the detection range ofActive Parking Assist will not be detected whenthe parking space is measured. These are nottaken into account when the parking procedureis calculated, e.g. overhanging loads, tail sec-tions or loading ramps of trucks. Active ParkingAssist may therefore guide you into the parkingspace too early.
GWARNING
If there are objects above the detection range:
RActive Parking Assist may steer too early
Rthe vehicle may not stop in front of these
objects
This could cause a collision. There is a risk of
an accident.
If objects are located above the detection
range, stop and deactivate Active Parking
Assist.
Further information about the detection range(Ypage 180).
176Driving systems
Driving and parking
Page 182 of 370
Parking Assist PARKTRONIC is only an aid. It isnot a replacement for your attention to yourimmediate surroundings. You are alwaysresponsible for safe maneuvering, parking andexiting a parking space. Make sure that thereare no persons, animals or objects in the maneu-vering area while maneuvering and parking in/leaving parking spaces.
!When parking, pay particular attention toobjects above or below the sensors, such asflower pots or trailer drawbars. Parking AssistPARKTRONIC does not detect such objectswhen they are in the immediate vicinity of thevehicle. You could damage the vehicle or theobjects.
The sensors may not detect snow and otherobjects that absorb ultrasonic waves.
Ultrasonic sources such as an automatic carwash, the compressed-air brakes of a truck ora pneumatic drill could cause Parking AssistPARKTRONIC to malfunction.
Parking Assist PARKTRONIC may not functioncorrectly on uneven terrain.
!If you do not need the trailer tow hitch,remove the detachable ball coupling. ParkingAssist PARKTRONIC measures the minimumdetection range to an obstacle from thebumper, not the ball coupling.
Parking Assist PARKTRONIC is activated auto-matically when you:
Rswitch on the ignition
Rshift the transmission to position[,^or\\
Parking Assist PARKTRONIC is deactivated atspeeds above 11 mph (18 km/h). It is reactiva-ted at lower speeds.
Parking Assist PARKTRONIC is deactivated forthe rear area when you establish an electricalconnection between your vehicle and a trailer.
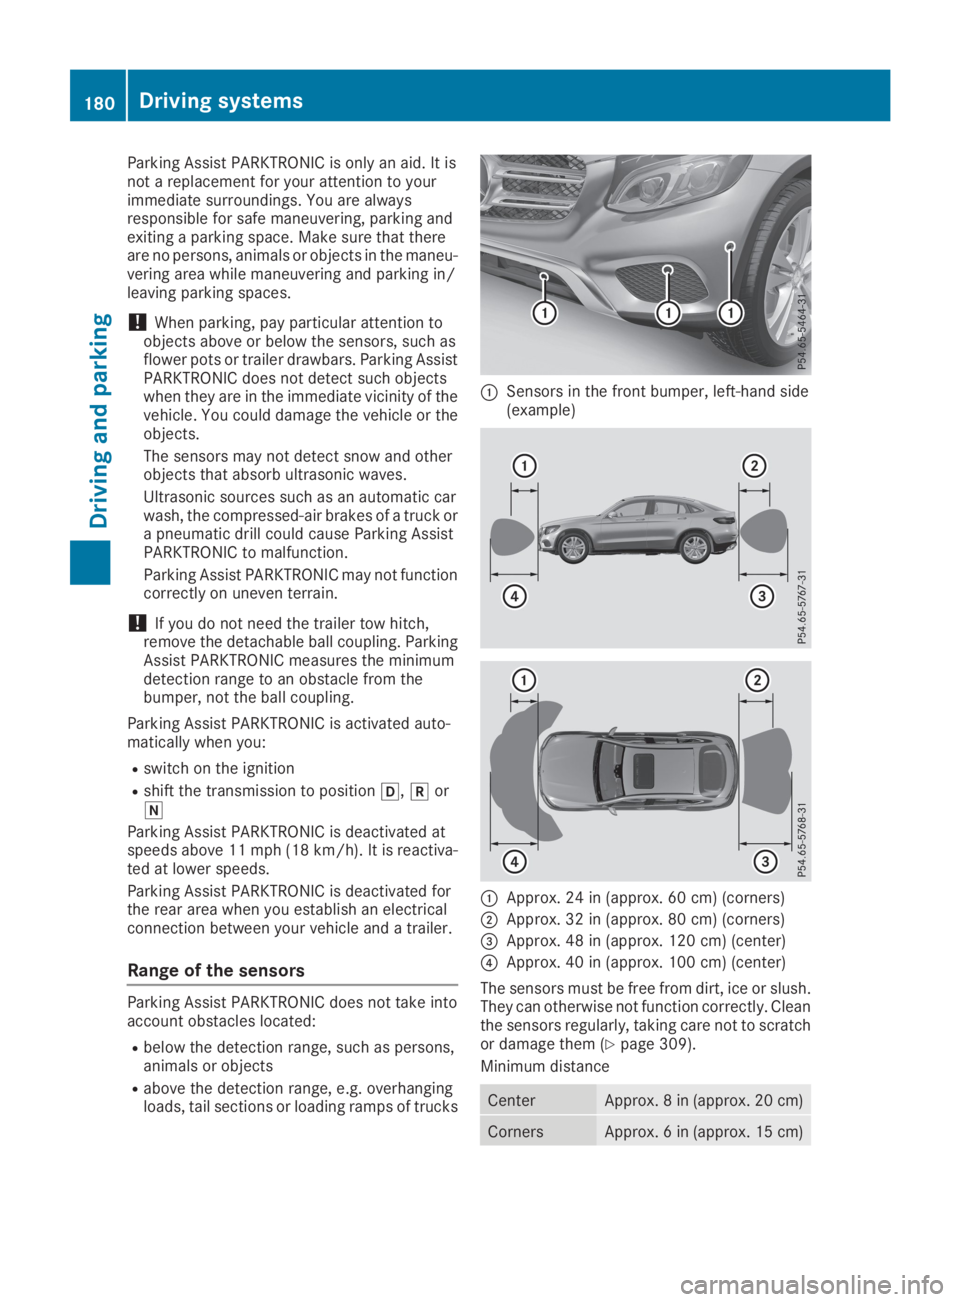
Range of the sensors
Parking Assist PARKTRONIC does not take intoaccount obstacles located:
Rbelow the detection range, such as persons,animals or objects
Rabove the detection range, e.g. overhangingloads, tail sections or loading ramps of trucks
CSensors in the front bumper, left-hand side(example)
CApprox. 24 in (approx. 60 cm) (corners)
DApprox. 32 in (approx. 80 cm) (corners)
Page 185 of 370
Rif there is a sudden change in temperature,e.g. when driving into a heated garage in win-ter
Rif the camera lens is dirty or obstructed.Observe the notes on cleaning(Ypage 309)
Rif the rear of your vehicle is damaged. In thiscase, have the camera position and settingchecked at a qualified specialist workshop
The field of vision and other functions of the rearview camera may be restricted due to additionalaccessories on the rear of the vehicle (e.g.license plate holder, rear bicycle rack).
The rear view camera is protected from rain-drops and dust by means of a flap. When the rearview camera is activated, this flap opens.
The flap closes again when:
Ryou have finished the maneuvering process
Ryou switch off the engine
Ryou open the cargo compartment
Observe the notes on cleaning (Ypage 309).
For technical reasons, the flap may remain openbriefly after the rear view camera has beendeactivated.
Activating/deactivating the rear view
camera
XTo activate:make sure that theActiva‐Activa‐
tion by R geartion by R gearfunction is selected in themultimedia system (see the Digital Operator'sManual).
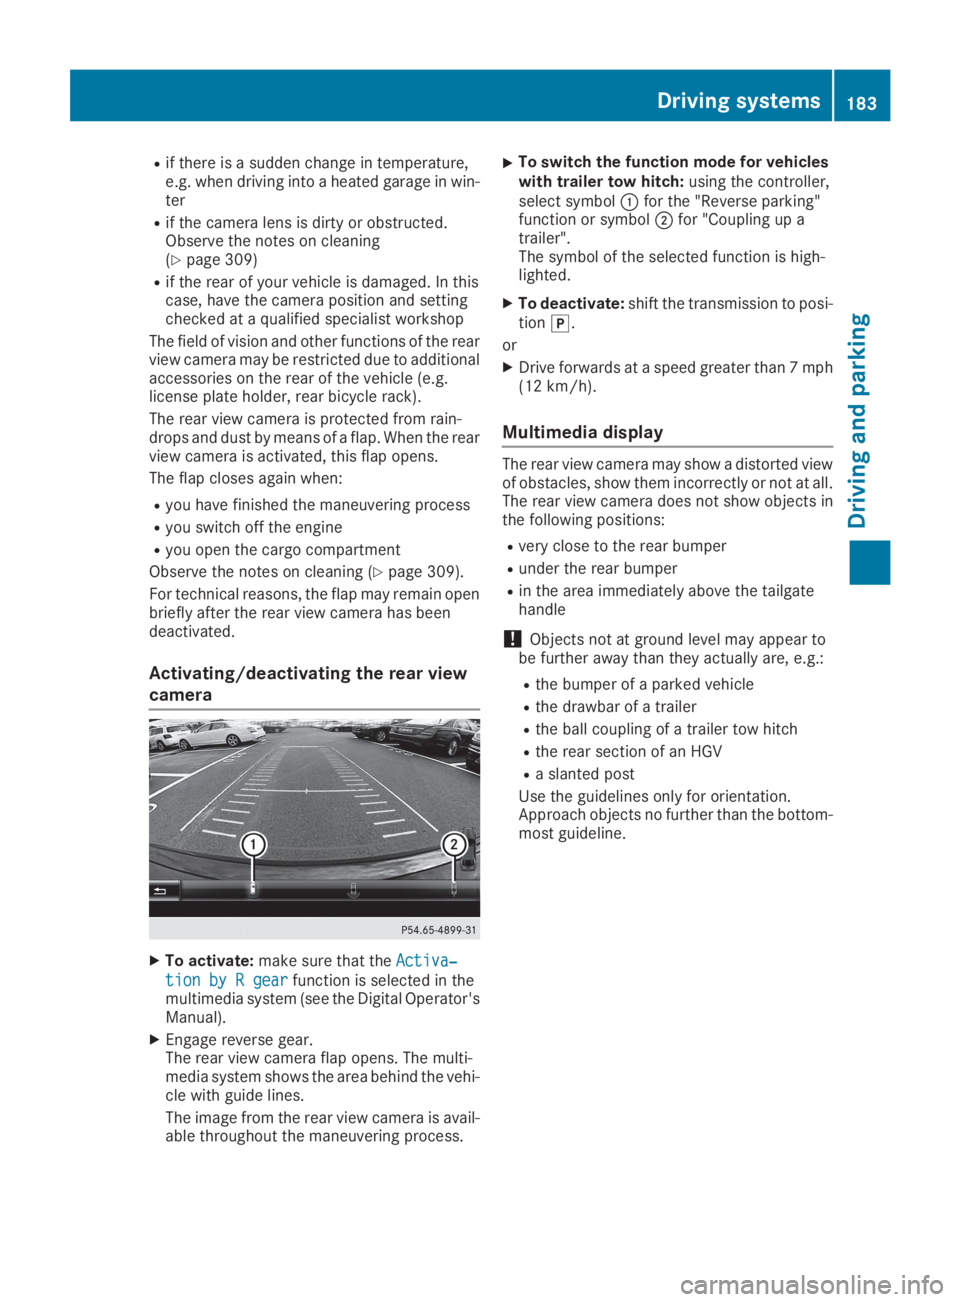
XEngage reverse gear.The rear view camera flap opens. The multi-media system shows the area behind the vehi-cle with guide lines.
The image from the rear view camera is avail-able throughout the maneuvering process.
XTo switch the function mode for vehicleswith trailer tow hitch:using the controller,select symbolCfor the "Reverse parking"function or symbolDfor "Coupling up atrailer".The symbol of the selected function is high-lighted.
XTo deactivate:shift the transmission to posi-tion].
or
XDrive forwards at a speed greater than 7 mph(12 km/h).
Multimedia display
The rear view camera may show a distorted viewof obstacles, show them incorrectly or not at all.The rear view camera does not show objects inthe following positions:
Rvery close to the rear bumper
Runder the rear bumper
Rin the area immediately above the tailgatehandle
!Objects not at ground level may appear tobe further away than they actually are, e.g.:
Rthe bumper of a parked vehicle
Rthe drawbar of a trailer
Rthe ball coupling of a trailer tow hitch
Rthe rear section of an HGV
Ra slanted post
Use the guidelines only for orientation.Approach objects no further than the bottom-most guideline.
Driving systems183
Driving and parking
Z
Page 191 of 370
The full screen option is only available in the fol-lowing views:
RTop view with picture from the rear view cam-era
RTop view with picture from the front camera
Multimedia display
Important safety notes
The camera system may show a distorted viewof obstacles, show them incorrectly or not at all.Obstacles are not shown by the system in thefollowing locations:
Runder the front and rear bumpers
Rvery close to the front and rear bumpers
Rin the area immediately above the tailgatehandle
Rvery close to the exterior mirrors
Rin the transitional areas between the variouscameras in the virtual top view
!Objects not at ground level may appear tobe further away than they actually are, e.g.:
Rthe bumper of a parked vehicle
Rthe drawbar of a trailer
Rthe ball coupling of a trailer tow hitch
Rthe rear section of an HGV
Ra slanted post
Use the guidelines only for orientation.Approach objects no further than the bottom-most guideline.
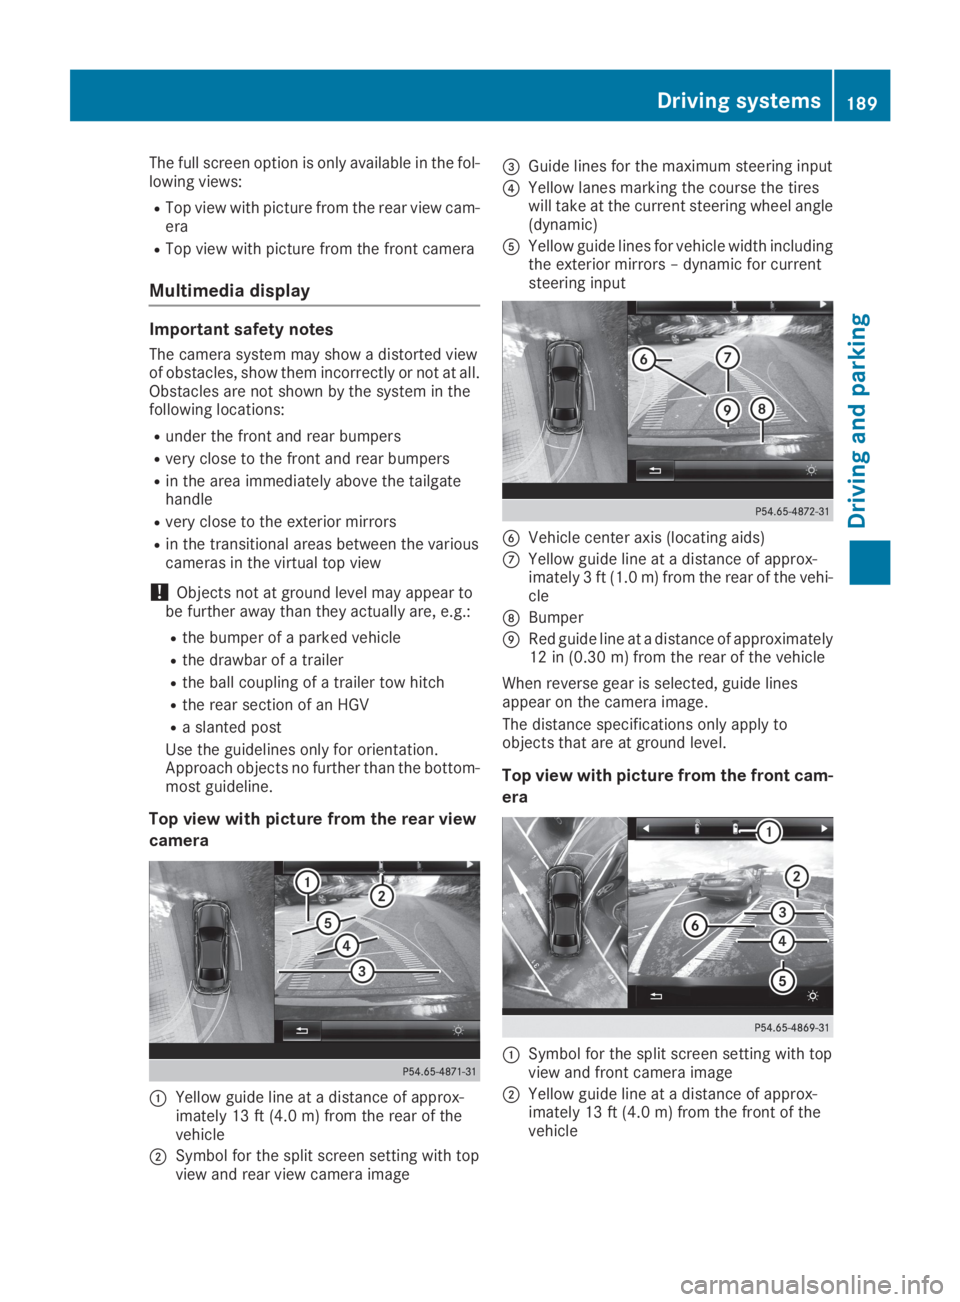
Top view with picture from the rear view
camera
CYellow guide line at a distance of approx-imately 13 ft (4.0 m) from the rear of thevehicle
DSymbol for the split screen setting with topview and rear view camera image
Page 201 of 370
If you select the reverse gear, Active Blind SpotAssist is not operational.
The brightness of the warning lamps is auto-matically adapted to the brightness of the sur-roundings.
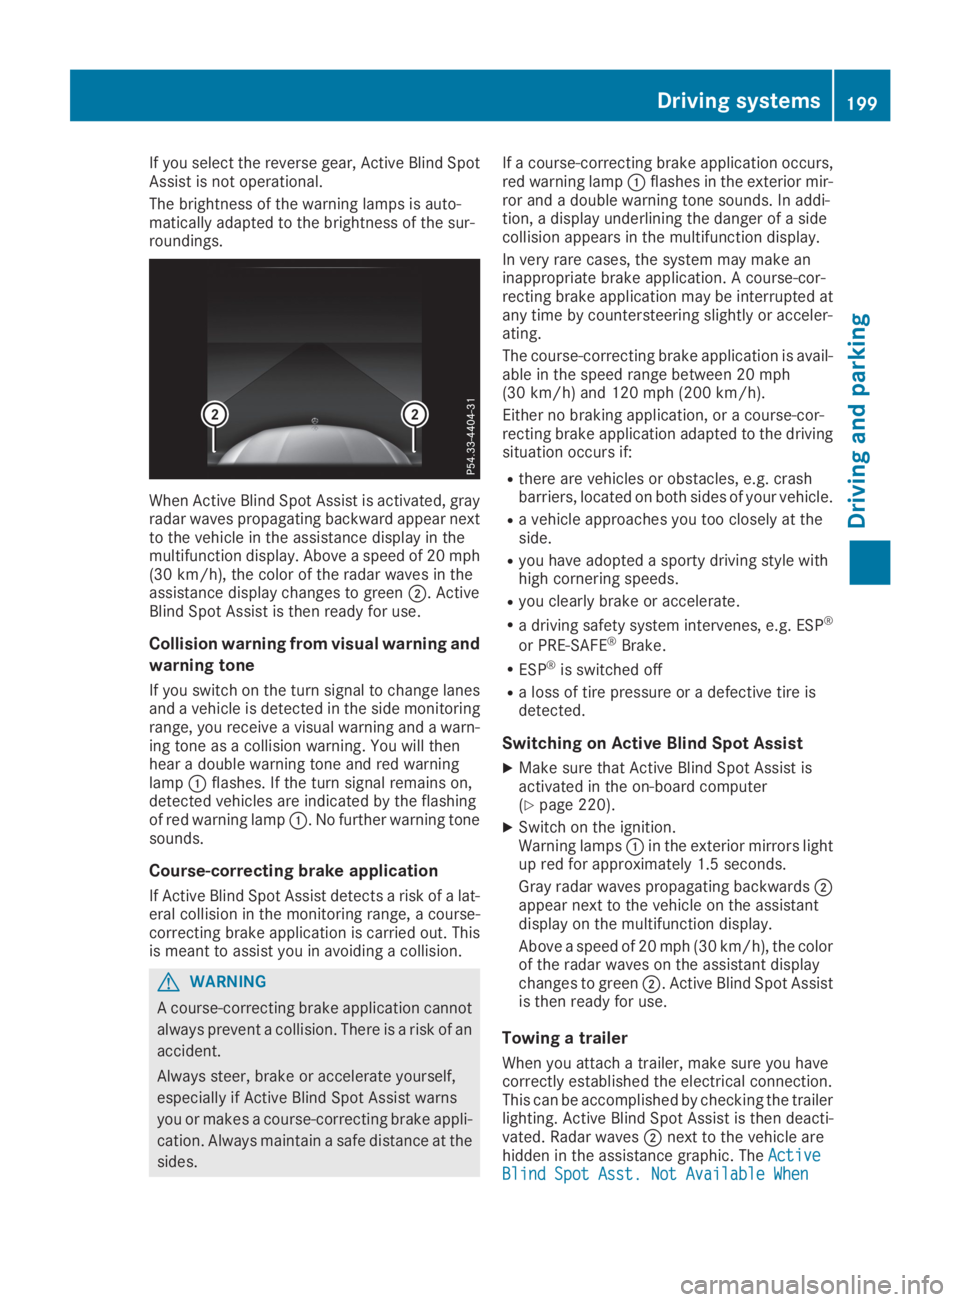
When Active Blind Spot Assist is activated, grayradar waves propagating backward appear nextto the vehicle in the assistance display in themultifunction display. Above a speed of 20 mph(30 km/h), the color of the radar waves in theassistance display changes to greenD. ActiveBlind Spot Assist is then ready for use.
Collision warning from visual warning and
warning tone
If you switch on the turn signal to change lanesand a vehicle is detected in the side monitoringrange, you receive a visual warning and a warn-ing tone as a collision warning. You will thenhear a double warning tone and red warninglampCflashes. If the turn signal remains on,detected vehicles are indicated by the flashingof red warning lampC. No further warning tonesounds.
Course-correcting brake application
If Active Blind Spot Assist detects a risk of a lat-eral collision in the monitoring range, a course-correcting brake application is carried out. Thisis meant to assist you in avoiding a collision.
GWARNING
A course-correcting brake application cannot
always prevent a collision. There is a risk of an
accident.
Always steer, brake or accelerate yourself,
especially if Active Blind Spot Assist warns
you or makes a course-correcting brake appli-
cation. Always maintain a safe distance at the
sides.
If a course-correcting brake application occurs,red warning lampCflashes in the exterior mir-ror and a double warning tone sounds. In addi-tion, a display underlining the danger of a sidecollision appears in the multifunction display.
In very rare cases, the system may make aninappropriate brake application. A course-cor-recting brake application may be interrupted atany time by countersteering slightly or acceler-ating.
The course-correcting brake application is avail-able in the speed range between 20 mph(30 km/h) and 120 mph (200 km/h).
Either no braking application, or a course-cor-recting brake application adapted to the drivingsituation occurs if:
Rthere are vehicles or obstacles, e.g. crashbarriers, located on both sides of your vehicle.
Ra vehicle approaches you too closely at theside.
Ryou have adopted a sporty driving style withhigh cornering speeds.
Ryou clearly brake or accelerate.
Ra driving safety system intervenes, e.g. ESP®
or PRE-SAFE®Brake.
RESP®is switched off
Ra loss of tire pressure or a defective tire isdetected.
Switching on Active Blind Spot Assist
XMake sure that Active Blind Spot Assist isactivated in the on-board computer(Ypage 220).
XSwitch on the ignition.Warning lampsCin the exterior mirrors lightup red for approximately 1.5 seconds.
Gray radar waves propagating backwardsDappear next to the vehicle on the assistantdisplay on the multifunction display.
Above a speed of 20 mph (30 km/h), the colorof the radar waves on the assistant displaychanges to greenD. Active Blind Spot Assistis then ready for use.
Towing a trailer
When you attach a trailer, make sure you havecorrectly established the electrical connection.This can be accomplished by checking the trailerlighting. Active Blind Spot Assist is then deacti-vated. Radar wavesDnext to the vehicle arehidden in the assistance graphic. TheActiveActiveBlind Spot Asst. Not Available WhenBlind Spot Asst. Not Available When
Driving systems199
Driving and parking
Z
Page 205 of 370
For more information, please contact a qualifiedspecialist workshop.
Please observe the manufacturer's operatinginstructions for the trailer coupling if a detach-able trailer coupling is used.
Couple and uncouple the trailer carefully. If youdo not couple the trailer to the towing vehiclecorrectly, the trailer could become detached.
Make sure that the following values are notexceeded:
Rthe permissible trailer drawbar noseweight
Rthe permissible trailer load
Rthe permissible rear axle load of the towingvehicle
Rthe maximum permissible gross vehicleweight of both the towing vehicle and thetrailer
The applicable permissible values, which mustnot be exceeded, can be found:
Rin the vehicle documents
Ron the type plate for the trailer
Ron the vehicle identification plate
If the values differ, the lowest value applies.
When towing a trailer, your vehicle's handlingcharacteristics will be different in comparisonwith when driving without a trailer.
The vehicle/trailer combination:
Ris heavier
Ris restricted in its acceleration and gradient-climbing capability
Rhas an increased braking distance
Ris affected more by strong crosswinds
Rdemands more sensitive steering
Rhas a larger turning circle
This could impair the handling characteristics.
When towing a trailer, always adjust your speedto the current road and weather conditions. Donot exceed the maximum permissible speed foryour vehicle/trailer combination.
Notes on towing a trailer
General notes
RDo not exceed the maximum permissiblespeed for vehicle/trailer combinations in therelevant country.
This lowers the risk of an accident.
ROnly install an approved trailer coupling onyour vehicle.
Further information on availability and oninstallation is available from any authorizedMercedes-Benz Center.
RThe bumpers of your vehicle are not suitablefor installing detachable trailer couplings.
RDo not install hired trailer couplings or otherdetachable trailer couplings on the bumpersof your vehicle.
RIf you no longer need the ball coupling,remove it from the ball coupling recess. Thiswill reduce the risk of damage to the ball cou-pling.
When towing a trailer, set the tire pressure onthe rear axle of the towing vehicle for a maxi-mum load; see the tire pressure table in the fuelfiller flap (Ypage 348).
Please note that when towing a trailer, the fol-lowing driving systems have limited availabilityor are not available at all:
RPARKTRONIC (Ypage 179)
RBlind Spot Assist (Ypage 193)
RActive Lane Keeping Assist (Ypage 200)
On vehicles without level control, the height ofthe ball coupling will alter according to the loadplaced on the vehicle. If necessary, use a trailerwith a height-adjustable drawbar.
You will find permissible trailer loads under"Technical data" (Ypage 364).
Driving tips
Observe the information on ESP®trailer stabili-zation (Ypage 71) and on pulling away with atrailer (Ypage 135).
The maximum permissible speed for vehicle/trailer combinations depends on the type oftrailer. Before beginning the journey, check thetrailer's documents to see what the maximumpermitted speed is. Observe the maximum per-missible speed in the relevant country.
For certain Mercedes-Benz vehicles, the maxi-mum permissible rear axle load is increasedwhen towing a trailer. See the "Technical data"section to find out whether this applies to yourvehicle (Ypage 365). In the event of increasedrear axle load, the vehicle/trailer combinationmay not exceed a maximum speed of 60 mph(100 km/h) for reasons concerning the operat-ing permit. This also applies in countries in
Towing a trailer203
Driving and parking
Z
Page 207 of 370
XSwitch off the engine.
XClose the doors and tailgate.
XCouple up the trailer.
XEstablish the electrical connection betweenthe vehicle and the trailer.
XCheck that the trailer lighting system is work-ing.
XPush the combination switch upwards/down-wards and check whether the correspondingturn signal on the trailer flashes.
A trailer that is connected is recognized onlywhen the electrical connection is establishedcorrectly and when the lighting system is work-ing properly. The function of other systems alsodepends on this, for example:
RESP®
RPARKTRONIC
RActive Parking Assist
RActive Blind Spot Assist
RActive Lane Keeping Assist
Vehicles with AIR BODY CONTROL: if you coupleup a trailer, the vehicle always remains at high-way level. Observe the following note when cou-pling up a trailer:
RUnless highway level has been set manually,the vehicle is automatically lowered to high-way level. If a speed of 5 mph (8 km/h) hasbeen reached, this may be the case.
These restrictions apply to accessories that aresupplied with power via the trailer socket in yourvehicle, e.g. a rear bicycle rack.
Observe the maximum permissible trailerdimensions (width and length).
Most U.S. states and all Canadian provincesrequire by law:
RSafety chains between the towing vehicle andthe trailer. The chains should be cross-woundunder the trailer drawbar. They must be fas-tened to the vehicle's trailer coupling, not tothe bumper or the axle.
Leave enough play in the chains to make tightcornering possible.
RA separate brake system for certain types oftrailer.
RSafety switch for braked trailers. Check thespecific legal requirements applicable to yourstate.
If the trailer becomes detached from the tow-ing vehicle, the safety feature applies thetrailer brakes.
Towing a trailer
There are several legal requirements for towinga trailer, e.g. the maximum permissible speed.Make sure that your car/trailer combinationcomplies with the local regulations:
Rin your place of residence
Rat your destination
The police and local authorities can provide reli-able information.
To accumulate driving experience and accustomyourself to the new handling characteristics,practice the following at a location where thereis no traffic:
RCornering
RStopping
RBacking up
Check the following before the journey:
RTrailer tow hitch
RSafety switch for braked trailers
RSafety chains
RElectrical connections
RLighting system
RWheels and tires
RLoad securing
Adjust the exterior mirrors so that you have aclear view of the rear section of the trailer.
If the trailer is equipped with electronically con-trolled brakes, pull away carefully in the car/trailer combination. Brake manually using thebrake controller and check whether the brakesfunction correctly.
Regularly check that the load is secure.
When towing a trailer, your vehicle's handlingcharacteristics will be different in comparisonwith when driving without a trailer.
The vehicle/trailer combination:
Ris heavier
Ris restricted in its acceleration and gradient-climbing capability
Rhas an increased braking distance
Ris affected more by strong crosswinds
Rdemands more sensitive steering
Rhas a larger turning circle
Avoid sudden steering movements.
Avoid braking abruptly. If possible, brake gentlyat first to allow the trailer to run on. Then,increase the braking force rapidly.
Towing a trailer205
Driving and parking
Z
Page 208 of 370
When overtaking, pay particular attention to theextended length of your vehicle/trailer combi-nation.
Due to the length of the vehicle/trailer combi-nation, you require additional road space whenovertaking before you can change back to theoriginal lane.
If the automatic transmission repeatedly shiftsbetween gears on uphill or downhill gradients,shift to a lower gear.
Driving in a lower gear and at a reduced speeddecreases the risk of engine damage.
If the coolant temperature increases signifi-cantly when climate control is switched on,switch climate control off.
Coolant heat can also be dissipated by openingthe windows and switching the ventilationblower and the interior temperature to the high-est level.
Decoupling a trailer
GWARNING
If you uncouple a trailer with the overrun
brake engaged, you could trap your hand
between the vehicle and the trailer drawbar.
There is a risk of injury.
Do not uncouple a trailer if the overrun brake
is engaged.
GWARNING
Vehicles with level control:
The vehicle is lowered as soon as you discon-
nect the trailer cable. This could result in your
limbs or those of other people that are
between the vehicle body and tires or under-
neath the vehicle being trapped. There is a
risk of injury.
Make sure that nobody is in the immediate
vicinity of the wheel housings or under the
vehicle when you disconnect the trailer cable.
!Do not disconnect a trailer with an engagedoverrun brake. Otherwise, your vehicle couldbe damaged by the rebounding of the overrunbrake.
XApply the vehicle's parking brake manually.
XShift the transmission to position].
XClose all doors and the tailgate.
XSwitch off the engine.
XSecure the vehicle and trailer against rollingaway.
XRemove the trailer cable.
XRemove the safety chains, if there are any.
XUncouple the trailer.
Removing the ball coupling
XObserve the manufacturer's installationinstructions.
XPress the protective cap into the ball couplingrecess.
XMake sure that the protective cap is firmly inplace.
Observe the loading guidelines (Ypage 278)and the safety notes regarding stowage spaces(Ypage 278).
Information on cleaning and care of the trailertow hitch (Ypage 310).
Trailer power supply
!Accessories with a maximum power con-sumption of 180 W can be connected to thepermanent power supply.
You must not charge a trailer battery using thepower supply.
The trailer socket of your vehicle is equipped atthe factory with a permanent power supply.
The permanent power supply is supplied viatrailer socket pin 4.
The trailer's permanent power supply isswitched off in the event of low vehicle supplyvoltage and after six hours at the latest.
A qualified specialist workshop can providemore information about installing the trailerelectrics.
Permissible trailer loads and trailer
drawbar noseweights
Weight specifications
The gross trailer weight is calculated as theweight of the trailer plus the weight of the loadand the trailer's equipment.
206Towing a trailer
Driving and parking