display MERCEDES-BENZ GLC-Class 2016 X253 Comand Manual
[x] Cancel search | Manufacturer: MERCEDES-BENZ, Model Year: 2016, Model line: GLC-Class, Model: MERCEDES-BENZ GLC-Class 2016 X253Pages: 222, PDF Size: 6.39 MB
Page 32 of 222
Adjusting the volumefor phone calls
You can adjust thevolume for hands-free
mod eduring atelephon ecall .
XTurn th ethumbwheel to th eright of th e
controller .
or
XPress th eW orX buttonon th emul-
tifunction steering wheel.
iSetting th evolume for th eVoic eControl
Syste mvoice output ,see th eseparat e
operating instructions.
Switching the sound on oroff
Media source sound
XPress th ethumbwheel to th eright of th e
controller .
or
XPress th e8 buttonon th emultifunction
steering wheel.
iIf th eaudio output is switched off ,th e
status lin ewill sho wthe8 symbol. If
you switch th emedia source or chang eth e
volume, th esoun dis automatically
switched on .
Switching navigati onannouncements
off and onagain
XTo switch offnavigation announce-
ments :press th ethumbwheel to th eright
of th econtroller during th eannouncement.
The Spoken
drivin grecommendations
havebee ndeactivated.message
appears.
XTo switch navigation announcement s
back on: switch COMAND off and then on
again (
Ypage 29).
or
XStart ane wrout ecalculation (Ypage 69).or
XSelec
t+: while rout eguidance is active ,
sho wthemen uand pre ssthecontroller
(
Ypage 87) .
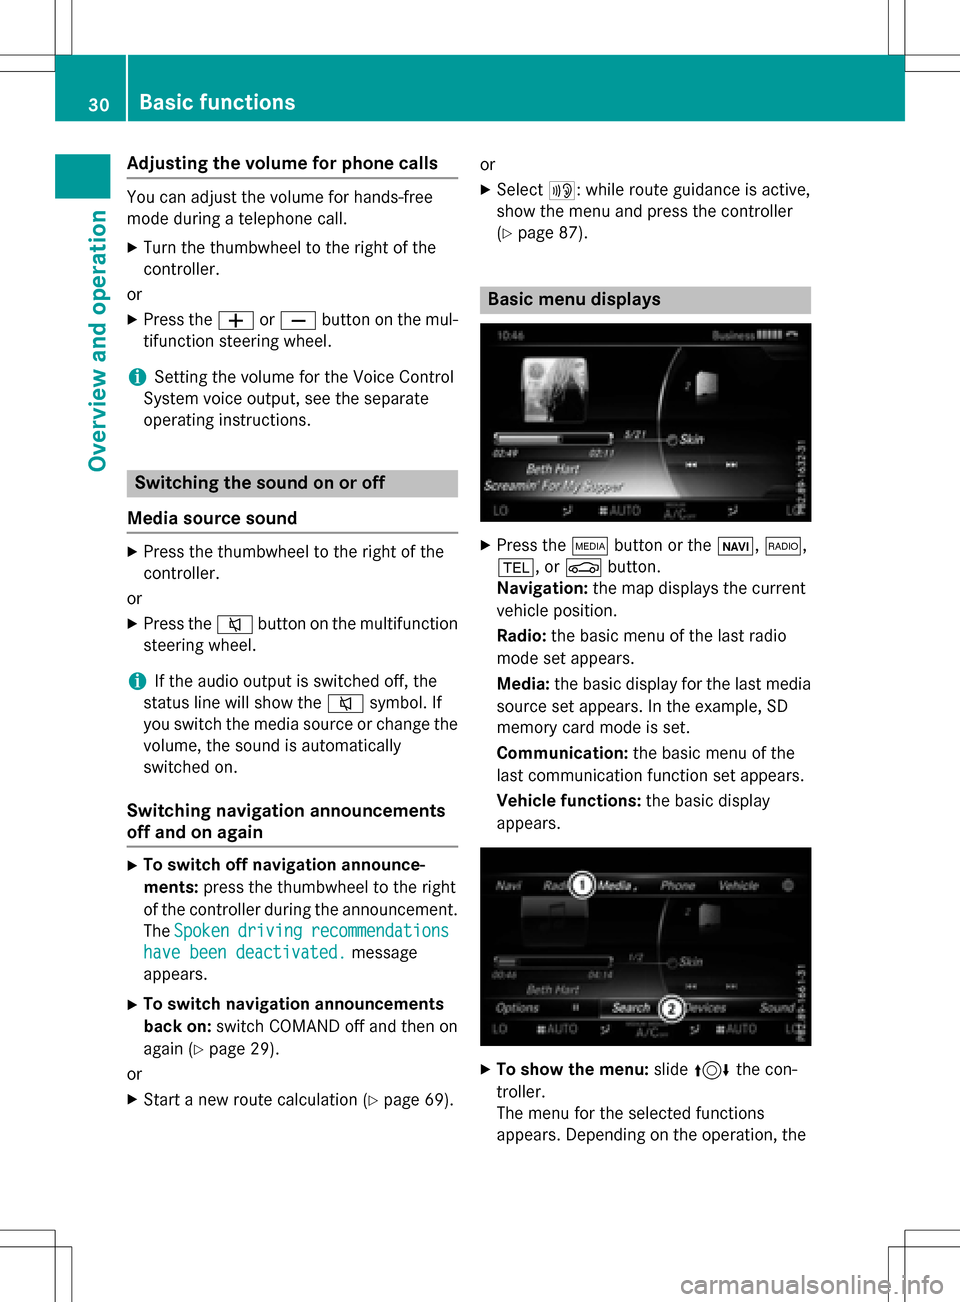
Basic menu displays
XPresstheÕ buttonor th eß, $,
%, orØ button.
Navigation: themap displays th ecurren t
vehicl eposition .
Radio :th ebasic men uof th elast radi o
mod e set appear s.
Media: thebasic display for th elast media
source set appears. In th eexample, SD
memory car dmod eis set.
Communication: thebasic men uof th e
last communication function set appears.
Vehicle functions: thebasic display
appear s.
XTo sho wthemenu: slide4 thecon-
troller .
The men ufor th eselected function s
appears. Dependin gon th eoperation ,th e
30Basic functions
Overview and operation
Page 34 of 222
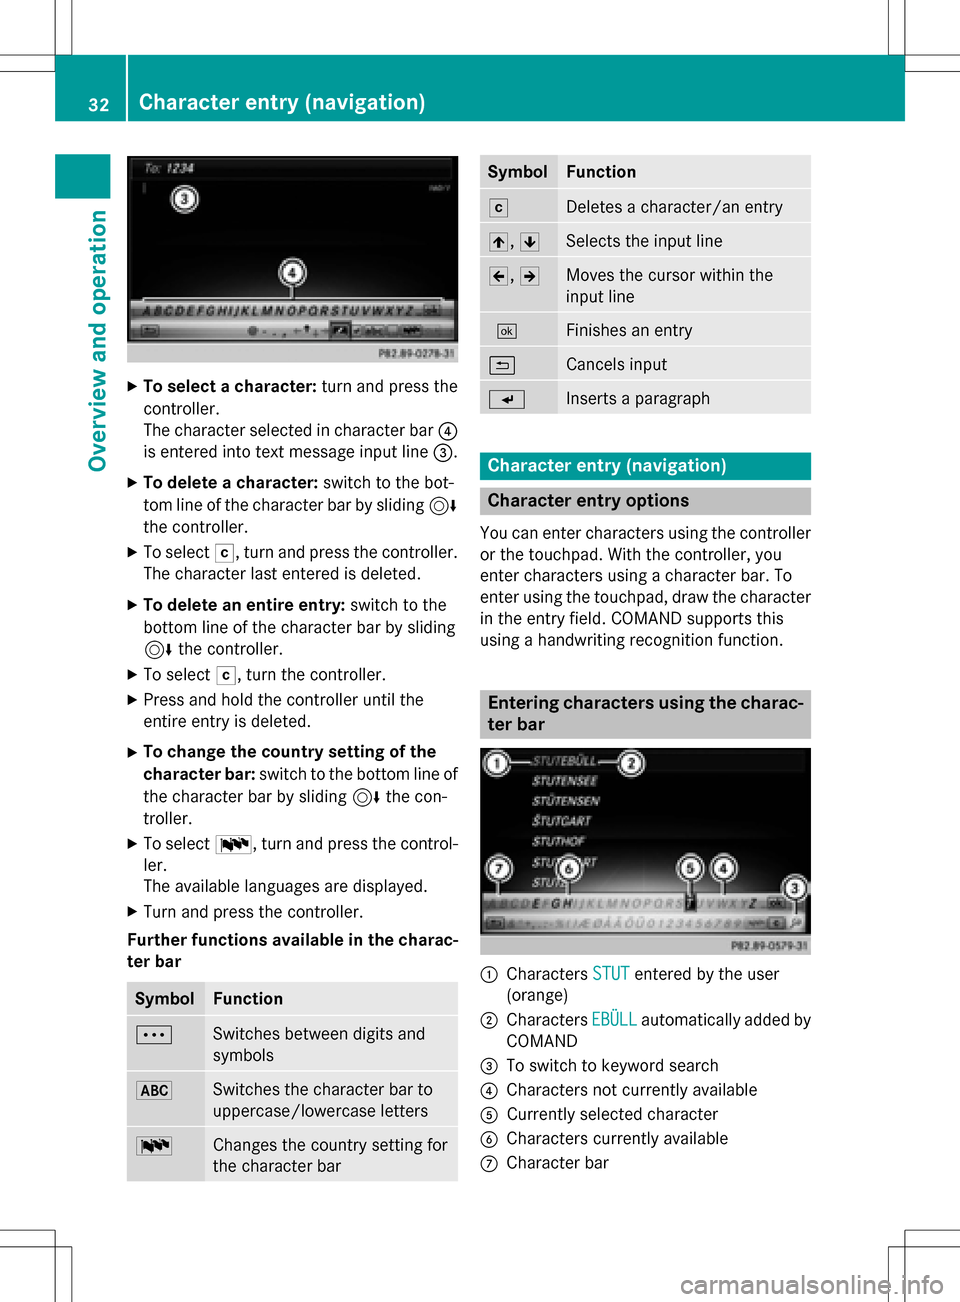
XTo select a character:turn and press the
controller.
The character selected in character bar ?
is entered into text message input line =.
XTo delete a character:switch to the bot-
tom line of the character bar by sliding 6
the controller.
XTo select F, turn and press the controller.
The character last entered is deleted.
XTo delete an entire entry: switch to the
bottom line of the character bar by sliding
6 the controller.
XTo select F, turn the controller.
XPress and hold the controller until the
entire entry is deleted.
XTo change the country setting of the
character bar: switch to the bottom line of
the character bar by sliding 6the con-
troller.
XTo select B, turn and press the control-
ler.
The available languages are displayed.
XTurn and press the controller.
Further functions available in the charac-
ter bar
SymbolFunction
ÄSwitches between digits and
symbols
*Switches the character bar to
uppercase/lowercase letters
BChanges the country setting for
the character bar
SymbolFunction
FDeletes a character/an entry
4, 5Selects the input line
2,3Moves the cursor within the
input line
¬Finishes an entry
&Cancels input
SInserts a paragraph
Character entry (navigation)
Character entry options
You can enter characters using the controller
or the touchpad. With the controller, you
enter characters using a character bar. To
enter using the touchpad, draw the character
in the entry field. COMAND supports this
using a handwriting recognition function.
Entering characters using the charac-
ter bar
:Characters STUTentered by the user
(orange)
;Characters EBÜLLautomatically added by
COMAND
=To switch to keyword search
?Characters not currently available
ACurrently selected character
BCharacters currently available
CCharacter bar
32Character entry (navigation)
Overview and operation
Page 36 of 222
SymbolFunction
èSwitches to keyword search
(
Ypage 70)
4,5Selects the input line
2,3Moves the cursor within the
input line
¬Confirms an entry
&Cancels input
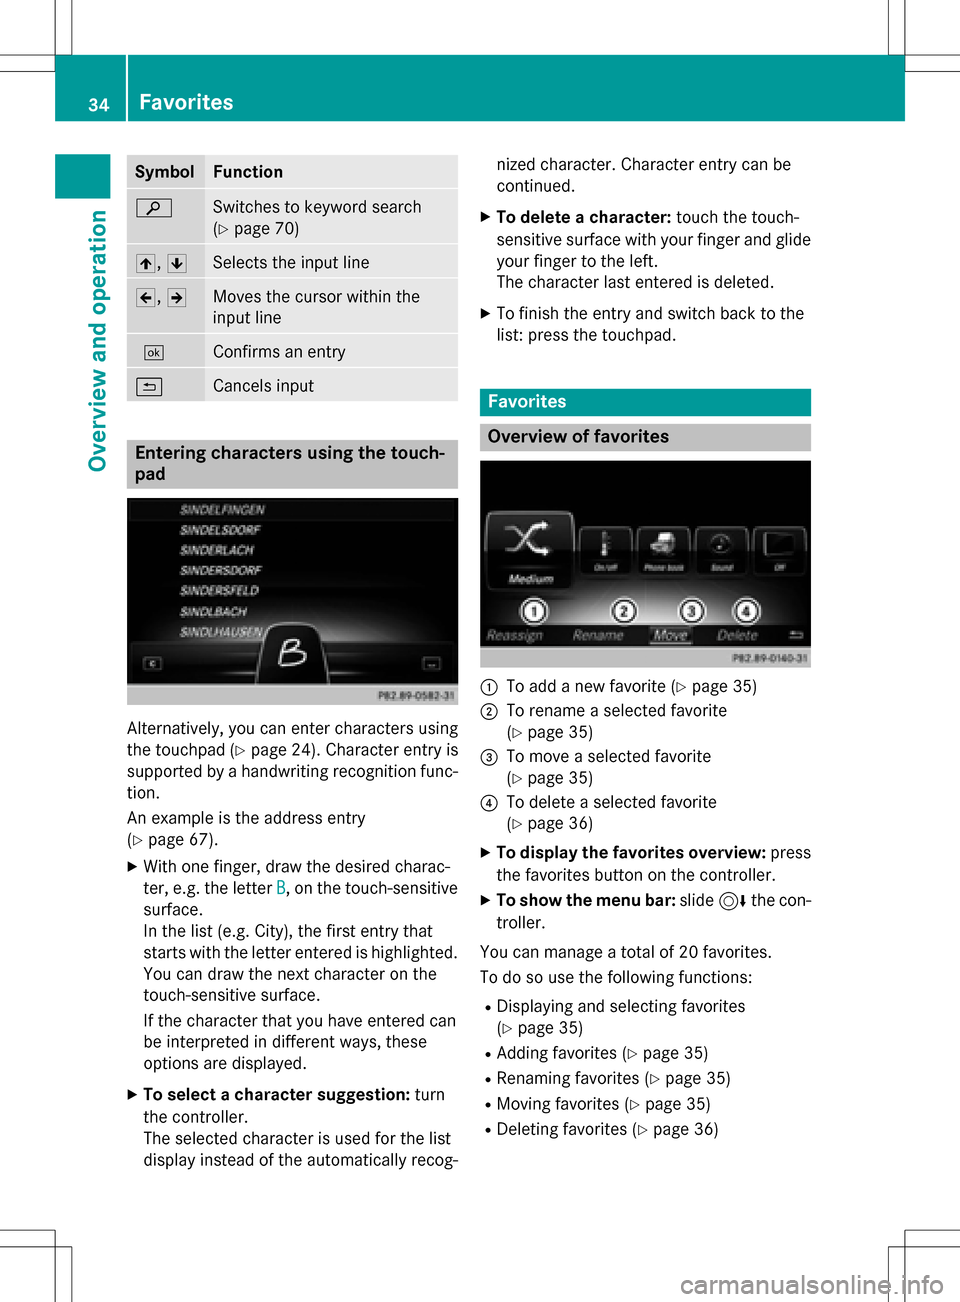
Entering characters using the touch-
pad
Alternatively, you can enter characters using
the touchpad (
Ypage 24). Character entry is
supported by a handwriting recognition func-
tion.
An example is the address entry
(
Ypage 67).
XWith one finger, draw the desired charac-
ter, e.g. the letter B
, on the touch-sensitive
surface.
In the list (e.g. City), the first entry that
starts with the letter entered is highlighted.
You can draw the next character on the
touch-sensitive surface.
If the character that you have entered can
be interpreted in different ways, these
options are displayed.
XTo select a character suggestion: turn
the controller.
The selected character is used for the list
display instead of the automatically recog- nized character. Character entry can be
continued.
XTo delete a character:
touch the touch-
sensitive surface with your finger and glide
your finger to the left.
The character last entered is deleted.
XTo finish the entry and switch back to the
list: press the touchpad.
Favorites
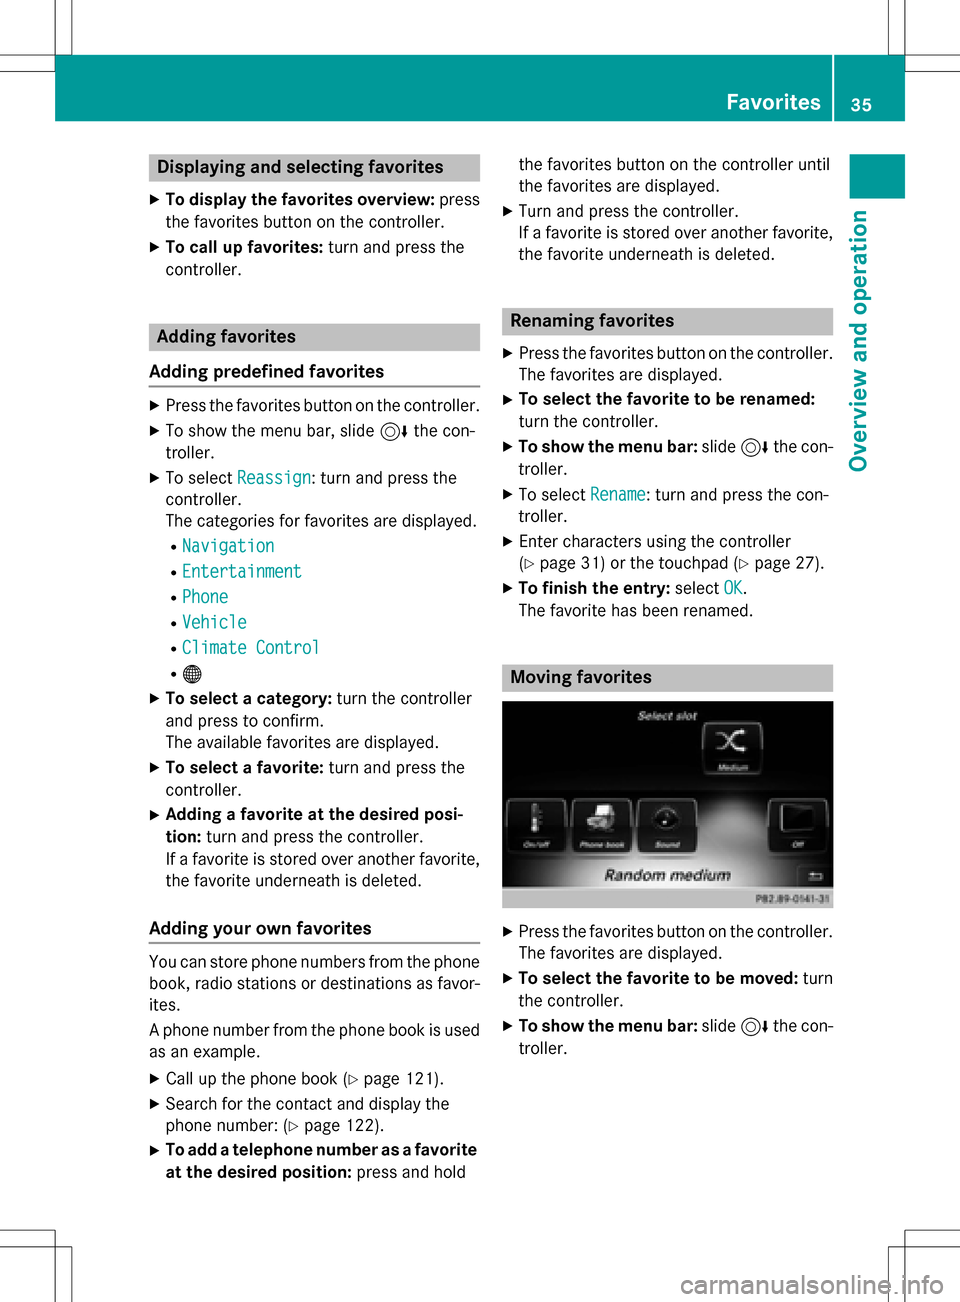
Overview of favorites
:To add a new favorite (Ypage 35)
;To rename a selected favorite
(
Ypage 35)
=To move a selected favorite
(
Ypage 35)
?To delete a selected favorite
(
Ypage 36)
XTo display the favorites overview: press
the favorites button on the controller.
XTo show the menu bar: slide6the con-
troller.
You can manage a total of 20 favorites.
To do so use the following functions:
RDisplaying and selecting favorites
(
Ypage 35)
RAdding favorites (Ypage 35)
RRenaming favorites (Ypage 35)
RMoving favorites (Ypage 35)
RDeleting favorites (Ypage 36)
34Favorites
Overview and operation
Page 37 of 222
Displaying andselecting favorites
XTo display th efavorites overview: press
th efavorites butto non th econtroller .
XTo callup favorites: turn and press th e
controller .
Adding favorites
Adding predefined favorites
XPress th efavorites butto non th econtroller .
XTo showthemen ubar ,slid e6 thecon-
troller.
XTo selec tReassign:turn and press th e
controller .
The categorie sfo rfavorites are displayed .
RNavigation
REntertainmen t
RPhone
RVehicle
RClimateContro l
R®
XTo selec t acategory: turn thecontroller
and press to confirm .
The available favorites are displayed .
XTo select afavorite: turn and press th e
controller .
XAddingafavorit eat th edesired posi-
tion: turn and press th econtroller .
If afavorit eis stored over another favorite,
th efavorit eunderneat his deleted.
Adding you rown favorites
You can stor ephone number sfrom th ephone
book, radio station sor destination sas favor -
ites.
A phone number from th ephone boo kis used
as an example.
XCall up th ephone boo k (Ypage 121).
XSearchfo rth econtact and display th e
phone number : (
Ypage 122).
XTo add atelephon enumber as afavorit e
at th edesired position: press and holdth
efavorites butto non th econtroller until
th efavorites are displayed .
XTurnand press th econtroller .
If afavorit eis stored over another favorite,
th efavorit eunderneat his deleted.
Renaming favorites
XPress th efavorites butto non th econtroller .
The favorites are displayed .
XTo selectth efavorit eto be renamed:
turn th econtroller .
XTo show th emenu bar: slide6 thecon-
troller.
XTo selec tRename:turn and press th econ-
troller.
XEnte rcharacters usin gth econtroller
(
Ypage 31) or th etouchpad (Ypage 27).
XTo finish th eentry :selec tOK.
The favorit ehas been renamed.
Moving favorites
XPress th efavorites butto non th econtroller .
The favorites are displayed .
XTo selectth efavorit eto be moved :turn
th econtroller .
XTo show th emenu bar: slide6 thecon-
troller.
Favorites35
Overview and operation
Page 38 of 222
XTo selectMove: turn and press the control-
ler.
XTo store the favorite in the desired
order: turn and press the controller.
If a favorite is stored over another favorite,
the favorite underneath is deleted.
Deleting favorites
XPress the favorites button on the controller.
The favorites are displayed.
XTo select a favorite to be deleted: turn
the controller.
XTo show the menu bar: slide6the con-
troller.
XTo select Delete: turn and press the con-
troller.
XTo select Yes: turn and press the controller.
The favorite is deleted.
XIf you select No, the process will be can-
celed.
36Favorites
Overview and operation
Page 39 of 222
Your COMAND equipment..................38
Important safet ynotes ...................... .38
Display settings .................................. .38
Time settings ...................................... .39
Text reader settings ............................41
Voice Contro lSyste msettings ..........41
WiFi ...................................................... 42
Bluetoot h
®settings ............................ 44
Automatic volume adjustment ..........45
Setting th esyste mlanguage .............45
Calling up an dediting th eFavor -
ites function ........................................ 45
Importing/exporting data ..................46
Reset function .................................... .48
37
System settings
Page 40 of 222
Your COMANDequipment
i
These operatin ginstruction sdescribe all
th estandar dan doptional equipmen tof
your COMAN Dsystem, as available at th e
time of going to print .Country-specifi cdif -
ference sare possible. Bear in min dthat
your vehicle may no tfeature all function s
described here. Thi salso applies to safety-
relevant systems an dfunctions.
iRead th einformation on qualified special-
ist workshop sin th evehicle Operator's
Manual.
Important safet ynotes
GWARNING
If you operat emobile communication equip-
men twhil edriving, you will be distracted from
traffic conditions. You could also los econtro l
of th evehicle. There is aris kof an accident.
Only operat ethis equipment when th evehicle
is stationary.
GWARNING
SD memor ycards are small parts .The ycan be
swallowe dan dcause asphyxiation .Thi s
poses an increase dris kof injury or eve nfatal
injury.
Kee pSD memor ycards out of th ereach of
children .If an SD memor ycar dis swallowed,
see kimmediate medical attention .
You mustobserv eth elega lrequirements fo r
th ecountry in whic hyou are currentl ydrivin g
when operatin gmobile communication s
equipmen tin th evehicle.
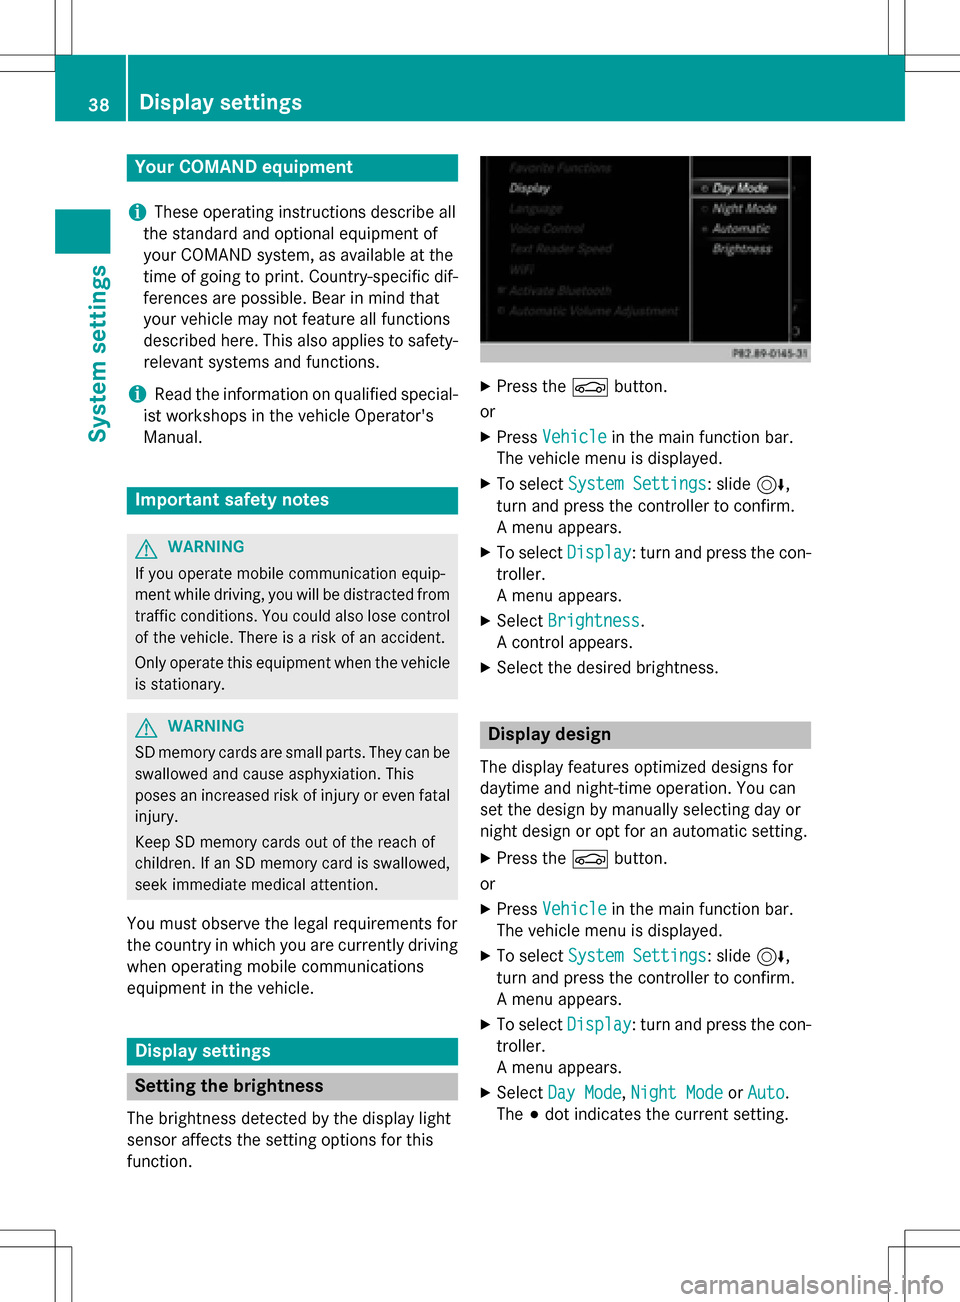
Display settings
Setting th ebrightness
The brightness detecte dby th edisplay ligh t
sensor affects th esetting option sfo rthis
function .
XPress theØ button.
or
XPress Vehicl ein themain function bar .
The vehicle men uis displayed.
XTo selec tSystem Settings:slid e6,
turn an dpress th econtroller to confirm .
A men uappears .
XTo selec tDispla y:turn an dpress th econ-
troller.
A men uappears .
XSelectBrightness.
A contro lappears .
XSelectth edesire dbrightness.
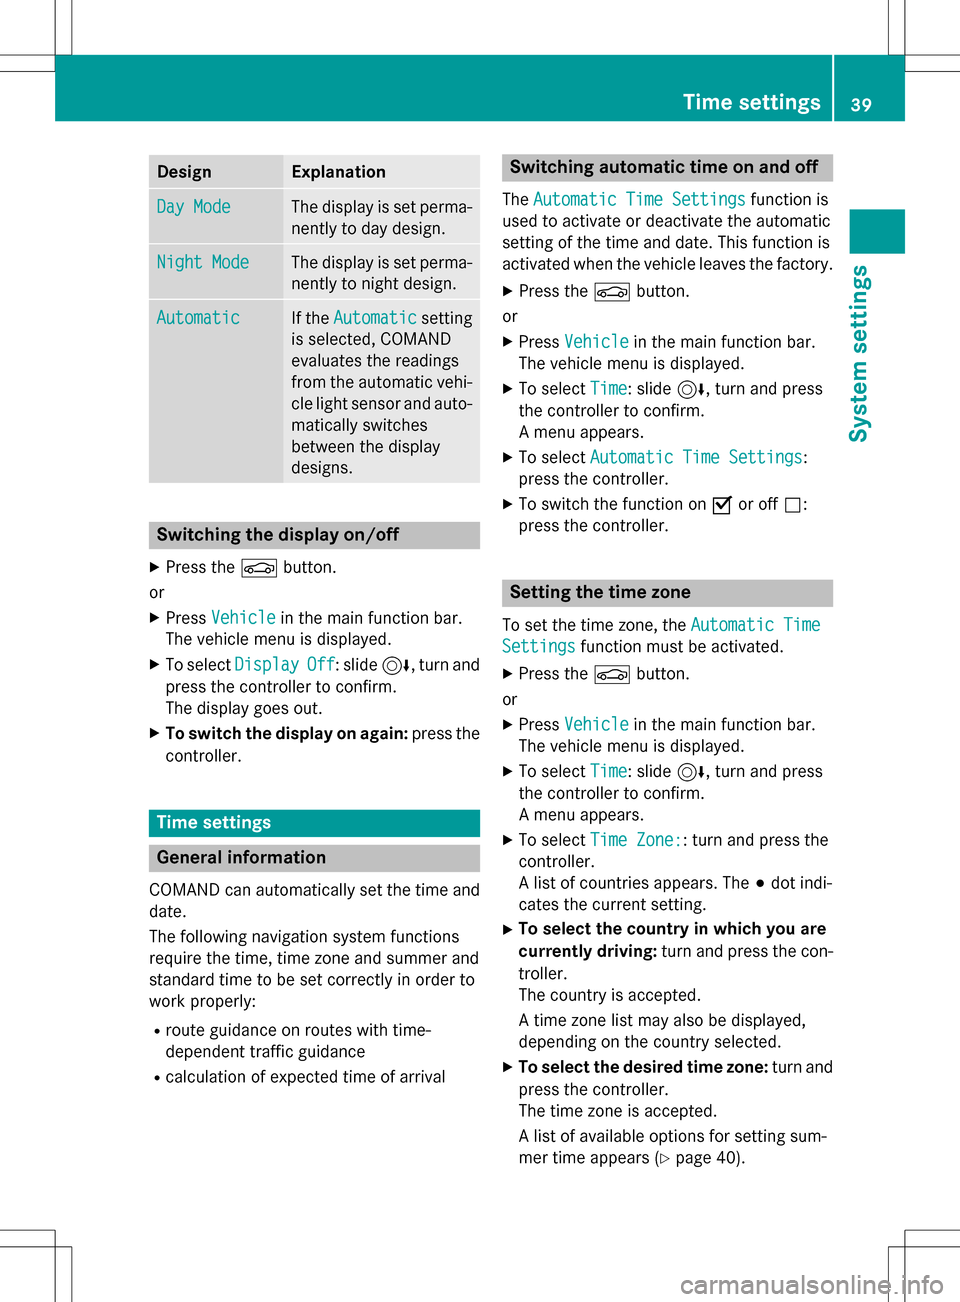
Display design
The display feature soptimize ddesign sfo r
daytime an dnight-time operation .You can
set th edesign by manually selecting day or
night design or opt fo ran automatic setting .
XPress theØ button.
or
XPress Vehicl ein themain function bar .
The vehicle men uis displayed.
XTo selec tSystem Settings:slid e6,
turn an dpress th econtroller to confirm .
A men uappears .
XTo selec tDispla y:turn an dpress th econ-
troller.
A men uappears .
XSelectDa yMode,Nigh tModeor Auto.
The #dot indicates th ecurren tsetting .
38Display settings
System settings
Page 41 of 222
DesignExplanation
Day ModeThe display is set perma-
nently to day design .
Night ModeThe display is set perma-
nently to night design .
AutomaticIf theAutomaticsetting
is selected, COMAND
evaluates th ereadings
from th eautomati cvehi-
cle ligh tsensor and auto-
matically switches
between th edisplay
designs.
Switchin gth edisplay on/of f
XPress theØ button.
or
XPress Vehicl ein themain function bar.
The vehicl emen uis displayed.
XTo select DisplayOff:slid e6, turnand
press th econtroller to confirm .
The display goe sout .
XTo switch th edisplay on again: press the
controller .
Time settings
General information
COMAND can automatically set th etime and
date.
The following navigation system function s
require th etime, time zone and summer and
standard time to be set correctl yin order to
wor kproperly:
Rroute guidance on route swit htime-
dependen ttraffic guidance
Rcalculation of expecte dtime of arrival
Switchin gautomatic time on and off
The Automatic Tim eSettingsfunction is
used to activat eor deactivat eth eautomati c
setting of th etime and date. This function is
activated when th evehicl eleaves th efactory.
XPress th eØ button.
or
XPress Vehicl ein themain function bar.
The vehicl emen uis displayed.
XTo select Time:slid e6, turnand press
th econtroller to confirm .
A men uappears .
XTo select Automatic Tim eSettings:
press th econtroller .
XTo switch th efunction on Oor of fª:
press th econtroller .
Setting th etime zon e
To set thetime zone ,th eAutomatic Tim e
Settingsfunction mustbe activated.
XPress th eØ button.
or
XPress Vehicl ein themain function bar.
The vehicl emen uis displayed.
XTo select Time:slid e6, turnand press
th econtroller to confirm .
A men uappears .
XTo select TimeZone::tur nand press th e
controller .
A list of countrie sappears .The #dot indi-
cates th ecurren tsetting .
XTo select th ecountr yin which you ar e
currently driving: turnand press th econ-
troller.
The country is accepted.
A time zone list may also be displayed,
dependin gon th ecountry selected.
XTo select th edesired time zone: turnand
press th econtroller .
The time zone is accepted.
A list of available option sfo rsetting sum -
mer time appears (
Ypage 40).
Time settings39
System settings
Z
Page 42 of 222
Setting summer and standard time
You can use theDaylight Saving Time
menu to set automatic summer time change-
over or switch the summer time setting on or
off. The changeover to summer time advan-
ces the time by one hour.
TheDaylight Saving Time
menu or the
Automatic
option is not available in all coun-
tries.
XPress the Øbutton.
or
XPress Vehiclein the main function bar.
The vehicle menu is displayed.
XTo select Time: slide6, turn and press
the controller to confirm.
A menu appears.
XTo select Daylight Saving Time: turn
and press the controller.
A list of available options for setting sum-
mer time appears.
XTo select Automatic,Onor Off: turn and
press the controller.
SettingFunction
AutomaticThe summer and
standard time are
automatically
changed over.
OnThe clock is
advanced one hour
ahead of standard
time.
OffThe standard time
for the chosen time
zone is selected.
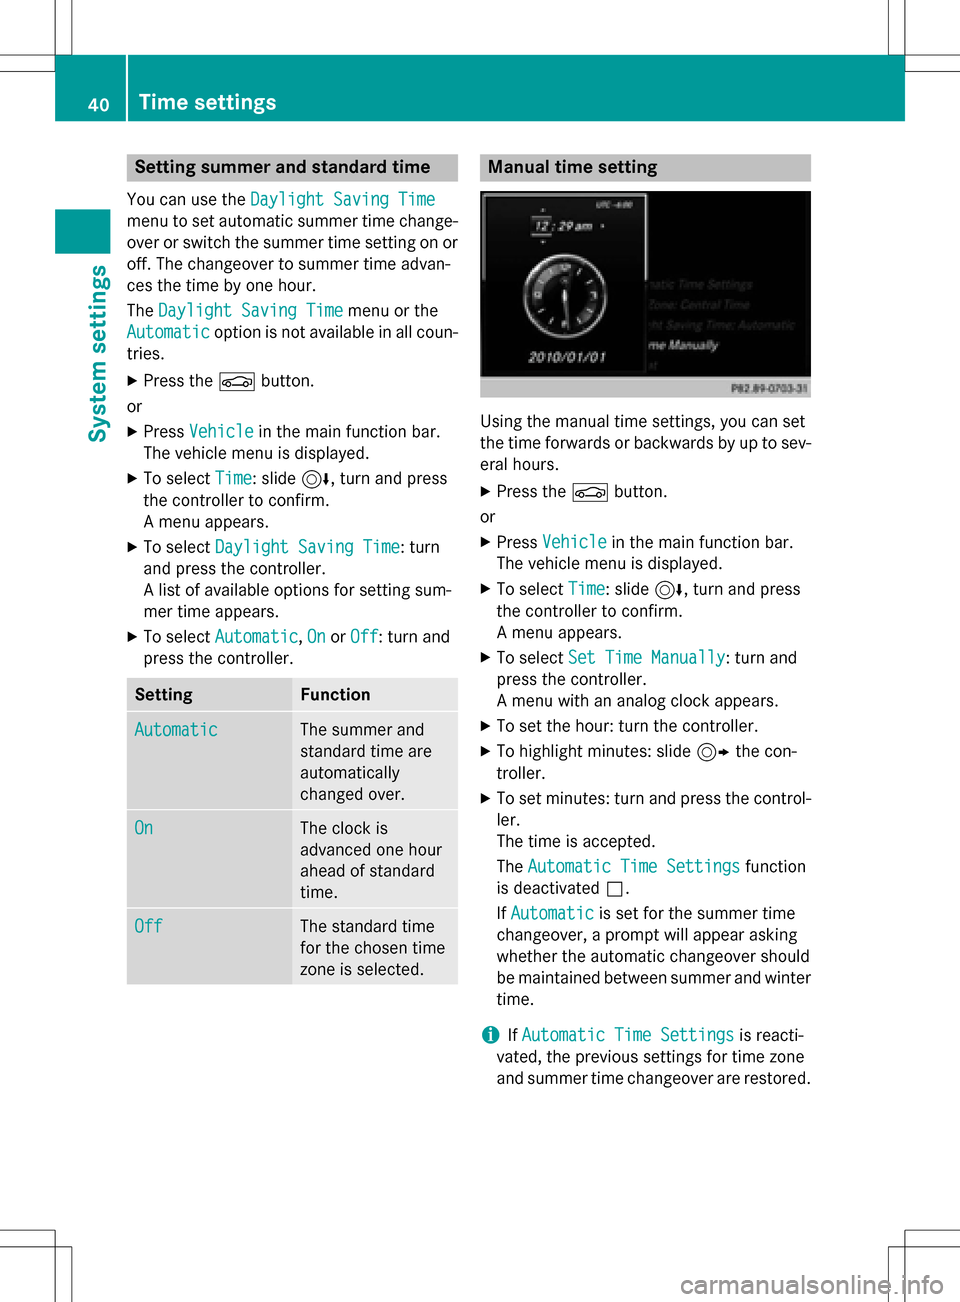
Manual time setting
Using the manual time settings, you can set
the time forwards or backwards by up to sev-
eral hours.
XPress the Øbutton.
or
XPress Vehiclein the main function bar.
The vehicle menu is displayed.
XTo select Time: slide6, turn and press
the controller to confirm.
A menu appears.
XTo select Set Time Manually: turn and
press the controller.
A menu with an analog clock appears.
XTo set the hour: turn the controller.
XTo highlight minutes: slide 9the con-
troller.
XTo set minutes: turn and press the control-
ler.
The time is accepted.
The Automatic Time Settings
function
is deactivated ª.
If Automatic
is set for the summer time
changeover, a prompt will appear asking
whether the automatic changeover should
be maintained between summer and winter time.
iIf Automatic Time Settingsis reacti-
vated, the previous settings for time zone
and summer time changeover are restored.
40Time settings
System settings
Page 43 of 222
Setting the time and date format
Use this function to set the time and date for-mat for all displays in the vehicle.
XPress the Øbutton.
or
XPress Vehiclein the main function bar.
The vehicle menu is displayed.
XTo select Time: slide6, turn and press
the controller to confirm.
A menu appears.
XTo select Format: turn and press the con-
troller.
XTo select the desired date format: turn and
press the controller.
The #dot indicates the current setting.
XTo select the desired time format: turn and
press the controller.
The #dot indicates the current setting.
AbbreviationMeaning
YYYY/MM/DDYear/Month/Day
date format, year (all
four digits)
YY/MM/DDYear/Month/Day
date format, year
(two digits)
MM/DD/YYYYMonth/Day/Year
date format, year (all
four digits)
DD/MM/YYYYDay/Month/Year
date format, year (all
four digits)
HH:MM (24 hrs)Hours : Minutes
(24 hour time for-
mat)
HH:MM (AM/PM)Hours : Minutes
(AM/PM time for-
mat)
Text reader settings
XPress the Øbutton.
or
XPress Vehiclein the main function bar.
The vehicle menu is displayed.
XTo select System Settings: slide6,
turn and press the controller to confirm.
A menu appears.
XTo select Text Reader Speed: turn and
press the controller.
A list appears.
XSelect Fast,Mediumor Slow.
The #dot indicates the current setting.
Voice Control System settings
Opening/closing the help window
i
If the set system language is not suppor-
ted by the Voice Control System, English
will be selected.
The help window also shows you information
on audible instructions:
Rduring individualization
Rduring subsequent operation of the Voice
Control System
XPress the Øbutton.
or
XPress Vehiclein the main function bar.
The vehicle menu is displayed.
XTo select System Settings: slide6,
turn and press the controller to confirm.
A menu appears.
XTo select Voice Control: turn and press
the controller.
XSelect Help Window.
You have switched the help window on O
or off ª.
More information on the Voice Control Sys-
tem is available in the separate operating
instructions.
Voice Control System settings41
System settings
Z