wheel MERCEDES-BENZ GLC-Class 2016 X253 Owner's Manual
[x] Cancel search | Manufacturer: MERCEDES-BENZ, Model Year: 2016, Model line: GLC-Class, Model: MERCEDES-BENZ GLC-Class 2016 X253Pages: 418, PDF Size: 9.23 MB
Page 330 of 418
You can find further information on the
mbrace system under "Owners Online" at
http://www.mbusa.com.
The system has not been able to initiate an
MB Info call, if:
Rthe indicator lamp in MB Info call button
ïis flashing continuously.
Rno voice connection to the Mercedes-Benz
Customer Assistance Center was estab-
lished.
This can occur if the relevant mobile phone
network is not available, for example.
The Call Failed
message appears in the
multifunction display.
XTo end a call: press the~button on the
multifunction steering wheel.
or
XPress the corresponding COMAND/Audio
20 button for ending a phone call.
Call priority
When service calls are active, e.g. Roadside
Assistance or MB Info calls, an emergency
call can still be initiated. In this case, an emer-
gency call will take priority and override all
other active calls.
The indicator lamp of the respective button
flashes until the call is ended.
An emergency call can only be terminated by the Mercedes-Benz Customer Assistance
Center.
All other calls can be ended by pressing:
Rthe ~ button on the multifunction steer-
ing wheel
Rthe corresponding button in COMAND/
Audio 20 to end the voice call
When a call is initiated, the audio system is
muted.
The mobile phone is no longer connected to
COMAND/Audio 20.
However, if you want to use your mobile
phone, do so only when the vehicle is station-
ary and in a safe location.
Downloading destinations
Downloading destinations
Downloading destinations gives you access
to a database with over 15 million points of
interest (POIs). These can be downloaded on
the navigation system in your vehicle. If you
know the destination, the address can be
downloaded. Alternatively, you can obtain the
location of Points of Interest (POIs)/impor-
tant destinations in the vicinity.
Furthermore, you can download routes with
up to four way points.
You are prompted to confirm route guidance
to the address entered.
XSelect Yesby turning 3or sliding 1
the controller and confirm with 7.
The system calculates the route and sub-
sequently starts the route guidance with
the address entered.
If you select No
the address can be stored in
the address book.
The destination download function is availa-
ble if:
Rthe vehicle is equipped with a navigation
system.
Rthe relevant mobile phone network is avail- able and data transfer is possible.
Route Assistance
This service is part of the mbrace PLUS Pack-
age and cannot be purchased separately.
You can use the route assistance function
even if the vehicle is not equipped with a nav-
igation system.
Within the framework of this service, you
receive a professional and reliable form of
navigation support without having to leave
your vehicle.
The customer service representative finds a
suitable route depending on your vehicle's
current position and the desired destination.
You will then be guided live through the cur-
rent route section.
328Features
Stowage and features
Page 344 of 418
Working in the engine compartment poses a
risk of injury.
Where possible, let the engine cool down andtouch only the components described in the
following.
GWARNING
Windshield washer concentrate could ignite if it comes into contact with hot engine compo-
nents or the exhaust system. There is a risk of
fire and injury.
Make sure that no windshield washer con-
centrate is spilled next to the filler neck.
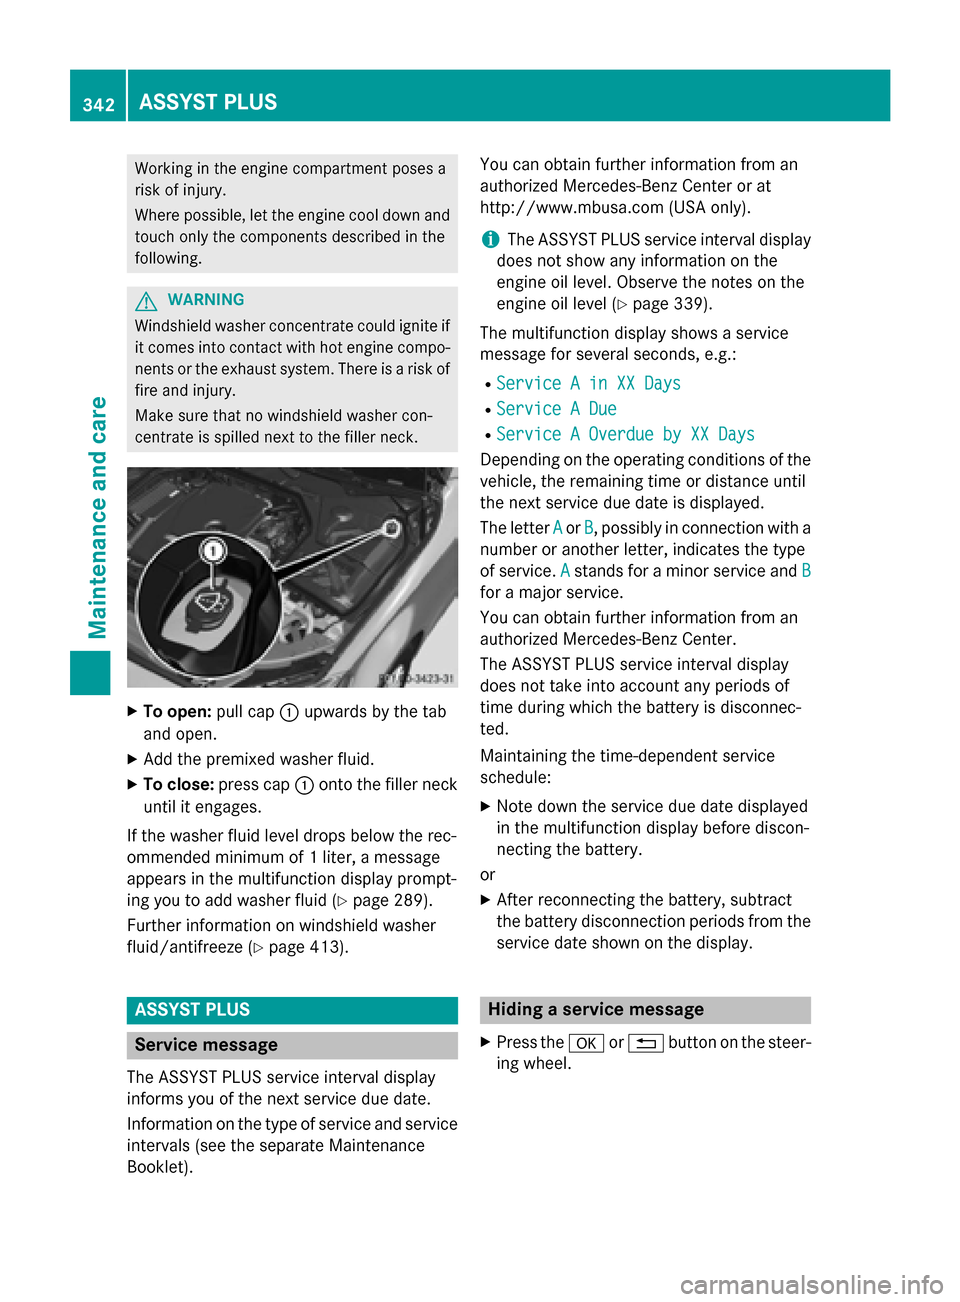
XTo open: pull cap:upwards by the tab
and open.
XAdd the premixed washer fluid.
XTo close: press cap :onto the filler neck
until it engages.
If the washer fluid level drops below the rec-
ommended minimum of 1 liter, a message
appears in the multifunction display prompt-
ing you to add washer fluid (
Ypage 289).
Further information on windshield washer
fluid/antifreeze (
Ypage 413).
ASSYST PLUS
Service message
The ASSYST PLUS service interval display
informs you of the next service due date.
Information on the type of service and service
intervals (see the separate Maintenance
Booklet). You can obtain further information from an
authorized Mercedes-Benz Center or at
http://www.mbusa.com (USA only).
iThe ASSYST PLUS service interval display
does not show any information on the
engine oil level. Observe the notes on the
engine oil level (
Ypage 339).
The multifunction display shows a service
message for several seconds, e.g.:
RService A in XX Days
RService A Due
RService A Overdue by XX Days
Depending on the operating conditions of the
vehicle, the remaining time or distance until
the next service due date is displayed.
The letter A
orB, possibly in connection with a
number or another letter, indicates the type
of service. A
stands for a minor service and B
for a major service.
You can obtain further information from an
authorized Mercedes-Benz Center.
The ASSYST PLUS service interval display
does not take into account any periods of
time during which the battery is disconnec-
ted.
Maintaining the time-dependent service
schedule:
XNote down the service due date displayed
in the multifunction display before discon-
necting the battery.
or
XAfter reconnecting the battery, subtract
the battery disconnection periods from the service date shown on the display.
Hiding a service message
XPress the aor% button on the steer-
ing wheel.
342ASSYST PLUS
Maintenance and care
Page 345 of 418
Displaying service messages
XSwitchon th eignition .
XUseò on thesteerin gwhee lto cal lup
th elist of menus.
XPress 9or: on thesteerin gwhee l
to selec tth eServic e
menuand confirm
wit ha.
XPress 9or: on thesteerin gwhee l
to selec tth eASSYST PLU S
submenuand
confirm wit ha.
The servic edue dat eappears in th emulti-
function display.
Information about Service
Resetting th eASSYS TPLUS service
interva ldisplay
!If th eASSYST PLU Sservic einterval dis -
play has been inadvertentl yreset ,this set -
ting can be correcte dat aqualified special-
ist workshop .
Hav eservic ewor kcarrie dout as described
in th eMaintenance Booklet .Thi smay oth-
erwise lead to increase dwear and damage
to th emajor assemblies or th evehicle.
A qualified specialis tworkshop ,e.g. an
authorized Mercedes-Ben zCenter, will reset
th eASSYST PLU Sservic einterval display
after th eservic ewor khas been carrie dout .
You can also obtain further information on
maintenance work, fo rexample.
Specia lservice requirement s
The specifiedmaintenance interval take sonly
th enormal operation of th evehicle into
account. Under arduous operatin gcondition s
or increase dload on th evehicle, mainte -
nance wor kmus tbe carrie dout more fre-
quently, fo rexample:
Rregular city drivin gwit hfrequent intermedi-
at estops
Rif th evehicle is primarily used to trave l
short distances
Ruse in mountainous terrain or on poo rroad
surfaces
Rif th eengin eis ofte nlef tidlin gfo rlon gperi-
ods
Under these or similar conditions, have, fo r
example, th eair filter, engin eoil and oil filte r
replaced or changed more frequently. Under
arduous operatin gconditions, th etires mus t
be checke dmore often. Further information
can be obtained at aqualified specialist work-
shop, e.g. an authorized Mercedes-Ben zCen -
ter.
Drivin gabroad
An extensive Mercedes-Ben zServic enetwor k
is also available in other countries. You can
obtain further information from any author -
ized Mercedes-Ben zCenter.
Car e
General notes
HEnvironmental not e
Dispose of empty packagin gand cleanin g
cloths in an environmentally responsible man -
ner.
!Fo rcleanin gyour vehicle, do no tuse any
of th efollowing :
Rdry, rough or har dcloths
Rabrasiv ecleanin gagents
Rsolvents
Rcleanin gagents containin gsolvents
Do no tscrub .
Do no ttouch th esurfaces or protective
films wit hhar dobjects ,e.g. arin gor ic e
scraper. You could otherwise scratch or
damage th esurfaces and protective film.
!Do no tpar kth evehicle fo ran extended
period straight after cleanin git,particularly
after havin gcleaned th ewheels wit hwhee l
cleaner. Wheel cleaners could caus e
increase dcorrosion of th ebrake discs and
brake pads/linings. Fo rthis reason ,you
Care343
Maintenance and care
Z
Page 346 of 418
should drive for a few minutes after clean-
ing. Braking heats the brake discs and the
brake pads/linings, thus drying them. The
vehicle can then be parked.
Regular care of your vehicle is a condition for
retaining the quality in the long term.
Use care products and cleaning agents rec-
ommended and approved by Mercedes-Benz.
Washing the vehicle and cleaning the
paintwork
Automatic car wash
GWARNING
Braking efficiency is reduced after washing
the vehicle. There is a risk of an accident.
After the vehicle has been washed, brake
carefully while paying attention to the traffic
conditions until full braking power is restored.
!If DISTRONIC PLUS or the HOLD function
is activated, the vehicle brakes automati-
cally in certain situations.
To prevent damage to the vehicle, deacti-
vate DISTRONIC PLUS and the HOLD func-
tion in the following or other similar situa-
tions:
Rwhen towing the vehicle
Rin the car wash
!Never clean your vehicle in a Touchless
Automatic Car Wash as these use special
cleaning agents. These cleaning agents can
damage the paintwork or plastic parts.
!Make sure that:
Rthe side windows and the sliding sunroof are fully closed.
Rthe ventilation/heating is switched off
(the OFF button has been pressed).
Rthe windshield wiper switch is at position
0.
Rthe 360° camera or rear view camera is
switched off.
The vehicle may otherwise be damaged.
!If the SmartKey is within the rear detec-
tion range of KEYLESS-GO, the following
situations, for example, could lead to the
unintentional opening of the trunk:
Rusing a car wash
Rusing a power washer
Make sure that the SmartKey is at least
10 ft (3 m) away from the vehicle.
!If the SmartKey is within the rear detec-
tion range of KEYLESS-GO, the following
situations, for example, could lead to the
unintentional opening of the tailgate:
Rusing a car wash
Rusing a power washer
Make sure that the SmartKey is at least 3 m
away from the vehicle.
!Make sure that the automatic transmis-
sion is in neutral position Nwhen washing
your vehicle in a tow-through car wash. The
vehicle may otherwise be damaged.
ROperating with the SmartKey:
Do not remove the SmartKey from the
ignition lock. Do not open the driver's
door when the engine is switched off or
at very low speeds. Otherwise, when in
transmission position Dor Rthe auto-
matic transmission will automatically
switch to park position Pand block the
wheels.
ROperating with the Start/Stop button:
Do not open the driver's door when the
engine is switched off or at very low
speeds. Otherwise, when in transmission
position Dor Rthe automatic transmis-
sion will automatically switch to park
position Pand block the wheels.
Observe the following to make sure that the
automatic transmission stay
s in positionN
neutral:
Operating with the SmartKey:
XMake sure that the ignition is switched on.
XMake sure that the vehicle is stationary.
XDepress and hold the brake pedal.
344Care
Maintenance and care
Page 348 of 418
Rtrim
Rventilation slots
Damaged seals or electrical components
can lead to leaks or failures.
!If the SmartKey is within the rear detec-
tion range of KEYLESS-GO, the following
situations, for example, could lead to the
unintentional opening of the trunk:
Rusing a car wash
Rusing a power washer
Make sure that the SmartKey is at least
10 ft (3 m) away from the vehicle.
!If the SmartKey is within the rear detec-
tion range of KEYLESS-GO, the following
situations, for example, could lead to the
unintentional opening of the tailgate:
Rusing a car wash
Rusing a power washer
Make sure that the SmartKey is at least 3 m
away from the vehicle.
!Edition 1 special model: parts of your
vehicle are covered with a decorative foil.
Maintain a distance of at least 70 cm
between the foil-wrapped parts of the vehi-
cle and the nozzle of the power washer.
Information about the correct distance is
available from the equipment manufac-
turer.
Move the power washer nozzle around
when cleaning your vehicle.
Cleaning the paintwork
!Do not affix:
Rstickers
Rfilms
Rmagnetic plates or similar items
to painted surfaces. You could otherwise
damage the paintwork.
Scratches, corrosive deposits, areas affected
by corrosion and damage caused by inade-
quate care cannot always be completely repaired. In such cases, visit a qualified spe-
cialist workshop.
XRemove dirt immediately, where possible,
while avoiding rubbing too hard.
XSoak insect remains with insect remover
and rinse off the treated areas afterwards.
XSoak bird droppings with water and rinse
off the treated areas afterwards.
XRemove coolant, brake fluid, tree resin,
oils, fuels and greases by rubbing gently
with a cloth soaked in petroleum ether or
lighter fluid.
XUse tar remover to remove tar stains.
XUse silicone remover to remove wax.
If water no longer forms "beads" on the paint
surface, use the paint care products recom-
mended and approved by Mercedes-Benz.
This is the case approximately every three to
five months, depending on the climate con-
ditions and the care product used.
If dirt has penetrated the paint surface or if
the paint ha s b
ecome dull, the paint cleaner
recommended and approved by Mercedes-
Benz should be used.
Do not use these care products in the sun or
on the hood while the hood is hot.
XUse a suitable touch-up stick, e.g. MB
Touch-Up Stick, to repair slight damage to
the paintwork quickly and provisionally.
Matte finish care
!Never polish the vehicle or the light alloy
wheels. Polishing causes the finish to
shine.
!The following may cause the paint to
become shiny and thus reduce the matte
effect:
Rstrong rubbing of the paintwork with
unsuitable materials
Rfrequent use of automatic car washes
Rwashing the vehicle in direct sunlight
!Never use paint cleaner, buffing or pol-
ishing products, or gloss preserver, e.g.
346Care
Maintenance and care
Page 349 of 418
wax. These products are only suitable for
high-gloss surfaces. Their use on vehicles
with matte finish leads to considerable sur-
face damage (shiny, spotted areas).
Always have paintwork repairs carried out
at a qualified specialist workshop.
!Do not use wash programs with a hot wax
treatment under any circumstances.
Observe these notes if your vehicle has a
clear matte finish. This will help you to avoid
damage to the paintwork due to incorrect
treatment.
These notes also apply to light alloy wheels
with a clear matte finish.
The vehicle should preferably be washed by
hand using a soft sponge, car shampoo and
plenty of water.
Use only insect remover and car shampoo
from the range of approved Mercedes-Benz
care products.
Cleaning the vehicle parts
Cleaning the wheels
GWARNING
The water jet from a circular jet nozzle (dirt
blasters) can cause invisible exterior damage
to the tires or chassis components. Compo-
nents damaged in this way may fail unexpect-
edly. There is a risk of an accident.
Do not use power washers with circular jet
nozzles to clean the vehicle. Have damaged
tires or chassis components replaced imme-
diately.
!Do not use acidic wheel cleaning products
to remove brake dust. This could damage
wheel bolts and brake components.
!Do not park the vehicle for an extended
period straight after cleaning it, particularly
after having cleaned the wheels with wheel
cleaner. Wheel cleaners could cause
increased corrosion of the brake discs and
brake pads/linings. For this reason, you should drive for a few minutes after clean-
ing. Braking heats the brake discs and the
brake pads/linings, thus drying them. The
vehicle can then be parked.
Cleaning the windows
GWARNING
You could become trapped by the windshield wipers if they start moving while cleaning the
windshield or wiper blades. There is a risk of
injury.
Always switch off the windshield wipers and
the ignition before cleaning the windshield or
wiper blades.
!Do not use dry cloths, abrasive products,
solvents or cleaning agents containing sol-
vents to clean the inside of the windows. Do
not touch the insides of the windows with
hard objects, e.g. an ice scraper or ring.
There is otherwise a risk of damaging the
windows.
!Clean the water drainage channels of the
windshield and the rear window at regular
intervals. Deposits such as leaves, petals
and pollen may under certain circumstan-
ces prevent water from draining away. This
can lead to corrosion damage and damage
to electronic components.
XClean the inside and outside of the win-
dows with a damp cloth and a cleaning
product that is recommended and
approved by Mercedes-Benz.
Cleaning wiper blades
GWARNING
You could become trapped by the windshield wipers if they start moving while cleaning the
windshield or wiper blades. There is a risk of
injury.
Always switch off the windshield wipers and
the ignition before cleaning the windshield or
wiper blades.
Care347
Maintenance and care
Z
Page 350 of 418
!Do not pull the wiper blade. Otherwise,
the wiper blade could be damaged.
!Do not clean wiper blades too often and
do not rub them too hard. Otherwise, the
graphite coating could be damaged. This
could cause wiper noise.
!Hold the wiper arm securely when folding
back. The windshield could be damaged if
the wiper arm smacks against it suddenly.
XFold the windshield wiper arms away from
the windshield.
XCarefully clean the wiper blades with a
damp cloth.
XFold the windshield wiper arms back again
before switching on the ignition.
Cleaning the exterior lighting
!Only use cleaning agents or cleaning
cloths which are suitable for plastic light
lenses. Unsuitable cleaning agents or
cleaning cloths could scratch or damage
the plastic light lenses.
XClean the plastic lenses of the exterior
lights with a wet sponge and a mild cleaning
agent, e.g. Mercedes-Benz car shampoo or cleaning cloths.
Cleaning the mirror turn signals
!Only use cleaning agents or cleaning
cloths that are suitable for plastic lenses.
Unsuitable cleaning agents or cleaning
cloths could scratch or damage the plastic lenses of the mirror turn signals.
XClean the plastic lenses of the mirror turn
signals in the exterior mirror housing usinga wet sponge and mild cleaning agent, e.g.
Mercedes-Benz car shampoo or cleaning
cloths.
Cleaning the side running board
!Do not clean the aluminum inserts of the
side running board with alkaline or acidic
cleaners, such as wheel cleaner. Do not use acidic wheel cleaners to remove brake
dust. The aluminum inserts could other-
wise be damaged.
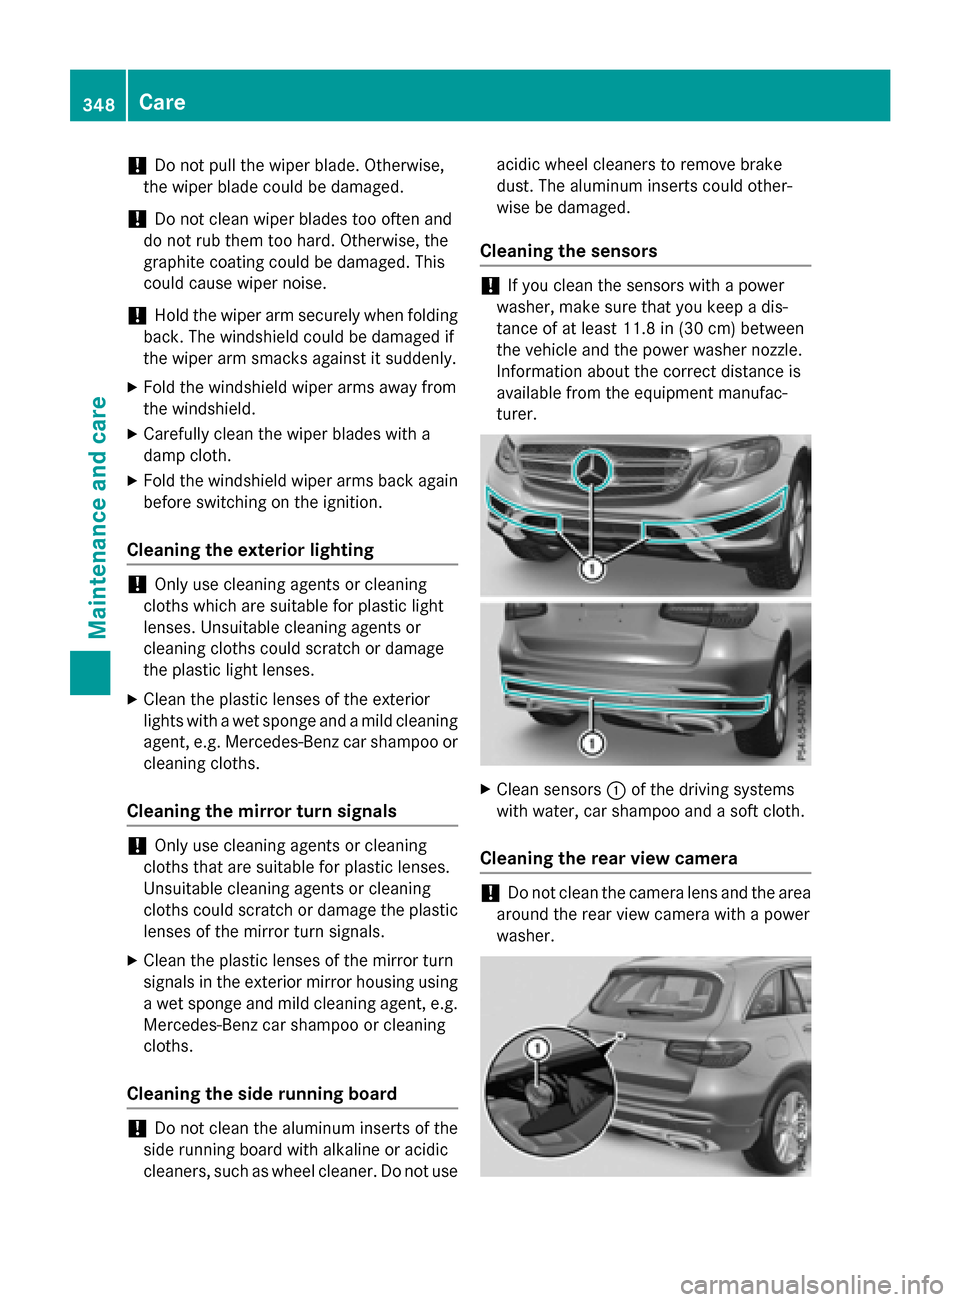
Cleaning the sensors
!If you clean the sensors with a power
washer, make sure that you keep a dis-
tance of at least 11.8 in (30 cm) between
the vehicle and the power washer nozzle.
Information about the correct distance is
available from the equipment manufac-
turer.
XClean sensors :of the driving systems
with water, car shampoo and a soft cloth.
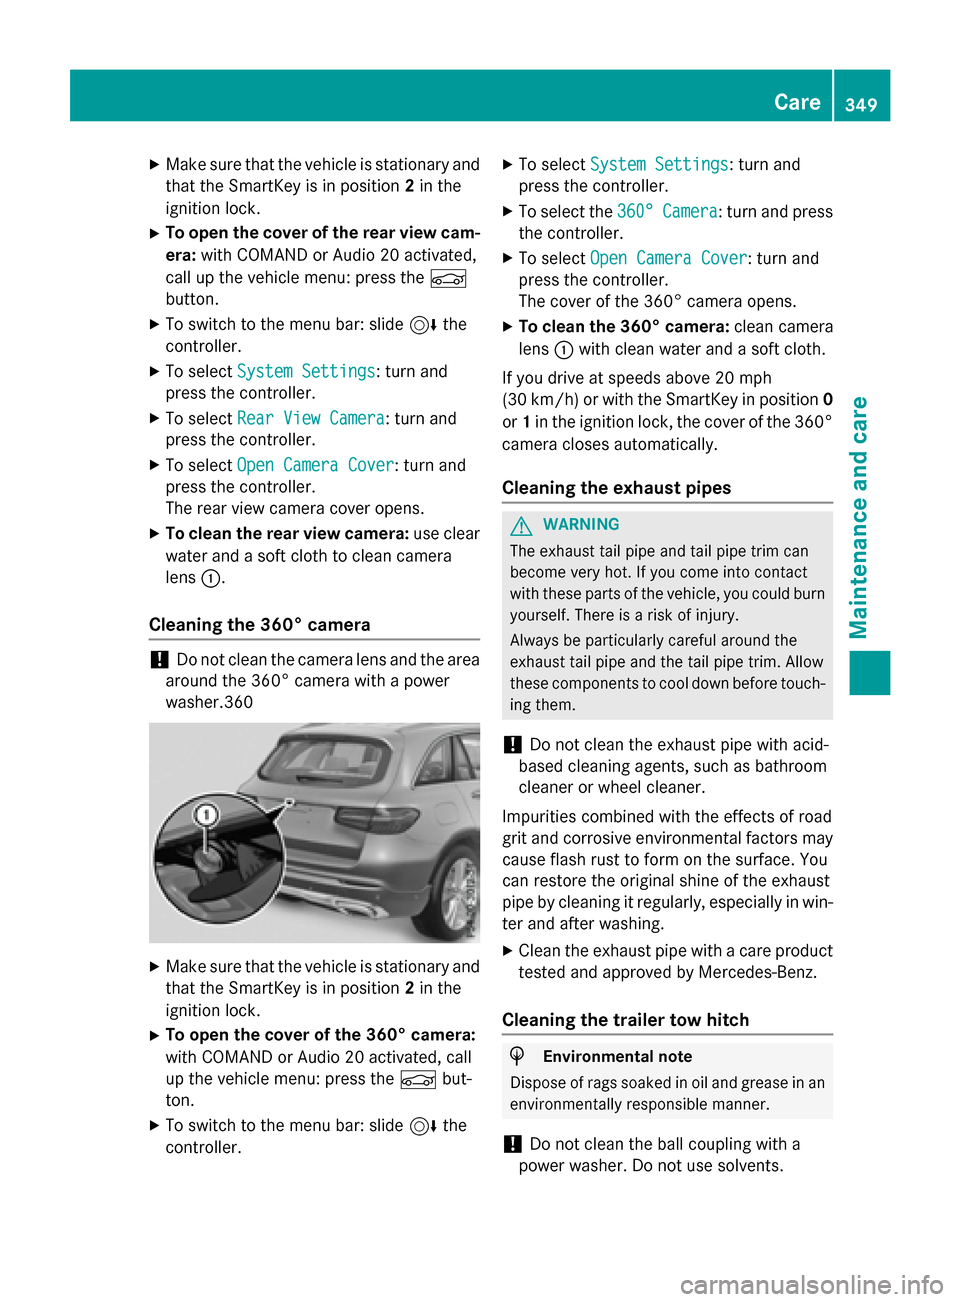
Cleaning the rear view camera
!Do not clean the camera lens and the area
around the rear view camera with a power
washer.
348Care
Maintenance and care
Page 351 of 418
XMake sure that the vehicle is stationary andthat the SmartKey is in position 2in the
ignition lock.
XTo open the cover of the rear view cam- era: with COMAND or Audio 20 activated,
call up the vehicle menu: press the Ñ
button.
XTo switch to the menu bar: slide 6the
controller.
XTo select System Settings: turn and
press the controller.
XTo select Rear View Camera: turn and
press the controller.
XTo select Open Camera Cover: turn and
press the controller.
The rear view camera cover opens.
XTo clean the rear view camera: use clear
water and a soft cloth to clean camera
lens :.
Cleaning the 360° camera
!Do not clean the camera lens and the area
around the 360° camera with a power
washer.360
XMake sure that the vehicle is stationary and that the SmartKey is in position 2in the
ignition lock.
XTo open the cover of the 360° camera:
with COMAND or Audio 20 activated, call
up the vehicle menu: press the Ñbut-
ton.
XTo switch to the menu bar: slide 6the
controller.
XTo select System Settings: turn and
press the controller.
XTo select the 360°Camera: turn and press
the controller.
XTo select Open Camera Cover: turn and
press the controller.
The cover of the 360° camera opens.
XTo clean the 360° camera: clean camera
lens :with clean water and a soft cloth.
If you drive at speeds above 20 mph
(30 km/h) or with the SmartKey in position 0
or 1in the ignition lock, the cover of the 360°
camera closes automatically.
Cleaning the exhaust pipes
GWARNING
The exhaust tail pipe and tail pipe trim can
become very hot. If you come into contact
with these parts of the vehicle, you could burn
yourself. There is a risk of injury.
Always be particularly careful around the
exhaust tail pipe and the tail pipe trim. Allow
these components to cool down before touch-
ing them.
!Do not clean the exhaust pipe with acid-
based cleaning agents, such as bathroom
cleaner or wheel cleaner.
Impurities combined with the effects of road
grit and corrosive environmental factors may
cause flash rust to form on the surface. You
can restore the original shine of the exhaust
pipe by cleaning it regularly, especially in win-
ter and after washing.
XClean the exhaust pipe with a care product
tested and approved by Mercedes-Benz.
Cleaning the trailer tow hitch
HEnvironmental note
Dispose of rags soaked in oil and grease in an
environmentally responsible manner.
!Do not clean the ball coupling with a
power washer. Do not use solvents.
Care349
Maintenance and care
Z
Page 352 of 418
!Please note the care instructions in the
trailer coupling manufacturer's operating
instructions.
The ball coupling must be cleaned if it
becomes dirty or corroded.
XRemove rust on the ball, e.g. with a wire
brush.
XRemove dirt with a clean, lint-free cloth or a brush.
XAfter cleaning, lightly oil or grease the ball
coupling.
XCheck that the vehicle's trailer tow hitch is
working properly.
iYou can also have the maintenance work
on the ball coupling and the trailer tow hitch
carried out by a qualified specialist work-
shop.
Interior care
Cleaning the display
!For cleaning, do not use any of the fol-
lowing:
Ralcohol-based thinner or gasoline
Rabrasive cleaning agents
Rcommercially-available household clean-
ing agents
These may damage the display surface. Do not put pressure on the display surface
when cleaning. This could lead to irrepara-
ble damage to the display.
XBefore cleaning the display, make sure thatit is switched off and has cooled down.
XClean the display surface using a commer-
cially available microfiber cloth and
TFT/LCD display cleaner.
XDry the display surface using a dry micro-
fiber cloth.
Cleaning the plastic trim
GWARNING
Care products and cleaning agents containing solvents cause surfaces in the cockpit to
become porous. As a result, plastic parts may
come loose in the event of air bag deploy-
ment. There is a risk of injury.
Do not use any care products and cleaning
agents to clean the cockpit.
!Do not affix the following to plastic surfa-
ces:
Rstickers
Rfilms
Rscented oil bottles or similar items
You can otherwise damage the plastic.
!Do not allow cosmetics, insect repellent
or sunscreen to come into contact with the
plastic trim. This maintains the high-quality
look of the surfaces.
XWipe the plastic trim with a damp, lint-free
cloth, e.g. a microfiber cloth.
XHeavy soiling: use care and cleaning prod-
ucts recommended and approved by
Mercedes-Benz.
The surface may change color temporarily.
Wait until the surface is dry again.
Cleaning the steering wheel and gear or
selector lever
XThoroughly wipe with a damp cloth or use
leather care agents that have been recom-
mended and approved by Mercedes-Benz.
Cleaning genuine wood and trim ele-
ments
!Do not use solvent-based cleaning agents
such as tar remover, wheel cleaners, pol-
ishes or waxes. There is otherwise a risk of
damaging the surface.
!Do not use chrome polish on trim pieces.
The trim pieces have a chrome look but are
mostly made of anodized aluminum and
350Care
Maintenance and care
Page 357 of 418
life span also depends on use, care, stor-
age, etc.
RThe reflective safety jackets should be dis-posed of and replaced with new ones:
-after 15 washes, and/or
-if the reflective strips have become
scratched, and/or
-if the backing material and/or reflective
strips have become soiled and cannot becleaned off, and/or
-the fluorescence of a reflective safety
vest has faded e.g. due to the effects of
sunlight
RDispose of reflective safety jackets in an
environmentally responsible manner. To do
so, contact your local waste disposal com- pany.
Vehicle tool kit
General notes
The towing eye is located in the left-hand
stowage well under the cargo compartment
floor.
Apart from certain country-specific varia-
tions, the vehicles are not equipped with a
tire-change tool kit.
Some tools for changing a wheel are specific
to the vehicle. For more information on which tire changing tools are required and approved
to perform a wheel change on your vehicle,
consult a qualified specialist workshop.
Tools required for changing a wheel may
include, for example:
RJack
RWheel chock
RLug wrench
RRatchet wrench
RAlignment bolt
Towing eye
XOpen the tailgate.
XOpen the cargo compartment floor
(
Ypage 316).
The towing eye is located in the left-hand
stowage well under the cargo compartment
floor.
Vehicles with a TIREFIT kit
Example
XOpen the tailgate.
XOpen the cargo compartment floor
(
Ypage 316).
XPush retaining clamps :on the cover
downwards so as to release them.
XFold up cover in the direction of arrow ;.
XRemove tire inflation compressor=and
tire sealant bottle ?.
Where will I find...?355
Breakdown assistance