winter tires MERCEDES-BENZ GLC-Class 2016 X253 Owner's Manual
[x] Cancel search | Manufacturer: MERCEDES-BENZ, Model Year: 2016, Model line: GLC-Class, Model: MERCEDES-BENZ GLC-Class 2016 X253Pages: 418, PDF Size: 9.23 MB
Page 20 of 418
Stowage compartmentsArmrest (under) ............................. 308
Center console .............................. 307
Cup holders ................................... 318
Door ............................................... 308
Eyeglasses compartment ............... 307
Glove box ....................................... 307
Important safety information ......... 306
Map pockets ..................................3 08
Rear ............................................... 308
Stowage net ................................... 308
see Stowage areas
Stowage net ....................................... 308
Summer tires
In winter ........................................ 376
Sun visor ............................................ 319
Suspension settings
AIR BODY CONTROL ......................1 96
SUV
(Sport Utility Vehicle) ....................... 25
Switching air-recirculation mode
on/off ................................................. 147
T
Tachometer ........................................ 239
Tail lamps
see Lights
Tailgate
Display message ............................ 288
Emergency unlocking ....................... 97
Limiting the opening angle ...............9 7
Obstruction detection ......................9 2
Opening dimensions ......................4 15
Opening/closing .............................. 92
Opening/closing (automatically
from inside) ...................................... 96
Opening/closing (automatically
from outside) ................................... 93
Opening/closing (manually from
outside) ............................................ 93
Tank content
Fuel gauge ....................................... 33
Technical data
Capacities ...................................... 409
Information ....................................4 06
Tires/wheels ................................. 399
Trailer loads ................................... 416 Vehicle data ................................... 415
Telephone
Accepting a call (multifunction
steering wheel) .............................. 250
Display message ............................ 289
Introduction ................................... 250
Menu (on-board computer) ............ 250
Number from the phone book ........2 51
Redialing ........................................ 251
Rejecting/ending a call ................. 250
Temperature
Coolant (display in the instrument
cluster) .......................................... 239
Outside temperature ......................2 39
Setting (climate control) ................ 145
Tire pressure
Calling up (on-board computer) ..... 381
Checking manually ........................ 381
Display message ............................ 285
Maximum ....................................... 380
Not reached (TIREFIT) .................... 359
Notes ............................................. 379
Reached (TIREFIT) .......................... 359
Recommended ............................... 377
Tire pressure monitor
Checking the tire pressure elec-
tronically ........................................ 383
Function/notes .............................3 81
G
eneral notes ................................ 381
Important safety notes .................. 381
Radio type approval for the tire
pressure monitor ........................... 384
Restarting ...................................... 383
Warning lamp ................................. 302
Warning message .......................... 383
Tire-change tool kit ........................... 356
TIREFIT kit .......................................... 358
Tire pressure not reached .............. 359
Tire pressure reached .................... 359
Tires
Aspect ratio (definition) ................. 394
Average weight of the vehicle
occupants (definition) .................... 393
Bar (definition) ............................... 392
Changing a wheel .......................... 395
Characteristics .............................. 392
Checking ........................................ 375
Curb weight (definition) ................. 394
18Index
Page 21 of 418
Definition of terms ......................... 392
Direction of rotation ...................... 395
Display message ............................ 285
Distribution of the vehicle occu-
pants (definition) ............................ 395
DOT (Department of Transporta-
tion) (definition) ............................. 393
DOT, Tire Identification Number
(TIN) ............................................... 392
GAWR (Gross Axle Weight Rating)
(definition) ..................................... 393
General notes ................................ 399
GVW (Gross Vehicle Weight) (def-
inition) ........................................... 393
GVWR (Gross Vehicle Weight Rat-
ing) (definition) .............................. 393
Important safety notes .................. 374
Increased vehicle weight due to
optional equipment (definition) ...... 393
Information on driving .................... 374
Kilopascal (kPa) (definition) ........... 393
Labeling (overview) ........................ 389
Load bearing index (definition) ...... 394
Load index ..................................... 391
Load index (definition) ................... 393
Maximum load on a tire (defini-
tion) ............................................... 394
Maximum loaded vehicle weight
(definition) ..................................... 393
Maximum permissible tire pres-
sure (definition) ............................. 394
Maximum tire load ......................... 391
Maximum tire load (definition) ....... 394
MOExtended tires .......................... 376
Optional equipment weight (defi-
nition) ............................................ 394
PSI (pounds per square inch) (def-
inition) ........................................... 394
Replacing ....................................... 395
Service life ..................................... 376
Sidewall (definition) ....................... 394
Snow chains .................................. 377
Speed rating (definition) ................ 393
Storing ........................................... 395
Structure and characteristics
(definition) ..................................... 392
Summer tires in winter .................. 376
Temperature .................................. 388TIN (Tire Identification Number)
(definition) ..................................... 394
Tire bead (definition) ...................... 394
Tire pressure (definition) ................ 394
Tire pressures (recommended) ...... 393
Tire size (data) ............................... 399
Tire size designation, load-bearing
capacity, speed rating .................... 389
Tire tread ....................................... 375
Tire tread (definition) ..................... 394
Total load limit (definition) ............. 395
Traction ......................................... 388
Traction (definition) ....................... 394
Tread wear ..................................... 388
Uniform Tire Quality Grading
Standards ...................................... 387
Uniform Tire Quality Grading
Standards (definition) .................... 393
Wear indicator (definition) ............. 394
Wheel and tire combination ........... 401
Wheel rim (definition) .................... 393
see Flat tire
Top Tether ............................................ 63
Tow-starting
Emergency engine starting ............ 370
Important safety notes .................. 367
Towing a trailer
Axle load, permissible .................... 416
Cleaning the trailer tow hitch ......... 349
Coupling up a trailer ...................... 232
Decoupling a trailer ....................... 233
Driving tips .................................... 228
ESP
®(Electronic Stability Pro-
gram) ............................................... 75
Installing the ball coupling ............. 230
Lights display message .................. 272
Mounting dimensions .................... 415
Power supply ................................. 234
Pulling away with a trailer .............. 157
Removing the ball coupling ............ 234
Trailer loads ................................... 416
Towing away
Important safety guidelines ........... 367
Installing the towing eye ................ 368
Notes for 4MATIC vehicles ............ 370
Removing the towing eye ............... 369
T
ransporting the vehicle ................ 369
With both axles on the ground ....... 369
Index19
Page 23 of 418
W
Warning and indicator lampsABS ................................................ 294
Brakes ...........................................2 93
Check Engine ................................. 299
Coolant .......................................... 299
Distance warning ........................... 301
ESP
®.............................................. 296
ESP®OFF ....................................... 297
Fuel tank ........................................ 299
General notes ................................ 291
Overview .......................................... 34
Parking brake ................................ 298
PASSENGER AIR BAG ......................4 3
Reserv efuel .................................. .299
Restraint system ............................ 298
Seat belt ........................................ 292
Steering ......................................... 303
Tire pressure monitor .................... 302
Warranty .............................................. 23
Washer fluid
Display message ............................ 289
Wheel and tire combinations
Tires ............................................... 401
Wheel bolt tightening torque ........... 399
Wheel chock ...................................... 396
Wheels
Changing a wheel .......................... 395
Checking ........................................ 375
Cleaning ......................................... 347
General notes ................................ 399
Important safety notes .................. 374
Information on driving .................... 374
Interchanging/changing ................ 395
Mounting a new wheel ................... 398
Mounting a wheel .......................... 395
Removing a wheel .......................... 398
Snow chains .................................. 377
Storing ...........................................3 95
Tightening torque ........................... 399
Wheel size/tire size ....................... 399
Window curtain air bag
Display message ............................ 269
Operation ......................................... 51
Windows
see Side windows Windshield
Defrosting .............. ........................ 146
Wi
ndshield washer fluid
see Windshield washer system
Windshield washer system
Adding washer fluid ....................... 341
Important safety notes .................. 413
Windshield wipers
Problem (malfunction) ................... 138
Rear window wiper ........................ 135
Replacing the wiper blades ............ 135
Switching on/off ........................... 134
Winter driving
Important safety notes .................. 376
Slippery road surfaces ................... 180
Snow chains .................................. 377
Winter operation
Radiator cover ............................... 339
Summer tires ................................. 376
Winter tires
M+S tires ....................................... 376
Wiper blades
Cleaning ......................................... 347
Important safety notes .................. 135
Replacing ....................................... 135
Replacing (rear window) ................ 137
Replacing (windshield) ................... 135
Wooden trim (cleaning instruc-
tions) .................................................. 350
Index21
Page 69 of 418
Never leave animals unattended in the vehi-
cle. Always secure animals properly during
the journey, e.g. use a suitable animal trans-
port box.
Driving safety systems
Overview of driving safety systems
In this section, you will find information about
the following driving safety systems:
RABS (Anti-lock Braking System)
(
Ypage 67)
RBAS ( Brake Assist System) (Ypage 68)
RBAS PLUS with Cross-Traffic Assist ( Brake
A ssist System PLUS with Cross-Traffic
Assist) (
Ypage 68)
RCOLLISION PREVENTION ASSIST PLUS
(
Ypage 70)
RESP®(Electronic StabilityProgram)
(
Ypage 73)
REBD ( Electronic Brake force Distribution)
(
Ypage 75)
RADAPTIVE BRAKE (Ypage 75)
RPRE-SAFE®Brake (Ypage 75)
RSTEER CONTROL (Ypage 78)
Important safety notes
If you fail to adapt your driving style or if you
are inattentive, the driving safety systems can
neither reduce the risk of an accident nor
override the laws of physics. Driving safety
systems are merely aids designed to assist
driving. You are responsible for the distance
to the vehicle in front, for vehicle speed and
for braking in good time. Always adapt your
driving style to suit the prevailing road,
weather and traffic conditions and maintain a
safe distance from the vehicle in front. Drive
carefully.
The driving safety systems described only
work as effectively as possible when there is
adequate contact between the tires and the road surface. Please pay special attention to
the notes on tires, recommended minimum
tire tread depths, etc. (
Ypage 374).
In wintry driving conditions, always use winter tires (M+S tires) and if necessary, snow
chains. Only in this way will the driving safety
systems described in this section work as
effectively as possible.
ABS (Anti-lock Braking System)
General information
ABS regulates brake pressure in such a way
that the wheels do not lock when you brake.
This allows you to continue steering the vehi-
cle when braking.
The ! ABS warning lamp in the instrument
cluster lights up when the ignition is switched
on. It goes out when the engine is running.
ABS works from a speed of about 5 mph
(8 km/h), regardless of road-surface condi-
tions. ABS works on slippery surfaces, even
when you only brake gently.
Important safety notes
iObserve the "Important safety notes" sec-
tion (
Ypage 67).
GWARNING
If ABS is faulty, the wheels could lock when
braking. The steerability and braking charac-
teristics may be severely impaired. Addition-
ally, further driving safety systems are deac-
tivated. There is an increased danger of skid-
ding and accidents.
Drive on carefully. Have ABS checked imme-
diately at a qualified specialist workshop.
When ABS is malfunctioning, other systems,
including driving safety systems, will also
become inoperative. Observe the information on the ABS warning lamp (
Ypage 294) and
display messages which may be shown in the
instrument cluster (
Ypage 258).
Driving safety systems67
Safety
Z
Page 182 of 418
Always replace all brake disks and brake
pads/linings on an axle at the same time.
Always install new brake pads/linings when
replacing brake disks.
The vehicle is equipped with lightweight
brake disks to which the wheel assembly with
rim and threaded connection is matched.
The use of brake disks other than those
approved by Mercedes-Benz can change the
track width and is subject to approval, if appli-cable.
Shock-type loads when handling the brake
disks, such as when changing wheels, can
lead to a reduction in comfort when driving
with lightweight brake disks. Avoid shock-
type loads on the lightweight brake disks,
particularly on the brake plate.
Mercedes-Benz recommends that you only
use brake fluid that has been specially
approved for your vehicle by Mercedes-Benz,
or which corresponds to an equivalent quality
standard. Brake fluid which has not been
approved for Mercedes-Benz vehicles or
which is not of an equivalent quality could
affect your vehicle's operating safety.
Driving on wet roads
Hydroplaning
If water has accumulated to a certain depth
on the road surface, there is a danger of
hydroplaning occurring, even if:
Ryou drive at low speeds.
Rthe tires have adequate tread depth.
For this reason, in the event of heavy rain or in
conditions in which hydroplaning may occur,
you must drive in the following manner:
Rlower your speed.
Ravoid ruts.
Ravoid sudden steering movements.
Rbrake carefully.
Driving on flooded roads
!Bear in mind that vehicles traveling in
front or in the opposite direction create
waves. This may cause the maximum per-
missible water depth to be exceeded.
Failure to observe these notes may result in
damage to the engine, electrical systems
and transmission.
If you have to drive on stretches of road on
which water has collected, please bear in
mind that:
Rin the case of standing water, the water
level may be no higher than the lower edge of the vehicle body
Ryou should drive no faster than at a walking
pace
Winter driving
GWARNING
If you shift down on a slippery road surface in an attempt to increase the engine's braking
effect, the drive wheels could lose their grip.
There is an increased danger of skidding and
accidents.
Do not shift down for additional engine brak-
ing on a slippery road surface.
GDANGER
If the exhaust pipe is blocked or adequate
ventilation is not possible, poisonous gases
such as carbon monoxide (CO) may enter the vehicle. This is the case, e.g. if the vehicle
becomes trapped in snow. There is a risk of
fatal injury.
If you leave the engine or the auxiliary heating
running, make sure the exhaust pipe and area
around the vehicle are clear of snow. To
ensure an adequate supply of fresh air, open a
window on the side of the vehicle that is not
facing into the wind.
Have your vehicle winter-proofed at a quali-
fied specialist workshop at the onset of win-
ter.
180Driving tips
Driving an d parking
Page 200 of 418
you use wintertires (M+S tire s), with snow
chains if necessary.
PARKTRONIC
Important safety notes
PARKTRONIC is an electronic parking aid with ultrasonic sensors. It monitors the area
around your vehicle using six sensors in the
front bumper and six sensors in the rear
bumper. PARKTRONIC indicates visually and
audibly the distance between your vehicle
and an object.
PARKTRONIC is only an aid. It is not a replace-
ment for your attention to your immediate
surroundings. You are always responsible for
safe maneuvering, parking and exiting a park-
ing space. When maneuvering, parking or
pulling out of a parking space, make sure that
there are no persons, animals or objects in
the area in which you are maneuvering.
!When parking, pay particular attention to
objects above or below the sensors, such
as flower pots or trailer drawbars.
PARKTRONIC does not detect such objects
when they are in the immediate vicinity of
the vehicle. You could damage the vehicle
or the objects.
The sensors may not detect snow and other
objects that absorb ultrasonic waves.
Ultrasonic sources such as an automatic
car wash, the compressed-air brakes on a
truck or a pneumatic drill could cause
PARKTRONIC to malfunction.
PARKTRONIC may not function correctly on
uneven terrain.
PARKTRONIC is activated automatically when
you:
Rswitch on the ignition
Rshift the transmission to position D,Ror N
PARKTRONIC is deactivated at speeds above
11 mph (18 km/ h). It is reactivated at lower
speeds.
Range of the sensors
General notes
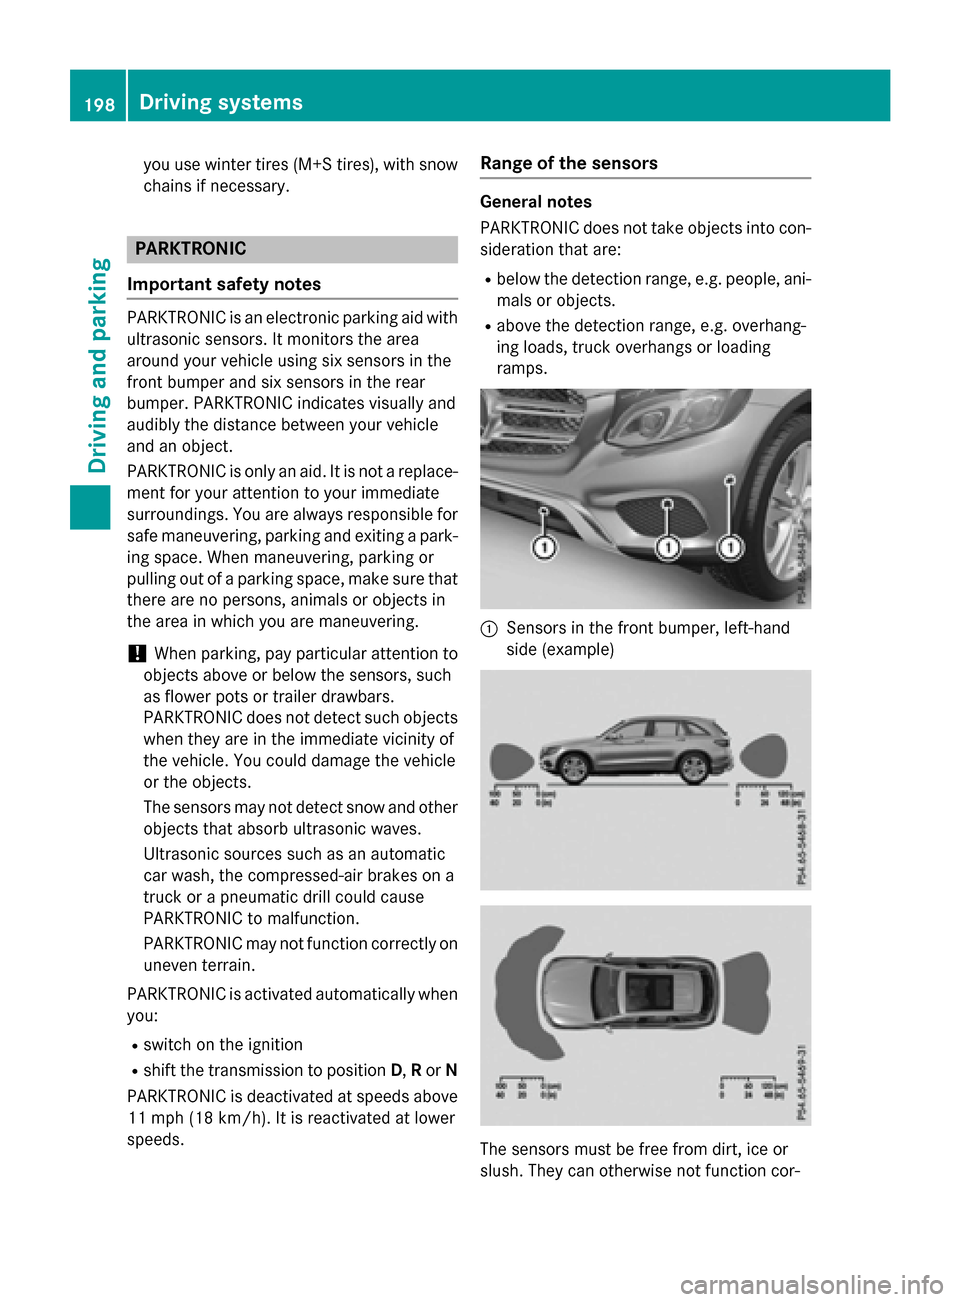
PARKTRONIC does not take objects into con-
sideration that are:
Rbelow the detection range, e.g. people, ani-
mals or objects.
Rabove the detection range, e.g. overhang-
ing loads, truck overhangs or loading
ramps.
:Sensors in the front bumper, left-hand
side (example)
The sensors must be free from dirt, ice or
slush. They can otherwise not function cor-
198Driving systems
Driving and parking
Page 347 of 418
XShift to neutralN.
XRelease the brake pedal.
XRelease the electric parking brake, if nec-
essary.
XSwitch off the ignition and leave the Smart-
Key in the ignition lock.
Operating with the Start/Stop button:
XMake sure that the ignition is switched on.
XMake sure that the vehicle is stationary.
XDepress and hold the brake pedal.
XEngage park position P.
XRelease the brake pedal.
XRemove Start/Stop button from ignition
lock (
Ypage 153).
XInsert the SmartKey into the ignition lock.
XSwitch on the ignition.
XDepress and hold the brake pedal.
XShift to neutralN.
XRelease the brake pedal.
XRelease the electric parking brake, if nec-
essary.
XSwitch off the ignition and leave the Smart-
Key in the ignition lock.
You can wash the vehicle in an automatic car wash from the very start.
If the vehicle is very dirty, pre-wash it before
cleaning it in an automatic car wash.
After using an automatic car wash, wipe off
wax from the windshield and the wiper
blades. This will prevent smears and reduce
wiping noises caused by residue on the wind-
shield.
Washing by hand
In some countries, washing by hand is only
allowed at specially equipped washing bays.
Observe the legal requirements in each coun-
try.
XDo not use hot water and do not wash the
vehicle in direct sunlight.
XUse a soft sponge to clean.
XUse a mild cleaning agent, such as a car
shampoo approved by Mercedes-Benz.
XThoroughly hose down the vehicle with a
gentle jet of water.
XDo not point the water jet directly towards
the air inlet.
XUse plenty of water and rinse out the
sponge frequently.
XRinse the vehicle with clean water and dry
thoroughly with a chamois.
XDo not let the cleaning agent dry on the
paintwork.
Carefully remove all deposits of road salt as
soon as possible when driving in winter.
Power washers
GWARNING
The water jet from a circular jet nozzle (dirt
blasters) can cause invisible exterior damage
to the tires or chassis components. Compo-
nents damaged in this way may fail unexpect-
edly. There is a risk of an accident.
Do not use power washers with circular jet
nozzles to clean the vehicle. Have damaged
tires or chassis components replaced imme-
diately.
!Always maintain a distance of at least
11.8 in (30 cm) between the vehicle and the
power washer nozzle. Information about
the correct distance is available from the
equipment manufacturer.
Move the power washer nozzle around
when cleaning your vehicle.
Do not aim directly at any of the following:
Rtires
Rdoor gaps, roof gaps, joints, etc.
Relectrical components
Rbattery
Rconnectors
Rlights
Rseals
Care345
Maintenance and care
Z
Page 358 of 418
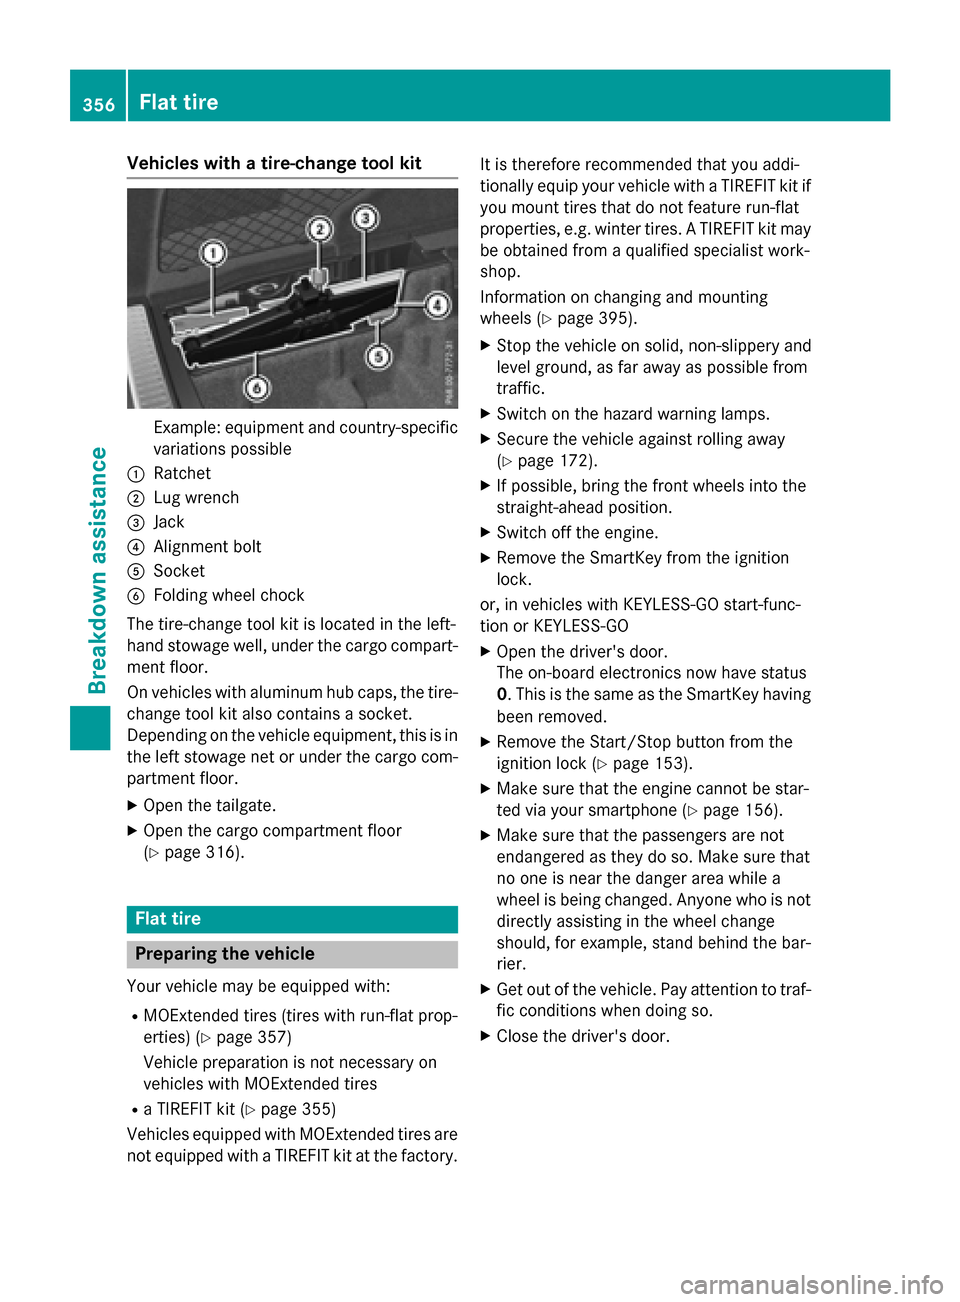
Vehicles with a tire-change tool kit
Example: equipment and country-specificvariations possible
:Ratchet
;Lug wrench
=Jack
?Alignment bolt
ASocket
BFolding wheel chock
The tire-change tool kit is located in the left-
hand stowage well, under the cargo compart-
ment floor.
On vehicles with aluminum hub caps, the tire-
change tool kit also contains a socket.
Depending on the vehicle equipment, this is in
the left stowage net or under the cargo com-
partment floor.
XOpen the tailgate.
XOpen the cargo compartment floor
(
Ypage 316).
Flat tire
Preparing the vehicle
Your vehicle may be equipped with:
RMOExtended tires (tires with run-flat prop-
erties) (
Ypage 357)
Vehicle preparation is not necessary on
vehicles with MOExtended tires
Ra TIREFIT kit (Ypage 355)
Vehicles equipped with MOExtended tires are
not equipped with a TIREFIT kit at the factory. It is therefore recommended that you addi-
tionally equip your vehicle with a TIREFIT kit if
you mount tires that do not feature run-flat
properties, e.g. winter tires. A TIREFIT kit may
be obtained from a qualified specialist work-
shop.
Information on changing and mounting
wheels (
Ypage 395).
XStop the vehicle on solid, non-slippery and
level ground, as far away as possible from
traffic.
XSwitch on the hazard warning lamps.
XSecure the vehicle against rolling away
(
Ypage 172).
XIf possible, bring the front wheels into the
straight-ahead position.
XSwitch off the engine.
XRemove the SmartKey from the ignition
lock.
or, in vehicles with KEYLESS-GO start-func-
tion or KEYLESS ‑GO
XOpen the driver's door.
The on-board electronics now have status
0. This is the same as the SmartKey having
been removed.
XRemove the Start/Stop button from the
ignition lock (
Ypage 153).
XMake sure that the engine cannot be star-
ted via your smartphone (
Ypage 156).
XMake sure that the passengers are not
endangered as they do so. Make sure that
no one is near the danger area while a
wheel is being changed. Anyone who is not
directly assisting in the wheel change
should, for example, stand behind the bar-
rier.
XGet out of the vehicle. Pay attention to traf-
fic conditions when doing so.
XClose the driver's door.
356Flat tire
Breakdo wn assis tance
Page 359 of 418
MOExtended tires (tires with run-flat
properties)
General notes
With MOExtended tires (tires with run flat
characteristics), you can continue to drive
your vehicle even if there is a total loss of
pressure in one or more tires. The affected
tire must not show any clearly visible damage.
You can recognize MOExtended tires by the
MOExtended marking which appears on the
sidewall of the tire. You will find this marking next to the tire size designation, the load-
bearing capacity and the speed index
(
Ypage 389).
MOExtended tires may only be used in con-
junction with an active tire pressure monitor.
If a pressure loss warning message
appears in the multifunction display:
Robserve the instructions in the display mes-
sages (
Ypage 285).
Rcheck the tire for damage.
Rif driving on, observe the following notes.
The driving distance possible in run-flat mode
is approximately 50 miles (80 km) when the
vehicle is partially laden. When the vehicle is
fully laden it is approximately 19 miles
(30 km).
In addition to the vehicle load, the driving dis-
tance possible depends upon:
Rvehicle speed
Rroad condition
Routside temperature
The driving distance possible in run-flat mode
may be reduced by extreme driving condi-
tions or maneuvers, or it can be increased
through a moderate style of driving.
The driving distance possible in run-flat mode
is counted from the moment the tire pressure
loss warning appears in the multifunction dis-
play.
You must not exceed a maximum speed of
50 mph (80 km/h). When replacing one or all tires, please
observe the following specifications for your
vehicle's tires:
Rsize
Rthe type and
Rthe "MOExtended" mark
If a tire has gone flat and cannot be replaced
with a MOExtended tire, a standard tire may
be used as a temporary measure. Make sure
tha
t you use the proper size and type (sum-
mer or winter tire).
Vehicles equipped with MOExtended tires are
not equipped with a TIREFIT kit at the factory.
It is therefore recommended that you addi-
tionally equip your vehicle with a TIREFIT kit if you mount tires that do not feature run-flat
properties, e.g. winter tires. A TIREFIT kit may
be obtained from a qualified specialist work-
shop.
Important safety notes
GWARNING
When driving in emergency mode, the driving
characteristics deteriorate, e.g. when corner-
ing, accelerating quickly and when braking.
There is a risk of an accident.
Do not exceed the stated maximum speed.
Avoid abrupt steering and driving maneuvers,
and driving over obstacles (curbs, potholes,
off-road). This applies in particular to a laden
vehicle.
Stop driving in emergency mode if:
Ryou hear banging noises.
Rthe vehicle starts to shake.
Ryou see smoke and smell rubber.
RESP®is intervening constantly.
Rthere are tears in the sidewalls of the tire.
After driving in emergency mode, have the
wheel rims checked at a qualified specialist
workshop with regard to their further use. The
defective tire must be replaced in every case.
Flat tire357
Breakdown assistance
Z
Page 375 of 418
Useful information............................374
Important safety notes .....................374
Operation ........................................... 374
Winter operation ............................... 376
Tire pressure ..................................... 377
Loading the vehicle ..........................384
All about wheels and tires ...............387
Changing a wheel .............................. 395
Wheel and tire combinations ...........399
373
Wheels and tires