weight MERCEDES-BENZ GLC COUPE 2016 User Guide
[x] Cancel search | Manufacturer: MERCEDES-BENZ, Model Year: 2016, Model line: GLC COUPE, Model: MERCEDES-BENZ GLC COUPE 2016Pages: 389, PDF Size: 7.34 MB
Page 69 of 389
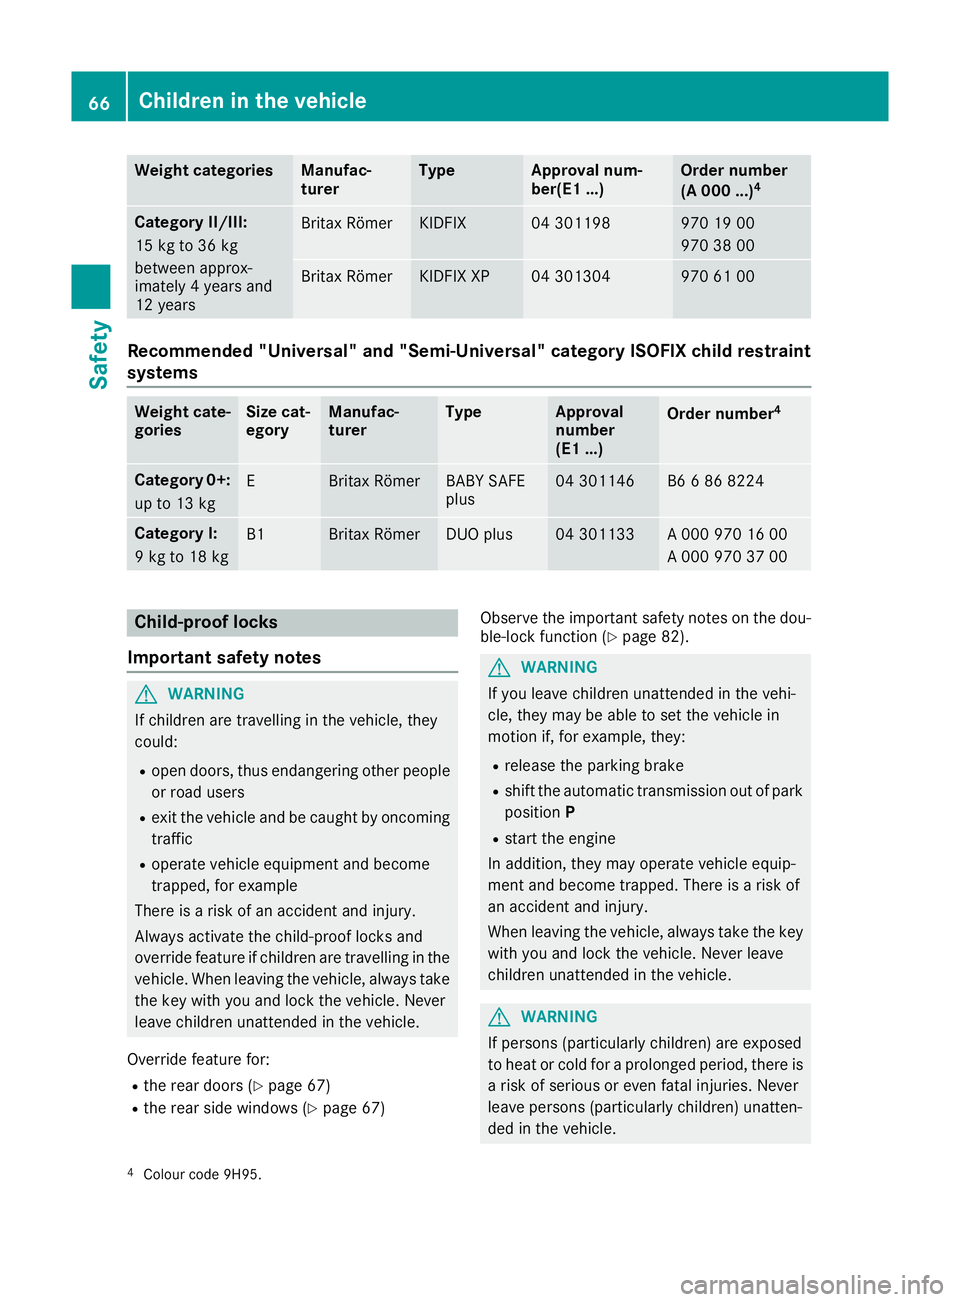
Weight categories Manufac-
turer Type Approval num-
ber(E1 ...) Order number
(A 000 ...)
4 Category II/III:
15 kg to 36 kg
between approx-
imately 4 years and
12 years Britax Römer KIDFIX 04 301198 970 19 00
970 38 00
Britax Römer KIDFIX XP 04 301304 970 61 00
Recommended "Universal" and "Semi-Universal" category ISOFIX child restraint
systems Weight cate-
gories Size cat-
egory Manufac-
turer Type Approval
number
(E1 ...)
Order number
4 Category 0+:
up to 13 kg E Britax Römer BABY SAFE
plus 04 301146 B6 6 86 8224
Category I:
9 kg to 18 kg
B1 Britax Römer DUO plus 04 301133 A 000 970 16 00
A 000 970 37 00
Child-proof locks
Important safety notes G
WARNING
If children are travelling in the vehicle, they
could:
R open doors, thus endangering other people
or road users
R exit the vehicle and be caught by oncoming
traffic
R operate vehicle equipment and become
trapped, for example
There is a risk of an accident and injury.
Always activate the child-proof locks and
override feature if children are travelling in the vehicle. When leaving the vehicle, always take the key with you and lock the vehicle. Never
leave children unattended in the vehicle.
Override feature for:
R the rear doors (Y page 67)
R the rear side windows (Y page 67)Observe the important safety notes on the dou-
ble-lock function (Y page 82). G
WARNING
If you leave children unattended in the vehi-
cle, they may be able to set the vehicle in
motion if, for example, they:
R release the parking brake
R shift the automatic transmission out of park
position P
R start the engine
In addition, they may operate vehicle equip-
ment and become trapped. There is a risk of
an accident and injury.
When leaving the vehicle, always take the key
with you and lock the vehicle. Never leave
children unattended in the vehicle. G
WARNING
If persons (particularly children) are exposed
to heat or cold for a prolonged period, there is a risk of serious or even fatal injuries. Never
leave persons (particularly children) unatten-
ded in the vehicle.
4 Colour code 9H95. 66
Children in the vehicleSafety
Page 175 of 389
Downhill gradients
Change into a lower gear in good time on long
and steep downhill gradients. Take particular
note of this when driving a laden vehicle and
when towing a trailer.
This also applies if cruise control, DISTRONIC
PLUS or SPEEDTRONIC is activated.
This will use the braking effect of the engine, so
less braking will be required to maintain vehicle
speed. This relieves the load on the brake sys-
tem and prevents the brakes from overheating
and wearing too quickly.
Heavy and light loads G
WARNING
The braking system can overheat if you leave your foot on the brake pedal while driving.
This increases the braking distance and could
even cause the braking system to fail. There is
a risk of an accident.
Never use the brake pedal as a footrest. Do
not simultaneously depress both the brake
pedal and the accelerator pedal while driving.
! Depressing the brake pedal constantly
results in excessive and premature wear to
the brake pads.
If heavy demands are made on the brakes, do
not park the vehicle immediately. Drive on for a
short while. This allows the airflow to cool the
brakes more quickly.
If the brakes have been used only moderately,
you should occasionally test their effectiveness.
To do this, brake more firmly from a higher
speed while paying attention to the traffic con-
ditions. This improves the grip of the brakes.
Wet road surfaces If you have driven for a long time in heavy rain
without braking, there may be a delayed reac-
tion from the brakes when braking for the first
time. This may also occur after a car wash or
after driving through deep water.
You will have to depress the brake pedal more
firmly. Maintain a greater distance to the vehicle in front.
After driving on a wet road or having the vehicle
washed, brake firmly while paying attention to
the traffic conditions. This will warm up the brake discs, thereby drying them more quickly
and protecting them against corrosion.
Limited braking performance on salt-
treated roads If you drive on salt-treated roads, a layer of salt
may form on the brake discs and pads. This can
increase the braking distance considerably.
R In order to prevent any salt build-up, apply the
brakes occasionally while paying attention to
the traffic conditions.
R Carefully depress the brake pedal at the end
of the journey and when starting the next
journey.
R Maintain a much greater distance to the vehi-
cle in front.
New brake discs and brake pads/
linings Brake pads/linings and discs that are either new
or have been replaced achieve optimum braking
effect only after several hundred kilometres of
driving. Compensate for the reduced braking
effect by applying greater force to the brake
pedal.
For safety reasons, Mercedes-Benz recom-
mends only fitting the following brake discs and brake pads/linings:
R brake discs that have been approved by
Mercedes-Benz
R brake pads/linings that have been approved
by Mercedes-Benz or that are of an equivalent
standard of quality
Other brake discs or brake pads/linings can
compromise the safety of your vehicle.
Always replace all brake discs and brake pads/
linings on an axle at the same time. Always fit
new brake pads/linings when replacing brake
discs.
The vehicle is equipped with lightweight brake
discs to which the wheel assembly with rim and threaded connection is matched.
The use of brake discs other than those
approved by Mercedes-Benz may alter track
width and is subject to approval, if applicable.
Shock-type loads when handling the brake
discs, such as when changing wheels, can lead
to a reduction in comfort when driving with light-
weight brake discs. Avoid shock-type loads on 172
Driving tipsDriving and pa
rking
Page 176 of 389
the lightweight brake discs, particularly on the
brake plate. Driving on wet roads
Aquaplaning If water has accumulated to a certain depth on
the road surface, there is a danger of aquaplan-
ing occurring, even if:
R you are driving at low speeds
R the tyres have adequate tread depth
For this reason, drive in the following manner in
the event of heavy rain or in conditions in which aquaplaning can occur:
R lower your speed
R avoid tyre ruts
R avoid sudden steering movements
R brake carefully
Driving on flooded roads !
Bear in mind that vehicles travelling in front
or in the opposite direction create waves. This may cause the maximum permissible water
depth to be exceeded.
These notes must be observed under all cir-
cumstances. You could otherwise damage
the engine, the electronics or the transmis-
sion.
If you must drive on stretches of road on which
water has collected, please bear in mind that:
R in the case of standing water, the water level
must be no higher than the lower edge of the
vehicle body
R you should drive no faster than walking pace Winter driving
G
WARNING
If you shift down on a slippery road surface in an attempt to increase the engine's braking
effect, the drive wheels could lose their grip.
This increases the risk of skidding and having
an accident.
Do not shift down for additional engine brak-
ing on a slippery road surface. G
DANGER
If the exhaust pipe is blocked or adequate
ventilation is not possible, poisonous gases
such as carbon monoxide (CO) may enter the vehicle. This is the case, e.g. if the vehicle
becomes trapped in snow. There is a risk of
fatal injury.
If you leave the engine or the auxiliary heating
running, make sure the exhaust pipe and area
around the vehicle are clear of snow. To
ensure an adequate supply of fresh air, open a window on the side of the vehicle that is not
facing into the wind.
Have your vehicle winterproofed at a qualified
specialist workshop at the onset of winter.
You should drive particularly carefully on slip-
pery road surfaces. Avoid sudden acceleration,
steering and braking manoeuvres. Do not use
cruise control or DISTRONIC PLUS.
If the vehicle threatens to skid or cannot be
stopped when moving at low speed:
X Shift the transmission to position N.
X Try to bring the vehicle under control by using
corrective steering.
The outside temperature indicator is not
designed to serve as an ice-warning device and
is therefore unsuitable for that purpose.
Changes in the outside temperature are dis-
played after a short delay.
Indicated temperatures just above the freezing
point do not guarantee that the road surface is
free of ice. The road may still be icy, especially in wooded areas or on bridges. The vehicle could
skid if you fail to adapt your driving style. Always
adapt your driving style and drive at a speed to
suit the prevailing weather conditions.
You should pay special attention to road condi-
tions when temperatures are around freezing
point.
Further information on driving with snow chains (Y page 359).
Further information on driving with summer
tyres (Y page 358).
Observe the notes in the "Winter operation" sec-
tion (Y page 358). Driving
tips
173Driving an d parking Z
Page 221 of 389
If you drive at speeds above 60 km/h and lane
markings are detected, the lines on the assis- tant display (Y page 239) appear in green.
Active Lane Keeping Assist is ready for use.
X To deactivate: press button;.
Indicator lamp :goes out. Active Lane Keep-
ing Assist is deactivated. The Lane
Lane Keeping
Keeping
Assist off
Assist off message appears on the multi-
function display.
Selecting Standard or Adaptive setting X On the Assistance
Assistance menu on the on-board
computer, select the Active Lane Keep‐
Active Lane Keep‐
ing Assist
ing Assist function (Ypage 242).
X Select setting Standard
StandardorAdaptive
Adaptive.
When Standard
Standard is selected, no warning vibra-
tion occurs if:
R you have switched on the turn signal. In this
event, the warnings are suppressed for a
certain period of time
R a driving safety system such as ABS, BAS or
ESP ®
engages
When Adaptive Adaptive is selected, no warning vibra-
tion occurs if:
R you have switched on the turn signal. In this
event, the warnings are suppressed for a
certain period of time
R a driving safety system such as ABS, BAS or
ESP ®
engages
R you accelerate hard, e.g. kickdown
R you brake hard
R you steer actively, e.g. swerve to avoid an
obstacle or change lane quickly
R you cut the corner on a sharp bend
To ensure that you are warned only when nec-
essary and in good time if you cross the lane
marking, the system detects certain conditions
and warns you accordingly.
The warning vibration occurs earlier in the fol-
lowing situations:
R you approach the outer lane marking on a
bend
R the road has very wide lanes, e.g. a motorway
R the system detects solid lane markings
The warning vibration occurs later in the follow- ing situations:
R the road has narrow lanes
R you cut the corner on a bend Towing a trailer
If you couple up a trailer, make sure that you
have correctly established the electrical con-
nection. This can be accomplished by checking
the trailer lighting. Towing a trailer
Important safety notes
G
WARNING
You could lose control of the vehicle/trailer
combination if it begins to swerve. The vehi-
cle/trailer combination could even overturn.
There is a risk of an accident.
On no account should you attempt to
straighten out the vehicle/trailer combina-
tion by increasing speed. Decrease your
speed and do not countersteer. Brake if nec-
essary. G
WARNING
If the maximum permissible load for a carrier system is exceeded, the carrier could come
loose from the vehicle and endanger other
road users. There is a risk of an accident and injury.
Never exceed the maximum permissible load
when using a carrier.
! If you have a trailer tow hitch retrofitted,
changes to the engine cooling system may be necessary, depending on the vehicle type.
If you have a trailer tow hitch retrofitted,
observe the anchorage points on the chassis.
Retrofitting a trailer tow hitch is only permissible
if a trailer load is specified in your vehicle docu-
ments. If this is not the case, then the vehicle is not approved for towing a trailer.
For more information, please contact a qualifiedspecialist workshop.
Exceeding the maximum permissible nose-
weight of the trailer drawbar on the ball coupling
may cause damage.
Damage may be caused to the following:
R towing vehicle
R trailer 218
Towing a trailerDriving and parking
Page 222 of 389
R
ball coupling
R trailer tow hitch
The vehicle/trailer combination could become
unstable.
The vehicle/trailer combination could also
become unstable if the noseweight used is lower
than the minimum permissible noseweight.
To avoid hazardous situations:
R make sure to check the noseweight before
each journey
R use a noseweight as close as possible to the
maximum noseweight
R do not exceed the maximum permissible
noseweight
R do not use a noseweight lower than the min-
imum noseweight
Make sure that the following values are not
exceeded:
R the permissible noseweight
R the permissible trailer load
R the permissible rear axle load of the towing
vehicle
R the maximum permissible gross vehicle
weight of both the towing vehicle and the
trailer
The applicable permissible values, which must
not be exceeded, can be found:
R in your vehicle documents
R on the type plates for the trailer
R on the vehicle identification plate
If the values differ, the lowest value applies.
You will find permissible trailer loads under
"Technical data" (Y page 380).
When reversing the towing vehicle, make sure
there is nobody between the trailer and the vehi- cle.
Couple and uncouple the trailer carefully. If you
do not couple the trailer to the towing vehicle
correctly, the trailer could become detached.
When towing a trailer, your vehicle's handling
characteristics will be different to when driving
without a trailer.
The vehicle/trailer combination:
R is heavier
R is restricted in its acceleration and gradient-
climbing capability
R has an increased braking distance
R is affected more by strong crosswinds R
demands more sensitive steering
R has a larger turning circle
This can impair the vehicle's handling charac-
teristics. Adapt your driving style accordingly.
Maintain a safe distance. Drive carefully.
When towing a trailer, always adjust your speed to the current road and weather conditions. Do
not exceed the maximum permissible speed for
your vehicle/trailer combination. Notes on towing a trailer
General notes When towing a trailer, set the tyre pressure on
the rear axle of the towing vehicle for a maxi-
mum load. Further information on the tyre pres-
sure table in the fuel filler flap (Y page 359).
You will find permissible trailer loads under
"Technical data" (Y page 380).
Driving tips Observe the information on ESP
®
trailer stabili-
sation (Y page 76).
The maximum permissible speed for vehicle/
trailer combinations depends on the type of
trailer. Before beginning the journey, check the
trailer's documents to see what the maximum
permitted speed is. Observe the maximum per-
missible speed in the relevant country.
For certain Mercedes-Benz vehicles, the maxi-
mum permissible rear axle load is increased
when towing a trailer. See the "Technical data"
section to find out whether this applies to your
vehicle (Y page 381). In the event of increased
rear axle load, the car/trailer combination may
not exceed a maximum speed of 100 km/ hfor
reasons concerning the operating permit. This
also applies in countries in which the maximum
permissible speed for car/trailer combinations
is greater than 100 km/h.
When towing a trailer, your vehicle's handling
characteristics will be different to when driving
without a trailer and the vehicle will consume
more fuel.
Shift to a lower gear in good time on long and
steep downhill gradients.
This also applies in the case of:
R activated DISTRONIC PLUS
R activated cruise control Towing a trailer
219Driving and parking Z
Page 228 of 389

Problem
Possible causes/consequences and
M
MSolutions Unlocking using the
switch on the driver's
door:
The ball coupling does
not swivel out even
though:
R the vehicle is station-
ary
R no trailer cable is con-
nected The on-board voltage is too low.
X Engage parking position P.
X Switch on the power supply.
or X Start the engine.
If the ball coupling still does not unlock: X Consult a qualified specialist workshop. The ball coupling does
not swivel out or in. The
indicator lamp in the
switch is flashing perma-
nently. The Trailer Trailer
coupling Check lock
coupling Check lock
message appears on the
multifunction display. There is a malfunction in the release electronics.
X When the ball coupling is swivelled in: pull and hold the switch
on the tailgate until the ball coupling vertically engages in a securely locked position and then engages again under the bumper.
X When the ball coupling is swivelled out: pull and hold the switch
on the tailgate until the ball coupling engages under the bumper.
If the ball coupling still does not unlock: X Consult a qualified specialist workshop. Bicycle rack
General notes
Trailer tow hitch (example with additional
guide pin)
Depending on the bicycle rack's design, you can transport up to four bicycles on it:
R When attached by clamping onto the ball cou-
pling :, the maximum payload is 75 kg. You
can transport up to three bicycles.
R When attached to the ball coupling :and
also the guide pin ;, the maximum payload is
100 kg. You can transport up to four bicycles.
The payload is calculated from the weight of the
bicycle rack and the load of the bicycle rack. To transport bicycles with a total weight
between 75 kg and 100 kg, use only bicycle
racks with additional support on the guide
pin
;. Important safety notes
G
WARNING
The bicycle rack can detach from the vehicle if
you
R exceed the permissible payload of the
trailer tow hitch
R use the bicycle rack incorrectly
R attach the bicycle rack to the ball coupling
beneath the ball head
There is a risk of an accident.
For your safety and that of other road users,
observe the following:
R Always observe the permissible payload of
the trailer tow hitch.
R Use the bicycle rack only to transport bicy-
cles. Bicycle rack
225Driving and parking
Z
Page 230 of 389
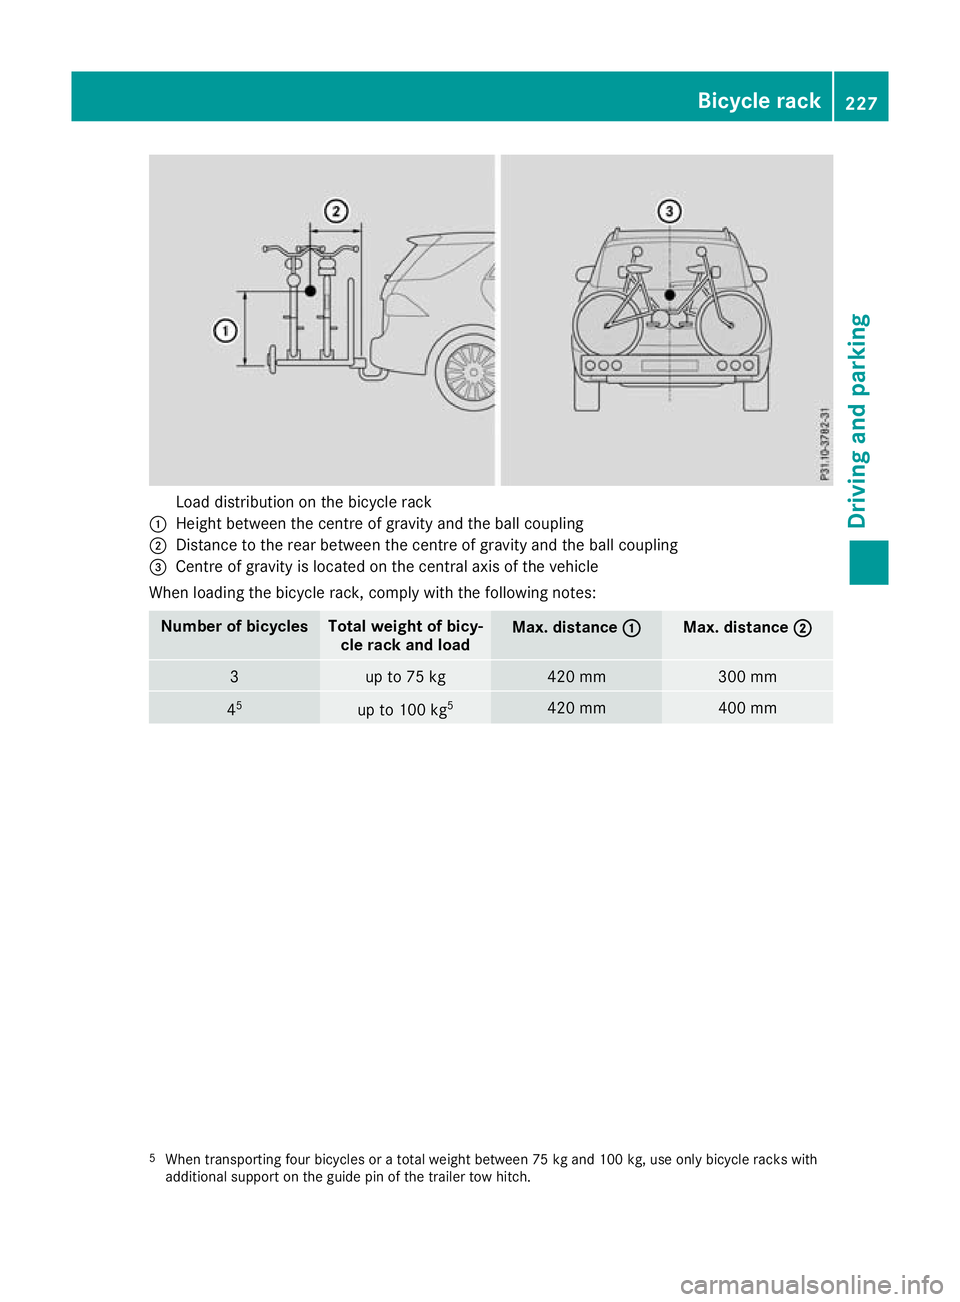
Load distribution on the bicycle rack
: Height between the centre of gravity and the ball coupling
; Distance to the rear between the centre of gravity and the ball coupling
= Centre of gravity is located on the central axis of the vehicle
When loading the bicycle rack, comply with the following notes: Number of bicycles Total weight of bicy-
cle rack and load Max. distance
:
: Max. distance
;
; 3 up to 75 kg 420 mm 300 mm
4
5 up to 100 kg
5 420 mm 400 mm
5
When transporting four bicycles or a total weight between 75 kg and 100 kg, use only bicycle racks with
additional support on the guide pin of the trailer tow hitch. Bicycle rack
227Driving and parking Z
Page 262 of 389
Display messages
Possible causes/consequences and
M
MSolutions Front-passenger
Front-passenger
airbag airbag
disabled
disabled See
See
Owner's Manual
Owner's Manual The front-passenger front airbag is disabled during the journey
although:
R An adult
or
R A person of the corresponding stature is on the front-passenger
seat
If additional forces are applied to the seat, the weight the system
detects may be too low.
G WARNING
The front-passenger front airbag does not deploy during an accident.
This poses an increased risk of injury!
X Pull over and stop the vehicle safely as soon as possible, paying
attention to road and traffic conditions.
X Secure the vehicle against rolling away (Y page 167).
X Switch the ignition off.
X Have the front passenger step out of the vehicle.
X Make sure that the seat is unoccupied, close the front-passenger
door and switch on the ignition.
X Observe the PASSENGER AIR BAG indicator lamps on the centre
console and the multifunction display and check the following:
Seat unoccupied and ignition switched on:
R A self-diagnosis is carried out. The PASSENGER AIR BAG OFF and
PASSENGER AIR BAG ON indicator lamps must light up simulta-
neously for approximately six seconds
R The PASSENGER AIR BAG OFF indicator lamp must then light up
and remain lit after the self-diagnosis. If the indicator lamp is on,
the automatic front-passenger front airbag deactivation system
has disabled the front-passenger front airbag (Y page 49)
R The Front-passenger airbag enabled See Owner's Man‐
Front-passenger airbag enabled See Owner's Man‐
ual ual orFront-passenger airbag disabled See Owner's
Front-passenger airbag disabled See Owner's
Manual
Manual display messages must not appear on the multifunction
display
X Wait for a period of at least 60 seconds until the necessary system
checks have been completed.
X Make sure that the display messages do not appear on the multi-
function display.
If these conditions are met, the front-passenger seat can be occupied again. Whether the PASSENGER AIR BAG OFF indicator lamp remains lit or goes out depends on how the automatic front-passenger front
airbag deactivation system classifies the occupant.
If the conditions are not met, the system is not operating correctly.
X Consult a qualified specialist workshop immediately.
Further information on the automatic front-passenger front airbag
deactivation system (Y page 49). Display
messages
259On-board computer and displays Z
Page 263 of 389
Display messages
Possible causes/consequences and
M
MSolutions Front-passenger
Front-passenger
airbag enabled See airbag enabled See
Owner's Manual Owner's Manual The front-passenger front airbag is enabled during the journey
although:
R A child, a small adult or an object weighing less than the system
weight threshold is located on the front-passenger seat
or
R The front-passenger seat is not occupied
The system may detect objects or forces that are placing additional
weight on the seat.
G WARNING
The airbag may deploy unintentionally.
This poses an increased risk of injury!
X Pull over and stop the vehicle safely as soon as possible, paying
attention to road and traffic conditions.
X Secure the vehicle against rolling away (Y page 167).
X Switch the ignition off.
X Open the front-passenger door.
X Remove the child and child seat from the front-passenger seat.
X Make sure that no objects are present that are applying additional
weight to the seat.
The system might otherwise detect the additional weight and inter- pret the seat occupant's weight as greater than it actually is.
X Make sure that the seat is unoccupied, close the front-passenger
door and switch on the ignition.
X Observe the PASSENGER AIR BAG indicator lamps on the centre
console and the multifunction display and check the following:
Seat unoccupied and ignition switched on:
R A self-diagnosis is carried out. The PASSENGER AIR BAG OFF and
PASSENGER AIR BAG ON indicator lamps must light up simulta-
neously for approximately six seconds
R The PASSENGER AIR BAG OFF indicator lamp must then light up
and remain lit after the self-diagnosis. If the indicator lamp is on,
the automatic front-passenger front airbag deactivation system
has disabled the front-passenger front airbag (Y page 49)
R The Front-passenger airbag enabled See Owner's Man‐
Front-passenger airbag enabled See Owner's Man‐
ual ual orFront-passenger airbag disabled See Owner's
Front-passenger airbag disabled See Owner's
Manual
Manual display messages must not appear on the multifunction
display
X Wait for a period of at least 60 seconds until the necessary system
checks have been completed.
X Make sure that the display messages do not appear on the multi-
function display.
If these conditions are met, the front-passenger seat can be occupied again. Whether the PASSENGER AIR BAG OFF indicator lamp remains lit or goes out depends on how the automatic front-passenger front
airbag deactivation system classifies the occupant.
If the conditions are not met, the system is not operating correctly. 260
Display
messagesOn-board computer and displays
Page 308 of 389
Stowage areas
Loading guidelines
G
WARNING
Combustion engines emit poisonous exhaust
gases such as carbon monoxide. If the tailgate is open when the engine is running, particu-
larly if the vehicle is moving, exhaust fumes
could enter the passenger compartment.
There is a risk of poisoning.
Turn off the engine before opening the tail-
gate. Never drive with the tailgate open. G
WARNING
If objects, luggage or loads are not secured or not secured sufficiently, they could slip, tip
over or be flung around and thereby hit vehicle
occupants. There is a risk of injury, especially when braking or abruptly changing directions.
Always store objects so that they cannot be
flung around. Secure objects, luggage or
loads against slipping or tipping before the
journey. G
WARNING
The exhaust tail pipe and tail pipe trim can
become very hot. If you come into contact
with these parts of the vehicle, you could burn
yourself. There is a risk of injury.
Always be particularly careful around the
exhaust tail pipe and the tail pipe trim. Allow
these components to cool down before touch-
ing them.
The handling characteristics of a laden vehicle
are dependent on the distribution of the load
within the vehicle. For this reason, you should
note the following when transporting a load:
R never exceed the maximum gross vehicle
weight or the permissible axle loads for the
vehicle (including occupants).
R the luggage compartment is the preferred
place to store objects.
R position heavy loads as far forward as possi-
ble and as low down in the load compartment as possible. R
the load must not protrude above the upper
edge of the seat backrests.
R always place the load behind unoccupied
seats if possible.
R hook in the safety net when loading.
R secure the load with sufficiently strong and
wear-resistant lashing material. pad sharp
edges for protection.
i Lashing material is available at any qualified
specialist workshop. Stowage compartments
Important safety notes G
WARNING
If you transport objects in the vehicle interior and these are not adequately secured, they
could slip or be flung around and thereby
strike vehicle occupants. In addition, cup
holders, open stowage spaces and mobile
phone brackets may not always be able to
hold the objects placed in them in the event of an accident. There is a risk of injury, particu-
larly in the event of sharp braking or sudden
changes of direction.
R Always stow objects in such a way that they
cannot be tossed about in these or similar
situations.
R Always make sure that objects do not proj-
ect from stowage spaces, luggage nets or
stowage nets.
R Ensure that closable stowage spaces are
shut before beginning your journey.
R Always stow and secure heavy, hard, poin-
ted, sharp-edged, fragile or outsize objects
in the load compartment.
Read the loading guidelines (Y page 305). Stowage areas
305Stowing and features Z