seats MERCEDES-BENZ GLC COUPE 2016 Owner's Guide
[x] Cancel search | Manufacturer: MERCEDES-BENZ, Model Year: 2016, Model line: GLC COUPE, Model: MERCEDES-BENZ GLC COUPE 2016Pages: 389, PDF Size: 7.34 MB
Page 120 of 389
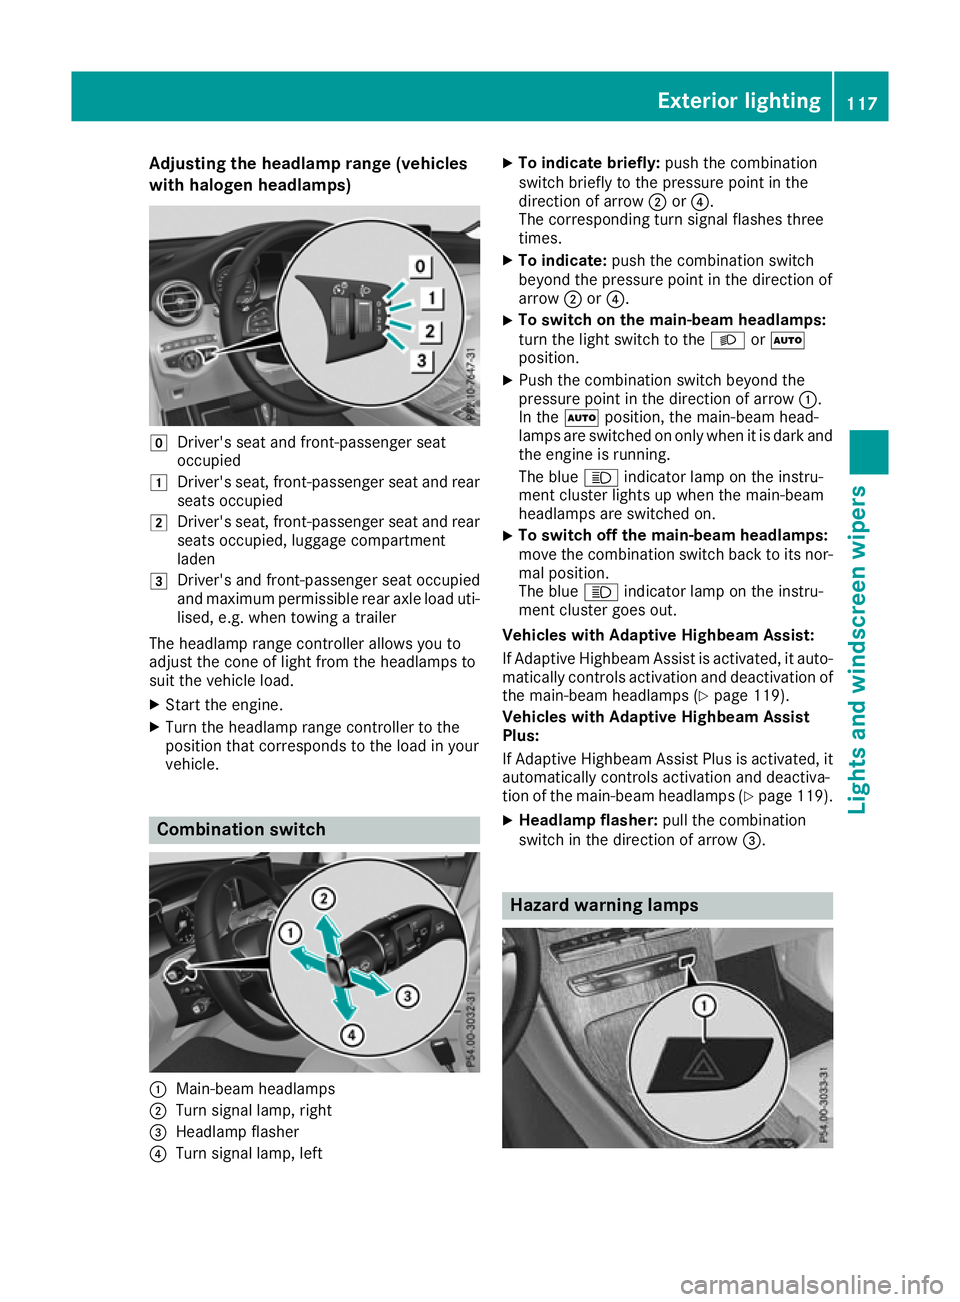
Adjusting the headlamp range (vehicles
with halogen headlamps) g
Driver's seat and front-passenger seat
occupied
1 Driver's seat, front-passenger seat and rear
seats occupied
2 Driver's seat, front-passenger seat and rear
seats occupied, luggage compartment
laden
3 Driver's and front-passenger seat occupied
and maximum permissible rear axle load uti-
lised, e.g. when towing a trailer
The headlamp range controller allows you to
adjust the cone of light from the headlamps to
suit the vehicle load.
X Start the engine.
X Turn the headlamp range controller to the
position that corresponds to the load in your
vehicle. Combination switch
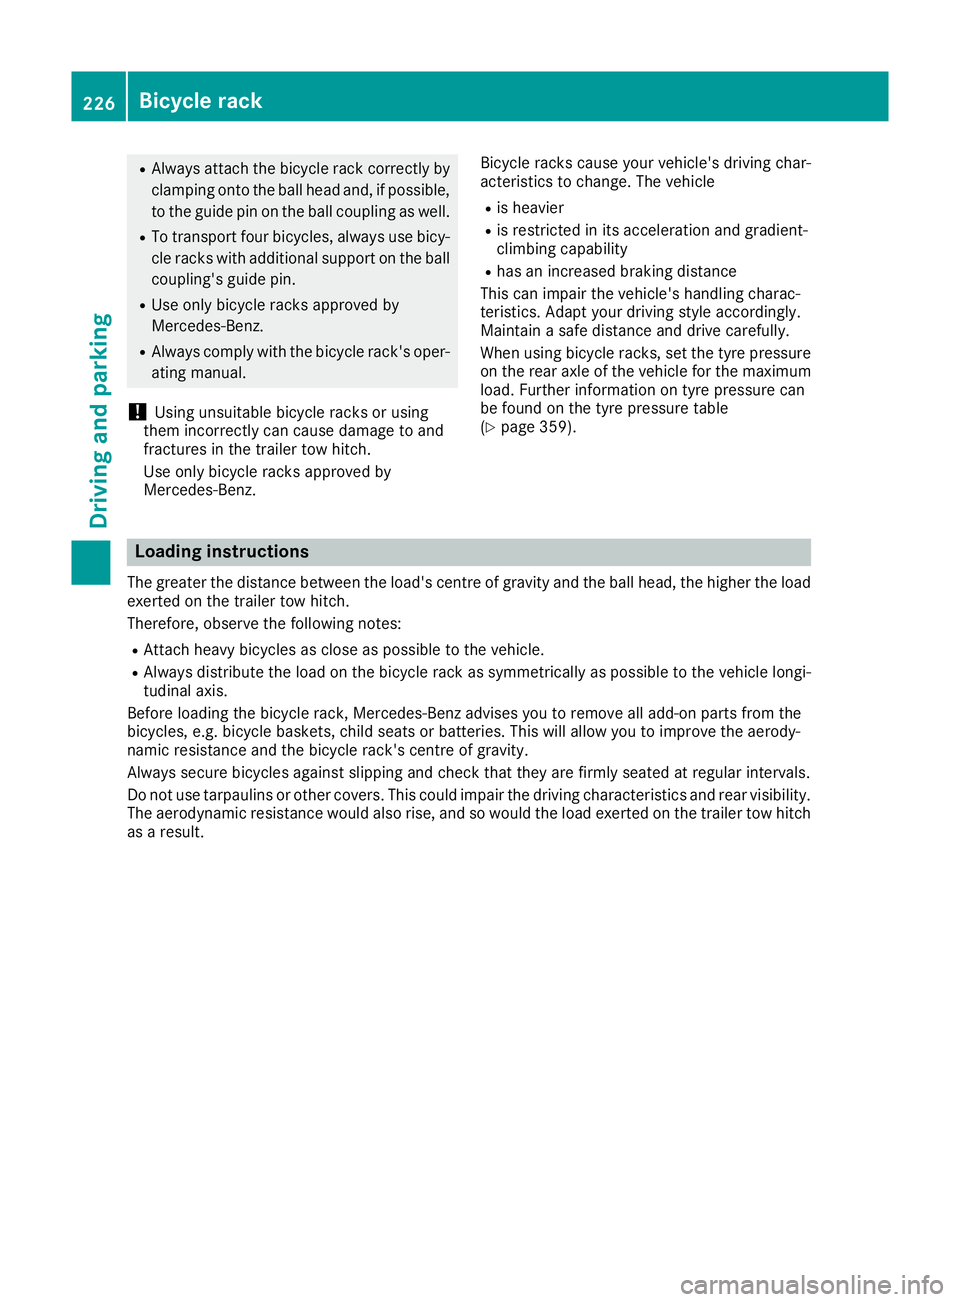
:
Main-beam headlamps
; Turn signal lamp, right
= Headlamp flasher
? Turn signal lamp, left X
To indicate briefly: push the combination
switch briefly to the pressure point in the
direction of arrow ;or?.
The corresponding turn signal flashes three
times.
X To indicate: push the combination switch
beyond the pressure point in the direction of
arrow ;or?.
X To switch on the main-beam headlamps:
turn the light switch to the LorÃ
position.
X Push the combination switch beyond the
pressure point in the direction of arrow :.
In the Ãposition, the main-beam head-
lamps are switched on only when it is dark and
the engine is running.
The blue Kindicator lamp on the instru-
ment cluster lights up when the main-beam
headlamps are switched on.
X To switch off the main-beam headlamps:
move the combination switch back to its nor- mal position.
The blue Kindicator lamp on the instru-
ment cluster goes out.
Vehicles with Adaptive Highbeam Assist:
If Adaptive Highbeam Assist is activated, it auto- matically controls activation and deactivation of
the main-beam headlamps (Y page 119).
Vehicles with Adaptive Highbeam Assist
Plus:
If Adaptive Highbeam Assist Plus is activated, it
automatically controls activation and deactiva-
tion of the main-beam headlamps (Y page 119).
X Headlamp flasher: pull the combination
switch in the direction of arrow =. Hazard warning lamps Exterior lighting
117Lights and windscreen wipers Z
Page 229 of 389
R
Always attach the bicycle rack correctly by
clamping onto the ball head and, if possible,
to the guide pin on the ball coupling as well.
R To transport four bicycles, always use bicy-
cle racks with additional support on the ball
coupling's guide pin.
R Use only bicycle racks approved by
Mercedes-Benz.
R Always comply with the bicycle rack's oper-
ating manual.
! Using unsuitable bicycle racks or using
them incorrectly can cause damage to and
fractures in the trailer tow hitch.
Use only bicycle racks approved by
Mercedes-Benz. Bicycle racks cause your vehicle's driving char-
acteristics to change. The vehicle
R is heavier
R is restricted in its acceleration and gradient-
climbing capability
R has an increased braking distance
This can impair the vehicle's handling charac-
teristics. Adapt your driving style accordingly.
Maintain a safe distance and drive carefully.
When using bicycle racks, set the tyre pressure on the rear axle of the vehicle for the maximum
load. Further information on tyre pressure can
be found on the tyre pressure table
(Y page 359). Loading instructions
The greater the distance between the load's centre of gravity and the ball head, the higher the load exerted on the trailer tow hitch.
Therefore, observe the following notes:
R Attach heavy bicycles as close as possible to the vehicle.
R Always distribute the load on the bicycle rack as symmetrically as possible to the vehicle longi-
tudinal axis.
Before loading the bicycle rack, Mercedes-Benz advises you to remove all add-on parts from the
bicycles, e.g. bicycle baskets, child seats or batteries. This will allow you to improve the aerody-
namic resistance and the bicycle rack's centre of gravity.
Always secure bicycles against slipping and check that they are firmly seated at regular intervals.
Do not use tarpaulins or other covers. This could impair the driving characteristics and rear visibility. The aerodynamic resistance would also rise, and so would the load exerted on the trailer tow hitchas a result. 226
Bicycle rackDriving an
d parking
Page 308 of 389
Stowage areas
Loading guidelines
G
WARNING
Combustion engines emit poisonous exhaust
gases such as carbon monoxide. If the tailgate is open when the engine is running, particu-
larly if the vehicle is moving, exhaust fumes
could enter the passenger compartment.
There is a risk of poisoning.
Turn off the engine before opening the tail-
gate. Never drive with the tailgate open. G
WARNING
If objects, luggage or loads are not secured or not secured sufficiently, they could slip, tip
over or be flung around and thereby hit vehicle
occupants. There is a risk of injury, especially when braking or abruptly changing directions.
Always store objects so that they cannot be
flung around. Secure objects, luggage or
loads against slipping or tipping before the
journey. G
WARNING
The exhaust tail pipe and tail pipe trim can
become very hot. If you come into contact
with these parts of the vehicle, you could burn
yourself. There is a risk of injury.
Always be particularly careful around the
exhaust tail pipe and the tail pipe trim. Allow
these components to cool down before touch-
ing them.
The handling characteristics of a laden vehicle
are dependent on the distribution of the load
within the vehicle. For this reason, you should
note the following when transporting a load:
R never exceed the maximum gross vehicle
weight or the permissible axle loads for the
vehicle (including occupants).
R the luggage compartment is the preferred
place to store objects.
R position heavy loads as far forward as possi-
ble and as low down in the load compartment as possible. R
the load must not protrude above the upper
edge of the seat backrests.
R always place the load behind unoccupied
seats if possible.
R hook in the safety net when loading.
R secure the load with sufficiently strong and
wear-resistant lashing material. pad sharp
edges for protection.
i Lashing material is available at any qualified
specialist workshop. Stowage compartments
Important safety notes G
WARNING
If you transport objects in the vehicle interior and these are not adequately secured, they
could slip or be flung around and thereby
strike vehicle occupants. In addition, cup
holders, open stowage spaces and mobile
phone brackets may not always be able to
hold the objects placed in them in the event of an accident. There is a risk of injury, particu-
larly in the event of sharp braking or sudden
changes of direction.
R Always stow objects in such a way that they
cannot be tossed about in these or similar
situations.
R Always make sure that objects do not proj-
ect from stowage spaces, luggage nets or
stowage nets.
R Ensure that closable stowage spaces are
shut before beginning your journey.
R Always stow and secure heavy, hard, poin-
ted, sharp-edged, fragile or outsize objects
in the load compartment.
Read the loading guidelines (Y page 305). Stowage areas
305Stowing and features Z
Page 311 of 389
Vehicle occupants could be struck in the
event of sudden braking or an accident, for
instance, if you:
R transport other heavy or sharp-edged
objects in the skibag
R do not secure the skibag with the lashing
straps
There is a risk of accident and injury.
Store only skis in the skibag. Always secure
the skibag with the lashing straps so that it
cannot move around.
A maximum of four pairs of skis or two snow-
boards can be transported in the ski/snow-
board bag.
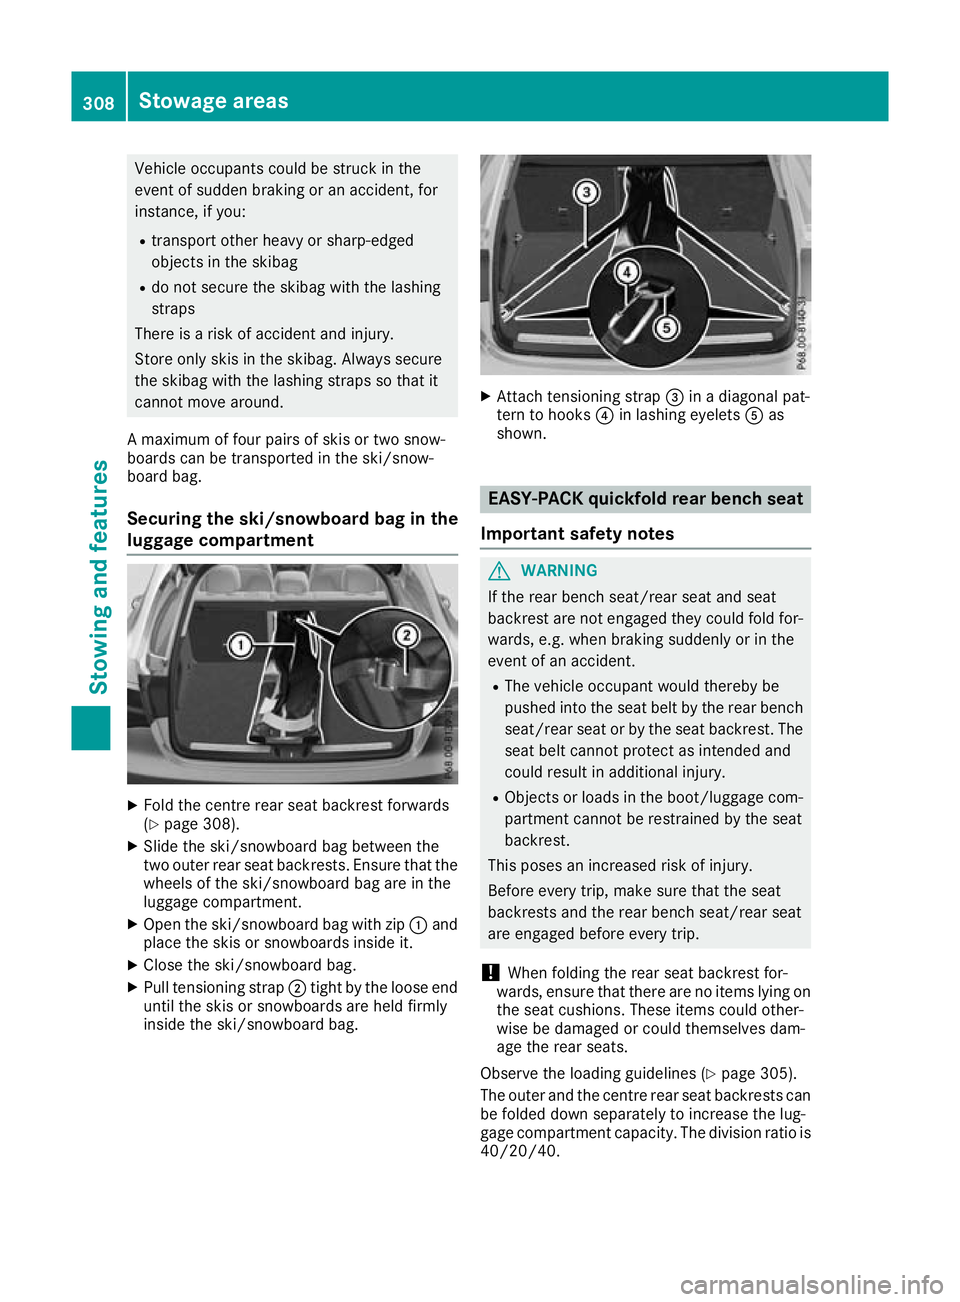
Securing the ski/snowboard bag in the
luggage compartment X
Fold the centre rear seat backrest forwards
(Y page 308).
X Slide the ski/snowboard bag between the
two outer rear seat backrests. Ensure that the
wheels of the ski/snowboard bag are in the
luggage compartment.
X Open the ski/snowboard bag with zip :and
place the skis or snowboards inside it.
X Close the ski/snowboard bag.
X Pull tensioning strap ;tight by the loose end
until the skis or snowboards are held firmly
inside the ski/snowboard bag. X
Attach tensioning strap =in a diagonal pat-
tern to hooks ?in lashing eyelets Aas
shown. EASY-PACK quickfold rear bench seat
Important safety notes G
WARNING
If the rear bench seat/rear seat and seat
backrest are not engaged they could fold for- wards, e.g. when braking suddenly or in the
event of an accident.
R The vehicle occupant would thereby be
pushed into the seat belt by the rear bench
seat/rear seat or by the seat backrest. The
seat belt cannot protect as intended and
could result in additional injury.
R Objects or loads in the boot/luggage com-
partment cannot be restrained by the seat
backrest.
This poses an increased risk of injury.
Before every trip, make sure that the seat
backrests and the rear bench seat/rear seat
are engaged before every trip.
! When folding the rear seat backrest for-
wards, ensure that there are no items lying on the seat cushions. These items could other-
wise be damaged or could themselves dam-
age the rear seats.
Observe the loading guidelines (Y page 305).
The outer and the centre rear seat backrests can be folded down separately to increase the lug-
gage compartment capacity. The division ratio is
40/20/40. 308
Stowage areasStowing and features
Page 363 of 389
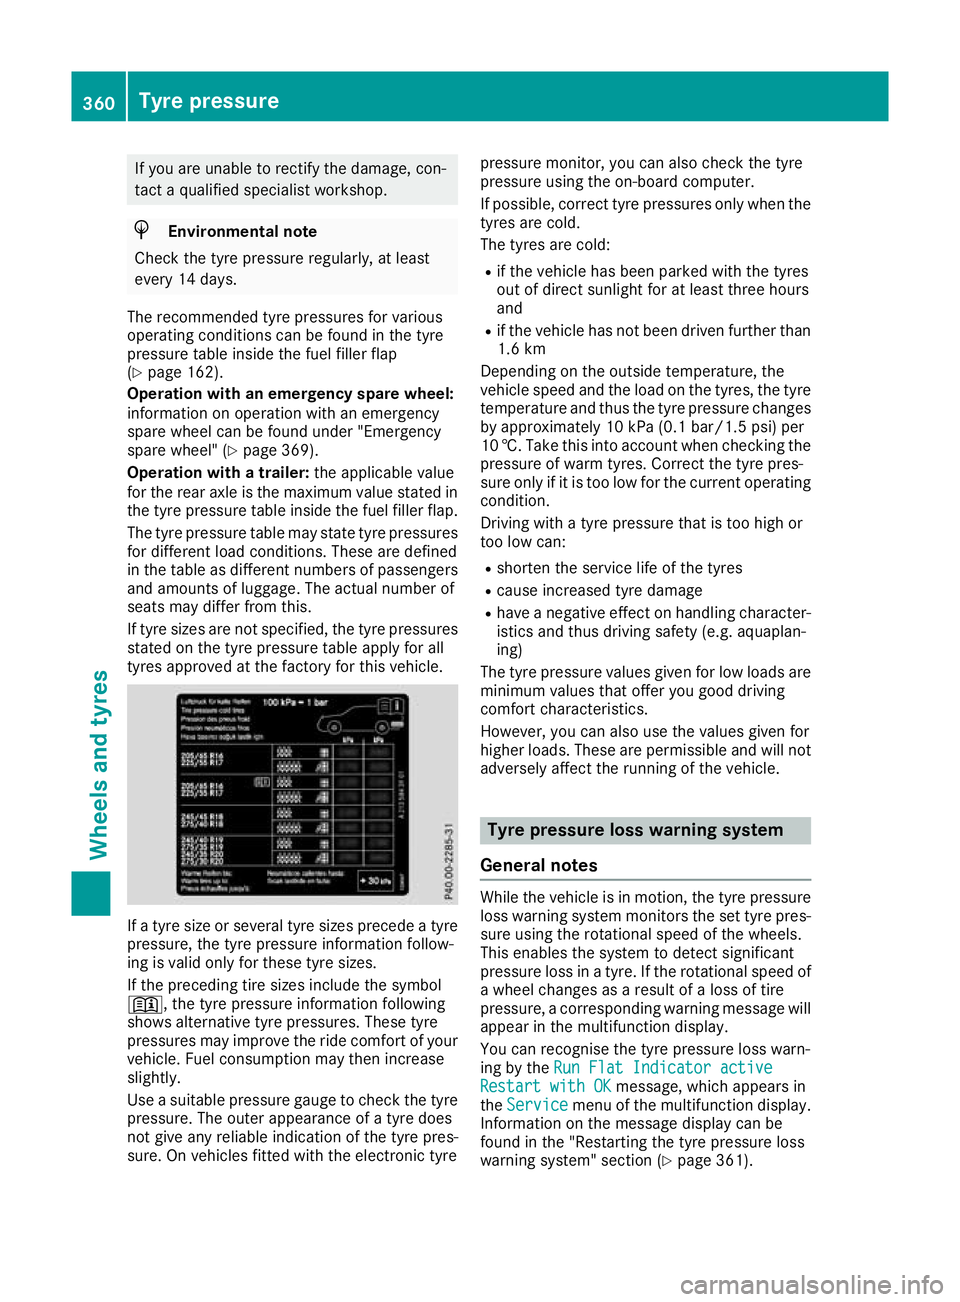
If you are unable to rectify the damage, con-
tact a qualified specialist workshop. H
Environmental note
Check the tyre pressure regularly, at least
every 14 days.
The recommended tyre pressures for various
operating conditions can be found in the tyre
pressure table inside the fuel filler flap
(Y page 162).
Operation with an emergency spare wheel:
information on operation with an emergency
spare wheel can be found under "Emergency
spare wheel" (Y page 369).
Operation with a trailer: the applicable value
for the rear axle is the maximum value stated in the tyre pressure table inside the fuel filler flap.
The tyre pressure table may state tyre pressures for different load conditions. These are defined
in the table as different numbers of passengers and amounts of luggage. The actual number of
seats may differ from this.
If tyre sizes are not specified, the tyre pressures
stated on the tyre pressure table apply for all
tyres approved at the factory for this vehicle. If a tyre size or several tyre sizes precede a tyre
pressure, the tyre pressure information follow-
ing is valid only for these tyre sizes.
If the preceding tire sizes include the symbol
+, the tyre pressure information following
shows alternative tyre pressures. These tyre
pressures may improve the ride comfort of your
vehicle. Fuel consumption may then increase
slightly.
Use a suitable pressure gauge to check the tyre
pressure. The outer appearance of a tyre does
not give any reliable indication of the tyre pres-
sure. On vehicles fitted with the electronic tyre pressure monitor, you can also check the tyre
pressure using the on-board computer.
If possible, correct tyre pressures only when the
tyres are cold.
The tyres are cold:
R if the vehicle has been parked with the tyres
out of direct sunlight for at least three hours
and
R if the vehicle has not been driven further than
1.6 km
Depending on the outside temperature, the
vehicle speed and the load on the tyres, the tyre temperature and thus the tyre pressure changes by approximately 10 kPa (0.1 bar/1.5 psi) per
10 †. Take this into account when checking the
pressure of warm tyres. Correct the tyre pres-
sure only if it is too low for the current operating
condition.
Driving with a tyre pressure that is too high or
too low can:
R shorten the service life of the tyres
R cause increased tyre damage
R have a negative effect on handling character-
istics and thus driving safety (e.g. aquaplan-
ing)
The tyre pressure values given for low loads are
minimum values that offer you good driving
comfort characteristics.
However, you can also use the values given for
higher loads. These are permissible and will not
adversely affect the running of the vehicle. Tyre pressure loss warning system
General notes While the vehicle is in motion, the tyre pressure
loss warning system monitors the set tyre pres-
sure using the rotational speed of the wheels.
This enables the system to detect significant
pressure loss in a tyre. If the rotational speed of
a wheel changes as a result of a loss of tire
pressure, a corresponding warning message will appear in the multifunction display.
You can recognise the tyre pressure loss warn-
ing by the Run Flat Indicator active Run Flat Indicator active
Restart with OK
Restart with OK message, which appears in
the Service
Service menu of the multifunction display.
Information on the message display can be
found in the "Restarting the tyre pressure loss
warning system" section (Y page 361).360
Tyre pressureWheels and tyres