fold seats MERCEDES-BENZ GLC COUPE 2016 Owners Manual
[x] Cancel search | Manufacturer: MERCEDES-BENZ, Model Year: 2016, Model line: GLC COUPE, Model: MERCEDES-BENZ GLC COUPE 2016Pages: 389, PDF Size: 7.34 MB
Page 22 of 389
wide-angle function ......................
.202
Reversing feature
Side windows ................................... 95
Sliding sunroof ................................. 99
Tailgate ............................................ 91
Reversing lamps
Display message ............................ 261
Roof carrier ........................................ 315
Roof lining and carpets (cleaning
instructions) ...................................... 337
Roof load (maximum) ........................ 379
Route guidance
See also Digital Owner's Manual ... 292 S
Safety Children in the vehicle ..................... 56
see Occupant safety
see Operating safety
SD card
Inserting/removing ........................ 303
SD memory card
See also Digital Owner's Manual ... 292
Selecting ........................................ 237
Seat
Adjusting (Performance Seat) ....... .106
Folding the backrest (rear com-
partment) forwards/back .............. 308
Seat belt
Centre rear-compartment sea t........ 45
Correct usage .................................. 44
Seat belts
Adjusting the driver's and front-
passenger seat belt ......................... 45
Adjusting the height ......................... 45
Cleaning ......................................... 337
Fastening ......................................... 45
Important safety guidelines ............. 43
Introduction ..................................... 43
Rear seat belt status indicator ......... 46
Releasing ......................................... 45
Warning lamp ................................. 280
Warning lamp (function) ................... 46
Seats
Adjusting (electrically) ................... 103
Adjusting (manually and electri-
cally) .............................................. 103 Adjusting the 4-way lumbar sup-
port ................................................ 106
Adjusting the head restraint .......... 104
Calling up a stored setting (mem-
ory function) .................................. 114
Cleaning the cover ......................... 337
Correct driver's seat position ........ 101
Important safety notes .................. 101
Seat heating .................................. 106
Seat heating problem .................... 108
Seat ventilation .............................. 107
Seat ventilation problem ................ 108
Storing settings (memory func-
tion) ............................................... 113
Switching seat heating on/of f....... 106
Switching the seat ventilation on/ off .................................................. 107
Securing a load .................................. 310
Securing luggage ............................... 310
Selector lever
Cleaning ......................................... 336
see Automatic transmission
Sensors (cleaning instructions) ....... 335
Service Centre
see Qualified specialist workshop
Service menu (on-board com-
puter) .................................................. 240
Service message
see ASSYST PLUS
Service products
AdBlue ®
special additive s.............. 376
Brake fluid ..................................... 377
Coolant (engine) ............................ 378
Engine oil ....................................... 377
Fuel ................................................ 373
Important safety notes .................. 373
Washer fluid ................................... 378
Setting the date/time format
See also Digital Owner's Manua l... 292
Setting the language
See also Digital Owner's Manua l... 292
Setting the time
See also Digital Owner's Manua l... 292
Settings
Factory (on-board computer) ......... 245
On-board compute r....................... 240
SETUP (on-board computer) ............. 246 Index
19
Page 43 of 389
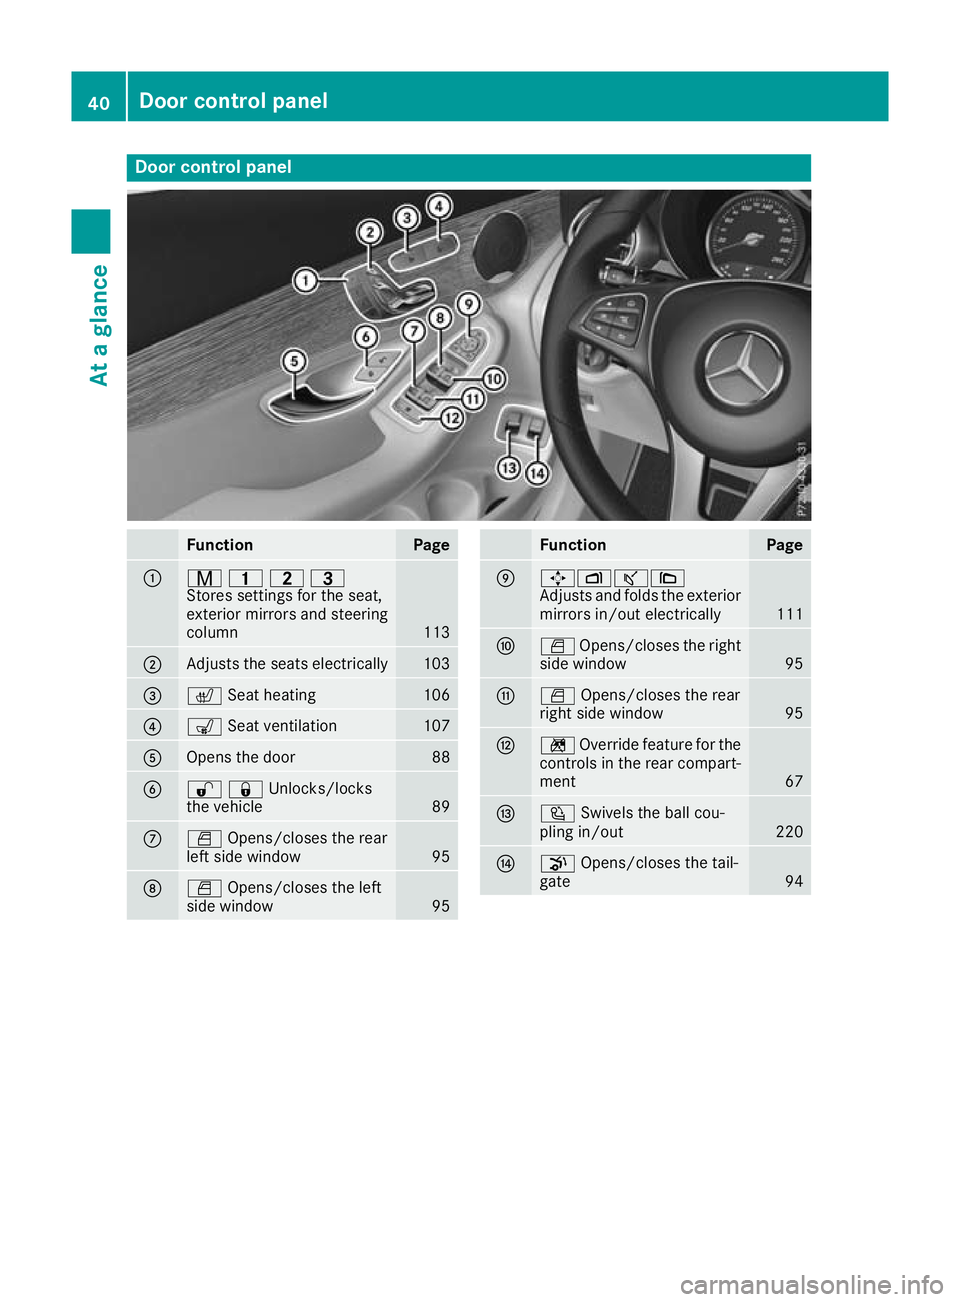
Door control panel
Function Page
:
r
45=
Stores settings for the seat,
exterior mirrors and steering
column 113
;
Adjusts the seats electrically 103
=
c
Seat heating 106
?
s
Seat ventilation 107
A
Opens the door 88
B
%&Unlocks/locks
the vehicle
89
C
W
Opens/closes the rear
left side window 95
D
W
Opens/closes the left
side window 95 Function Page
E
7Zª\
Adjusts and folds the exterior
mirrors in/out electrically 111
F
W
Opens/closes the right
side window 95
G
W
Opens/closes the rear
right side window 95
H
n
Override feature for the
controls in the rear compart-
ment 67
I
Ü
Swivels the ball cou-
pling in/out 220
J
p
Opens/closes the tail-
gate 9440
Door control panelAt a glance
Page 62 of 389
:
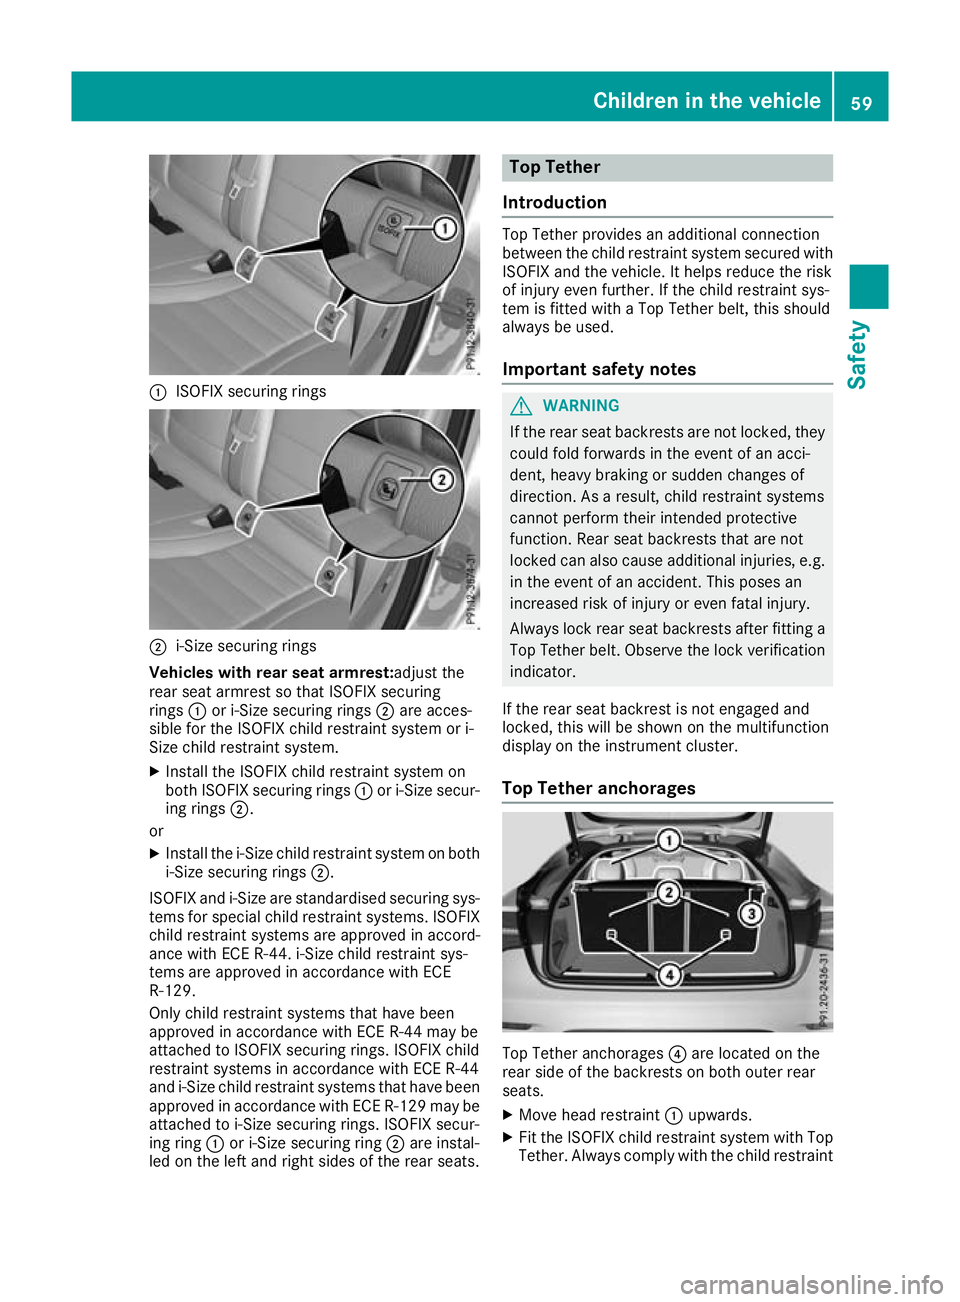
ISOFIX securing rings ;
i-Size securing rings
Vehicles with rear seat armrest: adjust the
rear seat armrest so that ISOFIX securing
rings :or i-Size securing rings ;are acces-
sible for the ISOFIX child restraint system or i-
Size child restraint system.
X Install the ISOFIX child restraint system on
both ISOFIX securing rings :or i-Size secur-
ing rings ;.
or X Install the i-Size child restraint system on both
i-Size securing rings ;.
ISOFIX and i-Size are standardised securing sys-
tems for special child restraint systems. ISOFIX
child restraint systems are approved in accord-
ance with ECE R-44. i-Size child restraint sys-
tems are approved in accordance with ECE
R-129.
Only child restraint systems that have been
approved in accordance with ECE R-44 may be
attached to ISOFIX securing rings. ISOFIX child
restraint systems in accordance with ECE R-44
and i‑Size child restraint systems that have been
approved in accordance with ECE R-129 may be attached to i-Size securing rings. ISOFIX secur-
ing ring :or i-Size securing ring ;are instal-
led on the left and right sides of the rear seats. Top Tether
Introduction Top Tether provides an additional connection
between the child restraint system secured with
ISOFIX and the vehicle. It helps reduce the risk
of injury even further. If the child restraint sys-
tem is fitted with a Top Tether belt, this should
always be used.
Important safety notes G
WARNING
If the rear seat backrests are not locked, they
could fold forwards in the event of an acci-
dent, heavy braking or sudden changes of
direction. As a result, child restraint systems
cannot perform their intended protective
function. Rear seat backrests that are not
locked can also cause additional injuries, e.g. in the event of an accident. This poses an
increased risk of injury or even fatal injury.
Always lock rear seat backrests after fitting a Top Tether belt. Observe the lock verificationindicator.
If the rear seat backrest is not engaged and
locked, this will be shown on the multifunction
display on the instrument cluster.
Top Tether anchorages Top Tether anchorages
?are located on the
rear side of the backrests on both outer rear
seats.
X Move head restraint :upwards.
X Fit the ISOFIX child restraint system with Top
Tether. Always comply with the child restraint Children in the vehicle
59Safety Z
Page 105 of 389
G
WARNING
The head restraints cannot provide the inten-
ded protection unless they are fitted and
adjusted correctly. There is an increased risk of injury to the head and neck in the event of
an accident or sudden braking, for example.
Always drive with the head restraints fitted.
Ensure that the centre of the head restraints
support the back of each vehicle occupant's
head at eye level before driving off.
Do not interchange the head restraints of the
front and rear seats. Otherwise, you cannot
adjust the height and angle of the head
restraints correctly.
Adjust the head restraint fore-and-aft position
so that it is as close as possible to the back of
your head. G
WARNING
If the driver's seat is not correctly engaged, it could unexpectedly move while driving. This
could cause you to lose control of the vehicle. There is a risk of an accident.
Always ensure that the driver's seat is
engaged before starting the vehicle. G
WARNING
You could lose control of the vehicle while
driving if you:
R adjust the driver's seat, steering wheel or
mirrors
R fasten the seat belt
There is a risk of an accident.
Adjust the driver's seat, head restraint, steer-
ing wheel and mirrors and fasten your seat
belt before starting the engine. G
WARNING
If you adjust the seat height carelessly, you or other vehicle occupants could be trapped andthereby injured. Children in particular could
accidentally press the electrical seat adjust-
ment buttons and become trapped. There is a
risk of injury.
While moving the seats, make sure that your
hands or other body parts do not get under the lever assembly of the seat adjustment sys-
tem.
G
WARNING
The seat belt does not offer the intended level of protection if you have not moved the back-
rest to an almost vertical position. When brak-
ing or in the event of an accident, you could
slide underneath the seat belt and sustain
abdomen or neck injuries, for example. This
poses an increased risk of injury or even fatal injury.
Adjust the seat properly before beginning
your journey. Always ensure that the backrest
is in an almost vertical position and that the
shoulder section of your seatbelt is routed
across the centre of your shoulder.
! To avoid damage to the seats and the seat
heating, observe the following information:
R do not spill any liquids on the seats. If liquid
is spilled on the seats, dry them as soon as possible.
R if the seat covers are damp or wet, do not
switch on the seat heating. The seat heat-
ing should also not be used to dry the seats.
R clean the seat covers as recommended;
see "Interior care".
R do not transport heavy loads on the seats.
Do not place sharp objects on the seat
cushions, e.g. knives, nails or tools. The
seats should only be occupied by passen-
gers, if possible.
R when the seat heating is in operation, do
not cover the seats with insulating materi-
als, e.g. blankets, coats, bags, seat covers,
child seats or booster seats.
! Make sure that there are no objects in the
footwell under or behind the seats when mov- ing the seats back. There is a risk that the
seats and/or the objects could be damaged.
i The rear-compartment head restraints can
be removed (Y page 105).
For more information, contact a qualified spe-
cialist workshop.
i Related topic:
R EASY-PACK quickfold rear bench seat
(Y page 308) 102
SeatsSeats, steering wheel and mirrors
Page 108 of 389
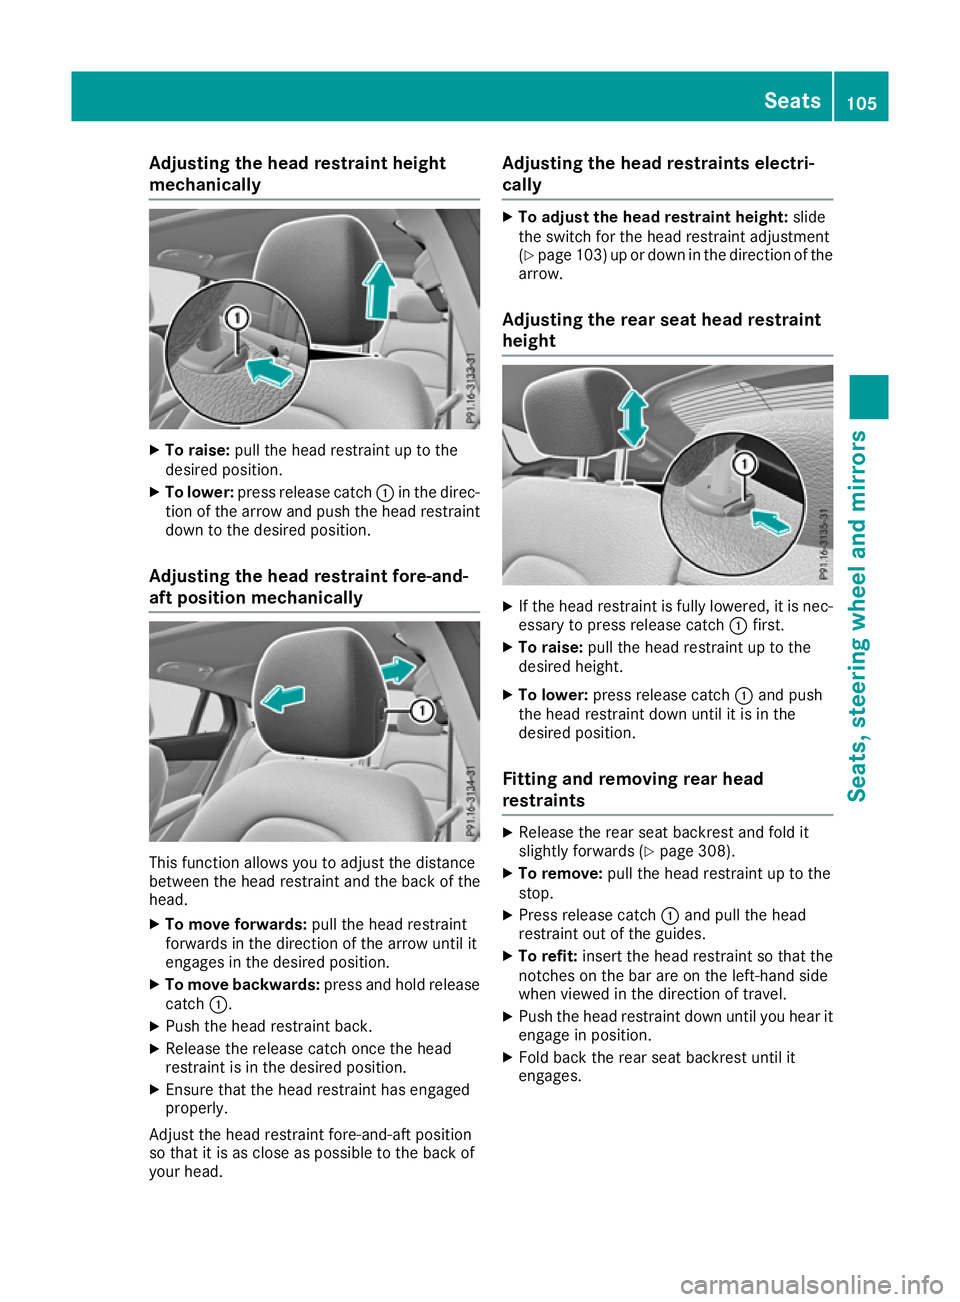
Adjusting the head restraint height
mechanically X
To raise: pull the head restraint up to the
desired position.
X To lower: press release catch :in the direc-
tion of the arrow and push the head restraint down to the desired position.
Adjusting the head restraint fore-and-
aft position mechanically This function allows you to adjust the distance
between the head restraint and the back of the
head.
X To move forwards: pull the head restraint
forwards in the direction of the arrow until it
engages in the desired position.
X To move backwards: press and hold release
catch :.
X Push the head restraint back.
X Release the release catch once the head
restraint is in the desired position.
X Ensure that the head restraint has engaged
properly.
Adjust the head restraint fore-and-aft position
so that it is as close as possible to the back of
your head. Adjusting the head restraints electri-
cally X
To adjust the head restraint height: slide
the switch for the head restraint adjustment
(Y page 103) up or down in the direction of the
arrow.
Adjusting the rear seat head restraint
height X
If the head restraint is fully lowered, it is nec-
essary to press release catch :first.
X To raise: pull the head restraint up to the
desired height.
X To lower: press release catch :and push
the head restraint down until it is in the
desired position.
Fitting and removing rear head
restraints X
Release the rear seat backrest and fold it
slightly forwards (Y page 308).
X To remove: pull the head restraint up to the
stop.
X Press release catch :and pull the head
restraint out of the guides.
X To refit: insert the head restraint so that the
notches on the bar are on the left-hand side
when viewed in the direction of travel.
X Push the head restraint down until you hear it
engage in position.
X Fold back the rear seat backrest until it
engages. Seats
105Seats, steering wheel and mirrors Z
Page 114 of 389
Exterior mirrors
Important safety notes G
WARNING
You could lose control of the vehicle while
driving if you:
R adjust the driver's seat, steering wheel or
mirrors
R fasten the seat belt
There is a risk of an accident.
Adjust the driver's seat, head restraint, steer-
ing wheel and mirrors and fasten your seat
belt before starting the engine. G
WARNING
The exterior mirrors reduce the size of the
image. Objects visible in the mirrors are
closer than they appear. You could misjudge
the distance from road users driving behind
you when changing lanes, for instance. There is a risk of an accident.
You should therefore always look over your
shoulder to determine the actual distance
from road users driving behind you.
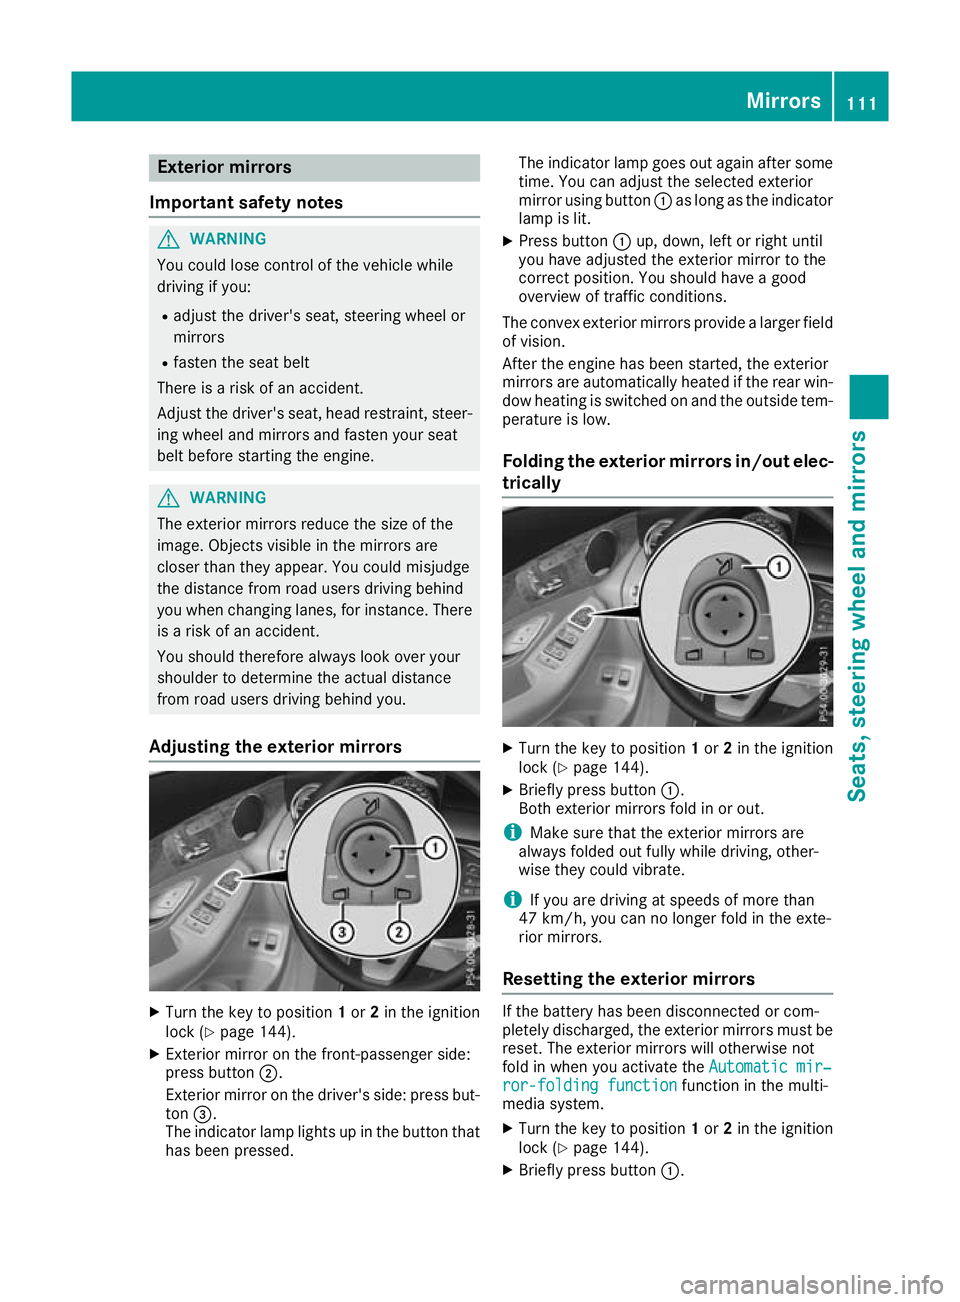
Adjusting the exterior mirrors X
Turn the key to position 1or 2in the ignition
lock (Y page 144).
X Exterior mirror on the front-passenger side:
press button ;.
Exterior mirror on the driver's side: press but-
ton =.
The indicator lamp lights up in the button that has been pressed. The indicator lamp goes out again after some
time. You can adjust the selected exterior
mirror using button :as long as the indicator
lamp is lit.
X Press button :up, down, left or right until
you have adjusted the exterior mirror to the
correct position. You should have a good
overview of traffic conditions.
The convex exterior mirrors provide a larger field of vision.
After the engine has been started, the exterior
mirrors are automatically heated if the rear win-
dow heating is switched on and the outside tem- perature is low.
Folding the exterior mirrors in/out elec- trically X
Turn the key to position 1or 2in the ignition
lock (Y page 144).
X Briefly press button :.
Both exterior mirrors fold in or out.
i Make sure that the exterior mirrors are
always folded out fully while driving, other-
wise they could vibrate.
i If you are driving at speeds of more than
47 km/h, you can no longer fold in the exte-
rior mirrors.
Resetting the exterior mirrors If the battery has been disconnected or com-
pletely discharged, the exterior mirrors must be reset. The exterior mirrors will otherwise not
fold in when you activate the Automatic mir‐ Automatic mir‐
ror-folding function
ror-folding function function in the multi-
media system.
X Turn the key to position 1or 2in the ignition
lock (Y page 144).
X Briefly press button :. Mirrors
111Seats, steering wheel and mirrors Z
Page 115 of 389
Folding the exterior mirrors in/out
automatically When the
Automatic
Automatic mirror-folding
mirror-folding func‐
func‐
tion
tion function is activated in the multimedia sys-
tem (see Digital Operating Instructions):
R the exterior mirrors fold in automatically as
soon as you lock the vehicle from the outside
R the exterior mirrors fold out again automati-
cally as soon as you unlock the vehicle
i If the exterior mirrors have been folded in
manually, they do not fold out.
Exterior mirror pushed out of position If an exterior mirror has been pushed out of
position (forwards or backwards), proceed as
follows:
X Vehicles without electrically folding exte-
rior mirrors: manually move the exterior mir-
ror into the correct position.
X Vehicles with electrically folding exterior
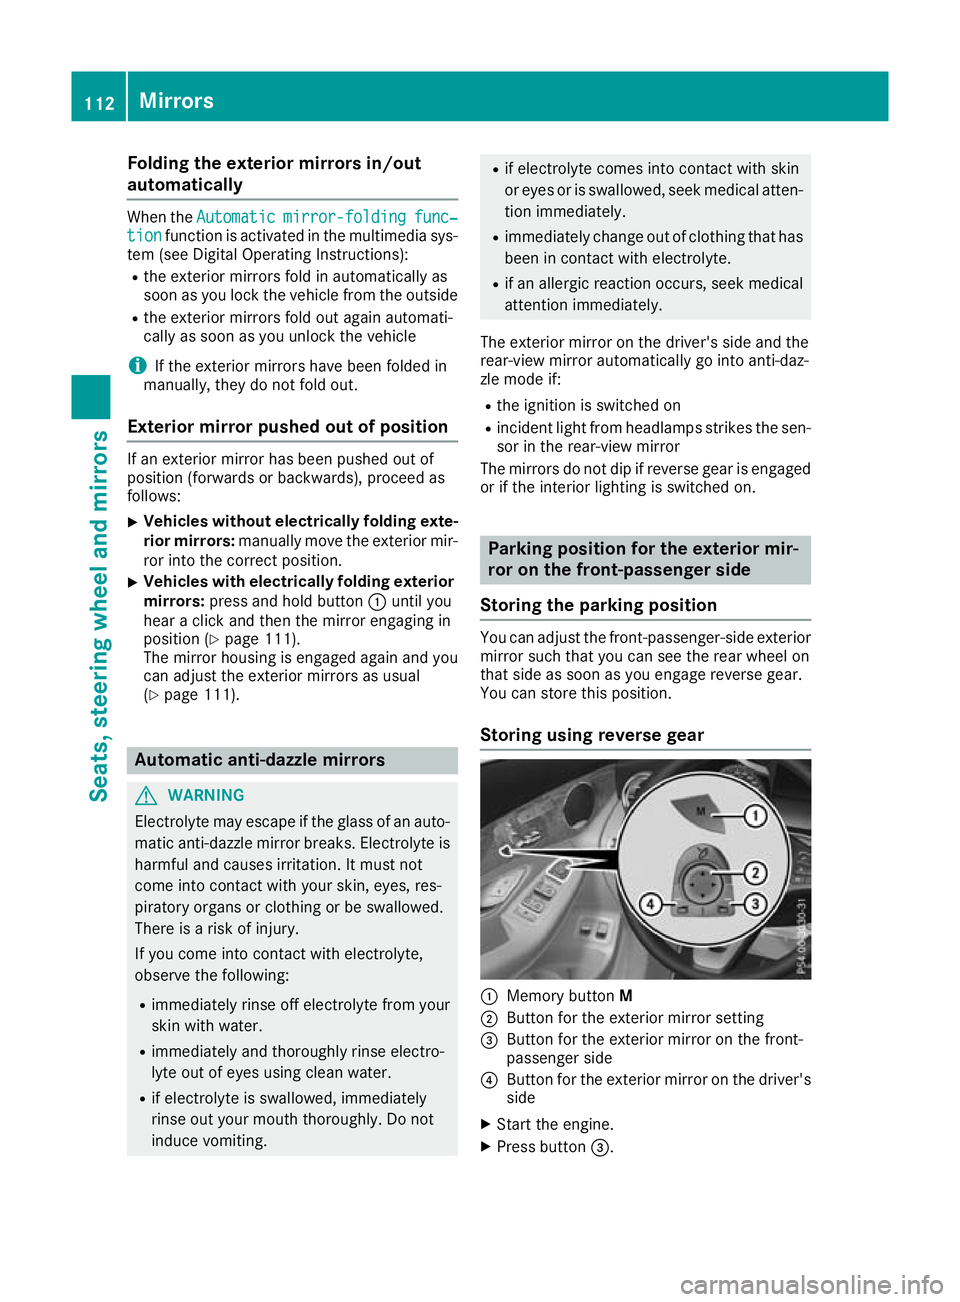
mirrors: press and hold button :until you
hear a click and then the mirror engaging in
position (Y page 111).
The mirror housing is engaged again and you
can adjust the exterior mirrors as usual
(Y page 111). Automatic anti-dazzle mirrors
G
WARNING
Electrolyte may escape if the glass of an auto- matic anti-dazzle mirror breaks. Electrolyte is
harmful and causes irritation. It must not
come into contact with your skin, eyes, res-
piratory organs or clothing or be swallowed.
There is a risk of injury.
If you come into contact with electrolyte,
observe the following:
R immediately rinse off electrolyte from your
skin with water.
R immediately and thoroughly rinse electro-
lyte out of eyes using clean water.
R if electrolyte is swallowed, immediately
rinse out your mouth thoroughly. Do not
induce vomiting. R
if electrolyte comes into contact with skin
or eyes or is swallowed, seek medical atten-
tion immediately.
R immediately change out of clothing that has
been in contact with electrolyte.
R if an allergic reaction occurs, seek medical
attention immediately.
The exterior mirror on the driver's side and the
rear-view mirror automatically go into anti-daz-
zle mode if:
R the ignition is switched on
R incident light from headlamps strikes the sen-
sor in the rear-view mirror
The mirrors do not dip if reverse gear is engaged or if the interior lighting is switched on. Parking position for the exterior mir-
ror on the front-passenger side
Storing the parking position You can adjust the front-passenger-side exterior
mirror such that you can see the rear wheel on
that side as soon as you engage reverse gear.
You can store this position.
Storing using reverse gear :
Memory button M
; Button for the exterior mirror setting
= Button for the exterior mirror on the front-
passenger side
? Button for the exterior mirror on the driver's
side
X Start the engine.
X Press button =.112
MirrorsSeats, steering wheel and
mirrors
Page 311 of 389
Vehicle occupants could be struck in the
event of sudden braking or an accident, for
instance, if you:
R transport other heavy or sharp-edged
objects in the skibag
R do not secure the skibag with the lashing
straps
There is a risk of accident and injury.
Store only skis in the skibag. Always secure
the skibag with the lashing straps so that it
cannot move around.
A maximum of four pairs of skis or two snow-
boards can be transported in the ski/snow-
board bag.
Securing the ski/snowboard bag in the
luggage compartment X
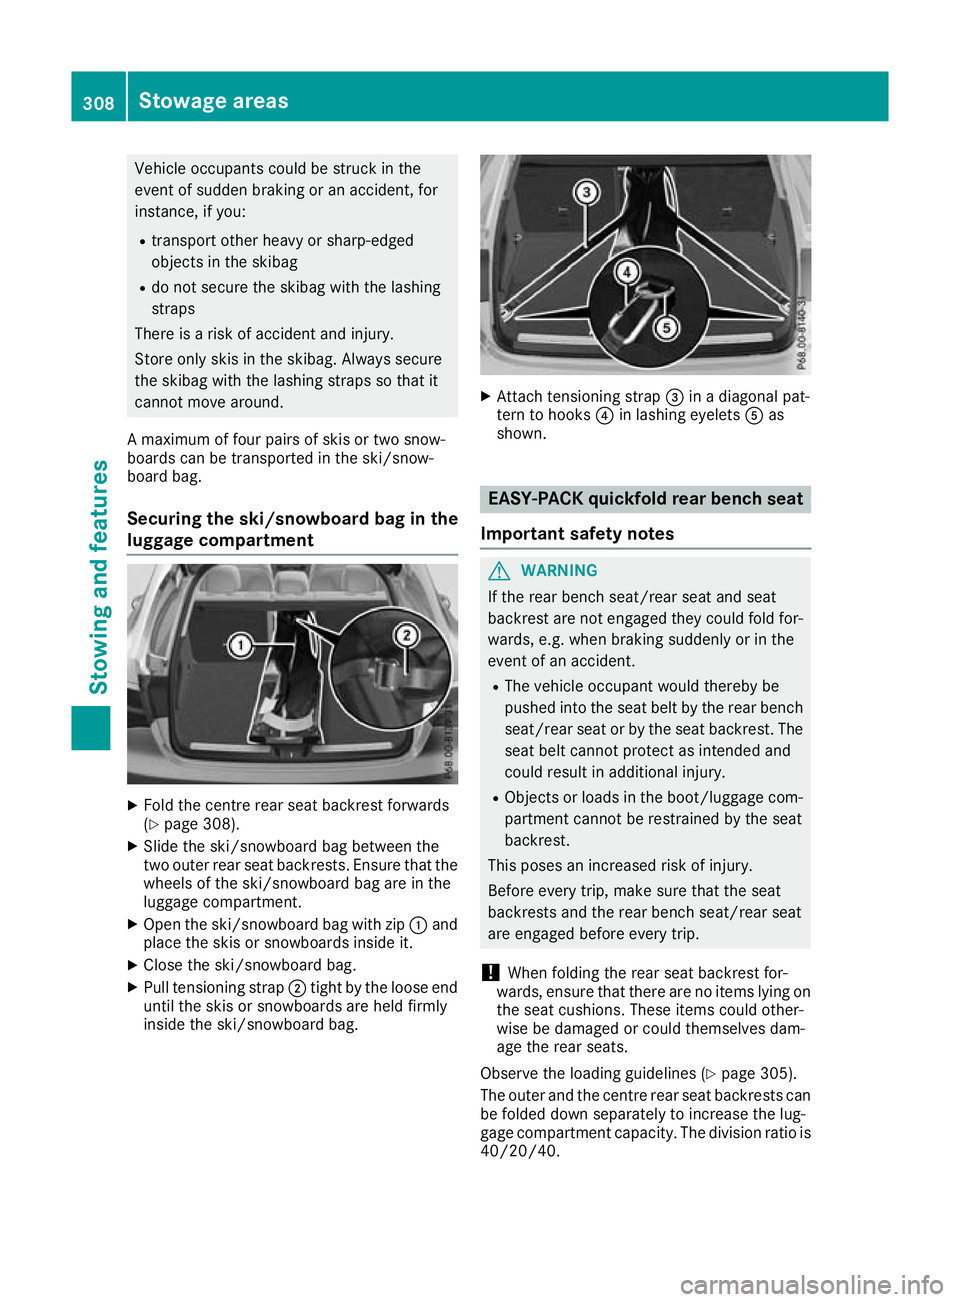
Fold the centre rear seat backrest forwards
(Y page 308).
X Slide the ski/snowboard bag between the
two outer rear seat backrests. Ensure that the
wheels of the ski/snowboard bag are in the
luggage compartment.
X Open the ski/snowboard bag with zip :and
place the skis or snowboards inside it.
X Close the ski/snowboard bag.
X Pull tensioning strap ;tight by the loose end
until the skis or snowboards are held firmly
inside the ski/snowboard bag. X
Attach tensioning strap =in a diagonal pat-
tern to hooks ?in lashing eyelets Aas
shown. EASY-PACK quickfold rear bench seat
Important safety notes G
WARNING
If the rear bench seat/rear seat and seat
backrest are not engaged they could fold for- wards, e.g. when braking suddenly or in the
event of an accident.
R The vehicle occupant would thereby be
pushed into the seat belt by the rear bench
seat/rear seat or by the seat backrest. The
seat belt cannot protect as intended and
could result in additional injury.
R Objects or loads in the boot/luggage com-
partment cannot be restrained by the seat
backrest.
This poses an increased risk of injury.
Before every trip, make sure that the seat
backrests and the rear bench seat/rear seat
are engaged before every trip.
! When folding the rear seat backrest for-
wards, ensure that there are no items lying on the seat cushions. These items could other-
wise be damaged or could themselves dam-
age the rear seats.
Observe the loading guidelines (Y page 305).
The outer and the centre rear seat backrests can be folded down separately to increase the lug-
gage compartment capacity. The division ratio is
40/20/40. 308
Stowage areasStowing and features