power steering MERCEDES-BENZ GLC COUPE 2016 Owners Manual
[x] Cancel search | Manufacturer: MERCEDES-BENZ, Model Year: 2016, Model line: GLC COUPE, Model: MERCEDES-BENZ GLC COUPE 2016Pages: 389, PDF Size: 7.34 MB
Page 37 of 389
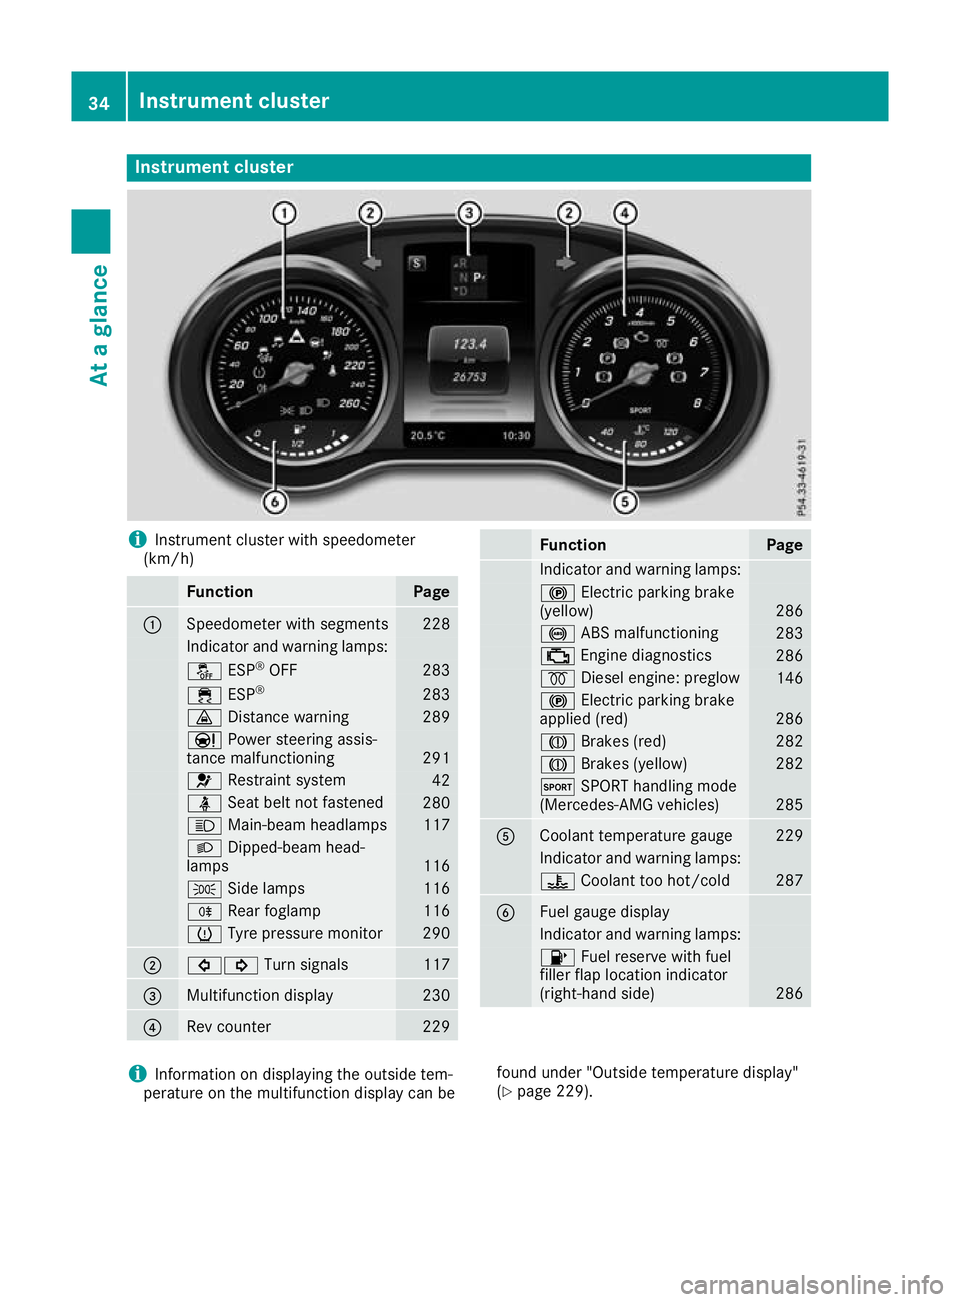
Instrument cluster
i
Instrument cluster with speedometer
(km/h) Function Page
:
Speedometer with segments 228
Indicator and warning lamps:
å
ESP®
OFF 283
÷
ESP® 283
·
Distance warning 289
Ð
Power steering assis-
tance malfunctioning 291
6
Restraint system 42
ü
Seat belt not fastened 280
K
Main-beam headlamps 117
L
Dipped-beam head-
lamps 116
T
Side lamps 116
R
Rear foglamp 116
h
Tyre pressure monitor 290
;
#!
Turn signals 117
=
Multifunction display 230
?
Rev counter 229 Function Page
Indicator and warning lamps:
!
Electric parking brake
(yellow) 286
!
ABS malfunctioning 283
;
Engine diagnostics 286
%
Diesel engine: preglow 146
!
Electric parking brake
applied (red) 286
J
Brakes (red) 282
J
Brakes (yellow) 282
M
SPORT handling mode
(Mercedes-AMG vehicles) 285
A
Coolant temperature gauge 229
Indicator and warning lamps:
?
Coolant too hot/cold 287
B
Fuel gauge display
Indicator and warning lamps:
8
Fuel reserve with fuel
filler flap location indicator
(right-hand side) 286
i
Information on displaying the outside tem-
perature on the multifunction display can be found under "Outside temperature display"
(Y
page 229). 34
Instrument clusterAt a glance
Page 82 of 389
The PRE-SAFE
®
Brake function can also brake
the vehicle automatically under the following
conditions:
R the driver and front passenger have their seat
belts fastened
R the vehicle speed is between approximately
7 km/h and 200 km/h
At speeds of up to approximately 70 km/h, PRE-
SAFE ®
Brake can also detect:
R stationary objects in the path of your vehicle,
e.g. stopped or parked vehicles
R pedestrians in the path of your vehicle
i If an increased danger of collision exists,
preventative passenger protection measures
(PRE-SAFE ®
) are triggered (Y page 55).
If the danger of collision with the vehicle in front remains and you do not brake, take evasive
action or accelerate quickly, the vehicle may
perform automatic emergency braking up to the
point of full brake application. Automatic full
brake application is not performed until imme-
diately prior to an imminent accident.
You can prevent the engagement of PRE-SAFE ®
Brake at any time by:
R depressing the accelerator pedal further
R activating kickdown
R releasing the brake pedal
The braking action of PRE-SAFE ®
Brake is ended
automatically if:
R you manoeuvre to avoid the obstacle
R the danger of collision has passed
R an obstacle is no longer detected in front of
your vehicle STEER CONTROL
General information STEER CONTROL helps you by transmitting a
noticeable steering force to the steering wheel
in the direction required for vehicle stabilisation.
This steering support is provided in particular if:
R both right wheels or both left wheels are on a
wet or slippery road surface when you brake
R the vehicle begins to skid Important safety notes i
Observe the "Important safety notes" sec-
tion (Y page 68).
No steering support is provided from STEER
CONTROL, if: R ESP ®
is deactivated
R ESP ®
is malfunctioning
R the steering is faulty
If ESP ®
is malfunctioning, you will be assisted
further by the electrical power steering. Protection against theft
Immobiliser
The immobiliser prevents your vehicle from
being started without the correct key.
X To activate with the key: remove the key
from the ignition lock.
X To activate with KEYLESS-GO start func-
tion or KEYLESS-GO:
switch the ignition off
and open the driver's door.
X To deactivate: switch on the ignition.
When leaving the vehicle, always take the key
with you and lock the vehicle. Anyone can start
the engine if a valid key has been left inside the vehicle.
i The immobiliser is always deactivated when
you start the engine. ATA (Anti-Theft Alarm system) Protection against theft
79Safety Z
Page 110 of 389
The three red indicator lamps in the button indi-
cate the heating level you have selected.
The system automatically switches down from
level 3to level 2after approximately eight
minutes.
The system automatically switches down from
level 2to level 1after approximately ten
minutes.
The system automatically switches off approx-
imately 20 minutes after it is set to level 1.
X Turn the key to position 1or 2in the ignition
lock (Y page 144).
X To switch on: press button:repeatedly
until the desired heating level is set.
X To switch off: press button:repeatedly
until all the indicator lamps go out.
i If the vehicle battery voltage is too low, the
seat heating may switch off.
i If drive program
E(Y page 157) is selected,
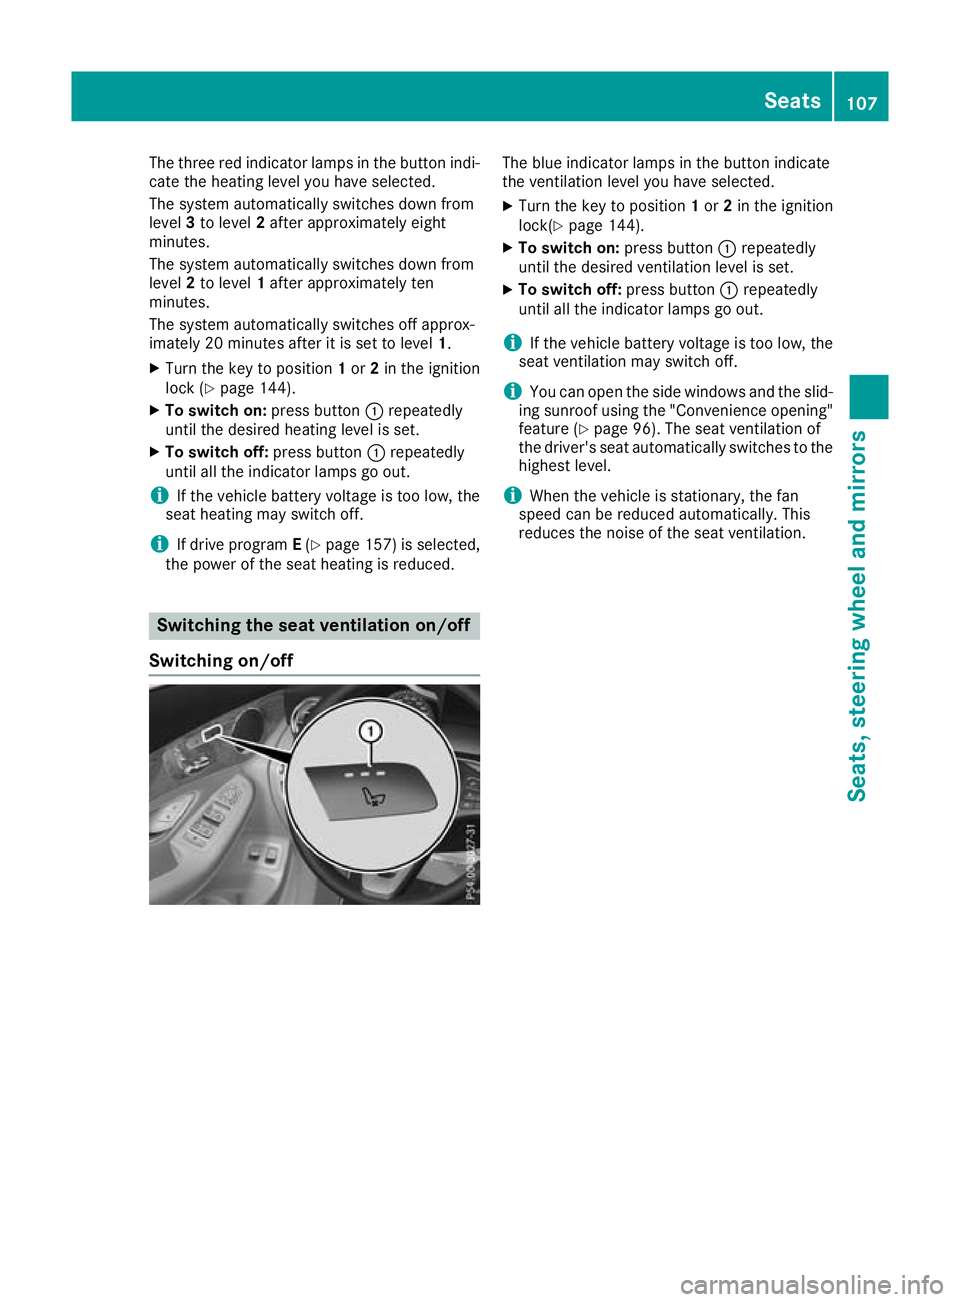
the power of the seat heating is reduced. Switching the seat ventilation on/off
Switching on/off The blue indicator lamps in the button indicate
the ventilation level you have selected.
X Turn the key to position 1or 2in the ignition
lock(Y page 144).
X To switch on: press button:repeatedly
until the desired ventilation level is set.
X To switch off: press button:repeatedly
until all the indicator lamps go out.
i If the vehicle battery voltage is too low, the
seat ventilation may switch off.
i You can open the side windows and the slid-
ing sunroof using the "Convenience opening" feature (Y page 96). The seat ventilation of
the driver's seat automatically switches to the
highest level.
i When the vehicle is stationary, the fan
speed can be reduced automatically. This
reduces the noise of the seat ventilation. Seats
107Seats, steering wheel and mirrors Z
Page 146 of 389
Running-in notes
Important safety notes
In certain driving and driving safety systems, the sensors adjust automatically while a certain dis-
tance is being driven after the vehicle has been delivered or after repairs. Full system effective-
ness is not reached until the end of this teach-in process.
Brake pads/linings and discs that either are new or have been replaced achieve optimum braking
effect only after several hundred kilometres of
driving. Compensate for the reduced braking
effect by applying greater force to the brake
pedal. The first 1500 km
The more you treat the engine with sufficient
care at the start, the more satisfied you will be
with the engine performance later on.
R You should therefore drive at varying road
speeds and engine speeds for the first
1500 km.
R Avoid overstraining the vehicle during this
period, e.g. driving at full throttle.
R When shifting gears manually, shift up in good
time, before the rev counter needle reaches
Ô of the way to the red area of the rev counter
display.
R Do not shift down a gear manually in order to
brake.
R Try to avoid depressing the accelerator pedal
beyond the pressure point (kickdown).
After 1500 km, you can increase the engine
speed gradually and accelerate the vehicle to
full speed.
You should also observe these notes on running- in if the engine or parts of the drive train on your
vehicle have been replaced.
Always observe the maximum permissible
speed. Driving
Important safety notes
G
WARNING
Objects in the driver's footwell can impede
pedal travel or block a pedal which is
depressed. This jeopardises safe operation of the vehicle. There is a risk of an accident.
Stow all objects in the vehicle safely, so that
they cannot reach the driver's footwell. Make sure the floormats and carpets are properly
secured so that they cannot slip and obstruct the pedals. Do not lay several floormats or
carpets on top of one another. G
WARNING
Unsuitable footwear can hinder correct usage of the pedals, e.g.:
R shoes with thick soles
R shoes with high heels
R slippers
There is a risk of an accident.
Wear suitable footwear to ensure correct
usage of the pedals. G
WARNING
If you switch off the ignition while driving,
safety-relevant functions are only available
with limitations, or not at all. This could affect, for example, the power steering and the brake
boosting effect. You will require considerably
more effort to steer and brake. There is a risk of an accident.
Do not switch off the ignition while driving. G
WARNING
If the parking brake has not been fully
released when driving, the parking brake can:
R overheat and cause a fire
R lose its hold function.
There is a risk of fire and an accident. Release
the parking brake fully before driving off.
! Do not warm up the engine when the vehicle
is stationary. Drive off immediately. Avoid Driving
143Driving and parking Z
Page 173 of 389
Emergency braking
The vehicle can also be braked during an emer-
gency by using the electric parking brake.
X While driving, press handle :of the electric
parking brake (Y page 169).
The vehicle is braked as long as you keep
handle :of the electric parking brake
depressed. The longer electric parking brake
handle :is depressed, the greater the brak-
ing force.
During braking:
R a warning tone sounds
R the Release parking brake
Release parking brake display mes-
sage appears
R red indicator lamp !on the instrument
cluster flashes
When the vehicle has been braked to a stand-
still, the electric parking brake is applied. Parking up the vehicle
If you leave the vehicle parked up for longer than
four weeks, the battery may be damaged by
exhaustive discharging.
If you leave the vehicle parked up for longer than
six weeks, it may suffer from lack of use.
X Contact a qualified specialist workshop and
seek advice.
i You can obtain information on trickle charg-
ers from a qualified specialist workshop.
Hybrid vehicles: observe the notes on the high-
voltage battery in the separate Owner's Manual. Driving tips
General driving tips
Important safety notes G
WARNING
If you switch off the ignition while driving,
safety-relevant functions are only available
with limitations, or not at all. This could affect, for example, the power steering and the brake
boosting effect. You will require considerably
more effort to steer and brake. There is a risk of an accident. Do not switch off the ignition while driving.
Drive sensibly – save fuel Observe the following tips to save fuel:
X The tyres should always be inflated to the rec-
ommended tyre pressure.
X Remove unnecessary loads.
X Remove roof racks when they are not needed.
X Warm up the engine at low engine speeds.
X Avoid frequent acceleration or braking.
X Have all maintenance work carried out as
indicated by the service intervals in the Ser-
vice Booklet or by the service interval display.
Fuel consumption also increases when driving in
cold weather, in stop-start traffic, on short jour- neys and in hilly terrain. ECO display
The ECO display shows you how economical
your driving style is. The ECO display assists you in achieving the most economical driving style
for the selected settings and prevailing condi-
tions. Consumption can be significantly influ-
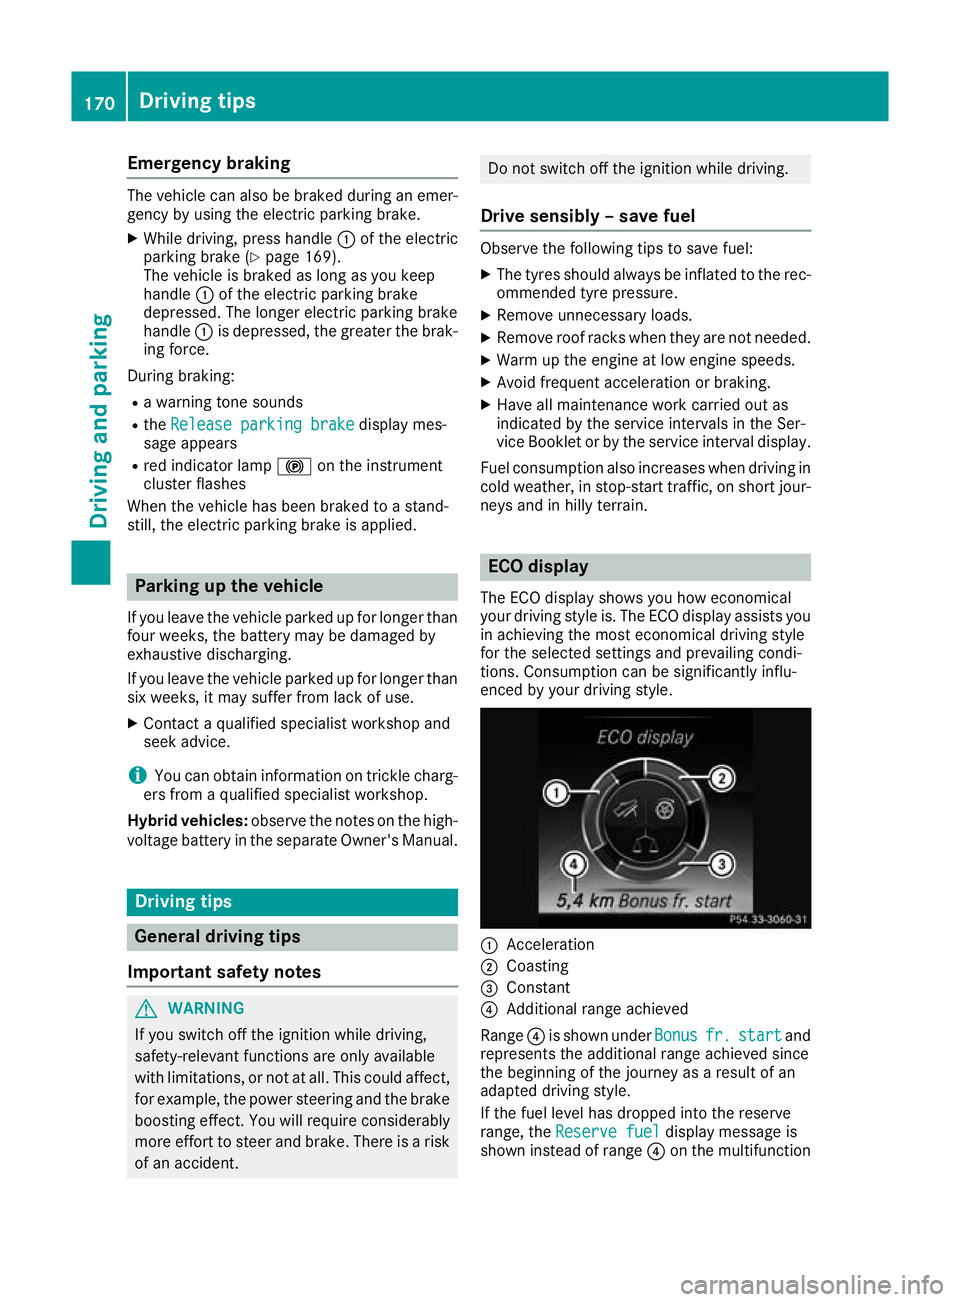
enced by your driving style. :
Acceleration
; Coasting
= Constant
? Additional range achieved
Range ?is shown under Bonus Bonusfr. fr.start
start and
represents the additional range achieved since
the beginning of the journey as a result of an
adapted driving style.
If the fuel level has dropped into the reserve
range, the Reserve fuel Reserve fuel display message is
shown instead of range ?on the multifunction 170
Driving tipsDriving and parking
Page 232 of 389
The segments between the speed of the vehi-
cle in front and the stored speed light up. Rev counter
! Do not drive in the overrevving range. Doing
so will damage the engine.
The red band in the rev counter indicates the
engine's overrevving range.
The fuel supply is interrupted to protect the
engine when the red band is reached. Outside temperature display
You should pay special attention to road condi-
tions when temperatures are around freezing
point.
Bear in mind that the outside temperature dis-
play indicates the measured air temperature
and not the road surface temperature.
The outside temperature display is in the multi-
function display (Y page 230).
Changes in the outside temperature are dis-
played after a short delay. Coolant temperature gauge
G
WARNING
If you open the bonnet while the engine is
overheating or while there is a fire in the
engine compartment, you could come into
contact with hot gases or other leaking ser-
vice products. There is a danger of injury.
Allow an overheating engine to cool down
before opening the bonnet. If there is a fire in the engine compartment, leave the bonnet
closed and notify the fire brigade.
The coolant temperature gauge is in the lower
section of the rev counter (Y page 34).
At high outside temperatures and when driving
in mountainous terrain, the coolant temperature
may rise to the end of the scale.
Under normal operating conditions and with the correct coolant level, the coolant temperature
may rise to 120 †. Operating the on-board computer
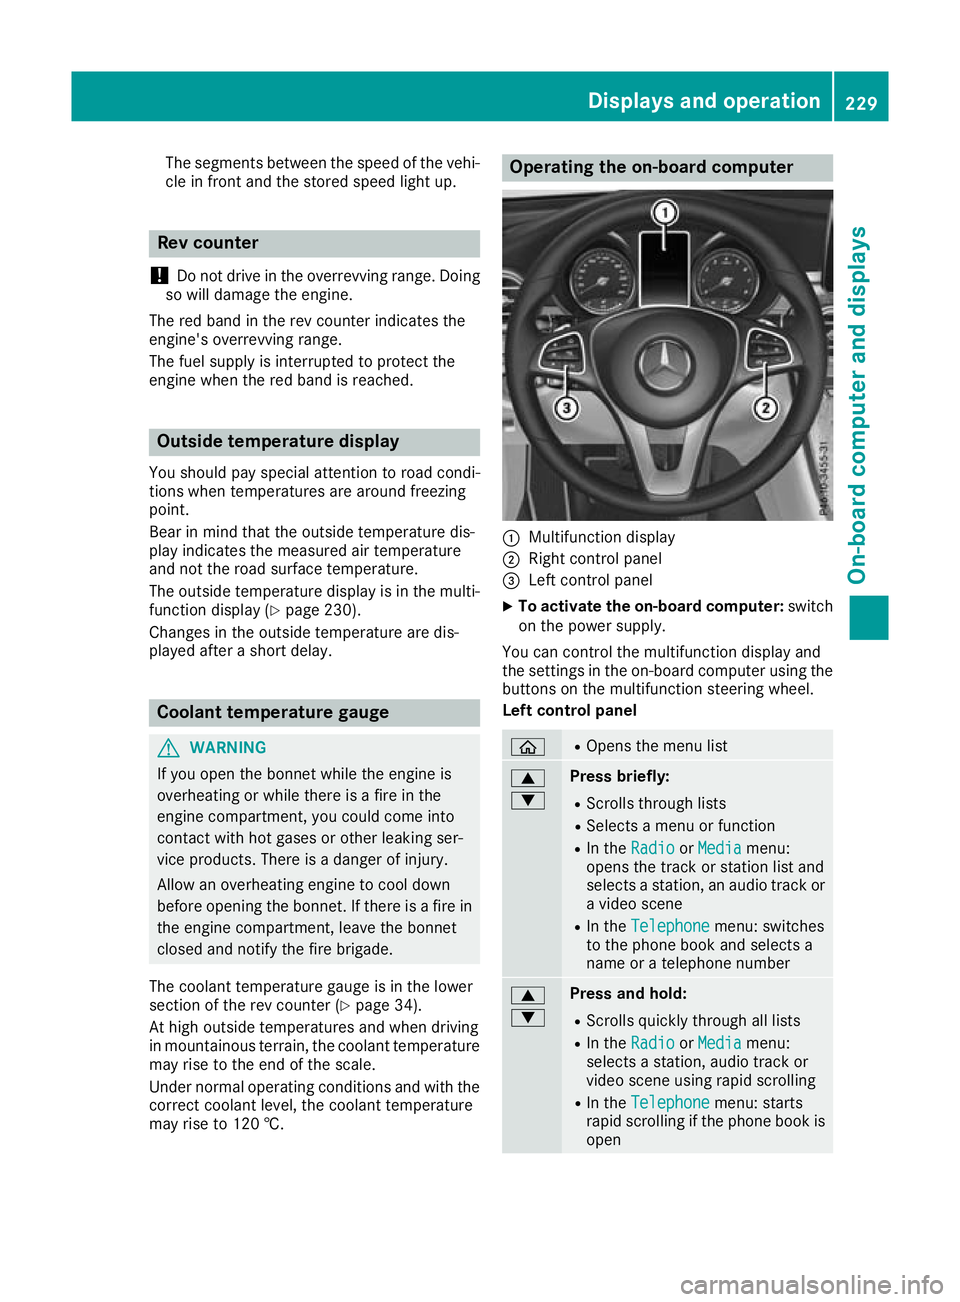
:
Multifunction display
; Right control panel
= Left control panel
X To activate the on-board computer: switch
on the power supply.
You can control the multifunction display and
the settings in the on-board computer using the buttons on the multifunction steering wheel.
Left control panel ò R
Opens the menu list 9
: Press briefly:
R Scrolls through lists
R Selects a menu or function
R In the Radio Radio orMedia
Media menu:
opens the track or station list and
selects a station, an audio track or a video scene
R In the Telephone Telephone menu: switches
to the phone book and selects a
name or a telephone number 9
: Press and hold:
R
Scrolls quickly through all lists
R In the Radio Radio orMedia
Media menu:
selects a station, audio track or
video scene using rapid scrolling
R In the Telephone Telephone menu: starts
rapid scrolling if the phone book is open Displays and operation
229On-board computer and displays Z
Page 281 of 389
Display messages
Possible causes/consequences and
M
MSolutions j
Trailer coupling Trailer coupling
extending… extending… The ball coupling is swivelled out or in.
Only swivel the ball coupling in or out when the vehicle is stationary.
No trailer may be coupled during the swivelling procedure. Do not
attempt to speed up, slow down or initiate the swivelling process using your hand, foot or other aids.
X Move the ball coupling of the trailer tow hitch to an operational
position (Y page 220). &
inoperative inoperative
Battery
Battery
low
low The on-board voltage is too low.
The auxiliary heating (Y
page 137) has switched itself off. The auxiliary
heating or remote activation of heating and ventilation systems can-
not be switched on.
X Drive for a considerable distance.
The battery charges. The auxiliary heating or remote activation of
heating and ventilation systems is operational again as soon as the
on-board voltage is sufficient. &
inoperative Refuel inoperative Refuel
vehicle vehicle There is too little fuel in the fuel tank. The auxiliary heating cannot be
switched on (Y page 137).
X Refuel at the nearest filling station. &
inoperative inoperative
See
SeeOwn‐
Own‐
er's Man.
er's Man. The auxiliary heating is temporarily malfunctioning or faulty.
X When the vehicle is on a level surface and the engine has cooled
down, make up to four attempts to switch on the auxiliary heating,
waiting several minutes between each attempt (Y page 137).
If the auxiliary heating does not switch on: X Consult a qualified specialist workshop. Ð
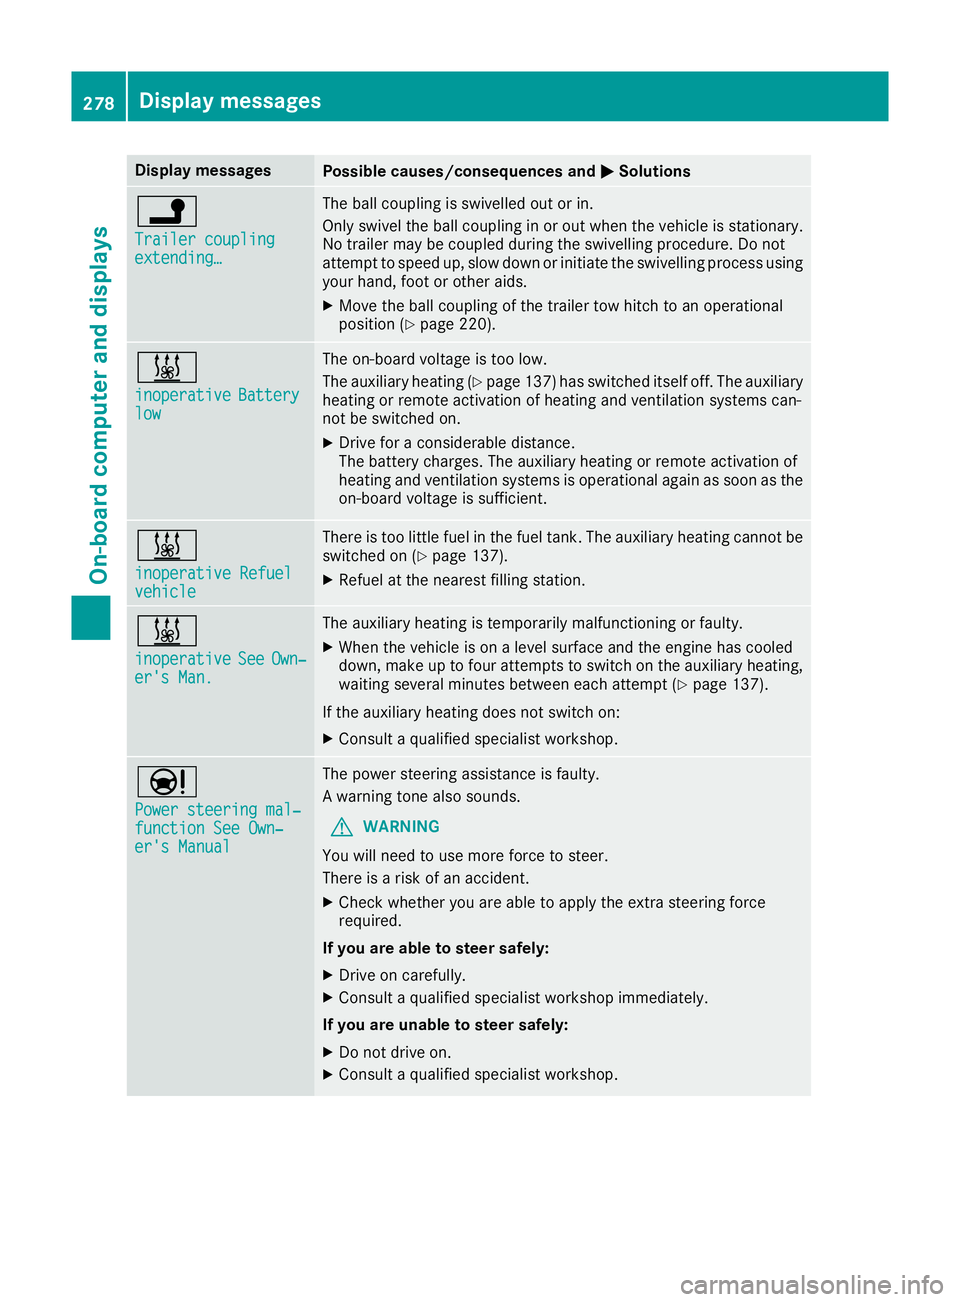
Power steering mal‐ Power steering mal‐
function See Own‐ function See Own‐
er's Manual er's Manual The power steering assistance is faulty.
A warning tone also sounds.
G WARNING
You will need to use more force to steer.
There is a risk of an accident.
X Check whether you are able to apply the extra steering force
required.
If you are able to steer safely:
X Drive on carefully.
X Consult a qualified specialist workshop immediately.
If you are unable to steer safely:
X Do not drive on.
X Consult a qualified specialist workshop. 278
Display
messagesOn-board computer and displays
Page 294 of 389
Vehicle
Warning/
indicator
lamp
N N
Signal type
Possible causes/consequences and M
MSolutions Ð
N
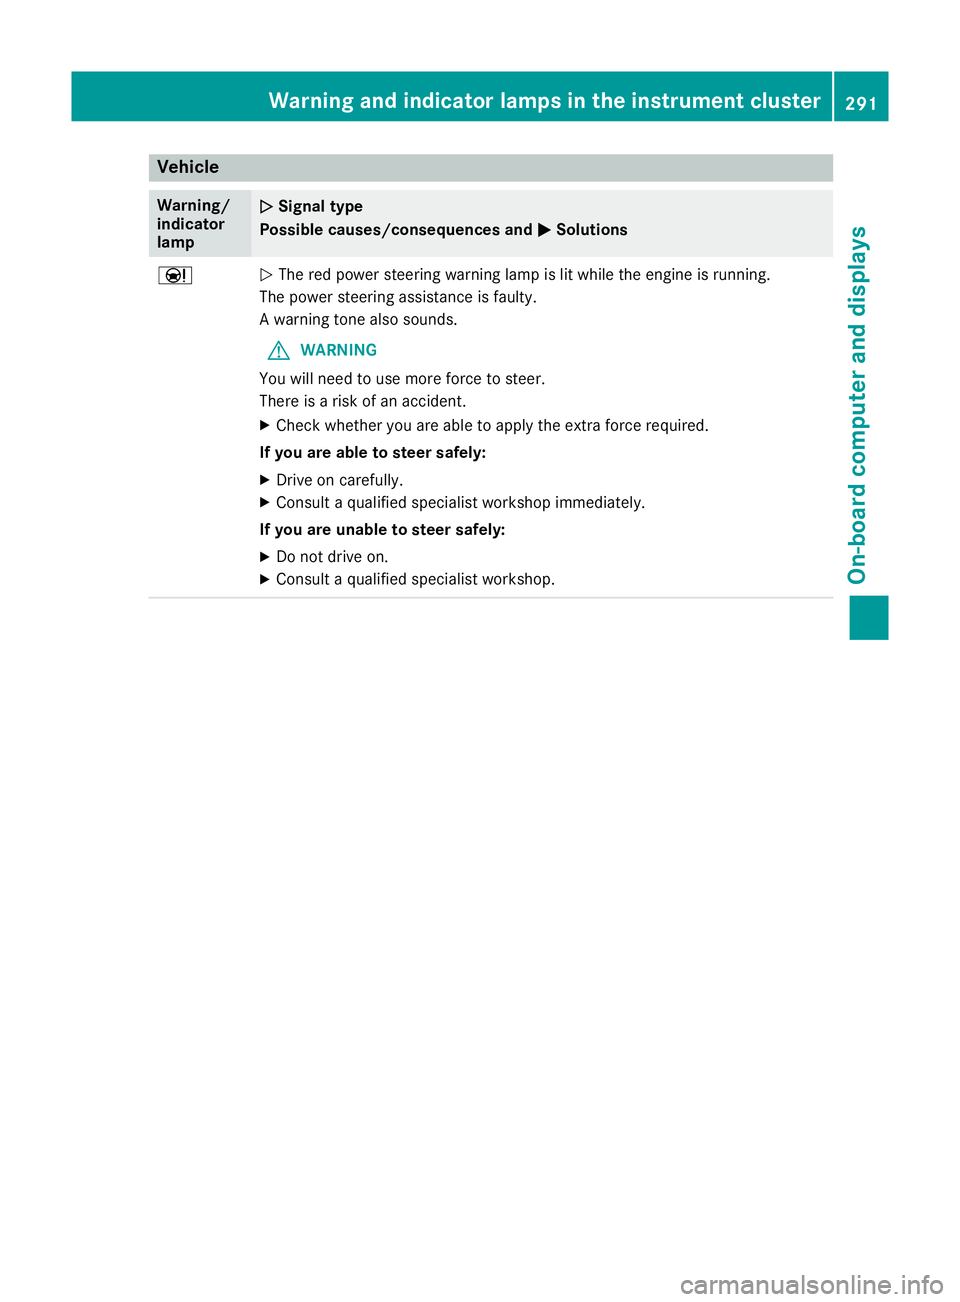
The red power steering warning lamp is lit while the engine is running.
The power steering assistance is faulty.
A warning tone also sounds.
G WARNING
You will need to use more force to steer.
There is a risk of an accident.
X Check whether you are able to apply the extra force required.
If you are able to steer safely:
X Drive on carefully.
X Consult a qualified specialist workshop immediately.
If you are unable to steer safely:
X Do not drive on.
X Consult a qualified specialist workshop. Warning and indicator lamps in the instrument cluster
291On-board computer and displays Z
Page 353 of 389
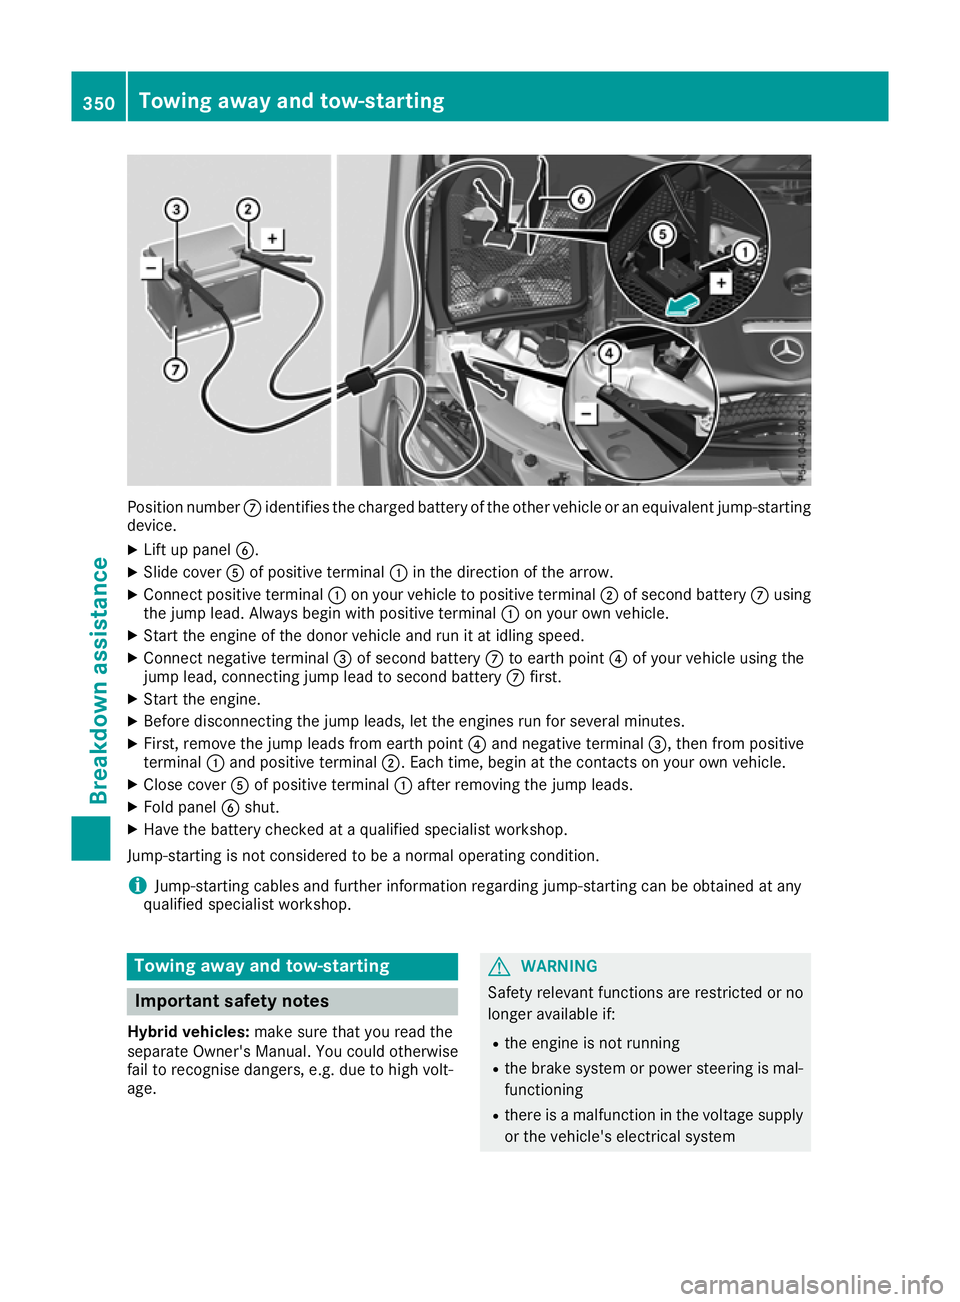
Position number
Cidentifies the charged battery of the other vehicle or an equivalent jump-starting
device.
X Lift up panel B.
X Slide cover Aof positive terminal :in the direction of the arrow.
X Connect positive terminal :on your vehicle to positive terminal ;of second battery Cusing
the jump lead. Always begin with positive terminal :on your own vehicle.
X Start the engine of the donor vehicle and run it at idling speed.
X Connect negative terminal =of second battery Cto earth point ?of your vehicle using the
jump lead, connecting jump lead to second battery Cfirst.
X Start the engine.
X Before disconnecting the jump leads, let the engines run for several minutes.
X First, remove the jump leads from earth point ?and negative terminal =, then from positive
terminal :and positive terminal ;. Each time, begin at the contacts on your own vehicle.
X Close cover Aof positive terminal :after removing the jump leads.
X Fold panel Bshut.
X Have the battery checked at a qualified specialist workshop.
Jump-starting is not considered to be a normal operating condition.
i Jump-starting cables and further information regarding jump-starting can be obtained at any
qualified specialist workshop. Towing away and tow-starting
Important safety notes
Hybrid vehicles: make sure that you read the
separate Owner's Manual. You could otherwise
fail to recognise dangers, e.g. due to high volt-
age. G
WARNING
Safety relevant functions are restricted or no
longer available if:
R the engine is not running
R the brake system or power steering is mal-
functioning
R there is a malfunction in the voltage supply
or the vehicle's electrical system 350
Towing away and tow-startingBreakdown assistance
Page 354 of 389
When your vehicle is towed away or towed
started, you may require considerably more
effort to steer and brake. There is a risk of an
accident.
In such cases use a rigid towing bar. Before
being towed away or tow started, make sure
the steering moves freely. G
WARNING
If the steering wheel lock is engaged, the vehi- cle can no longer be steered. There is a risk of
an accident.
Always switch on the ignition when towing
with a tow rope or a towing bar. G
WARNING
When towing or tow-starting another vehicle
and its weight is greater than the permissible gross weight of your vehicle, the:
R towing eye may be torn off
R car/trailer combination may swerve or
even overturn
There is a risk of an accident.
When towing or tow-starting another vehicle,
its weight should not be greater than the per- missible gross weight of your vehicle.
Details on the permissible gross vehicle weight
of your vehicle can be found on the vehicle iden-
tification plate (Y page 372).
! When Active Brake Assist, Distance Pilot
DISTRONIC or the HOLD function is activated, the vehicle brakes automatically in certain
situations.
To avoid damage to the vehicle, deactivate
these systems in the following or similar sit-
uations:
R when towing away
R in a car wash
! Make sure that the electric parking brake is
released. If the electric parking brake is faulty, visit a qualified specialist workshop.
! Only secure the tow cable or tow bar to the
towing eyes or, if available, to the trailer tow
hitch. You could otherwise damage the vehi-
cle. !
Observe the following points when towing
with a tow rope:
R Secure the tow rope on the same side on
both vehicles.
R Make sure that the tow rope is not longer
than legally permitted. Mark the tow rope in
the middle, e.g. with a white cloth
(30 x 30 cm). This will make other road
users aware that a vehicle is being towed.
R Only secure the tow cable to the towing
eyes or, if available, to the trailer tow hitch.
R Observe the brake lamps of the towing
vehicle while driving. Always maintain a dis-
tance a distance so that the tow rope does not sag.
R Do not use steel cables or chains to tow
your vehicle. You could otherwise damage
the vehicle.
! Do not use the trailer tow hitch for recovery
or towing. Do not use the towing eye for
recovery. This could damage the vehicle. If in
doubt, have the vehicle recovered using a
crane.
! When towing, pull away slowly and
smoothly. If the tractive power is too high, the
vehicles could be damaged.
! Shift the automatic transmission to
Nand
do not open the driver's or front passenger's
door during towing. The automatic transmis-
sion may otherwise shift to position P, which
could damage the transmission.
! You may tow the vehicle for a maximum of
50km. A towing speed of 50 km/h must not
be exceeded.
For towing distances over 50 km, the entire
vehicle must be lifted up and transported.
Observe the legal requirements in each individ-
ual country when towing.
It is better to have the vehicle transported than
to have it towed.
If the vehicle has suffered transmission damage, have it transported on a transporter or trailer.
The automatic transmission must be in position
N when the vehicle is being towed. If the auto-
matic transmission cannot be shifted to position
N, have the vehicle transported on a transporter
or trailer. Towing away and tow-starting
351Breakdown assistance Z