fog light MERCEDES-BENZ GLC COUPE 2018 Owner's Manual
[x] Cancel search | Manufacturer: MERCEDES-BENZ, Model Year: 2018, Model line: GLC COUPE, Model: MERCEDES-BENZ GLC COUPE 2018Pages: 370, PDF Size: 6.19 MB
Page 16 of 370
Light function, activeDisplay message ............................ 237
Light switch
Operation ...................................... .108
Lights
Adaptive Highbeam Assist ............. 110
Automatic headlamp mode ............ 108
Cornering light function ................. 110
Fogged up headlamps .................... 111
General notes ................................ 108
Hazard warning lamps ................... 110
High beam flasher .......................... 109
High-beam headlamps ................... 109
Light switch ................................... 108
Low-beam headlamps .................... 109
Parking lamps ................................ 109
Rear fog lamp ................................ 109
Setting exterior lighting ................. 108
Standing lamps .............................. 109
Switching the daytime running
lamps on/off (on-board com-
puter) ............................................. 220
Turn signals ................................... 109
see Interior lighting
Loading guidelines ............................ 276
Locking
see Central locking
Locking (doors)
Automatic ........................................ 84
Emergency locking ........................... 84
From inside (central locking but-
ton) ..................................................8 3
Locking centrally
see Central locking
Low-beam headlamps
Display message ............................ 237
Replacing bulbs ............................ .113
Switching on/off ........................... 109
Lubricant additives
see Additives (engine oil)
Lumbar support
Adjusting the 4-way lumbar sup-
port ................................................ 100
M
M+S tires ............................................ 335 Malfunction message
see Display messages
Matte finish (cleaning instruc-
tions) ..................................................3 11
mbrace
Call priority ....................................2 96
Display message ............................ 231
Downloading destinations
(COMAND) ..................................... 296
Downloading routes ....................... 299
Emergency call .............................. 293
General notes ................................ 292
Geo fencing ................................... 299
Info call button .............................. 295
Locating a stolen vehicle ...............2 98
Remote fault diagnosis .................. 298
Remote vehicle locking .................. 297
Roadside assistance button ........... 294
Search & Send ............................... 296
Self-test ......................................... 293
Speed alert .................................... 299
System .......................................... 293
Triggering the vehicle alarm ........... 299
Vehicle remote unlocking .............. 297
Mechanical key
Function/notes ................................ 79
General notes .................................. 79
Inserting .......................................... 79
Locking vehicle ................................ 84
Removing ......................................... 79
Unlocking the driver's door .............. 84
Media Interface
see Digital Operator's Manual
Memory card (audio) ......................... 215
Memory function
Seats, steering wheel, exterior
mirrors ........................................... 107
Mercedes-Benz Intelligent Drive
360°camera .................................. 185
Active Blind Spot Assist ................. 195
Active Lane Keeping Assist ............ 198
ATTENTION ASSIST ........................ 189
Blind Spot Assist ............................ 191
Distance Pilot DISTRONIC ............. 161
Distance Pilot DISTRONIC with
Steering Pilot ................................. 167
General notes ................................ 159
Lane Keeping Assist ...................... 193
14Index
Page 110 of 370
Exterior lighting
General notes
USA only: if you wish to drive during the daytime
without lights, switch off theDaytime Run‐
ning Lightsfunction via the on-board com-
puter (Ypage 220).
Setting the exterior lighting
Setting options
Exterior lighting can be set using the:
Rlight switch (Ypage 108)
Rcombination switch (Ypage 109)
Ron-board computer (Ypage 220)
Light switch
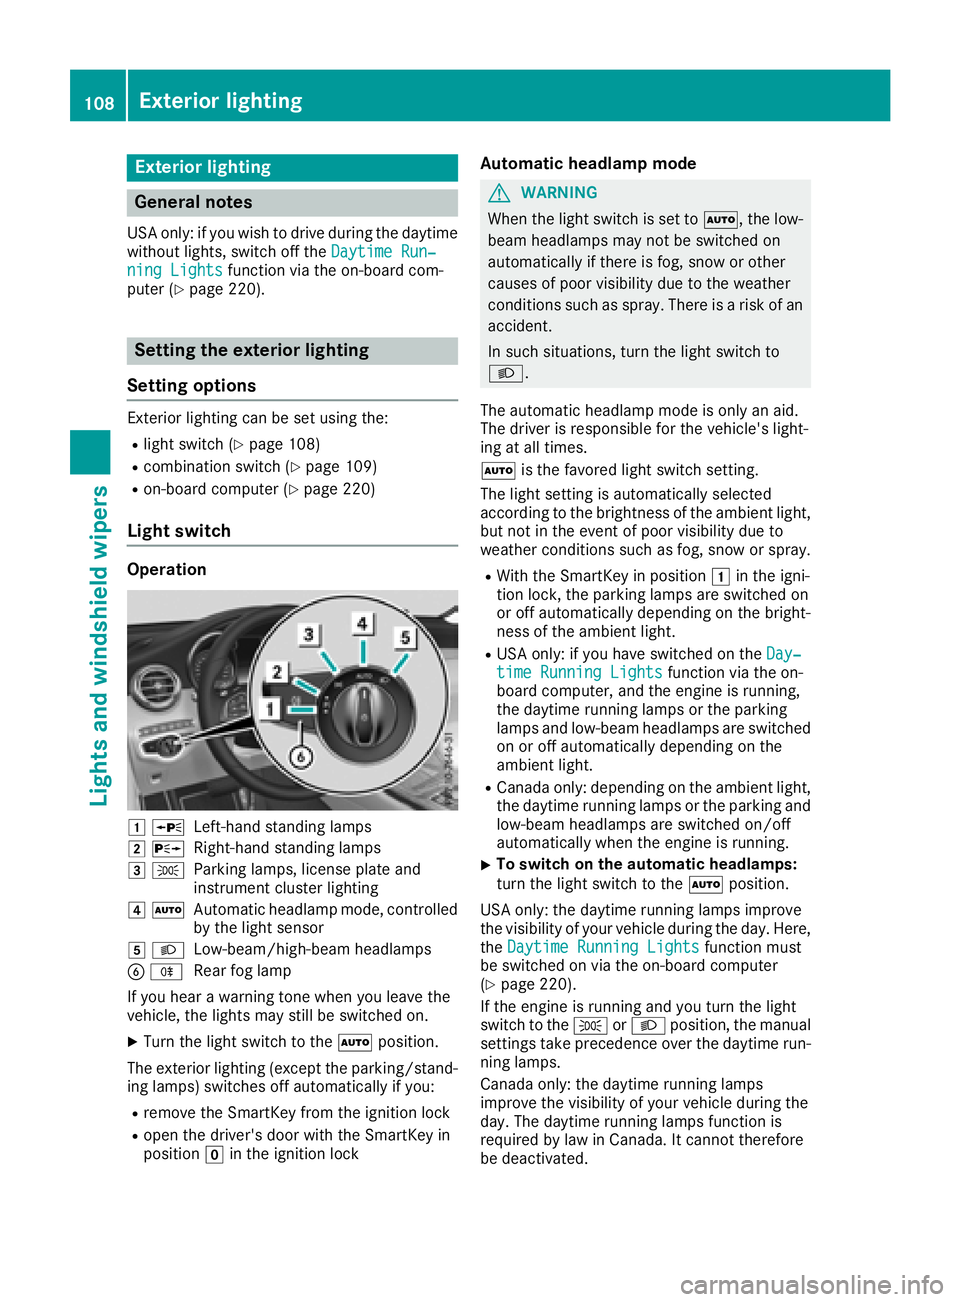
Operation
1 WLeft-hand standing lamps
2XRight-hand standing lamps
3TParking lamps, license plate and
instrument cluster lighting
4ÃAutomatic headlamp mode, controlled
by the light sensor
5 LLow-beam/high-beam headlamps
BRRear fog lamp
If you hear a warning tone when you leave the
vehicle, the lights may still be switched on.
XTurn the light switch to the Ãposition.
The exterior lighting (except the parking/stand-
ing lamps) switches off automatically if you:
Rremove the SmartKey from the ignition lock
Ropen the driver's door with the SmartKey in
position gin the ignition lock
Automatic headlamp mode
GWARNING
When the light switch is set to Ã, the low-
beam headlamps may not be switched on
automatically if there is fog, snow or other
causes of poor visibility due to the weather
conditions such as spray. There is a risk of an
accident.
In such situations, turn the light switch to
L.
The automatic headlamp mode is only an aid.
The driver is responsible for the vehicle's light-
ing at all times.
à is the favored light switch setting.
The light setting is automatically selected
according to the brightness of the ambient light,
but not in the event of poor visibility due to
weather conditions such as fog, snow or spray.
RWith the SmartKey in position 1in the igni-
tion lock, the parking lamps are switched on
or off automatically depending on the bright-
ness of the ambient light.
RUSA only: if you have switched on the Day‐time Running Lightsfunction via the on-
board computer, and the engine is running,
the daytime running lamps or the parking
lamps and low-beam headlamps are switched
on or off automatically depending on the
ambient light.
RCanada only: depending on the ambient light,
the daytime running lamps or the parking and
low-beam headlamps are switched on/off
automatically when the engine is running.
XTo switch on the automatic headlamps:
turn the light switch to the Ãposition.
USA only: the daytime running lamps improve
the visibility of your vehicle during the day. Here,
the Daytime Running Lights
function must
be switched on via the on-board computer
(
Ypage 220).
If the engine is running and you turn the light
switch to the TorL position, the manual
settings take precedence over the daytime run-
ning lamps.
Canada only: the daytime running lamps
improve the visibility of your vehicle during the
day. The daytime running lamps function is
required by law in Canada. It cannot therefore
be deactivated.
108Exterior lighting
Lights and windshield wipers
Page 111 of 370
When the engine is running and the vehicle is
stationary: if you move the selector lever from a
driving position toj, the daytime driving lights
and low-beam headlamps go out after three
minutes.
When the engine is running, the vehicle is sta-
tionary and in bright ambient light: if you turn the
light switch to the Tposition, the daytime
running lamps and parking lamps switch on.
If the engine is running and you turn the light
switch to the Lposition, the manual settings
take precedence over the daytime running
lamps.
Low-beam headlamps
GWARNING
When the light switch is set to Ã, the low-
beam headlamps may not be switched on
automatically if there is fog, snow or other
causes of poor visibility due to the weather
conditions such as spray. There is a risk of an
accident.
In such situations, turn the light switch to
L.
Even if the light sensor does not detect that it is
dark, the parking lamps and low-beam head-
lamps switch on when the ignition is switched on and the light switch is set to the Lposition.
This is a particularly useful function in the event
of rain and fog.
XTo switch on the low-beam headlamps:
turn the SmartKey to position 2in the igni-
tion lock or start the engine.
XTurn the light switch to the Lposition.
The green Lindicator lamp in the instru-
ment cluster lights up.
Rear fog lamp
The rear fog lamp improves visibility of your
vehicle for the traffic behind in the event of thick
fog. You must observe the legal requirements
for the country in which you are currently driving
when operating the rear fog lamp.
XTo switch on the rear fog lamp: turn the
SmartKey in the ignition lock to position 2or
start the engine.
XTurn the light switch to the LorÃ
position.
XPress the Rbutton.
The yellow Rindicator lamp on the instru-
ment cluster lights up.
Parking lamps
!If the battery charge is very low, the parking
lamps or standing lamps are automatically
switched off to enable the next engine start.
Always park your vehicle safely and in a well lit
area, in accordance with the relevant legal
stipulations. Avoid using the Tparking
lamps over a period of several hours. If pos-
sible, switch on the right-hand Xor left-
hand W standing lamps.
XTo switch on the parking lamps: turn the
light switch to the Tposition.
The green Tindicator lamp on the instru-
ment cluster lights up.
Standing lamps
Switching on the standing lamps ensures the
corresponding side of the vehicle is illuminated.
XTo switch on the parking lamp: turn the
Smart Key to position gin the ignition lock or
remove the SmartKey.
XTurn the light switch to the W(left-hand
side of the vehicle) or X(right-hand side of
the vehicle) position.
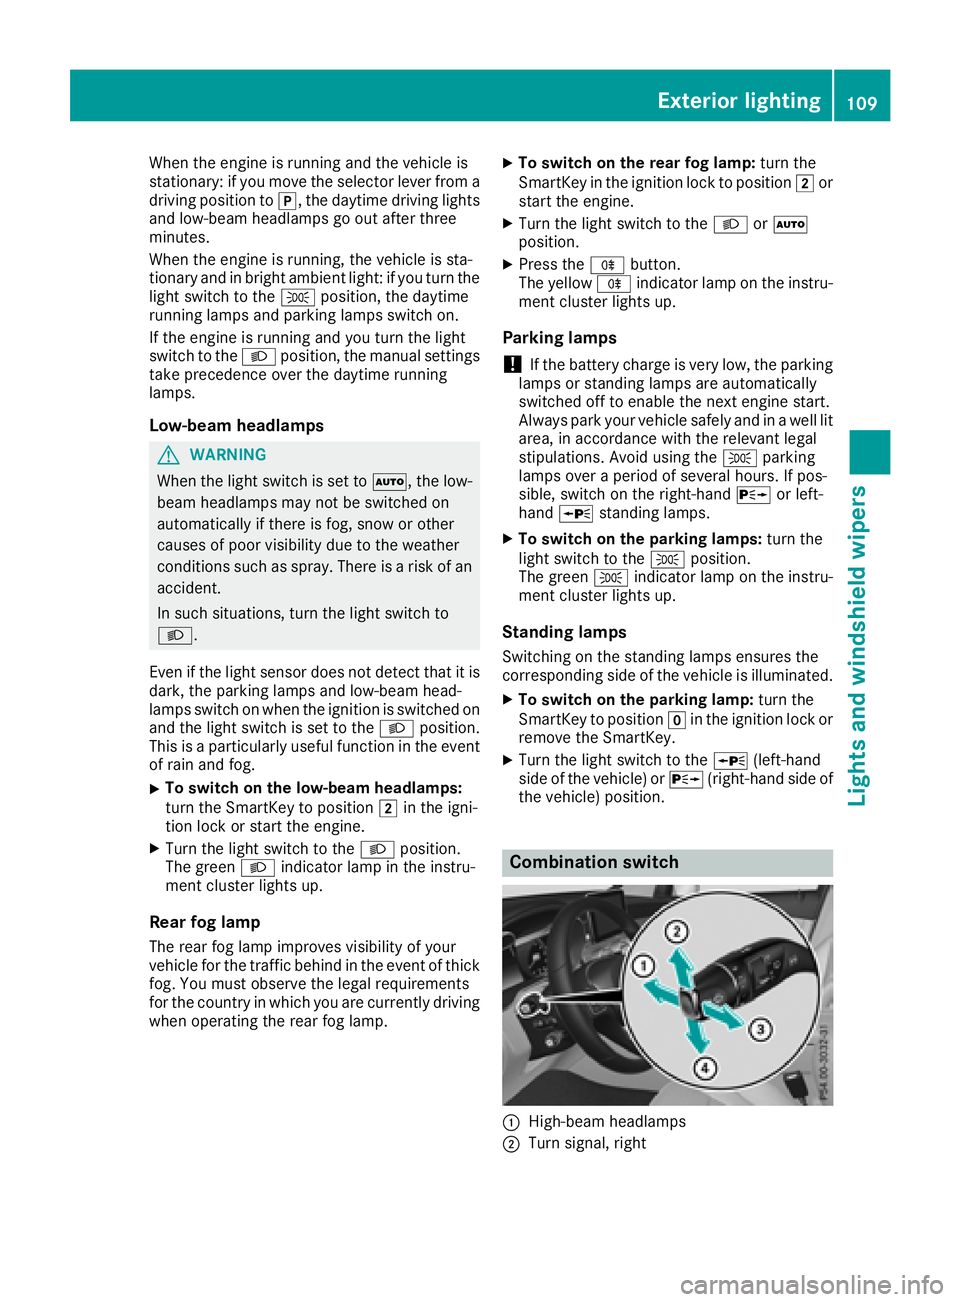
Combination switch
:High-beam headlamps
;Turn signal, right
Exterior lighting109
Lights and windshield wipers
Z
Page 113 of 370
The system automatically adapts the low-beam
headlamp range depending on the distance to
the other vehicle. Once the system no longer
detects any other vehicles, it reactivates the
high-beam headlamps.
The system's optical sensor is located behind
the windshield near the overhead control panel.
Important safety notes
GWARNING
Adaptive Highbeam Assist does not recognize
road users:
Rwho have no lights, e.g. pedestrians
Rwho have poor lighting, e.g. cyclists
Rwhose lighting is blocked, e.g. by a barrier
On very rare occasions, Adaptive Highbeam
Assist may fail to recognize other road users
that have lights, or may recognize them too
late. In this, or in similar situations, the auto-
matic high-beam headlamps will not be deac-
tivated or will be activated regardless. There is a risk of an accident.
Always carefully observe the traffic conditions
and switch off the high-beam headlamps in
good time.
Adaptive Highbeam Assist cannot take into
account road, weather or traffic conditions.
Adaptive Highbeam Assist is only an aid. You are responsible for adjusting the vehicle's lighting
to the prevailing light, visibility and traffic con-
ditions.
In particular, the detection of obstacles can be
impaired if:
Rthere is poor visibility, e.g. due to fog, heavy
rain or snow
Rthere is dirt on the sensors or anything else
covering the sensors
Switching Adaptive Highbeam Assist
on/off
XTo switch on: turn the light switch to the
à position.
XPress the combination switch forwards
beyond the pressure point (Ypage 109).
The _ indicator lamp on the multifunction
display lights up when it is dark and the light
sensor switches on the low-beam headlamps. If you are driving at speeds above approx-
imately 16 mph (25 km/h)
:
The headlamp range is set automatically
depending on the distance between the vehi-
cle and other road users.
If you are driving at speeds above approx-
imately 19 mph (30 km/h) and no other road
users are detected:
The high-beam headlamps are switched on
automatically. The Kindicator lamp on the
instrument cluster also lights up.
If you are driving at speeds below approx-
imately 16 mph (25 km/h) or other road users are detected or the roads are adequately lit:
The high-beam headlamps are switched off
automatically. The Kindicator lamp on the
instrument cluster goes out. The _indi-
cator lamp on the multifunction display
remains lit.
XTo switch off: move the combination switch
back to its normal position or move the light
switch to another position.
The K indicator lamp on the instrument
cluster goes out.
Headlamps fogged up on the inside
Certain climatic and physical conditions may
cause moisture to form in the headlamp. This
moisture does not affect the functionality of the
headlamp.
Exterior lighting111
Lights and windshield wipers
Z
Page 122 of 370
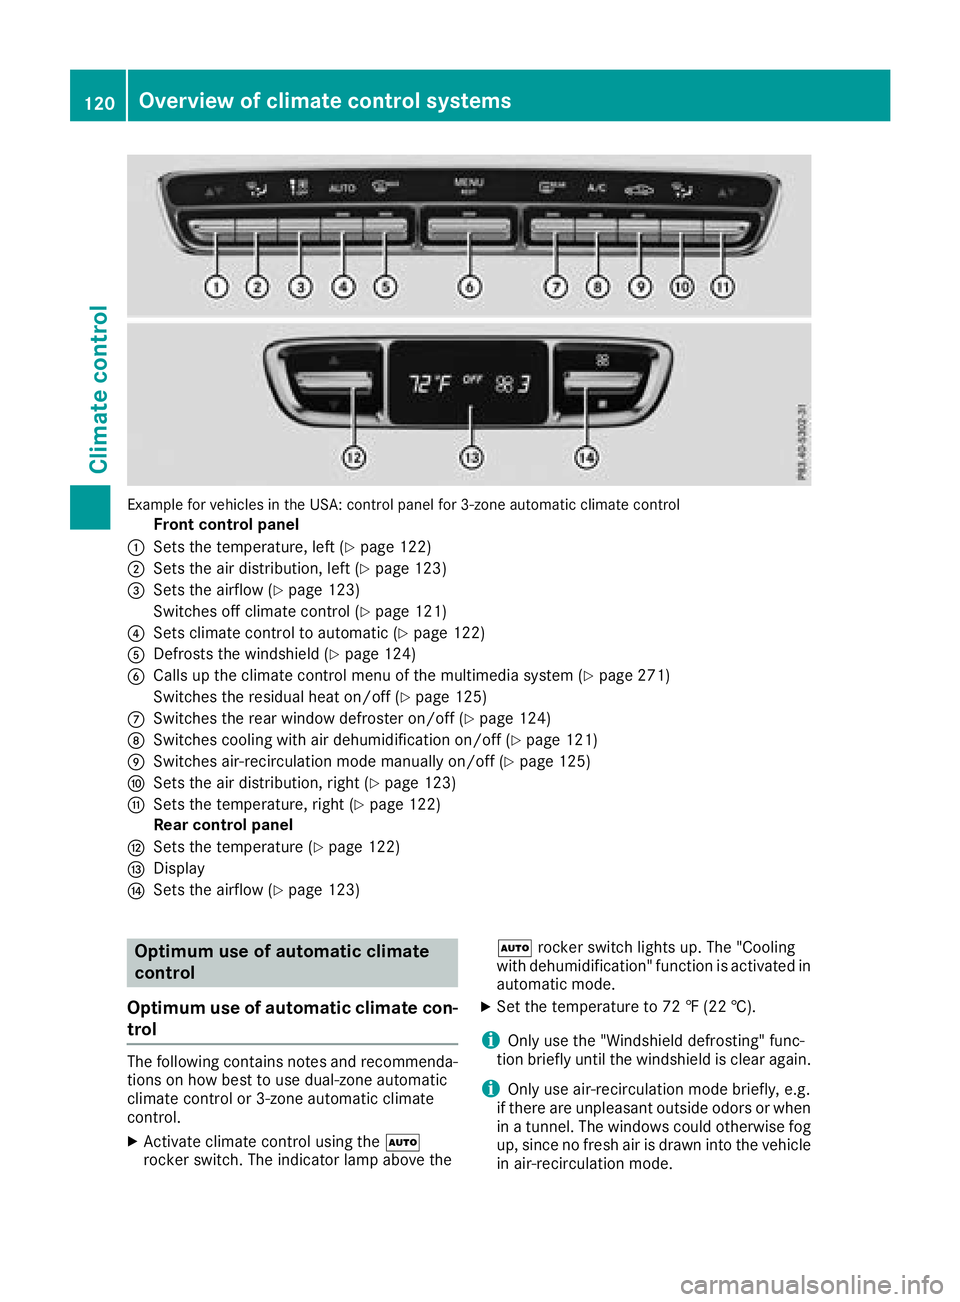
Example for vehicles in the USA: control panel for 3-zone automatic climate control
Front control panel
:Sets the temperature, left (Ypage 122)
;Sets the air distribution, left (Ypage 123)
=Sets the airflow (Ypage 123)
Switches off climate control (
Ypage 121)
?Sets climate control to automatic (Ypage 122)
ADefrosts the windshield (Ypage 124)
BCalls up the climate control menu of the multimedia system (Ypage 271)
Switches the residual heat on/off (
Ypage 125)
CSwitches the rear window defroster on/off (Ypage 124)
DSwitches cooling with air dehumidification on/off (Ypage 121)
ESwitches air-recirculation mode manually on/off (Ypage 125)
FSets the air distribution, right (Ypage 123)
GSets the temperature, right (Ypage 122)
Rear control panel
HSets the temperature (Ypage 122)
IDisplay
JSets the airflow (Ypage 123)
Optimum use of automatic climate
control
Optimum use of automatic climate con-
trol
The following contains notes and recommenda-
tions on how best to use dual-zone automatic
climate control or 3-zone automatic climate
control.
XActivate climate control using the Ã
rocker switch. The indicator lamp above the Ã
rocker switch lights up. The "Cooling
with dehumidification" function is activated in
automatic mode.
XSet the temperature to 72 ‡ (22 †).
iOnly use the "Windshield defrosting" func-
tion briefly until the windshield is clear again.
iOnly use air-recirculation mode briefly, e.g.
if there are unpleasant outside odors or when
in a tunnel. The windows could otherwise fog
up, since no fresh air is drawn into the vehicle in air-recirculation mode.
120Overview of climate control systems
Climate control
Page 123 of 370
Vehicles with 3-zone automatic climate control:
use the "Residual heat" function if you want to
heat or ventilate the vehicle interior when the
ignition is switched off. The residual heat func-
tion can only be activated or deactivated with
the ignition switched off. The residual heat func-
tion is deactivated when the ignition is switched
on.
DYNAMIC SELECT switch (except
Mercedes-AMG GLC 63 4MATIC/
GLC 63 S 4MATIC)
You can choose between various drive programs
with the DYNAMIC SELECT switch
(
Ypage 138).
If you have selected drive program E:
Rwhen heating, the electrical heater booster is
deactivated and heat output is reduced as a
result
Rthe rear window defroster running time is
reduced
If you have selected drive program C,Sor S+,
the current climate settings are maintained.
ECO start/stop function
During automatic engine switch-off, the climate
control system only operates at a reduced capa-
city. If you require the full climate control output,
you can switch off the ECO start/stop function
by pressing the ECO button (
Ypage 136).
Operating the climate control sys-
tems
Activates/deactivates climate con-
trol
General notes
When the climate control is switched off, the air
supply and air circulation are also switched off.
The windows could fog up. Therefore, switch off
climate control only briefly
Switch on climate control primarily using the
à rocker switch (
Ypage 122).
Activating/deactivating
XTurn the SmartKey to position 2in the igni-
tion lock (Ypage 130).
XTo switch on: set the airflow to level 1or
higher using the Hrocker switch.
XTo switch off: set the airflow to level 0using
the H rocker switch.
i3-zone automatic climate control: when cli-
mate control is switched off, "OFF" appears in
the rear-compartment display.
Switching cooling with air dehumidification on/off
General notes
If you deactivate the "Cooling with air-dehumidification" function, the air inside the vehicle will not
be cooled. The air inside the vehicle will also not be dehumidified. The windows can fog up more
quickly. Therefore, only deactivate the "Cooling with air-dehumidification" function briefly.
The "Cooling with air dehumidification" function is only available when the engine is running. The air
inside the vehicle is cooled and dehumidified according to the temperature selected.
Condensation may drip from the underside of the vehicle when it is in cooling mode. This is normal
and not a sign that there is a malfunction.
Activating/deactivating
XPress the ¿rocker switch up or down.
The indicator lamp above the rocker switch lights up or goes out.
Operating the climate control systems121
Climate control
Page 126 of 370
3-zone automatic climate control
XActivate or deactivate the "Synchronization"
function using the multimedia system
(
Ypage 271).
The synchronization function is deactivated:
Rif the settings for the front-passenger side are
changed
Rthe settings for the rear compartment are
changed
Defrosting the windshield
General notes
You can use this function to defrost the wind-
shield or to clear a fogged up windshield or front
side windows on the inside.
Switch off the "Windshield defrosting" function
as soon as the windshield is clear again.
Switching the "Windshield defrosting"
function on or off
XTurn the SmartKey to position 2in the igni-
tion lock (Ypage 130).
XTo switch on: press rocker switch ¬on
the front control unit up or down.
The indicator lamp above the ¬rocker
switch lights up. The current climate control
settings are deactivated.
The climate control system switches to the
following functions:
Rhigh airflow
Rhigh temperature
Rair distribution to the windshield and front
side windows
Rair-recirculation mode off
iIf necessary, the "Cooling with air dehumid-
ification" function is activated. In this case,
the indicator lamp above the ¿rocker
switch remains switched off.
XTo switch off: press rocker switch ¬up or
down.
The indicator lamp above the ¬rocker
switch goes out. The previously selected set- tings are restored. Air-recirculation mode
remains deactivated.
Defrosting the windows
Windows fogged up on the inside
XActivate the "Cooling with air dehumidifica-
tion" function with the ¿rocker switch.
XSwitch on automatic mode using the Ã
rocker switch.
XIf the windows continue to fog up, activate the "Windshield defrosting" function using the
¬ rocker switch.
iYou should only select this setting until the
windshield is clear again.
Windows fogged up on the outside
XActivate the windshield wipers.
XSwitch on automatic mode using the Ã
rocker switch.
iIf you clean the windows regularly, they do
not fog up so quickly.
Rear window defroster
General notes
The rear window defroster has a high current
draw. You should therefore switch it off as soon
as the rear window is clear. Otherwise, the rear
window defroster switches off automatically
after several minutes.
If the battery voltage is too low, the rear window defroster may switch off.
Activating/deactivating
XTurn the SmartKey to position 2in the igni-
tion lock (Ypage 130).
XPress rocker switch ¤up or down.
The indicator lamp above rocker switch ¤
lights up or goes out.
124Operating the climate control systems
Climate control
Page 127 of 370
Problems with the rear window defroster
ProblemPossible causes/consequences andMSolutions
The rear window
defroster has deactiva-
ted prematurely or can-
not be activated.The battery has not been sufficiently charged.
XSwitch off any consumers that are not required, e.g. reading lamps,
interior lighting or the seat heating.
When the battery is sufficiently charged, the rear window defroster
can be activated again.
Switches air-recirculation mode
on/off
General notes
You can also temporarily deactivate the flow of
fresh air manually if unpleasant odors are enter-
ing the vehicle from outside. The air already
inside the vehicle will then be recirculated.
If you switch on air-recirculation mode, the win-
dows can fog up more quickly, in particular at
low temperatures. Only use air-recirculation
mode briefly to prevent the windows from fog-
ging up.
Activating/deactivating
XTurn the SmartKey to position 2in the igni-
tion lock (Ypage 130).
XTo activate: press thegrocker switch up
or down.
The indicator lamp above the grocker
switch lights up.
Air-recirculation mode switches on automati-
cally:
Rat high outside temperatures
Rat high levels of pollution (3-zone automatic
climate control only)
Rin a tunnel (vehicles with a navigation system
only)
The indicator lamp above the grocker
switch is not lit when automatic air-recirculation
mode is activated. Outside air is added after
about 30 minutes.
XTo deactivate: press thegrocker switch
up or down.
The indicator lamp above the grocker
switch goes out. Air-recirculation mode deactivates automati-
cally:
Rafter approximately five minutes at outside
temperatures below approximately 41 ‡
(5 †)
Rafter approximately five minutes if cooling
with air dehumidification is deactivated
Rafter approximately 30 minutes at outside
temperatures above approximately 41 ‡
(5 †) if the "Cooling with dehumidification"
function is activated
Switching the residual heat on or off
General notes
The residual heat function is only available with
3-zone automatic climate control.
Once the engine is switched off, it is possible to
make use of the residual heat of the engine to
continue heating or ventilating the front com-
partment of the vehicle for approximately
30 minutes. The heating or ventilation time
depends on the interior temperature that has
been set.
Activating/deactivating
XTurn the SmartKey to position uin the igni-
tion lock or remove it (Ypage 130).
XTo activate: press the!rocker switch up
or down.
The indicator lamp above the !rocker
switch lights up.
The blower will run at a low speed regardless of
the airflow setting.
If you activate the residual heat function at high
temperatures, only the ventilation will be acti-
vated. The blower runs at medium speed.
Operating the climate control systems125
Climate control
Page 161 of 370
braking maneuvers. Do not use cruise control or
Distance Pilot DISTRONIC.
If the vehicle threatens to skid or cannot be
stopped when moving at low speed:
XShift the transmission to positioni.
The outside temperature indicator is not
designed to serve as an ice-warning device and
is therefore unsuitable for that purpose.
Changes in the outside temperature are dis-
played after a short delay.
Indicated temperatures just above the freezing
point do not guarantee that the road surface is
free of ice. The road may still be icy, especially in
wooded areas or on bridges. The vehicle could
skid if you fail to adapt your driving style. Always
adapt your driving style and drive at a speed to
suit the prevailing weather conditions.
You should pay special attention to road condi-
tions when temperatures are around freezing
point.
For more information on driving with snow
chains, see (
Ypage 335).
For more information on driving with summer
tires, see (
Ypage 335).
Observe the notes in the "Winter operation" sec- tion (
Ypage 335).
Driving systems
Mercedes-Benz Intelligent Drive
Mercedes-Benz Intelligent Drive stands for inno-
vative driver assistance and safety systems
which enhance comfort and support the driver in
critical situations. With these intelligent coordi-
nated systems Mercedes-Benz has set a mile-
stone on the path towards autonomous driving.
Mercedes-Benz Intelligent Drive embraces all
elements of active and passive safety in one well
thought out system – for the safety of the vehi-
cle occupants and that of other road users.
Further information on driving safety systems
(
Ypage 65).
Cruise control
General notes
Cruise control maintains a constant road speed
for you. It brakes automatically in order to avoid
exceeding the set speed. Change into a lower gear in good time on long and steep downhill
gradients. This is especially important if the
vehicle is laden or towing a trailer. By doing so,
you will make use of the braking effect of the
engine. This relieves the load on the brake sys-
tem and prevents the brakes from overheating
and wearing too quickly.
Use cruise control only if road and traffic con-
ditions make it appropriate to maintain a steady
speed for a prolonged period. You can store any
road speed above 20 mph (30 km/ h).
Important safety notes
Cruis econtrol can neither reduce th eris kof an
acciden tif you fail to adapt your driving style no r
override th elaws of physics .Cruis econtrol can -
no ttak eint oaccoun tth eroad ,traffic and
weather conditions. Cruis econtrol is only an
aid. You are responsible for maintainin g asafe
distanc eto th evehicl ein front, for vehicl e
speed, for braking in goo dtime and for staying in
lane.
Do no tuse cruise control :
Rin road and traffic condition swhic hdo no t
allow you to maintai n aconstan tspeed, e.g. in
heav ytraffic or on windin groad s
Ron slippery road surfaces. Braking or accel-
erating could caus eth edriv ewheels to lose
traction and th evehicl ecould then skid
Rwhen there is poor visibility, e.g. due to fog ,
heav yrain or snow
If there is achang eof drivers ,advise th ene w
driver of th espee dstored.
iThe spee dindicated in th espeedometer
may differ slightly from th espee dstored.
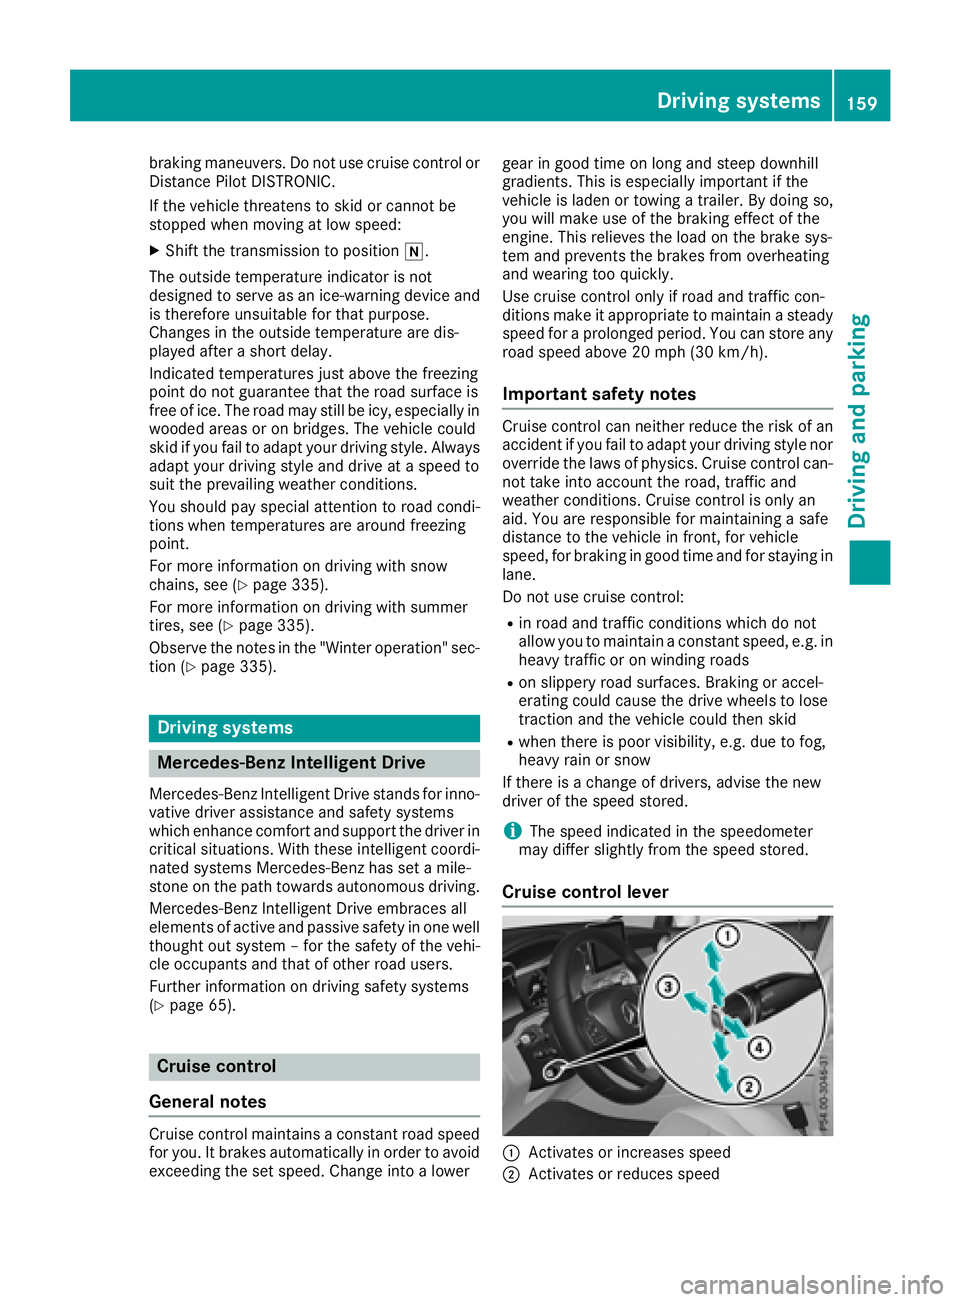
Cruise control lever
:Activates or increases spee d
;Activates or reducesspee d
Driving systems159
Driving and parking
Z
Page 164 of 370
Apply the brakes yourself in these situations
and try to take evasive action.
!When Distance Pilot DISTRONIC or the
HOLD function are activated, the vehicle
brakes automatically in certain situations.
To avoid damage to the vehicle, deactivate
these systems in the following or similar sit-
uations:
Rwhen towing the vehicle
Rin the car wash
Distance Pilot DISTRONIC can neither reduce
the risk of an accident if you fail to adapt your
driving style nor override the laws of physics.
Distance Pilot DISTRONIC cannot take into
account road, weather or traffic conditions. Dis-
tance Pilot DISTRONIC is only an aid. You are
responsible for maintaining a safe distance to
the vehicle in front, for vehicle speed, for brak-
ing in good time and for staying in lane.
Do not use Distance Pilot DISTRONIC:
Rin road and traffic conditions which do not
allow you to maintain a constant speed, e.g. in
heavy traffic or on winding roads
Ron slippery road surfaces. Braking or accel-
erating could cause the drive wheels to lose
traction and the vehicle could then skid
Rin poor visibility, e.g. due to fog, heavy rain or
snow
Distance Pilot DISTRONIC may not detect nar-
row vehicles driving in front, e.g . mo
torcycles, or
vehicles driving on a different line.
In particular, the detection of obstacles can be
impaired if:
Rthere is dirt on the sensors or anything else
covering the sensors
Rthere is snow or heavy rain
Rthere is interference by other radar sources
Rthere are strong radar reflections, for exam-
ple in parking garages
If Distance Pilot DISTRONIC no longer detects a
vehicle in front, it may unexpectedly accelerate
to the speed stored. This speed may:
Rbe too high if you are driving in a turning lane
or an exit lane
Rbe so high in the right lane that you pass vehi-
cles driving on the left (in countries where
they drive on the right)
Rbe so high in the left lane that you pass vehi-
cles driving on the right (in countries where
they drive on the left)
If there is a change of drivers, advise the new
driver of the speed stored.
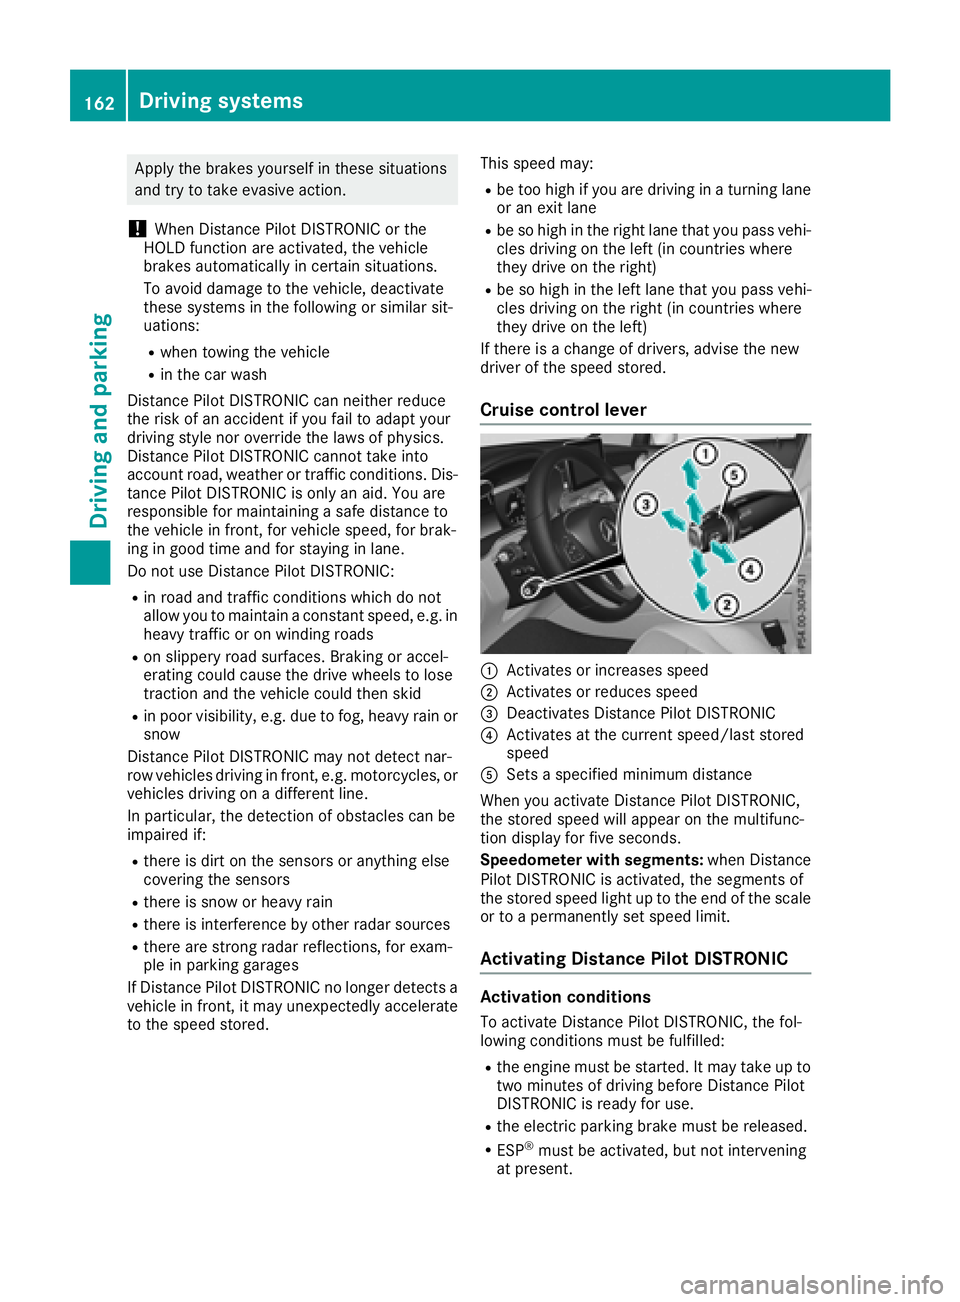
Cruise control lever
:Activates or increases speed
;Activates or reduces speed
=Deactivates Distance Pilot DISTRONIC
?Activates at the current speed/last stored
speed
ASets a specified minimum distance
When you activate Distance Pilot DISTRONIC,
the stored speed will appear on the multifunc-
tion display for five seconds.
Speedometer with segments: when Distance
Pilot DISTRONIC is activated, the segments of
the stored speed light up to the end of the scale
or to a permanently set speed limit.
Activating Distance Pilot DISTRONIC
Activation conditions
To activate Distance Pilot DISTRONIC, the fol-
lowing conditions must be fulfilled:
Rthe engine must be started. It may take up to
two minutes of driving before Distance Pilot
DISTRONIC is ready for use.
Rthe electric parking brake must be released.
RESP®must be activated, but not intervening
at present.
162Driving systems
Driving an d parking