air condition MERCEDES-BENZ GLC SUV 2015 Workshop Manual
[x] Cancel search | Manufacturer: MERCEDES-BENZ, Model Year: 2015, Model line: GLC SUV, Model: MERCEDES-BENZ GLC SUV 2015Pages: 497, PDF Size: 15.27 MB
Page 467 of 497

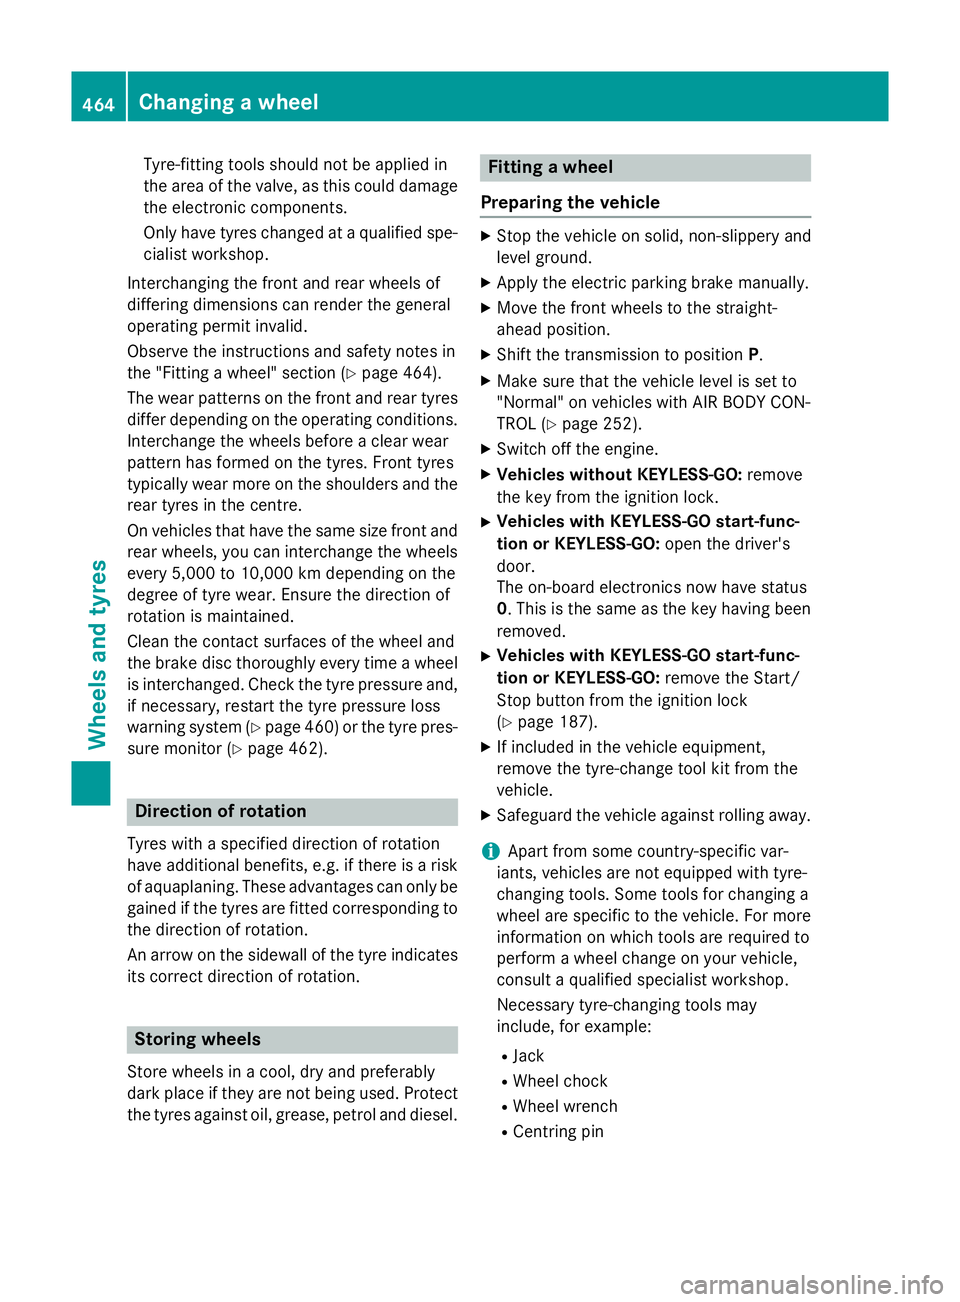
Tyre-fitting tools should not be applied in
the area of the valve, as this could damage
the electronic components.
Only have tyres changed at a qualified spe- cialist workshop.
Interchanging the front and rear wheels of
differing dimensions can render the general
operating permit invalid.
Observe the instructions and safety notes in
the "Fitting a wheel" section (Y page 464).
The wear patterns on the front and rear tyres differ depending on the operating conditions.Interchange the wheels before a clear wear
pattern has formed on the tyres. Front tyres
typically wear more on the shoulders and the
rear tyres in the centre.
On vehicles that have the same size front and rear wheels, you can interchange the wheels
every 5,000 to 10,000 km depending on the
degree of tyre wear. Ensure the direction of
rotation is maintained.
Clean the contact surfaces of the wheel and
the brake disc thoroughly every time a wheel
is interchanged. Check the tyre pressure and,
if necessary, restart the tyre pressure loss
warning system (Y page 460) or the tyre pres-
sure monitor (Y page 462). Direction of rotation
Tyres with a specified direction of rotation
have additional benefits, e.g. if there is a risk of aquaplaning. These advantages can only begained if the tyres are fitted corresponding to
the direction of rotation.
An arrow on the sidewall of the tyre indicates
its correct direction of rotation. Storing wheels
Store wheels in a cool, dry and preferably
dark place if they are not being used. Protect the tyres against oil, grease, petrol and diesel. Fitting a wheel
Preparing the vehicle X
Stop the vehicle on solid, non-slippery and
level ground.
X Apply the electric parking brake manually.
X Move the front wheels to the straight-
ahead position.
X Shift the transmission to position P.
X Make sure that the vehicle level is set to
"Normal" on vehicles with AIR BODY CON-
TROL (Y page 252).
X Switch off the engine.
X Vehicles without KEYLESS-GO: remove
the key from the ignition lock.
X Vehicles with KEYLESS-GO start-func-
tion or KEYLESS-GO: open the driver's
door.
The on-board electronics now have status
0. This is the same as the key having been removed.
X Vehicles with KEYLESS-GO start-func-
tion or KEYLESS-GO: remove the Start/
Stop button from the ignition lock
(Y page 187).
X If included in the vehicle equipment,
remove the tyre-change tool kit from the
vehicle.
X Safeguard the vehicle against rolling away.
i Apart from some country-specific var-
iants, vehicles are not equipped with tyre-
changing tools. Some tools for changing a
wheel are specific to the vehicle. For more information on which tools are required to
perform a wheel change on your vehicle,
consult a qualified specialist workshop.
Necessary tyre-changing tools may
include, for example:
R Jack
R Wheel chock
R Wheel wrench
R Centring pin 464
Changing a wheelWheels and tyres
Page 471 of 497

X
Turn the crank of the jack anti-clockwise
until the vehicle is once again standing
firmly on the ground.
X Place the jack to one side.
X Tighten the wheel bolts evenly in a cross-
wise pattern in the sequence indicated ( :
to A). The specified tightening torque is
130 Nm.
X Turn the jack back to its initial position.
X Stow the jack and the rest of the tyre-
change tool kit in the load compartment
again.
X Check the air pressure of the newly fitted
wheel and adjust accordingly.
Observe the recommended tyre pressure
(Y page 458).
If you are driving with the emergency spare
wheel fitted, the tyre pressure loss warning
system or the tyre pressure monitor cannot
function reliably. Only restart the tyre pres-
sure loss warning system or tyre pressure
monitor when the defective wheel has been
replaced with a new wheel.
Vehicles with a tyre pressure monitor: all
fitted wheels must be equipped with func-
tioning sensors. Wheel and tyre combinations
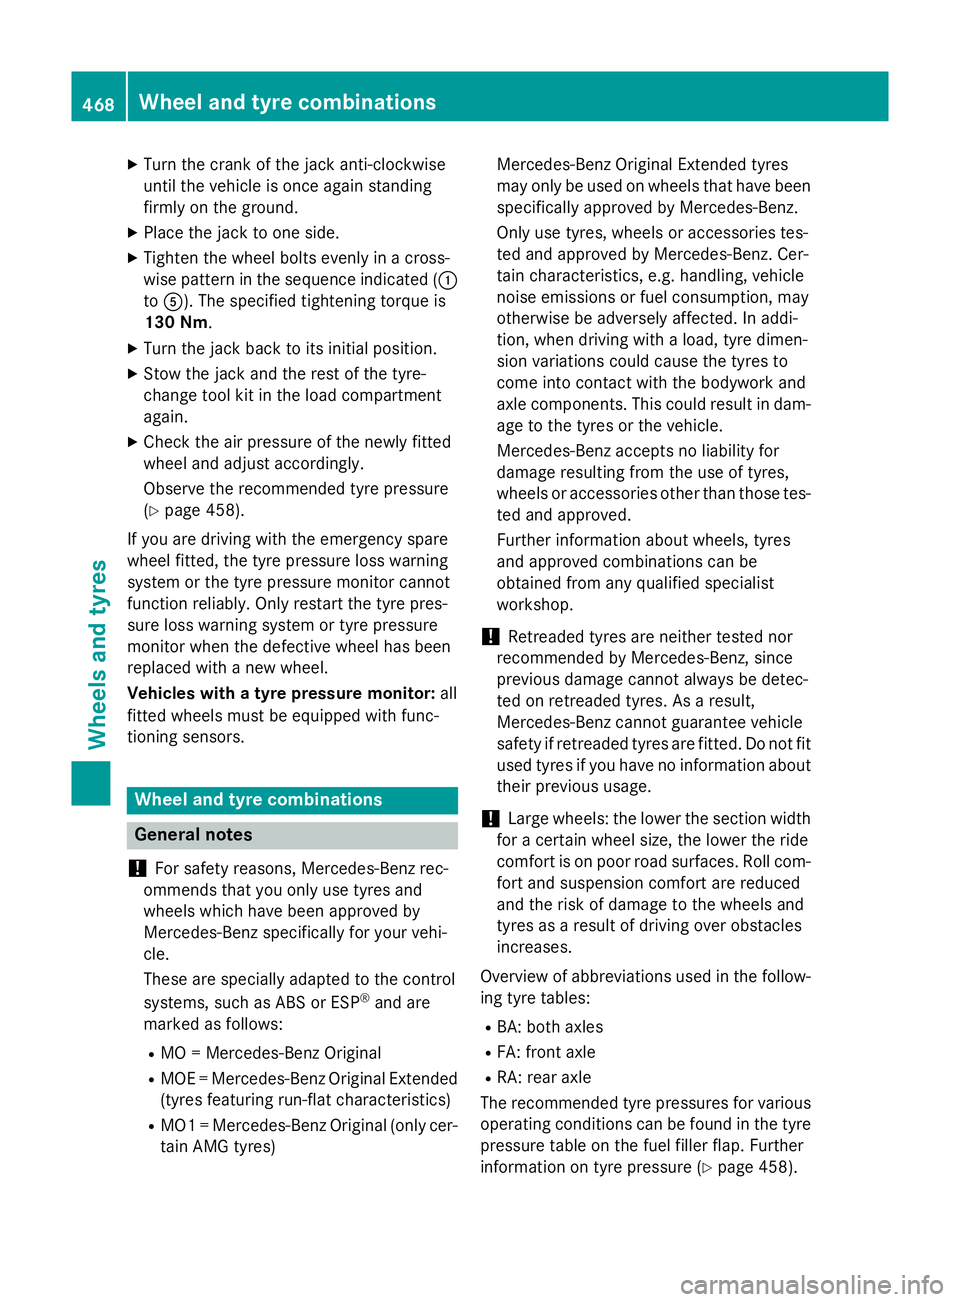
General notes
! For safety reasons, Mercedes-Benz rec-
ommends that you only use tyres and
wheels which have been approved by
Mercedes-Benz specifically for your vehi-
cle.
These are specially adapted to the control
systems, such as ABS or ESP ®
and are
marked as follows:
R MO = Mercedes-Benz Original
R MOE = Mercedes-Benz Original Extended
(tyres featuring run-flat characteristics)
R MO1 = Mercedes-Benz Original (only cer-
tain AMG tyres) Mercedes-Benz Original Extended tyres
may only be used on wheels that have been
specifically approved by Mercedes-Benz.
Only use tyres, wheels or accessories tes-
ted and approved by Mercedes-Benz. Cer-
tain characteristics, e.g. handling, vehicle
noise emissions or fuel consumption, may
otherwise be adversely affected. In addi-
tion, when driving with a load, tyre dimen-
sion variations could cause the tyres to
come into contact with the bodywork and
axle components. This could result in dam- age to the tyres or the vehicle.
Mercedes-Benz accepts no liability for
damage resulting from the use of tyres,
wheels or accessories other than those tes-
ted and approved.
Further information about wheels, tyres
and approved combinations can be
obtained from any qualified specialist
workshop.
! Retreaded tyres are neither tested nor
recommended by Mercedes-Benz, since
previous damage cannot always be detec-
ted on retreaded tyres. As a result,
Mercedes-Benz cannot guarantee vehicle
safety if retreaded tyres are fitted. Do not fit
used tyres if you have no information about their previous usage.
! Large wheels: the lower the section width
for a certain wheel size, the lower the ride
comfort is on poor road surfaces. Roll com-
fort and suspension comfort are reduced
and the risk of damage to the wheels and
tyres as a result of driving over obstacles
increases.
Overview of abbreviations used in the follow- ing tyre tables:
R BA: both axles
R FA: front axle
R RA: rear axle
The recommended tyre pressures for various
operating conditions can be found in the tyre pressure table on the fuel filler flap. Further
information on tyre pressure (Y page 458).468
Wheel and tyre combinationsWheels and tyres
Page 491 of 497

!
Only the washer fluids SummerFit and
WinterFit can be mixed. Otherwise, the
spraying nozzles could become blocked.
Comply with the important safety notes for
service products when handling washer fluid
(Y page 480).
At temperatures above freezing:
X Fill the washer fluid reservoir with a mixture
of water and washer fluid, e.g. MB Sum-
merFit.
Mix 1 part MB SummerFit to 100 parts water.
At temperatures below freezing:
X Fill the washer fluid reservoir with a mixture
of water and washer fluid, e.g. MB Winter-
Fit.
For the correct mixing ratio refer to the
information on the antifreeze reservoir.
i Add washer fluid concentrate, e.g. MB
SummerFit or MB WinterFit, to the washer
fluid all year round. Vehicle data
General notes
Please note that for the specified vehicle
data: R the heights specified may vary as a result
of:
- tyres
- load
- condition of the suspension
- optional equipment
R optional equipment reduces the maximum
payload
R Vehicle-specific weight information can be
found on the vehicle identification plate
(Y page 480).
R only for certain countries: you can find vehi-
cle-specific vehicle data in the COC docu-
ments (CERTIFICATE OF CONFORMITY).
These documents are delivered with your
vehicle. Observe the information relating to level con-
trol:
R AIR BODY CONTROL (Y page 252)
R Off-Road Engineering package
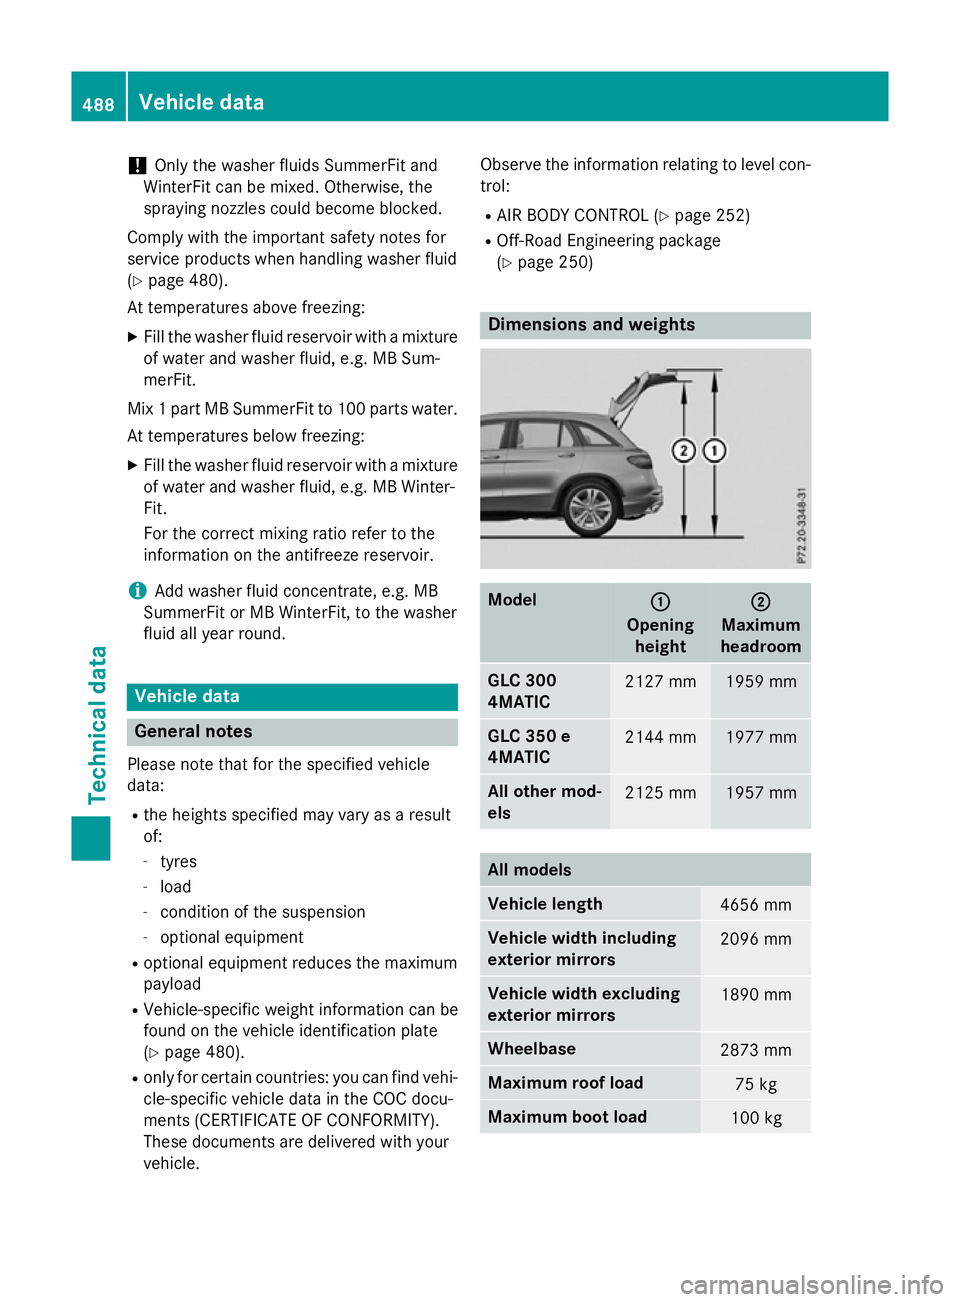
(Y page 250) Dimensions and weights
Model
: :
Opening height ;
;
Maximum
headroom GLC 300
4MATIC
2127 mm 1959 mm
GLC 350 e
4MATIC
2144 mm 1977 mm
All other mod-
els
2125 mm 1957 mm
All models
Vehicle length
4656 mm
Vehicle width including
exterior mirrors
2096 mm
Vehicle width excluding
exterior mirrors
1890 mm
Wheelbase
2873 mm
Maximum roof load
75 kg
Maximum boot load
100 kg488
Vehicle dataTechnical data
Page 492 of 497

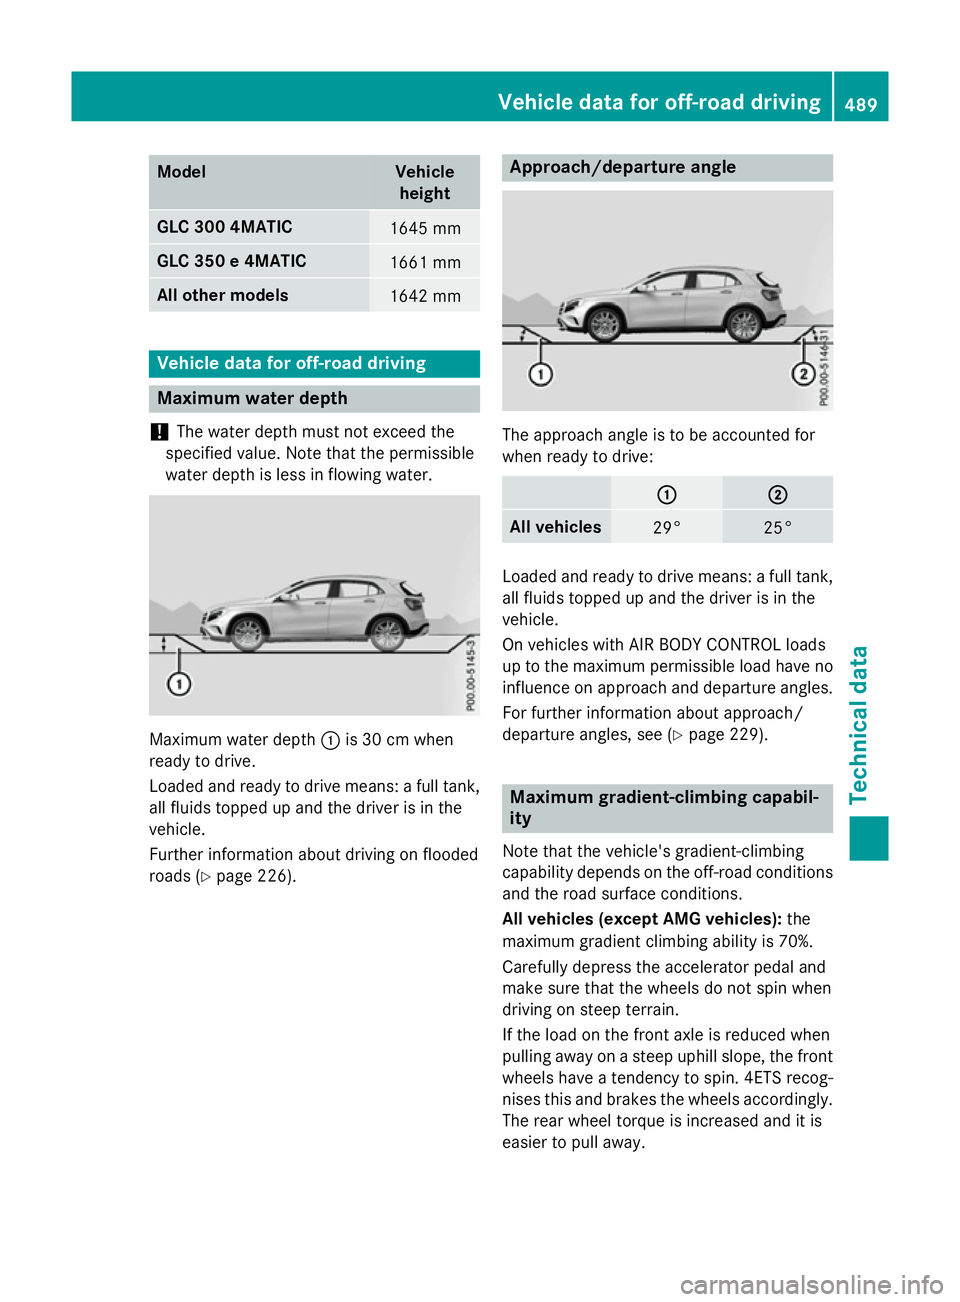
Model Vehicle
height GLC 300 4MATIC
1645 mm
GLC 350 e 4MATIC
1661 mm
All other models
1642 mm
Vehicle data for off-road driving
Maximum water depth
! The water depth must not exceed the
specified value. Note that the permissible
water depth is less in flowing water. Maximum water depth
:is 30 cm when
ready to drive.
Loaded and ready to drive means: a full tank, all fluids topped up and the driver is in the
vehicle.
Further information about driving on flooded
roads (Y page 226). Approach/departure angle
The approach angle is to be accounted for
when ready to drive:
: : ;
;
All vehicles
29° 25°
Loaded and ready to drive means: a full tank,
all fluids topped up and the driver is in the
vehicle.
On vehicles with AIR BODY CONTROL loads
up to the maximum permissible load have no
influence on approach and departure angles.
For further information about approach/
departure angles, see (Y page 229). Maximum gradient-climbing capabil-
ity
Note that the vehicle's gradient-climbing
capability depends on the off-road conditions and the road surface conditions.
All vehicles (except AMG vehicles): the
maximum gradient climbing ability is 70%.
Carefully depress the accelerator pedal and
make sure that the wheels do not spin when
driving on steep terrain.
If the load on the front axle is reduced when
pulling away on a steep uphill slope, the front
wheels have a tendency to spin. 4ETS recog- nises this and brakes the wheels accordingly. The rear wheel torque is increased and it is
easier to pull away. Vehicle data for off-road driving
489Technical data Z