four wheel drive MERCEDES-BENZ GLC SUV 2015 Owners Manual
[x] Cancel search | Manufacturer: MERCEDES-BENZ, Model Year: 2015, Model line: GLC SUV, Model: MERCEDES-BENZ GLC SUV 2015Pages: 497, PDF Size: 15.27 MB
Page 7 of 497

1, 2, 3 ...
4ETS (Electronic Traction System) see ETS/4ETS (Electronic Trac-
tion System)
4MATIC (permanent four-wheel
drive) .................................................. 254
4MATIC off-road system ...................254
12 V socket
see Socket (12 V)
230 V power socket .......................... 406
360° camera
Cleaning ......................................... 425
Function/notes ............................ .267 A
ABS (Anti-lock Braking System) Display message ............................ 336
Function/notes ................................ 79
Important safety notes .................... 79
Warning lamp ................................. 379
Accident
Automatic measures after an acci-
dent ................................................. 65
Activating/deactivating air-recir-
culation mode ................................... .170
Activating/deactivating cooling
with air dehumidification ................. 162
Active Blind Spot Assist
Activating/deactivating (on-
board computer) ............................ 328
Display message ............................ 362
Active Lane Keeping Assist
Activating/deactivating (on-
board computer) ............................ 329
Display message ............................ 361
Function/notes ............................ .283
Active light function ......................... 142
Active Light System
Display message ............................ 352
Active Parking Assist
Cancelling ...................................... 261
Detecting parking spaces .............. 258
Display message ............................ 362
Exiting a parking space .................. 260
Function/notes ............................ .257
Important safety notes .................. 257 Parking .......................................... 259
Towing a trailer .............................. 257
ADAPTIVE BRAKE ................................. 87
Adaptive Brake Assist
Function/notes ................................ 83
Adaptive brake lights .......................... 84
Adaptive Damping System (ADS) ..... 253
Adaptive Highbeam Assist Plus
Display message ............................ 353
Function/notes ............................ .143
Switching on/off ........................... 144
AdBlue ®
Additive ......................................... 484
Display message ............................ 356
Displaying level and range ............. 327
Filling capacity ............................... 485
Important safety notes .................. 484
Low outside temperatures ............. 484
Purity ............................................. 485
Topping up ..................................... 207
Additional speedometer ................... 333
Additives (engine oil) ........................ 486
Adjusting the headlamp range ......... 140
AIR BODY CONTROL
Display message ............................ 359
Function/notes ............................ .252
Lowering the rear of the vehicle .... 253
Raising the rear of the vehicle ....... 254
Air conditioning
General notes ................................ 156
Air filter (white display message) .... 356
Air vents
Important safety notes .................. 183
Rear ............................................... 184
Setting .......................................... .183
Setting the centre air vents ........... 184
Setting the side air vents .............. .184
Air-conditioning system
see Climate control
Airbag
Automatic front-passenger front
airbag deactivatio n .......................... 56
Introduction ..................................... 53
PASSENGER AIR BAG indicator
lamps ............................................... 48
Airbags
Display message ............................ 349 4
Index
Page 257 of 497

When the vehicle has been lowered, indi-
cator lamp ;remains lit.
i Lowering is interrupted if:
R a vehicle door is opened
R button :was briefly pulled again
R the vehicle is moving faster than
2 km/h
i The vehicle is automatically set to the
level of the most recently selected drive
program (Y page 195) if you drive faster
than 2 km/h.
Raising the rear of the vehicle To raise using the button in the left-hand-
side luggage compartment trim:
X Pull switch :briefly.
Indicator lamp ;goes out.
The vehicle is raised by 40 mm.
i The vehicle is automatically set to the
level of the most recently selected drive
program (Y page 195) if you drive faster
than 2 km/h.
X If the vehicle can no longer be raised
when stationary: start the engine.
The process will then be continued.
i If you drive off when the rear of the vehicle
has been lowered, the ÁVehicle
Vehicle ris‐ ris‐
ing Please wait
ing Please wait display may appear in
the multifunction display. 4MATIC (permanent all-wheel drive)
4MATIC ensures that all four wheels are per-
manently driven. Together with ESP ®
, it
improves the traction of your vehicle when-
ever a drive wheel spins due to insufficient
grip.
If you fail to adapt your driving style, 4MATIC can neither reduce the risk of an accident nor
override the laws of physics. 4MATIC cannot
take account of road, weather and traffic con- ditions. 4MATIC is only an aid. You are
responsible for the distance to the vehicle in front, for vehicle speed, for braking in good
time and for staying in the lane.
If a drive wheel spins due to insufficient grip:
R when pulling away, only depress the accel-
erator pedal as far as is necessary
R accelerate less when driving
! Never tow the vehicle with one axle
raised. This may damage the transfer case.
Damage of this sort is not covered by the
Mercedes-Benz implied warranty. All
wheels must remain either on the ground or be fully raised. Observe the instructions for
towing the vehicle with all wheels in full
contact with the ground.
i In wintry driving conditions, the maximum
effect of 4MATIC can only be achieved if
you use winter tyres (M+S tyres), with snow
chains if necessary. PARKTRONIC
Important safety notes PARKTRONIC is an electronic parking aid with
ultrasonic sensors. It monitors the area
around your vehicle using six sensors in the
front bumper and six sensors in the rear
bumper. PARKTRONIC indicates visually and
audibly the distance between your vehicle
and an object.
PARKTRONIC is only an aid. It is not a substi-
tute for your attention to the immediate sur-
roundings. The responsibility for safe
manoeuvring and parking remains with you.
Make sure that there are no persons, animals
or objects in range while manoeuvring and
parking.
! When parking, pay particular attention to
objects above or below the sensors, such
as flower pots or trailer drawbars.
PARKTRONIC does not detect such objects
when they are in the immediate vicinity of
the vehicle. You could damage the vehicle
or the objects. 254
Driving systemsDriving and parking
Page 299 of 497

R
the climate control
- the climate control settings
- the rear window heating operation period
- the performance of the seat heating
R the availability of the Eco Assistant
If the ignition is switched off for less than four hours, the previously selected drive program
is activated when the engine is next started. If
the ignition is switched off for more than four hours, drive program Cis activated when the
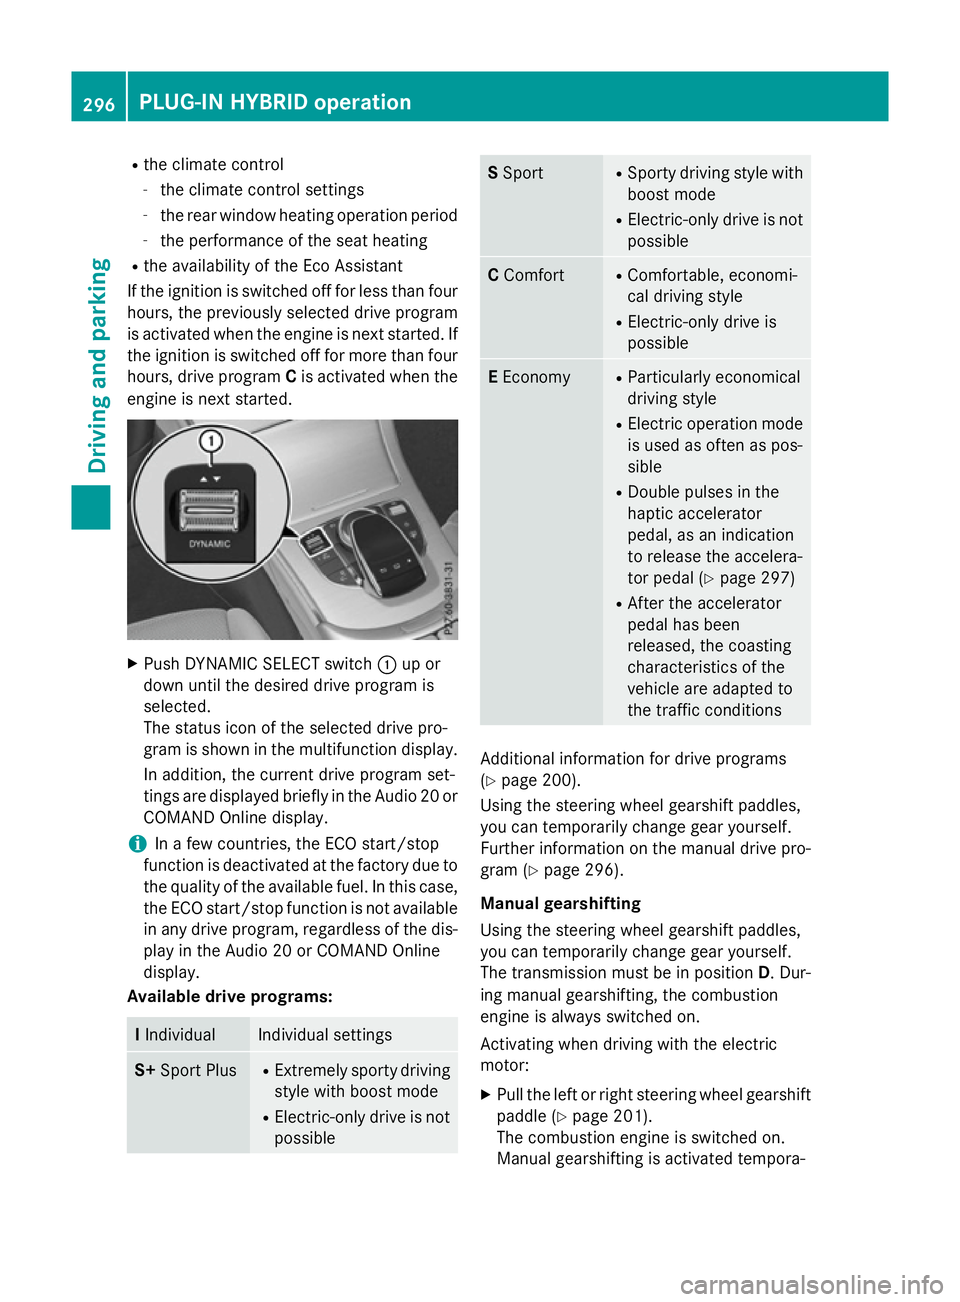
engine is next started. X
Push DYNAMIC SELECT switch :up or
down until the desired drive program is
selected.
The status icon of the selected drive pro-
gram is shown in the multifunction display.
In addition, the current drive program set-
tings are displayed briefly in the Audio 20 or COMAND Online display.
i In a few countries, the ECO start/stop
function is deactivated at the factory due to the quality of the available fuel. In this case,
the ECO start/stop function is not available in any drive program, regardless of the dis-
play in the Audio 20 or COMAND Online
display.
Available drive programs: I
Individual Individual settings
S+
Sport Plus R
Extremely sporty driving
style with boost mode
R Electric-only drive is not
possible S
Sport R
Sporty driving style with
boost mode
R Electric-only drive is not
possible C
Comfort R
Comfortable, economi-
cal driving style
R Electric-only drive is
possible E
Economy R
Particularly economical
driving style
R Electric operation mode
is used as often as pos-
sible
R Double pulses in the
haptic accelerator
pedal, as an indication
to release the accelera-
tor pedal (Y page 297)
R After the accelerator
pedal has been
released, the coasting
characteristics of the
vehicle are adapted to
the traffic conditions Additional information for drive programs
(Y page 200).
Using the steering wheel gearshift paddles,
you can temporarily change gear yourself.
Further information on the manual drive pro-
gram (Y page 296).
Manual gearshifting
Using the steering wheel gearshift paddles,
you can temporarily change gear yourself.
The transmission must be in position D. Dur-
ing manual gearshifting, the combustion
engine is always switched on.
Activating when driving with the electric
motor:
X Pull the left or right steering wheel gearshift
paddle (Y page 201).
The combustion engine is switched on.
Manual gearshifting is activated tempora- 296
PLUG
‑IN HYBRI D operationDriving an d parking
Page 465 of 497

monitor active
monitor active
message is shown instead
of the tyre pressure display. The tyre pres-
sures are already being monitored.
If an emergency spare wheel is fitted, for a
few minutes the system may continue to
show the tyre pressure of the wheel that has
been removed. If this occurs, note that the
value displayed for the position where the
spare wheel is fitted is not the same as the
current tyre pressure of the emergency spare wheel.
Warning messages of the tyre pressure
monitor If the tyre pressure monitor detects a pres-
sure loss in one or more tyres, a warning mes-
sage is shown in the multifunction display.
The yellow tyre pressure warning lamp then
lights up.
R If the Please correct tyre pressure
Please correct tyre pressure
message appears in the multifunction dis-
play, the tyre pressure in at least one tyre is
too low. The tyre pressure must be correc-
ted when the opportunity arises.
R If the Check tyre(s)
Check tyre(s) message appears in
the multifunction display, the tyre pressure in at least one tyre has dropped signifi-
cantly. The tyres must be checked.
R If the Warning tyre defect Warning tyre defect message
appears in the multifunction display, the
tyre pressure in at least one tyre has drop- ped suddenly. The tyres must be checked.
Observe the instructions and safety notes in
the display messages in the "Tyres" section
(Y page 367).
If the wheel positions on the vehicle are inter-
changed, the tyre pressures may be displayed
for the wrong positions for a short time. After a few minutes of driving, this is rectified and
the tyre pressures are displayed for the cor-
rect positions.
Restarting the tyre pressure monitor When you restart the tyre pressure monitor,
all existing warning messages are deleted and the warning lamps go out. The monitor uses
the currently set tyre pressures as the refer-
ence values for monitoring. In most cases, the
tyre pressure monitor will automatically
detect the new reference values after you
have changed the tyre pressure. However,
you can also set reference values manually as described here. The tyre pressure monitor
then monitors the new tyre pressure values.
X Use the table on the inside of the fuel filler
flap to ensure that the tyre pressure is set
correctly in all four tyres for the current
operating conditions.
Also observe the notes in the section on
tyre pressures (Y page 458).
X Make sure that the key is in position 2in the
ignition lock (Y page 187).
X Press the òbutton on the steering
wheel to call up the list of menus.
X Press 9or: on the steering wheel
to select the Service Servicemenu.
X Press the abutton.
X Press 9or: to select Tyre pres‐
Tyre pres‐
sure
sure.
X Press the abutton.
The current tyre pressure for each wheel or
the Tyre pressures will be dis‐
Tyre pressures will be dis‐
played played after
aftera
afew
few minutes
minutes of
ofdriv‐
driv‐
ing
ing message will be displayed in the mul-
tifunction display.
X Press the :button.
The Use current pressures as new
Use current pressures as new
reference values
reference values message appears in
the multifunction display.
If you wish to confirm the restart: X Press the abutton.
The Tyre press. monitor restarted
Tyre press. monitor restarted
message appears in the multifunction dis-
play.
After you have driven for a few minutes, the system checks whether the current tyre
pressures are within the specified range.
The new tyre pressures are then accepted
as reference values and monitored. 462
Tyre pressureWheels and tyres