service indicator MERCEDES-BENZ GLC SUV 2015 Owners Manual
[x] Cancel search | Manufacturer: MERCEDES-BENZ, Model Year: 2015, Model line: GLC SUV, Model: MERCEDES-BENZ GLC SUV 2015Pages: 497, PDF Size: 15.27 MB
Page 12 of 497
see Warning and indicator lamps
Display message
Driving systems ............................. 359
Hybrid drive system ....................... 357
Display messages
ASSYST PLUS ................................ 419
Calling up (on-board computer) ..... 335
Engine ............................................ 353
General information ....................... 335
Hiding (on-board computer) ........... 335
Introduction ................................... 335
Key ................................................ 374
Lights ............................................. 350
Safety systems .............................. 336
Tyres ..............................................3 67
Vehicle .......................................... .369
Distance warning function
Function/notes ................................ 82
Distance warning signal (warning
lamp) ................................................. .386
DISTRONIC PLUS
Activating ....................................... 238
Activation conditions ..................... 238
Cruise control lever ....................... 237
Deactivating ................................... 243
Display message ............................ 364
Displays in the instrument cluster .. 242 Driving tips ................................... .244
Driving with DISTRONIC PLUS ....... 239
Function/notes ............................ .236
Important safety notes .................. 236
Selecting ........................................ 238
Setting the specified minimum
distance ......................................... 241
Setting the speed .......................... 241
Stopping ........................................ 240
with Steering Assist and Stop&Go Pilot ............................................... 245
Door
Automatic locking (switch) ............ 102
Central locking/unlocking (key) ...... 95
Control panel ................................... 42
Display message ............................ 371
Emergency locking ........................ 103
Emergency unlocking ..................... 102
Important safety notes .................. 100
Opening (from the inside) .............. 101 Drive programs
Automatic transmission ................. 200
Display (DIRECT SELECT lever) ...... 198
Driver's door
see Door
Driving abroad
Mercedes-Benz Service ................. 420
Symmetrical dipped bea m............. 138
Driving Assistance Plus package ..... 280
Driving in mountainous terrain
Approach/departure angle ............ 229
Driving off-road
see Off-road driving
Driving on flooded roads .................. 226
Driving safety system
BAS PLUS with Cross-Traffic
Assist ............................................... 80
COLLISION PREVENTION ASSIST
PLUS ................................................ 81
EBD (electronic brake force distri-
bution) ............................................. 87
Recuperative Brake System ............. 46
STEER CONTROL ............................. 90
Driving safety systems
ABS (Anti-lock Braking System) ....... 79
ADAPTIVE BRAK E............................. 87
Adaptive Brake Assist ...................... 83
Adaptive brake lights ....................... 84
BAS (Brake Assist System) .............. 79
Distance warning function ............... 82
ESP ®
(Electronic Stability Pro-
gram) ............................................... 84
Important safety guidelines ............. 78
Overview .......................................... 78
PRE-SAFE ®
Brake ............................. 87
Driving system
AIR BODY CONTROL ...................... 252
DISTRONIC PLUS with Steering
Assist and Stop&Go Pilot ............... 245
Driving Assistance Plus package ... 280
Driving systems
360°camera .................................. 267
Active Blind Spot Assist ................. 280
Active Lane Keeping Assist ............ 283
Active Parking Assist ..................... 257
ATTENTION ASSIST ........................ 272
Blind Spot Assist ............................ 276 Index
9
Page 18 of 497
Maximum charge current
Setting (charging cable) ................. 214
Setting (on-board computer) .......... 329
Memory card (audio) ......................... 323
Memory function
Seats, steering wheel, exterior
mirrors ........................................... 134
Mercedes-Benz Contact
Display message ............................ 343
General notes ................................ 409
Info call button .............................. 409
Roadside Assistance call button .... 409
Mercedes-Benz emergency call
system
Switch in the overhead control
panel ............................................. .408
Mercedes-Benz Intelligent Drive
360°camera .................................. 267
Active Blind Spot Assist ................. 280
Active Lane Keeping Assist ............ 283
Active Parking Assist ..................... 257
ATTENTION ASSIST ........................ 272
Blind Spot Assist ............................ 276
DISTRONIC PLUS ........................... 236
DISTRONIC PLUS with Steering
Assist and Stop&Go Pilot .............. .245
General notes ................................ 230
Lane Keeping Assist ..................... .279
PARKTRONIC ................................. 254
PRE-SAFE ®
(anticipatory occu-
pant protection) ............................... 63
PRE-SAFE ®
PLUS (anticipatory
occupant protection PLUS) .............. 64
Reversing camera .......................... 262
Traffic Sign Assist .......................... 274
Mercedes-Benz Service Centre
see Qualified specialist workshop
Message memory (on-board com-
puter) ................................................. .335
Messages
see Display messages
see Warning and indicator lamps
Mirror turn signal
Cleaning ......................................... 424
Mirrors
see Exterior mirrors
see Rear-view mirror see Vanity mirror (in sun visor)
Mobile phone
Frequencies ................................... 478
Installation ..................................... 478
Menu (on-board computer) ............ 324
Notes/placing in the bracket ......... 410
Transmission output (maximum) .... 478
Modifying the programming (key) ..... 96
MOExtended tyres .............................434
Motorway mode ................................ 142
MP3
Operating ....................................... 323
Multifunction display
Function/notes ............................ .315
Permanent display ......................... 333
Multifunction steering wheel
Operating the on-board computer .. 314
Overview .......................................... 37 N
Navigation Menu (on-board computer) ............ 320
Notes on running in a new vehicle .. 186 O
Occupant safety Automatic front-passenger front
airbag deactivatio n .......................... 56
Automatic measures after an acci-
dent ................................................. 65
Children in the vehicle ..................... 65
Important safety notes .................... 47
PASSENGER AIRBAG indicator
lamp ................................................. 48
Pets in the vehicle ........................... 78
PRE-SAFE ®
(anticipatory occu-
pant protection) ............................... 63
PRE-SAFE ®
PLUS (anticipatory
occupant protection PLUS) .............. 64
Restraint system introduction .......... 46
Restraint system warning lamp ....... .47
Seat belts ........................................ 48
Odometer ........................................... 318
Off-road driving
Approach/departure angle ............ 489
Checklist after driving off-road ...... 228 Index
15
Page 22 of 497
Introduction .....................................46
Warning lamp ................................. 383
Warning lamp (function) ...................47
Rev counter ........................................ 313
Reversing camera
Cleaning instructions ..................... 425
Displays in the Audio display ......... 263
Displays in the COMAND display ... 263
Function/notes ............................ .262
Switching on/off ........................... 263
Reversing feature
Panorama sliding sunroof .............. 114
Roller sunblinds ............................ .116
Side windows ................................. 110
Tailgate .......................................... 104
Reversing lamp
Changing bulbs .............................. 148
Reversing lamp (display message) .. 352
Roller sunblind
Panorama sliding sunroof .............. 115
Roller sunblinds (panorama sliding
sunroof)
Operating ....................................... 116
Roof carrier ........................................ 402
Roof lining and carpets (cleaning
instructions) ...................................... 428
Roof load (maximum) ........................ 488S
Safety Children in the vehicle ..................... 65
Hybrid drive system ......................... 44
see Operating safety
Safety net
Attaching ....................................... 398
Important safety information ......... 398
Safety notes
Hybrid vehicles ................................ 44
SD memory card
Selecting ........................................ 323
Seat
Folding the backrest (rear com-
partment) forwards/back ...... 393, 394
Seat belt
Centre rear-compartment sea t........ 51
Correct usage .................................. 50 Seat belts
Adjusting the driver's and front-
passenger seat belt ......................... 52
Adjusting the height ......................... 50
Cleaning ......................................... 428
Fastening ......................................... 50
Important safety guidelines ............. 49
Introduction ..................................... 48
Rear seat belt status indicator ......... 52
Releasing ......................................... 51
Warning lamp ................................. 376
Warning lamp (function) ................... 52
Seats
Adjusting (electrically) ................... 123
Adjusting (manually and electri-
cally) .............................................. 122
Adjusting the 4-way lumbar sup-
port ................................................ 125
Adjusting the head restraint .......... 123
Calling up a stored setting (mem-
ory function) .................................. 135
Cleaning the cover ......................... 427
Correct driver's seat position ........ 120
Important safety notes .................. 121
Seat heating .................................. 125
Seat heating problem .................... 127
Seat ventilation .............................. 127
Seat ventilation problem ................ 128
Storing settings (memory func-
tion) ............................................... 135
Switching seat heating on/of f....... 125
Switching the seat ventilation on/
off .................................................. 127
Section
PLUG-IN HYBRID operation ............ 286
Securing a load
see Stowage space
Securing luggage ............................... 396
Selector lever
Cleaning ......................................... 427
see Automatic transmission
Sensors (cleaning instructions) ....... 425
Service menu (on-board com-
puter) .................................................. 326
Service message
see ASSYST PLUS Index
19
Page 23 of 497
Service products
AdBlue ®
special additives .............. 484
Brake fluid .....................................4 86
Coolant (engine) ............................ 487
Engine oil ....................................... 485
Fuel ................................................ 480
Important safety notes .................. 480
Washer fluid ................................... 487
Setting the charge current (on-
board computer) ............................... 329
Setting the departure time (on-
board computer) ............................... 330
Settings
Factory (on-board computer) ......... 334
On-board computer ....................... 327
Side lamps
Switching on/off ........................... 140
Side windows
Convenience closing ..................... .111
Convenience opening .................... 111
Important safety notes .................. 109
Opening/closing ............................ 110
Problem (malfunction) ................... 113
Resetting ....................................... 112
Reversing feature ........................... 110
Sidebag ................................................ 55
Ski/snowboard bag .......................... 393
Sliding sunroof
see Panorama sliding sunroof
Snow chains ...................................... 457
Socket (12 V)
Centre console .............................. 406
General notes ................................ 405
Luggage compartment ................... 406
Rear compartment ......................... 406
Socket (230 V) ................................... 406
Specialist workshop ............................ 28
Spectacles compartment ................. 391
Speed, controlling
see Cruise control
Speedometer
Activating/deactivating the addi-
tional speedometer ........................ 333
Digital ............................................ 319
In the Instrument cluster ................. 34
Segments ...................................... 313
Selecting a display unit .................. 332 see Instrument cluster
SPEEDTRONIC
Deactivating variable ..................... 235
Display message ............................ 365
Function/notes ............................ .233
General notes ................................ 233
Important safety notes .................. 233
LIM indicator lamp ......................... 234
Permanent ..................................... 236
Selecting ........................................ 234
Setting the speed .......................... 235
Storing the current spee d.............. 234
Storing the current speed or call-
ing up the last stored speed .......... 235
Switching to passive ...................... 235
Variabl e......................................... 234
Start/Stop button
Starting the engine ........................ 190
Start/stop function
see ECO start/stop function
Starting (engine) ................................ 189
STEER CONTROL .................................. 90
Steering
Display message ............................ 374
Warning lamps ............................... 388
Steering Assist and Stop&Go Pilot
(DISTRONIC PLUS)
Display message ............................ 365
Steering assistant STEER CON-
TROL
see STEER CONTROL
Steering wheel
Adjusting (electrically) ................... 129
Adjusting (manually) ...................... 128
Button overview ............................... 37
Buttons (on-board computer) ......... 314
Cleaning ......................................... 427
EASY ENTRY/EXIT feature ............. 130
Important safety notes .................. 128
Steering wheel heating .................. 129
Storing settings (memory func-
tion) ............................................... 135
Steering wheel gearshift paddles .... 201
Steering wheel heating
Problem (malfunction) ................... 130
Switching on/of f........................... 129
Stowage areas ................................... 39020
Index
Page 62 of 497
fit the child restraint system to a suitable
rear seat.
R the front-passenger seat is occupied by a
person with a smaller build (e.g. a teenager
or small adult), either the PASSENGER AIR
BAG ON or PASSENGER AIR BAG OFF indi-
cator lamp lights up and remains lit after
the system self-test depending on the
result of the classification.
- if the PASSENGER AIR BAG ON indicator
lamp lights up, move the front-passenger
seat as far back as possible. Alterna-
tively, a person with a small build can sit on a rear seat.
- if the PASSENGER AIR BAG OFF indicator
lamp is lit, a person with a smaller build
should not use the front-passenger seat.
R the front-passenger seat is occupied by an
adult or a person with a build correspond-
ing to that of an adult, the PASSENGER AIR
BAG ON indicator lamp lights up after the
system self-test and remains lit. This indi-
cates that the front-passenger front airbag
is enabled.
If children are travelling in the vehicle, be sure
to observe the notes on "Children in the vehi- cle" (Y page 65).
If the automatic front-passenger front airbag
deactivation system is malfunctioning, the
red 6 restraint system warning lamp in
the instrument cluster and the PASSENGER
AIR BAG OFF indicator lamp light up simulta-
neously. The front-passenger front airbag is
disabled in this case and does not deploy dur- ing an accident. Have the system checked as
soon as possible by qualified technicians.
Consult a Mercedes-Benz Service Centre. The
front-passenger seat should only be repaired at a Mercedes-Benz Service Centre.
If the front-passenger seat, the seat cover orthe seat cushion is damaged, have the nec-
essary repair work carried out at a Mercedes- Benz Service Centre.
For safety reasons, Mercedes-Benz recom-
mends that you only use a child restraint sys-
tem which has been tested and approved by Mercedes-Benz in combination with the auto-
matic front-passenger front airbag deactiva-
tion system.
System self-test G
DANGER
If both the PASSENGER AIR BAG OFF and
PASSENGER AIR BAG ON indicator lamps do
not light up during the system self-test, the
system is malfunctioning. The front-
passenger front airbag might be triggered
unintentionally or might not be triggered at all in the event of an accident with high deceler-
ation. This poses an increased risk of injury or even fatal injury.
In this case the front-passenger seat may notbe used. Do not install a child restraint system
on the front-passenger seat. Have the auto-
matic front-passenger front airbag deactiva-
tion system checked and repaired immedi-
ately at a qualified specialist workshop. G
WARNING
If the PASSENGER AIRBAG OFF indicator lamp remains lit after the system self-test, the
front-passenger front airbag is disabled. It willnot be deployed in the event of an accident. In
this case, the front-passenger front airbag
cannot perform its intended protective func-
tion, e.g. when a person is seated in the front- passenger seat.
That person could, for example, come into
contact with the vehicle's interior, especially
if the person is sitting too close to the dash-
board. This poses an increased risk of injury or even fatal injury.
When the front-passenger seat is occupied,
always ensure that:
R the classification of the person in the front-
passenger seat is correct and the front-
passenger front airbag is enabled or disa- Occupant safety
59Safety
Z
Page 155 of 497
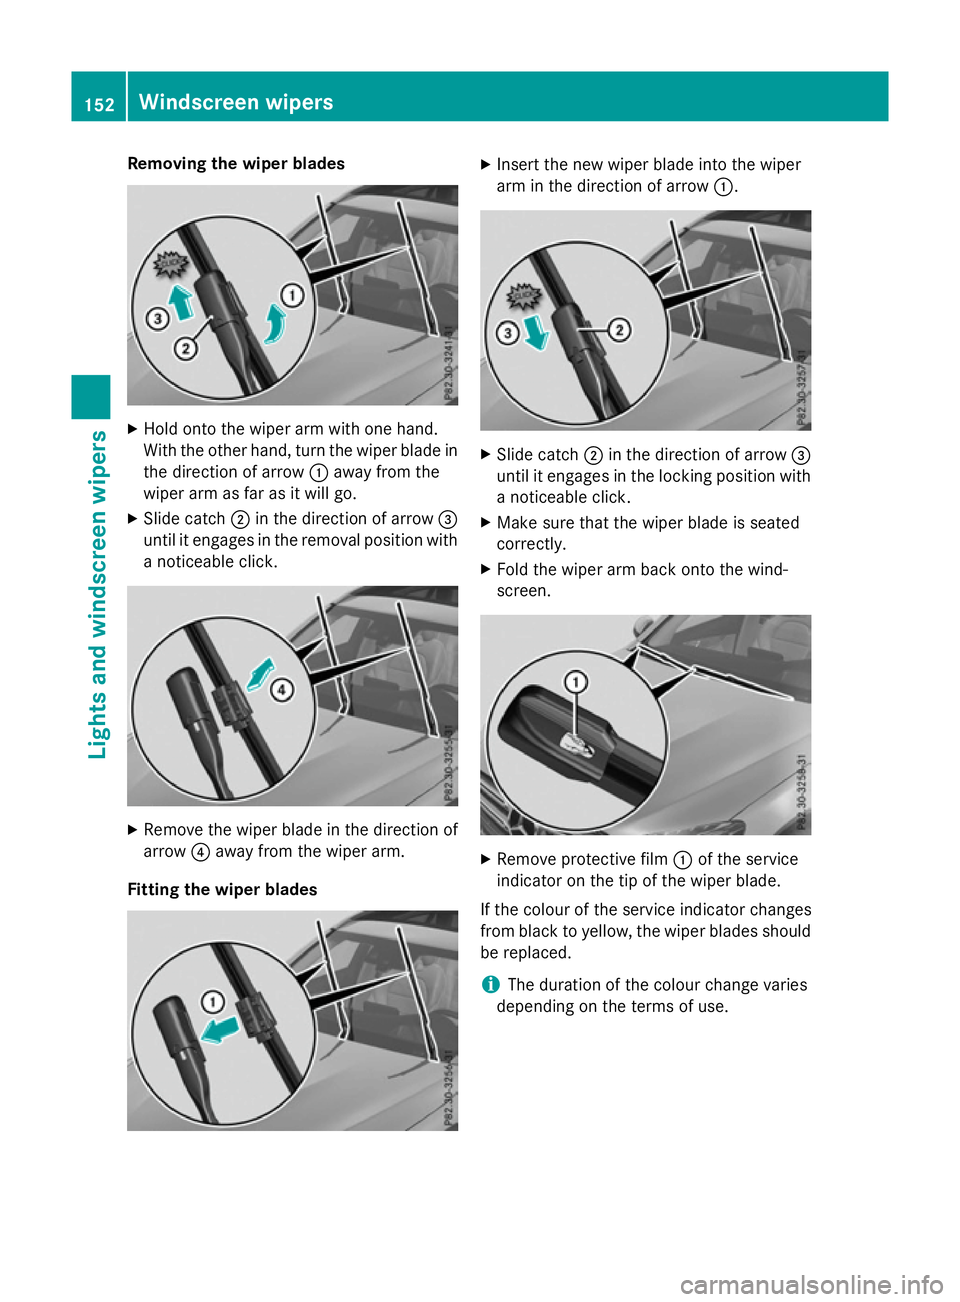
Removing the wiper blades
X
Hold onto the wiper arm with one hand.
With the other hand, turn the wiper blade in
the direction of arrow :away from the
wiper arm as far as it will go.
X Slide catch ;in the direction of arrow =
until it engages in the removal position with
a noticeable click. X
Remove the wiper blade in the direction of
arrow ?away from the wiper arm.
Fitting the wiper blades X
Insert the new wiper blade into the wiper
arm in the direction of arrow :. X
Slide catch ;in the direction of arrow =
until it engages in the locking position with a noticeable click.
X Make sure that the wiper blade is seated
correctly.
X Fold the wiper arm back onto the wind-
screen. X
Remove protective film :of the service
indicator on the tip of the wiper blade.
If the colour of the service indicator changes
from black to yellow, the wiper blades should be replaced.
i The duration of the colour change varies
depending on the terms of use. 152
Windscreen wipersLights and windscreen wipers
Page 225 of 497
Releasing automatically
The electric parking brake of your vehicle is
released automatically when all of the follow-
ing conditions are fulfilled:
R the engine is running
R the transmission is in position Dor R
R the seat belt is fastened
R you depress the accelerator pedal
If the transmission is in position R, the boot lid
must be closed.
If your seat belt is not fastened, the following conditions must be fulfilled to automatically
release the electric parking brake:
R the driver's door is closed
R you have shifted out of transmission posi-
tion Por you have previously driven faster
than 3 km/h
Ensure that you do not depress the acceler-
ator pedal unintentionally. Otherwise, the
parking brake will be released and the vehicle will start to move.
Emergency braking The vehicle can also be braked during an
emergency by using the electric parking
brake.
X While driving, push handle :of the electric
parking brake (Y page 220).
The vehicle is braked as long as you keep
handle :of the electric parking brake
depressed. The longer electric parking
brake handle :is depressed, the greater
the braking force.
During braking:
R a warning tone sounds
R the Release
Release parking parkingbrake
brakedisplay mes-
sage appears
R the red !indicator lamp in the instru-
ment cluster flashes
When the vehicle has been braked to a stand- still, the electric parking brake is applied. Parking up the vehicle
If you leave the vehicle parked up for longer
than four weeks, the battery may be damaged
by exhaustive discharging.
If you leave the vehicle parked up for longer
than six weeks, it may suffer from lack of use.
X Contact a qualified specialist workshop
and seek advice.
i You can obtain information about trickle
chargers from a qualified specialist work-
shop.
PLUG-IN HYBRID vehicles: observe the
important safety notes for the high-voltage
battery (Y page 440). Driving tips
General driving tips
Important safety notes G
WARNING
If you switch off the ignition while driving,
safety-relevant functions are only available
with limitations, or not at all. This could affect, for example, the power steering and the brake
boosting effect. You will require considerably
more effort to steer and brake. There is a risk of an accident.
Do not switch off the ignition while driving.
Drive sensibly – save fuel Observe the following tips to save fuel:
X The tyres should always be inflated to the
recommended tyre pressure.
X Remove unnecessary loads.
X Remove roof racks when they are not nee-
ded.
X Warm up the engine at low engine speeds.
X Avoid frequent acceleration or braking.
X Have all maintenance work carried out as
indicated by the service intervals in the 222
Driving tipsDriving and parking
Page 276 of 497
R
if you are driving with the active Steer
Assist of DISTRONIC PLUS
R if the time has been set incorrectly
R in active driving situations, such as when
you change lanes or change your speed
The ATTENTION ASSIST tiredness assess-
ment is deleted and restarted when continu-
ing the journey, if:
R you switch off the engine
R you take off your seat belt and open the
driver's door, e.g. for a change of drivers or to take a break
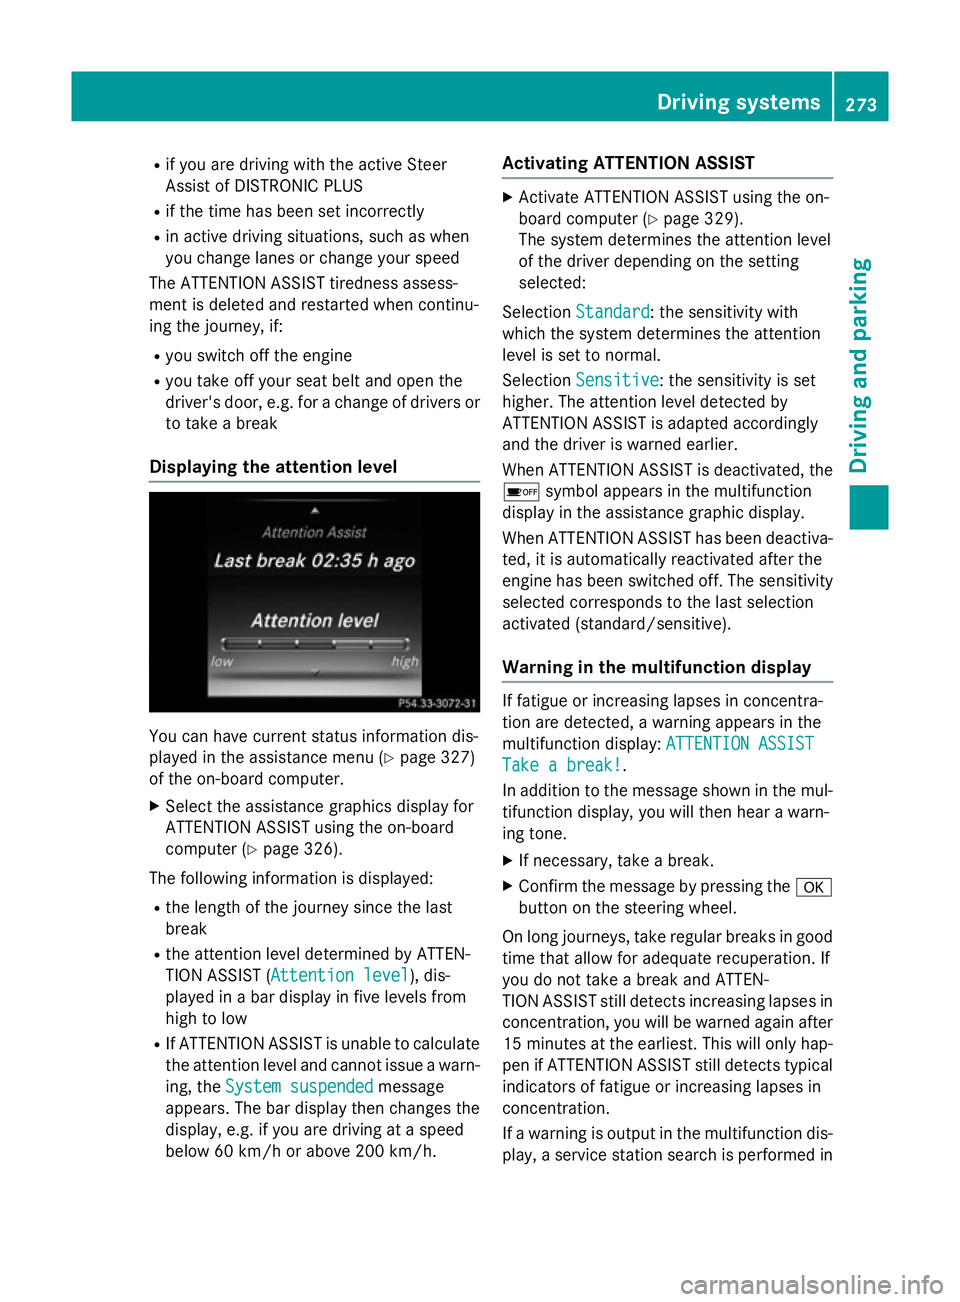
Displaying the attention level You can have current status information dis-
played in the assistance menu (Y page 327)
of the on-board computer.
X Select the assistance graphics display for
ATTENTION ASSIST using the on-board
computer (Y page 326).
The following information is displayed:
R the length of the journey since the last
break
R the attention level determined by ATTEN-
TION ASSIST ( Attention level
Attention level), dis-
played in a bar display in five levels from
high to low
R If ATTENTION ASSIST is unable to calculate
the attention level and cannot issue a warn-
ing, the System suspended
System suspended message
appears. The bar display then changes the
display, e.g. if you are driving at a speed
below 60 km/h or above 200 km/h. Activating ATTENTION ASSIST X
Activate ATTENTION ASSIST using the on-
board computer (Y page 329).
The system determines the attention level
of the driver depending on the setting
selected:
Selection Standard Standard : the sensitivity with
which the system determines the attention
level is set to normal.
Selection Sensitive Sensitive: the sensitivity is set
higher. The attention level detected by
ATTENTION ASSIST is adapted accordingly
and the driver is warned earlier.
When ATTENTION ASSIST is deactivated, the é symbol appears in the multifunction
display in the assistance graphic display.
When ATTENTION ASSIST has been deactiva-
ted, it is automatically reactivated after the
engine has been switched off. The sensitivity selected corresponds to the last selection
activated (standard/sensitive).
Warning in the multifunction display If fatigue or increasing lapses in concentra-
tion are detected, a warning appears in the
multifunction display: ATTENTION ASSIST ATTENTION ASSIST
Take a break!
Take a break!.
In addition to the message shown in the mul-
tifunction display, you will then hear a warn-
ing tone.
X If necessary, take a break.
X Confirm the message by pressing the a
button on the steering wheel.
On long journeys, take regular breaks in good time that allow for adequate recuperation. If
you do not take a break and ATTEN-
TION ASSIST still detects increasing lapses in
concentration, you will be warned again after
15 minutes at the earliest. This will only hap-
pen if ATTENTION ASSIST still detects typical indicators of fatigue or increasing lapses in
concentration.
If a warning is output in the multifunction dis-
play, a service station search is performed in Driving systems
273Driving and parking Z
Page 442 of 497
R
Make sure that the positive terminal of a
connected battery does not come into con-
tact with vehicle parts.
R Never place metal objects or tools on a bat-
tery.
R It is important that you observe the descri-
bed order of the battery terminals when
connecting and disconnecting a battery.
R When jump-starting, make sure that the
battery poles with identical polarity are
connected.
R It is particularly important to observe the
described order when connecting and dis-
connecting the jump leads.
R Never connect or disconnect the battery
terminals while the engine is running. G
WARNING
Battery acid is caustic. There is a risk of injury. Avoid contact with the skin, eyes or clothing.
Do not breathe in any battery gases. Do not
lean over the battery. Keep the batteries out
of the reach of children. Immediately rinse off
battery acid thoroughly with plenty of clean
water and seek medical attention at once.
All vehicles: H
Environmental note Batteries contain pollutants.
It is illegal to dispose of them with the household rubbish.
They must be collected sep-
arately and disposed of in anenvironmentally responsible
recycling system. Dispose of batteries in an
environmentally responsible
manner. Take discharged
batteries to a qualified spe-
cialist workshop or to a col-
lection point for used batter-
ies.
! Have the battery checked regularly at a
qualified specialist workshop. Observe the service intervals in the Service
Booklet or contact a qualified specialist
workshop for more information.
! Always have work on the batteries carried
out at a qualified specialist workshop.
Should it, in exceptional circumstances, be absolutely necessary to disconnect the 12-
volt battery yourself, please observe the
following:
R secure the vehicle to prevent it from roll-
ing away.
R switch off the engine and remove the
key. Make sure the ignition is switched
off. Check that all the indicator lamps in
the instrument cluster are off. Otherwise,
you may damage electronic components such as the alternator, for example.
R first, disconnect the negative terminal
clamp, followed by the positive terminal
clamp. Never swap the terminal clamps.
The vehicle electronics may otherwise be
damaged.
R the transmission is locked in position P
after disconnecting the battery. The vehi-
cle is secured against rolling away. You
can then no longer move the vehicle.
The batteries and the covers of the positive
terminal clamps must always be fitted
securely during operation.
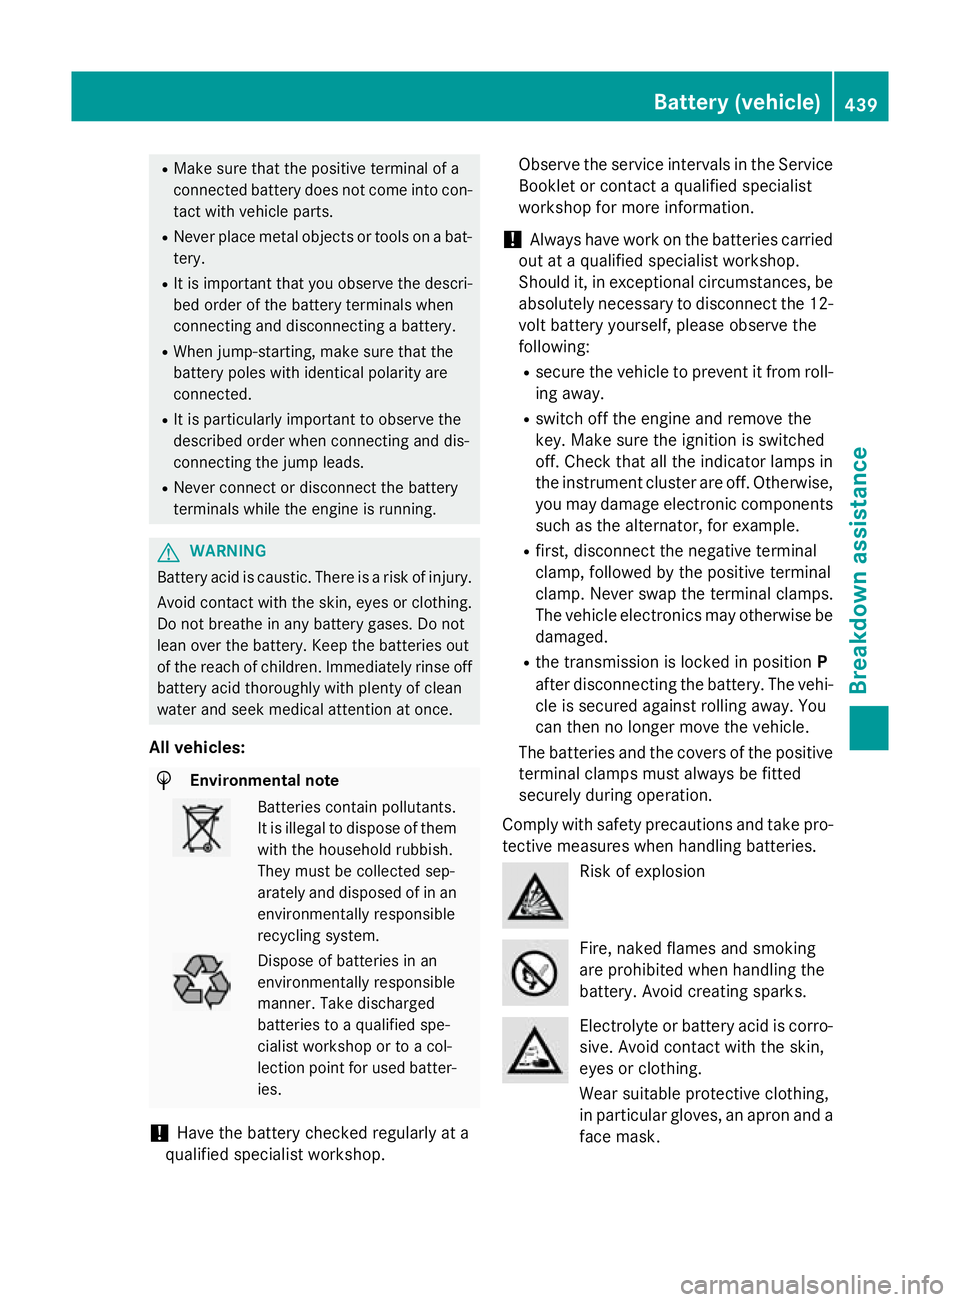
Comply with safety precautions and take pro-
tective measures when handling batteries. Risk of explosion
Fire, naked flames and smoking
are prohibited when handling the
battery. Avoid creating sparks.
Electrolyte or battery acid is corro-
sive. Avoid contact with the skin,
eyes or clothing.
Wear suitable protective clothing,
in particular gloves, an apron and a face mask. Battery (vehicle)
439Breakdown assistance Z
Page 444 of 497
Avoid contact with the skin, eyes or clothing.
Immediately rinse electrolyte splashes off
with water and seek medical attention
straight away.
! Exhaustive discharge caused by the vehi-
cle standing idle for lengthy periods can
damage the high-voltage battery. If the
vehicle is idle for lengthy periods leave the
high-voltage battery connected to a charg-
ing station.
Consult a Mercedes-Benz Service Centre if
you wish to leave your vehicle parked up for a
long period of time. Charging the 12 V battery
Vehicles with a lithium-ion battery:
! Only use battery chargers with a maxi-
mum charging voltage of 14.4 V.
All ot her vehicles G
WARNING
During charging and jump-starting, explosive
gases can escape from the battery. There is a risk of an explosion.
Particularly avoid fire, naked flames, creating
sparks and smoking. Ensure there is sufficient
ventilation while charging and jump-starting.
Do not lean over a battery. G
WARNING
Battery acid is caustic. There is a risk of injury. Avoid contact with the skin, eyes or clothing.
Do not breathe in any battery gases. Do not
lean over the battery. Keep the batteries out
of the reach of children. Immediately rinse off
battery acid thoroughly with plenty of clean
water and seek medical attention at once. G
WARNING
A discharged battery can freeze at tempera-
tures below freezing point. When jump-start-
ing the vehicle or charging the battery, gases can escape from the battery. There is a risk of
an explosion.
Allow the frozen battery to thaw out before
charging it or jump-starting.
! Only use battery chargers with a maxi-
mum charging voltage of 14.8 V.
All ve hicles:
! Only charge the battery using the jump-
start connection point.
The jump-starting connection point is in the
engine compartment (Y page 443).
X Open the bonnet.
X Connect the battery charger to the positive
terminal and earth point in the same order
as when connecting the donor battery in
the jump-starting procedure (Y page 443).
Keep away from fire and open flames. Do not lean over the battery. Never charge the bat-
tery if it is still fitted to the vehicle, unless you
use a battery charger which has been tested
and approved by Mercedes-Benz. A battery
charger unit specially adapted for Mercedes- Benz vehicles and tested and approved by
Mercedes-Benz is available as an accessory.
This device permits charging of the battery in
position. Contact a Mercedes-Benz Service
Centre for information and availability. Read
the battery charger's operating instructions
before charging the battery.
All vehicles except vehicles with a lith-
ium-ion battery: if the indicator/warning
lamps in the instrument cluster do not light up at low temperatures, it is very likely that the
discharged battery has frozen. In this case
you may neither jump-start the vehicle nor
charge the battery. The service life of a bat-
tery that has been thawed may be reduced.
The starting characteristics may be impaired,
especially at low temperatures. Have the
thawed battery checked at a qualified spe-
cialist workshop.
Vehicles with a lithium-ion battery: at low
temperatures, do not charge a battery which
has been removed using a battery charger. Battery (vehicle)
441Breakdown assistance Z