Side mirror MERCEDES-BENZ GLC SUV 2017 X253 User Guide
[x] Cancel search | Manufacturer: MERCEDES-BENZ, Model Year: 2017, Model line: GLC SUV, Model: MERCEDES-BENZ GLC SUV 2017 X253Pages: 374, PDF Size: 6.23 MB
Page 109 of 374
For this reason, always make sure of the
actual distance from the road users traveling
behind by glancing over your shoulder.
Adjusting the exterior mirrors
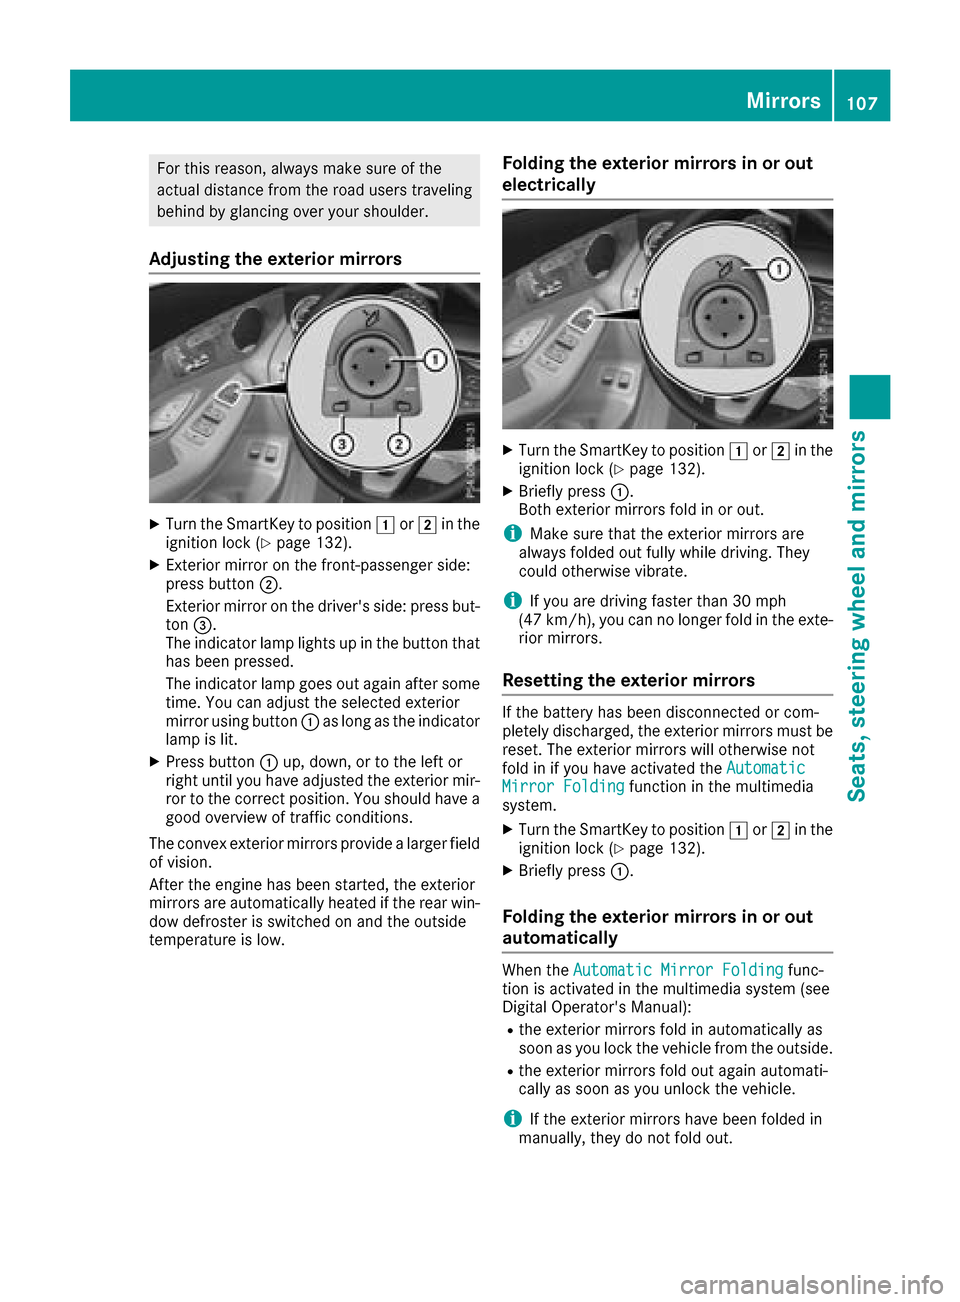
XTurn the SmartKey to position1or2 in the
ignition lock (Ypage 132).
XExterior mirror on the front-passenger side:
press button ;.
Exterior mirror on the driver's side: press but-
ton =.
The indicator lamp lights up in the button that
has been pressed.
The indicator lamp goes out again after some
time. You can adjust the selected exterior
mirror using button :as long as the indicator
lamp is lit.
XPress button :up, down, or to the left or
right until you have adjusted the exterior mir-
ror to the correct position. You should have a
good overview of traffic conditions.
The convex exterior mirrors provide a larger field of vision.
After the engine has been started, the exterior
mirrors are automatically heated if the rear win-
dow defroster is switched on and the outside
temperature is low.
Folding the exterior mirrors in or out
electrically
XTurn the SmartKey to position 1or2 in the
ignition lock (Ypage 132).
XBriefly press :.
Both exterior mirrors fold in or out.
iMake sure that the exterior mirrors are
always folded out fully while driving. They
could otherwise vibrate.
iIf you are driving faster than 30 mph
(47 km/h), you can no longer fold in the exte-
rior mirrors.
Resetting the exterior mirrors
If the battery has been disconnected or com-
pletely discharged, the exterior mirrors must be
reset. The exterior mirrors will otherwise not
fold in if you have activated the Automatic
Mirror Foldingfunction in the multimedia
system.
XTurn the SmartKey to position 1or2 in the
ignition lock (Ypage 132).
XBriefly press :.
Folding the exterior mirrors in or out
automatically
When theAutomatic Mirror Foldingfunc-
tion is activated in the multimedia system (see
Digital Operator's Manual):
Rthe exterior mirrors fold in automatically as
soon as you lock the vehicle from the outside.
Rthe exterior mirrors fold out again automati-
cally as soon as you unlock the vehicle.
iIf the exterior mirrors have been folded in
manually, they do not fold out.
Mirrors107
Seats, steering wheel and mirrors
Z
Page 110 of 374
Exterior mirror pushed out of position
If an exterior mirror has been pushed out of
position, proceed as follows:
XVehicles without electrically folding exte-
rior mirrors:manually move the exterior mir-
ror into the correct position.
XVehicles with electrically folding exterior
mirrors: press and hold button :until you
hear a click and then the mirror engaging in
position (
Ypage 107).
The mirror housing is engaged again and you
can adjust the exterior mirrors as usual
(
Ypage 107).
If an exterior mirror has been pushed out of
position, proceed as follows:
XPress and hold button :until you hear a click
and the mirror engages audibly into position
(
Ypage 107).
The mirror housing is engaged again and you
can adjust the exterior mirrors as usual
(
Ypage 107).
Automatic anti-glare mirrors
GWARNING
Electrolyte may escape if the glass in an auto-
matic anti-glare mirror breaks. The electrolyte
is harmful and causes irritation. It must not
come into contact with your skin, eyes, res-
piratory organs or clothing or be swallowed.
There is a risk of injury.
If you come into contact with the electrolyte,
observe the following:
RRinse off the electrolyte from your skin
immediately with water.
RImmediately rinse the electrolyte out of
your eyes thoroughly with clean water.
RIf the electrolyte is swallowed, immediately
rinse your mouth out thoroughly. Do not
induce vomiting.
RIf electrolyte comes into contact with your
skin or hair or is swallowed, seek medical
attention immediately.
RImmediately change out of clothing which
has come into contact with electrolyte.
RIf an allergic reaction occurs, seek medical
attention immediately.
The exterior mirror on the driver's side and the
rear-view mirror automatically go into anti-glare mode if:
Rthe ignition is switched on
Rincident light from headlamps strikes the sen-
sor in the rear-view mirror
The mirrors do not go into anti-glare mode if
reverse gear is engaged or if the interior lighting
is switched on.
Parking position for the exterior mir-
ror on the front-passenger side
Storing the parking position
You can set the front-passenger side exterior
mirror such that you can see the rear wheel on
that side as soon as you engage reverse gear.
You can store this position.
Storing using reverse gear
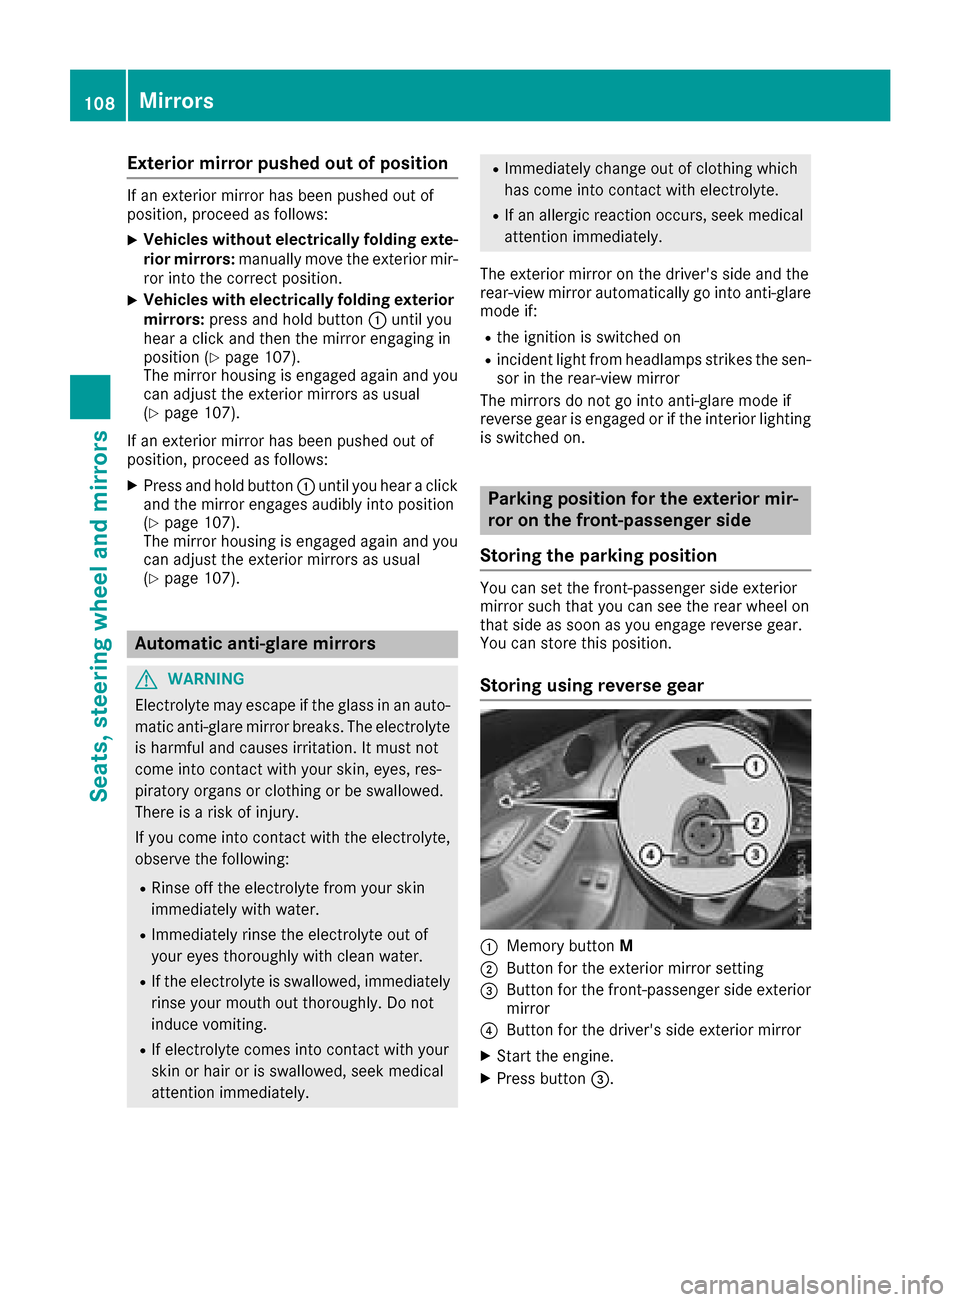
:Memory button M
;Button for the exterior mirror setting
=Button for the front-passenger side exterior
mirror
?Button for the driver's side exterior mirror
XStart the engine.
XPress button=.
108Mirrors
Seats, steering wheel and mirrors
Page 111 of 374
XEngage reverse gear.
The exterior mirror on the front-passenger
side moves to the preset parking position.
XUse button;to adjust the exterior mirror to
a position that allows you to see the rear
wheel and the curb.
The parking position is stored.
iIf you shift the transmission to another posi-
tion, the exterior mirror on the front-
passenger side returns to the driving position.
Saving using the memory button
You can store the parking position of the exte-
rior mirror on the front-passenger side using
memory button M:. The reverse gear must not
be engaged.
XTurn the SmartKey to position 2in the igni-
tion lock (Ypage 132).
XPress button =.
XUse button;to adjust the exterior mirror to
a position that allows you to see the rear
wheel and the curb.
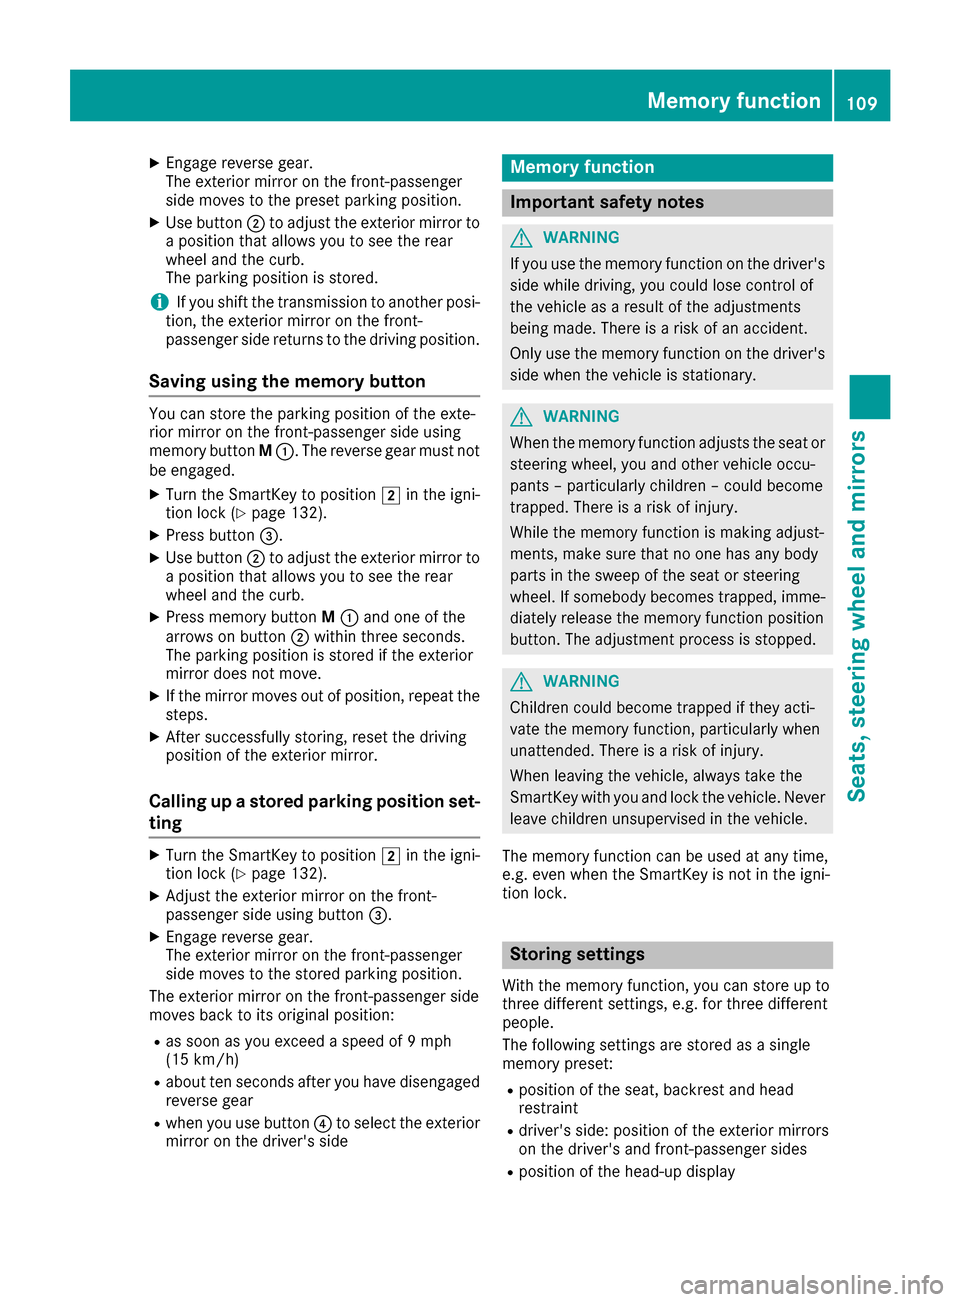
XPress memory button M: and one of the
arrows on button ;within three seconds.
The parking position is stored if the exterior
mirror does not move.
XIf the mirror moves out of position, repeat the
steps.
XAfter successfully storing, reset the driving
position of the exterior mirror.
Calling up a stored parking position set-
ting
XTurn the SmartKey to position 2in the igni-
tion lock (Ypage 132).
XAdjust the exterior mirror on the front-
passenger side using button =.
XEngage reverse gear.
The exterior mirror on the front-passenger
side moves to the stored parking position.
The exterior mirror on the front-passenger side
moves back to its original position:
Ras soon as you exceed a speed of 9 mph
(15 km/h)
Rabout ten seconds after you have disengaged
reverse gear
Rwhen you use button ?to select the exterior
mirror on the driver's side
Memory function
Important safety notes
GWARNING
If you use the memory function on the driver's side while driving, you could lose control of
the vehicle as a result of the adjustments
being made. There is a risk of an accident.
Only use the memory function on the driver's
side when the vehicle is stationary.
GWARNING
When the memory function adjusts the seat or steering wheel, you and other vehicle occu-
pants – particularly children – could become
trapped. There is a risk of injury.
While the memory function is making adjust-
ments, make sure that no one has any body
parts in the sweep of the seat or steering
wheel. If somebody becomes trapped, imme-
diately release the memory function position
button. The adjustment process is stopped.
GWARNING
Children could become trapped if they acti-
vate the memory function, particularly when
unattended. There is a risk of injury.
When leaving the vehicle, always take the
SmartKey with you and lock the vehicle. Never
leave children unsupervised in the vehicle.
The memory function can be used at any time,
e.g. even when the SmartKey is not in the igni-
tion lock.
Storing settings
With the memory function, you can store up to
three different settings, e.g. for three different
people.
The following settings are stored as a single
memory preset:
Rposition of the seat, backrest and head
restraint
Rdriver's side: position of the exterior mirrors
on the driver's and front-passenger sides
Rposition of the head-up display
Memory function109
Seats, steering wheel and mirrors
Z
Page 112 of 374
XAdjust the seat accordingly (Ypage 100).
XOn the driver's side, adjust the steering wheel
(Ypage 105) and the exterior mirrors
(Ypage 107).
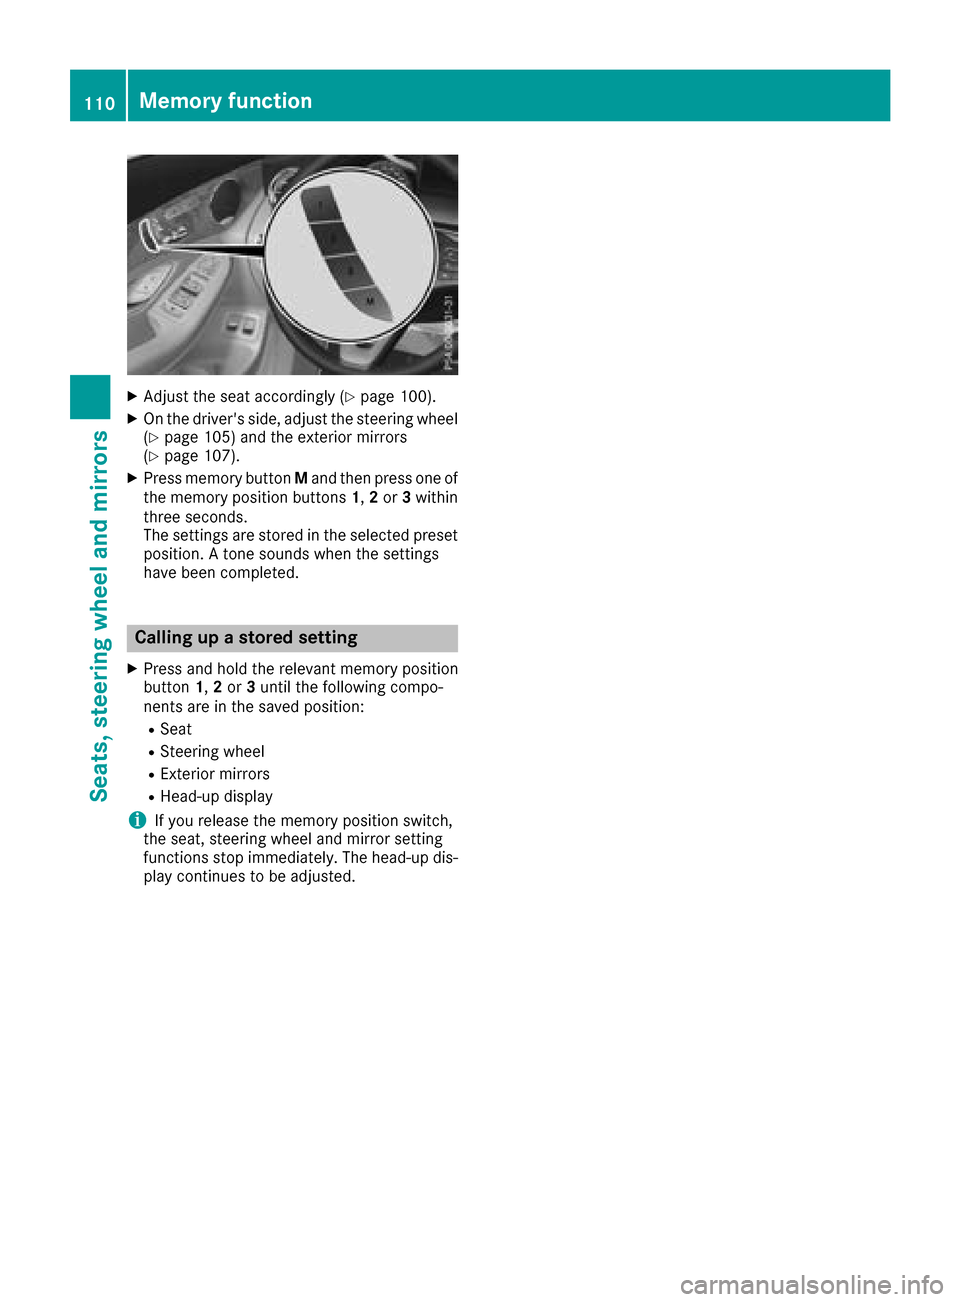
XPress memory button Mand then press one of
the memory position buttons 1,2 or 3within
three seconds.
The settings are stored in the selected preset
position. A tone sounds when the settings
have been completed.
Calling up a stored setting
XPress and hold the relevant memory position
button 1,2 or 3until the following compo-
nents are in the saved position:
RSeat
RSteering wheel
RExterior mirrors
RHead-up display
iIf you release the memory position switch,
the seat, steering wheel and mirror setting
functions stop immediately. The head-up dis-
play continues to be adjusted.
110Memory function
Seats, steering wheel and mirrors
Page 189 of 374
360° camera
General notes
The 360° camera is a system consisting of four
cameras.
The system processes images from the follow-
ing cameras:
RRear view camera
RFront camera
RTwo side cameras in the exterior mirrors
The cameras cover the immediate surroundings
of the vehicle. The system supports you, for
example when parking or if vision is restricted at
an exit.
You can show images from the 360° camera in
full-screen mode or in seven different split-
screen views on the multimedia system. A split- screen view also includes a top view of the vehi-
cle. This view is calculated from the data sup-
plied by the installed cameras (virtual camera).
The seven split-screen views are:
RTop view and picture from the rear view cam-
era (130° viewing angle)
RTop view and image from the front camera
(130° viewing angle without displaying the
maximum steering wheel angle)
RTop view and enlarged rear view
RTop view and enlarged front view
RTop view and trailer view (vehicles with trailer
tow hitch)
RTop view and images from the rear-facing side
cameras (rear wheel view)
RTop view and images from the forward-facing
side cameras (front wheel view)
When the function is active and you shift the
transmission from hork toi, the guide
lines are hidden in the multimedia system.
When you change between transmission posi-
tions hand k, you see the previously selec-
ted front or rear view.
Distances measured by PARKTRONIC will also
be optically displayed:
Rin split screen view as red or yellow brackets
around the vehicle icon in the top view, or
Rat the bottom right as red or yellow brackets
around the vehicle symbol in full-screen mode
The line thickness and color of the brackets
show how far the vehicle is from an object.
Ryellow brackets with thin lines: PARKTRONIC
is active
Ryellow brackets with normal lines: an object is present in close range of the vehicle
Rred line: an object is present in the immediate
close range of the vehicle
Important safety notes
The 360°camera is only an aid and may show a
distorted view of obstacles, show them incor-
rectly or not at all. The 360°camera is not a
substitute for attentive driving.
You are always responsible for safe maneuver-
ing and parking. Make sure that there are no
persons, animals or objects in the maneuvering
area while maneuvering and parking in parking
spaces.
You are always responsible for safety, and must
always pay attention to your surroundings when
parking and maneuvering. This applies to the
areas behind, in front of and beside the vehicle. You could otherwise endanger yourself and oth-
ers.
The 360° camera will not function or will func-
tion in a limited manner:
Rif the doors are open
Rif the exterior mirrors are folded in
Rif the tailgate is open
Rin heavy rain, snow or fog
Rat night or in very dark places
Rif the cameras are exposed to very bright light
Rif the area is lit by fluorescent bulbs or LED
lighting (the display may flicker)
Rif the camera lenses fog up, e.g. when driving
into a heated garage in winter, causing a rapid
change in temperature
Rif the camera lenses are dirty or covered
Rif the vehicle components in which the cam-
eras are installed are damaged. In this case,
have the camera position and setting checked
at a qualified specialist workshop
Do not use the 360° camera in this case. You
can otherwise injure others or cause damage to
objects or the vehicle.
The guide lines in the multimedia system display
show the distances to your vehicle. The distan-
ces only apply to road level.
In trailer mode, the guide lines are shown at the
level of the trailer tow hitch.
Driving systems187
Driving and parking
Z
Page 192 of 374
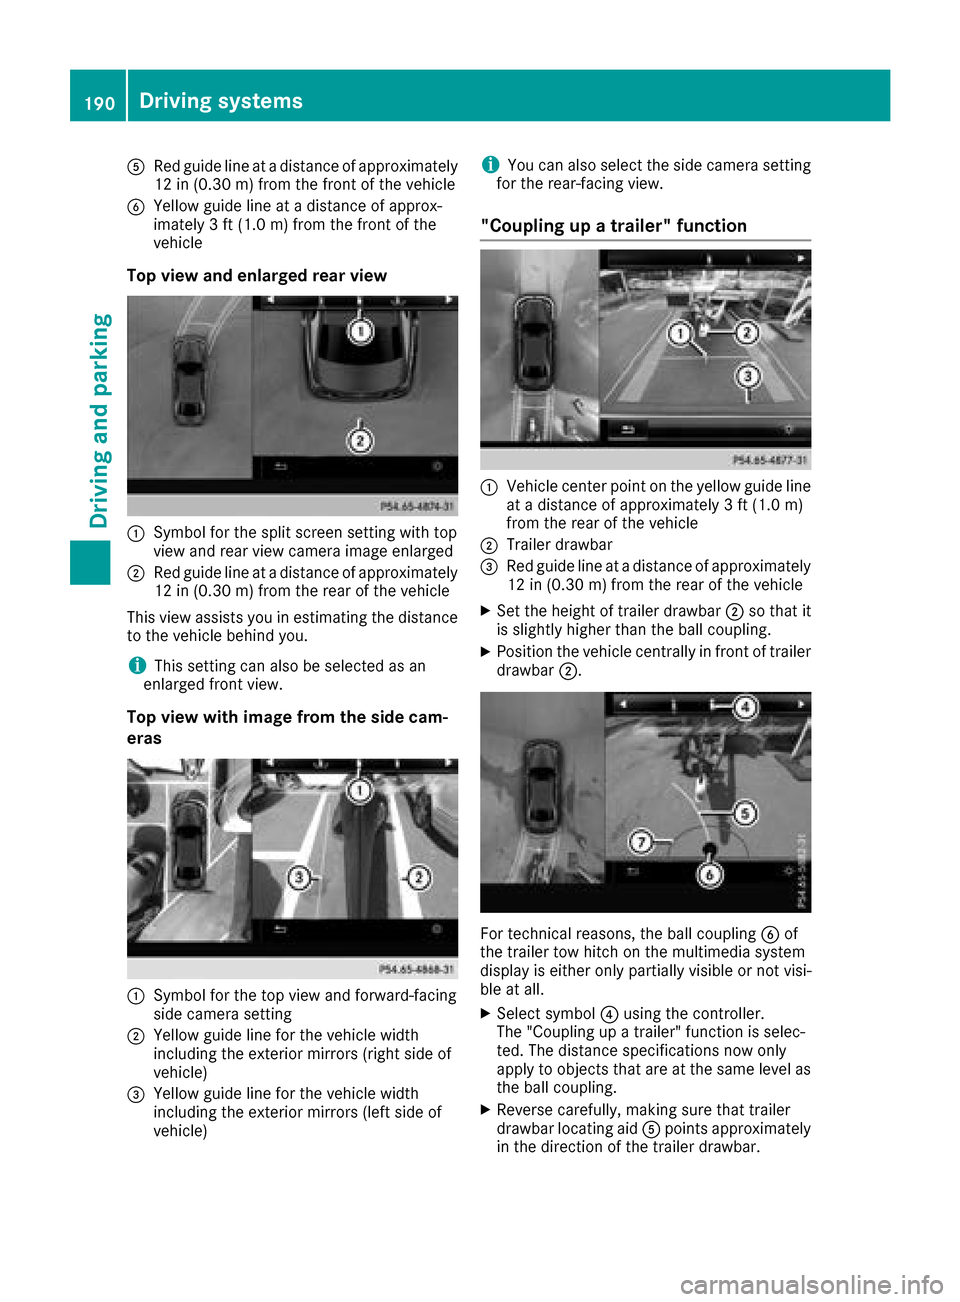
ARed guide lineat adistanc eof approximately
12 in (0.30m) from the front of the vehicle
BYellow guide line at a distance of approx-
imately 3 ft (1.0 m) fromthe front of the
vehicle
Top view and enlarged rear view
:Symbol for the split screen setting with top
view and rear view camera image enlarged
;Red guide line at a distance of approximately
12 in (0.30 m)from the rear of the vehicle
This view assists you in estimating the distance
to the vehicle behind you.
iThis setting can also be selected as an
enlarged front view.
Top view with image from the side cam-
eras
:Symbol for the top view and forward-facing
side camera setting
;Yellow guide line for the vehicle width
including the exterior mirrors (right side of
vehicle)
=Yellow guide line for the vehicle width
including the exterior mirrors (left side of
vehicle)
iYou can also select the side camera setting
for the rear-facing view.
"Coupling up a trailer" function
:Vehicle center point on the yellow guide line
at a distance of approximately 3 ft (1.0 m)
from the rear of the vehicle
;Trailer drawbar
=Red guide line at a distance of approximately
12 in (0.30 m) from the rear of the vehicle
XSet the height of trailer drawbar ;so that it
is slightly higher than the ball coupling.
XPosition the vehicle centrally in front of trailer
drawbar ;.
For technical reasons, the ball coupling Bof
the trailer tow hitch on the multimedia system
display is either only partially visible or not visi-
ble at all.
XSelect symbol ?using the controller.
The "Coupling up a trailer" function is selec-
ted. The distance specifications now only
apply to objects that are at the same level as
the ball coupling.
XReverse carefully, making sure that trailer
drawbar locating aid Apoints approximately
in the direction of the trailer drawbar.
190Driving systems
Driving and parking
Page 195 of 374
The sign indicating the end of a restriction only
appears with the restriction in the instrument
cluster when:
RThe regulation must be observed with the
restriction, or
RTraffic Sign Assist is unable to determine
whether the restriction applies
If Traffic Sign Assist is unable to determine a
maximum permitted speed from any of the avail-
able sources, no speed limit appears in the
instrument cluster either.
Traffic Sign Assist is not available in all coun-
tries. In this case, display :appears in the
assistance graphic (
Ypage 219).
Important safety notes
Traffic Sign Assist is only an aid and is not always
able to correctly display speed limits. Traffic
signs always have priority over the Traffic Sign
Assist display.
The system may be either functionally impaired
or temporarily unavailable if the information in
the digital street map of the navigation system is
incorrect or out of date.
Instrument cluster display
Displaying the assistance graphic
XCall up the assistance graphic display func-
tion using the on-board computer
(
Ypage 219).
Detected traffic signs appear in the instru-
ment cluster.
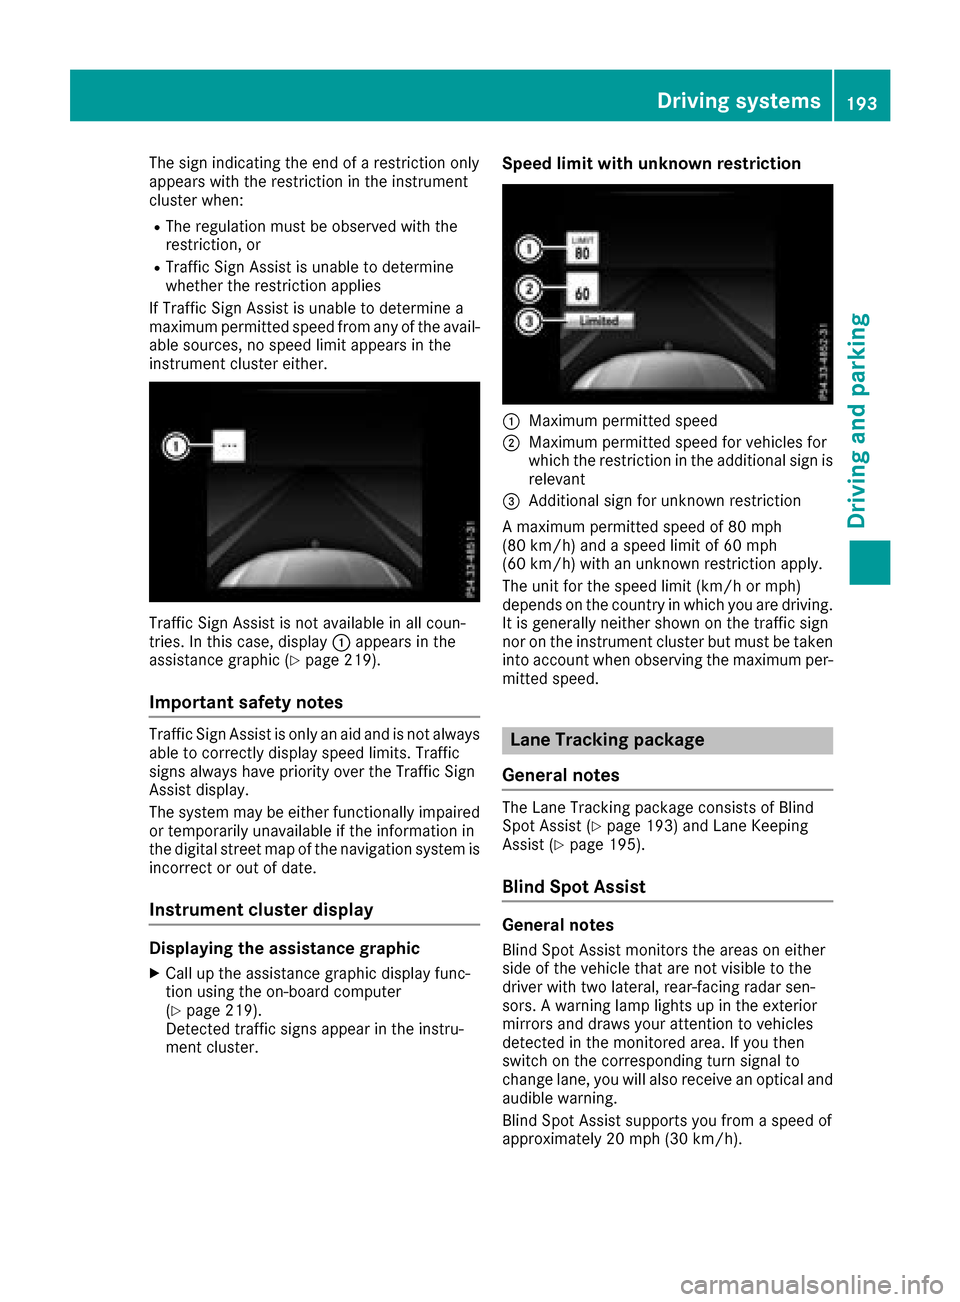
Speed limit with unknown restriction
:Maximum permitted speed
;Maximum permitted speed for vehicles for
which the restriction in the additional sign is relevant
=Additional sign for unknown restriction
A maximum permitted speed of 80 mph
(80 km/h) and a speed limit of 60 mph
(60 km/h) with an unknown restriction apply.
The unit for the speed limit (km/h or mph)
depends on the country in which you are driving. It is generally neither shown on the traffic sign
nor on the instrument cluster but must be taken
into account when observing the maximum per-
mitted speed.
Lane Tracking package
General notes
The Lane Tracking package consists of Blind
Spot Assist (Ypage 193) and Lane Keeping
Assist (Ypage 195).
Blind Spot Assist
General notes
Blind Spot Assist monitors the areas on either
side of the vehicle that are not visible to the
driver with two lateral, rear-facing radar sen-
sors. A warning lamp lights up in the exterior
mirrors and draws your attention to vehicles
detected in the monitored area. If you then
switch on the corresponding turn signal to
change lane, you will also receive an optical and
audible warning.
Blind Spot Assist supports you from a speed of
approximately 20 mph (30 km/h).
Driving systems193
Driving and parking
Z
Page 197 of 374
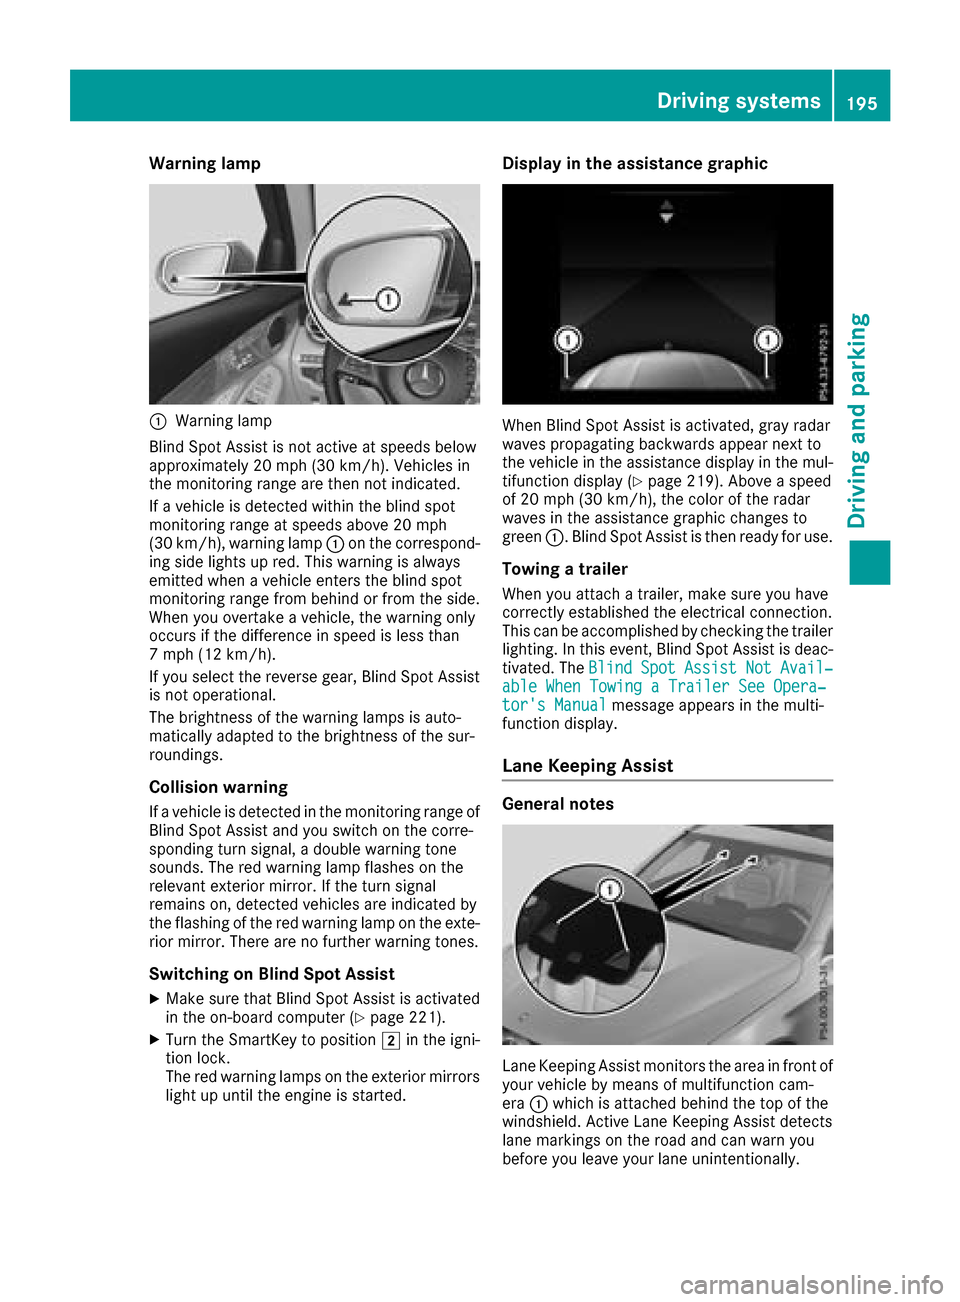
Warning lamp
:Warning lamp
Blind Spot Assist is not active at speeds below
approximately 20 mph (30 km/h). Vehicles in
the monitoring range are then not indicated.
If a vehicle is detected within the blind spot
monitoring range at speeds above 20 mph
(30 km/h), warning lamp :on the correspond-
ing side lights up red. This warning is always
emitted when a vehicle enters the blind spot
monitoring range from behind or from the side.
When you overtake a vehicle, the warning only
occurs if the difference in speed is less than
7 mph (12 km/h).
If you select the reverse gear, Blind Spot Assist is not operational.
The brightness of the warning lamps is auto-
matically adapted to the brightness of the sur-
roundings.
Collision warning
If a vehicle is detected in the monitoring range of
Blind Spot Assist and you switch on the corre-
sponding turn signal, a double warning tone
sounds. The red warning lamp flashes on the
relevant exterior mirror. If the turn signal
remains on, detected vehicles are indicated by
the flashing of the red warning lamp on the exte-
rior mirror. There are no further warning tones.
Switching on Blind Spot Assist
XMake sure that Blind Spot Assist is activated
in the on-board computer (Ypage 221).
XTurn the SmartKey to position 2in the igni-
tion lock.
The red warning lamps on the exterior mirrors
light up until the engine is started.
Display in the assistance graphic
When Blind Spot Assist is activated, gray radar
waves propagating backwards appear next to
the vehicle in the assistance display in the mul-
tifunction display (
Ypage 219). Above a speed
of 20 mph (30 km/h), the color of the radar
waves in the assistance graphic changes to
green :. Blind Spot Assist is then ready for use.
Towing a trailer
When you attach a trailer, make sure you have
correctly established the electrical connection.
This can be accomplished by checking the trailer
lighting. In this event, Blind Spot Assist is deac-
tivated. The Blind
SpotAssistNotAvail‐able When Towing a Trailer See Opera‐tor's Manualmessage appears in the multi-
function display.
Lane Keeping Assist
General notes
Lane Keeping Assist monitors the area in front of
your vehicle by means of multifunction cam-
era :which is attached behind the top of the
windshield. Active Lane Keeping Assist detects
lane markings on the road and can warn you
before you leave your lane unintentionally.
Driving systems195
Driving and parking
Z
Page 199 of 374
WhenStandardis selected, no warning vibra-
tion occurs if:
Ryou switch on the turn signals. In this event,
the warnings are suppressed for a certain
period of time.
Ra driving safety system intervenes, e.g. ABS,
BAS or ESP®.
Adaptive
When Adaptive
is selected, no warning vibra-
tion occurs if:
Ryou switch on the turn signals. In this event,
the warnings are suppressed for a certain
period of time.
Ra driving safety system intervenes, e.g. ABS,
BAS or ESP®.
Ryou accelerate hard, e.g. kickdown.
Ryou brake hard.
Ryou steer actively, e.g. swerve to avoid an
obstacle or change lanes quickly.
Ryou cut the corner on a sharp bend.
In order that you are warned only when neces-
sary and in good time if you cross the lane mark-
ing, the system recognizes certain conditions
and warns you accordingly.
The warning vibration occurs earlier if:
Ryou approach the outer lane marking on a
bend.
Rthe road has very wide lanes, e.g. a highway.
Rthe system detects solid lane markings.
The warning vibration occurs later if:
Rthe road has narrow lanes.
Ryou cut the corner on a bend.
Driving Assistance PLUS package
General notes
The Driving Assistance PLUS package consists
of DISTRONIC PLUS (Ypage 164), Active Blind
Spot Assist (Ypage 197) and Active Lane Keep-
ing Assist (Ypage 200).
Active Blind Spot Assist
General notes
Active Blind Spot Assist uses a radar sensor
system, pointed toward the rear of the vehicle,
to monitor the area to the sides of the vehicle
which the driver is unable to see. A warning lamp lights up in the exterior mirrors and draws your
attention to vehicles detected in the monitored
area. If you then switch on the corresponding
turn signal to change lane, you will also receive
an optical and audible warning. If a risk of lateral
collision is detected, corrective braking may
help you avoid a collision. Before a course-cor-
recting brake application, Active Blind Spot
Assist evaluates the space in the direction of
travel and at the sides of the vehicle. For this,
Active Blind Spot Assist uses the forward-facing
radar sensors.
Active Blind Spot Assist supports you from a
speed of approximately 20 mph (30 km/h).
Important safety notes
Active Blind Spot Assist is only an aid and is not
a substitute for attentive driving.
GWARNING
Active Blind Spot Assist does not react to:
Rvehicles overtaken too closely on the side,
placing them in the blind spot area
Rvehicles which approach with a large speed
differential and overtake your vehicle
As a result, Active Blind Spot Assist may nei-
ther give warnings nor intervene in such sit-
uations. There is a risk of an accident.
Always observe the traffic conditions care-
fully, and maintain a safe lateral distance.
iUSA only: This device has been approved by
the FCC as a "Vehicular Radar System". The
radar sensor is intended for use in an auto-
motive radar system only. Removal, tamper-
ing, or altering of the device will void any war-
ranties, and is not permitted by the FCC. Do
not tamper with, alter, or use in any non-
approved way.
Any unauthorized modification to this device
could void the user's authority to operate the
equipment.
iCanada only: This device complies with
RSS-210 of Industry Canada. Operation is
subject to the following two conditions:
1. This device may not cause interference,
and
2. This device must accept any interference
received, including interference that may
cause undesired operation of the device.
Driving systems197
Driving and parking
Z
Page 201 of 374
If you select the reverse gear, Active Blind Spot
Assist is not operational.
The brightness of the warning lamps is auto-
matically adapted to the brightness of the sur-
roundings.
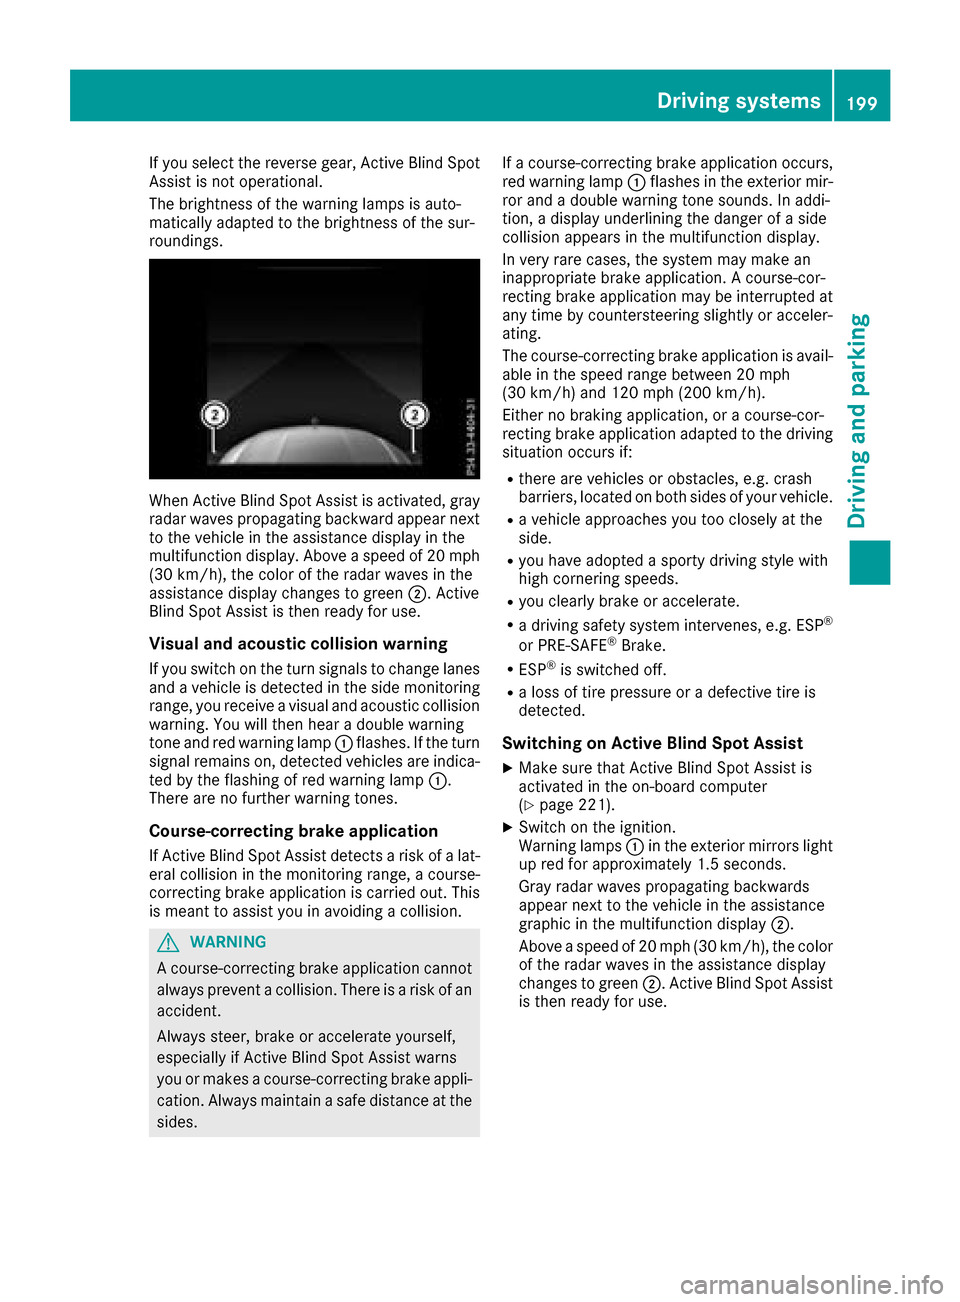
When Active Blind Spot Assist is activated, gray
radar waves propagating backward appear next
to the vehicle in the assistance display in the
multifunction display. Above a speed of 20 mph
(30 km/h), the color of the radar waves in the
assistance display changes to green;. Active
Blind Spot Assist is then ready for use.
Visual and acoustic collision warning
If you switch on the turn signals to change lanes
and a vehicle is detected in the side monitoring
range, you receive a visual and acoustic collision
warning. You will then hear a double warning
tone and red warning lamp :flashes. If the turn
signal remains on, detected vehicles are indica-
ted by the flashing of red warning lamp :.
There are no further warning tones.
Course-correcting brake application
If Active Blind Spot Assist detects a risk of a lat-
eral collision in the monitoring range, a course-
correcting brake application is carried out. This
is meant to assist you in avoiding a collision.
GWARNING
A course-correcting brake application cannot always prevent a collision. There is a risk of an
accident.
Always steer, brake or accelerate yourself,
especially if Active Blind Spot Assist warns
you or makes a course-correcting brake appli-
cation. Always maintain a safe distance at the
sides. If a course-correcting brake application occurs,
red warning lamp
:flashes in the exterior mir-
ror and a double warning tone sounds. In addi-
tion, a display underlining the danger of a side
collision appears in the multifunction display.
In very rare cases, the system may make an
inappropriate brake application. A course-cor-
recting brake application may be interrupted at
any time by countersteering slightly or acceler-
ating.
The course-correcting brake application is avail-
able in the speed range between 20 mph
(30 km/h) and 120 mph (200 km/h).
Either no braking application, or a course-cor-
recting brake application adapted to the driving situation occurs if:
Rthere are vehicles or obstacles, e.g. crash
barriers, located on both sides of your vehicle.
Ra vehicle approaches you too closely at the
side.
Ryou have adopted a sporty driving style with
high cornering speeds.
Ryou clearly brake or accelerate.
Ra driving safety system intervenes, e.g. ESP®
or PRE-SAFE®Brake.
RESP®is switched off.
Ra loss of tire pressure or a defective tire is
detected.
Switching on Active Blind Spot Assist
XMake sure that Active Blind Spot Assist is
activated in the on-board computer
(
Ypage 221).
XSwitch on the ignition.
Warning lamps :in the exterior mirrors light
up red for approximately 1.5 seconds.
Gray radar waves propagating backwards
appear next to the vehicle in the assistance
graphic in the multifunction display ;.
Above a speed of 20 mph (30 km/h), the color
of the radar waves in the assistance display
changes to green ;. Active Blind Spot Assist
is then ready for use.
Driving systems199
Driving and parking
Z