stop start MERCEDES-BENZ GLC SUV 2017 X253 Owner's Guide
[x] Cancel search | Manufacturer: MERCEDES-BENZ, Model Year: 2017, Model line: GLC SUV, Model: MERCEDES-BENZ GLC SUV 2017 X253Pages: 374, PDF Size: 6.23 MB
Page 93 of 374
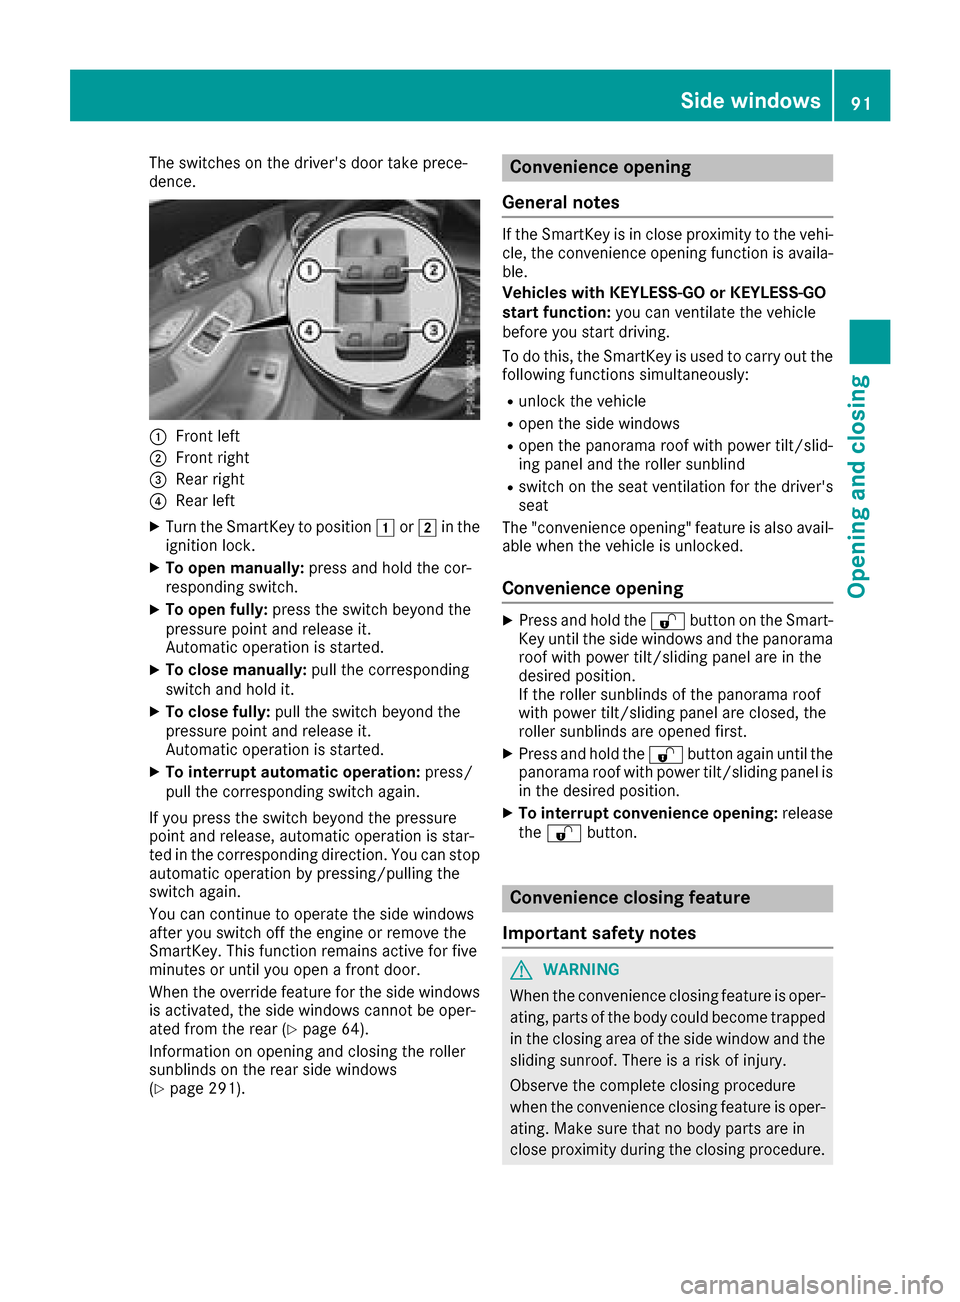
The switches on the driver's door take prece-
dence.
:Front left
;Front right
=Rear right
?Rear left
XTurn the SmartKey to position1or2 in the
ignition lock.
XTo open manually: press and hold the cor-
responding switch.
XTo open fully: press the switch beyond the
pressure point and release it.
Automatic operation is started.
XTo close manually: pull the corresponding
switch and hold it.
XTo close fully: pull the switch beyond the
pressure point and release it.
Automatic operation is started.
XTo interrupt automatic operation: press/
pull the corresponding switch again.
If you press the switch beyond the pressure
point and release, automatic operation is star-
ted in the corresponding direction. You can stop
automatic operation by pressing/pulling the
switch again.
You can continue to operate the side windows
after you switch off the engine or remove the
SmartKey. This function remains active for five
minutes or until you open a front door.
When the override feature for the side windows
is activated, the side windows cannot be oper-
ated from the rear (
Ypage 64).
Information on opening and closing the roller
sunblinds on the rear side windows
(
Ypage 291).
Convenience opening
General notes
If the SmartKey is in close proximity to the vehi-
cle, the convenience opening function is availa-
ble.
Vehicles with KEYLESS-GO or KEYLESS-GO
start function: you can ventilate the vehicle
before you start driving.
To do this, the SmartKey is used to carry out the
following functions simultaneously:
Runlock the vehicle
Ropen the side windows
Ropen the panorama roof with power tilt/slid-
ing panel and the roller sunblind
Rswitch on the seat ventilation for the driver's
seat
The "convenience opening" feature is also avail-
able when the vehicle is unlocked.
Convenience opening
XPress and hold the %button on the Smart-
Key until the side windows and the panorama
roof with power tilt/sliding panel are in the
desired position.
If the roller sunblinds of the panorama roof
with power tilt/sliding panel are closed, the
roller sunblinds are opened first.
XPress and hold the %button again until the
panorama roof with power tilt/sliding panel is
in the desired position.
XTo interrupt convenience opening: release
the % button.
Convenience closing feature
Important safety notes
GWARNING
When the convenience closing feature is oper- ating, parts of the body could become trapped
in the closing area of the side window and the
sliding sunroof. There is a risk of injury.
Observe the complete closing procedure
when the convenience closing feature is oper-
ating. Make sure that no body parts are in
close proximity during the closing procedure.
Side windows91
Opening and closing
Z
Page 96 of 374
GWARNING
At high speeds the raised sliding sunroof auto-
matically lowers slightly at the rear. This could
trap you or other persons. There is a risk of
injury. Make sure that nobody reaches into
the sweep of the sliding sunroof whilst the
vehicle is in motion.
If somebody becomes trapped, immediately
pull back the sliding sunroof switch. The slid-
ing sunroof lifts during opening.
!Only open the sliding sunroof if it is free of
snow and ice. Otherwise, malfunctions may
occur.
Do not allow anything to protrude from the
sliding sunroof. Otherwise, the seals could be
damaged.
!The weather can change abruptly. It could
start to rain or snow. Make sure that the slid- ing sunroof is closed when you leave the vehi-
cle. The vehicle electronics can be damaged if
water enters the vehicle interior.
Resonance noises can occur in addition to the
usual airflow noises when the sliding sunroof is
open. They are caused by minor pressure fluc-
tuations in the vehicle interior. Change the posi-
tion of the sliding sunroof or open a side window
slightly to reduce or eliminate these noises.
Sliding sunroof reversing feature
In the following section, the term "sliding sun-
roof" refers to the panorama roof with power
tilt/sliding panel.
The sliding sunroof is equipped with an auto-
matic reversing feature. If a solid object blocks
or restricts the sliding sunroof during the closing
process, the sliding sunroof opens again auto-
matically. The automatic reversing feature is
only an aid and is no substitute for your attention
when closing the sliding roof.
GWARNING
The reversing feature does not react:
Rto soft, light and thin objects, e.g. small fin-
gers
Rover the last 1/6 in (4 mm) of the closing
movement
Rduring resetting
Rwhen closing the sliding sunroof again man-
ually immediately after automatic reversing
This means that the reversing feature cannot
prevent someone being trapped in these sit-
uations. There is a risk of injury.
Make sure that no body parts are in close
proximity during the closing procedure.
If somebody becomes trapped:
Rrelease the switch immediately, or
Rpress the switch in any direction during the
automatic closing process
The closing process is stopped.
Operating the panorama roof with
power tilt/sliding panel
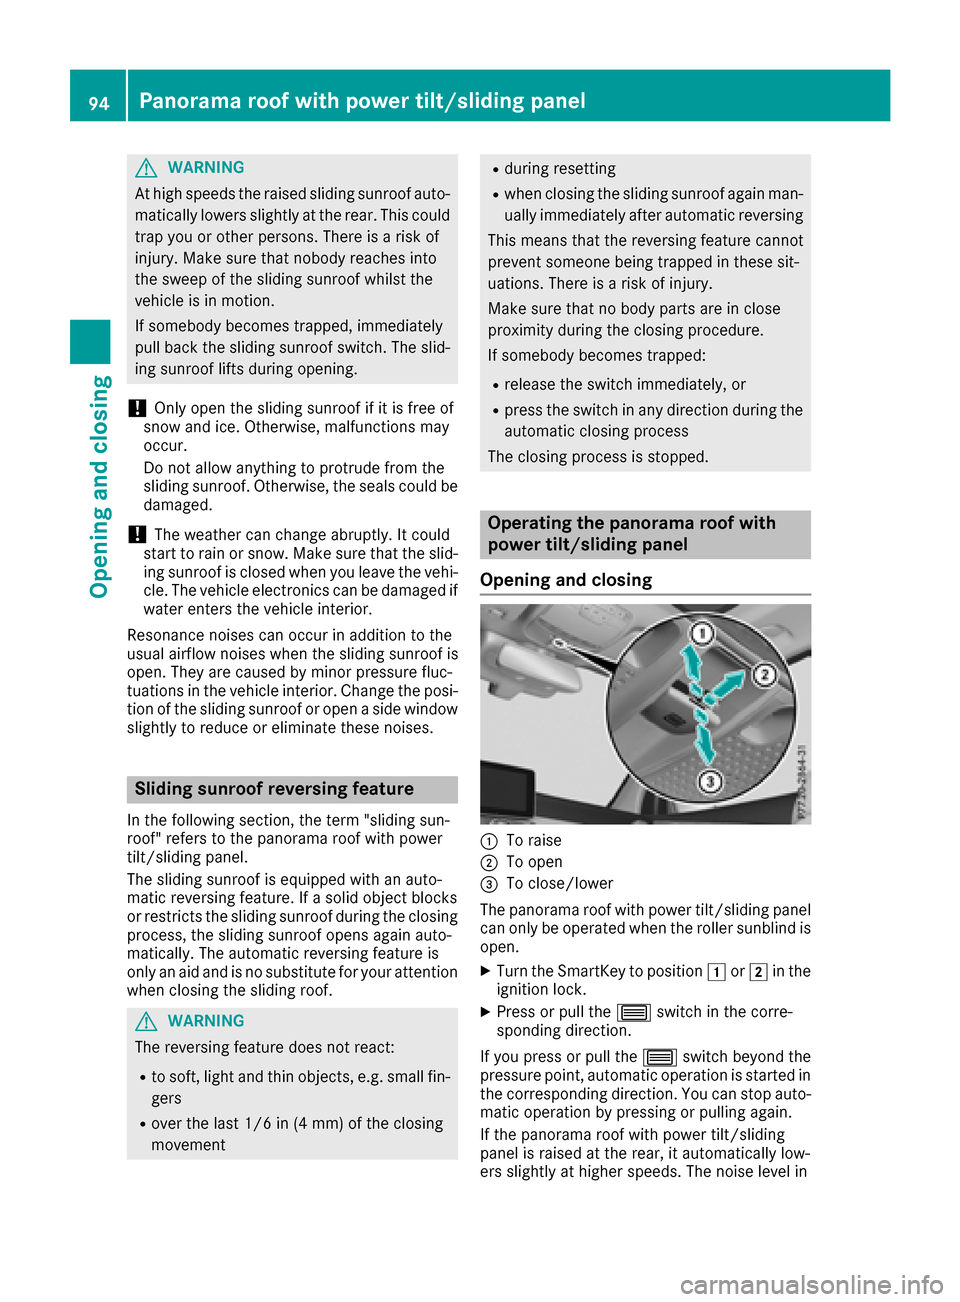
Opening and closing
:To raise
;To open
=To close/lower
The panorama roof with power tilt/sliding panel
can only be operated when the roller sunblind is
open.
XTurn the SmartKey to position 1or2 in the
ignition lock.
XPress or pull the 3switch in the corre-
sponding direction.
If you press or pull the 3switch beyond the
pressure point, automatic operation is started in the corresponding direction. You can stop auto-
matic operation by pressing or pulling again.
If the panorama roof with power tilt/sliding
panel is raised at the rear, it automatically low-
ers slightly at higher speeds. The noise level in
94Panorama roof with power tilt/sliding panel
Opening and closing
Page 97 of 374
the vehicle interior is reduced as a result. At low
speeds it raises again automatically.
You can also temporarily deactivate automatic
lowering. To do so, press the3switch. The
panorama roof with power tilt/sliding panel rai-
ses again automatically.
You can continue to operate the panorama roof
with power tilt/sliding panel after you switch off
the engine or remove the SmartKey. This func-
tion remains active for five minutes or until you
open a front door.
When a roof carrier is mounted the panorama
roof with power tilt/sliding panel cannot be
opened. The panorama roof with power tilt/slid-
ing panel can still be raised to allow ventilation
of the vehicle interior. If the panorama roof with
power tilt/sliding panel makes contact with a
roof carrier approved by Mercedes-Benz, the
sunroof will lower slightly but remain raised at
the rear.
Rain-closing feature
The raised panorama roof with power tilt/sliding panel automatically lowers when driving if it
starts to rain. The sliding sunroof is lowered
depending on:
Rthe road speed
Rthe intensity of the rain
You can manually cancel the automatic closing
procedure. Press or pull the 3switch in any
direction.
To raise the panorama roof with power tilt/slid- ing panel again, press the 3switch in direc-
tion :.
The rain-closing feature is then deactivated until
you:
Rpress or pull the 3switch in any direction
or
Rturn the SmartKey to another position in the
ignition lock (Ypage 132)
Operating the roller sunblinds for the
panorama roof with power tilt/sliding
panel
Important safety notes
GWARNING
Parts of the body could become trapped
between the roller sunblind and frame or slid-
ing sunroof during automatic opening or clos-
ing. There is a risk of injury.
When opening or closing, make sure that no
body parts are in the sweep of the roller sun-
blind.
If somebody becomes trapped:
Rrelease the switch immediately, or
Rduring automatic operation, push the
switch briefly in any direction
The opening or closing procedure will be stop- ped.
The roller sunblinds shield the vehicle interior
from sunlight. The roller sunblinds can only be
opened and closed when the panorama roof
with power tilt/sliding panel is closed.
Roller sunblind reversing feature
The roller sunblinds are equipped with an auto-
matic reversing feature. If a solid object blocks
or restricts a roller sunblind during the closing
process, the roller sunblind opens again auto-
matically. However, the automatic reversing
feature is only an aid and is not a substitute of
your attentiveness when closing the roller sun-
blind.
GWARNING
The reversing feature does not react in par-
ticular to soft, light and thin objects, e.g. small
fingers. This means that the reversing feature
cannot prevent someone being trapped in
these situations. There is a risk of injury.
When closing the roller sunblind, make sure
that no body parts are in the sweep area.
Panorama roof withpower tilt/sliding panel95
Opening and closing
Z
Page 98 of 374
If somebody becomes trapped:
Rrelease the switch immediately, or
Rpress the switch in any direction during the
automatic closing process
The closing process is stopped.
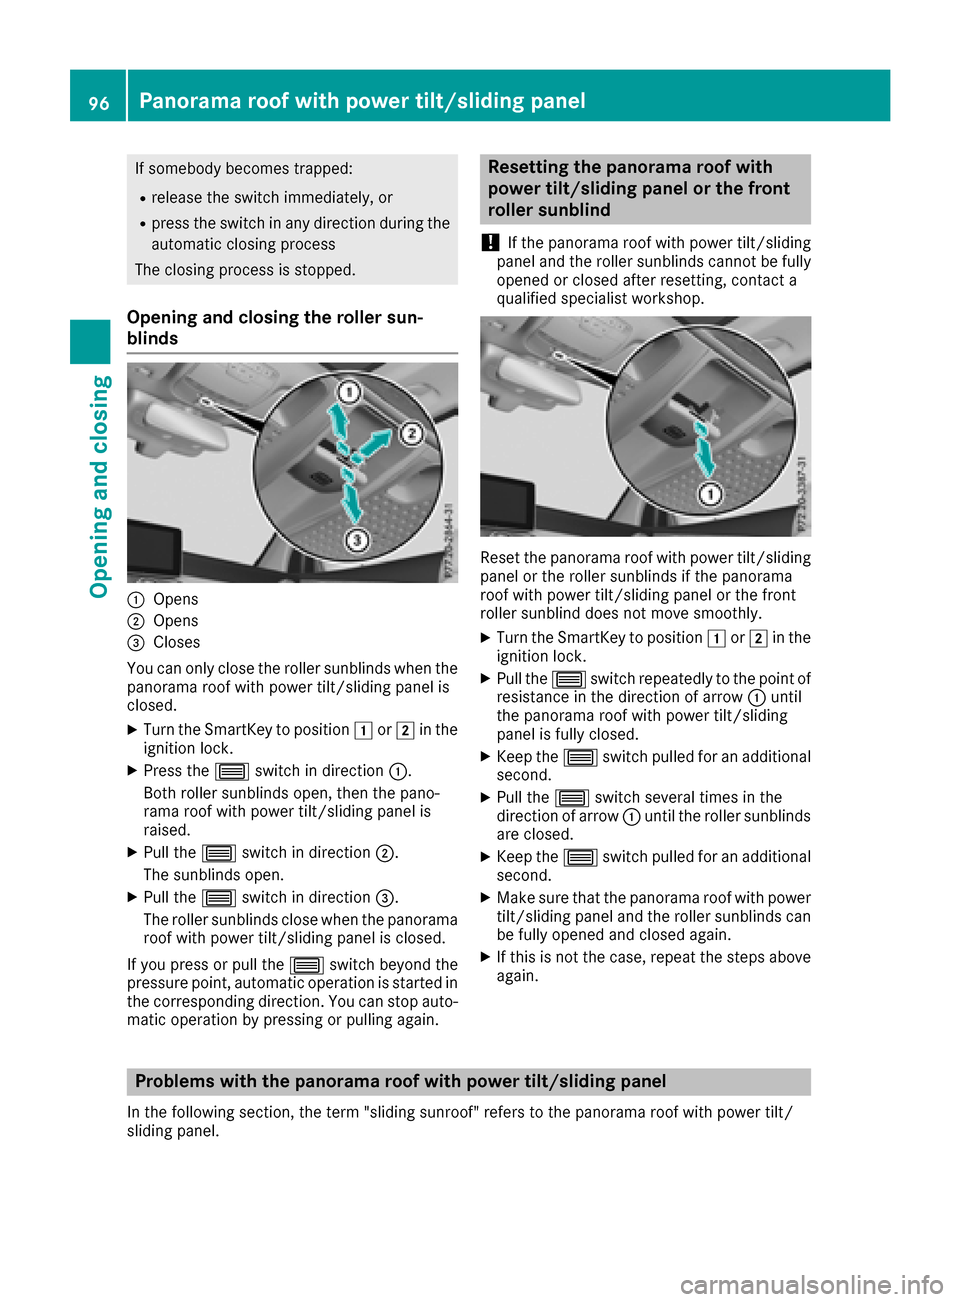
Opening and closing the roller sun-
blinds
:Opens
;Opens
=Closes
You can only close the roller sunblinds when the
panorama roof with power tilt/sliding panel is
closed.
XTurn the SmartKey to position 1or2 in the
ignition lock.
XPress the 3switch in direction :.
Both roller sunblinds open, then the pano-
rama roof with power tilt/sliding panel is
raised.
XPull the 3switch in direction ;.
The sunblinds open.
XPull the 3switch in direction =.
The roller sunblinds close when the panorama
roof with power tilt/sliding panel is closed.
If you press or pull the 3switch beyond the
pressure point, automatic operation is started in
the corresponding direction. You can stop auto- matic operation by pressing or pulling again.
Resetting the panorama roof with
power tilt/sliding panel or the front
roller sunblind
!
If the panorama roof with power tilt/sliding
panel and the roller sunblinds cannot be fully
opened or closed after resetting, contact a
qualified specialist workshop.
Reset the panorama roof with power tilt/sliding
panel or the roller sunblinds if the panorama
roof with power tilt/sliding panel or the front
roller sunblind does not move smoothly.
XTurn the SmartKey to position 1or2 in the
ignition lock.
XPull the 3switch repeatedly to the point of
resistance in the direction of arrow :until
the panorama roof with power tilt/sliding
panel is fully closed.
XKeep the 3switch pulled for an additional
second.
XPull the 3switch several times in the
direction of arrow :until the roller sunblinds
are closed.
XKeep the 3switch pulled for an additional
second.
XMake sure that the panorama roof with power
tilt/sliding panel and the roller sunblinds can
be fully opened and closed again.
XIf this is not the case, repeat the steps above
again.
Problems with the panorama roof with power tilt/sliding panel
In the following section, the term "sliding sunroof" refers to the panorama roof with power tilt/
sliding panel.
96Panorama roof with power tilt/sliding panel
Opening and closing
Page 108 of 374
control of the vehicle. There is a risk of an
accident.
Always wait until the adjustment process is
complete before driving off.
The EASY-ENTRY/EXIT feature makes getting in
and out of your vehicle easier.
You can activate and deactivate the EASY-
ENTRY/EXIT feature using the multimedia sys-
tem (see the Digital Operator's Manual)
Position of the steering wheel when the
EASY-ENTRY/EXIT feature is active
The steering wheel swings up when you:
Rremove the SmartKey from the ignition lock
Rwith KEYLESS-GO or KEYLESS-GO start
function: open the driver's door; the voltage
supply must be switched on
Rwith the SmartKey: open the driver's door;
the SmartKey must be in position gor1 in
the ignition lock (
Ypage 132)
Ropen the driver's door when the ignition is
switched off
iThe steering wheel only tilts up if the driving
position is stored after the steering column
adjustment has been adjusted (
Ypage 109).
The most recent driving position of the steering
wheel is stored if:
Rthe ignition is switched off
Rthe setting is stored using the memory func-
tion (Ypage 109)
iThe steering wheel only moves up if it has
not already reached the upper steering lim-
iter.
Position of the steering wheel for driv-
ing
The steering wheel is moved to the last selected
position when:
Rthe driver's door is closed and you insert the
SmartKey into the ignition lock
Ryou close the driver's door when the ignition
is switched on
Ryou press the Start/Stop button once in vehi-
cles with KEYLESS-GO or the KEYLESS-GO
start function
iThe steering wheel only returns to the last
set position if the driving position is stored
after the seat or steering column has been
adjusted (
Ypage 109).
The most recent driving position of the steering
wheel is stored if:
Rthe ignition is switched off
Rthe setting is stored using the memory func-
tion (Ypage 109)
Crash-responsive EASY-EXIT feature
If the crash-responsive EASY-EXIT feature is trig-
gered in an accident, the steering column will
move up when the driver's door is opened or the
SmartKey is removed from the ignition lock. This
makes it easier to exit the vehicle and rescue the occupants.
The crash-responsive EASY-EXIT feature is
operational only if the EASY-EXIT/ENTRY fea-
ture is activated in the multimedia system (see
Digital Operator's Manual).
Mirrors
Exterior mirrors
Important safety notes
GWARNING
You could lose control of your vehicle if you do the following while driving:
Radjust the driver's seat, head restraint,
steering wheel or mirrors
Rfasten the seat belt
There is a risk of an accident.
Adjust the driver's seat, head restraint, steer-
ing wheel and mirror and fasten your seat belt before starting the engine.
GWARNING
The exterior mirror on the front-passenger
side reduces the size of the image. Visible
objects are actually closer than they appear.
This means that you could misjudge the dis-
tance from road users traveling behind, e.g.
when changing lane. There is a risk of an acci-
dent.
106Mirrors
Seats, steering wheel and mirrors
Page 122 of 374
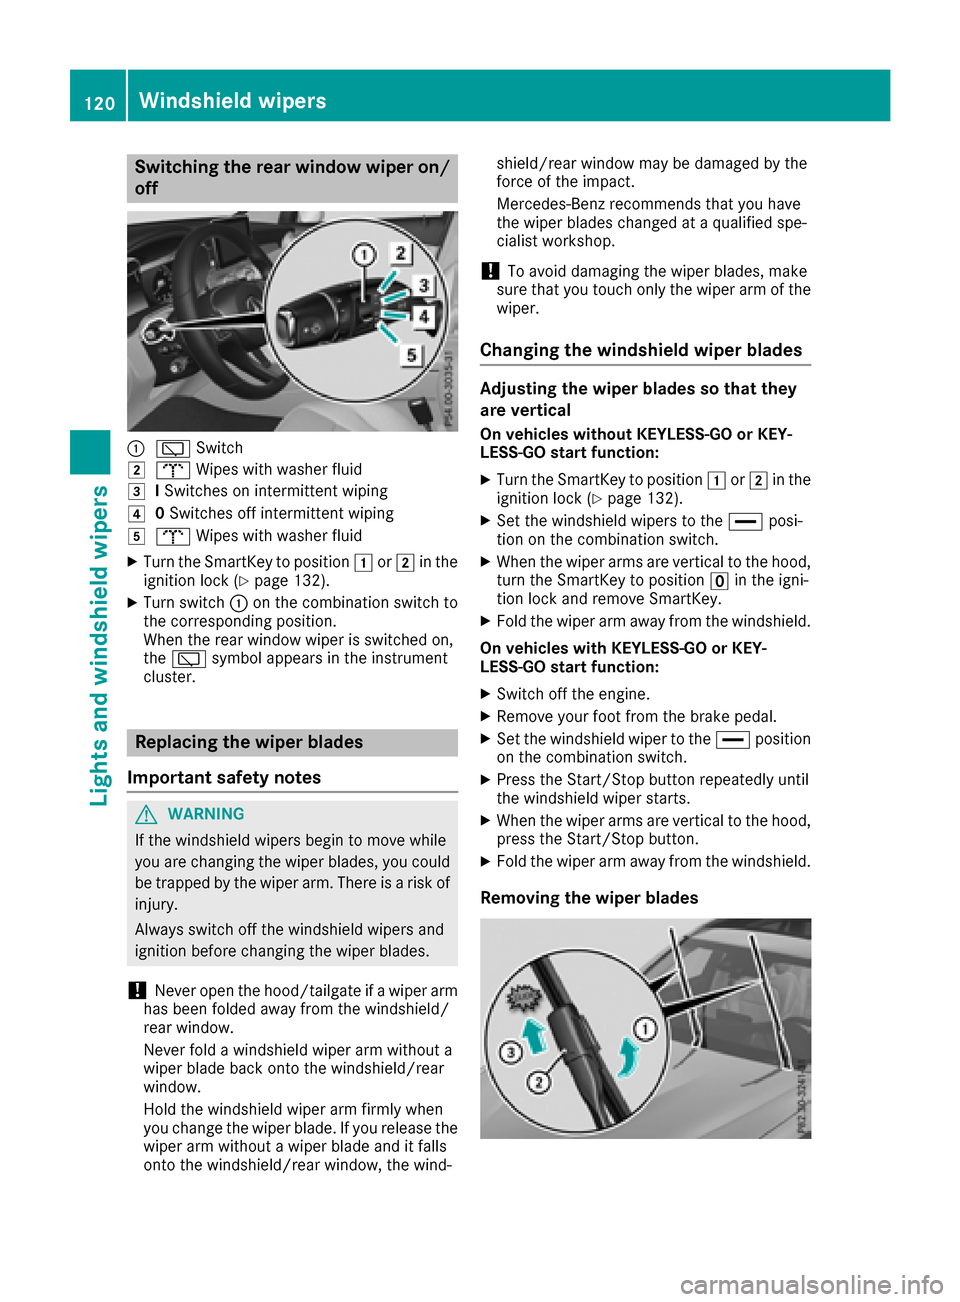
Switching the rear window wiper on/
off
:èSwitch
2bWipes with washer fluid
3ISwitches on intermittent wiping
40 Switches off intermittent wiping
5b Wipes with washer fluid
XTurn the SmartKey to position 1or2 in the
ignition lock (Ypage 132).
XTurn switch :on the combination switch to
the corresponding position.
When the rear window wiper is switched on,
the è symbol appears in the instrument
cluster.
Replacing the wiper blades
Important safety notes
GWARNING
If the windshield wipers begin to move while
you are changing the wiper blades, you could be trapped by the wiper arm. There is a risk of
injury.
Always switch off the windshield wipers and
ignition before changing the wiper blades.
!Never open the hood/tailgate if a wiper arm
has been folded away from the windshield/
rear window.
Never fold a windshield wiper arm without a
wiper blade back onto the windshield/rear
window.
Hold the windshield wiper arm firmly when
you change the wiper blade. If you release the
wiper arm without a wiper blade and it falls
onto the windshield/rear window, the wind- shield/rear window may be damaged by the
force of the impact.
Mercedes-Benz recommends that you have
the wiper blades changed at a qualified spe-
cialist workshop.
!To avoid damaging the wiper blades, make
sure that you touch only the wiper arm of the
wiper.
Changing the windshield wiper blades
Adjusting the wiper blades so that they
are vertical
On vehicles without KEYLESS-GO or KEY-
LESS‑GO start function:
XTurn the SmartKey to position 1or2 in the
ignition lock (Ypage 132).
XSet the windshield wipers to the °posi-
tion on the combination switch.
XWhen the wiper arms are vertical to the hood,
turn the SmartKey to position uin the igni-
tion lock and remove SmartKey.
XFold the wiper arm away from the windshield.
On vehicles with KEYLESS-GO or KEY-
LESS‑GO start function:
XSwitch off the engine.
XRemove your foot from the brake pedal.
XSet the windshield wiper to the °position
on the combination switch.
XPress the Start/Stop button repeatedly until
the windshield wiper starts.
XWhen the wiper arms are vertical to the hood,
press the Start/Stop button.
XFold the wiper arm away from the windshield.
Removing the wiper blades
120Windshield wipers
Lights and windshield wipers
Page 126 of 374
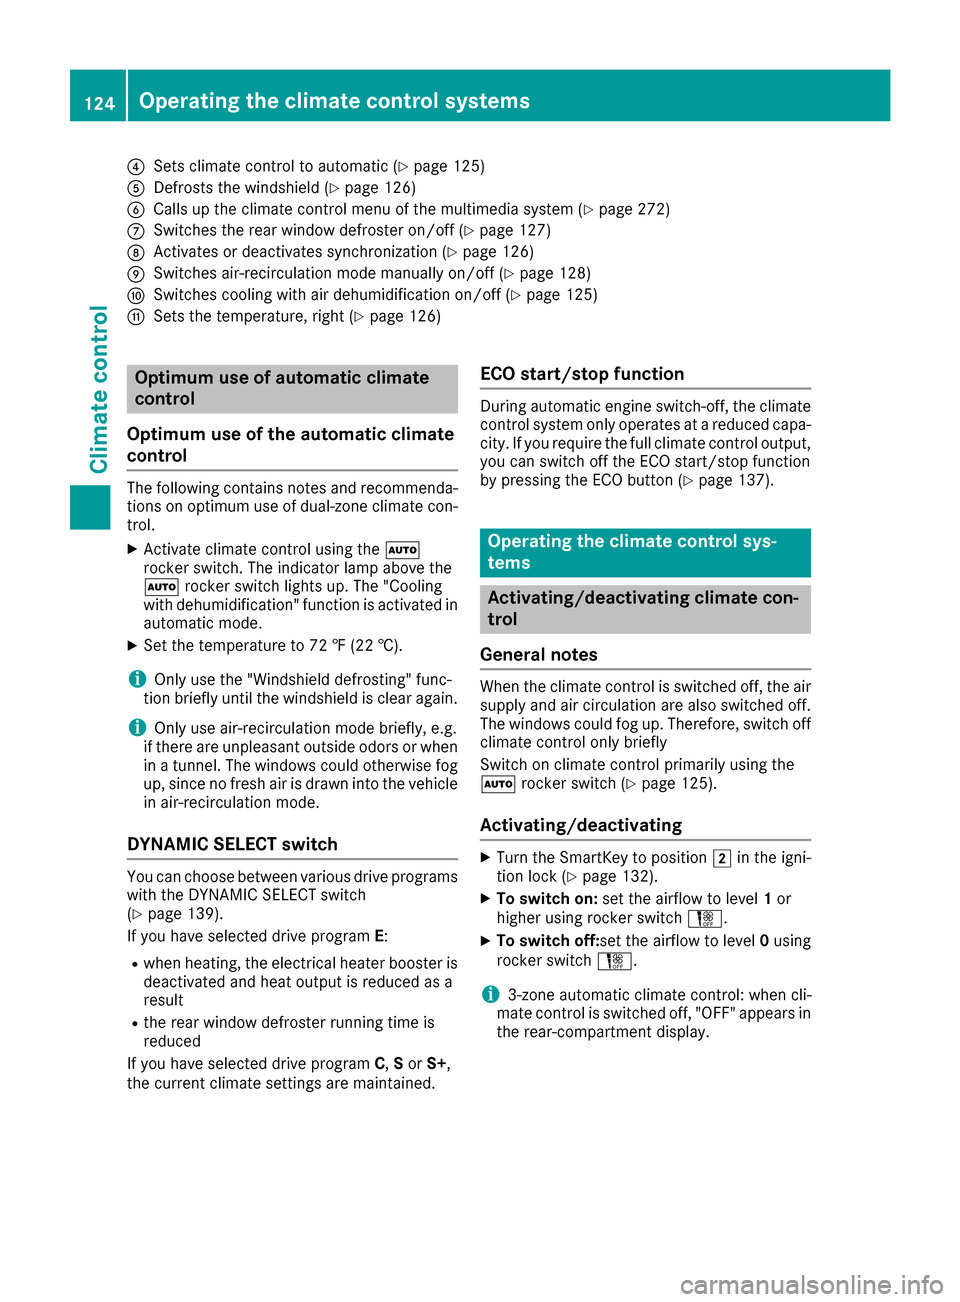
?Sets climate control to automatic (Ypage 125)
ADefrosts the windshield (Ypage 126)
BCalls up the climate control menu of the multimedia system (Ypage 272)
CSwitches the rear window defroster on/off (Ypage 127)
DActivates or deactivates synchronization (Ypage 126)
ESwitches air-recirculation mode manually on/off (Ypage 128)
FSwitches cooling with air dehumidification on/off (Ypage 125)
GSets the temperature, right (Ypage 126)
Optimum use of automatic climate
control
Optimum use of the automatic climate
control
The following contains notes and recommenda-
tions on optimum use of dual-zone climate con-
trol.
XActivate climate control using the Ã
rocker switch. The indicator lamp above the
à rocker switch lights up. The "Cooling
with dehumidification" function is activated in
automatic mode.
XSet the temperature to 72 ‡ (22 †).
iOnly use the "Windshield defrosting" func-
tion briefly until the windshield is clear again.
iOnly use air-recirculation mode briefly, e.g.
if there are unpleasant outside odors or when
in a tunnel. The windows could otherwise fog
up, since no fresh air is drawn into the vehicle in air-recirculation mode.
DYNAMIC SELECT switch
You can choose between various drive programs
with the DYNAMIC SELECT switch
(
Ypage 139).
If you have selected drive program E:
Rwhen heating, the electrical heater booster is
deactivated and heat output is reduced as a
result
Rthe rear window defroster running time is
reduced
If you have selected drive program C,S or S+ ,
the current climate settings are maintained.
ECO start/stop function
During automatic engine switch-off, the climate
control system only operates at a reduced capa-
city. If you require the full climate control output,
you can switch off the ECO start/stop function
by pressing the ECO button (
Ypage 137).
Operating the climate control sys-
tems
Activating/deactivating climate con-
trol
General notes
When the climate control is switched off, the air
supply and air circulation are also switched off.
The windows could fog up. Therefore, switch off
climate control only briefly
Switch on climate control primarily using the
à rocker switch (
Ypage 125).
Activating/deactivating
XTurn the SmartKey to position 2in the igni-
tion lock (Ypage 132).
XTo switch on: set the airflow to level 1or
higher using rocker switch H.
XTo switch off:set the airflow to level 0using
rocker switch H.
i3-zone automatic climate control: when cli-
mate control is switched off, "OFF" appears in
the rear-compartment display.
124Operating the climate control systems
Climate control
Page 134 of 374
!Do not warm up the engine with the vehicle
stationary. Drive off immediately. Avoid high
engine speeds and driving at full throttle until
the engine has reached its operating temper- ature.
Only shift the automatic transmission to the
desired drive position when the vehicle is sta-
tionary.
Where possible, avoid spinning the drive
wheels when pulling away on slippery roads.
You could otherwise damage the drive train.
Key positions
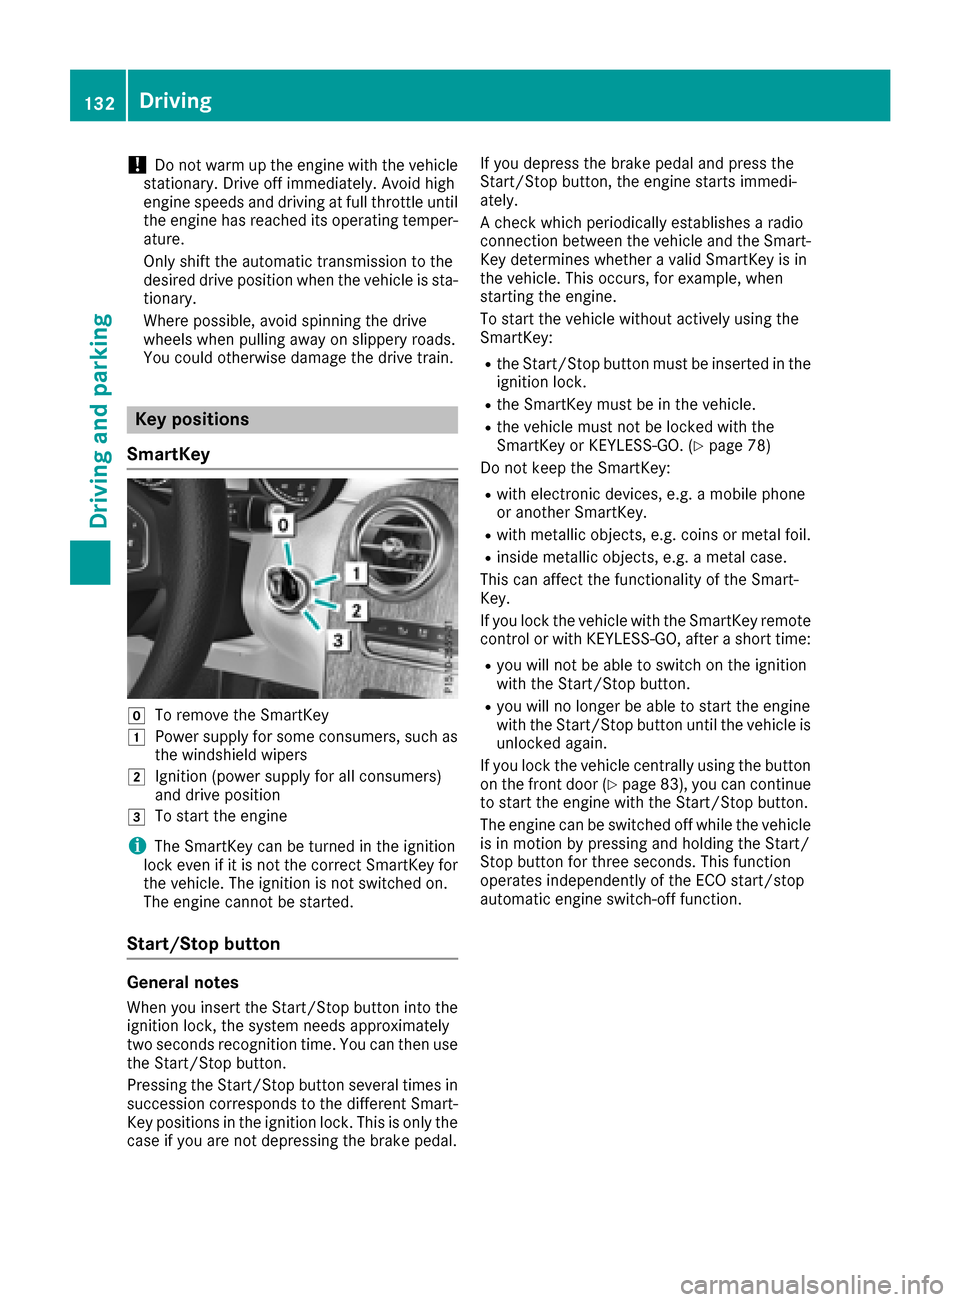
SmartKey
gTo remove the SmartKey
1Power supply for some consumers, such as
the windshield wipers
2Ignition (power supply for all consumers)
and drive position
3To start the engine
iThe SmartKey can be turned in the ignition
lock even if it is not the correct SmartKey for
the vehicle. The ignition is not switched on.
The engine cannot be started.
Start/Stop button
General notes
When you insert the Start/Stop button into the
ignition lock, the system needs approximately
two seconds recognition time. You can then use
the Start/Stop button.
Pressing the Start/Stop button several times in
succession corresponds to the different Smart-
Key positions in the ignition lock. This is only the
case if you are not depressing the brake pedal. If you depress the brake pedal and press the
Start/Stop button, the engine starts immedi-
ately.
A check which periodically establishes a radio
connection between the vehicle and the Smart-
Key determines whether a valid SmartKey is in
the vehicle. This occurs, for example, when
starting the engine.
To start the vehicle without actively using the
SmartKey:
Rthe Start/Stop button must be inserted in the
ignition lock.
Rthe SmartKey must be in the vehicle.
Rthe vehicle must not be locked with the
SmartKey or KEYLESS-GO. (Ypage 78)
Do not keep the SmartKey:
Rwith electronic devices, e.g. a mobile phone
or another SmartKey.
Rwith metallic objects, e.g. coins or metal foil.
Rinside metallic objects, e.g. a metal case.
This can affect the functionality of the Smart-
Key.
If you lock the vehicle with the SmartKey remote
control or with KEYLESS-GO, after a short time:
Ryou will not be able to switch on the ignition
with the Start/Stop button.
Ryou will no longer be able to start the engine
with the Start/Stop button until the vehicle is
unlocked again.
If you lock the vehicle centrally using the button
on the front door (
Ypage 83), you can continue
to start the engine with the Start/Stop button.
The engine can be switched off while the vehicle
is in motion by pressing and holding the Start/
Stop button for three seconds. This function
operates independently of the ECO start/stop
automatic engine switch-off function.
132Driving
Driving and parking
Page 135 of 374
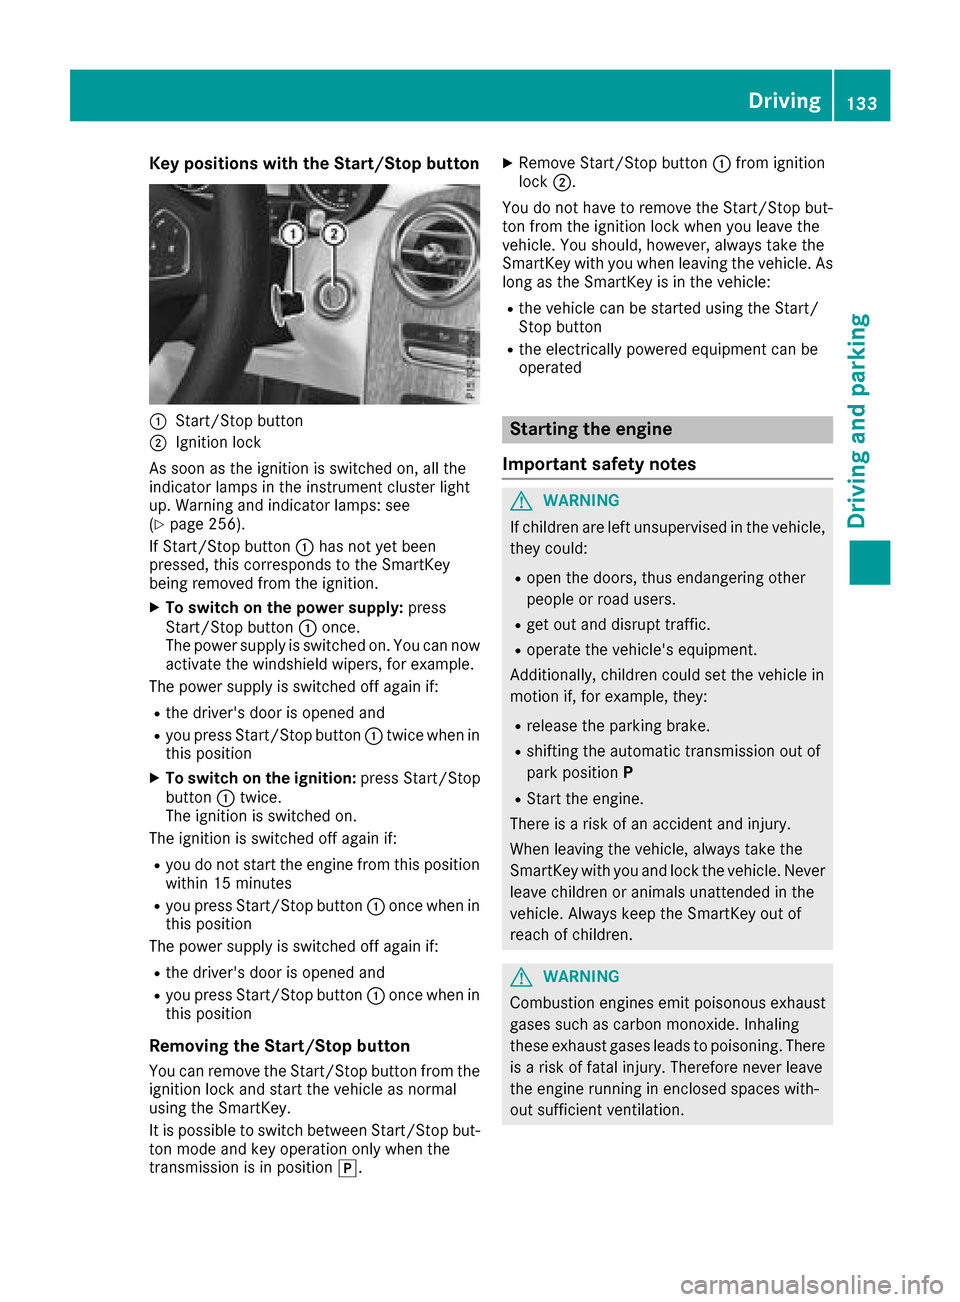
Key positions withthe Start/S topbutton
:Start/Sto pbutto n
;Ignition loc k
As soo nas th eignition is switched on ,all th e
indicator lamps in th einstrumen tcluste rligh t
up. Warning and indicator lamps :see
(
Ypage 256).
If Start/Sto pbutto n: has no tyet been
pressed, this correspond sto th eSmartKey
bein gremove dfrom th eignition .
XTo switch on th epower supply :press
Start/Sto pbutto n: once.
The power suppl yis switched on .You can no w
activat eth ewindshield wipers, for example .
The power suppl yis switched off again if:
Rth edriver' sdoor is opened and
Ryou press Start/Sto pbutto n: twice when in
this position
XTo switch on th eignition: press Start/Sto p
butto n: twice.
The ignition is switched on .
The ignition is switched off again if:
Ryou do no tstart th eengin efrom this position
within 15 minute s
Ryou press Start/Sto pbutto n: once when in
this position
The power suppl yis switched off again if:
Rth edriver' sdoor is opened and
Ryou press Start/Sto pbutto n: once when in
this position
Removing the Start/S topbutton
You can remove th eStart/Sto pbutto nfrom th e
ignition loc kand start th evehicl eas normal
usin gth eSmartKey.
It is possible to switch between St art/Sto
pb
ut -
to nmod eand ke yoperation only when th e
transmission is in position j.
XRemove Start/Stopbutto n: from ignition
loc k;.
You do no thave to remove th eStart/Sto pbut -
to nfrom th eignition loc kwhen you leav eth e
vehicle. You should, however ,always tak eth e
SmartKey wit hyou when leaving th evehicle. As
lon gas th eSmartKey is in th evehicle:
Rth evehicl ecan be started usin gth eStart /
Stop butto n
Rtheelectrically powered equipmen tcan be
operate d
Starting the engine
Important safety notes
GWARNIN G
If children are lef tunsupervised in th evehicle,
they could:
Ropen th edoors, thus endangering other
people or road users.
Rget out and disrupt traffic.
Roperate th evehicle's equipment.
Additionally, children could set th evehicl ein
motion if, for example ,they:
Rrelease th eparking brake.
Rshiftin gth eautomatic transmission out of
park positio nP
RStart th eengine.
Ther eis aris kof an acciden tand injury.
When leaving th evehicle, always tak eth e
SmartKey wit hyou and loc kth evehicle. Never
leav echildren or animals unattended in th e
vehicle. Always keep th eSmartKey out of
reac hof children .
GWARNING
Combustion engines emit poisonous exhaust
gase ssuc has carbon monoxide. Inhalin g
these exhaust gase sleads to poisoning .Ther e
is aris kof fatal injury. Therefore never leav e
th eengin erunnin gin enclosed spaces with-
out sufficien tventilation .
Driving133
Driving and parking
Z
Page 136 of 374
GWARNING
Flammable materials introduced through
environmental influence or by animals can
ignite if in contact with the exhaust system or
parts of the engine that heat up. There is a risk
of fire.
Carry out regular checks to make sure that
there are no flammable foreign materials in
the engine compartment or in the exhaust
system.
General notes
Vehicles with a gasoline engine: the catalytic
converter is preheated for up to 30 seconds
after a cold start. The sound of the engine may
change during this time.
Automatic transmission
XShift the transmission to position j
(Ypage 141).
The transmission position indicator on the
multifunction display shows j
(
Ypage 142).
iYou can start the engine in transmission
position jand i.
Starting procedure with the SmartKey
To start the engine using the SmartKey instead
of the Start/Stop button, pull the Start/Stop
button out of the ignition lock.
XTo start a diesel engine: turn the SmartKey
to position 2in the ignition lock
(
Ypage 132).
The % preglow indicator lamp in the instru-
ment cluster lights up.
XTurn the SmartKey to position 3in the igni-
tion lock (Ypage 132) and release it as soon
as the engine is running.
iVehicles with a diesel engine: you can
start the engine without preglow if the engine
is warm.
If the engine will not start:
XRemove the SmartKey from the ignition lock.
XReinsert the SmartKey into the ignition lock
after a short waiting period.
XTurn the SmartKey to position 2in the igni-
tion lock (Ypage 132).
The indicator lamps in the instrument cluster
light up (
Ypage 256).
XTurn the SmartKey to position 3in the igni-
tion lock (Ypage 132) and release it as soon
as the engine is running.
Starting procedure with the Start/Stop
button
The Start/Stop button is only available on vehi-
cles with KEYLESS-GO or the KEYLESS-GO start
function.
The Start/Stop button can be used to start the
vehicle manually without inserting the SmartKey
into the ignition lock. The Start/Stop button
must be inserted in the ignition lock and the
SmartKey must be in the vehicle. This mode for starting the engine operates independently of
the ECO start/stop automatic engine start func-
tion.
You can start the engine if a valid SmartKey is in
the vehicle. Switch off the engine and always
take the SmartKey with you when leaving the
vehicle, even if you only leave it for a short time.Pay attention to the important safety notes.
XDepress the brake pedal and keep it
depressed.
XPress the Start/Stop button once
(Ypage 133).
Vehicles with a gasoline engine: the engine
starts.
Vehicles with a diesel engine: preglow is
activated and the engine starts.
Starting procedure via smartphone
Observe the important safety notes on starting
the engine (Ypage 133).
You can also start your engine via your smart-
phone from outside the vehicle. In this case, the
previously selected climate control setting is
activated. In this way you can cool or heat the
interior of the vehicle before starting the jour-
ney.
Only start the engine via your smartphone if it is
safe to start and run the engine where your vehi-
cle is parked.
Observe the legal stipulations in the area where your vehicle is parked. Engine start via smart-
phone may be limited to certain countries or
regions.
134Driving
Driving and parking