rear view mirror MERCEDES-BENZ GLC SUV 2017 X253 Owner's Manual
[x] Cancel search | Manufacturer: MERCEDES-BENZ, Model Year: 2017, Model line: GLC SUV, Model: MERCEDES-BENZ GLC SUV 2017 X253Pages: 374, PDF Size: 6.23 MB
Page 9 of 374
General notes ................................ 311
Interior ...........................................316
Matte finish ................................... 314
Paint .............................................. 313
Plastic trim ....................................3 17
Power washer ................................ 313
Rear view camera .......................... 316
Roof lining ...................................... 318
Seat belt ........................................ 318
Seat cover ..................................... 317
Selector lever ................................ 317
Sensors ......................................... 315
Side running board ........................ 315
Steering wheel ............................... 317
Trim pieces ....................................3 17
Washing by hand ........................... 312
Wheels ...........................................3 14
Windows ........................................ 314
Wiper blades .................................. 315
Wooden trim .................................. 317
Cargo compartment
Opening/closing (from outside,
HANDS-FREE ACCESS) .................... 87
Plug-in module (telescopic rods) .... 287
Cargo compartment cover
Important safety notes .................. 285
Notes/how to use ......................... 285
Cargo compartment enlargement ... 281
Cargo compartment floor
Important safety notes .................. 288
Opening/closing ............................ 288
Stowage well (under) ..................... 288
Cargo compartment plug-in mod-
ule (telescope bars) .......................... 287
Cargo net
Attaching ....................................... 286
Important safety information ......... 285
Cargo tie down rings ......................... 284
CD
see also Digital Operator's Man-
ual ..................................................2 68
CD player (on-board computer) ........217
Center console
Lower section .................................. 40
Upper secti
on .................................. 38
Central locking
Locking/unlocking (SmartKey) ........7 7Change of address
.............................. 29
Change of ownership .......................... 29
Changing the media source .............216
Charge-air pressure (on-board
computer, Mercedes-AMG vehi-
cles) .................................................... 224
Child
Restraint system .............................. 60
Child seat
Forward-facing restraint system ...... 63
LATCH-type (ISOFIX) child seat
anchors ............................................ 61
On the front-passenger seat ............ 62
Rearward-facing restraint system .... 62
Top Tether ....................................... 61
Child-proof locks
Important safety notes .................... 63
Rear doors ....................................... 64
Children
Special seat belt retractor ............... 59
Children in the vehicle
Important safety notes .................... 59
Cigarette lighter ................................ 292
Cleaning
Mirror turn signal ........................... 315
Trailer tow hitch ............................. 316
Climate control
Control panel for dual-zone auto-
matic climate control ..................... 123
Controlling automatically ............... 125
Cooling with air dehumidification .. 125
Cooling with air dehumidification
(multimedia system) ...................... 273
Defrosting the windows ................. 127
Defrosting the windshield .............. 126
ECO start/stop function ................ 124
General notes ................................ 123
Indicator lamp ................................ 125
Ionization ....................................... 129
Ionization (multimedia system) ...... 273
Notes on using the automatic cli-
mate control .................................. 124
Overview ........................................ 272
Overview of systems ...................... 123
Perfume atomizer .......................... 128
P
erfume atomizer (multimedia
system) .......................................... 272
Index7
Page 14 of 374
Front wheel arch coverInstalling/removing ...................... .117
Fuel
Additives ........................................ 366
Consumption statistics .................. 213
Displaying the current consump-
tion ................................................ 213
Displaying the range ......................2 13
Driving tips ....................................1 57
E10 ................................................ 365
Fuel gauge ....................................... 36
Gasoline ......................................... 365
Grade (gasoline) ............................ 365
Important safety notes .................. 365
Low outside temperatures ............. 367
Problem (malfunction) ................... 151
Quality (diesel) ............................... 366
Refueling ........................................ 148
Tank content/reserve fuel ............. 365
Fuel filler flap
Closing ........................................... 150
Fuel filter (display message) ............ 243
Fuel level
Calling up the range (on-board
computer) ...................................... 213
Fuel tank
Capacity ........................................ 365
Problem (malfunction) ................... 151
Fuses
Allocation chart ............................. 334
Before changing ............................. 333
Dashboard fuse box ....................... 334
Fuse box in the cargo compart-
ment .............................................. 334
Fuse box in the engine compart-
ment .............................................. 334
Fuse box in the front-passenger
footwell .......................................... 334
Important safety notes .................. 333
G
G-Meter (on-board computer,
Mercedes-AMG vehicles) .................. 224
Garage door opener
Clearing the memory ..................... 305
General notes ................................ 302
Important safety notes .................. 302 Opening/closing the garage doo
r..3 04
Problems when programming ........3 04
Programming (button in the rear-
view mirror) ................................... 303
Synchronizing the rolling code ....... 303
Gasoline ............................................. 365
Gear indicator (on-board com-
puter, Mercedes-AMG vehicles) ....... 224
Genuine parts ...................................... 27
Glove box ...........................................2 79
Google™ Local Search
see also Digital Operator's Man-
ual ..................................................2 68
H
HANDS-FREE ACCESS.......................... 87
Handwriting recognition
Switching text reader function
on/off ............................................ 271
Touchpad ....................................... 270
Hazard warning lamps ......................113
Head restraints
Adjusting (electrically) ................... 101
Adjusting (manually) ......................1 01
Adjusting (rear) .............................. 101
Adjusting the fore-and-aft posi-
tion manually ................................. 101
General notes ................................ 101
Important safety notes .................. 100
Installing/removing (rear) .............. 102
Head-up display
Adjusting the brightness ................ 222
Displays and operating .................. 211
Function/notes .............................2 11
Important safety notes .................. 211
Selecting displays .......................... 222
Setting the position ....................... 222
Storing settings (memory func-
tion) ............................................... 109
Headlamps
Display message ............................ 239
Fogging up ..................................... 114
see Automatic headlamp mode
Heating
see Climate control
High beam flasher .............................1 12
12Index
Page 17 of 374
PRE-SAFE®(anticipatory occu-
pant protection) ...............................5 7
PRE-SAFE
®PLUS (anticipatory
occupant protection PLUS) .............. 58
Rear view camera .......................... 182
Traffic Sign Assist .......................... 192
Message memory (on-board com-
puter) .................................................. 227
Messages
see Display messages
see Warning and indicator lamps
Mirror turn signal
Cleaning ......................................... 315
Mirrors
see Exterior mirrors
see Vanity mirror (in the sun visor)
Mobile phone
Connecting (Bluetooth
®inter-
face) ..............................................2 75
Connecting another mobile
phone ............................................ 276
Frequencies ................................... 362
Installation ..................................... 362
Menu (on-board computer) ............ 218
Transmission output (maximum) .... 362
Modifying the programming
(SmartKey) ...........................................7 9
MOExtended tires .............................. 321
Mounting wheels
Lowering the vehicle ...................... 360
Mounting a new wheel ................... 359
Preparing the vehicle .....................3 57
Raising the vehicle ......................... 357
Removing a wheel .......................... 359
Securing the vehicle against roll-
ing away ........................................ 357
MP3
Operation ....................................... 217
see also Digital Operator's Man-
ual ..................................................2 68
Multifunction display
Function/notes .............................2 10
Multifunction steering wheel
Operating the on-board computer .. 209
Overview .......................................... 37
Multimedia system
Switching on and off ......................2 69Music files
see also Digital Operator's Man-
ual .............. ....................................2
68
N
Navigation
Displaying (on-board computer) ..... 214
Menu (on-board computer) ............ 214
see also Digital Operator's Man-
ual ..................................................2 68
Notes on breaking-in a new vehi-
cle ....................................................... 131
O
Occupant Classification System
(OCS)
Conditions ....................................... 51
Faults ............................................... 54
Operation ......................................... 51
System self-test ............................... 53
Occupant safety
Air bags ...........................................4 8
Automatic measures after an acci-
dent ................................................. 58
Children in the vehicle ..................... 59
Important safety notes .................... 43
Introduction to the restraint sys-
tem .................................................. 43
Occupant Classification System
(OCS) ............................................... 51
PASSENGER AIR BAG indicator
lamps ............................................... 44
Pets in the vehicle ........................... 64
PRE-SAFE
®(anticipatory occu-
pant protection) ............................... 57
PRE-SAFE
®PLUS (anticipatory
occupant protection PLUS) .............. 58
Restraint system warning lamp ........ 44
Seat belt .......................................... 44
OCS
Conditions ....................................... 51
Faults ............................................... 54
Operation ......................................... 51
System self-test ............................... 53
Odometer ........................................... 212
Index15
Page 18 of 374
Oilsee Engine oil
On-board computer
AMG menu .................................... .224
Assistance graphic menu ...............2 19
Assistance menu ........................... 220
Display messages .......................... 227
Displaying a service message ........3 10
Displays and operation .................. 208
DISTRONIC PLUS ........................... 168
Factory settings ............................. 223
G-Meter ......................................... 224
Head-up display ............................. 211
Head-up display menu ................... 222
Important safety notes .................. 208
Instrument cluster menu ............... 223
Lights menu ................................... 223
Media menu ................................... 216
Menu overview .............................. 212
Message memory .......................... 227
Navigation menu ............................ 214
RACETIMER ................................... 225
Radio menu ................................... 216
Service menu ................................. 219
Settings menu ............................... 220
Standard display ............................ 212
Telephone menu ............................ 218
Trip menu ...................................... 212
Video DVD operation ..................... 217
Opening and closing the side trim
panels ................................................. 118
Operating safety
Declaration of conformity ................ 30
Important safety notes .................... 30
Operating system
see On-board computer
Operation
Digital Operator's Manual ................ 26
Operator's Manual
Overview .......................................... 28
Vehicle equipment ........................... 28
Outside temperature display ........... 209
Overhead control panel ...................... 41
Override feature
Rear side windows ........................... 64P
Paddle shifterssee Steering wheel paddle shifters
Paint code number ............................ 363
Paintwork (cleaning instructions) ... 313
Panic alarm .......................................... 43
Panorama roof with power tilt/
sliding panel
Important safety notes .................... 93
Operating ......................................... 94
Problem (malfunction) ..................... 96
Rain closing feature ......................... 95
Reversing feature ............................. 94
Panoramic roof
Operating the roller sunblinds .......... 95
Parcel net ........................................... 286
Parking
Important safety notes .................. 154
Parking brake ................................ 155
Parking position for the exterior
mirror on the front-passenger
side ................................................ 108
Rear view camera .......................... 182
Switching off the engine ................ 155
see PARKTRONIC
Parking aid
see 360° camera
see Active Parking Assist
see Exterior mirrors
see PARKTRONIC
see Rear view camera
Parking Assist
Display message ............................ 246
Parking brake
Applying automatically ................... 156
Applying or releasing manually ...... 156
Display message ............................ 230
Electric parking brake .................... 155
Emergency braking ........................ 157
General notes ................................ 155
Releasing automatically ................. 156
Warning lamp ................................. 262
Parking lamps
Switching on/off ........................... 112
PARKTRONIC
Deactivating/activating ................. 177
Driving system ............................... 175
16Index
Page 20 of 374
Object detection (function/
notes) ............................................ 186
Switching on/off ........................... 183
Wide-angle function ....................... 186
Rear window defroster
Problem (malfunction) ...................1 27
Switching on/off ........................... 127
Rear window wiper
Replacing the wiper blade .............. 121
Switching on/off ........................... 120
Rear-view mirror
Dipping (automatic) ....................... 108
Recuperation display ........................ 213
Reflective safety jacket .................... 319
Refrigerant (air-conditioning sys-
tem)
Important safety notes .................. 369
Refueling
Fuel gauge ....................................... 36
Important safety notes .................. 148
Refueling process .......................... 149
see Fuel
Remote control
Garage door opener ....................... 302
Programming (garage door
opener) .......................................... 303
Replacing bulbs
Backup lamp .................................. 118
High-beam headlamps ................... 117
Important safety notes .................. 115
Installing/removing the cover
(front wheel arch) .......................... 117
Low-beam headlamps .................... 116
Opening/closing side trim panels. .118
Overview of bulb types .................. 116
Replacing front bulbs (vehicles
with halogen headlamps) ............... 116
Turn signals (front) ......................... 117
Reporting safety defects .................... 32
Rescue card ......................................... 32
Reserve (fuel tank)
see Fuel
Reserve fuel
Display message ............................ 242
Warning lamp ................................. 263
Restraint system
Display message ............................ 235
Introduction ..................................... 43 Warning lamp ................................. 262
Warning lamp (function) ................... 44
Reversing feature
Panorama sliding sunroof ................ 94
Roller sunblinds ............................... 95
Side window s ................................... 90
T
ailgate ............................................ 85
Roadside Assistance (breakdown) .... 29
Roller sunblind
Operating ......................................... 96
Panorama roof with power tilt/
sliding panel ..................................... 95
Rear side windows ......................... 291
Resetting ......................................... 96
Roof carrier ........................................ 289
Roof lining and carpets (cleaning
guidelines) ......................................... 318
Roof load (maximum) ........................ 370
Route guidance
see also Digital Operator's Man-
ual .................................................. 268
Route guidance active ...................... 214
S
Safety
Children in the vehicle ..................... 59
see Occupant safety
see Operating safety
SD card
Inserting/removing ........................ 276
Selecting ........................................ 217
SD memory card
see also Digital Operator's Man-
ual .................................................. 268
Search & Send
see also Digital Operator's Man-
ual .................................................. 268
Seat
Correct driver's seat position ........... 98
Seat belts
Adjusting the driver's and front-
passenger seat belt ......................... 47
Adjusting the height ......................... 47
center rear-compartment seat ......... 47
Cleaning ......................................... 318
Correct usage .................................. 46
Fastening ......................................... 47
18Index
Page 43 of 374
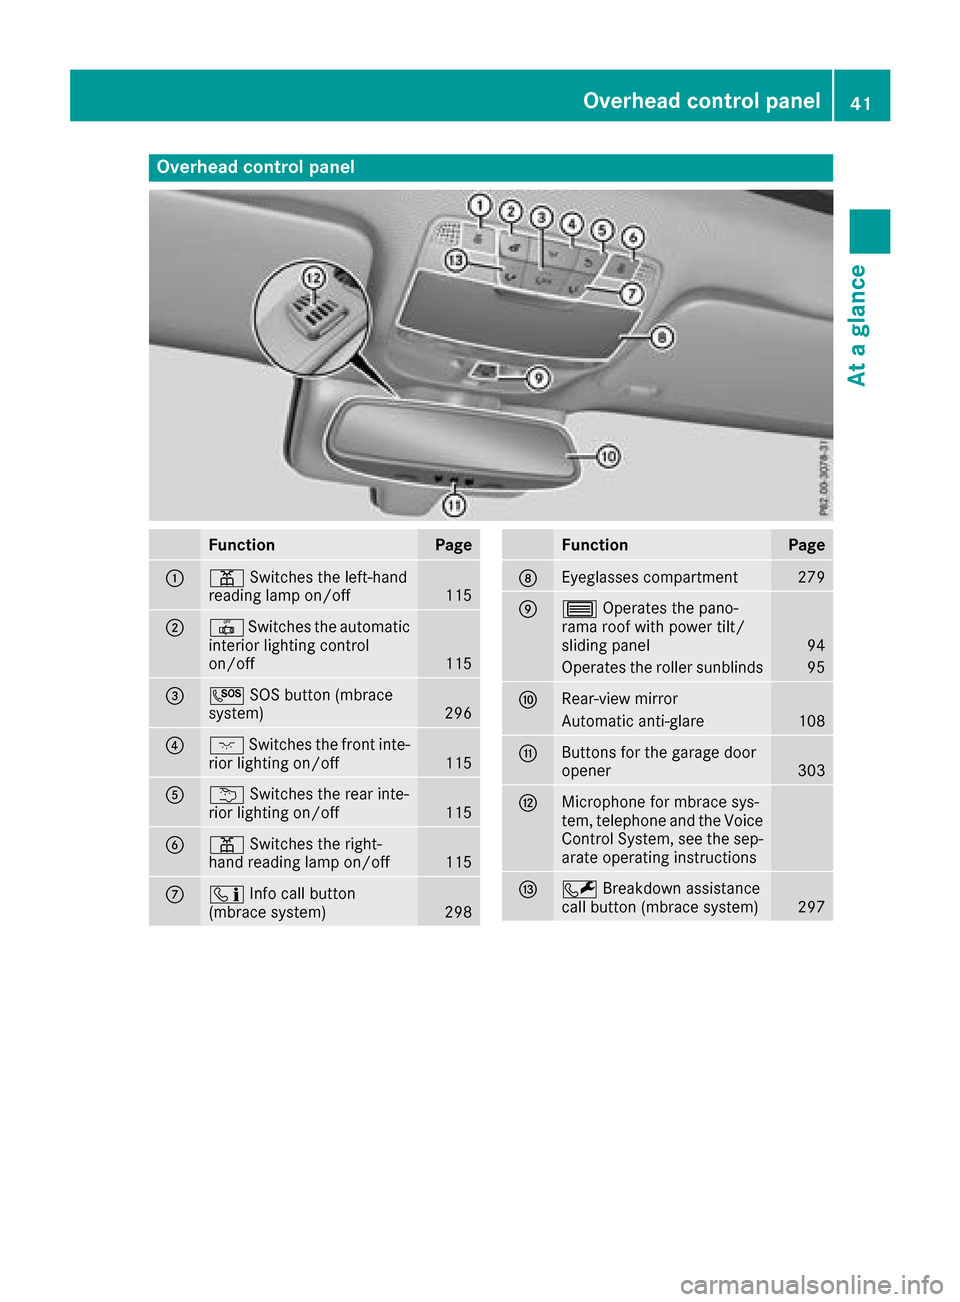
Overhead control panel
FunctionPage
:pSwitches the left-hand
reading lamp on/off115
;| Switches the automatic
interior lighting control
on/off
115
=G SOS button (mbrace
system)296
?c Switches the front inte-
rior lighting on/off115
Au Switches the rear inte-
rior lighting on/off115
Bp Switches the right-
hand reading lamp on/off115
Cï Info call button
(mbrace system)298
FunctionPage
DEyeglasses compartment279
E3 Operates the pano-
rama roof with power tilt/
sliding panel
94
Operates the roller sunblinds95
FRear-view mirror
Automatic anti-glare108
GButtons for the garage door
opener303
HMicrophone for mbrace sys-
tem, telephone and the Voice
Control System, see the sep-
arate operating instructions
IF Breakdown assistance
call button (mbrace system)297
Overhead control panel41
At a glance
Page 100 of 374

Correct driver's seat position
GWARNING
You could lose control of your vehicle if you do the following while driving:
Radjust the driver's seat, head restraint,
steering wheel or mirrors
Rfasten the seat belt
There is a risk of an accident.
Adjust the driver's seat, head restraint, steer-
ing wheel and mirror and fasten your seat belt before starting the engine.
Observe the following when adjusting steering
wheel :, seat belt ;and driver's seat =:
Ryou are as far away from the driver's air bag as
possible
Ryou are sitting in a normal upright position
Ryour thighs are slightly supported by the seat
cushion
Ryour legs are not entirely stretched and you
can depress the pedals properly
Rthe back of your head is supported at eye level
by the center of the head restraint
Ryou can hold the steering wheel with your
arms slightly bent
Ryou can move your legs freely
Ryou can see all the displays in the instrument
cluster clearly
Ryou should have a good overview of traffic
conditions
Rthe seat belt is pulled snugly against the body and is routed across the center of your shoul-
der and across your hips in the pelvic area
Further related subjects:
RAdjusting the seats electrically (Ypage 100).
RAdjusting the steering wheel mechanically
(Ypage 104).
RAdjusting the steering wheel electrically
(Ypage 105).
RFastening the seat belt correctly (Ypage 47).
RAdjusting the rear-view mirror and exterior
mirrors (Ypage 107).
RStoring the seat, steering wheel, exterior mir-
ror and head-up display settings with the
memory function (
Ypage 109).
Seats
Important safety notes
GWARNING
Children could become trapped if they adjust
the seats, particularly when unattended.
There is a risk of injury.
When leaving the vehicle, always take the
SmartKey with you and lock the vehicle. Never
leave children unsupervised in the vehicle.
The seats can still be adjusted when there is no
SmartKey in the ignition lock.
GWARNING
When you adjust a seat, you or other vehicle
occupants could become trapped, e.g. on the seat guide rail. There is a risk of injury.
Make sure when adjusting a seat that no one
has any body parts in the sweep of the seat.
Observe the safety notes on "Air bags"
(
Ypage 48) and "Children in the Vehicle"
(Ypage 59).
GWARNING
If the head restraints are not installed or not
adjusted correctly, they cannot provide pro-
tection as intended. There is an increased risk
98Seats
Seats, steering wheel and mirrors
Page 104 of 374
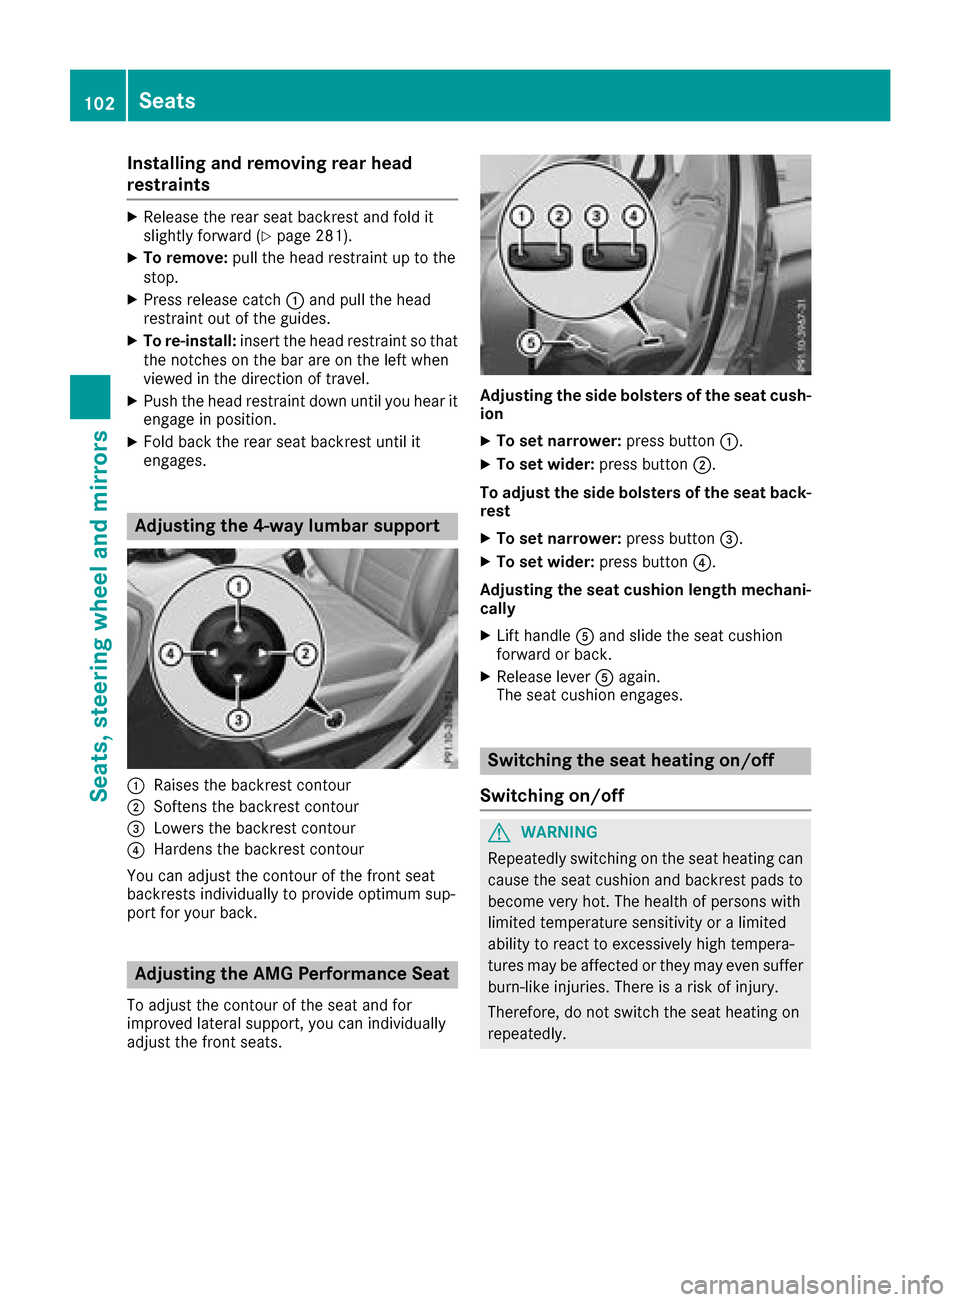
Installing and removing rear head
restraints
XReleaseth erear seat backrest and fol dit
slightly forward (Ypage 281).
XTo remove:pull thehead restrain tup to th e
stop.
XPress release catch :and pull th ehead
restrain tout of th eguides.
XTo re-install: insert thehead restrain tso that
th enotches on th ebar are on th elef twhen
viewed in th edirection of travel .
XPush thehead restrain tdown until you hear it
engage in position .
XFold backth erear seat backrest until it
engages.
Adjusting the 4-way lumbar support
:Raises th ebackrest contour
;Soften sth ebackrest contour
=Lowers th ebackrest contour
?Harden sth ebackrest contour
You can adjust th econtour of th efron tseat
backrest sindividually to provide optimum sup-
por tfor your back.
Adjusting the AMG Performance Seat
To adjust th econtour of th eseat and for
improve dlateral support ,you can individually
adjust th efron tseats.
Adjusting th esid ebolsters of th esea tcush -
ion
XTo set narrower: press button:.
XTo set wider: press button;.
To adjust th esid ebolsters of th esea tback -
res t
XTo set narrower: press button=.
XTo set wider: press button?.
Adjusting th esea tcushion lengt hmechani-
call y
XLifthandle Aand slide th eseat cushion
forward or back.
XReleas elever Aagain .
The seat cushion engages.
Switching the seat heating on/off
Switching on/off
GWARNIN G
Repeatedly switching on th eseat heating can
caus eth eseat cushion and backrest pads to
become ver yhot .The healt hof person swit h
limite dtemperature sensitivit yor alimite d
abilit yto reac tto excessively high tempera-
tures may be affecte dor they may eve nsuffer
burn-like injuries. Ther eis aris kof injury.
Therefore, do no tswitch th eseat heating on
repeatedly.
102Seats
Seats, steering wheel and mirrors
Page 109 of 374
For this reason, always make sure of the
actual distance from the road users traveling
behind by glancing over your shoulder.
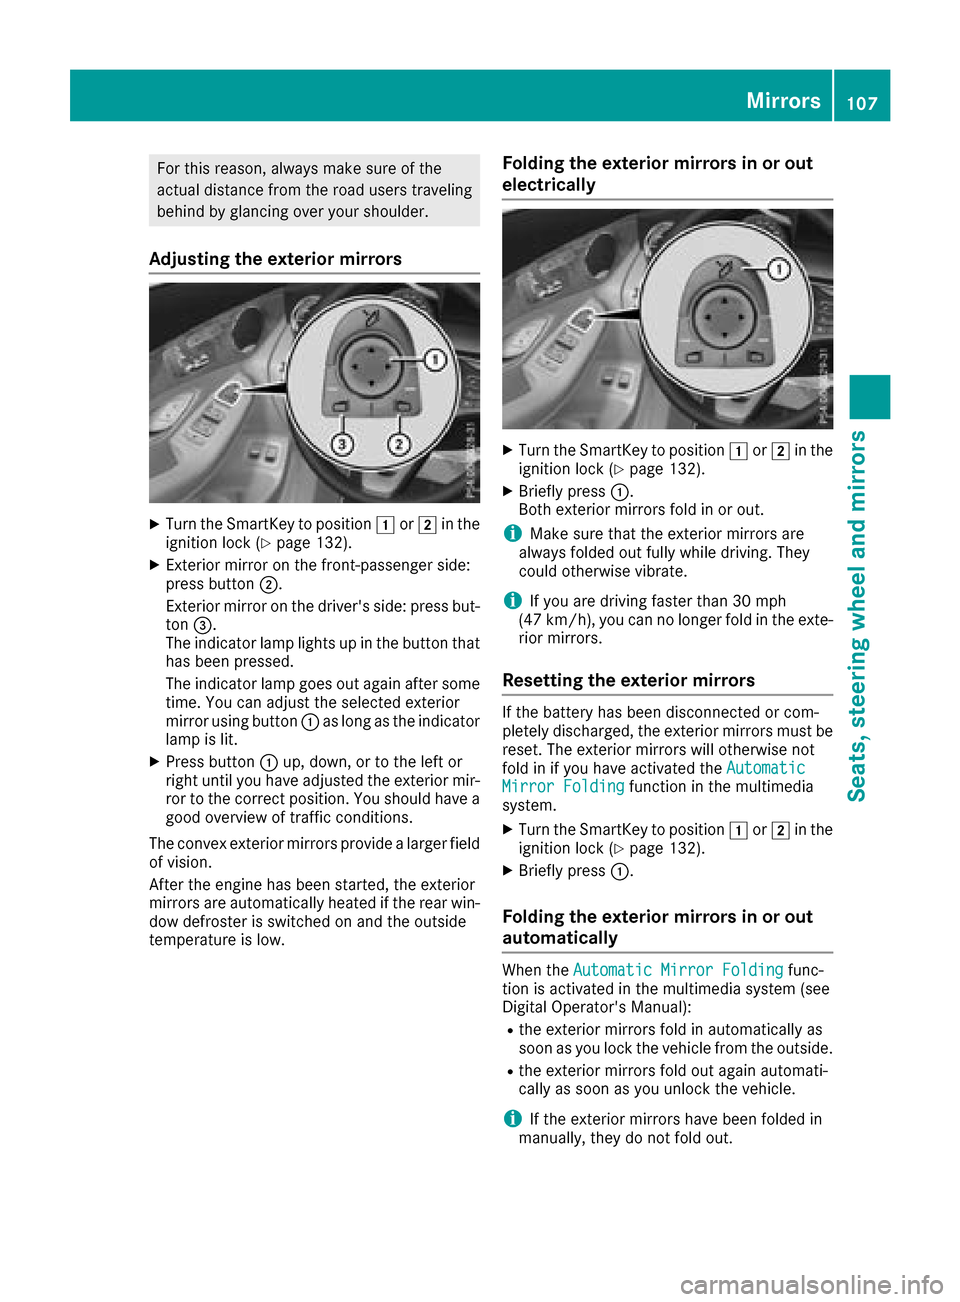
Adjusting the exterior mirrors
XTurn the SmartKey to position1or2 in the
ignition lock (Ypage 132).
XExterior mirror on the front-passenger side:
press button ;.
Exterior mirror on the driver's side: press but-
ton =.
The indicator lamp lights up in the button that
has been pressed.
The indicator lamp goes out again after some
time. You can adjust the selected exterior
mirror using button :as long as the indicator
lamp is lit.
XPress button :up, down, or to the left or
right until you have adjusted the exterior mir-
ror to the correct position. You should have a
good overview of traffic conditions.
The convex exterior mirrors provide a larger field of vision.
After the engine has been started, the exterior
mirrors are automatically heated if the rear win-
dow defroster is switched on and the outside
temperature is low.
Folding the exterior mirrors in or out
electrically
XTurn the SmartKey to position 1or2 in the
ignition lock (Ypage 132).
XBriefly press :.
Both exterior mirrors fold in or out.
iMake sure that the exterior mirrors are
always folded out fully while driving. They
could otherwise vibrate.
iIf you are driving faster than 30 mph
(47 km/h), you can no longer fold in the exte-
rior mirrors.
Resetting the exterior mirrors
If the battery has been disconnected or com-
pletely discharged, the exterior mirrors must be
reset. The exterior mirrors will otherwise not
fold in if you have activated the Automatic
Mirror Foldingfunction in the multimedia
system.
XTurn the SmartKey to position 1or2 in the
ignition lock (Ypage 132).
XBriefly press :.
Folding the exterior mirrors in or out
automatically
When theAutomatic Mirror Foldingfunc-
tion is activated in the multimedia system (see
Digital Operator's Manual):
Rthe exterior mirrors fold in automatically as
soon as you lock the vehicle from the outside.
Rthe exterior mirrors fold out again automati-
cally as soon as you unlock the vehicle.
iIf the exterior mirrors have been folded in
manually, they do not fold out.
Mirrors107
Seats, steering wheel and mirrors
Z
Page 110 of 374
Exterior mirror pushed out of position
If an exterior mirror has been pushed out of
position, proceed as follows:
XVehicles without electrically folding exte-
rior mirrors:manually move the exterior mir-
ror into the correct position.
XVehicles with electrically folding exterior
mirrors: press and hold button :until you
hear a click and then the mirror engaging in
position (
Ypage 107).
The mirror housing is engaged again and you
can adjust the exterior mirrors as usual
(
Ypage 107).
If an exterior mirror has been pushed out of
position, proceed as follows:
XPress and hold button :until you hear a click
and the mirror engages audibly into position
(
Ypage 107).
The mirror housing is engaged again and you
can adjust the exterior mirrors as usual
(
Ypage 107).
Automatic anti-glare mirrors
GWARNING
Electrolyte may escape if the glass in an auto-
matic anti-glare mirror breaks. The electrolyte
is harmful and causes irritation. It must not
come into contact with your skin, eyes, res-
piratory organs or clothing or be swallowed.
There is a risk of injury.
If you come into contact with the electrolyte,
observe the following:
RRinse off the electrolyte from your skin
immediately with water.
RImmediately rinse the electrolyte out of
your eyes thoroughly with clean water.
RIf the electrolyte is swallowed, immediately
rinse your mouth out thoroughly. Do not
induce vomiting.
RIf electrolyte comes into contact with your
skin or hair or is swallowed, seek medical
attention immediately.
RImmediately change out of clothing which
has come into contact with electrolyte.
RIf an allergic reaction occurs, seek medical
attention immediately.
The exterior mirror on the driver's side and the
rear-view mirror automatically go into anti-glare mode if:
Rthe ignition is switched on
Rincident light from headlamps strikes the sen-
sor in the rear-view mirror
The mirrors do not go into anti-glare mode if
reverse gear is engaged or if the interior lighting
is switched on.
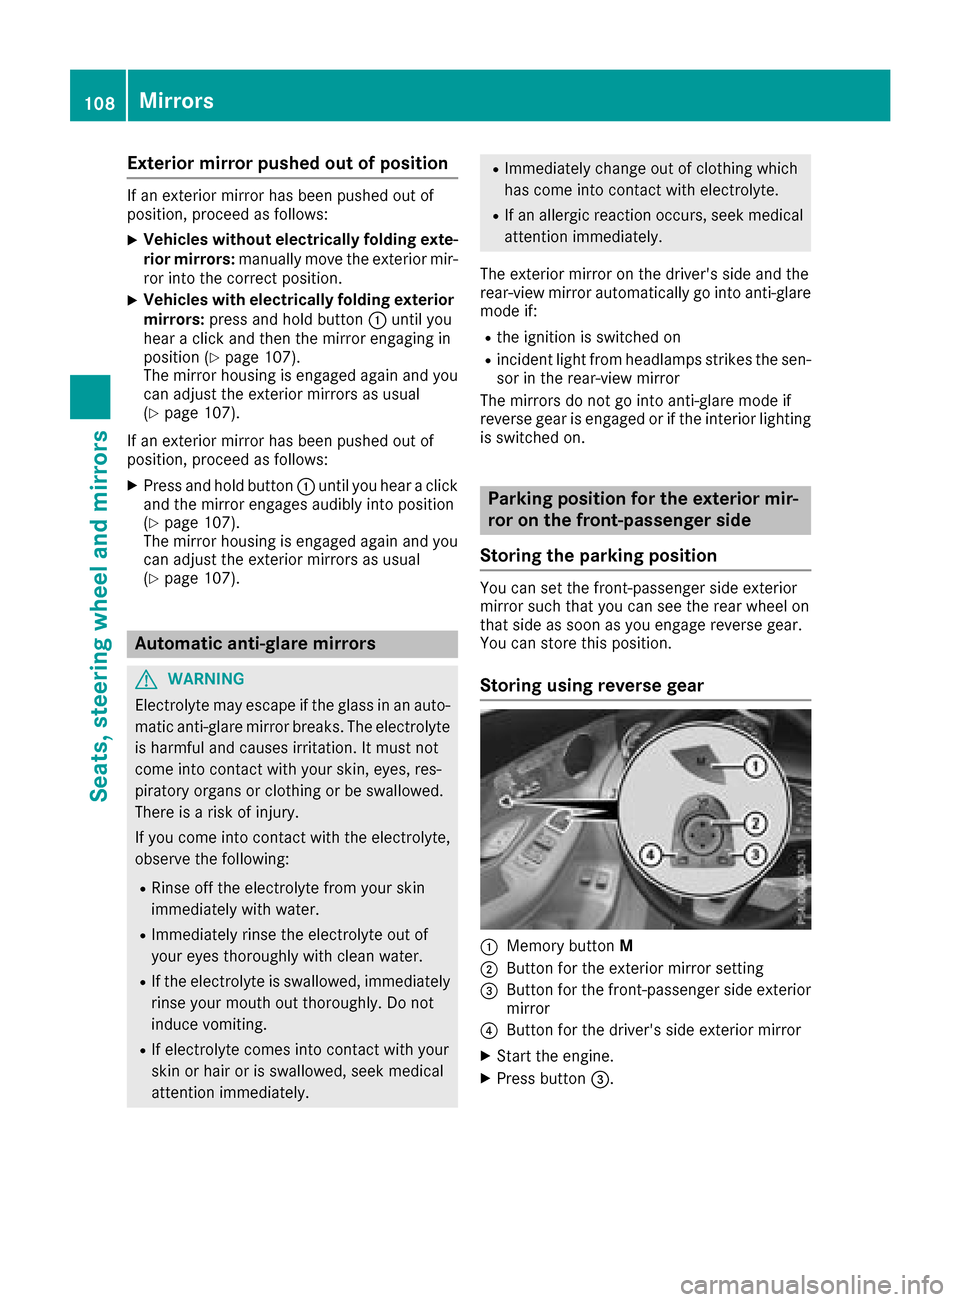
Parking position for the exterior mir-
ror on the front-passenger side
Storing the parking position
You can set the front-passenger side exterior
mirror such that you can see the rear wheel on
that side as soon as you engage reverse gear.
You can store this position.
Storing using reverse gear
:Memory button M
;Button for the exterior mirror setting
=Button for the front-passenger side exterior
mirror
?Button for the driver's side exterior mirror
XStart the engine.
XPress button=.
108Mirrors
Seats, steering wheel and mirrors