roof MERCEDES-BENZ GLE 2019 Owner's Manual
[x] Cancel search | Manufacturer: MERCEDES-BENZ, Model Year: 2019, Model line: GLE, Model: MERCEDES-BENZ GLE 2019Pages: 398, PDF Size: 12.25 MB
Page 98 of 398

!
If the sliding sunroof still cannot be opened or closed as a result of a malfunction, contact a
qualified specialist workshop. Problem
Possible causes/consequences and
0050
0050Solutions The sliding sunroof can-
not be closed and you
cannot see the cause. If the sliding sunroof is obstructed during closing and reopens again
slightly:
X Immediately after the sliding sunroof blocks, pull the 0056switch in
the overhead control panel down to the point of resistance and hold it until the sliding sunroof is closed.
The sliding sunroof is closed with increased force.
If the sliding sunroof is obstructed again during closing and then
reopens slightly:
X Immediately after the sliding sunroof blocks, pull the 0056switch in
the overhead control panel down to the point of resistance and hold it until the sliding sunroof is closed.
The sliding sunroof is closed without the automatic reversing fea-
ture. 96
Sliding sunroofOpening and closing
Page 104 of 398

0043
Rear seats
The three red indicator lamps in the button indicate the heating level you have selected.
The system automatically switches down from level 3to level 2after approximately eight minutes.
The system automatically switches down from level 2to level 1after approximately ten minutes.
The system automatically switches off approximately 35 minutes after it is set to level 1.
X Turn the SmartKey to position 0047or0048 in the ignition lock (Y page 135).
X To switch on: press button0043repeatedly until the desired heating level is set.
X To switch off: press button0043repeatedly until all the indicator lamps go out.
i If the battery voltage is too low, the seat heating may switch off.
Activating/deactivating seat ventilation The three blue indicator lamps in the buttons indicate the blower setting you have selected.
X Turn the SmartKey to position 0047or0048 in the ignition lock (Y page 135).
X To switch on: press button0043repeatedly until the desired blower setting is set.
X To switch off: press button0043repeatedly until all the indicator lamps go out.
i If the battery voltage is too low, the seat ventilation may switch off.
i You can open the side windows and the sliding sunroof using the "Convenience opening" feature
(Y page 89). The seat ventilation of the driver's seat automatically switches to the highest level. 102
SeatsSeats
, steering wheel and mirrors
Page 124 of 398
Overview of climate control systems
General notes
Observe the settings recommended on the fol-
lowing pages. The windows could otherwise fog up.
To prevent the windows from fogging up:
R Switch off climate control only briefly
R Switch on air-recirculation mode only briefly
R Switch on the cooling with air dehumidifica-
tion function
R Activate the "Windshield defrosting" function
briefly, if required
Climate control regulates the temperature and
the humidity in the vehicle interior and filters
undesirable substances out of the air.
The "Cooling with air dehumidification" function
is only available when the engine is running.
Optimum climate control is only achieved with
the side windows and roof closed.
The residual heat function can only be activated or deactivated with the ignition switched off
(Y page 131).
i Ventilate the vehicle for a brief period during
warm weather, e.g. using the convenience
opening feature (Y page 89). This will speed
up the cooling process and the desired inte-
rior temperature will be reached more
quickly. If you start the engine using your smartphone,
the last selected climate control setting is reac-
tivated (Y page 137).
i The integrated filter filters out most parti-
cles of dust and soot and completely filters
out pollen. It also reduces gaseous pollutants and odors. A clogged filter reduces the
amount of air supplied to the vehicle interior.
Depending on the operating conditions and
environmental influences, the interval for
replacing the filter may be shorter than speci- fied.
i Vehicles with ionization of the interior
air with air filter: in addition to ionization,
the vehicle has an air filter with anti-allergenic properties that contribute to improved air fil-
tration.
i It is possible that under certain circumstan-
ces the residual heat function may be activa-
ted automatically an hour after the SmartKey has been removed in order to dry the auto-
matic climate control. The vehicle is then ven-tilated for 30 minutes.
i Plug-in hybrid vehicles:
observe the notes
on climate control in the separate operating
instructions. 122
Overview of climate control systemsClimate control
Page 140 of 398
You can execute a maximum of two consecutive
starting attempts via your smartphone. If you
insert the SmartKey into the ignition lock, you
can carry out two more starting attempts.
Once you have started the engine, you can
switch the engine off via your smartphone at any time.
You can only start the engine via your smart-
phone if:
R the SmartKey is in the ignition lock
R park position 005Dis selected
R the accelerator pedal is not depressed
R the anti-theft alarm system is not activated
R the panic alarm is not activated
R the hazard warning lamps are switched off
R the hood is closed
R the doors are closed and locked
R the windows and sliding sunroof are closed
Also make sure that:
R the fuel tank is sufficiently filled
R the starter battery has been sufficiently
charged G
WARNING
Limbs could be crushed or trapped if the
engine is started unintentionally during ser-
vice or maintenance work. There is a risk of
injury.
Always secure the engine against uninten-
tional starting before carrying out mainte-
nance or repair work.
Make sure that the engine cannot be started via
your smartphone before carrying out mainte-
nance or repairs. You can prevent an engine
start via your smartphone if you:
R switch on the hazard warning lamps
R do not lock the doors
R open the hood Pulling away
General notes G
WARNING
If the engine speed is above the idling speed
and you engage transmission position 003A or
0046, the vehicle could pull away sud-
denly. There is a risk of an accident.
When engaging transmission position 003Aor
0046, always firmly depress the brake pedal
and do not simultaneously accelerate.
Depress the accelerator carefully when pulling
away.
The vehicle locks centrally once you have pulled away. The locking knobs in the doors drop down.
You can open the doors from the inside at any
time.
You can also deactivate the automatic locking
feature (Y page 240).
It is possible to shift the transmission from posi-
tion 005Dto the desired position only if you
depress the brake pedal. Only then is the park-
ing lock released. If you do not depress the
brake pedal, the DIRECT SELECT lever can still
be moved but the parking lock remains
engaged.
i Upshifts take place at higher engine speeds
after a cold start. This helps the catalytic con- verter to reach its operating temperature
more quickly.
Information on the automatic release of the
electric parking brake (Y page 158).
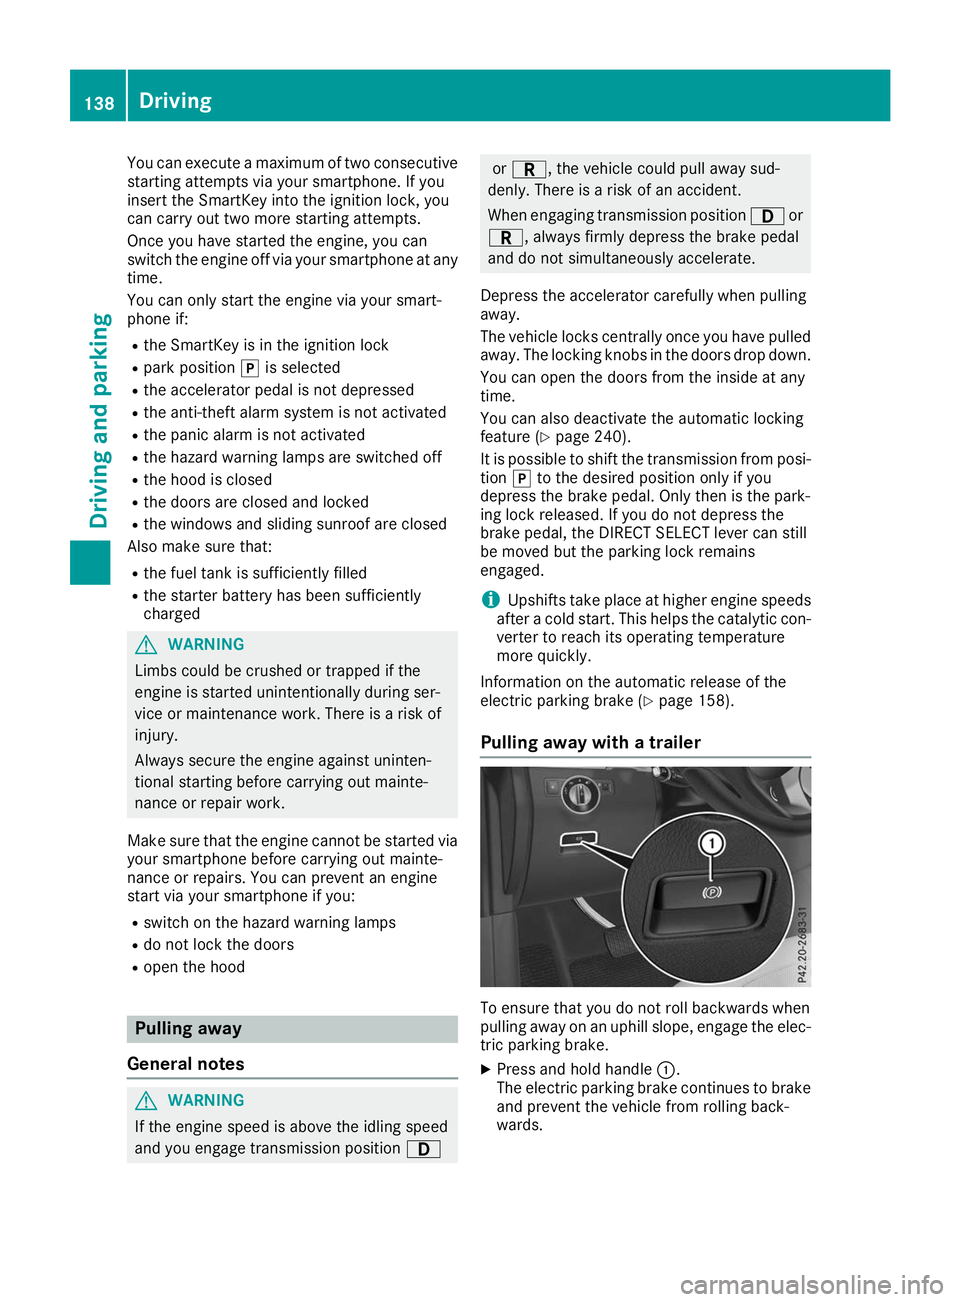
Pulling away with a trailer To ensure that you do not roll backwards when
pulling away on an uphill slope, engage the elec-
tric parking brake.
X Press and hold handle 0043.
The electric parking brake continues to brake
and prevent the vehicle from rolling back-
wards. 138
DrivingDriving and parking
Page 161 of 398
Emergency braking
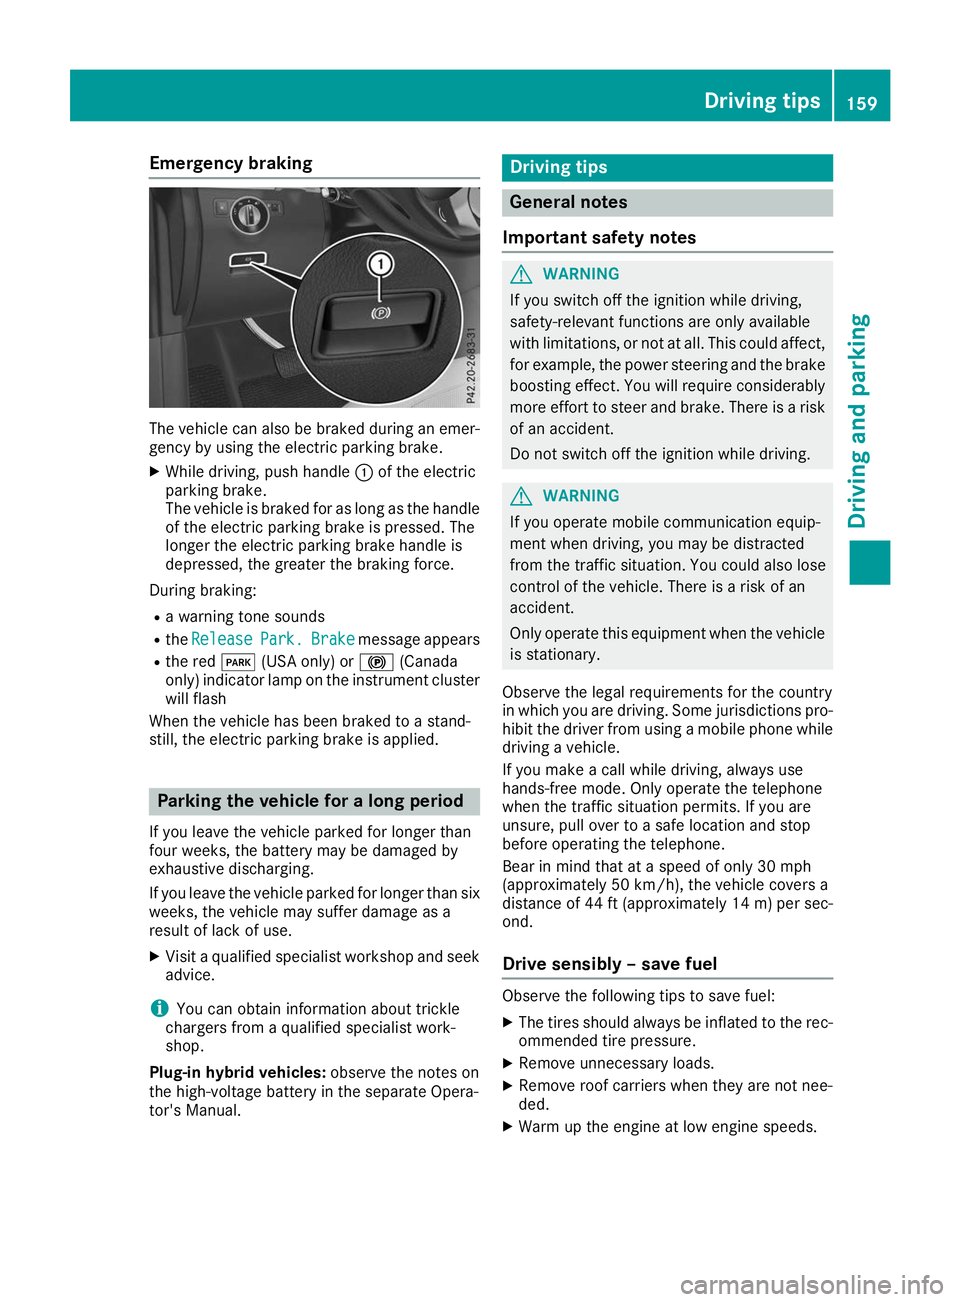
The vehicle can also be braked during an emer-
gency by using the electric parking brake.
X While driving, push handle 0043of the electric
parking brake.
The vehicle is braked for as long as the handle of the electric parking brake is pressed. The
longer the electric parking brake handle is
depressed, the greater the braking force.
During braking:
R a warning tone sounds
R the Release
Release Park. Park.Brake
Brakemessage appears
R the red 0049(USA only) or 0024(Canada
only) indicator lamp on the instrument cluster will flash
When the vehicle has been braked to a stand-
still, the electric parking brake is applied. Parking the vehicle for a long period
If you leave the vehicle parked for longer than
four weeks, the battery may be damaged by
exhaustive discharging.
If you leave the vehicle parked for longer than six weeks, the vehicle may suffer damage as a
result of lack of use.
X Visit a qualified specialist workshop and seek
advice.
i You can obtain information about trickle
chargers from a qualified specialist work-
shop.
Plug-in hybrid vehicles: observe the notes on
the high-voltage battery in the separate Opera-
tor's Manual. Driving tips
General notes
Important safety notes G
WARNING
If you switch off the ignition while driving,
safety-relevant functions are only available
with limitations, or not at all. This could affect, for example, the power steering and the brake
boosting effect. You will require considerably
more effort to steer and brake. There is a risk of an accident.
Do not switch off the ignition while driving. G
WARNING
If you operate mobile communication equip-
ment when driving, you may be distracted
from the traffic situation. You could also lose
control of the vehicle. There is a risk of an
accident.
Only operate this equipment when the vehicle is stationary.
Observe the legal requirements for the country
in which you are driving. Some jurisdictions pro-
hibit the driver from using a mobile phone while driving a vehicle.
If you make a call while driving, always use
hands-free mode. Only operate the telephone
when the traffic situation permits. If you are
unsure, pull over to a safe location and stop
before operating the telephone.
Bear in mind that at a speed of only 30 mph
(approximately 50 km/h), the vehicle covers a
distance of 44 ft (approximately 14 m)per sec-
ond.
Drive sensibly – save fuel Observe the following tips to save fuel:
X The tires should always be inflated to the rec-
ommended tire pressure.
X Remove unnecessary loads.
X Remove roof carriers when they are not nee-
ded.
X Warm up the engine at low engine speeds. Driving tips
159Driving and parking Z
Page 166 of 398
Off-road fording
!
Under no circumstances should you accel-
erate before entering the water. The bow
wave could cause water to enter and damage
the engine and other assemblies.
! Do not open any of the vehicle's doors while
fording. Otherwise, water could get into the
vehicle interior and damage the vehicle's
electronics and interior equipment.
R Establish how deep the water is and the char-
acteristics of the body of water before ford-
ing.
R Select the highest possible vehicle level.
R Shift to a lower gear using the left-hand steer-
ing wheel paddle shifter.
R Avoid high engine speeds.
R Enter and exit the water at a flat place and at
a steady walking pace.
R Drive slowly and at an even speed through the
water.
R Ensure that a bow wave does not form as you
drive.
R Do not stop and do not switch off the engine.
Water offers a high degree of resistance, and the ground is slippery and in some cases
unstable. Therefore, it is difficult and danger-
ous to pull away in the water.
R Clean any mud from the tire tread after ford-
ing.
R Apply the brakes to dry them after fording.
Always observe the fording depth values
(Y page 392). Winter driving
G
WARNING
If you shift down on a slippery road surface in an attempt to increase the engine's braking
effect, the drive wheels could lose their grip.
There is an increased danger of skidding and
accidents.
Do not shift down for additional engine brak-
ing on a slippery road surface. G
DANGER
If the exhaust pipe is blocked or adequate
ventilation is not possible, poisonous gases such as carbon monoxide (CO) may enter the
vehicle. This is the case, e.g. if the vehicle
becomes trapped in snow. There is a risk of
fatal injury.
If you leave the engine or the auxiliary heating
running, make sure the exhaust pipe and area
around the vehicle are clear of snow. To
ensure an adequate supply of fresh air, open a window on the side of the vehicle that is not
facing into the wind.
! When scraping ice off the rear window, take
care not to damage the rear-window seal or
trim.
Have your vehicle winter-proofed at a qualified
specialist workshop at the onset of winter.
Drive particularly carefully on slippery road sur- faces. Avoid sudden acceleration, steering and
braking maneuvers. Do not use cruise control or
Active Distance Assist DISTRONIC.
If the vehicle threatens to skid or cannot be
stopped when moving at low speed:
X Shift the transmission to position 005C.
X Try to bring the vehicle under control using
corrective steering.
When driving in snow with or without snow
chains, select driving program Slippery
(Y page 142).
i Vehicles with a diesel engine:
do not
cover the radiator, e.g. with a protective
cover. The measuring function of the on-
board diagnosis system may otherwise pro-
vide inaccurate values. Some of these values
are required by law and must therefore always be accurate.
The outside temperature indicator is not
designed to serve as an ice-warning device and
is therefore unsuitable for that purpose.
Changes in the outside temperature are dis-
played after a short delay.
Indicated temperatures just above the freezing
point do not guarantee that the road surface is
free of ice. The road may still be icy, especially in wooded areas or on bridges. You should pay
special attention to road conditions when tem-
peratures are around the freezing point.
For more information on driving with snow
chains, see (Y page 353).164
Driving tipsDriving and parking
Page 168 of 398
Familiarize yourself with the characteristics of
your vehicle and the gear shift operation before
driving through difficult terrain.
The following driving systems are specially
adapted to off-road driving:
R The Off-road drive program (vehicles without
Off-Road Engineering package)
(Y page 215)
R Off-road andOff-road Plus drive programs
(vehicles with Off-Road Engineering package) (Y page 216)
R LOW RANGE off-road gear (vehicles with the
Off-Road Engineering package)
(Y page 217)
R Differential lock (vehicles with the Off-Road
Engineering package) (Y page 217)
R Off-road ABS (Y page 67)
R Off-road 4ETS (Y page 70)
R Off-road ESP ®
(Y page 72)
R AIRMATIC package (vehicle level)
(Y page 183)
R DSR (Downhill Speed Regulation)
(Y page 214)
Observe the following notes:
R Stop the vehicle before starting to drive along
an off-road route. If necessary, select the off- road program (Y page 216) or shift to the
LOW RANGE off-road gear (Y page 217).
R Select a vehicle level that is suitable for the
terrain. To avoid damaging the vehicle, make
sure there is always sufficient ground clear-
ance.
R Check that items of luggage and loads are
stowed safely and are well secured
(Y page 299).
R Always keep the engine running and in gear
when driving on a downhill gradient. Activate
DSR (Y page 214).
R Always keep the engine running and in gear
when driving down an incline.
R Adapt your speed to the terrain. The rougher,
steeper or more ruts on the terrain, the slower your speed should be.
R Do not jump with the vehicle as this will inter-
rupt the vehicle's propulsion.
R Drive with extreme care on unfamiliar off-road
routes where visibility is poor. For safety rea- sons, get out of the vehicle first and survey
the off-road route. R
Look out for obstacles, such as rocks, holes,
tree stumps and furrows.
R Take care when turning on an uphill or down-
hill slope or when driving across a slope. The
vehicle could otherwise tip over.
R Always keep the doors, the tailgate, the side
windows and the sliding sunroof closed while
the vehicle is in motion.
R Do not shift the automatic transmission to
position 005C.
R Observe the notes on off-road fording
(Y page 164).
i Information about retrofitting special all-ter-
rain tires is available from any qualified spe-
cialist workshop.
i Do not use the HOLD function when driving
off-road, on steep uphill or downhill gradients
or on slippery or loose surfaces. The HOLD
function cannot hold the vehicle on such sur- faces.
Checklist before driving off-road !
If the engine oil warning lamp lights up while
the vehicle is in motion, stop the vehicle in a
safe place as soon as possible. Check the
engine oil level. The engine oil warning lamp
warning must not be ignored. Continuing the
journey while the symbol is displayed could
lead to engine damage.
X Engine oil level: check the engine oil level
and add oil if necessary.
When driving on steep gradients, the engine
oil level must be sufficiently high to ensure a
correct oil supply in the vehicle.
X DEF tank (BlueTEC vehicles): check the
level and add if necessary (Y page 153).
X Tire-changing tool kit: check that the jack is
working and make sure you have the lug
wrench, a robust tow cable and a folding
spade in the vehicle.
X Wheels and tires: check the tread depth and
pressure of the tires.
X Check for damage and remove any foreign
objects, e.g. small stones, from the wheels/
tires.
X Replace any missing valve caps.
X Replace dented or damaged wheels.
X Rims: dented or bent rims can result in a loss
of tire pressure and damage the tire bead. 166
Driving tipsDriving and parking
Page 306 of 398
Roof carrier
Important safety notes G
WARNING
When you load the roof, the center of gravity
of the vehicle rises and the driving character- istics change. If you exceed the maximum roof
load, the driving characteristics, as well as
steering and braking, will be greatly impaired. There is a risk of an accident.
Never exceed the maximum roof load and
adjust your driving style.
! Mercedes-Benz recommends that you only
use roof carriers that have been tested and
approved for Mercedes-Benz vehicles. This
helps to prevent damage to the vehicle.
Position the load on the roof carrier in such a way that the vehicle will not sustain damage
even when it is in motion.
Depending on the vehicle equipment, ensure
that when the roof carrier is installed you can:
R raise the sliding sunroof fully
R open the panorama roof with power tilt/
sliding panel fully
R open the tailgate fully
You will find information on the maximum roof
load in the "Technical data" section
(Y page 390).
An incorrectly secured roof carrier or roof load
may become detached from the vehicle. You
must therefore ensure that you observe the roof
carrier manufacturer's installation instructions.
Attaching the roof carrier X
Secure the roof carrier to roof rails 0043. In
doing so, observe the manufacturer's instal-
lation instructions. Features
Cup holder
Important safety notes G
WARNING
If you transport objects in the vehicle interior and these are not adequately secured, they
could slip or be flung around and thereby
strike vehicle occupants. In addition, cup
holders, open stowage spaces and mobile
phone brackets may not always be able to
hold the objects placed in them in the event of an accident. There is a risk of injury, particu-
larly in the event of sharp braking or sudden
changes of direction.
R Always stow objects in such a way that they
cannot be tossed about in these or similar
situations.
R Always make sure that objects do not pro-
trude out of the stowage spaces, luggage
nets or stowage nets.
R Ensure that closable stowage spaces are
shut before beginning your journey.
R Always stow and secure heavy, hard, poin-
ted, sharp-edged, fragile or large objects in
the cargo compartment.
Observe the loading guidelines (Y page 295).
! Only use the cup holders for containers of
the right size and which have lids. The drinks
could otherwise spill.
! Do not expose drinks bottles in the cup
holder in the center console to continuous,
strong and direct sunlight. The passenger
compartment in the area of the center con-
sole can otherwise be damaged by the con-
centrated and reflected sunlight.
Do not keep the KEYLESS-GO key in the tem-
perature-controlled cup holder (Y page 305).
Otherwise, the KEYLESS-GO key will not be rec-
ognized. 304
FeaturesStowage and features
Page 329 of 398
To avoid damage to the vehicle, deactivate
Active Distance Assist DISTRONIC and the
HOLD function in the following or similar sit-
uations:
R when towing the vehicle
R in the car wash
! Never clean your vehicle in a Touchless
Automatic Car Wash as these use special
cleaning agents. These cleaning agents can
damage the paintwork or plastic parts.
! Make sure that:
R the side windows and the sliding sunroof
are fully closed.
R that the blower of the ventilation/heating
system is switched off (OFF button has
been pressed).
R the windshield wiper switch is at position
005A.
The vehicle may otherwise be damaged.
! In car washes with a towing mechanism,
make sure that the automatic transmission is
in transmission position 005C; otherwise, the
vehicle could be damaged.
R Vehicles with a SmartKey:
Do not remove the SmartKey from the igni-
tion lock. Do not open the driver's door or
front-passenger door when the engine is
switched off. Otherwise, the automatic
transmission selects park position 005Dauto-
matically and locks the wheels. You can
prevent this by shifting the automatic trans- mission to 005Cbeforehand.
R Vehicles with KEYLESS-GO:
Do not open the driver's door or front-
passenger door when the engine is
switched off. Otherwise, the automatic
transmission selects park position 005Dauto-
matically and locks the wheels.
Observe the following to make sure that the
automatic transmission stays in position 005C:
X Make sure the vehicle is stationary and the
ignition is switched off.
X Turn the SmartKey to position in the ignition
lock 0048(Ypage 135).
Use the SmartKey instead of the Start/Stop
button on vehicles with KEYLESS-GO.
X Depress and hold the brake pedal.
X Shift the automatic transmission to position
005C. X
Release the brake pedal.
X Release the electric parking brake.
X Switch off the ignition and leave the SmartKey
in the ignition lock.
You can wash the vehicle in an automatic car
wash from the very start.
If the vehicle is very dirty, pre-wash it before
cleaning it in an automatic car wash.
After using an automatic car wash, wipe off wax
from the windshield and the wiper blades. This
will prevent smears and reduce wiping noises
caused by residue on the windshield.
Washing by hand In some countries, washing by hand is only
allowed at specially equipped washing bays.
Observe the legal requirements in all countries
concerned.
X Do not use hot water and do not wash the
vehicle in direct sunlight.
X Use a soft sponge to clean.
X Use a mild cleaning agent, such as a car
shampoo approved by Mercedes-Benz.
X Thoroughly hose down the vehicle with a gen-
tle jet of water.
X Do not point the water jet directly towards the
air inlets.
X Use plenty of water and rinse out the sponge
frequently.
X Rinse the vehicle with clean water and dry
thoroughly with a chamois.
X Do not let the cleaning agent dry on the paint-
work.
When using the vehicle in winter, remove all
traces of road salt deposits carefully and as
soon as possible.
Power washers G
WARNING
The water jet from a circular jet nozzle (dirt
blasters) can cause invisible exterior damage to the tires or chassis components. Compo-
nents damaged in this way may fail unexpect-edly. There is a risk of an accident.
Do not use power washers with circular jet
nozzles to clean the vehicle. Have damaged Care
327Maintenance and care
Z
Page 330 of 398
tires or chassis components replaced imme-
diately.
! Always maintain a distance of at least 12 in
(30 cm) between the vehicle and the power
washer nozzle. Information about the correct
distance is available from the equipment
manufacturer.
Move the power washer nozzle around when
cleaning your vehicle.
Do not aim directly at any of the following:
R Tires
R Door gaps, roof gaps, joints, etc.
R Electrical components
R Battery
R Plug-type couplings
R Light bulbs
R Seals
R Trim elements
R Ventilation slots
Damaged seals or electrical components can
lead to leaks or failures.
! Vehicles with decorative foil: parts of your
vehicle are covered with decorative foil. Main- tain a distance of at least 27.5 in (70 cm)
between the foil-wrapped parts of the vehicle and the nozzle of the high pressure cleaner.
Information about the correct distance is
available from the equipment manufacturer.
Move the power washer nozzle around when
cleaning your vehicle.
The water temperature of the high-pressure
cleaner must not exceed 140 °F (60 °C).
Cleaning the paintwork !
Do not affix:
R stickers
R films
R magnetic plates or similar items
to painted surfaces. You could otherwise
damage the paintwork.
Scratches, corrosive deposits, areas affected by
corrosion and damage caused by inadequate
care cannot always be completely repaired. In
such cases, visit a qualified specialist workshop. X
Remove dirt immediately, where possible,
while avoiding rubbing too hard.
X Soak insect remains with insect remover and
rinse off the treated areas afterwards.
X Soak bird droppings with water and rinse off
the treated areas afterwards.
X Remove tree resin, oils, fuels and greases by
rubbing gently with a cloth soaked in petro-
leum ether or lighter fluid
X Remove coolant and brake fluid with a moist
cloth and clear water.
X Use tar remover to remove tar stains.
X Use silicone remover to remove wax.
If water no longer forms "beads" on the paint
surface, use the paint care products recommen-
ded and approved by Mercedes-Benz. This is the
case approximately every three to five months,
depending on the climate conditions and the
care product used.
If dirt has penetrated the paint surface or if the
paint has become dull, the paint cleaner recom-
mended and approved by Mercedes-Benz
should be used.
Do not use these care products in the sun or on the hood while the hood is hot.
X Use a suitable touch-up stick, e.g. MB Touch-
Up Stick, to repair slight damage to the paint-
work quickly and provisionally.
Matte finish care !
Never polish the vehicle or the light alloy
wheels. Polishing causes the finish to shine.
! The following can give the paint a glossy
appearance and thus reduce the matt effect:
R Rubbing hard with unsuitable agents
R Washing the vehicle in direct sunlight
! Never use paint cleaner, buffing or polishing
products, or gloss preserver, e.g. wax, for the purpose of paintwork care. These products
are only suitable for high-gloss surfaces. Their
use on vehicles with matte paintwork leads to
considerable surface damage or, more spe-
cifically, to shiny, spotted areas.
Always have paintwork repairs carried out at a
qualified specialist workshop.
! Only use automatic car washes which cor-
respond to the latest technological stand-
ards. Never use wash programs which finish
by treating the vehicle with hot wax. 328
CareMaintenance and care