MERCEDES-BENZ GLE-Class 2016 C292 Owner's Manual
Manufacturer: MERCEDES-BENZ, Model Year: 2016, Model line: GLE-Class, Model: MERCEDES-BENZ GLE-Class 2016 C292Pages: 382, PDF Size: 8.83 MB
Page 361 of 382
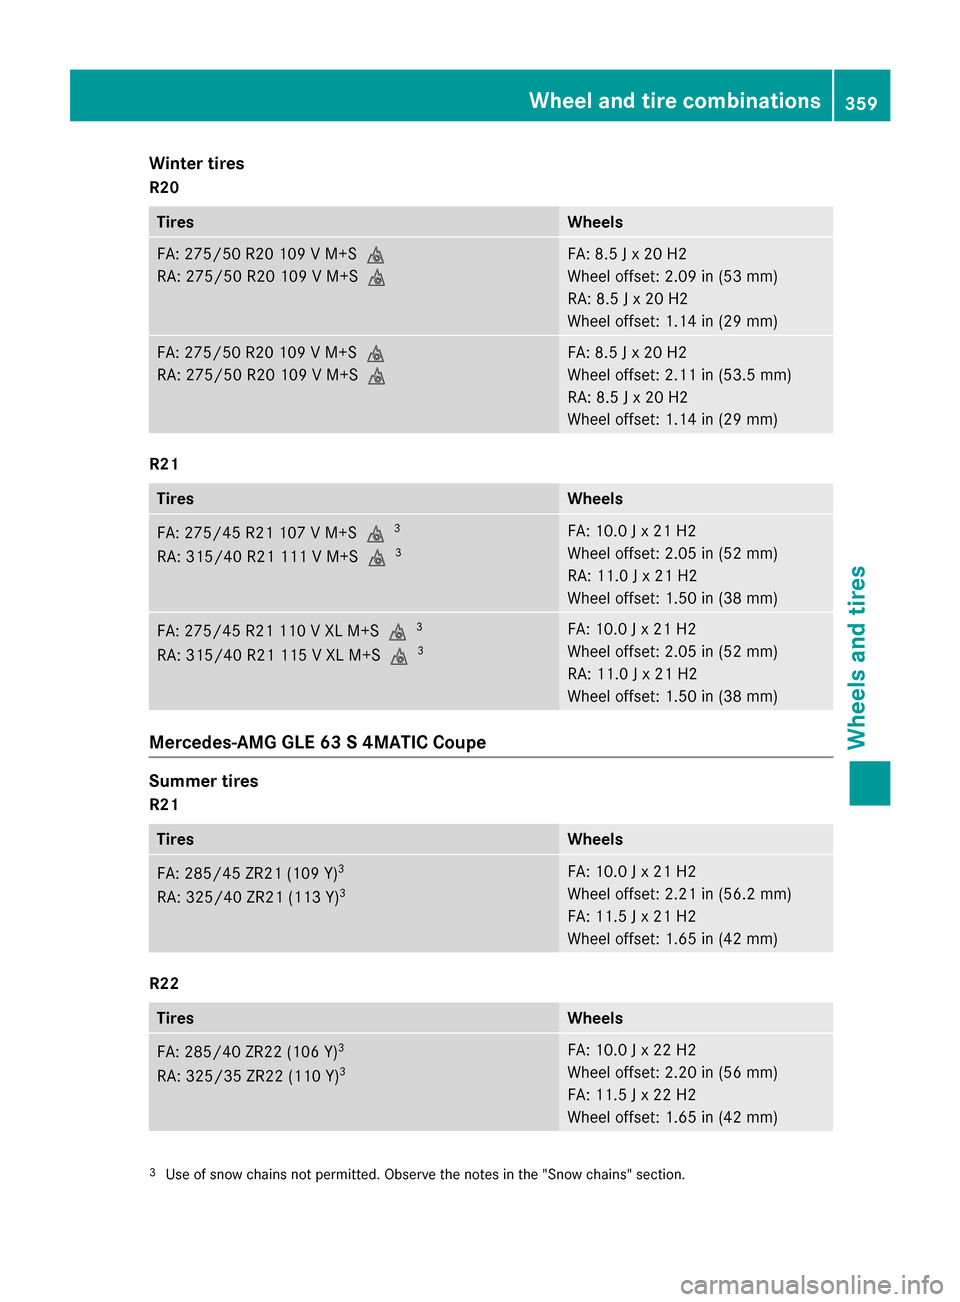
Winter tires
R20
TiresWheels
FA: 275/50 R20 109 V M+Si
RA: 275/50 R20 109 V M+SiFA: 8.5 J x 20 H2
Wheel offset: 2.09 in (53 mm)
RA: 8.5 J x 20 H2
Wheel offset: 1.14 in (29 mm)
FA: 275/50 R20 109 V M+Si
RA: 275/50 R20 109 V M+SiFA: 8.5 J x 20 H2
Wheel offset: 2.11 in (53.5 mm)
RA: 8.5 J x 20 H2
Wheel offset: 1.14 in (29 mm)
R21
TiresWheels
FA: 275/45 R21 107 V M+Si3
RA: 315/40 R21 111 V M+Si3
FA: 10.0 J x 21 H2
Wheel offset: 2.05 in (52 mm)
RA: 11.0 J x 21 H2
Wheel offset: 1.50 in (38 mm)
FA: 275/45 R21 110 V XL M+Si3
RA: 315/40 R21 115 V XL M+Si3
FA: 10.0 J x 21 H2
Wheel offset: 2.05 in (52 mm)
RA: 11.0 J x 21 H2
Wheel offset: 1.50 in (38 mm)
Mercedes-AMG GLE 63 S 4MATIC Coupe
Summer tires
R21
TiresWheels
FA: 285/45 ZR21 (109 Y)3
RA: 325/40 ZR21 (113 Y)3
FA: 10.0 J x 21 H2
Wheel offset: 2.21 in (56.2 mm)
FA: 11.5 J x 21 H2
Wheel offset: 1.65 in (42 mm)
R22
TiresWheels
FA: 285/40 ZR22 (106 Y)3
RA: 325/35 ZR22 (110 Y)3
FA: 10.0 J x 22 H2
Wheel offset: 2.20 in (56 mm)
FA: 11.5 J x 22 H2
Wheel offset: 1.65 in (42 mm)
3Use of snow chains not permitted. Observe the notes in the "Snow chains" section.
Wheel and tire combinations359
Wheels and tires
Z
Page 362 of 382
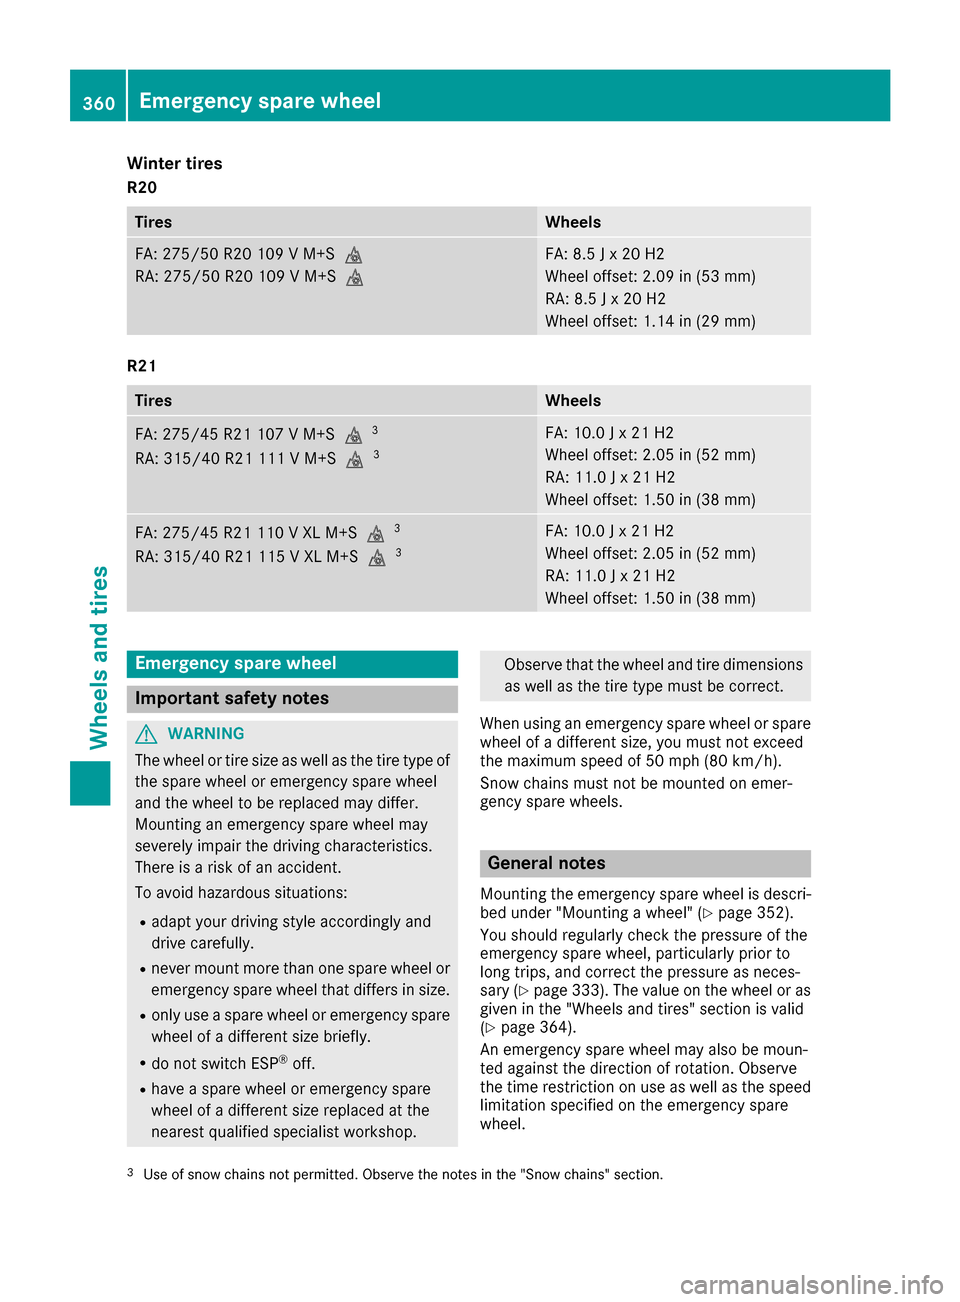
Winter tires
R20
TiresWheels
FA: 275/50 R20 109 V M+Si
RA: 275/50 R20 109 V M+SiFA: 8.5 J x 20 H2
Wheel offset: 2.09 in (53 mm)
RA: 8.5 J x 20 H2
Wheel offset: 1.14 in (29 mm)
R21
TiresWheels
FA: 275/45 R21 107 V M+Si3
RA: 315/40 R21 111 V M+Si3
FA: 10.0 J x 21 H2
Wheel offset: 2.05 in (52 mm)
RA: 11.0 J x 21 H2
Wheel offset: 1.50 in (38 mm)
FA: 275/45 R21 110 V XL M+Si3
RA: 315/40 R21 115 V XL M+Si3
FA: 10.0 J x 21 H2
Wheel offset: 2.05 in (52 mm)
RA: 11.0 J x 21 H2
Wheel offset: 1.50 in (38 mm)
Emergency spare wheel
Important safety notes
GWARNING
The wheel or tire size as well as the tire type of the spare wheel or emergency spare wheel
and the wheel to be replaced may differ.
Mounting an emergency spare wheel may
severely impair the driving characteristics.
There is a risk of an accident.
To avoid hazardous situations:
Radapt your driving style accordingly and
drive carefully.
Rnever mount more than one spare wheel or
emergency spare wheel that differs in size.
Ronly use a spare wheel or emergency spare
wheel of a different size briefly.
Rdo not switch ESP®off.
Rhave a spare wheel or emergency spare
wheel of a different size replaced at the
nearest qualified specialist workshop.
Observe that the wheel and tire dimensions
as well as the tire type must be correct.
When using an emergency spare wheel or spare
wheel of a different size, you must not exceed
the maximum speed of 50 mph (80 km/h).
Snow chains must not be mounted on emer-
gency spare wheels.
General notes
Mounting the emergency spare wheel is descri-
bed under "Mounting a wheel" (Ypage 352).
You should regularly check the pressure of the
emergency spare wheel, particularly prior to
long trips, and correct the pressure as neces-
sary (
Ypage 333). The value on the wheel or as
given in the "Wheels and tires" section is valid
(
Ypage 364).
An emergency spare wheel may also be moun-
ted against the direction of rotation. Observe
the time restriction on use as well as the speed limitation specified on the emergency spare
wheel.
3Use of snow chains not permitted. Observe the notes in the "Snow chains" section.
360Emergency spare wheel
Wheels and tires
Page 363 of 382
Replaceth etires after six years at th elatest ,
regardless of wear .This also applie sto th e
emergenc yspar ewheel.
iWhen you are driving wit hth ecollapsible
spar ewhee lmounted, th etire pressur eloss
warning system or th etire pressur emonitor
canno tfunction reliably. Only restar tth etire
pressur eloss warning system or tire pressur e
monitor when th edefective whee lhas been
replace dwit h a newwheel.
Vehicles with tire pressure monitor: after
mounting an emergenc yspar ewheel, th esys-
te m may still display th etire pressur eof th e
remove dwhee lfor afew minutes. The value
displayed for th emounte demergenc yspar e
whee lis no tth esam eas th ecurren ttire pres-
sur eof th eemergenc yspar ewheel.
Removing/stowing the emergency
spare wheel
Vehicles with a "Minispare" emergency
spare wheel under the cargo compart-
ment floor
Always observ eth einstruction sand safet y
note sin th e"Mounting awheel" section
(
Ypage 352).
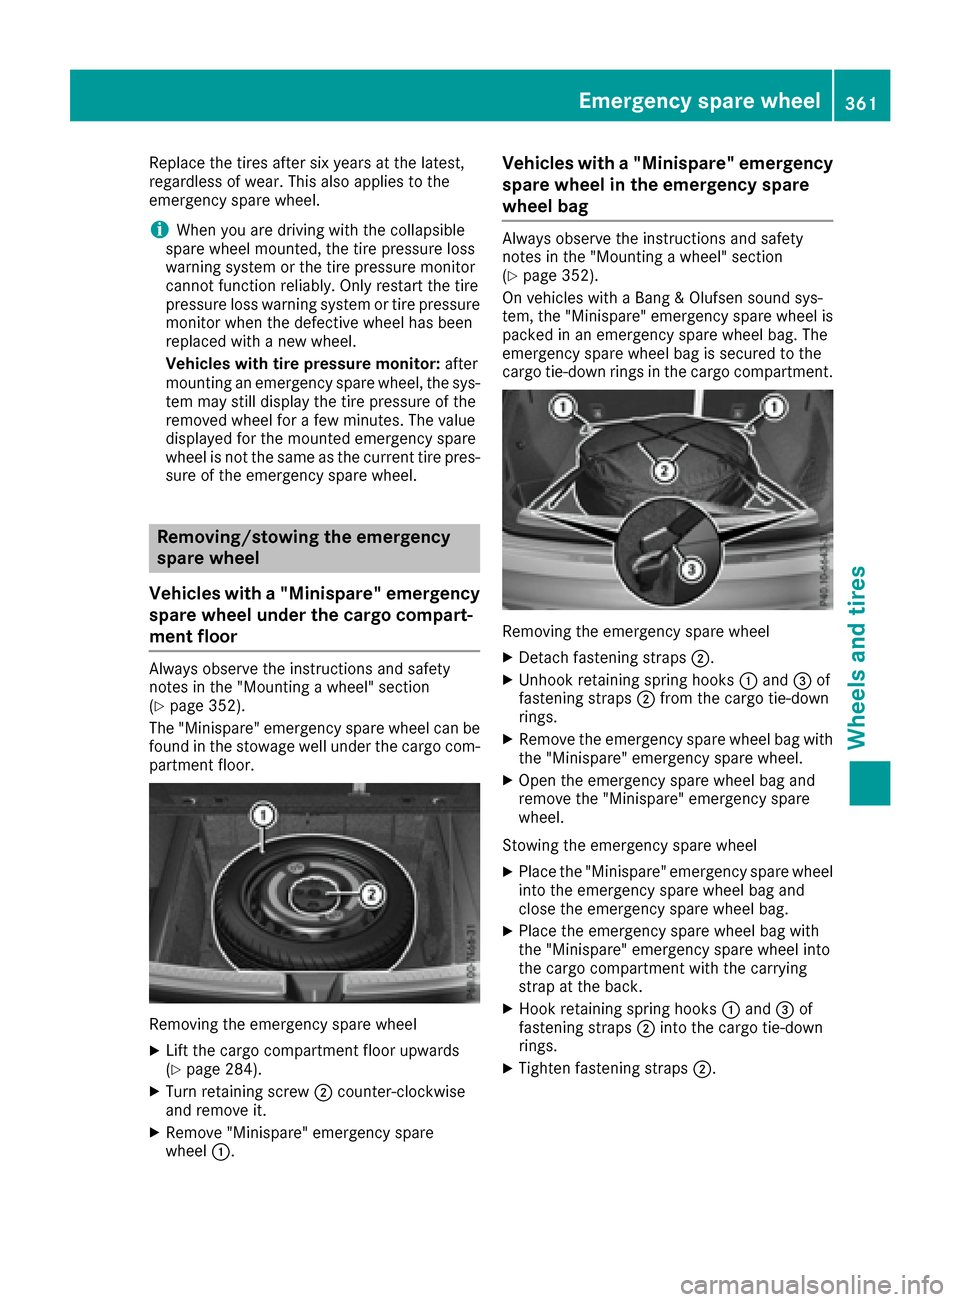
The "Minispare" emergenc yspar ewhee lcan be
foun din th estowage well under th ecargo com-
partmen tfloor.
Removin gth eemergenc yspar ewhee l
XLiftth ecargo compartmen tfloor upwards
(Ypage 284).
XTurn retaining screw ;counter-clockwise
and remove it .
XRemove "Minispare" emergenc yspar e
whee l:.
Vehicles with a "Minispare" emergency
spare wheel in the emergency spare
wheel bag
Always observ eth einstruction sand safet y
note sin th e"Mounting awheel" section
(
Ypage 352).
On vehicles wit h aBan g & Olufsen soun dsys-
tem, th e"Minispare" emergenc yspar ewhee lis
packe din an emergenc yspar ewhee lbag. The
emergenc yspar ewhee lbag is secured to th e
cargo tie-down rings in th ecargo compartment.
Removin gth eemergenc yspar ewhee l
XDetac hfastenin gstraps ;.
XUnhookretaining spring hooks :and =of
fastenin gstraps ;from th ecargo tie-down
rings.
XRemove th eemergenc yspar ewhee lbag wit h
th e"Minispare" emergenc yspar ewheel.
XOpen th eemergenc yspar ewhee lbag and
remove th e"Minispare" emergenc yspar e
wheel.
Stowin gth eemergenc yspar ewhee l
XPlaceth e"Minispare" emergenc yspar ewhee l
int oth eemergenc yspar ewhee lbag and
close th eemergenc yspar ewhee lbag.
XPlac eth eemergenc yspar ewhee lbag wit h
th e"Minispare" emergenc yspar ewhee lint o
th ecargo compartmen twit hth ecarryin g
strap at th eback.
XHook retaining spring hooks :and =of
fastenin gstraps ;intoth ecargo tie-down
rings.
XTighte nfastenin gstraps ;.
Emergency spare wheel361
Wheels and tires
Z
Page 364 of 382
Mercedes-AMG vehicles with a collaps-
ible spare wheel under the cargo com-
partment floor
!Only place the collapsible spare wheel in the
vehicle when it is dry. Otherwise, moisture
may get into the vehicle.
Always observe the instructions and safety
notes in the "Mounting a wheel" section
(
Ypage 352).
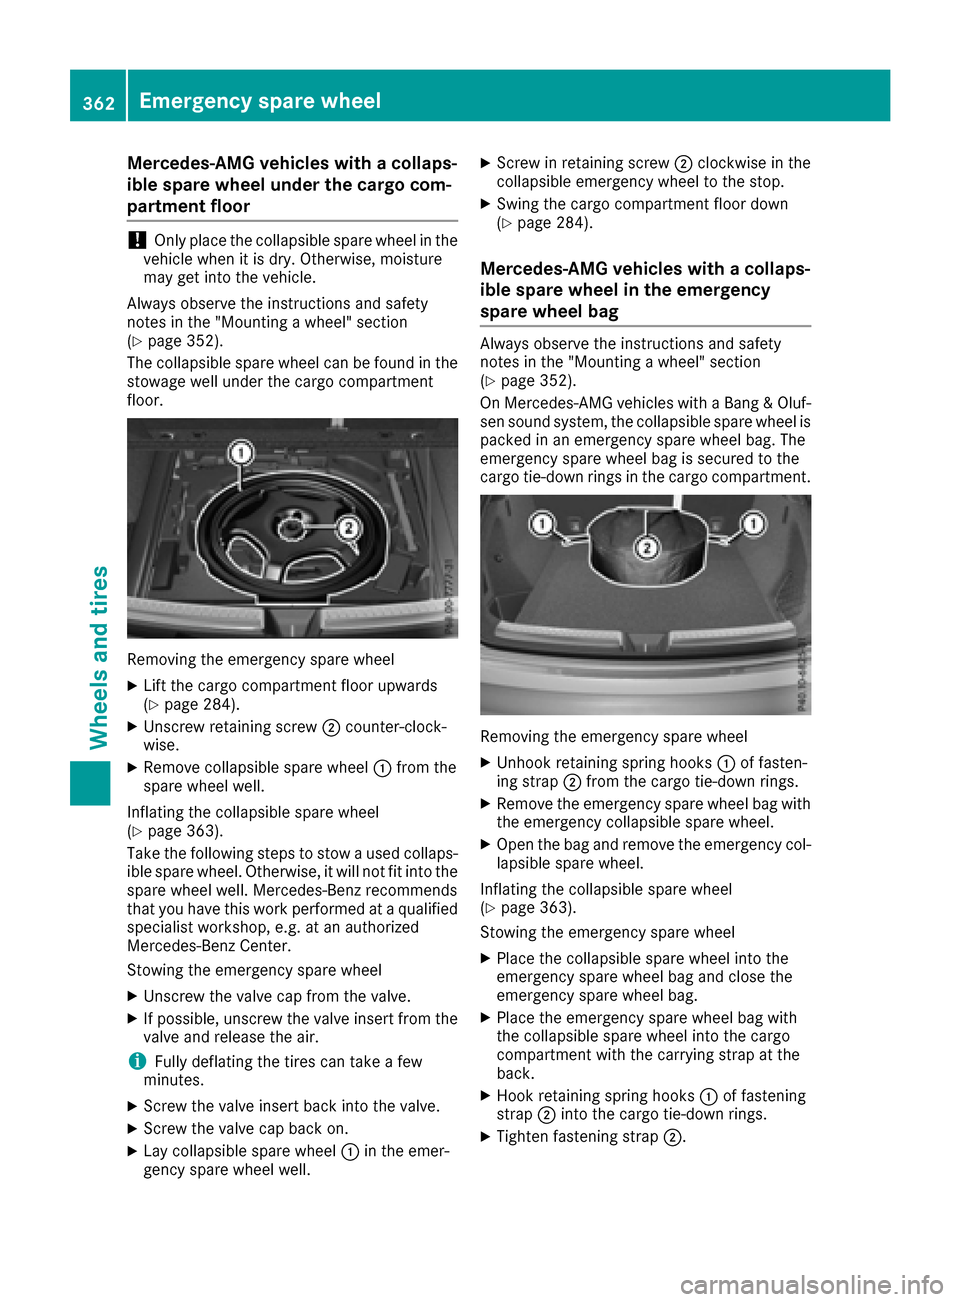
The collapsible spare wheel can be found in the
stowage well under the cargo compartment
floor.
Removing the emergency spare wheel
XLift the cargo compartment floor upwards
(Ypage 284).
XUnscrew retaining screw ;counter-clock-
wise.
XRemove collapsible spare wheel :from the
spare wheel well.
Inflating the collapsible spare wheel
(
Ypage 363).
Take the following steps to stow a used collaps- ible spare wheel. Otherwise, it will not fit into the
spare wheel well. Mercedes-Benz recommends
that you have this work performed at a qualified
specialist workshop, e.g. at an authorized
Mercedes-Benz Center.
Stowing the emergency spare wheel
XUnscrew the valve cap from the valve.
XIf possible, unscrew the valve insert from the
valve and release the air.
iFully deflating the tires can take a few
minutes.
XScrew the valve insert back into the valve.
XScrew the valve cap back on.
XLay collapsible spare wheel :in the emer-
gency spare wheel well.
XScrew in retaining screw ;clockwise in the
collapsible emergency wheel to the stop.
XSwing the cargo compartment floor down
(Ypage 284).
Mercedes-AMG vehicles with a collaps-
ible spare wheel in the emergency
spare wheel bag
Always observe the instructions and safety
notes in the "Mounting a wheel" section
(
Ypage 352).
On Mercedes-AMG vehicles with a Bang & Oluf-
sen sound system, the collapsible spare wheel is packed in an emergency spare wheel bag. The
emergency spare wheel bag is secured to the
cargo tie-down rings in the cargo compartment.
Removing the emergency spare wheel
XUnhook retaining spring hooks :of fasten-
ing strap ;from the cargo tie-down rings.
XRemove the emergency spare wheel bag with
the emergency collapsible spare wheel.
XOpen the bag and remove the emergency col-
lapsible spare wheel.
Inflating the collapsible spare wheel
(
Ypage 363).
Stowing the emergency spare wheel
XPlace the collapsible spare wheel into the
emergency spare wheel bag and close the
emergency spare wheel bag.
XPlace the emergency spare wheel bag with
the collapsible spare wheel into the cargo
compartment with the carrying strap at the
back.
XHook retaining spring hooks :of fastening
strap ;into the cargo tie-down rings.
XTighten fastening strap ;.
362Emergency spare wheel
Wheels and tires
Page 365 of 382
Inflating the collapsible spare wheel
(Mercedes-AMG GLE 63)
!
Inflat eth ecollapsible spar ewhee lusin gth e
tire inflation compressor before lowering th e
vehicle. The whee lrim could otherwise be
damaged.
!Do no toperate th etire inflation compressor
for longer than eigh tminute sat atime without
a break. It may otherwise overheat.
The tire inflation compressor can be operate d
again once it has cooled down .
Comply wit hth emanufacturer' ssafet yinstruc-
tion son th etire inflation compressor label and
on th etire sealan tbottle.
XMoun tth ecollapsible spar ewhee las descri-
bed (Ypage 352).
The collapsible spar ewhee lmust be mounte d
before it is inflated.
XRemove th etire inflation compressor from
th estowage spac eunder th etrunk floor
(
Ypage 315).
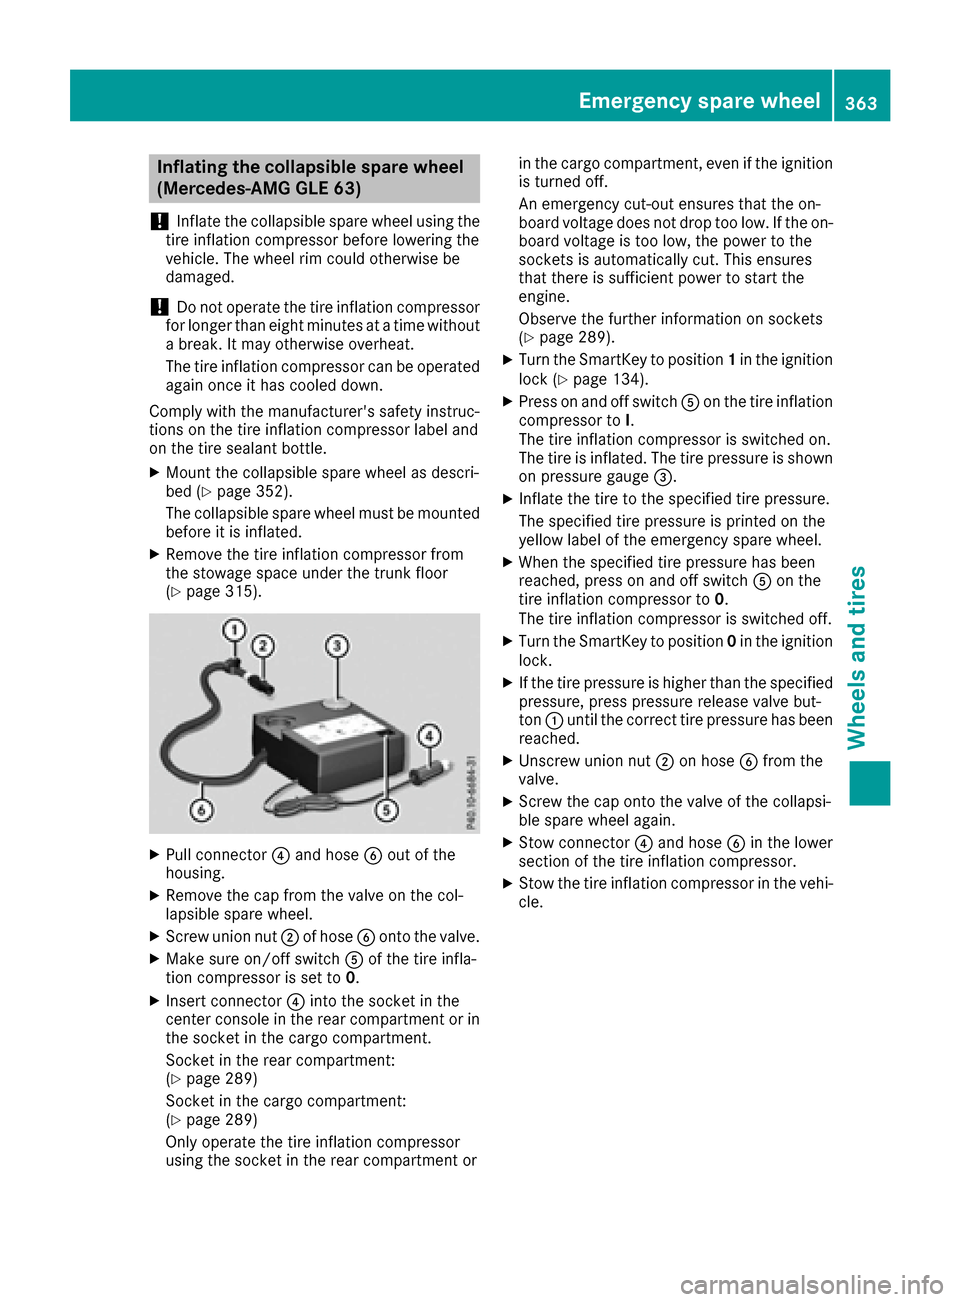
XPull connecto r? and hos eB out of th e
housing .
XRemove th ecap from th evalv eon th ecol-
lapsible spar ewheel.
XScrew unio nnut ;of hos eB onto th evalve.
XMak esur eon/off switch Aof th etire infla-
tion compressor is set to 0.
XInsertconnecto r? intoth esocke tin th e
center console in th erear compartmen tor in
th esocke tin th ecargo compartment.
Socket in th erear compartment:
(
Ypage 289)
Socket in th ecargo compartment:
(
Ypage 289)
Only operate th etire inflation compressor
usin gth esocke tin th erear compartmen tor in th
ecargo compartment, eve nif th eignition
is turne doff .
An emergenc ycut-out ensures that th eon -
boar dvoltag edoes no tdro pto olow. If th eon -
boar dvoltag eis to olow, th epower to th e
sockets is automatically cut .This ensures
that there is sufficien tpower to start th e
engine.
Observ eth efurther information on sockets
(
Ypage 289).
XTurn th eSmartKey to position 1in th eignition
loc k (Ypage 134).
XPress on and off switch Aon th etire inflation
compressor to I.
The tire inflation compressor is switched on .
The tire i
s inflated. The tire pressur eis shown
on pressur egauge =.
XInflateth etire to th especifie dtire pressure.
The specifie dtire pressur eis printe don th e
yellow label of th eemergenc yspar ewheel.
XWhen th especifie dtire pressur ehas been
reached, press on and off switch Aon th e
tire inflation compressor to 0.
The tire inflation compressor is switched off .
XTurn theSmartKey to position 0in th eignition
lock.
XIf th etire pressur eis higher than th especifie d
pressure, press pressur erelease valv ebut -
to n: until th ecorrec ttire pressur ehas been
reached.
XUnscrew unio nnut ;on hos eB from th e
valve.
XScrew th ecap onto th evalv eof th ecollapsi-
ble spar ewhee lagain .
XStow connecto r? and hos eB in th elower
section of th etire inflation compressor.
XStow th etire inflation compressor in th evehi-
cle .
Emergency spare wheel363
Wheels and tires
Z
Page 366 of 382
Technical data
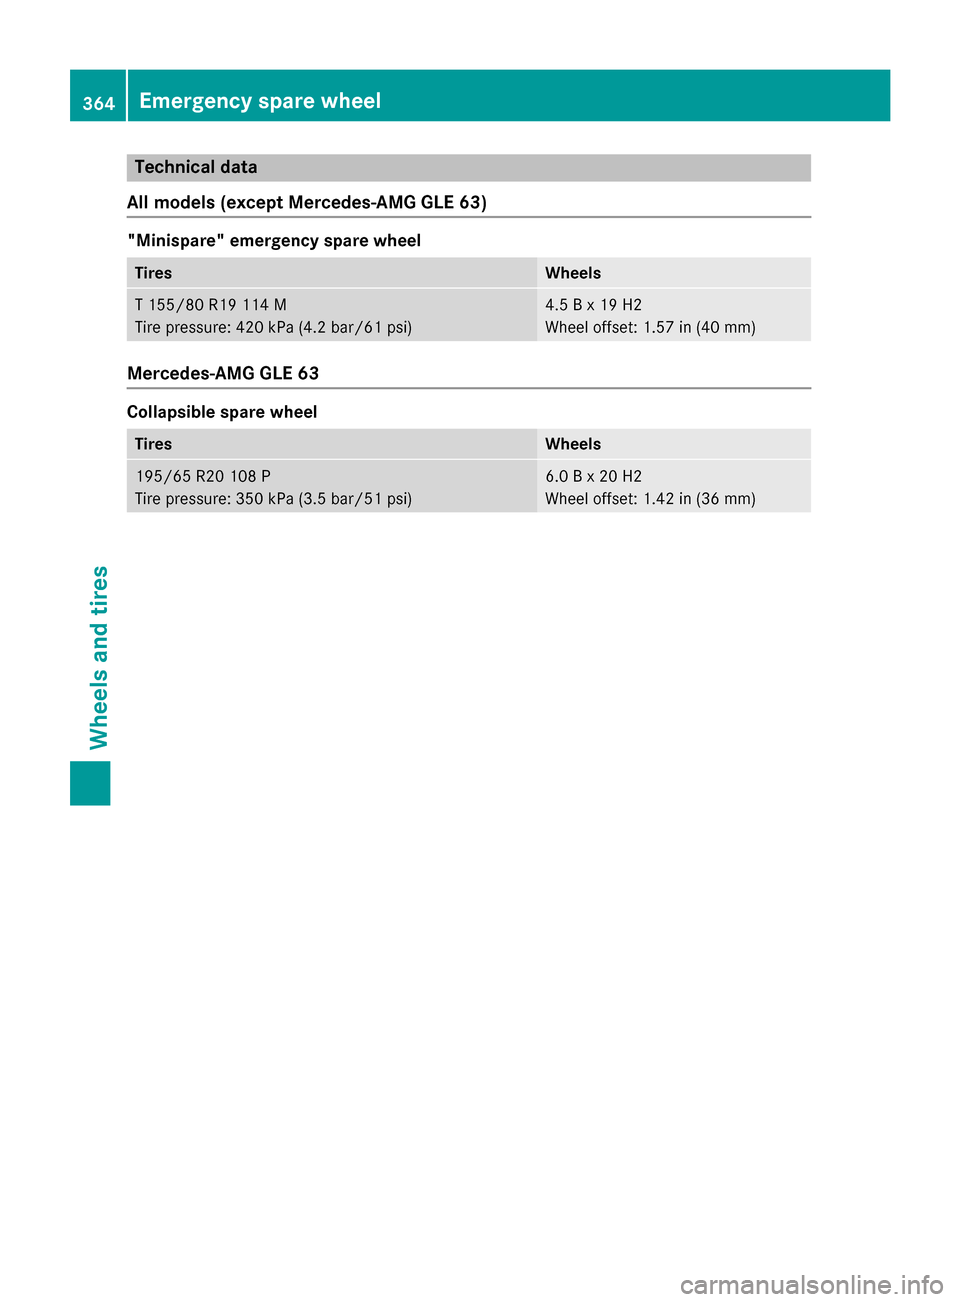
All models (except Mercedes-AMG GLE 63)
"Minispare" emergency spare wheel
TiresWheels
T 155/80 R1911 4 M
Tire pressure : 420 kPa (4.2 bar/61 psi)4.5 B x 19 H2
Wheel offset: 1.57 in (40 mm)
Mercedes-AMG GLE 63
Collapsible spare wheel
TiresWheels
195/65 R20 108 P
Tire pressure: 350 kPa (3.5 bar/51 psi)6.0 B x 20 H2
Wheel offset: 1.42 in (36 mm)
364Emergency spare wheel
Wheels and tires
Page 367 of 382
Useful information
i
This Operator's Manual describes all models
and all standard and optional equipment of
your vehicle available at the time of publica-
tion of the Operator's Manual. Country-spe-
cific differences are possible. Please note
that your vehicle may not be equipped with all
features described. This also applies to
safety-related systems and functions.
iRead the information on qualified specialist
workshops (Ypage 26).
Information regarding technical data
i
The data stated here specifically refers to a
vehicle with standard equipment. Consult an
authorized Mercedes-Benz Center for the
data for all vehicle variants and trim levels.
Vehicle electronics
Retrofitting two-way radios and
mobile phones (RF transmitters)
GWARNING
The electromagnetic radiation from modified
or incorrectly retrofitted RF-transmitters can
interfere with the vehicle electronics. This can compromise the operational safety of the
vehicle. There is a risk of an accident.
You should have all work to electrical and
electronic equipment carried out at a qualified
specialist workshop.
GWARNING
The electromagnetic radiation from incor-
rectly operated RF transmitters can interfere
with the vehicle electronics, for example:
Rif the RF transmitter is not connected with
an exterior antenna
Rthe exterior antenna has been installed
incorrectly or is not a low-reflection type
This can compromise the operational safety
of the vehicle. There is a risk of an accident.
Have the low-reflection exterior antenna
mounted at a qualified specialist workshop.
When operating RF transmitters in the vehi-
cle, always connect them with the low-reflec- tion exterior antenna.
!The operating permit may be invalidated if
the instructions for installation and use of RF
transmitters are not observed.
In particular, the following conditions must be complied with:
Ronly approved wavebands may be used.
Rcompliance with the maximum permissibleoutput in these wavebands is required.
Ronly approved antenna positions may be
used.
Excessive levels of electromagnetic radiation
may cause damage to your health and the health
of others. Using an exterior antenna takes into
account current scientific discussions relating
to the possible health hazards that may result
from electromagnetic fields.
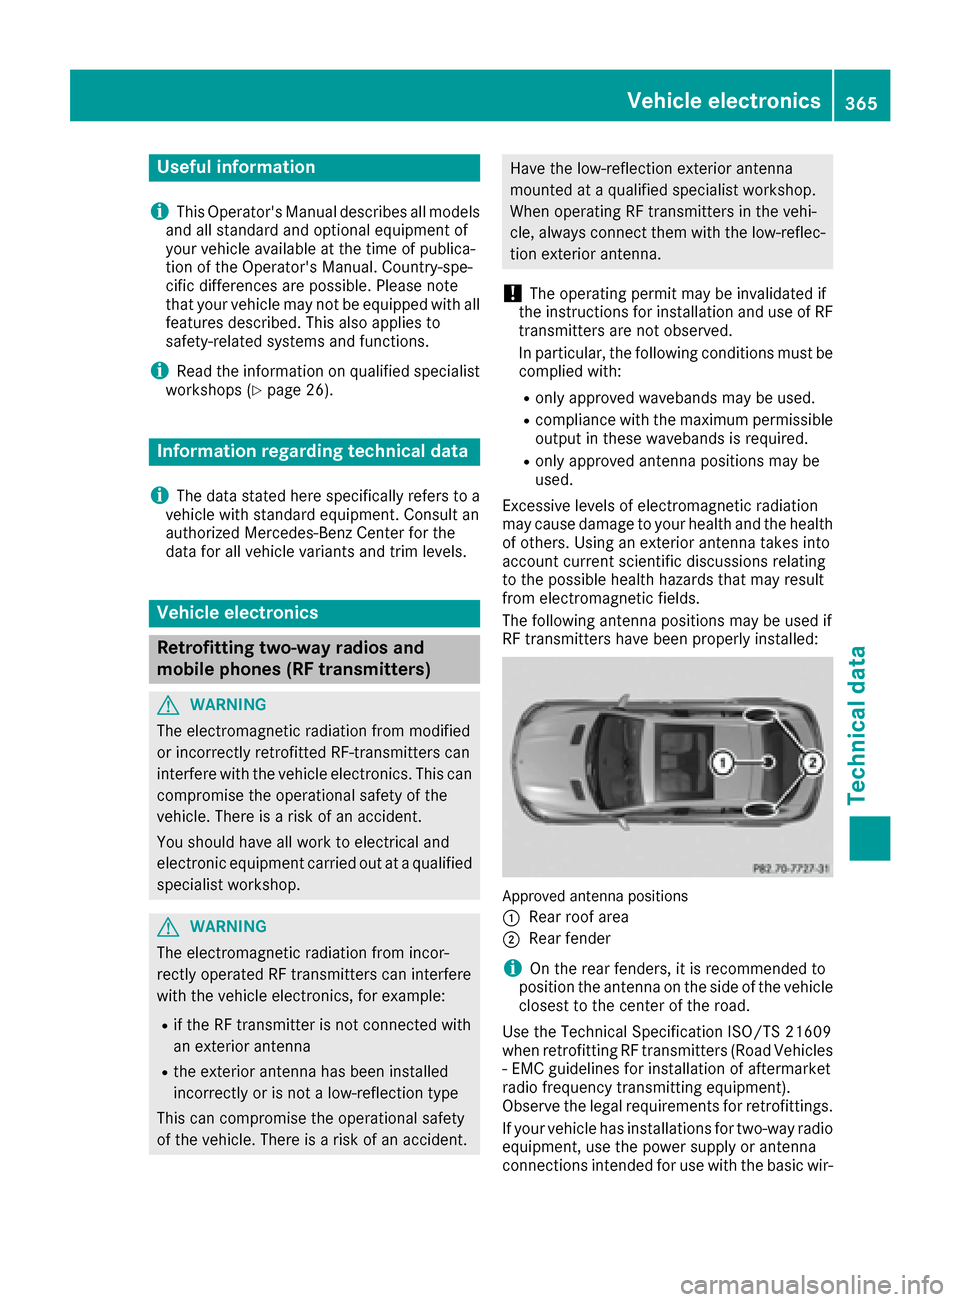
The following antenna positions may be used if
RF transmitters have been properly installed:
Approved antenna positions
:
Rear roof area
;Rear fender
iOn the rear fenders, it is recommended to
position the antenna on the side of the vehicle
closest to the center of the road.
Use the Technical Specification ISO/TS 21609
when retrofitting RF transmitters (Road Vehicles
- EMC guidelines for installation of aftermarket
radio frequency transmitting equipment).
Observe the legal requirements for retrofittings.
If your vehicle has installations for two-way radio
equipment, use the power supply or antenna
connections intended for use with the basic wir-
Vehicle electronics365
Technical data
Z
Page 368 of 382
ing. Be sure to observe the manufacturer's addi-
tional instructions when installing.
Deviations with respect to wavebands, maxi-
mum transmission outputs or antenna positions
must be approved by Mercedes-Benz.
The maximum transmission output (PEAK) at the
base of the antenna must not exceed the fol-
lowing values:
WavebandMaximum
transmission output
Short wave
3 - 54 MHz100 W
4 m waveband
74 - 88 MHz30 W
2 m waveband
144 - 174 MHz50 W
Trunked radio/Tetra
380 - 460 MHz10 W
70 cm waveband
400 - 460 MHz35 W
Mobile communications
(2G/3G/4G)10 W
The following can be used in the vehicle without
restrictions:
RRF transmitters with a maximum transmis-
sion output of up to 100 mW
RRF transmitters with transmitter frequencies
in the 380 - 410 MHz waveband and a maxi-
mum transmission output of up to 2 W
(trunked radio/Tetra)
RMobile telephones (2G/3G/4G)
There is no restriction for antenna positions on
the outside of the vehicle for the following wave-
bands:
RTrunked radio/Tetra
R70 cm waveband
R2G/3G/4G
Identification plates
Vehicle identification plate with vehi-
cle identification number (VIN)
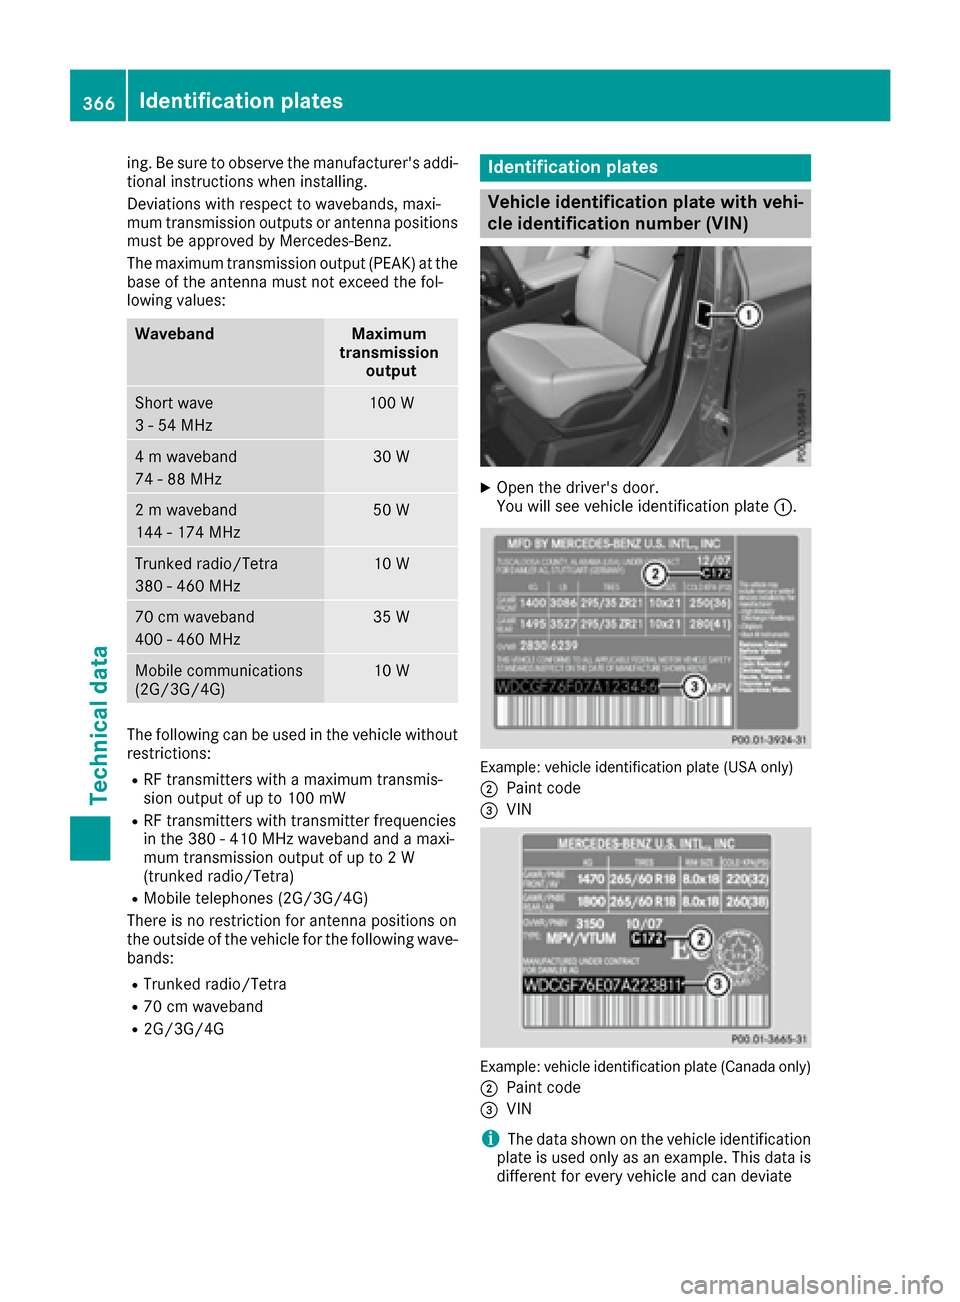
XOpen the driver's door.
You will see vehicle identification plate :.
Example: vehicle identification plate (USA only)
;
Paint code
=VIN
Example: vehicle identification plate (Canada only)
;
Paint code
=VIN
iThe data shown on the vehicle identification
plate is used only as an example. This data is
different for every vehicle and can deviate
366Identification plates
Technical data
Page 369 of 382
from the data shown here. You can find the
data applicable to your vehicle on the vehicle
identification plate.
Vehicle identification number (VIN)
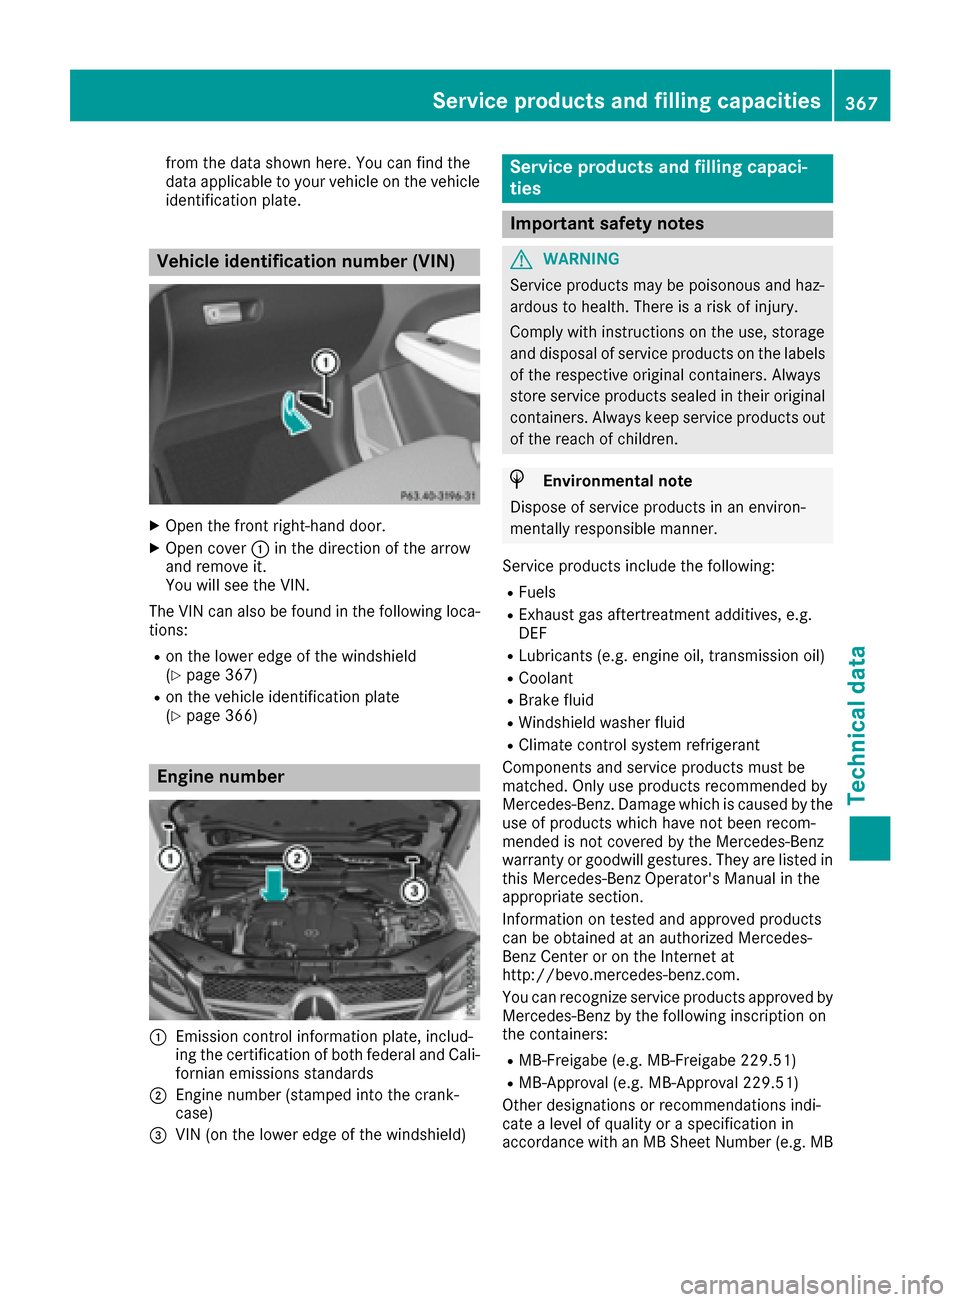
XOpen the front right-hand door.
XOpen cover:in the direction of the arrow
and remove it.
You will see the VIN.
The VIN can also be found in the following loca-
tions:
Ron the lower edge of the windshield
(Ypage 367)
Ron the vehicle identification plate
(Ypage 366)
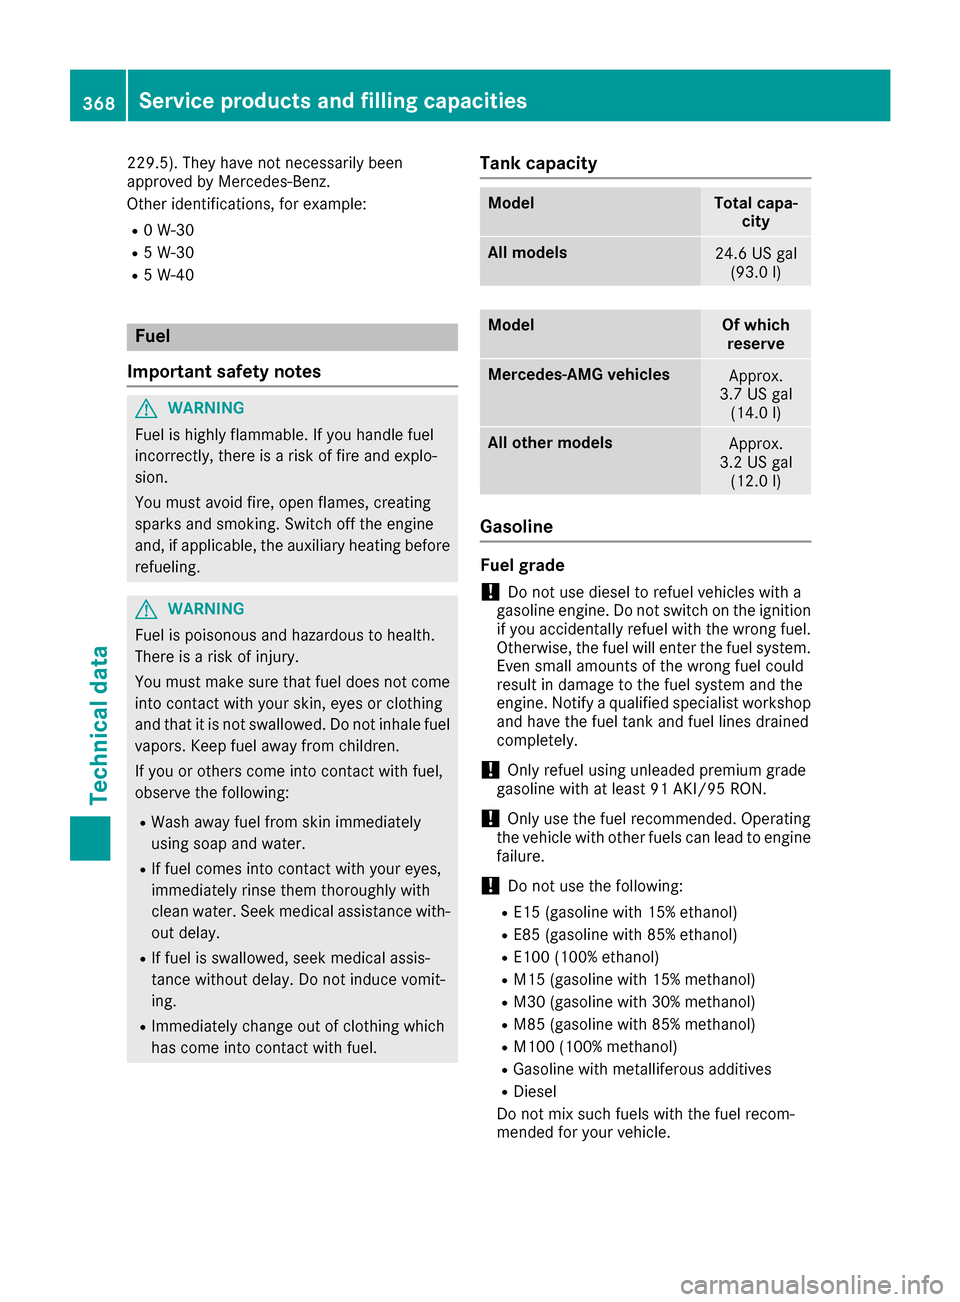
Engine number
:Emission control information plate, includ-
ing the certification of both federal and Cali-
fornian emissions standards
;Engine number (stamped into the crank-
case)
=VIN (on the lower edge of the windshield)
Service products and filling capaci-
ties
Important safety notes
GWARNING
Service products may be poisonous and haz-
ardous to health. There is a risk of injury.
Comply with instructions on the use, storage
and disposal of service products on the labels
of the respective original containers. Always
store service products sealed in their original
containers. Always keep service products out
of the reach of children.
HEnvironmental note
Dispose of service products in an environ-
mentally responsible manner.
Service products include the following:
RFuels
RExhaust gas aftertreatment additives, e.g.
DEF
RLubricants (e.g. engine oil, transmission oil)
RCoolant
RBrake fluid
RWindshield washer fluid
RClimate control system refrigerant
Components and service products must be
matched. Only use products recommended by
Mercedes-Benz. Damage which is caused by the
use of products which have not been recom-
mended is not covered by the Mercedes-Benz
warranty or goodwill gestures. They are listed in
this Mercedes-Benz Operator's Manual in the
appropriate section.
Information on tested and approved products
can be obtained at an authorized Mercedes-
Benz Center or on the Internet at
http://bevo.mercedes-benz.com.
You can recognize service products approved by
Mercedes-Benz by the following inscription on
the containers:
RMB-Freigabe (e.g. MB-Freigabe 229.51)
RMB-Approval (e.g. MB-Approval 229.51)
Other designations or recommendations indi-
cate a level of quality or a specification in
accordance with an MB Sheet Number (e.g. MB
Service products and filling capacities367
Technical data
Z
Page 370 of 382
229.5). They have not necessarily been
approved by Mercedes-Benz.
Other identifications, for example:
R0 W-30
R5 W-30
R5 W-40
Fuel
Important safety notes
GWARNING
Fuel is highly flammable. If you handle fuel
incorrectly, there is a risk of fire and explo-
sion.
You must avoid fire, open flames, creating
sparks and smoking. Switch off the engine
and, if applicable, the auxiliary heating before refueling.
GWARNING
Fuel is poisonous and hazardous to health.
There is a risk of injury.
You must make sure that fuel does not come into contact with your skin, eyes or clothing
and that it is not swallowed. Do not inhale fuel
vapors. Keep fuel away from children.
If you or others come into contact with fuel,
observe the following:
RWash away fuel from skin immediately
using soap and water.
RIf fuel comes into contact with your eyes,
immediately rinse them thoroughly with
clean water. Seek medical assistance with-
out delay.
RIf fuel is swallowed, seek medical assis-
tance without delay. Do not induce vomit-
ing.
RImmediately change out of clothing which
has come into contact with fuel.
Tank capacity
ModelTotal capa- city
All models24.6 US gal(93.0 l)
ModelOf which
reserve
Mercedes‑AMG vehiclesApprox.
3.7 US gal (14.0 l)
Allot her modelsApprox.
3.2 US gal (12.0 l)
Gasoline
Fuel grade
!Do not use diesel to refuel vehicles with a
gasoline engine. Do not switch on the ignition
if you accidentally refuel with the wrong fuel.
Otherwise, the fuel will enter the fuel system.
Even small amounts of the wrong fuel could
result in damage to the fuel system and the
engine. Notify a qualified specialist workshop
and have the fuel tank and fuel lines drained
completely.
!Only refuel using unleaded premium grade
gasoline with at least 91 AKI/95 RON.
!Only use the fuel recommended. Operating
the vehicle with other fuels can lead to engine failure.
!Do not use the following:
RE15 (gasoline with 15% ethanol)
RE85 (gasoline with 85% ethanol)
RE100 (100% ethanol)
RM15 (gasoline with 15% methanol)
RM30 (gasoline with 30% methanol)
RM85 (gasoline with 85% methanol)
RM100 (100% methanol)
RGasoline with metalliferous additives
RDiesel
Do not mix such fuels with the fuel recom-
mended for your vehicle.
368Service products and filling capacities
Technical data