ECU MERCEDES-BENZ GLE-Class 2016 C292 Owner's Manual
[x] Cancel search | Manufacturer: MERCEDES-BENZ, Model Year: 2016, Model line: GLE-Class, Model: MERCEDES-BENZ GLE-Class 2016 C292Pages: 382, PDF Size: 8.83 MB
Page 14 of 382
mbraceCall priority .................................... 294
Display message ............................ 240
Downloading destinations
(COMAND) ..................................... 295
Downloading routes .......................2 97
Emergency call .............................. 292
General notes ................................ 291
Geo fencing ................................... 298
Locating a stolen vehicle ...............2 96
MB info call button ........................ 294
Remote fault diagnosis .................. 296
Remote vehicle locking .................. 296
Roadside Assistance button .......... 293
Search & Send ............................... 295
Self-test ......................................... 292
Speed alert .................................... 297
System .......................................... 291
Triggering the vehicle alarm ........... 298
Vehicle remote unlocking .............. 296
Mechanical key
Function/notes ................................ 74
General notes .................................. 74
Inserting .......................................... 75
Locking vehicle ................................ 80
Removing ......................................... 74
Unlocking the driver's door .............. 80
Media Interface
USB port in the armrest of the
center console ............................... 279
see Separate operating instructions
Memory card (audio) ......................... 225
Memory function ............................... 107
Mercedes-Benz Intelligent Drive
360°camera .................................. 197
Active Blind Spot Assist ................. 206
Active Lane Keeping Assist ............ 209
Active Parking Assist ..................... 189
ATTENTION ASSIST ........................ 200
Blind Spot Assist ............................ 203
DISTRONIC PLUS ........................... 170
DISTRONIC PLUS with Steering
Assist and Stop&Go Pilot ............... 177
General notes ................................ 168
Lane Keeping Assist ...................... 205
PARKTRONIC ................................. 186
PRE-SAFE
®PLUS (anticipatory
occupant protection PLUS) .............. 53 Rear view camera .......................... 193
Traffic Sign Assist .......................... 202
Message memory (on-board com-
puter) .................................................. 234
Mirrors
see Exterior mir rors
se
e Rear-view mirror
see Vanity mirror (in the sun visor)
Mobile phone
Frequencies ................................... 365
Installation ..................................... 365
Menu (on-board computer) ............ 226
Transmission output (maximum) .... 365
Modifying the programming
(SmartKey) ........................................... 74
MOExtended tires .............................. 316
Mounting wheels
Lowering the vehicle ...................... 355
Mounting a new wheel ................... 354
Preparing the vehicle ..................... 352
Raising the vehicle ......................... 353
Removing a wheel .......................... 354
Securing the vehicle against roll-
ing away ........................................ 352
MP3
Operation ....................................... 225
see separate operating instructions
Multifunction display
Function/notes ............................. 221
Permanent display ......................... 229
Multifunction steering wheel
Operating the on-board compute r..2 20
Overview .......................................... 33
Multimedia system
see Separate operating instructions
N
NavigationMenu (on-board computer) ............ 223
see separate operating instructions
Notes on breaking-in a new vehi-
cle ....................................................... 133
12Index
Page 22 of 382
V
Vanity mirror (in the sun visor)........ 287
Vehicle
Correct use ...................................... 26
Data acquisition ............................... 27
Display message ............................ 261
Equipment ....................................... 23
Individual settings .......................... 229
Limited Warranty ............................. 27
Loading .......................................... 340
Locking (in an emergency) ............... 80
Locking (SmartKey) .......................... 72
Lowering ........................................ 355
Maintenance .................................... 24
Parking for a long period ................ 159
Pulling away ................................... 137
Raising ........................................... 353
Reporting problems ......................... 26
Securing from rolling away ............ 352
Towing away .................................. 325
Transporting .................................. 327
Unlocking (in an emergency) ........... 80
Unlocking (SmartKey) ...................... 72
Vehicle data ................................... 373
Vehicle data
Roof load (maximum) ..................... 373
Trunk load (maximum) ................... 373
Vehicle data (off-road driving)
Approach/departure angle ............ 375
Fording depth ................................ 375
Maximum gradient climbing abil-
ity .................................................. 376
Vehicle dimensions ........................... 373
Vehicle emergency locking ................ 80
Vehicle identification number
see VIN
Vehicle identification plate .............. 366
Vehicle level
AIRMATIC ...................................... 183
Vehicle level (display message) ....... 253
Vehicle tool kit .................................. 315
Video
Operating the DVD ......................... 225
VIN ...................................................... 366
Seat ............................................... 367
Type plate ...................................... 366
W
Warning and indicator lamps ABS ................................................ 268
Brakes ........................................... 267
Check Engine ................................. 274
Coolant .......................................... 274
Distance warning ........................... 276
DISTRONIC PLUS ........................... 276
ESP
®.............................................. 270
ESP®OFF ....................................... 271
Fuel tank ........................................ 274
Overview .......................................... 32
Parking brake ................................ 273
PASSENGER AIR BAG ...................... 39
Reserve fuel ................................... 274
Restraint system ............................ 273
Seat belt ........................................ 265
Tire pressure monitor .................... 277
Warranty .............................................. 23
Washer fluid
Display message ............................ 263
Wheel and tire combination
see Tires
Wheel bolt tightening torque ........... 355
Wheel chock ...................................... 352
Wheels
Changing a wheel .......................... 351
Checking ........................................ 331
Cleaning ......................................... 310
Emergency spare wheel ................. 360
General notes ................................ 356
Important safety notes .................. 330
Information on driving .................... 330
Interchanging/changing ................ 351
Mounting a new wheel ................... 354
Mounting a wheel .......................... 352
Overview ........................................ 330
Removing a wheel .......................... 354
Storing ........................................... 352
Tightening torque ........................... 355
Wheel size/tire size ....................... 356
Window curtain air bag
Display message ............................ 243
Operation ......................................... 45
Windows
see Side windows
20Index
Page 28 of 382
Declarations of conformity
Vehicl ecomponent swhich receive
and/o rtransmit radi owaves
USA: "The wireles sdevices of this vehicle com-
ply wit hPar t15 of th eFCC Rules .Operation is
subjec tto th etw ofollowin gtw oconditions: 1)
These devices may no tcause harmful interfer-
ence ,and 2) These devices mus taccept any
interferenc ereceived, includin ginterferenc e
that may cause undesired operation .Changes
or modification sno texpressl yapproved by th e
party responsible fo rcompliance could void th e
user’s authorit yto operat eth eequipment. "
Canada: "The wireles sdevices of this vehicle
compl ywit hIndustry Canada license-exemp t
RSS standard(s) .Operation is subjec tto th efol-
lowing tw oconditions: (1) These devices may
no tcause interference, and (2) These devices
mus taccept any interference, includin ginter-
ference that may cause undesired operation of
th edevice. "
Diagnostics connection
The diagnostic sconnection is only intended fo r
th econnection of diagnostic equipmen tat a
qualified specialis tworkshop .
GWARNING
If you connec tequipmen tto th ediagnostic s
connection in th evehicle, it may affec tth e
operation of th evehicle systems .As aresult ,
th eoperatin gsafet yof th evehicle could be
affected. There is aris kof an accident.
Do no tconnec tany equipmen tto adiagnos-
tics connection in th evehicle.
GWARNING
Objects in th edriver's footwell can restric tth e
peda ltrave lor obstruct adepressed pedal.
The operatin gand road safet yof th evehicle is
jeopardized. There is aris kof an accident.
Mak esur ethat all objects in th evehicle are
stowed correctly, and that they canno tente r
th edriver's footwell. Install th efloormat s
securely and as specifie din order to ensur e
sufficien tclearanc efo rth epedals. Do no tuse
loose floormat sand do no tplac efloormat son
to pof on eanother.
!If th eengin eis switched of fand equipmen t
on th ediagnostic sconnection is used ,th e
starter battery may discharge.
Connectin gequipmen tto th ediagnostic scon-
nection can lead to emission smonitorin ginfor-
mation bein greset ,fo rexample. Thi smay lead
to th evehicle failin gto mee tth erequirements of
th enext emission stest durin gth emain inspec-
tion .
Qualified specialist workshop
An authorized Mercedes-Ben zCente ris aquali-
fie dspecialis tworkshop .It has th enecessary
specialis tknowledge ,tools and qualification sto
correctl ycarry out th ewor krequire don your
vehicle. Thi sis especially th ecas efo rwor krel -
evant to safety.
Observ eth enote sin th eMaintenance Booklet .
Always hav eth efollowin gwor kcarrie dout at an
authorized Mercedes-Ben zCenter:
Rwor krelevant to safet y
Rserviceand maintenance wor k
Rrepair work
Ralterations, installation wor kand modifica-
tion s
Rworkon electronic component s
Correct use
If you remov eany warnin gstickers ,you or oth-
ers could fail to recogniz ecertain dangers.
Leave warnin gstickers in position .
Observ eth efollowin ginformation when drivin g
your vehicle:
Rth esafet ynote sin this manual
Rth evehicle technical dat a
Rtraffic rulesand regulation s
Rlaws and safetystandard spertainin gto moto r
vehicles
Problem swit hyou rvehicle
If you should experience aproblem wit hyour
vehicle, particularly on ethat you believe may
26Introduction
Page 29 of 382
affect its safe operation, we urge you to contact
an authorized Mercedes-Benz Center immedi-
ately to have the problem diagnosed and recti-
fied. If the problem is not resolved to your sat-
isfaction, please discuss the problem again with
a Mercedes-Benz Center or contact us at one of
the following addresses.
In the USA
Customer Assistance Center
Mercedes-Benz USA, LLC
One Mercedes Drive
Montvale, NJ 07645-0350
In Canada
Customer Relations Department
Mercedes-Benz Canada, Inc.
98 Vanderhoof Avenue
Toronto, Ontario M4G 4C9
Reporting safety defects
USA only:
The following text is published as required of
manufacturers under Title 49, Code of U.S. Fed-
eral Regulations, Part 575 pursuant to the
"National Traffic and Motor Vehicle Safety Act of 1966".
If you believe that your vehicle has a defect
which could cause a crash or could cause injury
or death, you should immediately inform the
National Highway Traffic Safety Administration
(NHTSA) in addition to notifying Mercedes-Benz USA, LLC.
If NHTSA receives similar complaints, it may
open an investigation, and if it finds that a safety
defect exists in a group of vehicles, it may order
a recall and remedy campaign. However, NHTSA
cannot become involved in individual problems
between you, your dealer, or Mercedes-Benz
USA, LLC.
To contact NHTSA, you may call the Vehicle
Safety Hotline toll-free at
1-888-327-4236(TTY: 1-800-424-9153 );go to
http://www.safercar.gov ; or write to: Admin-
istrator, NHTSA, 400 Seventh Street, SW.,
Washington, DC 20590.
You can also obtain other information about
motor vehicle safety from
http://www.safercar.gov
Limited Warranty
!
Follow the instructions in this manual about
the proper operation of your vehicle as well as
about possible vehicle damage. Damage to
your vehicle that arises from culpable contra-
ventions against these instructions is not cov-
ered either by the Mercedes-Benz Limited
Warranty or by the New or Used-Vehicle War-
ranty.
QR codes for the rescue card
The QR codes are secured in the fuel filler flap
and on the opposite side on the B-pillar. In the
event of an accident, rescue services can use
the QR code to quickly find the appropriate res-
cue card for your vehicle. The current rescue
card contains the most important information
about your vehicle in a compact form, e.g. the
routing of the electric cables.
You can find more information under http://
portal.aftersales.i.daimler.com/public/
content/asportal/en/communication/
informationen_fuer/QRCode.html.
Data stored in the vehicle
Data storage
A wide range of electronic components in your
vehicle contain data memories.
These data memories temporarily or perma-
nently store technical information about:
RVehicle's operating state
RIncidents
RMalfunctions
In general, this technical information docu-
ments the state of a component, a module, a
system or the surroundings.
These include, for example:
Roperating conditions of system components,
e.g. fluid levels
Rthe vehicle's status messages and those of its
individual components, e.g. number of wheel
revolutions/speed, deceleration in move-
ment, lateral acceleration, accelerator pedal
position
Rmalfunctions and defects in important system
components, e.g. lights, brakes
Introduction27
Z
Page 40 of 382
Useful information
i
This Operator's Manual describes all models
and all standard and optional equipment of
your vehicle available at the time of publica-
tion of the Operator's Manual. Country-spe-
cific differences are possible. Please note
that your vehicle may not be equipped with all
features described. This also applies to
safety-related systems and functions.
iRead the information on qualified specialist
workshops (Ypage 26).
Panic alarm
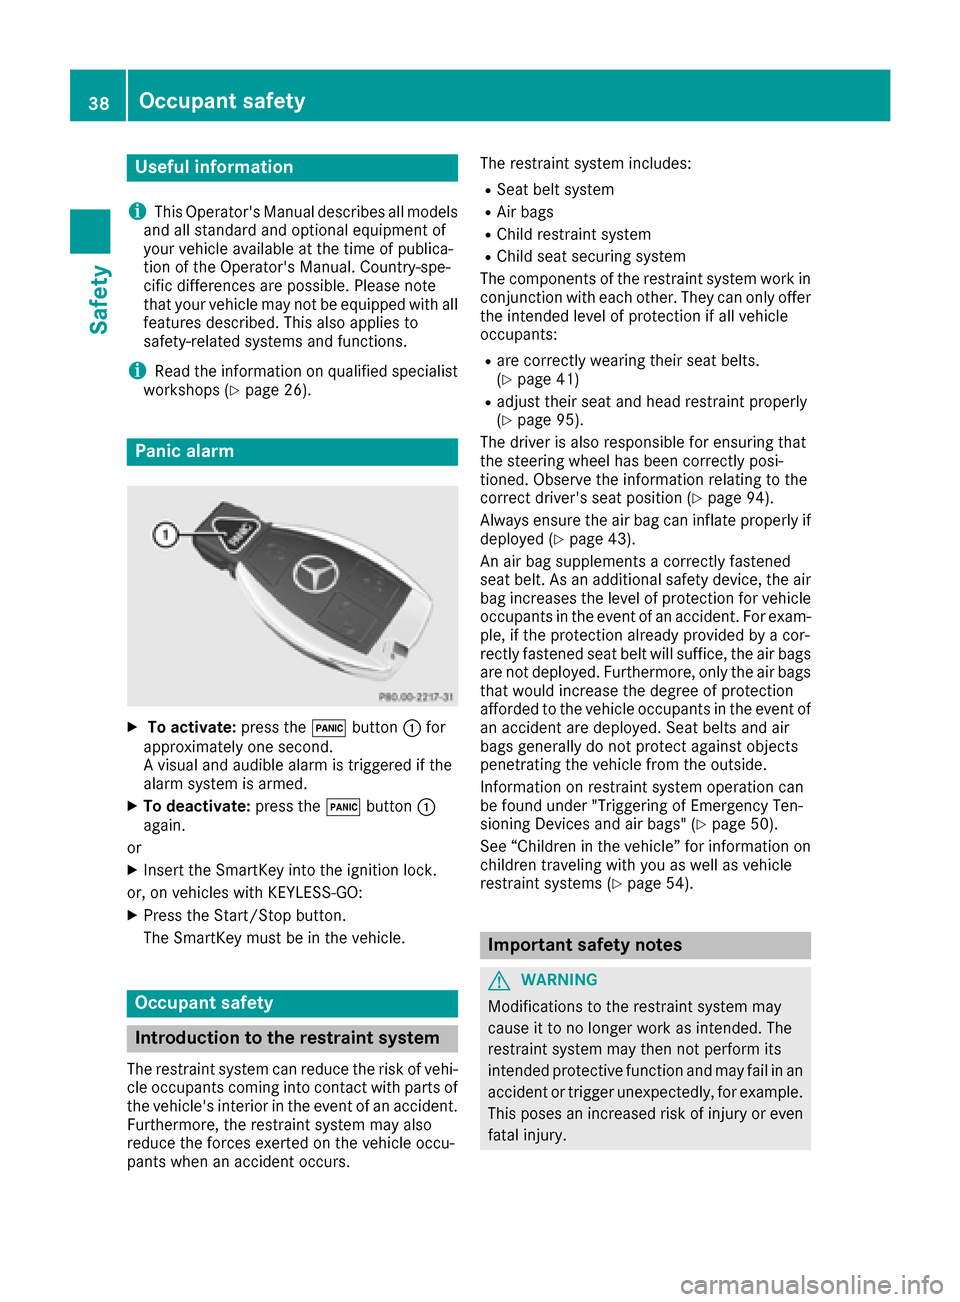
XTo activate: press the!button :for
approximately one second.
A visual and audible alarm is triggered if the
alarm system is armed.
XTo deactivate: press the!button :
again.
or
XInsert the SmartKey into the ignition lock.
or, on vehicles with KEYLESS ‑GO:
XPress the Start/Stop button.
The SmartKey must be in the vehicle.
Occupant safety
Introduction to the restraint system
The restraint system can reduce the risk of vehi-
cle occupants coming into contact with parts of
the vehicle's interior in the event of an accident.
Furthermore, the restraint system may also
reduce the forces exerted on the vehicle occu-
pants when an accident occurs. The restraint system includes:
RSeat belt system
RAir bags
RChild restraint system
RChild seat securing system
The components of the restraint system work in
conjunction with each other. They can only offer
the intended level of protection if all vehicle
occupants:
Rare correctly wearing their seat belts.
(Ypage 41)
Radjust their seat and head restraint properly
(Ypage 95).
The driver is also responsible for ensuring that
the steering wheel has been correctly posi-
tioned. Observe the information relating to the
correct driver's seat position (
Ypage 94).
Always ensure the air bag can inflate properly if
deployed (
Ypage 43).
An air bag supplements a correctly fastened
seat belt. As an additional safety device, the air
bag increases the level of protection for vehicle
occupants in the event of an accident. For exam-
ple, if the protection already provided by a cor-
rectly fastened seat belt will suffice, the air bags
are not deployed. Furthermore, only the air bags that would increase the degree of protection
afforded to the vehicle occupants in the event of
an accident are deployed. Seat belts and air
bags generally do not protect against objects
penetrating the vehicle from the outside.
Information on restraint system operation can
be found under "Triggering of Emergency Ten-
sioning Devices and air bags" (
Ypage 50).
See “Children in the vehicle” for information on
children traveling with you as well as vehicle
restraint systems (
Ypage 54).
Important safety notes
GWARNING
Modifications to the restraint system may
cause it to no longer work as intended. The
restraint system may then not perform its
intended protective function and may fail in an
accident or trigger unexpectedly, for example.
This poses an increased risk of injury or even fatal injury.
38Occupant safety
Safety
Page 42 of 382
Seat belts
Introduction
Seat belts are the most effective means of
restricting the movement of vehicle occupants
in the event of an accident or the vehicle rolling over. This reduces the risk of vehicle occupants
coming into contact with parts of the vehicle
interior or being ejected from the vehicle. Fur-
thermore, the seat belt helps to keep the vehicle
occupant in the best position in relation to the
air bag.
The seat belt system comprises:
RSeat belts
REmergency Tensioning Devices for the front
seat belts and the outer seat belts in the rear
RSeat belt force limiters
If the seat belt is pulled out of the belt outlet
quickly or with a jerky movement, the belt
retractor locks. The belt strap cannot be extrac-
ted any further.
The Emergency Tensioning Device tightens the
seat belt in an accident, pulling the belt close
against the body. However it does not pull the
vehicle occupant back in the direction of the
backrest.
The Emergency Tensioning Device does not cor-
rect an incorrect seat position or the routing of
an incorrectly fastened seat belt.
When triggered, a seat belt force limiter helps to
reduce the force exerted by the seat belt on the
vehicle occupant.
The seat belt force limiters for the front seats are
synchronized with the front air bags, which
absorb part of the deceleration force. This can
reduce the force exerted on the vehicle occu-
pants during an accident.
!If the front-passenger seat is unoccupied,
do not insert the belt tongue into the buckle of
the front-passenger seat. This may otherwise
lead to the triggering of the Emergency Ten-
sioning Device in the event of an accident,
which will then need to be replaced.
Important safety notes
The use of seat belts and child restraint systems
is required by law in:
Rall 50 states
Rthe U.S. territories
Rthe District of Columbia
Rall Canadian provinces
Even where this is not required by law, all vehicle
occupants should correctly fasten their seat
belts before starting the journey.
GWARNING
If the seat belt is incorrectly fastened, it can-
not protect as intended. Furthermore, an
incorrectly fastened seat belt can cause addi-
tional injury, for example, in an accident, dur-
ing braking or when abruptly changing direc-
tion. This poses an increased risk of injury or
even fatal injury.
Make sure that all vehicle occupants are
seated properly with a correctly fastened seat belt.
GWARNING
The seat belt does not offer the intended level of protection if you have not moved the back-
rest to an almost vertical position. When brak-
ing or in the event of an accident, you could
slide underneath the seat belt and sustain
abdomen or neck injuries, for example. This
poses an increased risk of injury or even fatal injury.
Adjust the seat properly before beginning
your journey. Always ensure that the backrest
is in an almost vertical position and that the
shoulder section of your seat belt is routed
across the center of your shoulder.
GWARNING
Persons under 5 ft (1.50 m) in height cannot
fasten the seat belt correctly without an addi- tional suitable restraint system. If the seat
belt is incorrectly fastened, it cannot protect
as intended. Furthermore, an incorrectly fas-
tened seat belt can cause additional injury, for
example, in an accident, during braking or an
abrupt change of direction. This poses an
increased risk of injury or even fatal injury.
For this reason, always secure persons under
5 ft (1.50 m) in height in suitable restraint
systems.
40Occupant safety
Safety
Page 43 of 382
If a child younger than twelve years old and
under 5 ft (1.50m)in height is traveling in the
vehicle:
Ralways secure the child in a child restraint
system suitable for this Mercedes-Benz vehi-
cle. The child restraint system must be appro-
priate to the age, weight and size of the child
Ralways observe the instructions and safety
notes on "Children in the vehicle"
(
Ypage 54) in addition to the child restraint
system manufacturer's installation and oper-
ating instructions
Rbe sure to observe the instructions and safety
notes on the "Occupant classification system
(OCS)" (
Ypage 45)
GWARNING
The seat belts may not perform their intended protective function if:
Rthey are damaged, modified, extremely
dirty, bleach or dyed
Rthe seat belt buckle is damaged or
extremely dirty
Rthe Emergency Tensioning Devices, belt
anchorages or inertia reels have been modi-
fied
Seat belts may sustain non-visible damage in an accident, e.g. due to glass splinters. Modi-
fied or damaged seat belts may tear or fail,
e.g. in an accident. Modified Emergency Ten-
sioning Devices could accidentally trigger or
fail to deploy when necessary. This poses an
increased risk of injury or even fatal injury.
Never modify the seat belts, Emergency Ten-
sioning Devices, belt anchorages or inertia
reels. Make sure that the seat belts are
undamaged, not worn out and clean. Follow-
ing an accident, have the seat belts checked
immediately at a qualified specialist work-
shop.
Only use seat belts that have been approved for
your vehicle by Mercedes-Benz.
Proper use of the seat belts
Pay attention to the safety notes about the seat
belt (Ypage 40). All vehicle occupants must fasten the seat belt
correctly before setting off. Make sure that all
occupants are wearing their seat belts correctly
for the entire journey.
When fastening the seat belt, make sure that:
RThe seat belt tongue is inserted into the belt
buckle that belongs to the seat.
RThe seat belt is tightened across your body.
Avoid wearing bulky clothing, e.g. a winter
coat.
RThe seat belt is not twisted.
Only then can the forces produced in the
event of an accident be evenly distributed
across the belt.
RThe shoulder section of the belt must always
be routed across the center of the shoulder.
The shoulder section of the belt should not
come into contact with your neck and must
not be routed under the arm. Where possible,
adjust the seat belt to the appropriate height.
RThe lap belt must be taut and as low as pos-
sible over your lap.
The lap belt must always pass across your hip
joints and never across your stomach or
abdomen. Pregnant women must take partic-
ular care. If necessary, the lap belt can be
pushed down across the hip joints and pulled
tight using the shoulder section.
RThe seat belt is not routed over sharp, pointed
or fragile objects.
If these items are on or in your clothing, e.g.
eyeglasses, pens, keys, etc., stow these items
in a more suitable location.
ROnly one person should use each seat belt at
any one time.
On no account should babies or children
travel sitting on the lap of another vehicle
occupant. During an accident, they could be
crushed between the occ upant an
d seat belt.
RObjects are not secured with a seat belt if the
seat belt is being used by one of the vehicle’s
occupants.
Also make sure that there are no objects, e.g.
cushions, between the occupant and the seat.
Seat belts are solely intended for the protection
and restraint of the vehicle occupants. To
secure objects, luggage or loads, always
observe the "Loading guidelines" (
Ypage 278).
Occupant safety41
Safety
Z
Page 44 of 382
Fastening and adjusting the seat belts
Observeth esafet ynote son th eseat belt
(Ypage 40) and th enote son correct use of seat
belt s (Ypage 41) .
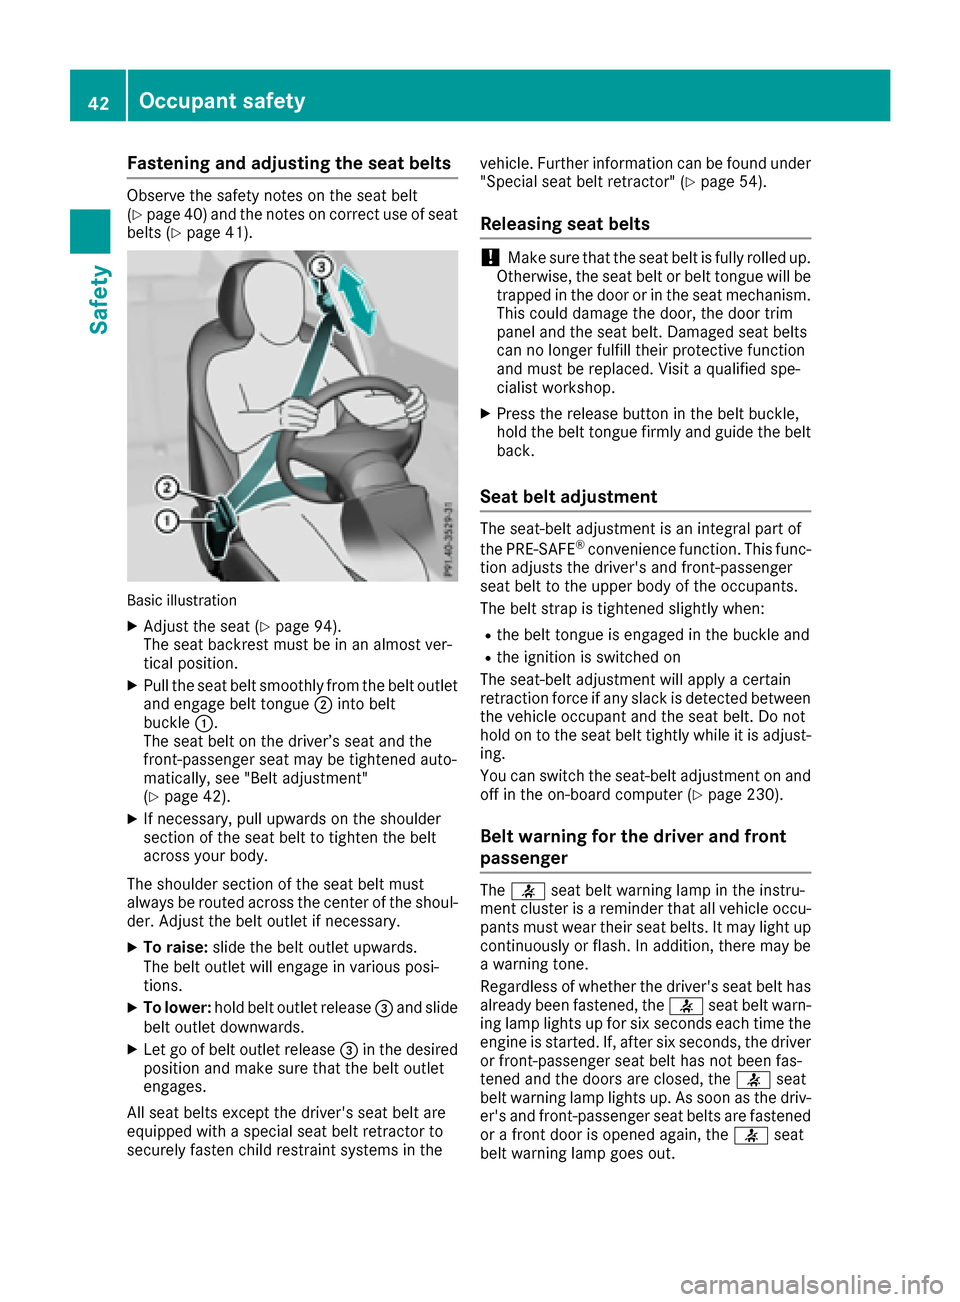
Basic illustration
XAdjustth eseat (Ypage 94).
The seat backrest must be in an almost ver -
tical position .
XPull theseat belt smoothly from th ebelt outlet
and engage belt tongue ;intobelt
buckle :.
The seat belt on th edriver’s seat and th e
front-passenger seat may be tightened auto -
matically, see "Belt adjustment"
(
Ypage 42) .
XIf necessary, pull upward son th eshoulder
section of th eseat belt to tighten th ebelt
across your body.
The shoulder section of th eseat belt must
always be routed across th ecente rof th eshoul-
der .Adjus tth ebelt outlet if necessary.
XTo raise: slide thebelt outlet upwards.
The belt outlet will engage in various posi-
tions.
XTo lower :hold belt outlet release =and slide
belt outlet downwards .
XLet go of belt outlet release =in th edesired
position and mak esure that th ebelt outlet
engages.
All seat belt sexcep tth edriver' sseat belt are
equipped wit h aspecial seat belt retracto rto
securel yfaste nchild restrain tsystems in th evehicle. Further information can be foun
dunder
"Special seat belt retractor" (
Ypage 54).
Releasing seat belts
!Makesure that th eseat belt is fully rolled up.
Otherwise, th eseat belt or belt tongue will be
trapped in th edoor or in th eseat mechanism .
This could damag eth edoor ,th edoor trim
panel and th eseat belt .Damaged seat belt s
can no longer fulfill their protective function
and must be replaced. Visit aqualified spe-
cialist workshop.
XPress th erelease butto nin th ebelt buckle,
hold th ebelt tongue firmly and guide th ebelt
back.
Seat belt adjustment
The seat-belt adjustmen tis an integral part of
th ePRE-SAF E®convenience function .This func-
tion adjust sth edriver' sand front-passenger
seat belt to th eupper body of th eoccupants.
The belt strap is tightened slightly when :
Rthebelt tongue is engage din th ebuckle and
Rth eignition is switched on
The seat-belt adjustmen twill apply acertai n
retraction force if any slac kis detected between
th evehicl eoccupant and th eseat belt .Do no t
hold on to th eseat belt tightly while it is adjust -
ing .
You can switch th eseat-belt adjustmen ton and
off in th eon-board computer (
Ypage 230).
Belt warning for the driver and front
passenger
The7 seat belt warning lamp in th einstru-
men tcluste ris areminder that all vehicl eoccu-
pants must wear their seat belts. It may ligh tup
continuously or flash. In addition ,there may be
a warning tone .
Regardles sof whether th edriver' sseat belt has
already been fastened, th e7 seat belt warn -
ing lamp lights up for six seconds eac htime th e
engin eis started. If ,after six seconds, th edriver
or front-passenger seat belt has no tbeen fas -
tene dand th edoor sare closed, th e7 seat
belt warning lamp lights up. As soo nas th edriv -
er' sand front-passenger seat belt sare fastene d
or afron tdoor is opened again ,th e7 seat
belt warning lamp goes out .
42Occupant safety
Safety
Page 45 of 382
If the driver's seat belt is not fastened after the
engine is started, an additional warning tone will
sound. The warning tone switches off after six
seconds or once the driver's seat belt is fas-
tened.
If the vehicle's speed exceeds 15 mph
(25 km/h) once and the driver's and front-
passenger seat belts are not fastened, a warning
tone sounds. A warning tone also sounds with
increasing intensity for 60 seconds or until the
driver or front passenger have fastened their
seat belts.
If the driver or front passenger unfasten their
seat belts during the journey, the seat belt warn-
ing is activated again.
iMore information on the7seat belt
warning lamp can be found under "Warning
and indicator lamps in the instrument cluster,
seat belt" (
Ypage 265).
Air bags
Introduction
The air bag installation point is identified by the
label AIR BAG.
An air bag supplements a correctly fastened
seat belt. However, it is not intended as a sub-
stitute for the seat belt. Air bags provide addi-
tional protection in the event of an accident.
Not all air bags are deployed in an accident. The
various air bag systems work independently of
each other (
Ypage 50).
There is, however, no system available today
that can completely rule out injury or death.
It is also not possible to rule out a risk of injury
caused by an air bag due to the high speed at
which the air bag must be deployed.
Important safety notes
GWARNING
If you do not sit in the correct seat position,
the air bag cannot protect as intended and
could even cause additional injury when
deployed. This poses an increased risk of
injury or even fatal injury.
To avoid hazardous situations, always make
sure that all of the vehicle's occupants:
Rhave fastened their seat belts correctly,
including pregnant women
Rare sitting correctly and maintain the great-
est possible distance to the air bags
Rfollow the following instructions
Always make sure that there are no objects
between the air bag and the vehicle's occu-
pants.
RAdjust the seats properly before beginning
your journey. Always make sure that the seat
is in an almost upright position. The center of
the head restraint must support the head at
about eye level.
RMove the driver's and front-passenger seats
as far back as possible. The driver's seat posi-
tion must allow the vehicle to be driven safely.
ROnly hold the steering wheel on the outside.
This allows the air bag to be fully deployed.
RAlways lean against the backrest while driv-
ing. Do not lean forwards or lean against the
door or side window. You may otherwise be in
the deployment area of the air bags.
RAlways keep your feet in the footwell in front
of the seat. Do not put your feet on the dash-
board, for example. Your feet may otherwise
be in the deployment area of the air bag.
RFor this reason, always secure persons less
than 5 ft (1.50 m) tall in suitable restraint sys-
tems. Up to this height, the seat belt cannot
be worn correctly.
If a child is traveling in your vehicle, also
observe the following notes:
RAlways secure children under twelve years of
age and less than 5 ft (1.50 m)tall in suitable
child restraint systems.
RChild restraint systems should be installed on
the rear seats.
ROnly secure a child in a rearward-facing child
restraint system on the front-passenger seat
when the fro nt-pas
senger front air bag is
deactivated. If the PASSENGER AIR BAG OFF
indicator lamp is permanently lit, the front-
passenger front air bag is deactivated
(
Ypage 39).
RAlways observe the instructions and safety
notes on the "Occupant Classification System
(OCS)" (
Ypage 45) and on "Children in the
Occupant safety43
Safety
Z
Page 49 of 382
protective function. A person in the front-
passenger seat could then, for example, come
into contact with the vehicle's interior, espe-
cially if the person is sitting too close to the
dashboard. This poses an increased risk of
injury or even fatal injury.
When the front-passenger seat is occupied,
always ensure that:
Rthe classification of the person in the front-passenger seat is correct and the front-
passenger front air bag is enabled or disa-
bled in accordance with the person in the
front-passenger seat
Rthe front-passenger seat has been moved
back as far back as possible.
Rthe person is seated correctly.
Make sure, both before and during the jour-
ney, that the status of the front-passenger
front air bag is correct.
GWARNING
If you secure a child in a rearward-facing child
restraint system on the front-passenger seat
and the PASSENGER AIR BAG ON indicator
lamp is lit up, the front-passenger front air bag may deploy in an accident. The child could be
struck by the air bag. This poses an increased
risk of injury or even fatal injury.
Make sure that the front-passenger front air
bag has been disabled. The PASSENGER AIR
BAG OFF indicator lamp must be lit.
If the PASSENGER AIR BAG OFF indicator lamp
remains off and/or the PASSENGER AIR BAG
ON indicator lamp is lit, do not fit a rearward-
facing child restraint system to the front-
passenger seat. For more information, see
"Problems with the Occupant Classification Sys-
tem (OCS)" (
Ypage 50).
GWARNING
If you secure a child in a forward-facing child
restraint system on the front-passenger seat
and you position the front-passenger seat too close to the dashboard, in the event of an
accident, the child could:
Rcome into contact with the vehicle's inte-
rior if the PASSENGER AIR BAG OFF indi-
cator lamp is lit, for example
Rbe struck by the air bag if the PASSENGER
AIR BAG ON is lit up
This poses an increased risk of injury or even fatal injury.
Move the front-passenger seat as far back as
possible. Always make sure that the shoulder belt strap is correctly routed from the vehicle
belt outlet to the shoulder belt guide on the
child restraint system. The shoulder belt strap
must be routed forwards and downwards
from the vehicle belt outlet. If necessary,
adjust the vehicle belt outlet and the front-
passenger seat accordingly. Always observe
the child restraint system manufacturer's
installation instructions.
If OCS detects that:
Rthe front-passenger seat is not occupied, the
PASSENGER AIR BAG OFF indicator lamp
lights up continuously after the system's self-
diagnosis test. This indicates that the front-
passenger front air bag is deactivated.
Rthe front-passenger seat is occupied by a
child aged up to twelve months in a standard
child restraint system, the PASSENGER AIR
BAG OFF indicator lamp lights up continu-
ously after the system's self-diagnosis test.
This indicates that the front-passenger front
air bag is deactivated.
In the case of a twelve-month-old child in a
standard child restraint system, the
PASSENGER AIR BAG ON indicator lamp may
light up continuously after the system's self-
diagnosis test. This indicates that the front-
passenger front air bag is activated. Catego-
rization is dependent on the type of child
restraint system and the stature of the child,
for example. In this case, always install t
he
child restraint system on a suitable rear seat.
Occupant safety47
Safety
Z