Theft MERCEDES-BENZ GLE-Class 2016 C292 Owner's Manual
[x] Cancel search | Manufacturer: MERCEDES-BENZ, Model Year: 2016, Model line: GLE-Class, Model: MERCEDES-BENZ GLE-Class 2016 C292Pages: 382, PDF Size: 8.83 MB
Page 5 of 382
1, 2, 3 ...
4ETS (Electronic Traction System)see ETS/4ETS (Electronic Trac-
tion System)
4MATIC (permanent four-wheel
drive) .................................................. 180
12 V socket
see Sockets
115 V socket ...................................... 289
360° camera
Cleaning ........................................ .312
Display in the multimedia system .. 198
Function/notes .............................1 97
A
ABS (Anti-lock Braking System)
Display message ............................ 235
Function/notes ................................ 60
Important safety notes .................... 60
Warning lamp ................................. 268
Accident
Automatic measures after an acci-
dent ................................................. 53
Activating/deactivating cooling
with air dehumidification ................. 124
Active Blind Spot Assist
Activating/deactivating (on-
board computer) ............................ 228
Display message ............................ 255
Function/information .................... 206
Trailer towing ................................. 209
Active Curve System
Display message ............................ 253
Function/notes ............................. 183
Active Driving Assistance package .. 206
Active Lane Keeping Assist
Activating/deactivating (on-
board computer) ............................ 228
Display message ............................ 255
Function/information .................... 209
Trailer towing ................................. 211
Active Parking Assist
Display message ............................ 256
Exiting a parking space .................. 192
Function/notes ............................. 189
Important safety notes .................. 189 Parking .......................................... 191
ADAPTIVE BRAKE ................................. 68
Adaptive Brake Assist
Function/notes ................................ 64
Adaptive Damping System
Function/notes ............................. 185
Adaptive Highbeam Assist
Display message ............................ 249
Function/notes ............................. 111
Switching on/off ........................... 112
Additives (engine oil) ........................ 371
ADS (Adaptive Damping System)
Function/notes ............................. 182
Air bags
Deployment ..................................... 50
Display message ............................ 244
Front air bag (driver, front
passenger) ....................................... 44
Important safety notes .................... 43
Introduction ..................................... 43
Knee bag .......................................... 44
Occupant Classification System
(OCS) ............................................... 45
PASSENGER AIR BAG indicator
lamps ............................................... 39
Side imp act a
ir bag .......................... 45
Window curtain air bag .................... 45
Air filter (display message) .............. 252
AIR FLOW ........................................... 126
Air vents
Glove box ....................................... 131
Important safety notes .................. 131
Rear ............................................... 132
Setting ........................................... 131
Setting the center air vents ........... 131
Setting the side air vents ............... 131
Air-conditioning system
see Climate control
AIRMATIC package
ADS (Adaptive Damping System) ... 182
Function/notes ............................. 182
Alarm
ATA (Anti-Theft Alarm system) ......... 70
Switching off (ATA) .......................... 70
Switching the function on/off
(ATA) ................................................ 70
Index3
Page 6 of 382
AMGAdaptive sport suspension sys-
tem ................................................ 185
AMG menu (on-board computer) .....2 31
Approach/departure angle .............. 167
Ashtray ............................................... 288
Assistance display (on-board com-
puter) ..................................................2 27
Assistance menu (on-board com-
puter) ..................................................2 27
ASSYST PLUS
Displaying a service message ........3 06
Hiding a service message .............. 306
Resetting the service interval dis-
play ................................................ 306
Service message ............................ 306
Special service requirements ......... 307
ATA (Anti-Theft Alarm system)
Activating/deactivating ................... 70
Function ...........................................7 0
Switching off the alarm .................... 70
ATTENTION ASSIST
Activating/deactivating ................. 228
Display message ............................ 253
Function/notes ............................. 200
Audio menu (on-board computer) .... 225
Audio system
see separate operating instructions
Authorized Mercedes-Benz Center
see Qualified specialist workshop
AUTO lights
Display message ............................ 248
see Lights
Automatic car wash (care) ............... 307
Automatic engine start (ECO start/
stop function) .................................... 139
Automatic engine switch-off (ECO
start/stop function) .......................... 139
Automatic headlamp mode .............. 108
Automatic transmission
Accelerator pedal position ............. 145
Changing gear ............................... 145
DIRECT SELECT lever ..................... 142
Display message ............................ 261
Drive program ................................ 147
Drive program display .................... 143
Driving tips .................................... 145 DYNAMIC SELECT control
ler ......... 142
Eme
rgency running mode .............. 150
Engaging drive position .................. 144
Engaging neutral ............................ 143
Engaging park position automati-
cally ............................................... 143
Engaging reverse gear ................... 143
Engaging the park position ............ 143
Gliding mode ................................. 146
Kickdown ....................................... 146
Manual shifting .............................. 147
Oil temperature (on-board com-
puter, Mercedes-AMG vehicles) ..... 231
Overview ........................................ 142
Problem (malfunction) ................... 150
Pulling away ................................... 137
Starting the engine ........................ 136
Steering wheel paddle shifters ...... 147
Trailer towing ................................. 147
Transmission position display ........ 143
Transmission positions .................. 145
Automatic transmission emer-
gency mode ....................................... 150
Axle load, permissible (trailer tow-
ing) ...................................................... 376
B
Bag hook ............................................ 283
Ball coupling
Installing ........................................ 213
Removing ....................................... 217
BAS (Brake Assist System) ................. 61
BAS PLUS with Cross-Traffic Assist
(Brake Assist PLUS with Cross-
Traffic Assist)
Function/notes ................................ 61
Important safety notes .................... 61
Battery (SmartKey)
Checking .......................................... 75
Important safety notes .................... 75
Replacing ......................................... 75
Battery (vehicle)
Charging ........................................ 322
Display message ............................ 250
Important safety notes .................. 320
Jump starting ................................. 323
Overview ........................................ 320
4Index
Page 16 of 382
Operating the roller sunblinds for
the sliding sunroof ........................... 91
Problem (malfunction) ..................... 93
Rain closing feature .........................91
Reversin gfeature ............................ .90
Parcel shelf ........................................2 83
Parking
Important safety notes .................. 156
Parking brake ................................ 158
Position of exterior mirror, front-
passenger side ............................... 106
Rear view camera .......................... 193
see PARKTRONIC
Parking aid
Active Parking Assist ..................... 189
see 360° camera
see Exterior mirrors
see PARKTRONIC
Parking brake
Display message ............................ 238
Electric parking brake .................... 158
Warning lamp ................................. 273
Parking lamps
Switching on/off ........................... 109
PARKTRONIC
Deactivating/activating ................. 188
Driving system ............................... 186
Function/notes .............................1 86
Important safety notes .................. 186
Problem (malfunction) ................... 189
Range of the sensors ..................... 187
Trailer towing ................................. 186
Warning display ............................. 188
PASSENGER AIR BAG
Display message ............................ 244
Indicator lamps ................................ 39
Problem (malfunction) ................... 244
Pets in the vehicle ............................... 59
Plastic trim (cleaning instruc-
tions) .................................................. 313
Power locks ......................................... 80
Power washers .................................. 309
Power windows
see Side windows
PRE-SAFE
®(anticipatory occupant
protection)
Display message ............................ 241 Operation ......................................... 52
PRE-SAFE
®Brake
Activating/deactivating ................. 228
Display message ............................ 241
Function/notes ................................ 68
Important safety notes .................... 68
W
arning lamp ................................. 276
PRE-SAFE
®PLUS (anticipatory
occupant protection PLUS)
Display message ............................ 242
Operation ......................................... 53
Protection against theft
ATA (Anti-Theft Alarm system) ......... 70
Immobilizer ...................................... 70
Protection of the environment
General notes .................................. 22
Pulling away
General notes ................................ 137
Trailer ............................................ 138
Pulling away (automatic transmis-
sion) .................................................... 137
Q
QR code
Mercedes-Benz Guide App ................. 1
Rescue card ..................................... 27
Qualified specialist workshop ........... 26
R
RACETIMER (on-board computer) .... 232
Radiator cover ................................... 303
Radio
Selecting a station ......................... 225
see separate operating instructions
Radio-wave reception/transmis-
sion in the vehicle
Declaration of conformity ................ 26
Rain closing feature (panorama
roof with power tilt/sliding panel) .... 91
Reading lamp ..................................... 112
Rear bench seat
Folding forwards/back .................. 282
Rear compartment
Setting the air vents ...................... 132
Setting the temperature ................ 126
14Index
Page 72 of 382
and
Rthe vehicle speed is between approximately
4 mph(7 km/ h) and 124 mph (200 km/h)
At speeds of up to approximately 44 mph
(70 km/h) PRE-SAFE
®Brake can also detect:
Rstationary objects in the path of your vehicle,
e.g. stopped or parked vehicles
Rpedestrians in the path of your vehicle
iIf there is an increased risk of a collision,
preventive passenger protection measures
(PRE-SAFE
®) are triggered (Ypage 52).
If the risk of collision with the vehicle in front
remains and you do not brake, take evasive
action or accelerate significantly, the vehicle
may perform automatic emergency braking, up
to the point of full brake application. Automatic
emergency braking is not performed until imme-
diately prior to an imminent accident.
You can prevent the intervention of the PRE-
SAFE
®Brake at any time by:
Rdepressing the accelerator pedal further.
Ractivating kickdown.
Rreleasing the brake pedal.
The braking action of PRE-SAFE®Brake is ended
automatically if:
Ryou maneuver to avoid the obstacle.
Rthere is no longer any danger of a collision.
Rthere is no longer an obstacle detected in
front of your vehicle.
STEER CONTROL
General information
STEER CONTROL helps you by transmitting a
noticeable steering force to the steering wheel
in the direction required for vehicle stabilization.
This steering assistance is provided in particular
if:
Rboth right wheels or both left wheels are on a
wet or slippery road surface when you brake.
Rthe vehicle starts to skid.
Important safety notes
iObserve the "Important safety notes" sec-
tion (Ypage 60). No steering support is provided from STEER
CONTROL, if:
RESP®is deactivated
RESP®is malfunctioning.
Rthe lighting is faulty.
If ESP®is malfunctioning, you will be assisted
further by the electrical power steering.
Protection against theft
Immobilizer
XTo activate with the SmartKey: remove the
SmartKey from the ignition lock.
XTo activate with KEYLESS-GO: switch the
ignition off and open the driver's door.
XTo deactivate: switch on the ignition.
The immobilizer prevents your vehicle from
being started without the correct SmartKey.
When leaving the vehicle, always take the
SmartKey with you and lock the vehicle. Anyone
can start the engine if a valid SmartKey has been
left inside the vehicle.
iThe immobilizer is always deactivated when
you start the engine.
In the event that the engine cannot be started
(yet the vehicle's battery is charged), the sys-
tem is not operational. Contact an authorized
Mercedes-Benz Center or call
1-800-FOR-MERCedes (in the USA) or
1-800-387-0100 (in Canada).
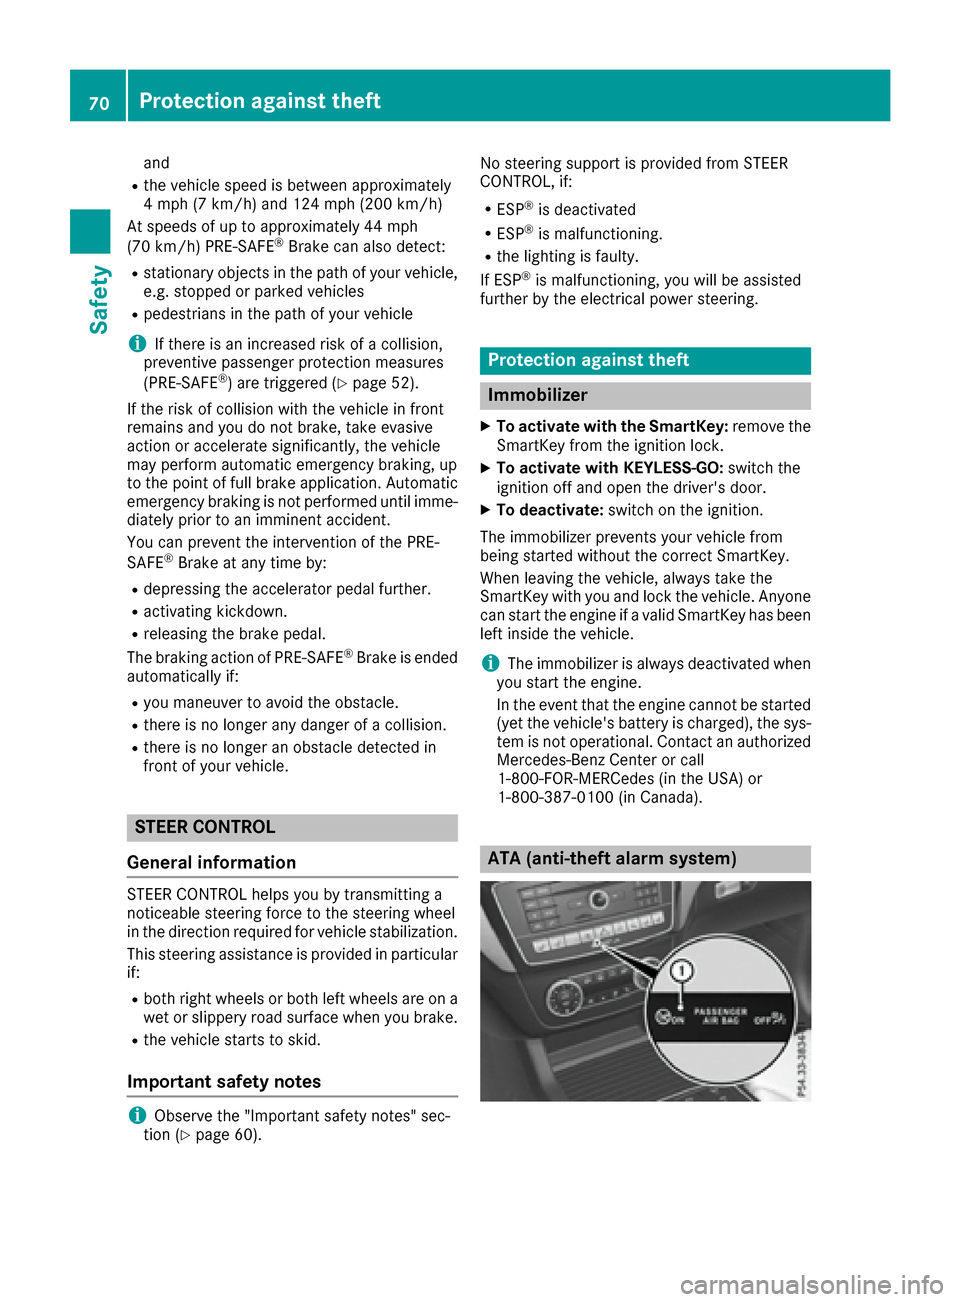
ATA (anti-theft alarm system)
70Protection against theft
Safety
Page 73 of 382
XTo arm:lock the vehicle with the SmartKey or
KEYLESS-GO.
Indicator lamp :flashes. The alarm system
is armed after approximately 15 seconds.
XTo deactivate: unlock the vehicle with the
SmartKey or KEYLESS-GO.
or
XInsert the SmartKey into the ignition lock.
A visual and audible alarm is triggered if the
alarm system is armed and you open:
Ra door
Rthe vehicle with the mechanical key
Rthe tailgate
Rthe hood
XTo switch the alarm off with the Smart-
Key: press the %or& button on the
SmartKey.
The alarm is switched off.
or
XRemove the Start/Stop button from the igni-
tion lock.
XInsert the SmartKey into the ignition lock.
The alarm is switched off.
XTo stop the alarm using KEYLESS-GO:
grasp the outside door handle. The SmartKey
must be outside the vehicle.
The alarm is switched off.
or
XPress the Start/Stop button on the dash-
board. The SmartKey must be inside the vehi- cle.
The alarm is switched off.
The alarm is not switched off, even if you close
the open door that triggered it, for example.
iIf the alarm continues for more than
30 seconds, the mbrace emergency call sys-
tem automatically notifies the Customer
Assistance Center. This is done either by text message or data connection. The emergency
call system sends the message or data pro vi-
d
ed that:
Ryou have subscribed to the mbrace service.
Rthe mbrace service has been activated
properly.
Rthe necessary mobile phone network is
available.
Protection against theft71
Safety
Z
Page 74 of 382
Useful information
i
This Operator's Manual describes all models
and all standard and optional equipment of
your vehicle available at the time of publica-
tion of the Operator's Manual. Country-spe-
cific differences are possible. Please note
that your vehicle may not be equipped with all
features described. This also applies to
safety-related systems and functions.
iRead the information on qualified specialist
workshops (Ypage 26).
SmartKey
Important safety notes
GWARNING
If children are left unsupervised in the vehicle,
they could:
Ropen the doors, thus endangering other
people or road users.
Rget out and disrupt traffic.
Roperate the vehicle's equipment.
Additionally, children could set the vehicle in
motion if, for example, they:
Rrelease the parking brake.
Rshifting the automatic transmission out of
park position P
RStart the engine.
There is a risk of an accident and injury.
When leaving the vehicle, always take the
SmartKey with you and lock the vehicle. Never
leave children or animals unattended in the
vehicle. Always keep the SmartKey out of
reach of children.
GWARNING
If you attach heavy or large objects to the
SmartKey, the SmartKey could be uninten-
tionally turned in the ignition lock. This could
cause the engine to be switched off. There is a risk of an accident.
Do not attach any heavy or large objects to theSmartKey. Remove any bulky key rings before
inserting the SmartKey into the ignition lock.
!Keep the SmartKey away from strong mag-
netic fields. Otherwise, the remote control
function could be affected.
Strong magnetic fields can occur in the vicin-
ity of powerful electrical installations.
Do not keep the SmartKey:
Rwith electronic devices, e.g. a mobile phone
or another SmartKey.
Rwith metallic objects, e.g. coins or metal foil.
Rinside metallic objects, e.g. a metal case.
This can affect the functionality of the Smart-
Key.
Do not keep the KEYLESS-GO or KEYLESS-GO
Start function key in the temperature-controlled
cup holder. Otherwise, the KEYLESS-GO or KEY-
LESS-GO Start function key will not be detected. Vehicles with KEYLESS-GO start function: do
not keep the SmartKey in the cargo compart-
ment. Otherwise, the SmartKey may not be
detected, e.g. when starting the engine using
the Start/Stop button.
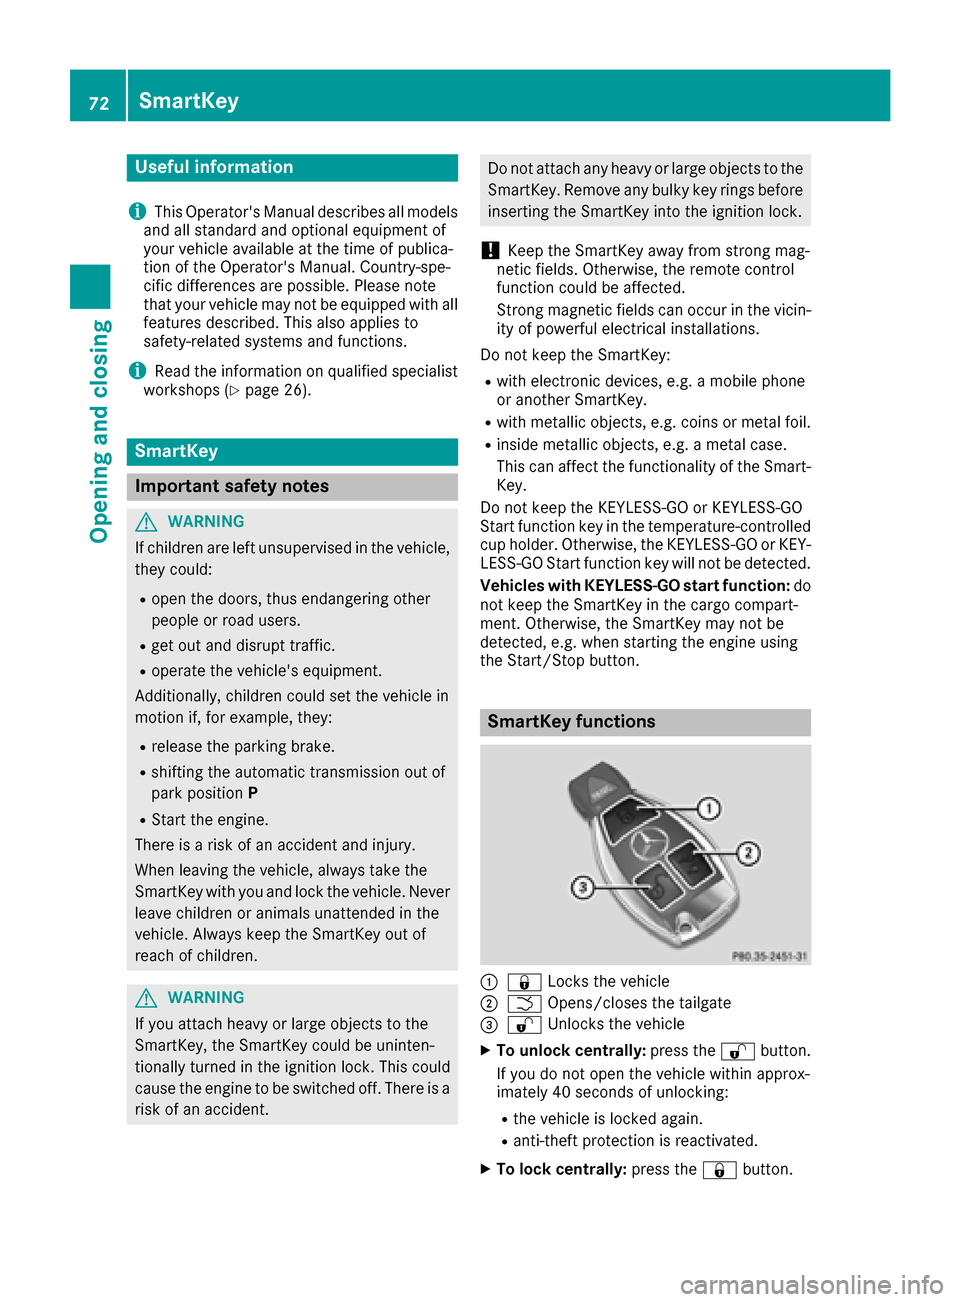
SmartKey functions
:& Locks the vehicle
;FOpens/closes the tailgate
=%Unlocks the vehicle
XTo unlock centrally: press the%button.
If you do not open the vehicle within approx-
imately 40 seconds of unlocking:
Rthe vehicle is locked again.
Ranti-theft protection is reactivated.
XTo lock centrally: press the&button.
72SmartKey
Opening and closing
Page 76 of 382
XTo deactivate:press the&button on the
SmartKey twice in rapid succession.
The battery check lamp of the SmartKey
flashes twice briefly and lights up once, then
KEYLESS-GO is deactivated (
Ypage 75).
XTo activate: press any button on the Smart-
Key.
or
XInsert the SmartKey into the ignition lock.
KEYLESS-GO and all of its associated features
are available again.
KEYLESS-GO start function
General notes
Bear in mind that the engine can be started by
any of the vehicle occupants if there is a Smart-
Key in the vehicle (
Ypage 136).
Changing the settings of the locking
system
You can change the settings of the locking sys-
tem. This means that only the driver's door and
the fuel filler flap are unlocked when the vehicle
is unlocked. This is useful if you frequently travel
on your own.
XTo change the setting: press and hold down
the % and& buttons simultaneously
for about six seconds until the battery indica-
tor lamp flashes twice (
Ypage 75).
If the setting of the locking system is changed
within the signal range of the vehicle, pressing
the & or% button:
Rlocks or
Runlocks the vehicle
The SmartKey now functions as follows:
XTo unlock: press the%button once.
XTo unlock centrally: press the%button
twice.
XTo lock centrally: press the&button. The KEYLESS-GO function is changed as fol-
lows:
XTo unlock the driver's door:
touch the inner
surface of the door handle on the driver's
door.
XTo unlock centrally: touch the inner surface
of the door handle on the front-passenger
door or the rear door.
XTo lock centrally: touch the outer sensor
surface on one of the door handles
(
Ypage 73).
XTo restore the factory settings: press and
hold down the %and& buttons simul-
taneously for approximately si x se
conds until
the battery check lamp flashes twice
(
Ypage 75).
Mechanical key
General notes
If the vehicle can no longer be locked or
unlocked with the SmartKey or the KEYLESS-GO
key, use the mechanical key.
If you use the mechanical key to unlock and
open the driver's door, the anti-theft alarm sys-
tem will be triggered. Switch off the alarm
(
Ypage 70).
If you unlock the vehicle using the mechanical
key, the fuel filler flap will not be unlocked auto- matically.
XTo unlock the fuel filler flap: insert the
SmartKey into the ignition lock.
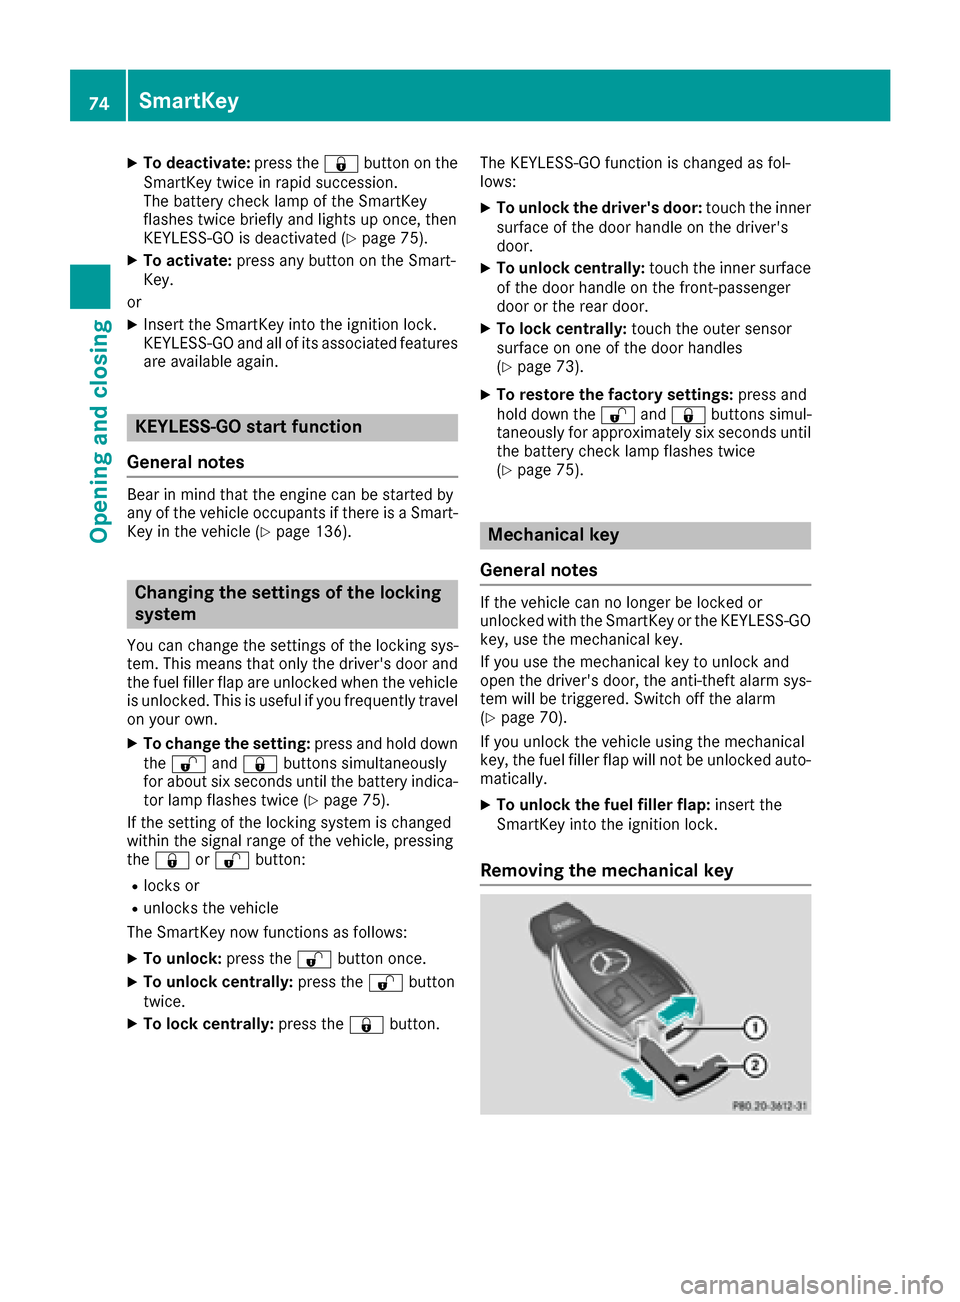
Removing the mechanical key
74SmartKey
Opening and closing
Page 81 of 382
Unlocking and opening doors from
the inside
You can open a door from inside the vehicle
even if it has been locked. You can only open the
rear doors from inside the vehicle if they are notsecured by the child-proof locks (
Ypage 59).
If the vehicle has previously been locked from
the outside, opening a door from the inside will
trigger the anti-theft alarm system. Switch off
the alarm (
Ypage 70).
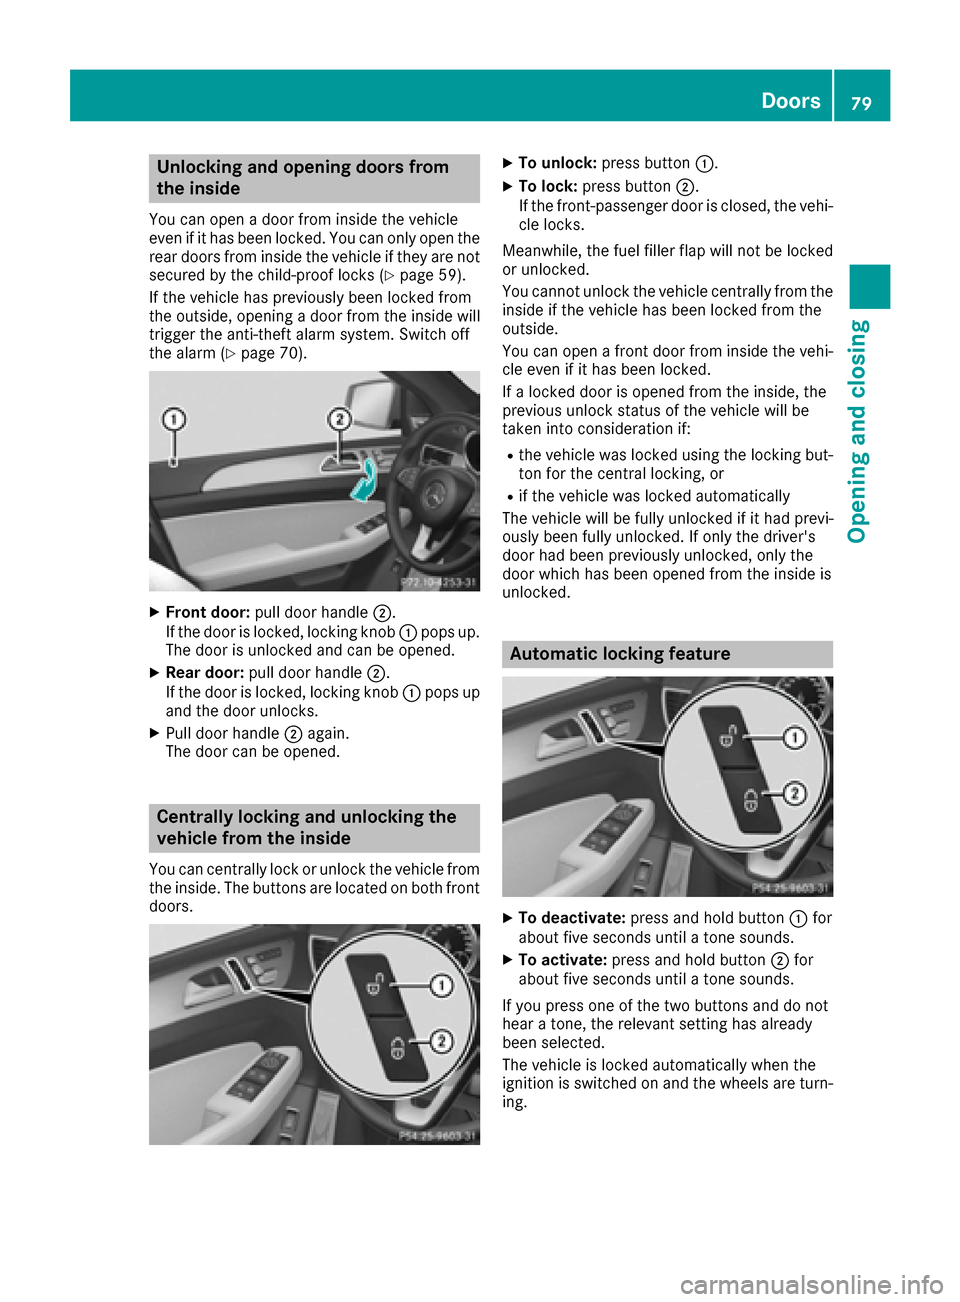
XFront door: pull door handle ;.
If the door is locked, locking knob :pops up.
The door is unlocked and can be opened.
XRear door: pull door handle ;.
If the door is locked, locking knob :pops up
and the door unlocks.
XPull door handle ;again.
The door can be opened.
Centrally locking and unlocking the
vehicle from the inside
You can centrally lock or unlock the vehicle from
the inside. The buttons are located on both front
doors.
XTo unlock: press button :.
XTo lock:press button ;.
If the front-passenger door is closed, the vehi-
cle locks.
Meanwhile, the fuel filler flap will not be locked
or unlocked.
You cannot unlock the vehicle centrally from the
inside if the vehicle has been locked from the
outside.
You can open a front door from inside the vehi-
cle even if it has been locked.
If a locked door is opened from the inside, the
previous unlock status of the vehicle will be
taken into consideration if:
Rthe vehicle was locked using the locking but-
ton for the central locking, or
Rif the vehicle was locked automatically
The vehicle will be fully unlocked if it had previ-
ously been fully unlocked. If only the driver's
door had been previously unlocked, only the
door which has been opened from the inside is
unlocked.
Automatic locking feature
XTo deactivate: press and hold button :for
about five seconds until a tone sounds.
XTo activate: press and hold button ;for
about five seconds until a tone sounds.
If you press one of the two buttons and do not
hear a tone, the relevant setting has already
been selected.
The vehicle is locked automatically when the
ignition is switched on and the wheels are turn-
ing.
Doors79
Opening and closing
Z
Page 82 of 382
You could therefore be locked out if:
Rthe vehicle is being pushed.
Rthe vehicle is being towed.
Rthe vehicle is on a roller dynamometer.
You can also switch the automatic locking func-
tion on and off using the on-board computer
(
Ypage 230).
Power closing
Power closing pulls the doors into their locks
automatically even if they are only partly closed.
XTo power close a door: push the door into
the lock up to the first detent position.
Power closing will pull the door fully closed.
Unlocking the driver's door (mechan-
ical key)
If the vehicle can no longer be locked or
unlocked with the SmartKey or KEYLESS-GO,
use the mechanical key.
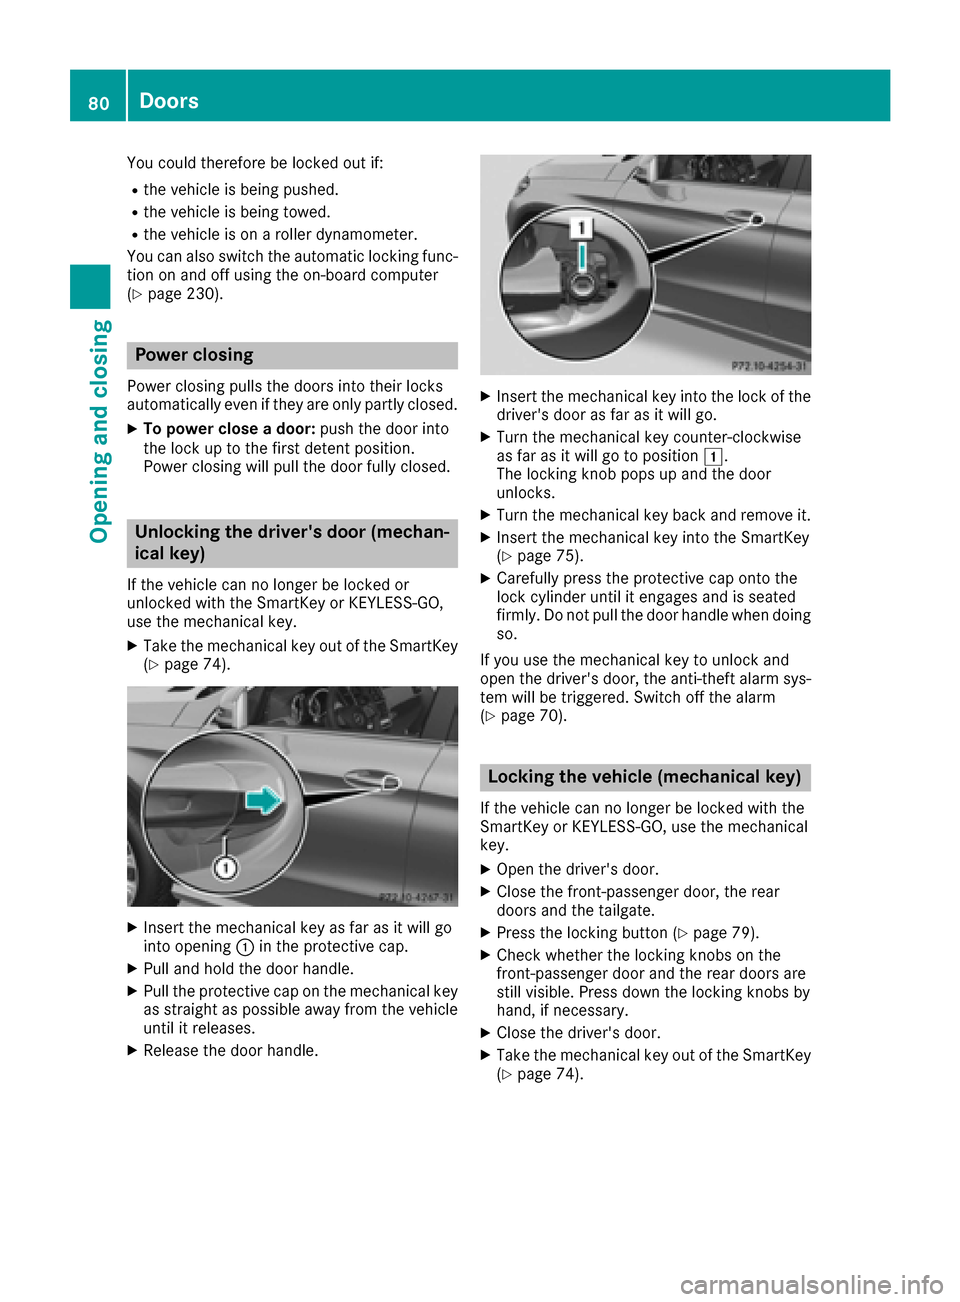
XTake the mechanical key out of the SmartKey
(Ypage 74).
XInsert the mechanical key as far as it will go
into opening :in the protective cap.
XPull and hold the door handle.
XPull the protective cap on the mechanical key
as straight as possible away from the vehicle
until it releases.
XRelease the door handle.
XInsert the mechanical key into the lock of the
driver's door as far as it will go.
XTurn the mechanical key counter-clockwise
as far as it will go to position 1.
The locking knob pops up and the door
unlocks.
XTurn the mechanical key back and remove it.
XInsert the mechanical key into the SmartKey
(Ypage 75).
XCarefully press the protective cap onto the
lock cylinder until it engages and is seated
firmly. Do not pull the door handle when doing
so.
If you use the mechanical key to unlock and
open the driver's door, the anti-theft alarm sys-
tem will be triggered. Switch off the alarm
(
Ypage 70).
Locking the vehicle (mechanical key)
If the vehicle can no longer be locked with the
SmartKey or KEYLESS-GO, use the mechanical
key.
XOpen the driver's door.
XClose the front-passenger door, the rear
doors and the tailgate.
XPress the locking button (Ypage 79).
XCheck whether the locking knobs on the
front-passenger door and the rear doors are
still visible. Press down the locking knobs by
hand, if necessary.
XClose the driver's door.
XTake the mechanical key out of the SmartKey
(Ypage 74).
80Doors
Opening and closing
Page 83 of 382
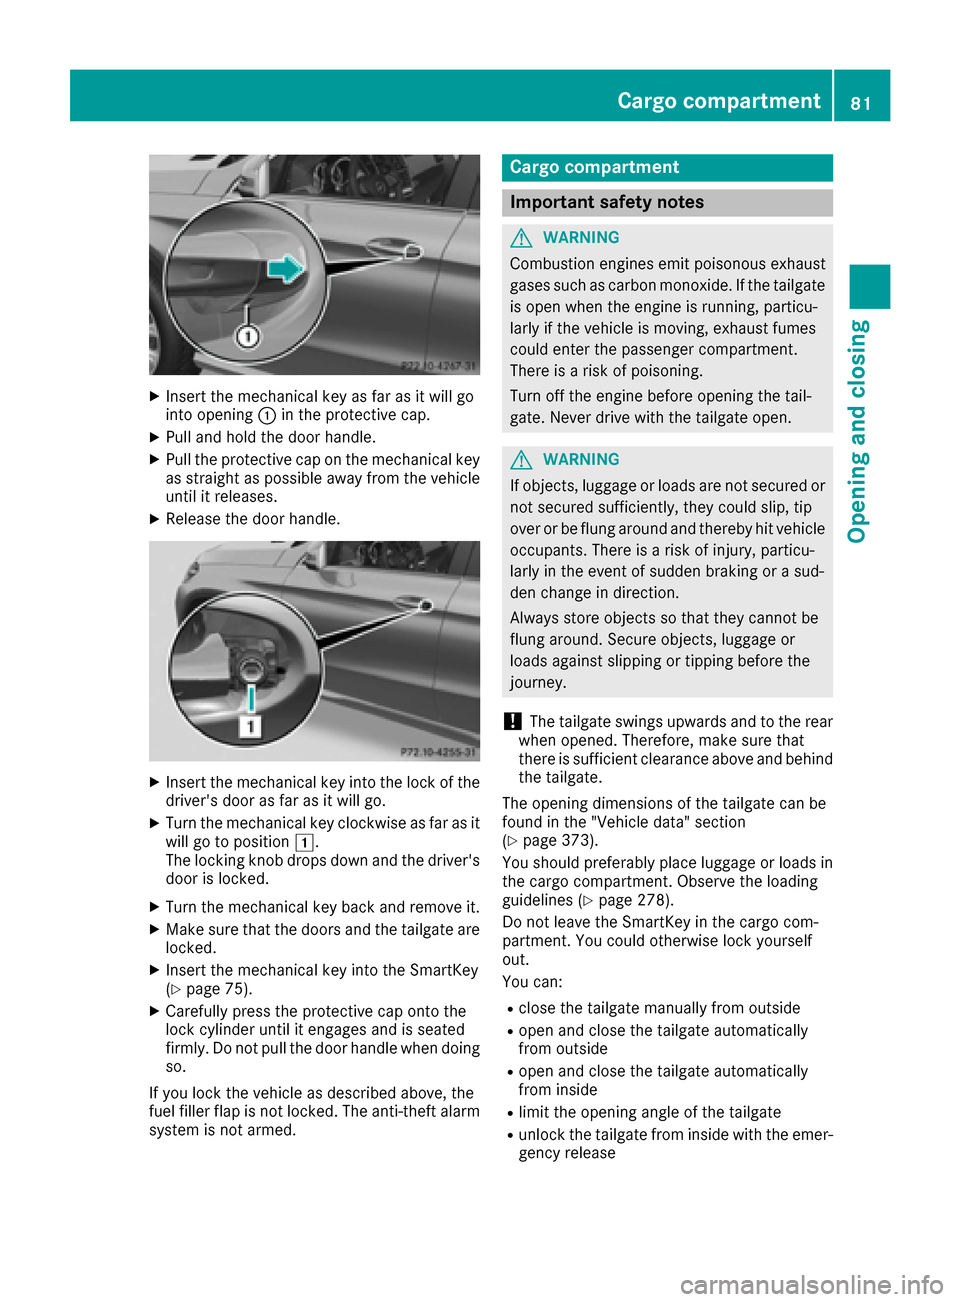
XInsert the mechanical key as far as it will go
into opening:in the protective cap.
XPull and hold the door handle.
XPull the protective cap on the mechanical key
as straight as possible away from the vehicle
until it releases.
XRelease the door handle.
XInsert the mechanical key into the lock of the
driver's door as far as it will go.
XTurn the mechanical key clockwise as far as it
will go to position 1.
The locking knob drops down and the driver's
door is locked.
XTurn the mechanical key back and remove it.
XMake sure that the doors and the tailgate are locked.
XInsert the mechanical key into the SmartKey
(Ypage 75).
XCarefully press the protective cap onto the
lock cylinder until it engages and is seated
firmly. Do not pull the door handle when doing
so.
If you lock the vehicle as described above, the
fuel filler flap is not locked. The anti-theft alarm system is not armed.
Cargo compartment
Important safety notes
GWARNING
Combustion engines emit poisonous exhaust
gases such as carbon monoxide. If the tailgate is open when the engine is running, particu-
larly if the vehicle is moving, exhaust fumes
could enter the passenger compartment.
There is a risk of poisoning.
Turn off the engine before opening the tail-
gate. Never drive with the tailgate open.
GWARNING
If objects, luggage or loads are not secured or
not secured sufficiently, they could slip, tip
over or be flung around and thereby hit vehicle
occupants. There is a risk of injury, particu-
larly in the event of sudden braking or a sud-
den change in direction.
Always store objects so that they cannot be
flung around. Secure objects, luggage or
loads against slipping or tipping before the
journey.
!The tailgate swings upwards and to the rear
when opened. Therefore, make sure that
there is sufficient clearance above and behind
the tailgate.
The opening dimensions of the tailgate can be
found in the "Vehicle data" section
(
Ypage 373).
You should preferably place luggage or loads in
the cargo compartment. Observe the loading
guidelines (
Ypage 278).
Do not leave the SmartKey in the cargo com-
partment. You could otherwise lock yourself
out.
You can:
Rclose the tailgate manually from outside
Ropen and close the tailgate automatically
from outside
Ropen and close the tailgate automatically
from inside
Rlimit the opening angle of the tailgate
Runlock the tailgate from inside with the emer- gency release
Cargo compartment81
Opening and closing
Z