four wheel drive MERCEDES-BENZ GLE-Class 2016 C292 Owner's Manual
[x] Cancel search | Manufacturer: MERCEDES-BENZ, Model Year: 2016, Model line: GLE-Class, Model: MERCEDES-BENZ GLE-Class 2016 C292Pages: 382, PDF Size: 8.83 MB
Page 5 of 382
1, 2, 3 ...
4ETS (Electronic Traction System)see ETS/4ETS (Electronic Trac-
tion System)
4MATIC (permanent four-wheel
drive) .................................................. 180
12 V socket
see Sockets
115 V socket ...................................... 289
360° camera
Cleaning ........................................ .312
Display in the multimedia system .. 198
Function/notes .............................1 97
A
ABS (Anti-lock Braking System)
Display message ............................ 235
Function/notes ................................ 60
Important safety notes .................... 60
Warning lamp ................................. 268
Accident
Automatic measures after an acci-
dent ................................................. 53
Activating/deactivating cooling
with air dehumidification ................. 124
Active Blind Spot Assist
Activating/deactivating (on-
board computer) ............................ 228
Display message ............................ 255
Function/information .................... 206
Trailer towing ................................. 209
Active Curve System
Display message ............................ 253
Function/notes ............................. 183
Active Driving Assistance package .. 206
Active Lane Keeping Assist
Activating/deactivating (on-
board computer) ............................ 228
Display message ............................ 255
Function/information .................... 209
Trailer towing ................................. 211
Active Parking Assist
Display message ............................ 256
Exiting a parking space .................. 192
Function/notes ............................. 189
Important safety notes .................. 189 Parking .......................................... 191
ADAPTIVE BRAKE ................................. 68
Adaptive Brake Assist
Function/notes ................................ 64
Adaptive Damping System
Function/notes ............................. 185
Adaptive Highbeam Assist
Display message ............................ 249
Function/notes ............................. 111
Switching on/off ........................... 112
Additives (engine oil) ........................ 371
ADS (Adaptive Damping System)
Function/notes ............................. 182
Air bags
Deployment ..................................... 50
Display message ............................ 244
Front air bag (driver, front
passenger) ....................................... 44
Important safety notes .................... 43
Introduction ..................................... 43
Knee bag .......................................... 44
Occupant Classification System
(OCS) ............................................... 45
PASSENGER AIR BAG indicator
lamps ............................................... 39
Side imp act a
ir bag .......................... 45
Window curtain air bag .................... 45
Air filter (display message) .............. 252
AIR FLOW ........................................... 126
Air vents
Glove box ....................................... 131
Important safety notes .................. 131
Rear ............................................... 132
Setting ........................................... 131
Setting the center air vents ........... 131
Setting the side air vents ............... 131
Air-conditioning system
see Climate control
AIRMATIC package
ADS (Adaptive Damping System) ... 182
Function/notes ............................. 182
Alarm
ATA (Anti-Theft Alarm system) ......... 70
Switching off (ATA) .......................... 70
Switching the function on/off
(ATA) ................................................ 70
Index3
Page 182 of 382
Deactivating theHOL Dfunction
The HOLD function is deactivated automatically
if:
Ryou accelerat eand th etransmissio nis in
position Dor R.
Ryou shift th etransmissio nto position P.
Ryou depress th ebrake peda lagain wit h acer-
tain amount of pressure until :disappears
from th emultifunction display.
Ryou secure th evehicle usin gth eelectric park-
in g brake .
Ryou activat eDISTRONIC PLUS.
iAfte r atime, th eelectric parking brake
secure sth evehicle and relieves th eservic e
brake .
Whe nth eHOLD function is activated, th etrans -
missio nis shifted automatically to position Pif:
Rth edriver's doo ris ope nand th edriver's seat
belt is unfastened.
Rth eengin eis switched off, unless it is auto-
matically switched of fby th eEC Ostart/sto p
function .
The electric parking brake secure sth evehicle
automatically if th eHOLD function is activated
when th evehicle is stationary and :
Rasyste mmalfunction occurs.
Rthepowe rsupply is no tsufficient.
On steep uphill or downhill inclines or if there is
a malfunction ,th etransmissio nmay also be
automatically shifted into position P.
4MATIC
4MATIC ensures that all four wheels are perma-
nently driven.Together wit hES P®and 4ETS, it
improves th etraction of your vehicle wheneve r
a drive whee lspins due to insufficien tgrip.
If you fail to adapt your drivin gstyle, 4MATIC can
neither reduce th eris kof acciden tno roverride
th elaws of physics. 4MATIC canno ttake
accoun tof road, weather and traffic conditions.
4MATIC is only an aid. You are responsible fo r
th edistanc eto th evehicle in front, fo rvehicle
speed, fo rbraking in goo dtime and fo rstayin gin
your lane.
!Never to wthevehicle wit hon eaxl eraised.
Thi smay damage th etransfe rcase. Damag e
of this sor tis no tcovered by th eMercedes -Benz Limited Warranty. Al
lwheels mus t
remain either on th egroun dor be full yraised.
Observ eth einstruction sfo rtowin gth evehi-
cl e wit hall wheels in full contact wit hth e
ground.
!A function or performanc etest should only
be carrie dout on atwo-axl edynamometer.
Before you operat eth evehicle on suc h a
dynamometer, please consult aqualified
workshop .You could otherwise damage th e
drive train or th ebrake system.
iIn wintr ydrivin gconditions, th emaximum
effect of 4MATIC can only be achieved if you
use winte rtires (M+Stire s), wi th snow chains
if necessary.
DSR (Downhill Speed Regulation)
General notes
DSR is an aid to assist you when driving down-
hill. It keeps the speed of travel at the speed
selected on the on-board computer. The steeper
the downhill gradient, the greater the DSR brak-
ing effect on the vehicle. When driving on flat
stretches of road or on an uphill gradient, the
DSR braking effect is minimal or nonexistent.
DSR controls the vehicle’s speed when it is acti-
vated and the transmission is in position D,R or
N. You can drive at a higher or a lower speed
than that set on the on-board computer at any
time by accelerating or braking.
Important safety notes
GWARNING
If the speed driven and the set speed deviate and you activate DSR on a slippery road sur-
face, the wheels may lose traction. There is an
increased danger of skidding and accidents.
Before switching DSR on, please take into
consideration the road surface and the differ- ence between driving speed and the set
speed.
If you fail to adapt your driving style, DSR can
neither reduce the risk of accident nor override the laws of physics. DSR cannot take account of
road, weather and traffic conditions. DSR is only
an aid. You are responsible for the distance to
180Driving system s
Driving an d parking
Page 224 of 382
Menus and submenus
Menu overview
Press the=or; button on the steering
wheel to call up the menu bar and select a menu.
Operating the on-board computer (
Ypage 220).
Depending on the equipment installed in the
vehicle, you can call up the following menus:
RTripmenu (Ypage 222)
RNavimenu (navigation instructions)
(Ypage 223)
RAudiomenu (Ypage 225)
RTelmenu (telephone) (Ypage 226)
RDriveAssistmenu (assistance)
(Ypage 227)
RServ.menu (Ypage 229)
RSett.menu (settings) (Ypage 229)
RAMGmenu (Mercedes-AMG vehicles)
(Ypage 231)
Trip menu
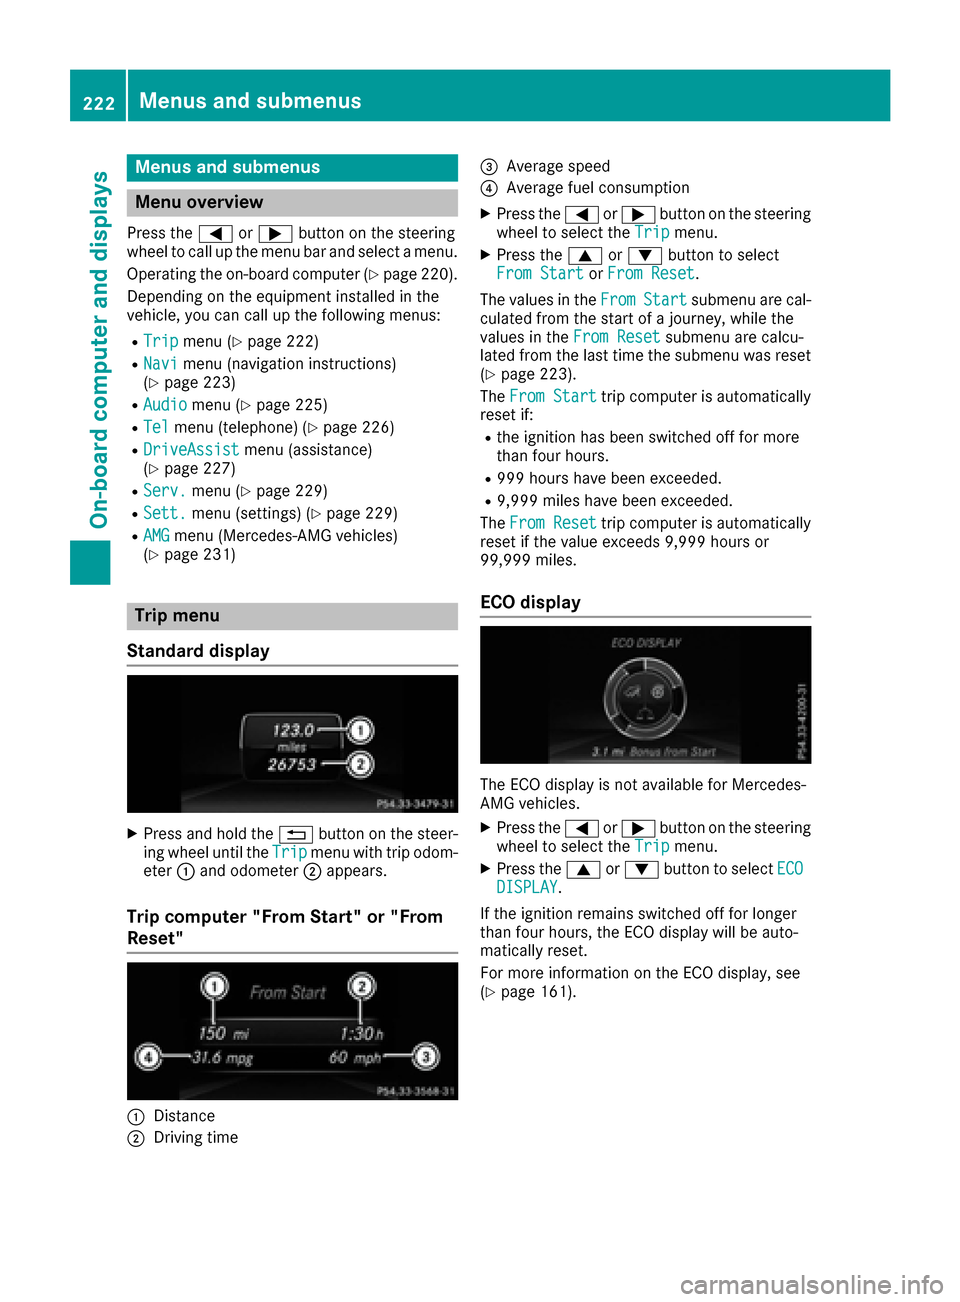
Standard display
XPress and hold the %button on the steer-
ing wheel until the Tripmenu with trip odom-
eter :and odometer ;appears.
Trip computer "From Start" or "From
Reset"
:Distance
;Driving time
=Average speed
?Average fuel consumption
XPress the =or; button on the steering
wheel to select the Tripmenu.
XPress the9or: button to select
From Startor From Reset.
The values in the From
Startsubmenu are cal-
culated from the start of a journey, while the
values in the From Reset
submenu are calcu-
lated from the last time the submenu was reset
(
Ypage 223).
The From Start
trip computer is automatically
reset if:
Rthe ignition has been switched off for more
than four hours.
R999 hours have been exceeded.
R9,999 miles have been exceeded.
The From Reset
trip computer is automatically
reset if the value exceeds 9,999 hours or
99,999 miles.
ECO display
The ECO display is not available for Mercedes-
AMG vehicles.
XPress the =or; button on the steering
wheel to select the Tripmenu.
XPress the9or: button to select ECODISPLAY.
If the ignition remains switched off for longer
than four hours, the ECO display will be auto-
matically reset.
For more information on the ECO display, see
(
Ypage 161).
222Menus and submenus
On-board computer and displays
Page 342 of 382
Restarting the tire pressure monitor
When you restart the tire pressure monitor, all
existing warning messages are deleted and the
warning lamps go out. The monitor uses the cur-
rently set tire pressures as the reference values
for monitoring. In most cases, the tire pressure
monitor will automatically detect the new refer-
ence values after you have changed the tire
pressure. However, you can also define refer-
ence values manually as described here. The tire
pressure monitor then monitors the new tire
pressure values.
XSet the tire pressure to the value recommen-
ded for the corresponding driving situation on
the Tire and Loading Information placard on
the driver's side B-pillar (
Ypage 333).
You can find more tire pressure values for
various operating conditions in the tire pres-
sure table inside the fuel filler flap
(
Ypage 333).
XMake sure that the tire pressure is correct on
all four wheels.
XMake sure that the SmartKey is in position 2
in the ignition lock.
XPress the =or; button on the steering
wheel to select the Serv.menu.
XPress the9or: button to select
Tire Pressure.
XPress the abutton.
The multifunction display shows the current
tire pressure for the individual tires or the
Tire pressure will be displayed
after driving a few minutesmessage.
XPress the :button.
The UseCurrentPressuresAsNewRef‐erenceValuesmessage appears in the mul-
tifunction display.
If you wish to confirm the restart:
XPress the abutton.
The TirePress.MonitorRestartedmes-
sage appears in the multifunction display.
After driving for a few minutes, the system
checks whether the current tire pressures are
within the specified range. The new tire pres-
sures are then accepted as reference values
and monitored.
If you wish to cancel the restart:
XPress the %button.
The tire pressure values stored at the last
restart will continue to be monitored.
Radio type approval for the tire pres-
sure monitor
CountryRadio type approval number
USAFCC ID: MRXMW2433A
FCC ID: MRXGG4
FCC ID: MRXMC34MA4
CanadaIC: 2546A-MW2433A
IC: 2546A-GG4
IC: 2546A-MC34MA4
Loading the vehicle
Instruction labels for tires and loads
GWARNING
Overloaded tires can overheat, causing a
blowout. Overloaded tires can also impair the steering and driving characteristics and lead
to brake failure. There is a risk of accident.
Observe the load rating of the tires. The load
rating must be at least half of the GAWR of
your vehicle. Never overload the tires by
exceeding the maximum load.
Two instruction labels on your vehicle show the maximum possible load.
(1) The Tire and Loading Information placard is on the B-pillar on the driver's side. The Tire
and Loading Information placard shows the
maximum permissible number of occu-
pants and the maximum permissible vehicle
load. It also contains details of the tire sizes
and corresponding pressures for tires
mounted at the factory.
(2) The vehicle identification plate is on the B- pillar on the driver's side. The vehicle iden-
tification plate informs you of the gross
vehicle weight rating. It is made up of the
vehicle weight, all vehicle occupants, the
fuel and the cargo. You can also find infor-
mation about the maximum gross axle
weight rating on the front and rear axle.
The maximum gross axle weight rating is
the maximum weight that can be carried by
one axle (front or rear axle). Never exceed
the maximum load or the maxi mum g
ross
axle weight rating for the front or rear axle.
340Loading the vehicle
Wheels and tires
Page 347 of 382
All passenger car tires must conform to the stat-
utory safety requirements in addition to these
grades.
iThe actual values for tires are vehicle-spe-
cific and may deviate from the values in the
illustration.
Treadwear
The treadwear grade is a comparative rating
based on the wear rate of the tire when tested
under controlled conditions on a specified U.S.
government course. For example, a tire graded
150 would wear one and one-half times as well
on the government course as a tire graded 100.
The relative performance of tires depends upon
the actual conditions of their use, however, and
may depart significantly from the norm due to
variations in driving habits, service practices
and differences in road characteristics and cli-
mate.
Traction
GWARNING
The traction grade assigned to this tire is
based on straight-ahead braking traction
tests, and does not include acceleration, cor-
nering, hydroplaning, or peak traction char-
acteristics.
!Avoid wheelspin. This can lead to damage to
the drive train.
The traction grades – from highest to lowest –
are AA, A, B and C. Those grades represent the
tire's ability to stop on wet pavement as meas-
ured under controlled conditions on specified
government test surfaces of asphalt and con-
crete. A tire marked C may have poor traction
performance.
The safe speed on a wet, snow covered or icy
road is always lower than on dry road surfaces.
You should pay special attention to road condi-
tions when temperatures are around freezing
point.
Mercedes-Benz recommends a minimum tread
depth of ãin (4 mm) on all four winter tires.
Observe the legally required minimum tire tread
depth (
Ypage 331). Winter tires can reduce the
braking distance on snow-covered surfaces in
comparison with summer tires. The braking dis-
tance is still much further than on surfaces that are not icy or covered with snow. Take appro-
priate care when driving.
Further information on winter tires (M+S
tires)
(
Ypage 332).
Temperature
GWARNING
The temperature grade for this tire is estab-
lished for a tire that is properly inflated and
not overloaded. Excessive speed, underinfla-
tion, or excessive loading, either separately or
in combination, can cause excessive heat
build-up and possible tire failure.
The temperature grades are A (the highest), B,
and C, representing the tire's resistance to the
generation of heat and its ability to dissipate
heat when tested under controlled conditions
on a specified indoor laboratory test wheel. Sus-
tained high temperature can cause the material
of the tire to degenerate and reduce tire life, and
excessive temperature can lead to sudden tire
failure. The grade C corresponds to a level of
performance which all passenger car tires must
meet under the Federal Motor Vehicle Safety
Standard No. 109. Grades B and A represent
higher levels of performance on the laboratory
test wheel than the minimum required by law.
All about wheels and tires345
Wheels and tires
Z