light MERCEDES-BENZ GLE-Class 2016 W218 User Guide
[x] Cancel search | Manufacturer: MERCEDES-BENZ, Model Year: 2016, Model line: GLE-Class, Model: MERCEDES-BENZ GLE-Class 2016 W218Pages: 450, PDF Size: 10.52 MB
Page 32 of 450
affect its safe operation, we urge you to contact
an authorized Mercedes-Benz Center immedi-
ately to have the problem diagnosed and recti-
fied. If the problem is not resolved to your sat-
isfaction, please discuss the problem again with
a Mercedes-Benz Center or contact us at one of
the following addresses.
In the USA
Customer Assistance Center
Mercedes-Benz USA, LLC
One Mercedes Drive
Montvale, NJ 07645-0350
In Canada
Customer Relations Department
Mercedes-Benz Canada, Inc.
98 Vanderhoof Avenue
Toronto, Ontario M4G 4C9
Reporting safety defects
USA only:
The following text is published as required of
manufacturers under Title 49, Code of U.S. Fed-
eral Regulations, Part 575 pursuant to the
"National Traffic and Motor Vehicle Safety Act of 1966".
If you believe that your vehicle has a defect
which could cause a crash or could cause injury
or death, you should immediately inform the
National Highway Traffic Safety Administration
(NHTSA) in addition to notifying Mercedes-Benz USA, LLC.
If NHTSA receives similar complaints, it may
open an investigation, and if it finds that a safety
defect exists in a group of vehicles, it may order
a recall and remedy campaign. However, NHTSA
cannot become involved in individual problems
between you, your dealer, or Mercedes-Benz
USA, LLC.
To contact NHTSA, you may call the Vehicle
Safety Hotline toll-free at
1-888-327-4236(TTY: 1-800-424-9153 );go to
http://www.safercar.gov ; or write to: Admin-
istrator, NHTSA, 400 Seventh Street, SW.,
Washington, DC 20590.
You can also obtain other information about
motor vehicle safety from
http://www.safercar.gov
Limited Warranty
!
Follow the instructions in this manual about
the proper operation of your vehicle as well as
about possible vehicle damage. Damage to
your vehicle that arises from culpable contra-
ventions against these instructions is not cov-
ered either by the Mercedes-Benz Limited
Warranty or by the New or Used-Vehicle War-
ranty.
QR codes for the rescue card
The QR codes are secured in the fuel filler flap
and on the opposite side on the B-pillar. In the
event of an accident, rescue services can use
the QR code to quickly find the appropriate res-
cue card for your vehicle. The current rescue
card contains the most important information
about your vehicle in a compact form, e.g. the
routing of the electric cables.
You can find more information under http://
portal.aftersales.i.daimler.com/public/
content/asportal/en/communication/
informationen_fuer/QRCode.html.
Data stored in the vehicle
Data storage
A wide range of electronic components in your
vehicle contain data memories.
These data memories temporarily or perma-
nently store technical information about:
RVehicle's operating state
RIncidents
RMalfunctions
In general, this technical information docu-
ments the state of a component, a module, a
system or the surroundings.
These include, for example:
Roperating conditions of system components,
e.g. fluid levels
Rthe vehicle's status messages and those of its
individual components, e.g. number of wheel
revolutions/speed, deceleration in move-
ment, lateral acceleration, accelerator pedal
position
Rmalfunctions and defects in important system
components, e.g. lights, brakes
30Introduction
Page 35 of 450

Cockpit
FunctionPage
:Steering wheel paddle shift-
ers159
;Combination switch116
=Instrument cluster34
?Horn
ADIRECT SELECT lever154
BPARKTRONIC warning dis-
play210
COverhead control panel40
DClimate control systems126
EIgnition lock145
Start/Stop button146
FunctionPage
FAdjusts the steering wheel
manually107
GAdjusts the steering wheel
electrically107
Steering wheel heating108
HCruise control lever191
IOpens the hood356
JDiagnostics connection29
KElectric parking brake179
LLight switch114
Cockpit33
At a glance
Page 36 of 450

Instrument cluster
Displays and controls
FunctionPage
:Speedometer
Speedometer segments263
;Fue lgauge
Fue lfiller flap location indi-
cator 8: thefuel filler cap
is on th eright-hand side .
FunctionPage
=Tachometer263
?Coolan ttemperature26 4
AMultifunction display265
BInstrumen tcluste rlighting26 3
iInformation on displayin gth eoutside tem-
peratur ein th emultifunction display can be
foun dunder "Outside temperature display"
(
Ypage 264).
iInformation on additional displays for PLUG-
IN HYBRID vehicles can be foun din th e
"PLUG-I NHYBRID operation "section
(
Ypage 245).
34Instrument cluster
At a glance
Page 40 of 450
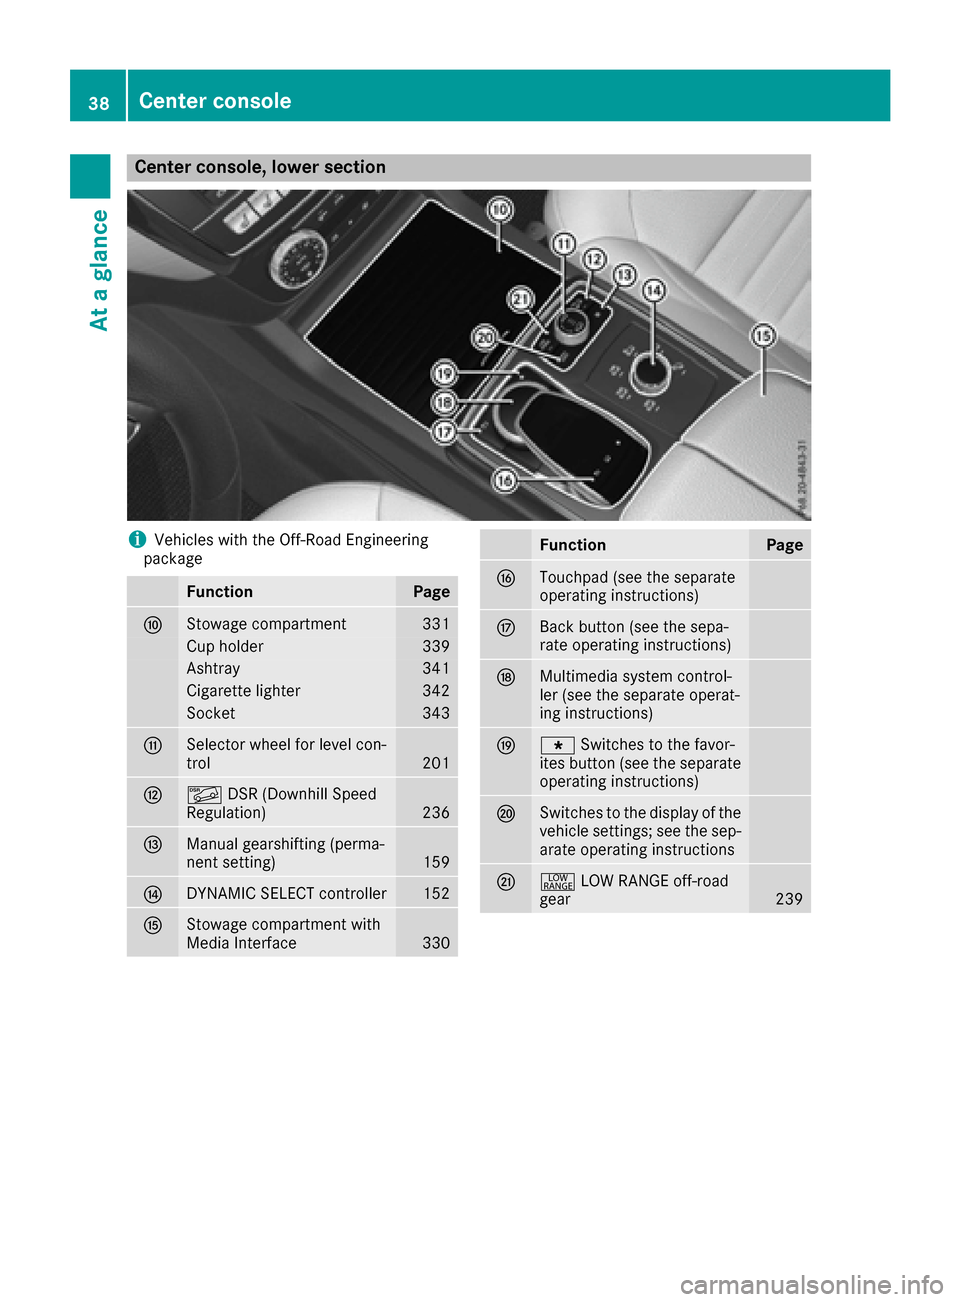
Center console, lower section
iVehicles with the Off-Road Engineering
package
FunctionPage
FStowage compartment331
Cup holder339
Ashtray341
Cigarette lighter342
Socket343
GSelector wheel for level con-
trol201
HÃ DSR (Downhill Speed
Regulation)236
IManual gearshifting (perma-
nent setting)159
JDYNAMIC SELECT controller152
KStowage compartment with
Media Interface330
FunctionPage
LTouchpad (see the separate
operating instructions)
MBack button (see the sepa-
rate operating instructions)
NMultimedia system control-
ler (see the separate operat-
ing instructions)
Og Switches to the favor-
ites button (see the separate
operating instructions)
PSwitches to the display of the
vehicle settings; see the sep-
arate operating instructions
Q+ LOW RANGE off-road
gear239
38Center console
At a glance
Page 41 of 450
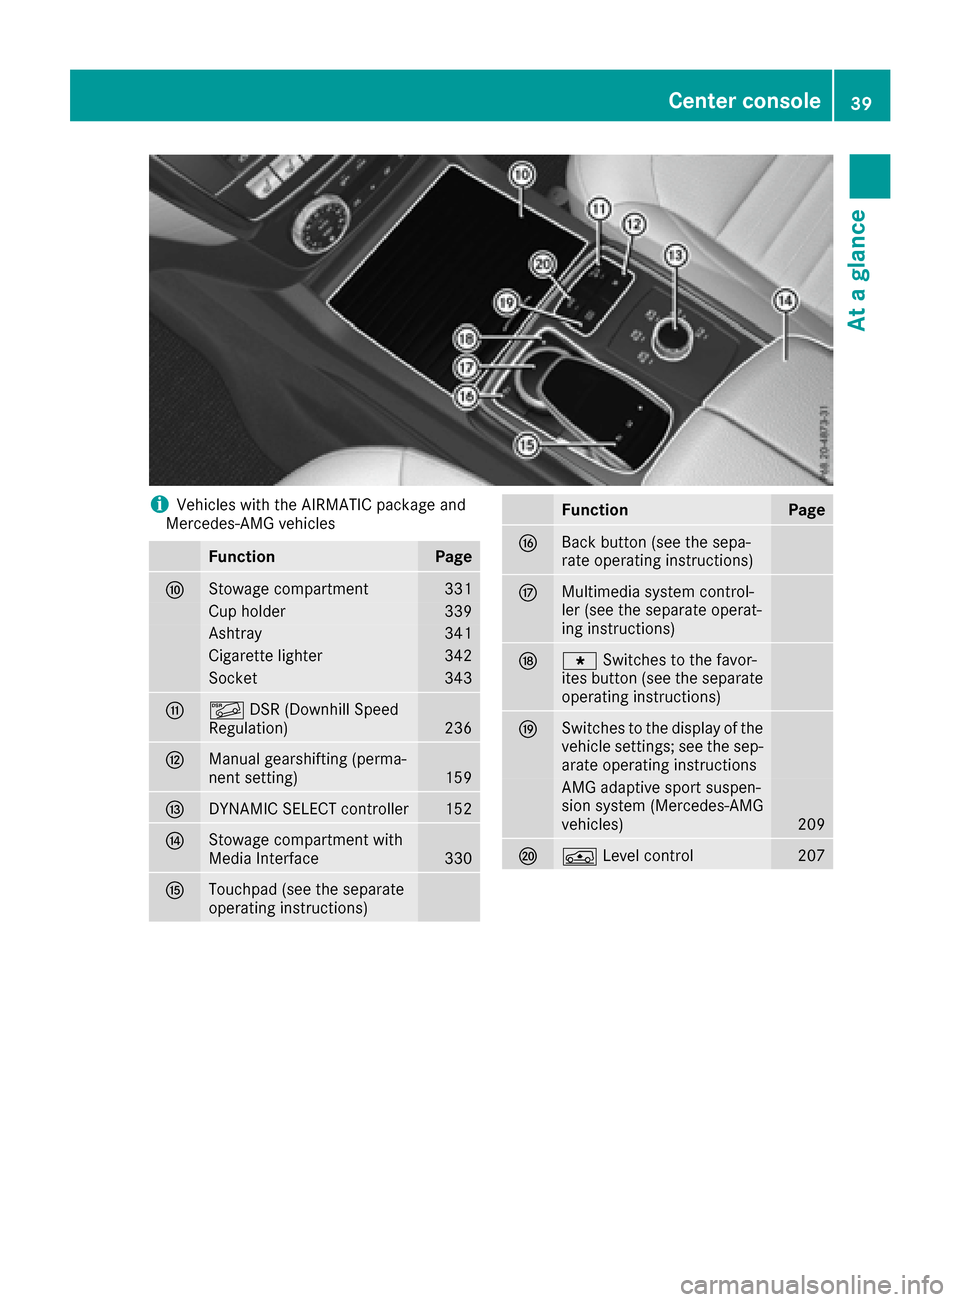
iVehicles with the AIRMATIC package and
Mercedes-AMG vehicles
FunctionPage
FStowage compartment331
Cup holder339
Ashtray341
Cigarette lighter342
Socket343
GÃ DSR (Downhill Speed
Regulation)236
HManual gearshifting (perma-
nent setting)159
IDYNAMIC SELECT controller152
JStowage compartment with
Media Interface330
KTouchpad (see the separate
operating instructions)
FunctionPage
LBack button (see the sepa-
rate operating instructions)
MMultimedia system control-
ler (see the separate operat-
ing instructions)
Ng Switches to the favor-
ites button (see the separate
operating instructions)
OSwitches to the display of the
vehicle settings; see the sep-
arate operating instructions
AMG adaptive sport suspen-
sion system (Mercedes-AMG
vehicles)
209
PÁ Level control207
Center console39
At a glance
Page 42 of 450

Overhead control panel
FunctionPage
:pSwitches the left-hand
reading lamp on/off118
;c Switches the front inte-
rior lighting on119
=u Switches the rear inte-
rior lighting on or off119
?| Switches the front inte-
rior lighting/automatic inte-
rior lighting control off
119
Ap Switches the right-
hand reading lamp on/off118
B3 Opens/closes the pan-
orama roof with power tilt/
sliding panel and roller sun-
blinds
97
FunctionPage
CEyeglasses compartment331
DF Roadside Assistance
call button (mbrace system)347
EG SOS button (mbrace
system)346
Fï MB Info call button
(mbrace system)348
GRear-view mirror110
HButtons for the garage door
opener354
IMicrophone for mbrace
(emergency call system),
telephone and LINGUA-
TRONIC
1
1LINGUATRONIC is only available in combination with COMAND. Please observe the separate operating
instructions.
40Overhead control panel
At a glance
Page 45 of 450
Deactivate the hybrid system manually if:
Rthe6 restraint system warning lamp in the
instrument cluster lights up after an accident
Rthe vehicle is badly damaged, e.g. after an
accident, and the restraint system compo-
nents were not activated
Rthe vehicle is badly damaged and has to be
towed or transported
XIf possible, move the vehicle out of the
danger zone: shift the automatic transmis-
sion into position N.
XRelease the electric parking brake.
XRoll the vehicle to a safe place and park it
safely.
Get assistance from others if necessary.
The vehicle is locked automatically when the
ignition is switched on and the wheels are turn-
ing. There is therefore a risk of being locked out
if the vehicle is being pushed or tested on a
dynamometer.
XSwitch the ignition off.
XShift the automatic transmission to park posi-
tion P.
Depress the electric parking brake
(
Ypage 179).
Secure the vehicle against rolling away
(
Ypage 409).
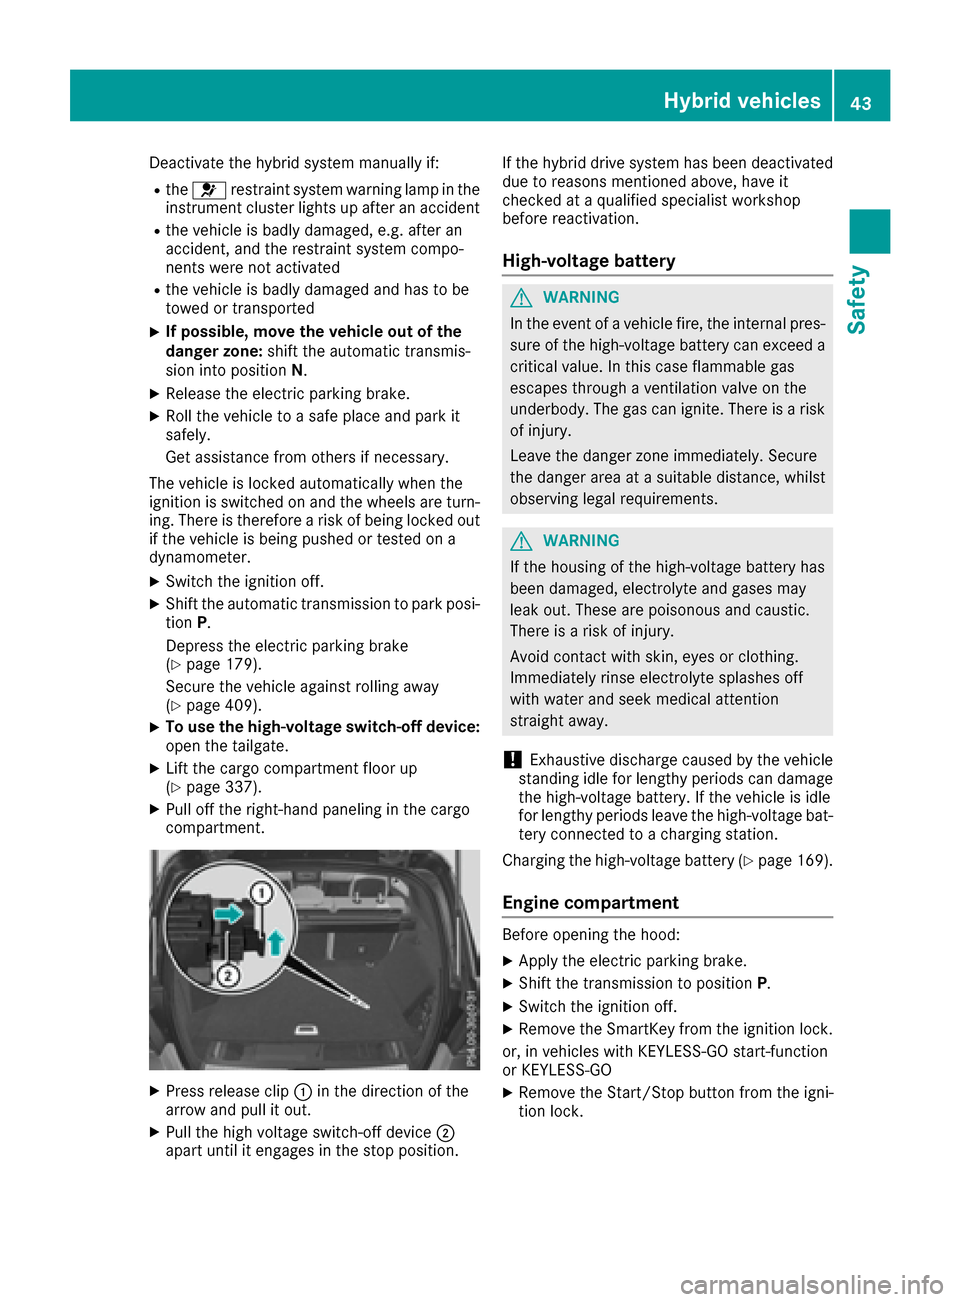
XTo use the high-voltage switch-off device:
open the tailgate.
XLift the cargo compartment floor up
(Ypage 337).
XPull off the right-hand paneling in the cargo
compartment.
XPress release clip :in the direction of the
arrow and pull it out.
XPull the high voltage switch-off device ;
apart until it engages in the stop position. If the hybrid drive system has been deactivated
due to reasons mentioned above, have it
checked at a qualified specialist workshop
before reactivation.
High-voltage battery
GWARNING
In the event of a vehicle fire, the internal pres- sure of the high-voltage battery can exceed a
critical value. In this case flammable gas
escapes through a ventilation valve on the
underbody. The gas can ignite. There is a risk
of injury.
Leave the danger zone immediately. Secure
the danger area at a suitable distance, whilst
observing legal requirements.
GWARNING
If the housing of the high-voltage battery has
been damaged, electrolyte and gases may
leak out. These are poisonous and caustic.
There is a risk of injury.
Avoid contact with skin, eyes or clothing.
Immediately rinse electrolyte splashes off
with water and seek medical attention
straight away.
!Exhaustive discharge caused by the vehicle
standing idle for lengthy periods can damage
the high-voltage battery. If the vehicle is idle
for lengthy periods leave the high-voltage bat-
tery connected to a charging station.
Charging the high-voltage battery (
Ypage 169).
Engine compartment
Before opening the hood:
XApply the electric parking brake.
XShift the transmission to position P.
XSwitch the ignition off.
XRemove the SmartKey from the ignition lock.
or, in vehicles with KEYLESS-GO start-function
or KEYLESS ‑GO
XRemove the Start/Stop button from the igni-
tion lock.
Hybrid vehicles43
Safety
Z
Page 47 of 450
This poses an increased risk of injury or evenfatal injury.
Never modify parts of the restraint system.
Never tamper with the wiring, the electronic
components or their software.
If it is necessary to modify an air bag system to
accommodate a person with disabilities, con-
tact an authorized Mercedes-Benz Center for
details. USA only: for further information con-
tact our Customer Assistance Center at
1-800-FOR-MERCedes (1‑800‑367‑6372).
Restraint system warning lamp
The functions of the restraint system are
checked after the ignition is switched on and at
regular intervals while the engine is running.
Therefore, malfunctions can be detected in
good time.
The 6 restraint system warning lamp in the
instrument cluster lights up when the ignition is
switched on. It goes out no later than a few sec-
onds after the vehicle is started. The compo-
nents of the restraint system are in operational
readiness.
A malfunction has occurred if the 6restraint
system warning lamp:
Rdoes not light up after the ignition is switched
on
Rdoes not go out after a few seconds with the
engine running
Rlights up again while the engine is running
All vehicles, except hybrid vehicles:
GWARNING
If restraint system is malfunctioning, restraint
system components may be triggered unin-
tentionally or might not be triggered at all in
the event of an accident with a high rate of
vehicle deceleration. This can affect the Emer- gency Tensioning Device or air bag, for exam-
ple. This poses an increased risk of injury or
even fatal injury.
Have the restraint system checked and
repaired in a qualified specialist workshop as
soon as possible.
Hybrid vehicles:
GDANGER
If the restraint system is malfunctioning, indi- vidual restraint system components may be
triggered unintentionally or might not be trig-
gered at all in the event of an accident with a
high rate of vehicle deceleration. This could
affect Emergency Tensioning Devices or air
bags, for example. The vehicle's high-voltage
electrical system may also not be deactivated
as intended in the event of an accident. You
could suffer an electric shock if you touch the
damaged components of the vehicle's high-
voltage electrical system. This poses an
increased risk of injury or even fatal injury.
Have the restraint system checked and
repaired immediately at a qualified specialist
workshop. Immediately switch off the ignition
and remove the SmartKey from the ignition
lock after an accident.
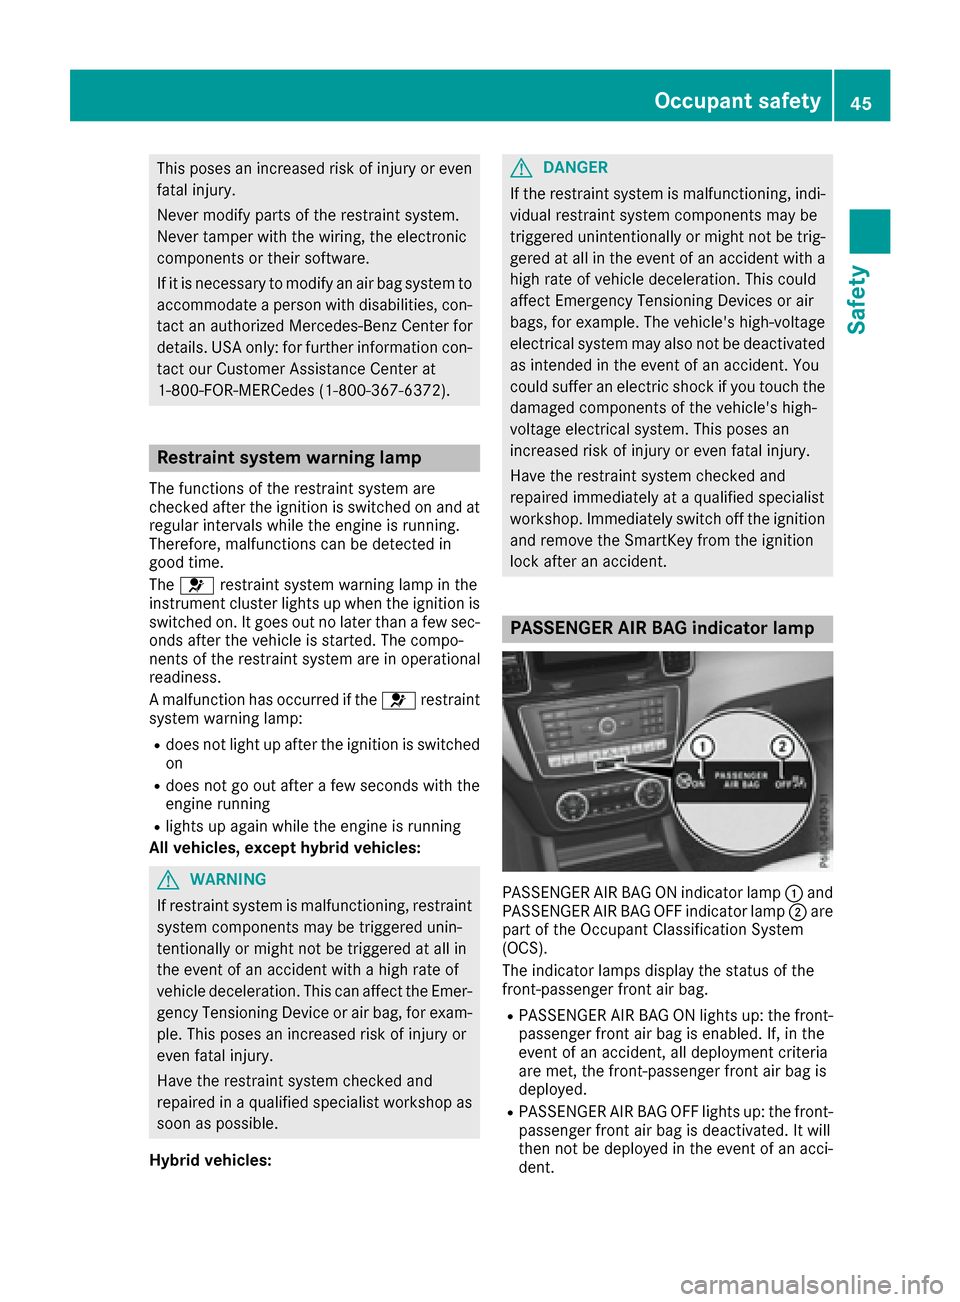
PASSENGER AIR BAG indicator lamp
PASSENGER AIR BAG ON indicator lamp :and
PASSENGER AIR BAG OFF indicator lamp ;are
part of the Occupant Classification System
(OCS).
The indicator lamps display the status of the
front-passenger front air bag.
RPASSENGER AIR BAG ON lights up: the front-
passenger front air bag is enabled. If, in the
event of an accident, all deployment criteria
are met, the front-passenger front air bag is
deployed.
RPASSENGER AIR BAG OFF lights up: the front-
passenger front air bag is deactivated. It will
then not be deployed in the event of an acci-
dent.
Occupant safety45
Safety
Z
Page 50 of 450

RThe seat belt is not routed over sharp, pointed
or fragile objects.
If these items are on or in your clothing, e.g.
eyeglasses, pens, keys, etc., stow these items
in a more suitable location.
ROnly one person should use each seat belt at
any one time.
On no account should babies or children
travel sitting on the lap of another vehicle
occupant. During an accident, they could be
crushed between the occupant and seat belt.
RObjects are not secured with a seat belt if theseat belt is being used by one of the vehicle’s
occupants.
Also make sure that there are no objects, e.g.
cushions, between the occupant and the seat.
Seat belts are solely intended for the protection
and restraint of the vehicle occupants. To
secure objects, luggage or loads, always
observe the "Loading guidelines" (
Ypage 329).
Fastening and adjusting the seat belts
Observe the safety notes on the seat belt
(Ypage 46) and the notes on correct use of seat
belts (Ypage 47).
Basic illustration
XAdjust the seat (Ypage 100).
The seat backrest must be in an almost ver-
tical position.
XPull the seat belt smoothly from the belt outlet
and engage belt tongue ;into belt
buckle :.
The seat belt on the driver’s seat and the
front-passenger seat may be tightened auto- matically, see "Belt adjustment"
(
Ypage 48).
XIf necessary, pull upwards on the shoulder
section of the seat belt to tighten the belt
across your body.
The shoulder section of the seat belt must
always be routed across the center of the shoul-
der. Adjust the belt outlet if necessary.
XTo raise: slide the belt outlet upwards.
The belt outlet will engage in various posi-
tions.
XTo lower: hold belt outlet release =and slide
belt outlet downwards.
XLet go of belt outlet release =in the desired
position and make sure that the belt outlet
engages.
All seat belts except the driver's seat belt are
equipped with a special seat belt retractor to
securely fasten child restraint systems in the
vehicle. Further information can be found under
"Special seat belt retractor" (
Ypage 60).
Releasing seat belts
!Make sure that the seat belt is fully rolled up.
Otherwise, the seat belt or belt tongue will be
trapped in the door or in the seat mechanism.
This could damage the door, the door trim
panel and the seat belt. Damaged seat belts
can no longer fulfill their protective function
and must be replaced. Visit a qualified spe-
cialist workshop.
XPress the release button in the belt buckle,
hold the belt tongue firmly and guide the belt
back.
Seat belt adjustment
The seat-belt adjustment is an integral part of
the PRE-SAFE®convenience function. This func-
tion adjusts the driver's and front-passenger
seat belt to the upper body of the occupants.
The belt strap is tightened slightly when:
Rthe belt tongue is engaged in the buckle and
Rthe ignition is switched on
The seat-belt adjustment will apply a certain
retraction force if any slack is detected between
the vehicle occupant and the seat belt. Do not
hold on to the seat belt tightly while it is adjust-
ing.
48Occupant safety
Safety
Page 51 of 450
You can switch the seat-belt adjustment on and
off in the on-board computer (Ypage 276).
Belt warning for the driver and front
passenger
The7 seat belt warning lamp in the instru-
ment cluster is a reminder that all vehicle occu-
pants must wear their seat belts. It may light up
continuously or flash. In addition, there may be
a warning tone.
Regardless of whether the driver's seat belt has
already been fastened, the 7seat belt warn-
ing lamp lights up for six seconds each time the engine is started. If, after six seconds, the driver
or front-passenger seat belt has not been fas-
tened and the doors are closed, the 7seat
belt warning lamp lights up. As soon as the driv-
er's and front-passenger seat belts are fastened
or a front door is opened again, the 7seat
belt warning lamp goes out.
If the driver's seat belt is not fastened after the
engine is started, an additional warning tone will
sound. The warning tone switches off after six
seconds or once the driver's seat belt is fas-
tened.
If the vehicle's speed exceeds 15 mph
(25 km/h) once and the driver's and front-
passenger seat belts are not fastened, a warning
tone sounds. A warning tone also sounds with
increasing intensity for 60 seconds or until the
driver or front passenger have fastened their
seat belts.
If the driver or front passenger unfasten their
seat belts during the journey, the seat belt warn-
ing is activated again.
iMore information on the 7seat belt
warning lamp can be found under "Warning
and indicator lamps in the instrument cluster,
seat belt" (
Ypage 316).
Air bags
Introduction
The air bag installation point is identified by the
label AIR BAG.
An air bag supplements a correctly fastened
seat belt. However, it is not intended as a sub-
stitute for the seat belt. Air bags provide addi-
tional protection in the event of an accident. Not all air bags are deployed in an accident. The
various air bag systems work independently of
each other (
Ypage 56).
There is, however, no system available today
that can completely rule out injury or death.
It is also not possible to rule out a risk of injury
caused by an air bag due to the high speed at
which the air bag must be deployed.
Important safety notes
GWARNING
If you do not sit in the correct seat position,
the air bag cannot protect as intended and
could even cause additional injury when
deployed. This poses an increased risk of
injury or even fatal injury.
To avoid hazardous situations, always make
sure that all of the vehicle's occupants:
Rhave fastened their seat belts correctly,
including pregnant women
Rare sitting correctly and maintain the great-
est possible distance to the air bags
Rfollow the following instructions
Always make sure that there are no objects
between the air bag and the vehicle's occu-
pants.
RAdjust the seats properly before beginning
your journey. Always make sure that the seat
is in an almost upright position. The center of
the head restraint must support the head at
about eye level.
RMove the driver's and front-passenger seats
as far back as possible. The driver's seat posi-
tion must allow the vehicle to be driven safely.
ROnly hold the steering wheel on the outside.
This allows the air bag to be fully deployed.
RAlways lean against the backrest while driv-
ing. Do not lean forwards or lean against the
door or side window. You may otherwise be in
the deployment area of the air bags.
RAlways keep your feet in the footwell in front
of the seat. Do not put your feet on the dash-
board, for example. Your feet may otherwise
be in the deployment area of the air bag.
RFor this reason, always secure persons less
than 5 ft (1.50 m) tall in suitable restraint sys-
tems. Up to this height, the seat belt cannot
be worn correctly.
Occupant safety49
Safety
Z