change time MERCEDES-BENZ GLE-CLASS SUV 2016 Owners Manual
[x] Cancel search | Manufacturer: MERCEDES-BENZ, Model Year: 2016, Model line: GLE-CLASS SUV, Model: MERCEDES-BENZ GLE-CLASS SUV 2016Pages: 450, PDF Size: 10.52 MB
Page 3 of 450
Welcome to the world of Mercedes-Benz
We urge you to read this Operator's Manual
carefully and familiarize yourself with the vehi-
cle before driving. For your own safety and a
longer vehicle life, follow the instructions and
warning notices in this manual. Ignoring them
could result in damage to the vehicle or personal
injury to you or others.
Vehicle damage caused by failure to follow
instructions is not covered by the Mercedes-
Benz Limited Warranty.
The equipment or product designation of your
vehicle may vary depending on:
RModel
ROrder
RCountry specification
RAvailability
Mercedes-Benz therefore reserves the right to
introduce changes in the following areas:
RDesign
REquipment
RTechnical features
The equipment in your vehicle may therefore
differ from that shown in the descriptions and
illustrations.
The following are integral components of the
vehicle:
ROperator's Manual
RMaintenance Booklet
REquipment-dependent supplements
Keep these documents in the vehicle at all
times. If you sell the vehicle, always pass all
documents on to the new owner.
You can also use the Mercedes-Benz Guides
App:
Apple®iOS
Android™
Please note that the Mercedes-Benz Guides App may not yet be available in your country.
The technical documentation team at
Daimler AG wishes you safe and pleasant motor-
ing.
Mercedes-Benz USA, LLC
Mercedes-Benz Canada, Inc.
A Daimler Company
1665847203
É1665847203]ËÍ
Page 27 of 450
Protection of the environment
General notes
HEnvironmental note
Daimler's declared policy is one of compre-
hensive environmental protection.
The objectives are for the natural resources
that form the basis of our existence on this
planet to be used sparingly and in a manner
that takes the requirements of both nature
and humanity into account.
You too can help to protect the environment
by operating your vehicle in an environmen-
tally responsible manner.
Fuel consumption and the rate of engine,
transmission, brake and tire wear are affected by these factors:
Roperating conditions of your vehicle
Ryour personal driving style
You can influence both factors. You should
bear the following in mind:
Operating conditions:
Ravoid short trips as these increase fuel con-
sumption.
Ralways make sure that the tire pressures
are correct.
Rdo not carry any unnecessary weight.
Rremove roof racks once you no longer need
them.
Ra regularly serviced vehicle will contribute
to environmental protection. You should
therefore adhere to the service intervals.
Ralways have service work carried out at a
qualified specialist workshop.
Personal driving style:
Rdo not depress the accelerator pedal when
starting the engine.
Rdo not warm up the engine when the vehicle
is stationary.
Rdrive carefully and maintain a safe distance
from the vehicle in front.
Ravoid frequent, sudden acceleration and
braking.
Rchange gear in good time and use each gear
only up to Ôof its maximum engine speed.
Rswitch off the engine in stationary traffic.
Rkeep an eye on the vehicle's fuel consump-
tion.
Environmental concerns and recom-
mendations
Wherever the operating instructions require you
to dispose of materials, first try to regenerate or
re-use them. Observe the relevant environmen-
tal rules and regulations when disposing of
materials. In this way you will help to protect the
environment.
Genuine Mercedes-Benz parts
HEnvironmental note
Daimler AG also supplies reconditioned major
assemblies and parts which are of the same
quality as new parts. They are covered by the
same Limited Warranty entitlements as new
parts.
!Air bags and Emergency Tensioning Devi-
ces, as well as control units and sensors for
these restraint systems, may be installed in
the following areas of your vehicle:
Rdoors
Rdoor pillars
Rdoor sills
Rseats
Rcockpit
Rinstrument cluster
Rcenter console
Do not install accessories such as audio sys-
tems in these areas. Do not carry out repairs or welding. You could impair the operating
efficiency of the restraint systems.
Have aftermarket accessories installed at a
qualified specialist workshop.
You could jeopardize the operating safety of
your vehicle if you use parts, tires and wheels as
well as accessories relevant to safety which
have not been approved by Mercedes-Benz. This
could lead to malfunctions in safety-relevant
Introduction25
Z
Page 29 of 450
have directly notified Mercedes-Benz USA,
LLC in writing of the need for its repair.
(2) the same substantial defect or malfunction of a less serious nature than category (1)
has been subject to repair four or more
times and you have directly notified
Mercedes-Benz in writing of the need for its
repair.
(3) the vehicle is out of service by reason of repair of the same or different substantial
defects or malfunctions for a cumulative
total of more than 30 calendar days.
Please send your written notice to:
Mercedes-Benz USA, LLC
Customer Assistance Center
One Mercedes Drive
Montvale, NJ 07645-0350
Maintenance
The Service and Warranty Booklet describes all
the necessary maintenance work which should
be done at regular intervals.
Always have the Service and Warranty Booklet
with you when you bring the vehicle to an
authorized Mercedes-Benz Center. The service
advisor will record every service for you in the
Service and Warranty Booklet.
Roadside Assistance
The Mercedes-Benz Roadside Assistance Pro-
gram offers technical help in the event of a
breakdown. Calls to the toll-free Roadside Assis-
tance Hotline are answered by our agents 24
hours a day, 365 days a year.
1-800-FOR-MERCedes(1-800-367-6372)
(USA)
1-800-387-0100 (Canada)
For additional information, refer to the
Mercedes-Benz Roadside Assistance Program
brochure (USA) or the "Roadside Assistance"
section in the Service and Warranty booklet
(Canada). You will find both in your vehicle lit-
erature portfolio.
Change of address or change of own-
ership
In the event of a change of address, please send us the "Notification of Address Change" in the
Service and Guarantee booklet or simply call the
Mercedes-Benz Customer Assistance Center
(USA) at the hotline number
1-800-FOR-MERCedes(1-800-367-6372) or
Customer Service Center (Canada) at
1-800-387-0100. This will assist us in contact-
ing you in a timely manner should the need arise.
If you sell your Mercedes, please leave the entire
literature in the vehicle so that it is available to
the next owner.
If you have purchased a used car, please send us the "Notification of Used Car Purchase" in the
Service and Guarantee booklet or simply call the
Mercedes-Benz Customer Assistance Center
(USA) at the hotline number
1-800-FOR-MERCedes(1-800-367-6372) or
Customer Service (Canada) at 1-800-387-0100.
Vehicle operation outside the USA
and Canada
If you plan to operate your vehicle in foreign
countries, please be aware that:
Rservice facilities or replacement parts may
not be readily available.
Runleaded fuel for vehicles with a catalytic
converter may not be available. Leaded fuel
may cause damage to the catalytic converter.
Rthe fuel may have a considerably lower octane
rating. Unsuitable fuel can cause engine dam-
age.
Some Mercedes-Benz models are available for
delivery in Europe through our European Deliv-
ery Program. For details, consult an authorized
Mercedes-Benz Center or write to one of the
following addresses.
In the USA
Mercedes-Benz USA, LLC
European Delivery Department
One Mercedes Drive
Montvale, NJ 07645-0350
In Canada
Mercedes-Benz Canada, Inc.
European Delivery Department
98 Vanderhoof Avenue
Toronto, Ontario M4G 4C9
Introduction27
Z
Page 38 of 450
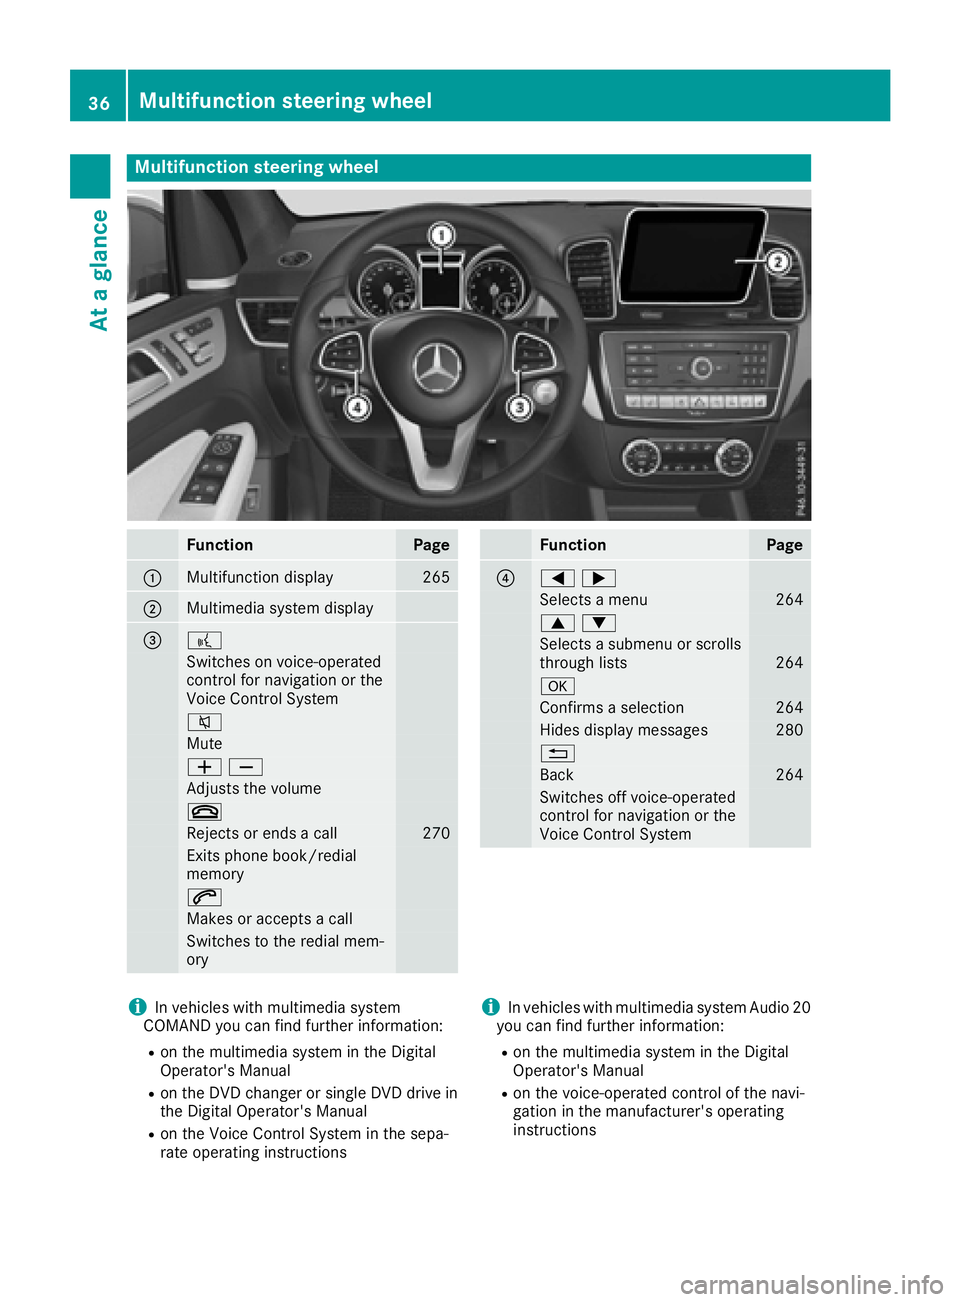
Multifunction steering wheel
FunctionPage
:Multifunction display265
;Multimedia system display
=?
Switches on voice-operated
control for navigation or the
Voice Control System
8
Mute
WX
Adjusts the volume
~
Rejects or ends a call270
Exits phone book/redial
memory
6
Makes or accepts a call
Switches to the redial mem-
ory
FunctionPage
?=;
Selects a menu264
9:
Selects a submenu or scrolls
through lists264
a
Confirms a selection264
Hides display messages280
%
Back264
Switches off voice-operated
control for navigation or the
Voice Control System
iIn vehicles with multimedia system
COMAND you can find further information:
Ron the multimedia system in the Digital
Operator's Manual
Ron the DVD changer or single DVD drive in
the Digital Operator's Manual
Ron the Voice Control System in the sepa-
rate operating instructions
iIn vehicles with multimedia system Audio 20
you can find further information:
Ron the multimedia system in the Digital
Operator's Manual
Ron the voice-operated control of the navi-
gation in the manufacturer's operating
instructions
36Multifunction steering wheel
At a glance
Page 83 of 450
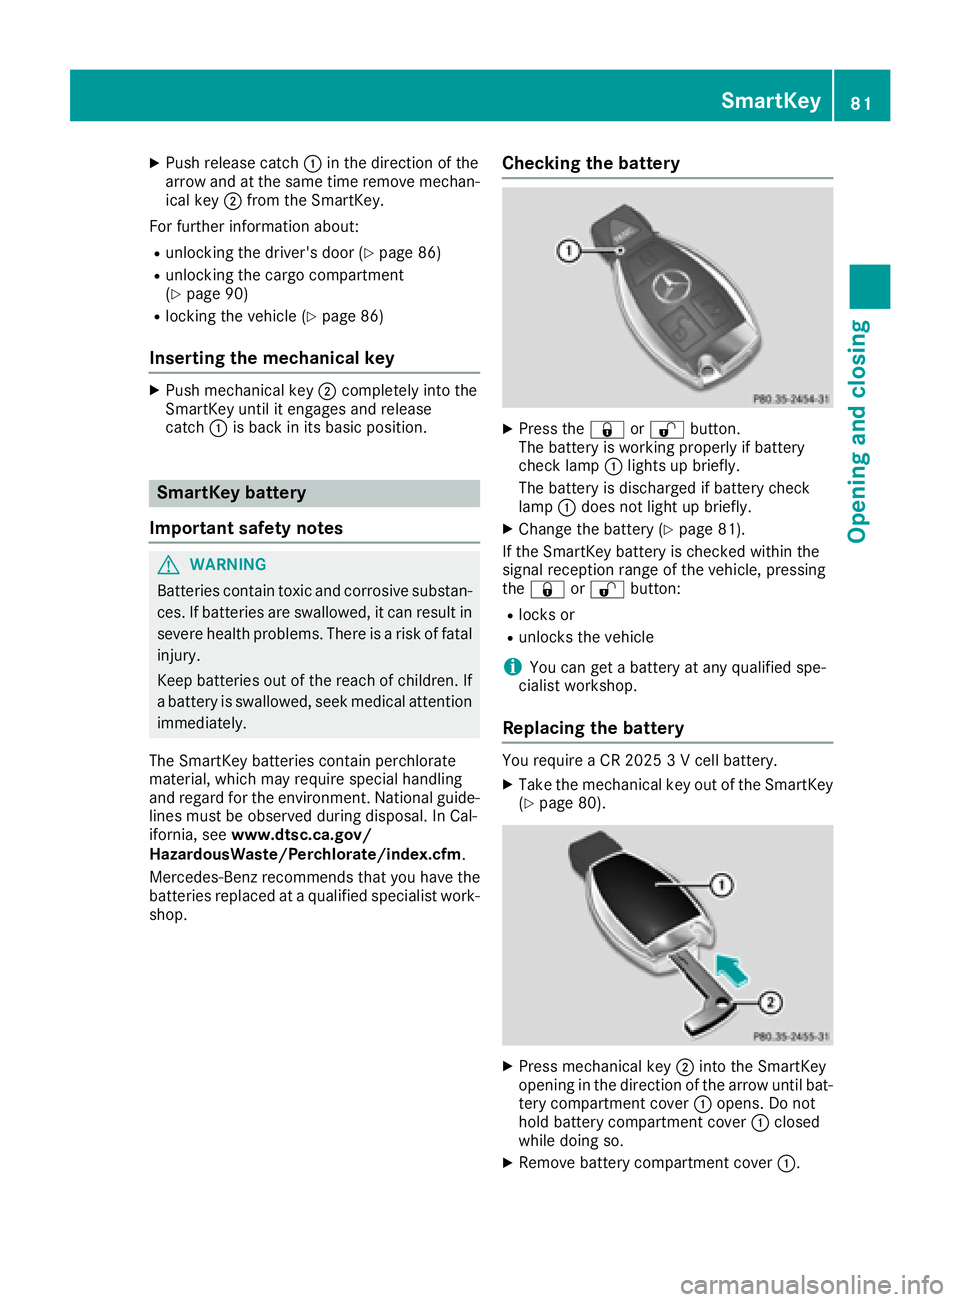
XPush release catch:in the direction of the
arrow and at the same time remove mechan- ical key ;from the SmartKey.
For further information about:
Runlocking the driver's door (Ypage 86)
Runlocking the cargo compartment
(Ypage 90)
Rlocking the vehicle (Ypage 86)
Inserting the mechanical key
XPush mechanical key ;completely into the
SmartKey until it engages and release
catch :is back in its basic position.
SmartKey battery
Important safety notes
GWARNING
Batteries contain toxic and corrosive substan- ces. If batteries are swallowed, it can result in
severe health problems. There is a risk of fatalinjury.
Keep batteries out of the reach of children. If
a battery is swallowed, seek medical attention immediately.
The SmartKey batteries contain perchlorate
material, which may require special handling
and regard for the environment. National guide-
lines must be observed during disposal. In Cal-
ifornia, see www.dtsc.ca.gov/
HazardousWaste/Perchlorate/index.cfm .
Mercedes-Benz recommends that you have the
batteries replaced at a qualified specialist work-
shop.
Checking the battery
XPress the &or% button.
The battery is working properly if battery
check lamp :lights up briefly.
The battery is discharged if battery check
lamp :does not light up briefly.
XChange the battery (Ypage 81).
If the SmartKey battery is checked within the
signal reception range of the vehicle, pressing
the & or% button:
Rlocks or
Runlocks the vehicle
iYou can get a battery at any qualified spe-
cialist workshop.
Replacing the battery
You require a CR 2025 3 V cell battery.
XTake the mechanical key out of the SmartKey
(Ypage 80).
XPress mechanical key ;into the SmartKey
opening in the direction of the arrow until bat-
tery compartment cover :opens. Do not
hold battery compartment cover :closed
while doing so.
XRemove battery compartment cover :.
SmartKey81
Opening and closing
Z
Page 119 of 450
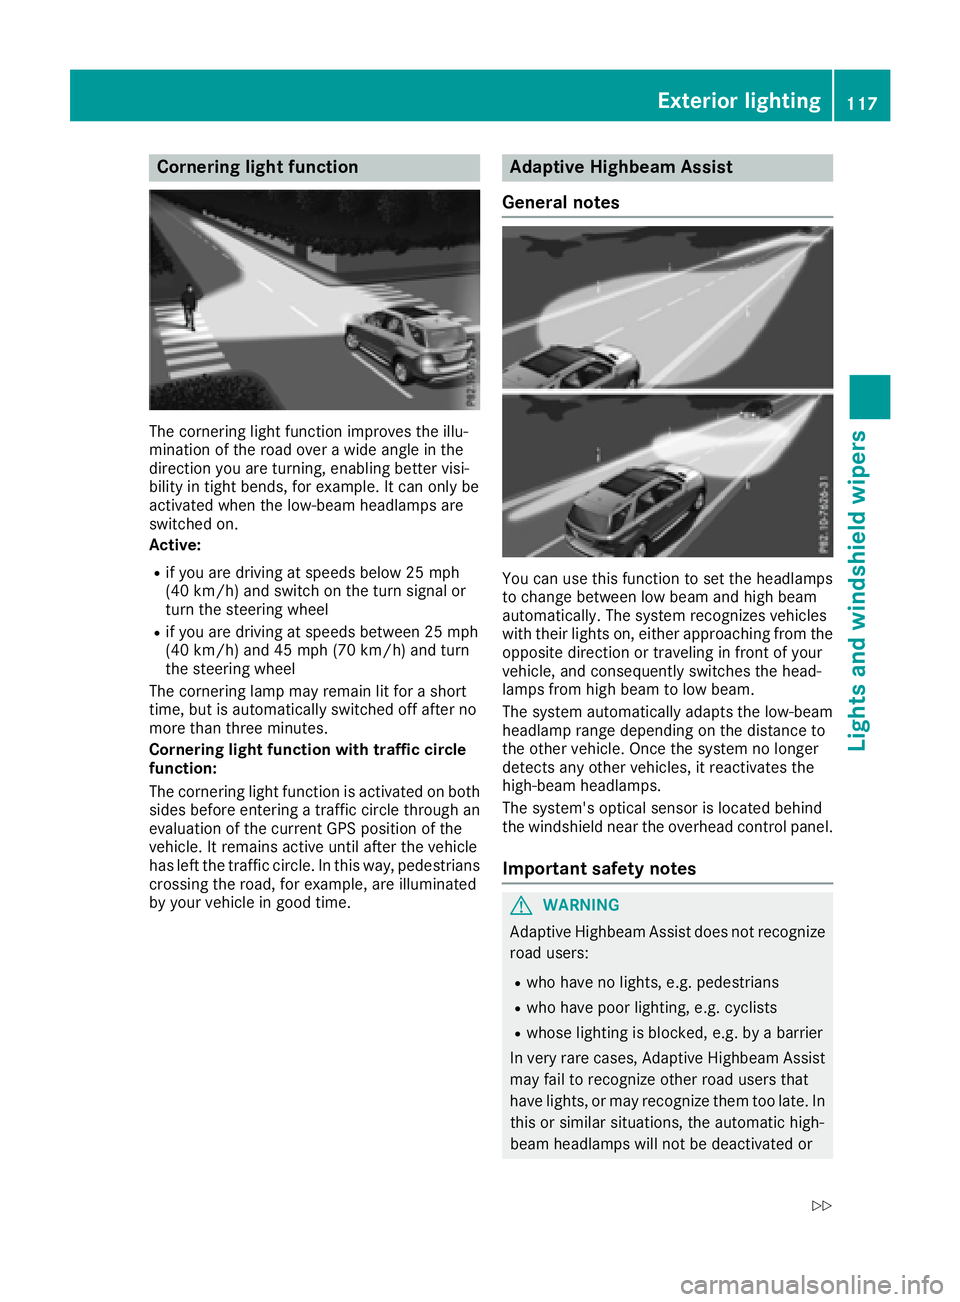
Cornering light function
The cornering light function improves the illu-
mination of the road over a wide angle in the
direction you are turning, enabling better visi-
bility in tight bends, for example. It can only be
activated when the low-beam headlamps are
switched on.
Active:
Rif you are driving at speeds below 25 mph
(40 km/h) and switch on the turn signal or
turn the steering wheel
Rif you are driving at speeds between 25 mph
(40 km/h) and 45 mph (70 km/h) and turn
the steering wheel
The cornering lamp may remain lit for a short
time, but is automatically switched off after no
more than three minutes.
Cornering light function with traffic circle
function:
The cornering light function is activated on both
sides before entering a traffic circle through an
evaluation of the current GPS position of the
vehicle. It remains active until after the vehicle
has left the traffic circle. In this way, pedestrians
crossing the road, for example, are illuminated
by your vehicle in good time.
Adaptive Highbeam Assist
General notes
You can use this function to set the headlamps
to change between low beam and high beam
automatically. The system recognizes vehicles
with their lights on, either approaching from the
opposite direction or traveling in front of your
vehicle, and consequently switches the head-
lamps from high beam to low beam.
The system automatically adapts the low-beam
headlamp range depending on the distance to
the other vehicle. Once the system no longer
detects any other vehicles, it reactivates the
high-beam headlamps.
The system's optical sensor is located behind
the windshield near the overhead control panel.
Important safety notes
GWARNING
Adaptive Highbeam Assist does not recognize
road users:
Rwho have no lights, e.g. pedestrians
Rwho have poor lighting, e.g. cyclists
Rwhose lighting is blocked, e.g. by a barrier
In very rare cases, Adaptive Highbeam Assist
may fail to recognize other road users that
have lights, or may recognize them too late. In this or similar situations, the automatic high-
beam headlamps will not be deactivated or
Exterior lighting117
Lights and windshield wipers
Z
Page 121 of 450
except when the SmartKey is in position2in the
ignition lock.
The color and brightness for the ambient lighting may be set via the multimedia system (see the
separate operating instructions).
Automatic interior lighting control
XTo switch on: set the switch to center posi-
tion B.
XTo switch off: set the switch to the |
position.
The interior lighting automatically switches on if
you:
Runlock the vehicle
Ropen a door
Rremove the SmartKey from the ignition lock
The interior light is activated for a short while
when the SmartKey is removed from the ignition
lock. This delayed switch-off can be adjusted via
the multimedia system (see the separate oper-
ating instructions).
Manual interior lighting control
XTo switch the front interior lighting on: set
the switch to the cposition.
XTo switch the front interior lighting off: set
the switch to the |position or (if the door
is closed) to the center position.
XTo switch the rear compartment interior
lighting on/off: press theubutton.
XTo switch the reading lamps on/off: press
the p button.
Crash-responsive emergency lighting
The interior lighting is activated automatically if
the vehicle is involved in an accident.
XTo switch off the crash-responsive emer-
gency lighting: press the hazard warning
lamp button.
or
XLock and then unlock the vehicle using the
SmartKey.
Replacing bulbs (vehicles with LED
headlamps)
The front and rear light clusters of your vehicle
are equipped with LED light bulbs. Do not
replace the bulbs yourself. Contact a qualified
specialist workshop which has the necessary
specialist knowledge and tools to carry out the
work required.
Lamps are an important aspect of vehicle safety.
You must therefore make sure that these func-
tion correctly at all times. Have the headlamp
setting checked regularly.
Changing bulbs (vehicles with halo-
gen headlamps)
Important safety notes
GWARNING
Bulbs, lamps and connectors can get very hot
when operating. If you change a bulb, you
could burn yourself on these components.
There is a risk of injury.
Allow these components to cool down before
changing a bulb.
Do not use a bulb that has been dropped or if its
glass tube has been scratched.
The bulb may explode if:
Ryou touch it
Rit is hot
Ryou drop it
Ryou scratch it
Only operate bulbs in enclosed lamps designed
for that purpose. Only install spare bulbs of the same type and the specified voltage.
Marks on the glass tube reduce the service life
of the bulbs. Do not touch the glass tube with
your bare hands. If necessary, clean the glass
tube when cold with alcohol or spirit and rub it
off with a lint-free cloth.
Protect bulbs from moisture during operation.
Do not allow bulbs to come into contact with
liquids.
Only replace the bulbs listed (
Ypage 120).
Have the bulbs that you cannot replace yourself
replaced at a qualified specialist workshop.
Changing bulbs (vehicles with halogen headlamps)119
Lights and windshield wipers
Z
Page 122 of 450
If you require assistance replacing bulbs, con-
sult a qualified specialist workshop.
If the new bulb still does not light up, consult a
qualified specialist workshop.
Headlamps and lights are an important aspect of
vehicle safety. You must therefore make sure
that these function correctly at all times. Have
the headlamp setting checked regularly.
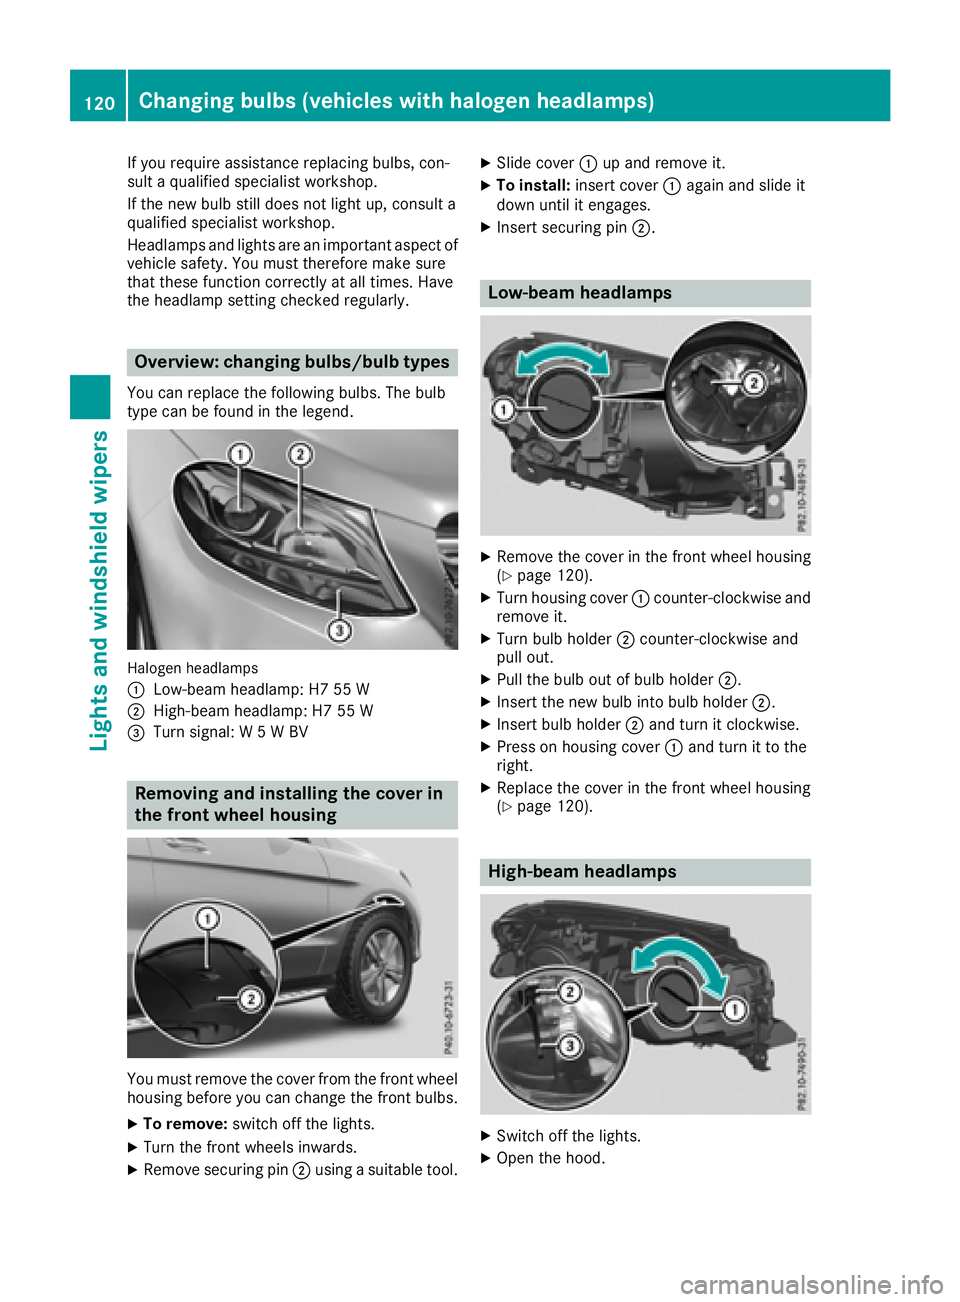
Overview: changing bulbs/bulb types
You can replace the following bulbs. The bulb
type can be found in the legend.
Halogen headlamps
:
Low-beam headlamp: H7 55 W
;High-beam headlamp: H7 55 W
=Turn signal: W 5 W BV
Removing and installing the cover in
the front wheel housing
You must remove the cover from the front wheel
housing before you can change the front bulbs.
XTo remove:switch off the lights.
XTurn the front wheels inwards.
XRemove securing pin ;using a suitable tool.
XSlide cover :up and remove it.
XTo install: insert cover :again and slide it
down until it engages.
XInsert securing pin ;.
Low-beam headlamps
XRemove the cover in the front wheel housing
(Ypage 120).
XTurn housing cover:counter-clockwise and
remove it.
XTurn bulb holder ;counter-clockwise and
pull out.
XPull the bulb out of bulb holder ;.
XInsert the new bulb into bulb holder ;.
XInsert bulb holder;and turn it clockwise.
XPress on housing cover :and turn it to the
right.
XReplace the cover in the front wheel housing
(Ypage 120).
High-beam headlamps
XSwitch off the lights.
XOpen the hood.
120Changing bulbs (vehicles with halogen headlamps)
Lights and windshield wipers
Page 131 of 450
ADirects the airflow through the footwell vents
BSwitches the seat heating on the left-hand side on/off
Optimum use of dual-zone climate
control
The following contains notes and recommenda-
tions on optimum use of dual-zone climate con-
trol.
RYou can switch on climate control by using the
Ãand¿ orà andÁ buttons.
The indicator lamps in the Ãand
¿ buttons or the ÃandÁ buttons
light up.
RSet the temperature to 72 ‡ (22 †).
ROnly use the "Windshield defrosting" function
briefly until the windshield is clear again.
ROnly use air-recirculation mode briefly, e.g. if
there are unpleasant outside odors or when in
a tunnel. The windows could otherwise fog up,
since no fresh air is drawn into the vehicle in
air-recirculation mode.
RUse the ZONE function to adopt the temper-
ature settings on the driver's side for the
front-passenger side as well. The indicator
lamp above the ábutton goes out.
RIf you change the settings of the climate con-
trol system, the climate status display
appears for approximately three seconds at
the bottom of the screen in the multimedia
system display. You will see the current set-
tings of the various climate control functions.
During automatic engine switch-off, the climate
control system only operates at a reduced capa-
city. If you require the full cl
imate control output,
you can switch off the ECO start/stop function
by pressing the ECO button (
Ypage 151).
Overview of climatecont rol systems129
Climate control
Page 134 of 450
Optimum use of 3-zone automatic cli-
mate control
The following contains instructions and recom-
mendations to enable you to get the most out of
your 3-zone automatic climate control.
RActivate climate control using theÃand
¿ buttons. The indicator lamps above the
à and¿ buttons light up.
RIn automatic mode, you can also use the ñ
button to set a climate mode (FOCUS/
MEDIUM/DIFFUSE). The MEDIUM level is
recommended.
RSet the temperature to 72 ‡ (22 †).
ROnly use the "Windshield defrosting" function
briefly until the windshield is clear again.
ROnly use air-recirculation mode briefly, e.g. if
there are unpleasant outside odors or when in
a tunnel. The windows could otherwise fog up, since no fresh air is drawn into the vehicle in
air-recirculation mode.
RUse the ZONE function to adopt the temper-
ature settings on the driver's side for the
front-passenger side and the rear compart-
ment as well. The indicator lamp above the
á button goes out.
RUse the residual heat function if you want to
heat or ventilate the vehicle interior when the
ignition is switched off. The residual heat
function can only be activated or deactivated with the ignition switched off.
RIf you change the settings of the climate con-
trol system, the climate status display
appears for approximately three seconds at
the bottom of the screen in the multimedia
system display. You will see the current set-
tings of the various climate control functions.
During automatic engine switch-off, the climate
control system only operates at a reduced capa-
city. If you require the full climate control output,
you can switch off the ECO start/stop function
by pressing the ECO button (
Ypage 151).
Operating the climate control sys-
tems
Activating/deactivating climate con-
trol
General notes
When the climate control is switched off, the air
supply and air circulation are also switched off.
The windows could fog up. Therefore, switch off
climate control only briefly
iSwitch on climate control primarily using
the à button (Ypage 134).
In the rear compartment, you can also switch
climate control on and off using the Ãand
^ buttons.
Activating or deactivating
XTurn the SmartKey to position 2in the ignition
lock (Ypage 145).
XTo activate: press theÃbutton.
The indicator lamp in the Ãbutton lights
up. Airflow and air distribution are set to auto-
matic mode.
or
XPress the ^button.
The indicator lamp in the ^button goes
out. The previously selected settings are
restored.
XTo deactivate: press the^button.
The indicator lamp in the ^button lights
up.
Switching cooling with air dehumidi-
fication on/off
General notes
If you deactivate the "Cooling with air-dehumid-
ification" function, the air inside the vehicle will
not be cooled. The air inside the vehicle will also
not be dehumidified. The windows can fog up
more quickly. Therefore, only deactivate the
"Cooling with air-dehumidification" function
briefly.
The "Cooling with air dehumidification" function is only available when the engine is running. The
air inside the vehicle is cooled and dehumidified
according to the temperature selected.
132Operating the climate control systems
Climate control