auxiliary battery MERCEDES-BENZ GLE COUPE 2015 Owners Manual
[x] Cancel search | Manufacturer: MERCEDES-BENZ, Model Year: 2015, Model line: GLE COUPE, Model: MERCEDES-BENZ GLE COUPE 2015Pages: 393, PDF Size: 12.71 MB
Page 19 of 393
Replacing the battery (auxiliary
heating remote control)
.................... 141
Rescue card ......................................... 25
Reserve (fuel tank)
see Fuel
Reserve fuel
Display messag e............................ 271
Warning lamp ................................. 294
Residual heat (climate control) ........ 137
Restraint system
Display message ............................ 262
Introduction ..................................... 37
Warning lamp ................................. 294
Warning lamp (function) ................... 38
Rev counter ........................................ 235
Reversing camera
Cleaning instructions ..................... 328
Display in the multimedia system .. 207
Function/note s............................. 206
Switching on/of f........................... 207
Reversing feature
Panorama sliding sunroo f................ 97
Side windows ................................... 92
Tailgate ............................................ 88
Reversing function
Roller sunblind ................................. 98
Reversing lamp (display message) .. 267
Roller sunblind
Panorama sliding sunroo f................ 98
Roof carrier ........................................ 305
Roof lining and carpets (cleaning
instructions) ...................................... 330
Roof load (maximum) ........................ 381
Route (navigation)
see Route guidance (navigation)
Route guidance (navigation) ............ 239S
Safety Children in the vehicle ..................... 52
see Occupant safety
SD memory card
Selecting ........................................ 241
Seat belt
Correct usage .................................. 40
Switching belt adjustment on/off
(on-board computer) ...................... 249 Seat belts
Adjusting the driver's and front-
passenger seat belt ......................... 41
Adjusting the height ......................... 41
Cleaning ......................................... 330
Display message ............................ 261
Fastening ......................................... 41
Important safety guidelines ............. 39
Introduction ..................................... 39
Rear seat belt status indicator ......... 42
Releasing ......................................... 41
Warning lamp ................................. 286
Warning lamp (function) ................... 41
Seats
Adjusting (electrically) ................... 103
Adjusting the head restraint .......... 103
Cleaning the cover ......................... 330
Correct driver's seat position ........ 101
Folding the rear bench seat for-
wards/back ................................... 302
Important safety notes .................. 102
Overview ........................................ 102
Seat heating problem .................... 107
Seat ventilation problem ................ 108
Storing settings (memory func-
tion) ............................................... 114
Switching seat heating on/of f....... 105
Switching the seat ventilation on/ off .................................................. 107
Section
Sliding sunroof ................................. 96
Selector lever
Cleaning ......................................... 329
Sensors (cleaning instructions) ....... 327
Service menu (on-board com-
puter) .................................................. 245
Service message
see ASSYST PLUS
Service products
AdBlue ®
special additive s.............. 377
Brake fluid ..................................... 380
Coolant (engine) ............................ 380
Engine oil ....................................... 378
Fuel ................................................ 375
Important safety notes .................. 374
Washer fluid ................................... 381
Setting the air distribution ............... 13316
Index
Page 140 of 393
and hold the
dbutton until the side win-
dows are closed.
The indicator lamp in the dbutton lights
up. Air-recirculation mode is activated.
If parts of the body are in the closing area during convenience closing, proceed as follows:
X Press the Wbutton to stop the side win-
dows.
The side windows stop.
X To then open the side window, press the W
button again.
or
X Press and hold the dbutton again for at
least two seconds.
The side windows move in the opposite direc- tion.
X Only vehicles with panorama sliding sun-
roof:
press the 3switch for stopping the
panorama sliding sunroof.
The panorama sliding sunroof stops.
X To then open the panorama sliding sunroof,
pull back on the 3switch.
i Notes on the automatic reversing feature
for:
R the side windows (Y page 92)
R the panorama sliding sunroof (Y page 97)
X Convenience opening feature (vehicles
with panorama sliding sunroof): press and
hold the dbutton until the side windows
and the panorama sliding sunroof are open.
The side windows and the panorama sliding
sunroof move back to their original position.
The indicator lamp in the dbutton goes
out. Air-recirculation mode is deactivated.
X Convenience opening feature (vehicles
without panorama sliding sunroof):
press
and hold the dbutton until the side win-
dows are open. The side windows move back to their original positions.
The indicator lamp in the dbutton goes
out. Air-recirculation mode is deactivated.
i If you open the side windows or the pano-
rama sliding sunroof manually after closing
with the convenience closing feature, they
will remain in this position when opened using
the convenience opening feature. Switching the residual heat on/off
General notes It is possible to make use of the residual heat of
the engine to continue heating the stationary
vehicle for up to 30 minutesafter the engine has
been switched off. The heating time depends on
the set interior temperature.
Switching on/off X
To switch on: press theÌorÁ button.
The indicator lamp in the ÌorÁ button
lights up.
i The blower will run at a low speed regardless
of the airflow setting.
i If you activate the residual heat function at
high temperatures, only the ventilation will be
activated. The blower runs at medium speed.
X To switch off: press theÌorÁ but-
ton.
The indicator lamp in the ÌorÁ button
goes out.
Residual heat is deactivated automatically:
R after approximately 30 minutes
R when the ignition is switched on
R if the battery voltage drops
R when the auxiliary heating is switched on Ionisation
Ionisation is used to purify and freshen the air in
the vehicle interior, which is conducive to a
pleasant climate.
The ionisation of the interior air is odourless and cannot, directly, be perceived in the vehicle inte-
rior.
You can switch ionisation on and off via the mul- timedia system (see the separate operating
instructions).
Ionisation can only be operated when the auto-
matic climate control is switched on. The side air vent on the driver's side must be open. Operating the climate control system
137Climate control Z
Page 141 of 393
Auxiliary heating
Important safety notes G
DANGER
If the exhaust pipe is blocked or sufficient
ventilation is not possible, toxic exhaust
fumes can enter the vehicle, especially car-
bon monoxide. This is the case, e.g. in
enclosed spaces, or if the vehicle is stuck in
snow. There is a risk of fatal injuries.
You should switch off the auxiliary heating in
enclosed spaces which do not have an extrac- tion system, e.g. a garage. If the vehicle is
stuck in snow and you must leave the auxiliary
heating running, keep the exhaust pipe and
the area around the vehicle clear of snow. To guarantee a sufficient supply of fresh air, open
a window on the side of the vehicle away from the wind. G
WARNING
When the auxiliary heating is switched on,
parts of the vehicle can become very hot.
Flammable materials such as leaves, grass or twigs may ignite if they come into contact
with:
R hot parts of the exhaust system
R the exhaust gas itself
There is a risk of fire.
When the auxiliary heating is switched on,
make sure that:
R no flammable materials come into contact
with hot vehicle components
R the exhaust gas can escape from the
exhaust pipe unhindered
R the exhaust gas does not come into contact
with flammable materials.
The auxiliary heating is fitted under the front
wing on the left-hand side of the vehicle. The
emissions outlet is found behind the left front
wheel.
! Operating the auxiliary heating/ventilation
draws on the vehicle battery. After you have
heated or ventilated the vehicle a maximum of two times, drive for a longer distance. Switch the auxiliary heating on regularly once a
month for about ten minutes.
The auxiliary heating heats the air in the vehicle
interior to the set temperature. This occurs with- out using the heat of the running engine. The
auxiliary heating is operated directly using the
vehicle's fuel. For this reason, the tank content
must be at least at reserve fuel level to ensure
that the auxiliary heating functions.
The auxiliary heating or auxiliary ventilation
automatically adjusts to changes in tempera-
ture and weather conditions. For this reason,
the auxiliary heating could switch from ventila-
tion mode to heating mode or from heating
mode to ventilation mode.
The auxiliary heating switches off when the
engine is switched off. The auxiliary ventilation
switches off when you turn the key to position 2
(Y page 146).
The auxiliary heating switches off automatically after 50 minute s.This time limit can be altered.
To do this, visit a qualified specialist workshop.
You cannot use the auxiliary ventilation to cool
the vehicle interior to a temperature lower than
the outside temperature.
Before switching on X
Turn the key to position 2in the ignition lock
(Y page 146).
X Set the desired temperature.
The auxiliary heating/ventilation can be activa-
ted even when climate control is set to manual.
Optimum comfort can be attained when the sys-
tem is set to automatic mode. Set the temper-
ature to 22 †.
The auxiliary heating or auxiliary ventilation can
be switched on/off using the button on the
centre console or the remote control.
The on-board computer can be used to specify
up to three departure times, one of which may
be preselected (Y page 247).138
Operating the climate control systemClimate control
Page 142 of 393
Switching the auxiliary heating/venti-
lation on or off using the button on the
centre console General notes
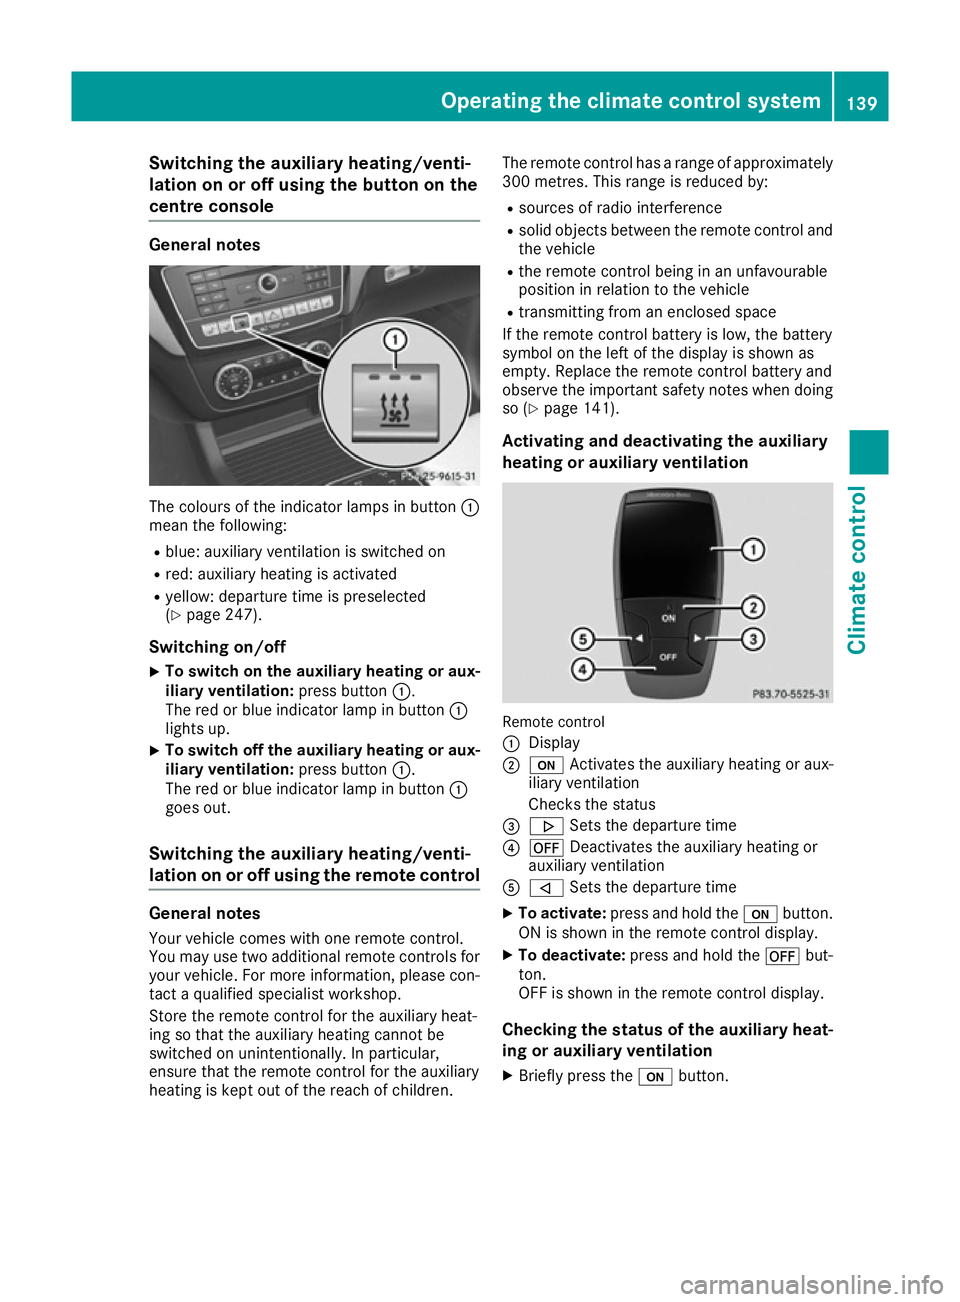
The colours of the indicator lamps in button
:
mean the following:
R blue: auxiliary ventilation is switched on
R red: auxiliary heating is activated
R yellow: departure time is preselected
(Y page 247).
Switching on/off X To switch on the auxiliary heating or aux-
iliary ventilation:
press button:.
The red or blue indicator lamp in button :
lights up.
X To switch off the auxiliary heating or aux-
iliary ventilation: press button:.
The red or blue indicator lamp in button :
goes out.
Switching the auxiliary heating/venti-
lation on or off using the remote control General notes
Your vehicle comes with one remote control.
You may use two additional remote controls for
your vehicle. For more information, please con-
tact a qualified specialist workshop.
Store the remote control for the auxiliary heat-
ing so that the auxiliary heating cannot be
switched on unintentionally. In particular,
ensure that the remote control for the auxiliary
heating is kept out of the reach of children. The remote control has a range of approximately
300 metres. This range is reduced by:
R sources of radio interference
R solid objects between the remote control and
the vehicle
R the remote control being in an unfavourable
position in relation to the vehicle
R transmitting from an enclosed space
If the remote control battery is low, the battery
symbol on the left of the display is shown as
empty. Replace the remote control battery and
observe the important safety notes when doing
so (Y page 141).
Activating and deactivating the auxiliary
heating or auxiliary ventilation Remote control
:
Display
; u Activates the auxiliary heating or aux-
iliary ventilation
Checks the status
= . Sets the departure time
? ^ Deactivates the auxiliary heating or
auxiliary ventilation
A , Sets the departure time
X To activate: press and hold the ubutton.
ON is shown in the remote control display.
X To deactivate: press and hold the ^but-
ton.
OFF is shown in the remote control display.
Checking the status of the auxiliary heat-
ing or auxiliary ventilation
X Briefly press the ubutton. Operating the climate control system
139Climate control Z
Page 144 of 393
Replacing the remote control battery
Important safety notes
G
WARNING
Batteries contain toxic and corrosive substan- ces. If batteries are swallowed, it can result in
severe health problems. There is a risk of fatal injury.
Keep batteries out of the reach of children. If
a battery is swallowed, seek medical attention immediately. H
Environmental note Batteries contain pollutants.
It is illegal to dispose of them with the household rubbish.
They must be collected sep-
arately and disposed of in anenvironmentally responsible
recycling system. Dispose of batteries in an
environmentally responsible
manner. Take discharged
batteries to a qualified spe-
cialist workshop or to a col-
lection point for used batter-
ies.
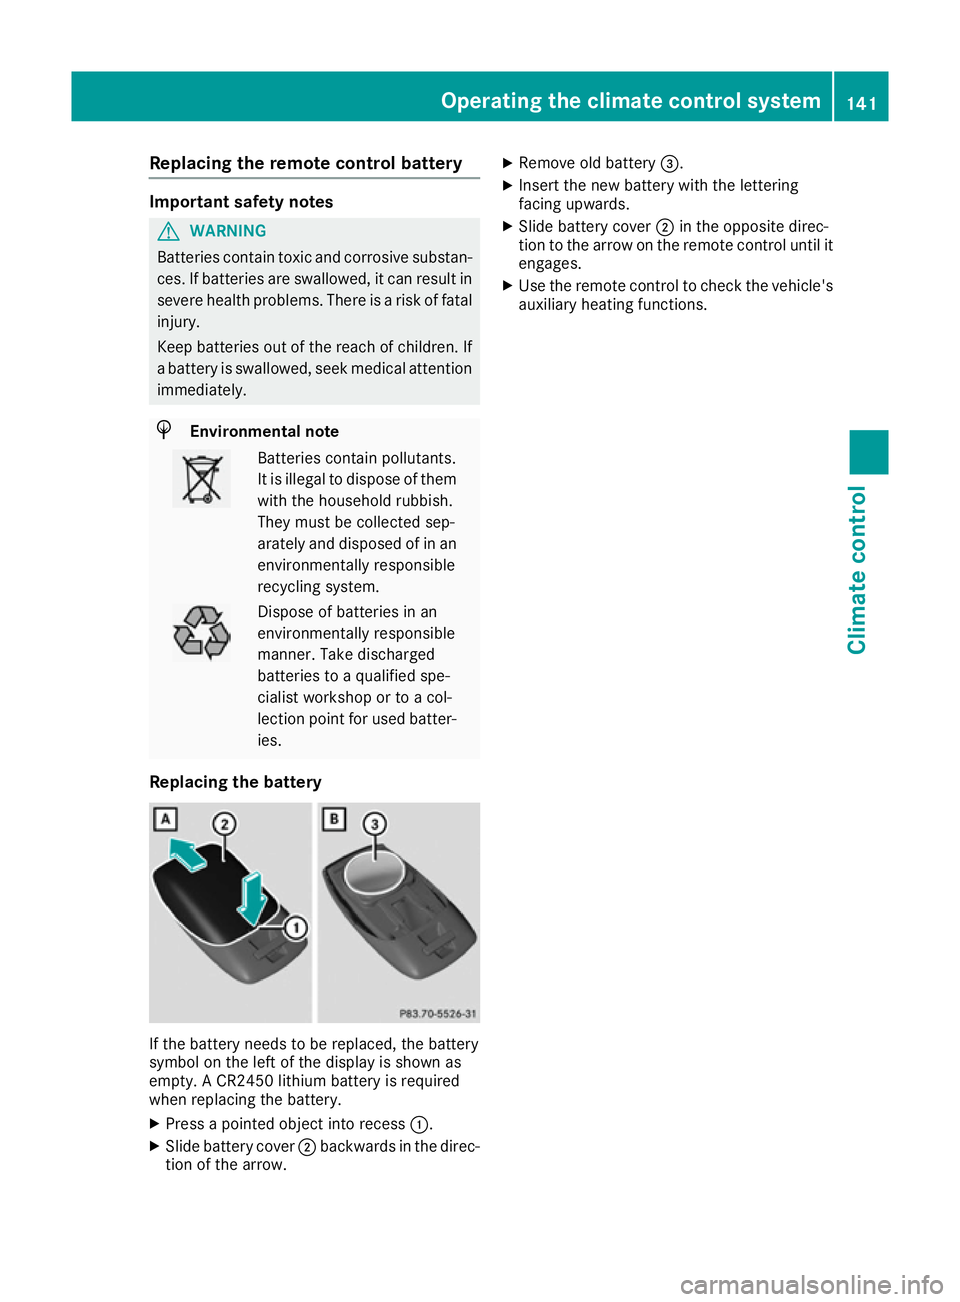
Replacing the battery If the battery needs to be replaced, the battery
symbol on the left of the display is shown as
empty. A CR2450 lithium battery is required
when replacing the battery.
X Press a pointed object into recess :.
X Slide battery cover ;backwards in the direc-
tion of the arrow. X
Remove old battery =.
X Insert the new battery with the lettering
facing upwards.
X Slide battery cover ;in the opposite direc-
tion to the arrow on the remote control until it
engages.
X Use the remote control to check the vehicle's
auxiliary heating functions. Operating the climate control system
141Climate control Z
Page 145 of 393
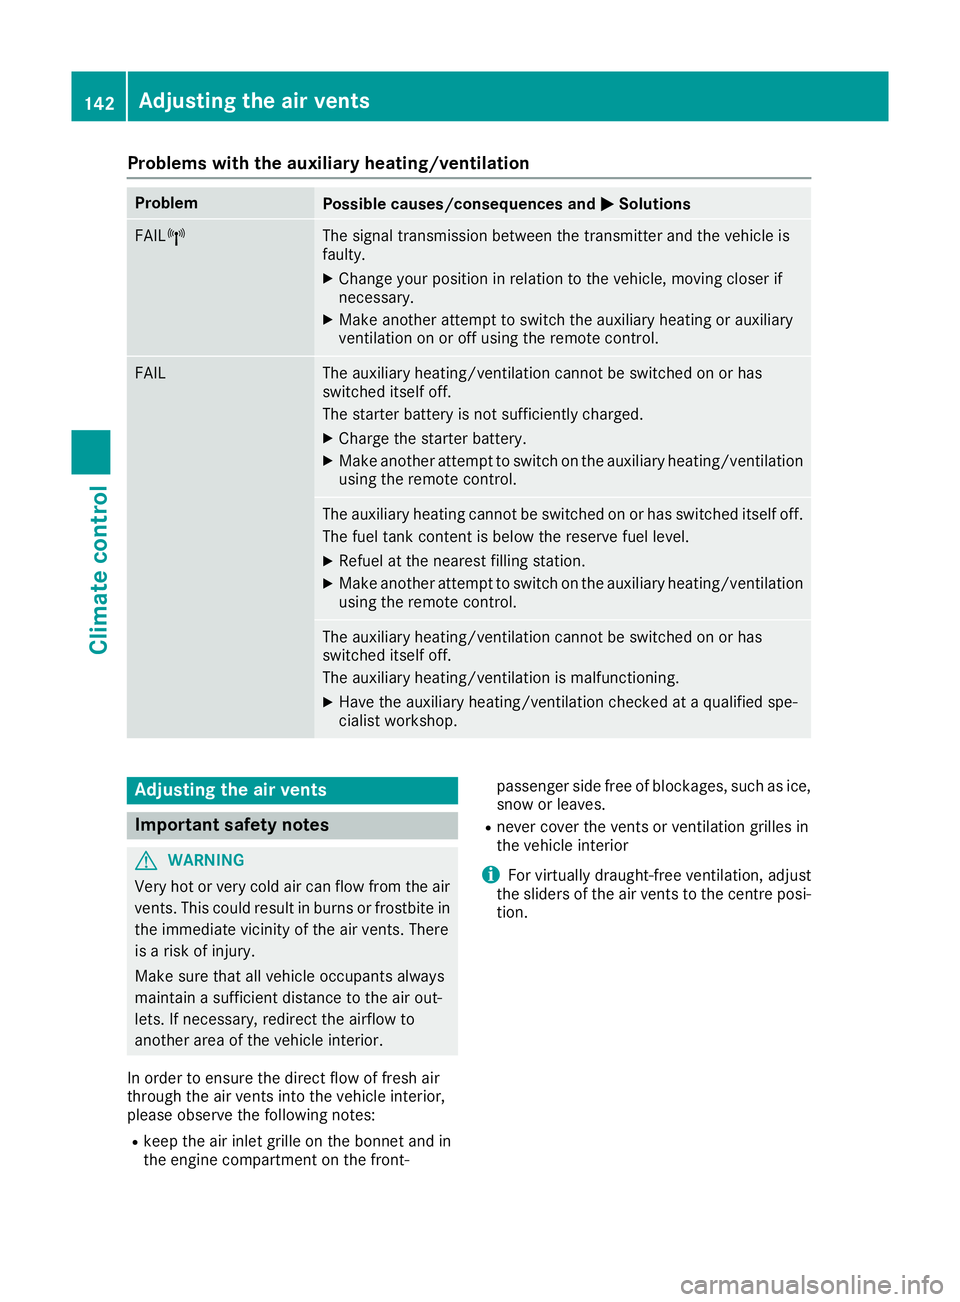
Problems with the auxiliary heating/ventilation
Problem
Possible causes/consequences and
M
MSolutions FAIL¨ The signal transmission between the transmitter and the vehicle is
faulty.
X
Change your position in relation to the vehicle, moving closer if
necessary.
X Make another attempt to switch the auxiliary heating or auxiliary
ventilation on or off using the remote control. FAIL The auxiliary heating/ventilation cannot be switched on or has
switched itself off.
The starter battery is not sufficiently charged.
X Charge the starter battery.
X Make another attempt to switch on the auxiliary heating/ventilation
using the remote control. The auxiliary heating cannot be switched on or has switched itself off.
The fuel tank content is below the reserve fuel level.
X Refuel at the nearest filling station.
X Make another attempt to switch on the auxiliary heating/ventilation
using the remote control. The auxiliary heating/ventilation cannot be switched on or has
switched itself off.
The auxiliary heating/ventilation is malfunctioning.
X Have the auxiliary heating/ventilation checked at a qualified spe-
cialist workshop. Adjusting the air vents
Important safety notes
G
WARNING
Very hot or very cold air can flow from the air vents. This could result in burns or frostbite in the immediate vicinity of the air vents. There
is a risk of injury.
Make sure that all vehicle occupants always
maintain a sufficient distance to the air out-
lets. If necessary, redirect the airflow to
another area of the vehicle interior.
In order to ensure the direct flow of fresh air
through the air vents into the vehicle interior,
please observe the following notes:
R keep the air inlet grille on the bonnet and in
the engine compartment on the front- passenger side free of blockages, such as ice,
snow or leaves.
R never cover the vents or ventilation grilles in
the vehicle interior
i For virtually draught-free ventilation, adjust
the sliders of the air vents to the centre posi- tion. 142
Adjusting the air ventsClimate control
Page 251 of 393
G
WARNING
When the auxiliary heating is switched on,
parts of the vehicle can become very hot.
Flammable materials such as leaves, grass or twigs may ignite if they come into contact
with:
R hot parts of the exhaust system
R the exhaust gas itself
There is a risk of fire.
When the auxiliary heating is switched on,
make sure that:
R no flammable materials come into contact
with hot vehicle components
R the exhaust gas can escape from the
exhaust pipe unhindered
R the exhaust gas does not come into contact
with flammable materials.
! Operating the auxiliary heating/ventilation
draws on the vehicle battery. After you have
heated or ventilated the vehicle a maximum of two times, drive for a longer distance.
Only vehicles with auxiliary heating have this
function.
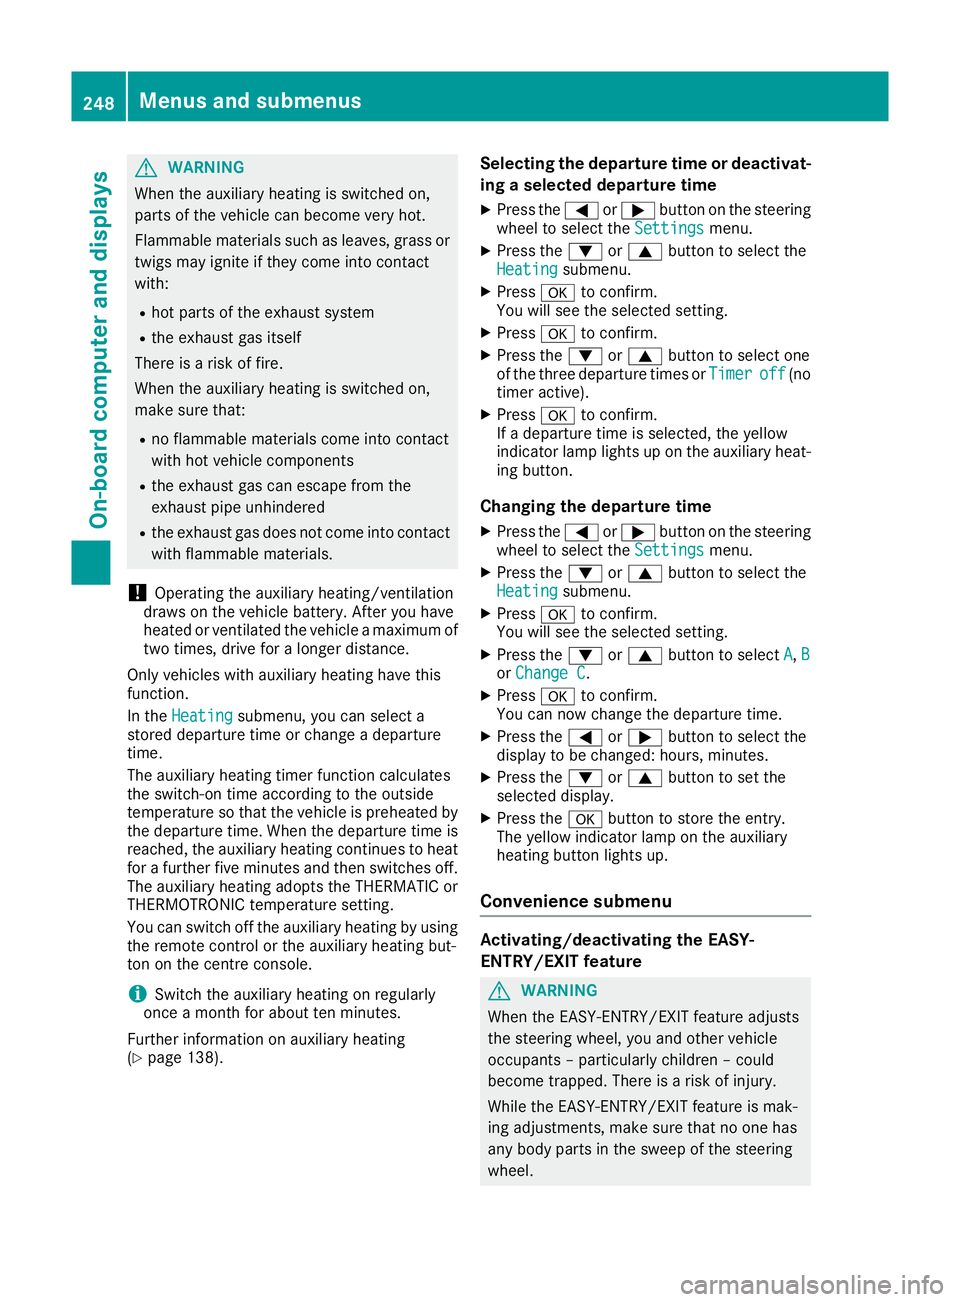
In the Heating Heating submenu, you can select a
stored departure time or change a departure
time.
The auxiliary heating timer function calculates
the switch-on time according to the outside
temperature so that the vehicle is preheated by the departure time. When the departure time isreached, the auxiliary heating continues to heat
for a further five minutes and then switches off. The auxiliary heating adopts the THERMATIC orTHERMOTRONIC temperature setting.
You can switch off the auxiliary heating by using
the remote control or the auxiliary heating but-
ton on the centre console.
i Switch the auxiliary heating on regularly
once a month for about ten minutes.
Further information on auxiliary heating
(Y page 138). Selecting the departure time or deactivat-
ing a selected departure time
X Press the =or; button on the steering
wheel to select the Settings Settingsmenu.
X Press the :or9 button to select the
Heating
Heating submenu.
X Press ato confirm.
You will see the selected setting.
X Press ato confirm.
X Press the :or9 button to select one
of the three departure times or Timer
Timeroff
off(no
timer active).
X Press ato confirm.
If a departure time is selected, the yellow
indicator lamp lights up on the auxiliary heat- ing button.
Changing the departure time
X Press the =or; button on the steering
wheel to select the Settings
Settingsmenu.
X Press the :or9 button to select the
Heating
Heating submenu.
X Press ato confirm.
You will see the selected setting.
X Press the :or9 button to select A
A, B
B
or Change C
Change C.
X Press ato confirm.
You can now change the departure time.
X Press the =or; button to select the
display to be changed: hours, minutes.
X Press the :or9 button to set the
selected display.
X Press the abutton to store the entry.
The yellow indicator lamp on the auxiliary
heating button lights up.
Convenience submenu Activating/deactivating the EASY-
ENTRY/EXIT feature
G
WARNING
When the EASY-ENTRY/EXIT feature adjusts
the steering wheel, you and other vehicle
occupants – particularly children – could
become trapped. There is a risk of injury.
While the EASY-ENTRY/EXIT feature is mak-
ing adjustments, make sure that no one has
any body parts in the sweep of the steering
wheel. 248
Menus and submenusOn-board computer and displays
Page 285 of 393
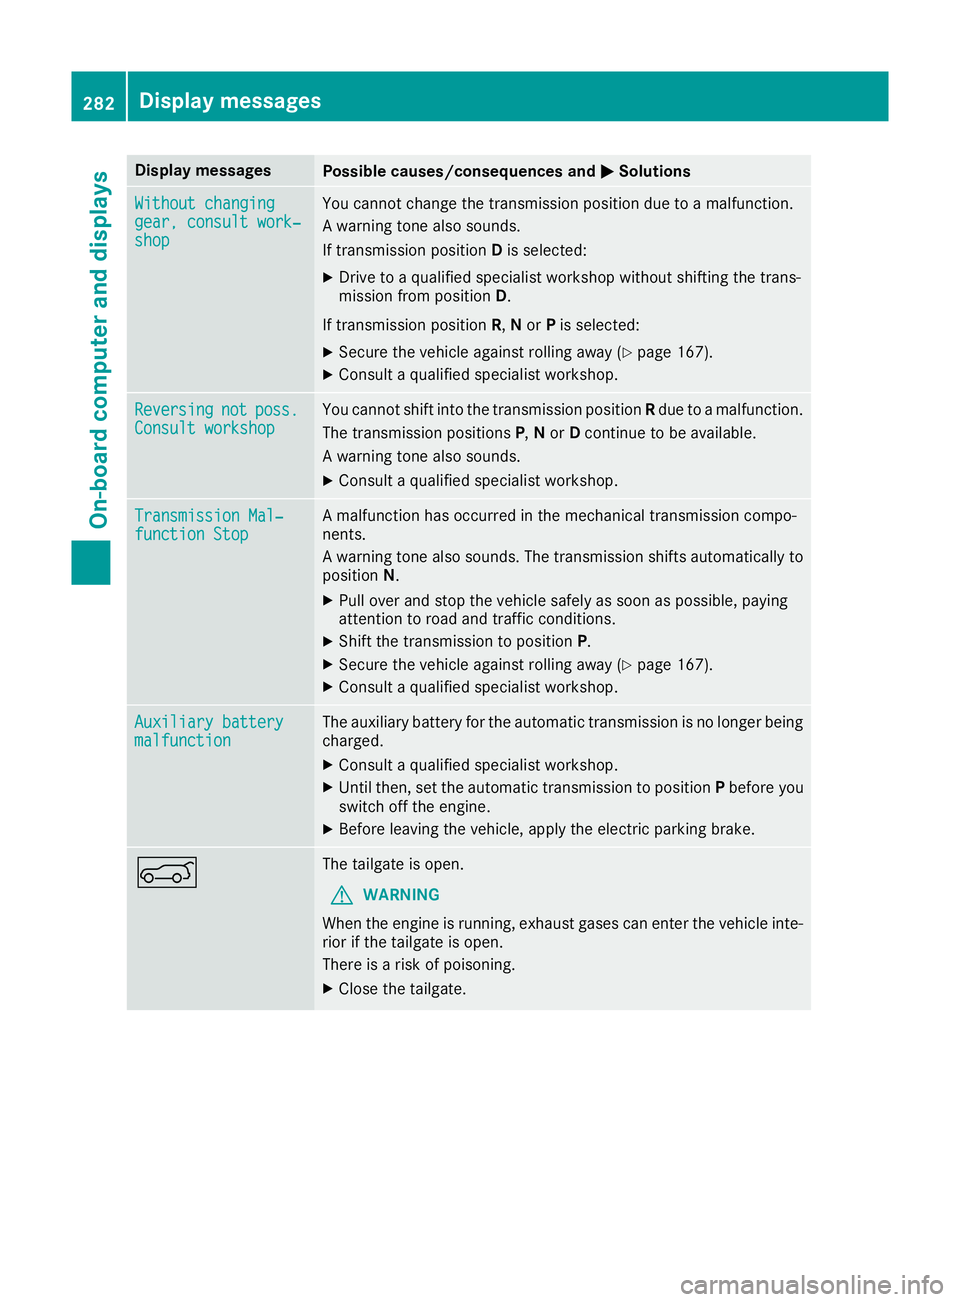
Display messages
Possible causes/consequences and
M
MSolutions Without changing
Without changing
gear, consult work‐ gear, consult work‐
shop shop You cannot change the transmission position due to a malfunction.
A warning tone also sounds.
If transmission position
Dis selected:
X Drive to a qualified specialist workshop without shifting the trans-
mission from position D.
If transmission position R,Nor Pis selected:
X Secure the vehicle against rolling away (Y page 167).
X Consult a qualified specialist workshop. Reversing Reversing
not
not poss.
poss.
Consult workshop
Consult workshop You cannot shift into the transmission position
Rdue to a malfunction.
The transmission positions P,N or Dcontinue to be available.
A warning tone also sounds.
X Consult a qualified specialist workshop. Transmission Mal‐
Transmission Mal‐
function Stop function Stop A malfunction has occurred in the mechanical transmission compo-
nents.
A warning tone also sounds. The transmission shifts automatically to position N.
X Pull over and stop the vehicle safely as soon as possible, paying
attention to road and traffic conditions.
X Shift the transmission to position P.
X Secure the vehicle against rolling away (Y page 167).
X Consult a qualified specialist workshop. Auxiliary battery Auxiliary battery
malfunction malfunction The auxiliary battery for the automatic transmission is no longer being
charged.
X Consult a qualified specialist workshop.
X Until then, set the automatic transmission to position Pbefore you
switch off the engine.
X Before leaving the vehicle, apply the electric parking brake. A The tailgate is open.
G WARNING
When the engine is running, exhaust gases can enter the vehicle inte- rior if the tailgate is open.
There is a risk of poisoning.
X Close the tailgate. 282
Display
messagesOn-board computer and displays
Page 287 of 393
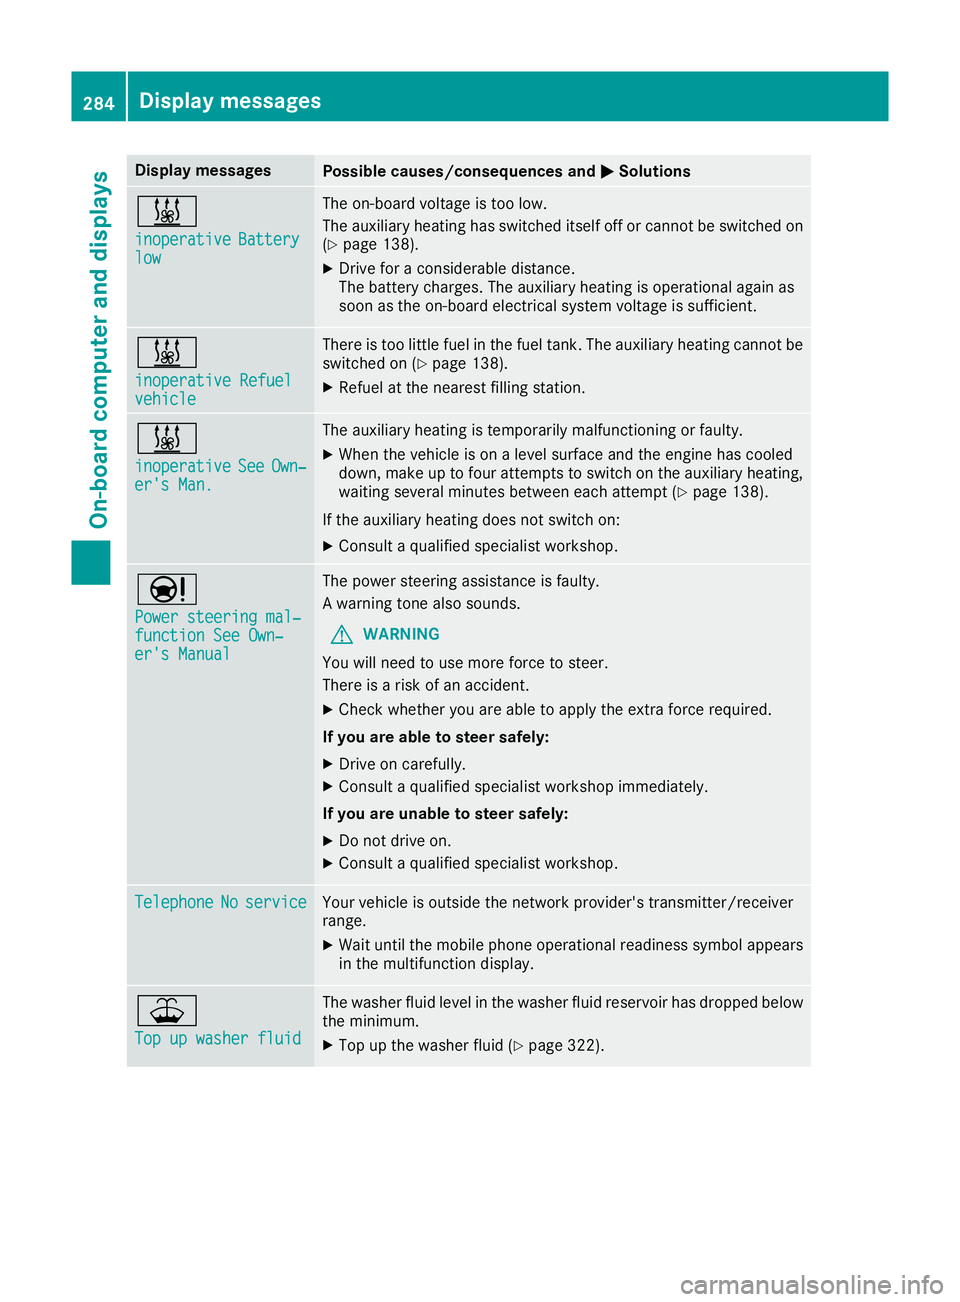
Display messages
Possible causes/consequences and
M
MSolutions &
inoperative inoperative
Battery
Battery
low
low The on-board voltage is too low.
The auxiliary heating has switched itself off or cannot be switched on
(Y page 138).
X Drive for a considerable distance.
The battery charges. The auxiliary heating is operational again as
soon as the on-board electrical system voltage is sufficient. &
inoperative Refuel inoperative Refuel
vehicle vehicle There is too little fuel in the fuel tank. The auxiliary heating cannot be
switched on (Y page 138).
X Refuel at the nearest filling station. &
inoperative inoperative
See
SeeOwn‐
Own‐
er's Man.
er's Man. The auxiliary heating is temporarily malfunctioning or faulty.
X When the vehicle is on a level surface and the engine has cooled
down, make up to four attempts to switch on the auxiliary heating,
waiting several minutes between each attempt (Y page 138).
If the auxiliary heating does not switch on: X Consult a qualified specialist workshop. Ð
Power steering mal‐ Power steering mal‐
function See Own‐ function See Own‐
er's Manual er's Manual The power steering assistance is faulty.
A warning tone also sounds.
G WARNING
You will need to use more force to steer.
There is a risk of an accident.
X Check whether you are able to apply the extra force required.
If you are able to steer safely:
X Drive on carefully.
X Consult a qualified specialist workshop immediately.
If you are unable to steer safely:
X Do not drive on.
X Consult a qualified specialist workshop. Telephone Telephone
No
Noservice
service Your vehicle is outside the network provider's transmitter/receiver
range.
X Wait until the mobile phone operational readiness symbol appears
in the multifunction display. ¥
Top up washer fluid Top up washer fluid The washer fluid level in the washer fluid reservoir has dropped below
the minimum.
X Top up the washer fluid (Y page 322).284
Display
messagesOn-board computer and displays