dashboard MERCEDES-BENZ GLE COUPE 2015 Owners Manual
[x] Cancel search | Manufacturer: MERCEDES-BENZ, Model Year: 2015, Model line: GLE COUPE, Model: MERCEDES-BENZ GLE COUPE 2015Pages: 393, PDF Size: 12.71 MB
Page 14 of 393
Problem (malfunction) ...................1
64
Fuses
Allocation chart ............................ .346
Before changing ............................ .346
Dashboard fuse box ....................... 346
Fuse box in the engine compart-
ment .............................................. 347
Fuse box under rear bench sea t.... 347
Important safety notes .................. 346 G
Garage door opener Clearing the memory ..................... 313
Frequencies ................................... 314
General notes ................................ 311
Important safety notes .................. 312
Opening/closing the garage doo r..3 13
Programming (button in the rear-
view mirror) ................................... 312
Synchronising the rolling code ....... 313
Gear indicator (on-board com-
puter, Mercedes-AMG vehicles) ....... 250
Gearshift paddles
see Steering wheel gearshift paddles
Gearshift program
SETUP (on-board computer) .......... 250
Genuine Mercedes-Benz parts ........... 22
Glove compartment .......................... 300H
Hazard warning lamps ......................117
Head restraints
Adjusting ....................................... 103
Adjusting (electrically) ................... 104
Adjusting (rear) .............................. 104
Fitting/removing (rear) .................. 105
Luxury ............................................ 104
Headlamps
Misting up ...................................... 120
see Automatic headlamp mode
Heating
see Climate control
High-pressure cleaners .................... 325
Hill start assist .................................. 149
HOLD function
Deactivating ................................... 192 Display message ............................ 274
Function/notes ............................
.191
Horn ...................................................... 27 I
Ignition lock see Key positions
Immobiliser .......................................... 75
Indicator and warning lamp
Restraint system ............................ 294
Indicator and warning lamps
Coolant .......................................... 295
DISTRONIC PLUS ........................... 297
Engine diagnostics ......................... 294
Indicator lamps
Display message ............................ 266
see Warning and indicator lamps
Insect protection on the radiator .... 319
Instrument cluster
Overview .......................................... 29
Warning and indicator lamps ........... 31
Instrument cluster lighting .............. 235
Intelligent Light System
Activating/deactivating ................. 246
Display message ............................ 267
Overview ........................................ 117
Setting the dipped-beam head-
lamps for driving on the right/left .. 246
Interior lighting
Automatic control system .............. 121
Emergency lighting ........................ 121
Manual control ............................... 121
Overview ........................................ 120
Reading lamp ................................. 120
Interior motion sensor
Deactivating ..................................... 77
Function .......................................... .76
Priming ............................................ 76
Switching off .................................... 76
ISOFIX child seat securing system ....54 J
Jack Storage location ............................3 32
Using ............................................. 358
Jump starting (engine) ......................341 Index
11
Page 25 of 393
Protection of the environment
General notes
H
Environmental note
Daimler's declared policy is one of compre-
hensive environmental protection.
Our objectives are to use the natural resour-
ces which form the basis of our existence on
this planet sparingly and in a manner which
takes the requirements of both nature and
humanity into consideration.
You too can help to protect the environment
by operating your vehicle in an environmen-
tally-responsible manner.
Fuel consumption and the rate of engine,
transmission, brake and tyre wear depend on
the following factors:
R operating conditions of your vehicle
R your personal driving style
You can influence both factors. Therefore,
please bear the following in mind:
Operating conditions:
R avoid short trips, as these increase fuel
consumption.
R observe the correct tyre pressure.
R do not carry any unnecessary weight in the
vehicle.
R remove the roof rack once you no longer
need it.
R a regularly serviced vehicle will contribute
to environmental protection. You should
therefore adhere to the service intervals.
R all maintenance work should be carried out
at a qualified specialist workshop.
Personal driving style:
R do not depress the accelerator pedal when
starting the engine.
R do not warm up the engine when the vehicle
is stationary.
R drive carefully and maintain a safe distance
from the vehicle in front.
R avoid frequent, sudden acceleration and
braking. R
change gear in good time and use each gear
only up to Ôof its maximum engine speed.
R switch off the engine in stationary traffic.
R monitor the vehicle's fuel consumption. Returning an end-of-life vehicle
EU countries only:
Mercedes-Benz will take back your old vehicle to
dispose of it in an environmentally-responsible
manner in accordance with the European Union (EU) End of Life Vehicles Directive.
There is a network of return points and disas-
sembly plants available. You can return your
vehicle to these plants free of charge. This
makes a valuable contribution to the recycling
process and the conservation of resources.
For further information on recycling old vehi-
cles, recovery and the terms of the policy, visit
the Mercedes-Benz homepage. Genuine Mercedes-Benz parts
H
Environmental note
Daimler AG also supplies reconditioned
assemblies and parts which are of the same
quality as new parts. For these, the same war-
ranty applies as for new parts.
! Airbags and seat belt tensioners, as well as
control units and sensors for these restraint
systems, may be installed in the following
areas of your vehicle:
R doors
R door pillars
R door sills
R seats
R dashboard
R instrument cluster
R centre console
Do not install accessories such as audio sys-
tems in these areas. Do not carry out repairs
or welding. You could impair the operating
efficiency of the restraint systems.
Have accessories retrofitted at a qualified
specialist workshop. 22
Introduction
Page 49 of 393
of the front-passenger front airbag both before
and during the journey.
If a person sits in the passenger seat, they must
be:
R seated with the seat belt fastened correctly
R in an almost upright position with their back
against the seat backrest
R with their feet resting on the floor, if possible
If the front passenger does not observe these
conditions, the automatic front-passenger front
airbag deactivation system may be influenced,
e.g. because the front passenger:
R transfers their weight by supporting them-
selves on a vehicle armrest
R sits in such a way that their weight is raised
from the seat cushion
The front-passenger front airbag may be disa-
bled by mistake as a result of these or similar
actions. In this case, the PASSENGER AIR BAG
OFF indicator lamp lights up permanently. The
front-passenger front airbag does not then
deploy during an accident. G
WARNING
If the PASSENGER AIRBAG OFF indicator lamp is lit, the front-passenger front airbag is disa-
bled. It will not be deployed in the event of an
accident and cannot perform its intended pro-
tective function. A person in the front-
passenger seat could then, for example, come
into contact with the vehicle's interior, espe-
cially if the person is sitting too close to the
dashboard. This poses an increased risk of
injury or even fatal injury.
When the front-passenger seat is occupied,
always make sure that:
R the classification of the person in the front-
passenger seat is correct and that the front-
passenger front airbag is enabled or disa-
bled in accordance with the person in the
front-passenger seat.
R the front-passenger seat has been moved
back as far back as possible.
R the person is seated correctly.
Make sure, both before and during the jour-
ney, that the status of the front-passenger
front airbag is correct. G
WARNING
If you secure a child on the co-driver's seat in a rearward-facing child restraint system and
the PASSENGER AIR BAG ON indicator lamp
lights up, the co-driver's airbag could be
deployed in the event of an accident. The child could be struck by the airbag. There is an
increased risk of injury, possibly even fatal.
In this case, always ensure that the co-driver's
airbag is disabled. The PASSENGER AIRBAG
OFF indicator lamp must light up.
If the PASSENGER AIR BAG OFF indicator lamp
remains off and/or the PASSENGER AIR BAG
ON indicator lamp lights up, do not install a rear- ward-facing child restraint system on the front-
passenger seat. Further information can be
found under "Problems with the automatic front-
passenger front airbag deactivation system"
(Y page 49). G
WARNING
If you secure a child in a forward-facing child
restraint system on the front-passenger seat
and you position the front-passenger seat too close to the dashboard, in the event of an
accident, the child could:
R come into contact with the vehicle's inte-
rior if the PASSENGER AIR BAG OFF indi-
cator lamp is lit, for example
R be struck by the airbag if the PASSENGER
AIR BAG ON is lit up
This poses an increased risk of injury or even fatal injury.
Move the front-passenger seat as far back as
possible. Always make sure that the shoulder belt strap is correctly routed from the vehicle
belt outlet to the shoulder belt guide on the
child restraint system. The shoulder belt strap
must be routed forwards and downwards
from the vehicle belt outlet. If necessary,
adjust the vehicle belt outlet and the front-
passenger seat accordingly. Always observe
the information in this Owner's Manual on
suitable positioning of the child restraint sys- tem in addition to the child restraint system
manufacturer's installation instructions. 46
Occupant safetySafety
Page 59 of 393
Child restraint system on the front-
passenger seat
General notes Accident statistics show that children secured
in the rear seats are safer than children secured
in the front-passenger seat. For this reason,
Mercedes-Benz strongly advises that you install a child restraint system on a rear seat.
Vehicles with the automatic front-passenger
front airbag deactivation system: if it is abso-
lutely necessary to fit a child restraint system tothe front-passenger seat, always observe the
information on the "Automatic front-passenger
front airbag deactivation system" (Y page 45).
You can thus avoid the risks that could arise as
a result of:
R a child restraint system that is not detected
by the automatic front-passenger front airbag
deactivation system
R the unintentional disabling of the front-
passenger front airbag
R the unsuitable positioning of the child
restraint system, e.g. too close to the dash-
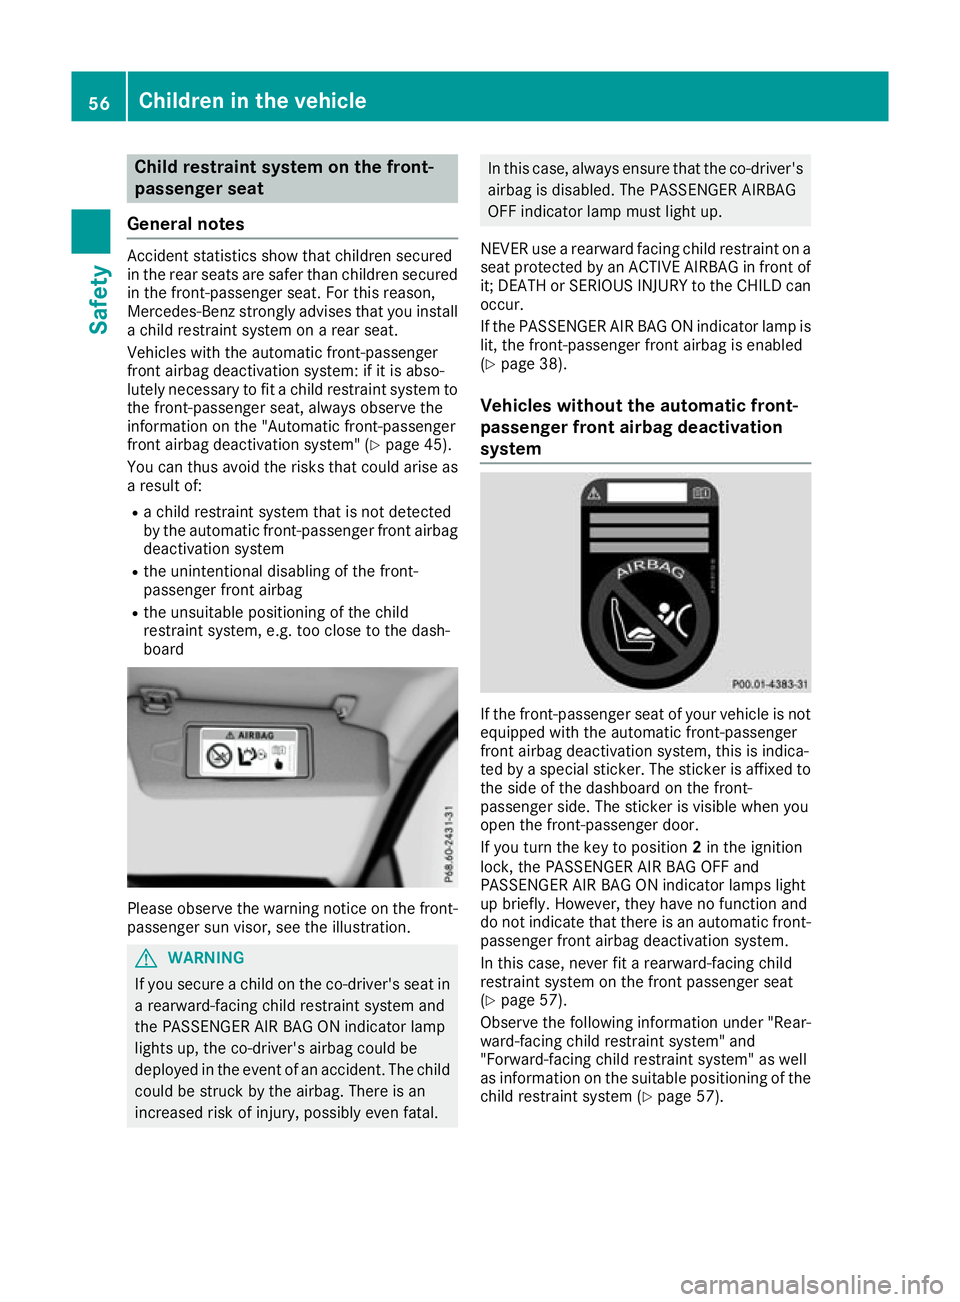
board Please observe the warning notice on the front-
passenger sun visor, see the illustration. G
WARNING
If you secure a child on the co-driver's seat in a rearward-facing child restraint system and
the PASSENGER AIR BAG ON indicator lamp
lights up, the co-driver's airbag could be
deployed in the event of an accident. The childcould be struck by the airbag. There is an
increased risk of injury, possibly even fatal. In this case, always ensure that the co-driver's
airbag is disabled. The PASSENGER AIRBAG
OFF indicator lamp must light up.
NEVER use a rearward facing child restraint on a seat protected by an ACTIVE AIRBAG in front of
it; DEATH or SERIOUS INJURY to the CHILD can
occur.
If the PASSENGER AIR BAG ON indicator lamp is lit, the front-passenger front airbag is enabled
(Y page 38).
Vehicles without the automatic front-
passenger front airbag deactivation
system If the front-passenger seat of your vehicle is not
equipped with the automatic front-passenger
front airbag deactivation system, this is indica-
ted by a special sticker. The sticker is affixed to
the side of the dashboard on the front-
passenger side. The sticker is visible when you
open the front-passenger door.
If you turn the key to position 2in the ignition
lock, the PASSENGER AIR BAG OFF and
PASSENGER AIR BAG ON indicator lamps light
up briefly. However, they have no function and
do not indicate that there is an automatic front- passenger front airbag deactivation system.
In this case, never fit a rearward-facing child
restraint system on the front passenger seat
(Y page 57).
Observe the following information under "Rear-
ward-facing child restraint system" and
"Forward-facing child restraint system" as well
as information on the suitable positioning of the
child restraint system (Y page 57).56
Children in the vehicleSafety
Page 203 of 393
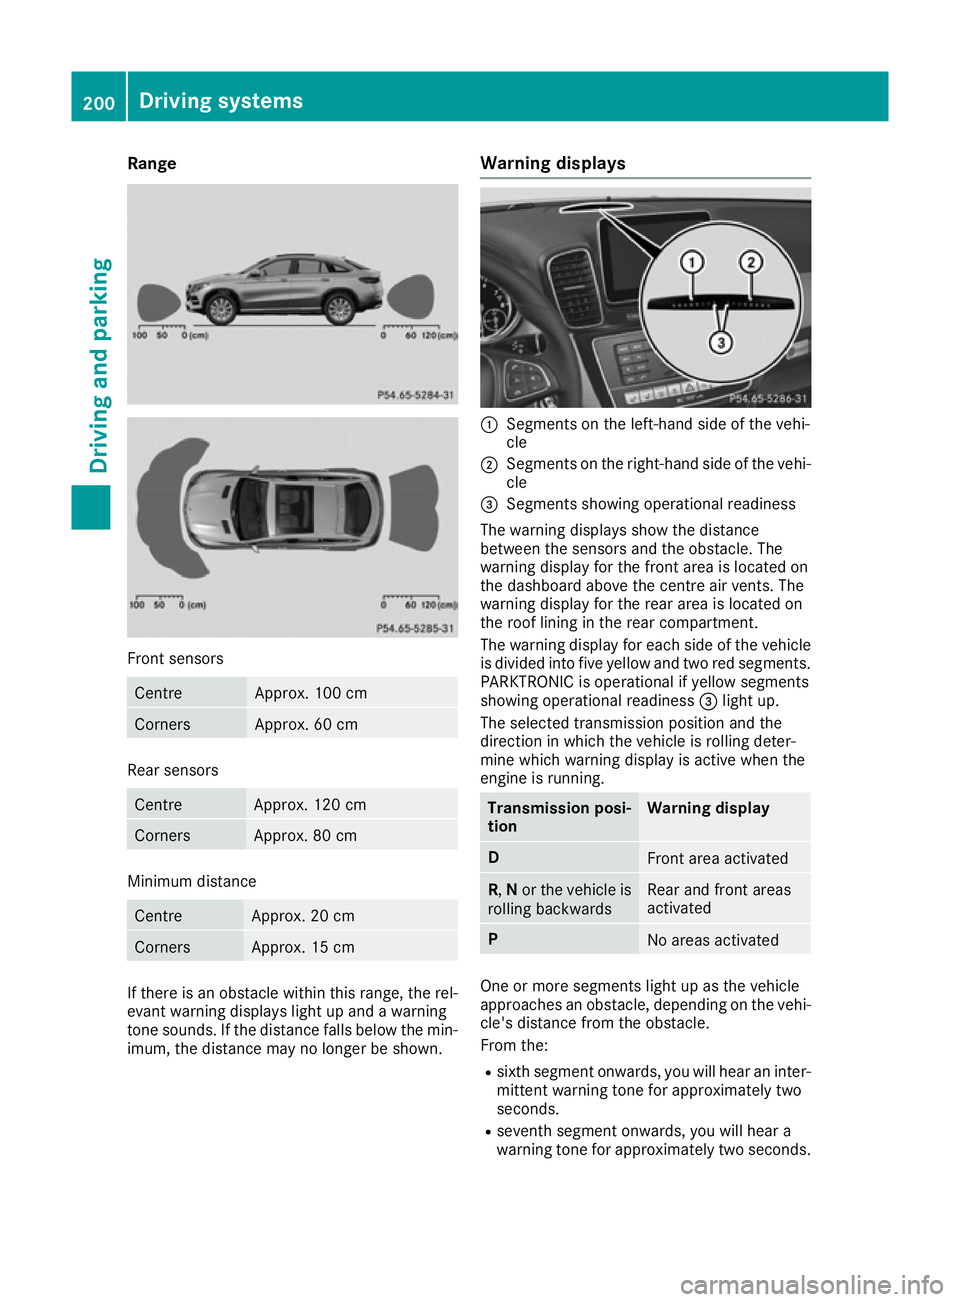
Range
Front sensors
Centre Approx. 100 cm
Corners Approx. 60 cm
Rear sensors
Centre Approx. 120 cm
Corners Approx. 80 cm
Minimum distance
Centre Approx. 20 cm
Corners Approx. 15 cm
If there is an obstacle within this range, the rel-
evant warning displays light up and a warning
tone sounds. If the distance falls below the min- imum, the distance may no longer be shown. Warning displays
:
Segments on the left-hand side of the vehi-
cle
; Segments on the right-hand side of the vehi-
cle
= Segments showing operational readiness
The warning displays show the distance
between the sensors and the obstacle. The
warning display for the front area is located on
the dashboard above the centre air vents. The
warning display for the rear area is located on
the roof lining in the rear compartment.
The warning display for each side of the vehicle
is divided into five yellow and two red segments.
PARKTRONIC is operational if yellow segments
showing operational readiness =light up.
The selected transmission position and the
direction in which the vehicle is rolling deter-
mine which warning display is active when the
engine is running. Transmission posi-
tion Warning display
D
Front area activated
R,
Nor the vehicle is
rolling backwards Rear and front areas
activated
P
No areas activated
One or more segments light up as the vehicle
approaches an obstacle, depending on the vehi-
cle's distance from the obstacle.
From the:
R sixth segment onwards, you will hear an inter-
mittent warning tone for approximately two
seconds.
R seventh segment onwards, you will hear a
warning tone for approximately two seconds. 200
Driving systemsDriving and parking
Page 349 of 393

Tow-starting (emergency engine
starting)
! Do not tow-start vehicles with automatic
transmission. You could otherwise damage
the automatic transmission.
You can find information on "Jump-starting"
under (Y page 341). Electrical fuses
Important safety notes
G
WARNING
If you manipulate, bridge or replace a faulty
fuse with a fuse of a higher amperage, the
electric cables could be overloaded. This may result in a fire. There is a risk of an accident
and injury.
Always replace faulty fuses with specified new fuses of the correct amperage.
! Only use fuses marked with an "S" for the
fuse box in the engine compartment and
under the rear bench seat. Components or
systems could otherwise be damaged.
The fuses in your vehicle disconnect faulty cir-
cuits. If a fuse blows, all the components on the
circuit and their functions will fail.
Blown fuses must be replaced with fuses of the same rating, which you can recognise by the
colour and fuse rating. The fuse ratings are listed
in the fuse allocation chart.
The fuse allocation chart is located in the fuse
box under the rear bench seat (Y page 347).
If the newly inserted fuse also blows, have the
cause traced and rectified at a qualified special-
ist workshop, e.g. a Mercedes-Benz Service
Centre. Before replacing a fuse
Observe the important safety notes
(Y page 346)
X Secure the vehicle against rolling away
(Y page 167).
X Switch off the engine.
X Switch off all electrical consumers. X
Remove the key from the ignition lock.
or, on vehicles with KEYLESS-GO start function
or KEYLESS ‑GO:
X Open the driver's door.
The on-board electronics now have status 0.
This is the same as the key having been
removed.
The driver's door can be closed again.
All indicator lamps in the instrument cluster
must be off.
The fuses are located in various fuse boxes:
R Fuse box on the front-passenger side of the
dashboard
R Fuse box in the engine compartment on the
right-hand side of the vehicle, when viewed in
the direction of travel
R Fuse box under the rear bench seat Dashboard fuse box
Observe the important safety notes
(Y page 346).
! Do not use a pointed object such as a screw-
driver to open the cover in the dashboard. You
could damage the dashboard or the cover.
! Make sure that no moisture can enter the
fuse box when the cover is open.
! When closing the cover, make sure that it is
lying correctly on the fuse box. Moisture seep-
ing in or dirt could otherwise impair the oper-
ation of the fuses. X
Open the front-passenger door.
X Open the glove compartment.
X To open: pull cover :outwards in the direc-
tion of the arrow and remove it. 346
Electrical fusesBreakdown assistance
Page 350 of 393
X
To close: clip in cover :on the front of the
dashboard.
Make sure that the door seal is positioned
over the cover.
X Fold cover :inwards until it engages.
X Close the glove compartment. Fuse box in the engine compartment
Observe the important safety notes
(Y page 346). G
WARNING
When the bonnet is open, and the windscreen wipers are set in motion, you can be injured by
the wiper linkage. There is a risk of injury.
Always switch off the windscreen wipers and
the ignition before opening the bonnet.
! Make sure that no moisture can enter the
fuse box when the cover is open.
! When closing the cover, make sure that it is
lying correctly on the fuse box. Moisture seep-
ing in or dirt could otherwise impair the oper- ation of the fuses. X
Open the bonnet (Y page 319).
X Remove any existing moisture from the fuse
box using a dry cloth.
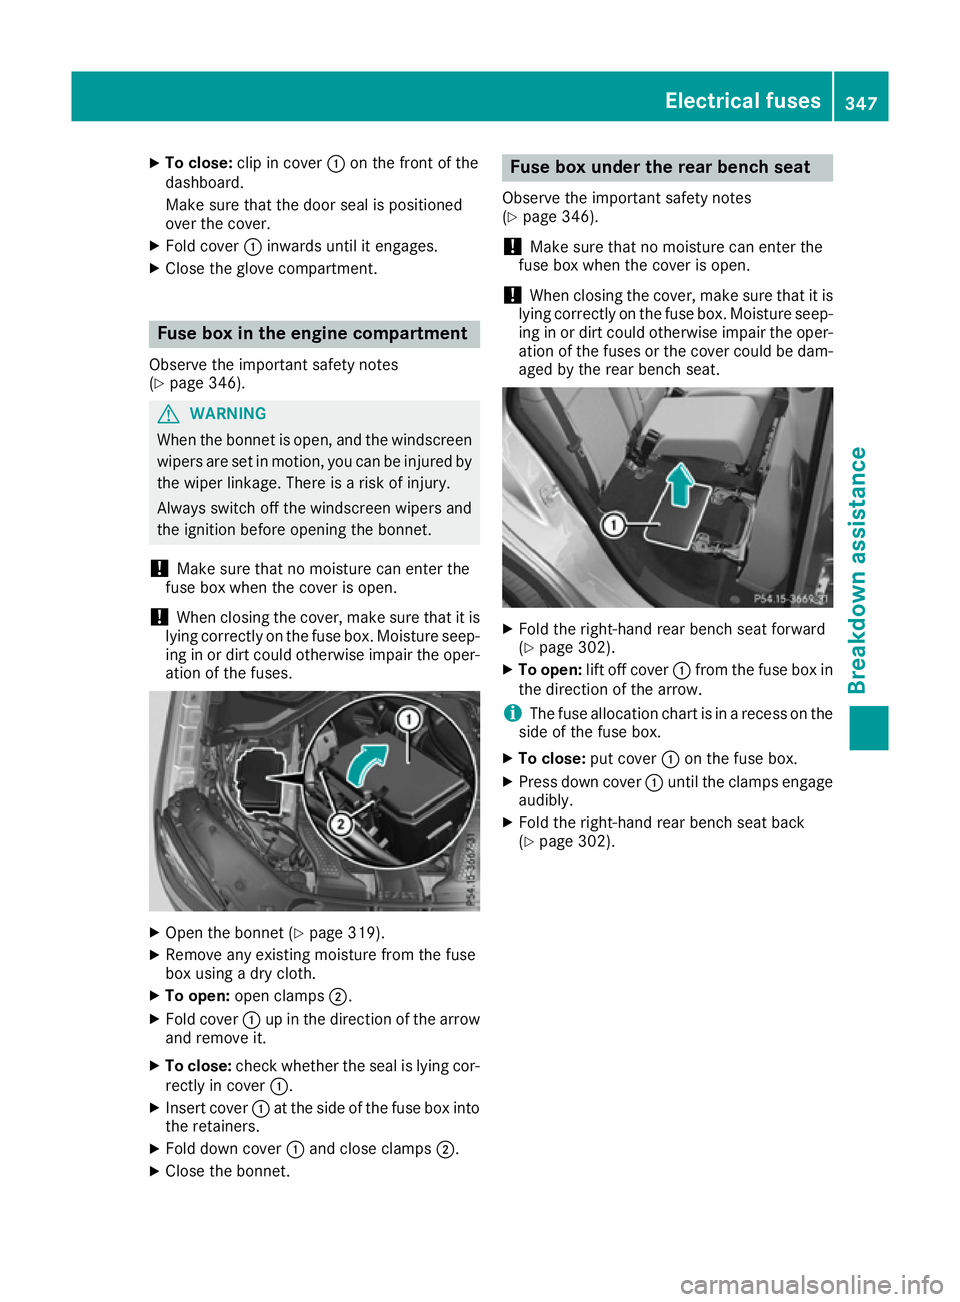
X To open: open clamps ;.
X Fold cover :up in the direction of the arrow
and remove it.
X To close: check whether the seal is lying cor-
rectly in cover :.
X Insert cover :at the side of the fuse box into
the retainers.
X Fold down cover :and close clamps ;.
X Close the bonnet. Fuse box under the rear bench seat
Observe the important safety notes
(Y page 346).
! Make sure that no moisture can enter the
fuse box when the cover is open.
! When closing the cover, make sure that it is
lying correctly on the fuse box. Moisture seep-
ing in or dirt could otherwise impair the oper- ation of the fuses or the cover could be dam-aged by the rear bench seat. X
Fold the right-hand rear bench seat forward
(Y page 302).
X To open: lift off cover :from the fuse box in
the direction of the arrow.
i The fuse allocation chart is in a recess on the
side of the fuse box.
X To close: put cover:on the fuse box.
X Press down cover :until the clamps engage
audibly.
X Fold the right-hand rear bench seat back
(Y page 302). Electrical fuses
347Breakdown assis tance Z