fuse MERCEDES-BENZ GLE COUPE 2015 Owners Manual
[x] Cancel search | Manufacturer: MERCEDES-BENZ, Model Year: 2015, Model line: GLE COUPE, Model: MERCEDES-BENZ GLE COUPE 2015Pages: 393, PDF Size: 12.71 MB
Page 14 of 393
Problem (malfunction) ...................1
64
Fuses
Allocation chart ............................ .346
Before changing ............................ .346
Dashboard fuse box ....................... 346
Fuse box in the engine compart-
ment .............................................. 347
Fuse box under rear bench sea t.... 347
Important safety notes .................. 346 G
Garage door opener Clearing the memory ..................... 313
Frequencies ................................... 314
General notes ................................ 311
Important safety notes .................. 312
Opening/closing the garage doo r..3 13
Programming (button in the rear-
view mirror) ................................... 312
Synchronising the rolling code ....... 313
Gear indicator (on-board com-
puter, Mercedes-AMG vehicles) ....... 250
Gearshift paddles
see Steering wheel gearshift paddles
Gearshift program
SETUP (on-board computer) .......... 250
Genuine Mercedes-Benz parts ........... 22
Glove compartment .......................... 300H
Hazard warning lamps ......................117
Head restraints
Adjusting ....................................... 103
Adjusting (electrically) ................... 104
Adjusting (rear) .............................. 104
Fitting/removing (rear) .................. 105
Luxury ............................................ 104
Headlamps
Misting up ...................................... 120
see Automatic headlamp mode
Heating
see Climate control
High-pressure cleaners .................... 325
Hill start assist .................................. 149
HOLD function
Deactivating ................................... 192 Display message ............................ 274
Function/notes ............................
.191
Horn ...................................................... 27 I
Ignition lock see Key positions
Immobiliser .......................................... 75
Indicator and warning lamp
Restraint system ............................ 294
Indicator and warning lamps
Coolant .......................................... 295
DISTRONIC PLUS ........................... 297
Engine diagnostics ......................... 294
Indicator lamps
Display message ............................ 266
see Warning and indicator lamps
Insect protection on the radiator .... 319
Instrument cluster
Overview .......................................... 29
Warning and indicator lamps ........... 31
Instrument cluster lighting .............. 235
Intelligent Light System
Activating/deactivating ................. 246
Display message ............................ 267
Overview ........................................ 117
Setting the dipped-beam head-
lamps for driving on the right/left .. 246
Interior lighting
Automatic control system .............. 121
Emergency lighting ........................ 121
Manual control ............................... 121
Overview ........................................ 120
Reading lamp ................................. 120
Interior motion sensor
Deactivating ..................................... 77
Function .......................................... .76
Priming ............................................ 76
Switching off .................................... 76
ISOFIX child seat securing system ....54 J
Jack Storage location ............................3 32
Using ............................................. 358
Jump starting (engine) ......................341 Index
11
Page 77 of 393
Following damage to the windscreen, have the
configuration and operation of the camera sys-
tem checked at a qualified specialist workshop.
Function X
To activate/deactivate: activate or deacti-
vate PRE-SAFE ®
Brake in the on-board com-
puter (Y page 244).
If the PRE-SAFE ®
Brake is not activated, the
æ symbol appears in the multifunction dis-
play.
If you have activated DSR (Y page 193), PRE-
SAFE ®
Brake is also deactivated.
This function will issue a warning if:
R at a speed of approximately 30 km/h or
higher, the distance maintained to the vehicle
travelling in front is insufficient for several
seconds.
The · distance warning lamp then lights
up in the instrument cluster.
R at a speed of around 7 km/h or more, you
rapidly approach a vehicle in front or a pedes-
trian
An intermittent warning tone will then sound
and the ·distance warning lamp lights up
in the instrument cluster.
X Brake immediately to defuse the situation.
or X Take evasive action provided it is safe to do
so.
The PRE-SAFE ®
Brake function can also brake
the vehicle automatically under the following
conditions:
R the driver and front passenger have their seat
belts fastened
and
R the vehicle speed is between approximately
7 km/h and 200 km/h
At a speed of up to approximately 70 km/h,
PRE-SAFE ®
Brake can also detect:
R stationary objects in the path of your vehicle,
e.g. stopped or parked vehicles
R pedestrians in the path of your vehicle
i If there is an increased risk of a collision,
preventive passenger protection measures
(PRE-SAFE ®
) are triggered (Y page 51).
If the risk of a collision with the vehicle in front
remains and you do not brake, take evasive action or accelerate significantly, the vehicle
may perform automatic emergency braking, up
to the point of full brake application. Automatic
emergency braking is not performed until imme- diately prior to an imminent accident.
You can prevent the intervention of PRE-SAFE ®
Brake at any time by:
R depressing the accelerator pedal further
R activating kickdown
R releasing the brake pedal
The braking action of PRE-SAFE ®
Brake is ended
automatically if:
R you manoeuvre to avoid the obstacle
R there is no longer any danger of a collision
R there is no longer an obstacle detected in
front of your vehicle STEER CONTROL
General notes STEER CONTROL helps you by transmitting a
noticeable steering force to the steering wheel
in the direction required for vehicle stabilisation.
This steering support is provided in particular if:
R both right wheels or both left wheels are on a
wet or slippery road surface when you brake
R the vehicle starts to skid
Important safety notes i
Observe the "Important safety notes" sec-
tion (Y page 64).
No steering support is provided from STEER
CONTROL, if: R ESP ®
is deactivated
R ESP ®
is malfunctioning
R the steering is faulty
If ESP ®
is malfunctioning, you will be assisted
further by the electrical power steering. 74
Driving safety systemsSafety
Page 133 of 393
Information on using THERMOTRONIC
automatic climate control
The following contains instructions and recom-
mendations to enable you to get the most out of your THERMOTRONIC automatic climate con-
trol.
R Activate climate control using the Ãand
¿ buttons. The indicator lamps above the
à and¿ buttons light up.
R In automatic mode, you can also use the ñ
button to set a climate mode (FOCUS/
MEDIUM/DIFFUSE). The MEDIUM level is
recommended.
R Set the temperature to 22 †.
R Only use the "Windscreen demisting" function
briefly until the windscreen is clear again.
R Only use air-recirculation mode briefly, e.g. if
there are unpleasant outside odours or when
in a tunnel. The windows could otherwise mist up as no fresh air is drawn into the vehicle inair-recirculation mode.
R Use the ZONE function to adopt the temper-
ature settings on the driver's side for the
front-passenger side and the rear compart-
ment as well. The indicator lamp above the
á button goes out.
R Use the residual heat function if you want to
heat or ventilate the vehicle interior when the
ignition is switched off. The residual heat
function can only be activated or deactivated with the ignition switched off.
R If you change the settings of the climate con-
trol system, the climate status display
appears for approximately three seconds at
the bottom of the screen in the multimedia
system display. You will see the current set-
tings of the various climate control functions.
During automatic engine switch-off, the climate
control only operates at a reduced capacity. If
you require the full climate control output, you
can switch off the ECO start/stop function by
pressing the ECO button (Y page 151). Operating the climate control system
Switching the climate control on/off
General notes When the climate control is switched off, the air
supply and air circulation are also switched off.
The windows could mist up. Therefore, only
switch off climate control briefly.
i Switch on climate control primarily using
the à button (Y page 132).
In the rear-compartment, you can also switch
climate control on/off using the Ãand^
buttons.
Activating/deactivating X
Turn the key to position 2in the ignition lock
(Y page 146).
X To activate: press theÃbutton.
The indicator lamp in the Ãbutton lights
up. Airflow and air distribution are set to auto-
matic mode.
or X Press the ^button.
The indicator lamp in the ^button goes
out. The previous settings are reactivated.
X To deactivate: press the^button.
The indicator lamp in the ^button lights
up. Activating/deactivating cooling with
air dehumidification
General notes If you deactivate the "Cooling with air dehumid-
ification" function, the air inside the vehicle will
not be cooled. The air inside the vehicle will also
not be dehumidified. The windows can mist up
more quickly. Therefore, only deactivate the
"Cooling with air dehumidification" function
briefly.
The "Cooling with air dehumidification" function
is only available when the engine is running. The air inside the vehicle is cooled and dehumidified
according to the temperature selected.
Condensation may drip from the underside of
the vehicle when cooling mode is active. This is
normal and not a sign that there is a malfunc-
tion. 130
Operating the climate control systemClimate cont
rol
Page 135 of 393
Problems with the "Cooling with air dehumidification" function
Problem
Possible causes/consequences and
M
MSolutions The indicator lamp in the
¿ orÁ button
flashes three times or
remains off. The cooling
with air dehumidification
function cannot be acti-
vated. The cooling with air dehumidification function has been deactivated
due to a malfunction.
X Consult a qualified specialist workshop. Setting climate control to automatic
mode
General notes In automatic mode, the set temperature is main-
tained automatically at a constant level. The
system automatically regulates the temperature of the dispensed air, the airflow and the air dis- tribution.
The "Cooling with air dehumidification" function
is activated automatically in automatic mode.
In the rear compartment, you can also switch
climate control for the rear seats to automatic
mode using the Ãbutton.
Automatic control X
Turn the key to position 2in the ignition lock
(Y page 146).
X Set the desired temperature.
X To activate: press theÃbutton.
The indicator lamp in the Ãbutton lights
up. Automatic air distribution and airflow are
activated.
X To switch to manual mode: press the_
button.
or X Press the IorK button.
The indicator lamp in the Ãbutton goes
out.
THERMOTRONIC automatic climate control:
when automatic mode is activated, you can
select a climate mode (Y page 132). Setting the climate mode
In automatic mode you can select the following
climate modes:
FOCUS high airflow, slightly cooler setting
MEDIUM medium airflow, standard setting
DIFFUSE low airflow, slightly warmer and draught-free setting
X Turn the key to position 2in the ignition lock
(Y page 146).
X Press the Ãbutton.
X Press the ñbutton repeatedly until the
desired climate mode appears in the display. Setting the temperature
THERMATIC automatic climate control Different temperatures can be set for the driv-
er's and front-passenger sides.
X Turn the key to position 2in the ignition lock
(Y page 146).
X To increase or decrease: turn control:or
B anti-clockwise or clockwise (Y page 127).
Only change the temperature setting in small increments. Start at 22 †. 132
Operating the climate control systemClimate control
Page 189 of 393
R
turn off at a motorway exit
R approach a tollgate
Even if the vehicle in front leaves the detection
range, DISTRONIC PLUS temporarily maintains
the current driving speed and does not acceler-
ate. This is based on the current map data in the navigation system.
Afterwards, the vehicle accelerates back to the
set speed you specified.
The system takes into account the fact that
overtaking on the right is not permitted on
motorways or high-speed major roads at speeds
above 80 km/h. The driving speed is adjusted to the speed of the queue of vehicles in the adja-
cent lane to the left.
i Prevention of overtaking on the right applies
to countries where traffic drives on the right.
In countries where traffic drives on the left,
overtaking on the left is prevented accord-
ingly.
Stopping G
WARNING
When leaving the vehicle, even if it is braked
only by DISTRONIC PLUS, it could roll away if:
R there is a malfunction in the system or in
the voltage supply.
R DISTRONIC PLUS has been deactivated
with the cruise control lever, e.g. by a vehi-
cle occupant or from outside the vehicle.
R the electrical system in the engine com-
partment, the battery or the fuses have
been tampered with.
R the battery is disconnected.
R the accelerator pedal has been depressed,
e.g. by a vehicle occupant.
There is a risk of an accident.
If you wish to exit the vehicle, always turn off
DISTRONIC PLUS and secure the vehicle
against rolling away.
If DISTRONIC PLUS detects that the vehicle in
front is stopping, it brakes your vehicle until it is stationary.
Once your vehicle is stationary, it remains sta-
tionary and you do not need to depress the
brake. After a short period, the vehicle is secured by
the electric parking brake, thus relieving the
service brake.
Depending on the specified minimum distance,
your vehicle will come to a standstill at a suffi-
cient distance behind the vehicle in front. The
specified minimum distance is set using the
control on the cruise control lever.
When the vehicle is stationary and DISTRONIC
PLUS is activated, position P is automatically
selected if:
R the driver's door is open and the driver's seat
belt is unfastened
R the engine is switched off, unless it is auto-
matically switched off by the ECO start/stop
function
The electric parking brake secures the vehicle
automatically if DISTRONIC PLUS is activated
when the vehicle is stationary and:
R a system fault occurs
R the power supply is insufficient
On steep uphill or downhill inclines or if there is
a malfunction, the transmission may also be
automatically shifted into position P.
Setting a speed Bear in mind that it may take a brief moment
until the vehicle has accelerated or braked to
the set speed.
X Press the cruise control lever up :for a
higher speed or down Afor a lower speed
X Keep the cruise control lever pressed until the
desired speed is reached.
X Release the cruise control lever.
The new speed is stored. DISTRONIC PLUS is
activated and adjusts the vehicle's speed to
the new speed stored.
X To adjust the set speed in 1 km/h incre-
ments:
briefly press the cruise control lever
up : or down Ato the pressure point.
The last stored speed increases or decreases in 1 km/h increments.
X To adjust the set speed in 10 km/
hincre-
ments: briefly press the cruise control lever
up : or down Abeyond the pressure point.
The last stored speed increases or decreases
in 10 km/h increments.
i If you accelerate to overtake, DISTRONIC
PLUS adjusts the vehicle's speed to the last 186
Driving systemsDriving and parking
Page 195 of 393
Important safety notes
G
WARNING
When leaving the vehicle, it can still roll away despite being braked by the HOLD function if:
R there is a malfunction in the system or in
the voltage supply
R the HOLD function is deactivated by the
accelerator pedal being depressed, e.g. by
a vehicle occupant
R the electrical system in the engine com-
partment, the battery or the fuses are tam-
pered with
R the battery is disconnected
There is a risk of an accident.
Before leaving the vehicle, always deactivate
the HOLD function and secure the vehicle
from rolling away.
! When DISTRONIC PLUS or the HOLD func-
tion is activated, the vehicle brakes automat- ically in certain situations.
To avoid damage to the vehicle, deactivate
DISTRONIC PLUS and the HOLD function in
the following or similar situations:
R when towing away
R in a car wash
Deactivating the HOLD function (Y page 192).
Activation conditions You can activate the HOLD function if:
R the vehicle is stationary
R the engine is running or if it has been auto-
matically switched off by the ECO start/stop
function
R the driver's door is closed or if your seat belt
is fastened
R the electric parking brake is released
R the transmission is in position D,Ror N
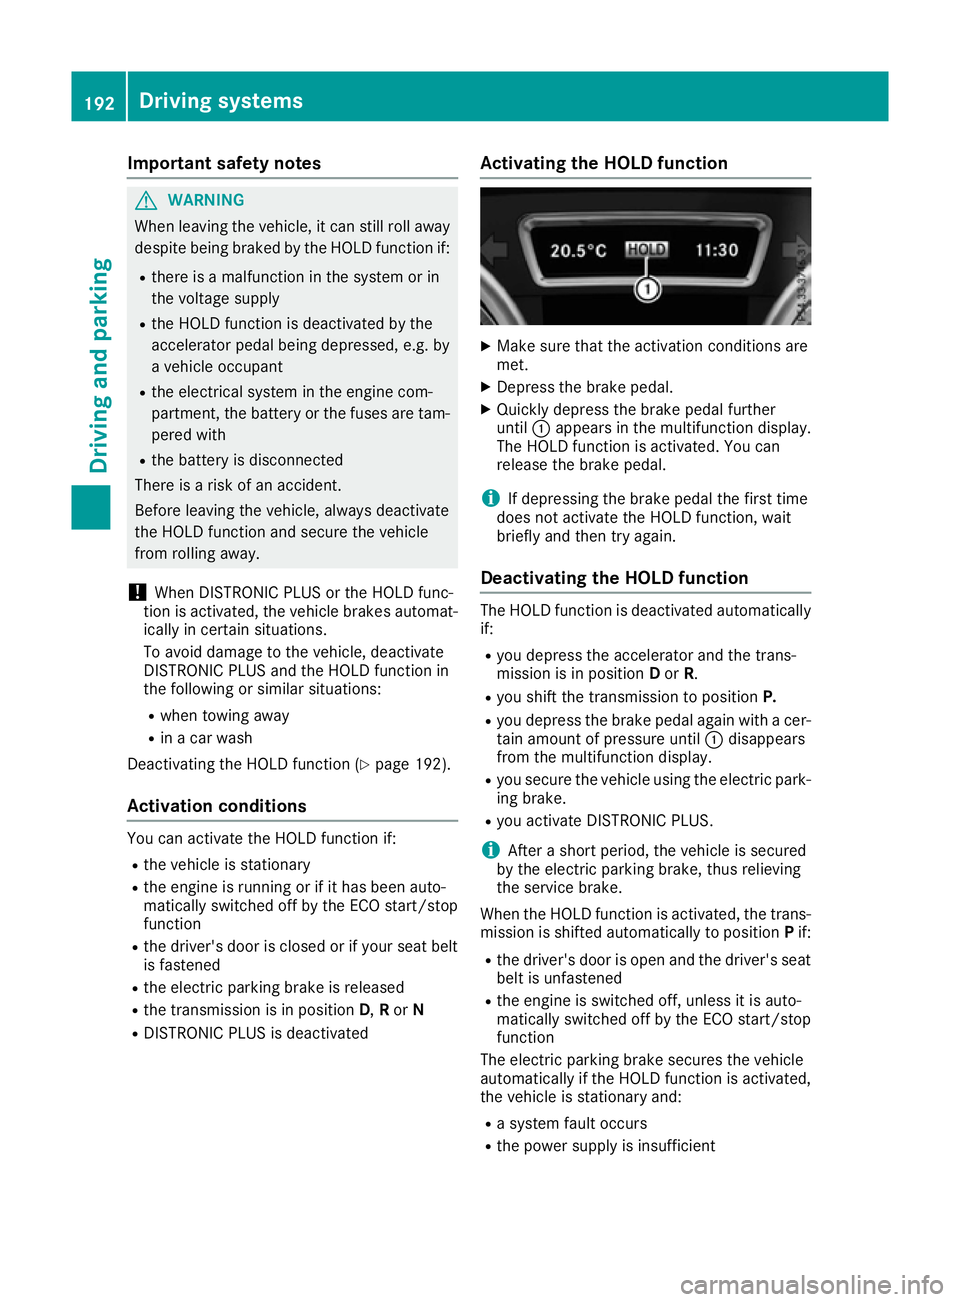
R DISTRONIC PLUS is deactivated Activating the HOLD function X
Make sure that the activation conditions are
met.
X Depress the brake pedal.
X Quickly depress the brake pedal further
until :appears in the multifunction display.
The HOLD function is activated. You can
release the brake pedal.
i If depressing the brake pedal the first time
does not activate the HOLD function, wait
briefly and then try again.
Deactivating the HOLD function The HOLD function is deactivated automatically
if:
R you depress the accelerator and the trans-
mission is in position Dor R.
R you shift the transmission to position P.
R you depress the brake pedal again with a cer-
tain amount of pressure until :disappears
from the multifunction display.
R you secure the vehicle using the electric park-
ing brake.
R you activate DISTRONIC PLUS.
i After a short period, the vehicle is secured
by the electric parking brake, thus relieving
the service brake.
When the HOLD function is activated, the trans-
mission is shifted automatically to position Pif:
R the driver's door is open and the driver's seat
belt is unfastened
R the engine is switched off, unless it is auto-
matically switched off by the ECO start/stop
function
The electric parking brake secures the vehicle
automatically if the HOLD function is activated,
the vehicle is stationary and:
R a system fault occurs
R the power supply is insufficient 192
Driving systemsDriving and pa
rking
Page 207 of 393
need to judge whether your vehicle will fit in
the parking space.
When driving at speeds below 30 km/h, you will
see parking symbol ;as a status indicator in
the instrument cluster. When a parking space
has been detected, an arrow towards the right or the left also appears. Active Parking Assist only
displays parking spaces on the front-passenger side as standard. Parking spaces on the driver's
side are displayed as soon as the turn signal on the driver's side is activated. When parking on
the driver's side, this must remain activated
until you confirm the use of Active Parking Assist by pressing the abutton on the multifunc-
tion steering wheel. The system automatically
determines whether the parking space is paral-
lel or at right angles to the direction of travel.
A parking space is displayed while you are driv-
ing past it, and until you are approximately 15 m away from it.
Parking G
WARNING
If you leave the vehicle when it is only being
braked by Active Parking Assist it could roll
away if:
R there is a malfunction in the system or in
the voltage supply.
R the electrical system in the engine com-
partment, the battery or the fuses are tam-
pered with.
R the battery is disconnected.
R the vehicle is accelerated, e.g. by a vehicle
occupant.
There is a risk of an accident.
Before leaving the vehicle, always secure it
against rolling away.
i When PARKTRONIC detects obstacles,
Active Parking Assist brakes automatically
during the parking process. You are respon-
sible for braking in good time. X
Stop the vehicle when the parking symbol
shows the desired parking space in the instru-
ment cluster.
X Shift the transmission to position R.
The Start Park Assist? Yes: OK No:
Start Park Assist? Yes: OK No:
% message appears in the multifunction
display.
X To cancel the procedure: press the%
button on the multifunction steering wheel or
pull away.
or X To park using Active Parking Assist: press
the a button on the multifunction steering
wheel.
The Park Assist active Accelerate
Park Assist active Accelerate
and brake Observe surroundings and brake Observe surroundings mes-
sage appears in the multifunction display.
X Release the multifunction steering wheel.
X Reverse the vehicle, being ready to brake at
all times. When reversing, drive at a speed
below 10 km/h. Otherwise, Active Parking
Assist will be cancelled.
Active Parking Assist brakes the vehicle to a
standstill when the vehicle approaches the
rear border of the parking space.
Manoeuvring may be required in tight parking spaces.
The Park Assist active Select D Park Assist active Select D
Observe surroundings
Observe surroundings message appears in
the multifunction display.
X Shift the transmission to position Dwhile the
vehicle is stationary.
Active Parking Assist immediately steers in
the other direction.
The Park Assist active Accelerate Park Assist active Accelerate
and brake Observe surroundings and brake Observe surroundings mes-
sage appears in the multifunction display.
i You will achieve the best results by waiting
for the steering procedure to complete before
pulling away.
X Drive forwards and be ready to brake at all
times.
Active Parking Assist brakes the vehicle to a
standstill.
The Park Assist active Select R Park Assist active Select R
Observe surroundings
Observe surroundings message appears in
the multifunction display.
As soon as the parking procedure is complete,
the Park Assist switched off
Park Assist switched off message
appears in the multifunction display and a warn- ing tone sounds. The vehicle is now parked. The 204
Driving systemsDriving an
d parking
Page 271 of 393
Display messages
Possible causes/consequences and
M
MSolutions Vehicles with trailer tow hitch: a fuse may have blown.
X Pull over and stop the vehicle safely as soon as possible, paying
attention to road and traffic conditions.
X Secure the vehicle against rolling away (Y page 167).
X Check the fuses (Y page 346).
X If necessary, replace the blown fuse. Observe the warning notes as
you do so.
If the multifunction display still shows the display message:
X Consult a qualified specialist workshop. b
Malfunction Malfunction
See
SeeOwn‐
Own‐
er's Manual
er's Manual The exterior lighting is faulty.
X Consult a qualified specialist workshop. b
AUTO lights inoper‐ AUTO lights inoper‐
ative ative The light sensor is faulty.
X
Consult a qualified specialist workshop. b
Switch off lights Switch off lights You leave the vehicle and the lights are switched on. A warning tone
also sounds.
X Turn the light switch to the Ãposition. b
Switch on headlamps Switch on headlamps You are driving without dipped-beam headlamps.
X
Turn the light switch to the Lorà position. Adaptive Highbeam Adaptive Highbeam
Assist Plus cur‐ Assist Plus cur‐
rently unavailable rently unavailable
See Owner's Manual See Owner's Manual Adaptive Highbeam Assist Plus is deactivated and temporarily inop-
erative.
Possible causes:
R the windscreen is dirty in the camera's field of vision
R visibility is impaired due to heavy rain, snow or fog
X Clean the windscreen.
If the system detects that the camera is fully operational again, the Adaptive Highbeam Assist Plus available again Adaptive Highbeam Assist Plus available again message is
displayed.
Adaptive Highbeam Assist Plus is operational again. Adaptive Highbeam Adaptive Highbeam
Assist Plus inoper‐ Assist Plus inoper‐
ative ative Adaptive Highbeam Assist Plus is faulty.
X Consult a qualified specialist workshop. 268
Display
messagesOn-board computer and displays
Page 349 of 393

Tow-starting (emergency engine
starting)
! Do not tow-start vehicles with automatic
transmission. You could otherwise damage
the automatic transmission.
You can find information on "Jump-starting"
under (Y page 341). Electrical fuses
Important safety notes
G
WARNING
If you manipulate, bridge or replace a faulty
fuse with a fuse of a higher amperage, the
electric cables could be overloaded. This may result in a fire. There is a risk of an accident
and injury.
Always replace faulty fuses with specified new fuses of the correct amperage.
! Only use fuses marked with an "S" for the
fuse box in the engine compartment and
under the rear bench seat. Components or
systems could otherwise be damaged.
The fuses in your vehicle disconnect faulty cir-
cuits. If a fuse blows, all the components on the
circuit and their functions will fail.
Blown fuses must be replaced with fuses of the same rating, which you can recognise by the
colour and fuse rating. The fuse ratings are listed
in the fuse allocation chart.
The fuse allocation chart is located in the fuse
box under the rear bench seat (Y page 347).
If the newly inserted fuse also blows, have the
cause traced and rectified at a qualified special-
ist workshop, e.g. a Mercedes-Benz Service
Centre. Before replacing a fuse
Observe the important safety notes
(Y page 346)
X Secure the vehicle against rolling away
(Y page 167).
X Switch off the engine.
X Switch off all electrical consumers. X
Remove the key from the ignition lock.
or, on vehicles with KEYLESS-GO start function
or KEYLESS ‑GO:
X Open the driver's door.
The on-board electronics now have status 0.
This is the same as the key having been
removed.
The driver's door can be closed again.
All indicator lamps in the instrument cluster
must be off.
The fuses are located in various fuse boxes:
R Fuse box on the front-passenger side of the
dashboard
R Fuse box in the engine compartment on the
right-hand side of the vehicle, when viewed in
the direction of travel
R Fuse box under the rear bench seat Dashboard fuse box
Observe the important safety notes
(Y page 346).
! Do not use a pointed object such as a screw-
driver to open the cover in the dashboard. You
could damage the dashboard or the cover.
! Make sure that no moisture can enter the
fuse box when the cover is open.
! When closing the cover, make sure that it is
lying correctly on the fuse box. Moisture seep-
ing in or dirt could otherwise impair the oper-
ation of the fuses. X
Open the front-passenger door.
X Open the glove compartment.
X To open: pull cover :outwards in the direc-
tion of the arrow and remove it. 346
Electrical fusesBreakdown assistance
Page 350 of 393
X
To close: clip in cover :on the front of the
dashboard.
Make sure that the door seal is positioned
over the cover.
X Fold cover :inwards until it engages.
X Close the glove compartment. Fuse box in the engine compartment
Observe the important safety notes
(Y page 346). G
WARNING
When the bonnet is open, and the windscreen wipers are set in motion, you can be injured by
the wiper linkage. There is a risk of injury.
Always switch off the windscreen wipers and
the ignition before opening the bonnet.
! Make sure that no moisture can enter the
fuse box when the cover is open.
! When closing the cover, make sure that it is
lying correctly on the fuse box. Moisture seep-
ing in or dirt could otherwise impair the oper- ation of the fuses. X
Open the bonnet (Y page 319).
X Remove any existing moisture from the fuse
box using a dry cloth.
X To open: open clamps ;.
X Fold cover :up in the direction of the arrow
and remove it.
X To close: check whether the seal is lying cor-
rectly in cover :.
X Insert cover :at the side of the fuse box into
the retainers.
X Fold down cover :and close clamps ;.
X Close the bonnet. Fuse box under the rear bench seat
Observe the important safety notes
(Y page 346).
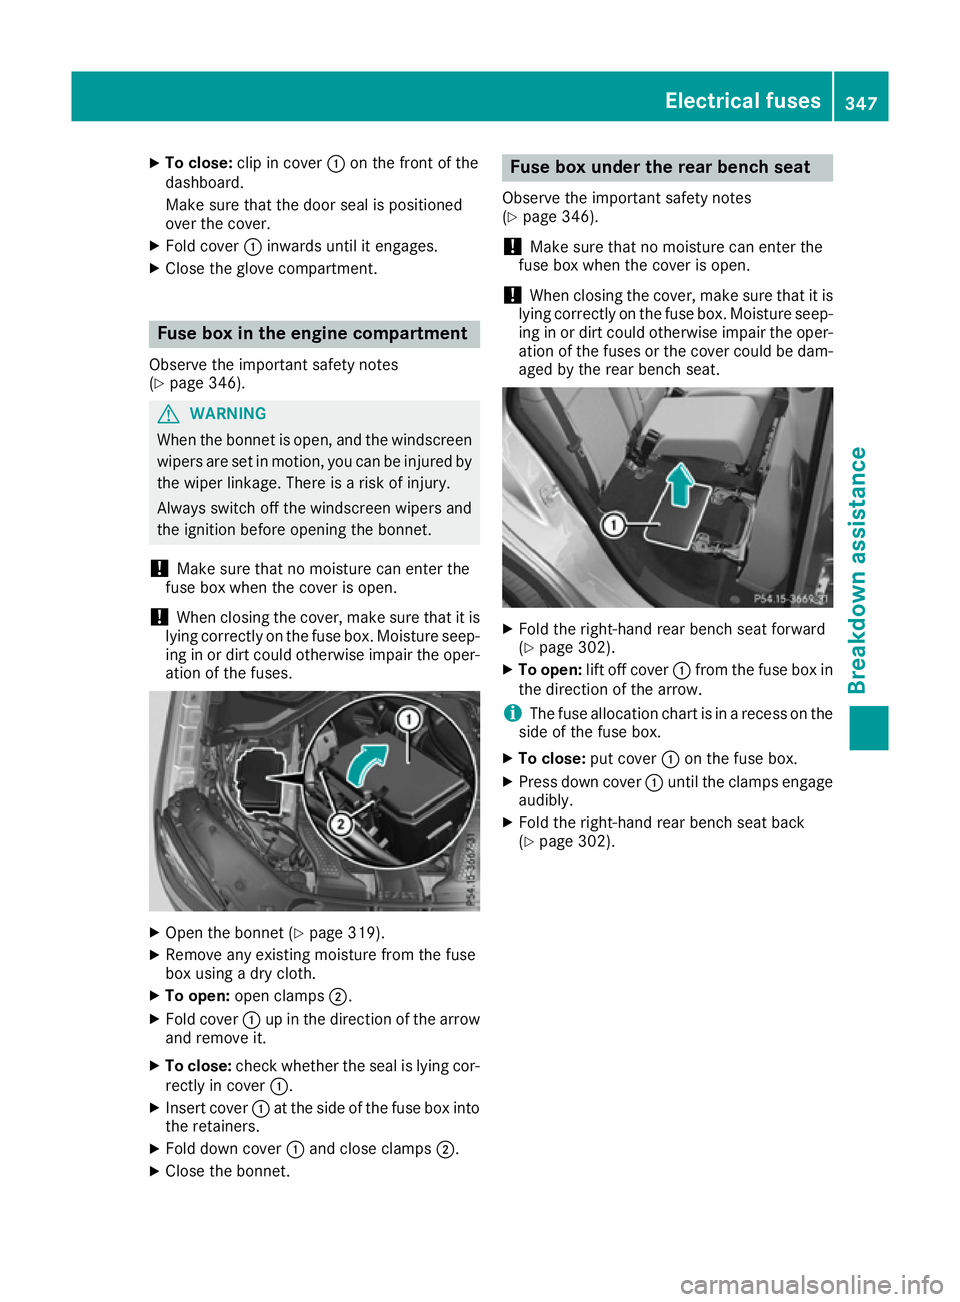
! Make sure that no moisture can enter the
fuse box when the cover is open.
! When closing the cover, make sure that it is
lying correctly on the fuse box. Moisture seep-
ing in or dirt could otherwise impair the oper- ation of the fuses or the cover could be dam-aged by the rear bench seat. X
Fold the right-hand rear bench seat forward
(Y page 302).
X To open: lift off cover :from the fuse box in
the direction of the arrow.
i The fuse allocation chart is in a recess on the
side of the fuse box.
X To close: put cover:on the fuse box.
X Press down cover :until the clamps engage
audibly.
X Fold the right-hand rear bench seat back
(Y page 302). Electrical fuses
347Breakdown assis tance Z