manual transmission MERCEDES-BENZ GLE COUPE 2015 Owners Manual
[x] Cancel search | Manufacturer: MERCEDES-BENZ, Model Year: 2015, Model line: GLE COUPE, Model: MERCEDES-BENZ GLE COUPE 2015Pages: 393, PDF Size: 12.71 MB
Page 7 of 393
Triggering ......................................... 49
Windowbag ...................................... 44
AIRMATIC package
ADS (Adaptive Damping System) ... 195
Function/notes ............................. 194
Alarm
ATA (Anti-Theft Alarm system) ......... 75
Switching off (ATA) .......................... 75
Switching the function on/off
(ATA) ................................................ 75
AMG
RIDE CONTROL sports suspen-
sion ................................................ 198
AMG menu (on-board computer) ..... 250
Anti-glare film .................................... 317
Approach/departure angle .............. 177
Aquaplaning ....................................... 173
Ashtray ............................................... 308
Assistance display (on-board com-
puter) .................................................. 243
Assistance menu (on-board com-
puter) .................................................. 243
ASSYST PLUS
Displaying a service message ........ 323
Hiding a service message .............. 323
Resetting the service interval dis-
play ................................................ 323
Service message ............................3 22
Special service requirements ......... 323
ATA (Anti-Theft Alarm system)
Activating/deactivating ................... 75
Function .......................................... .75
Switching off the alarm .................... 75
ATTENTION ASSIST
Activating/deactivating ................. 244
Display message ............................ 272
Function/note s............................. 214
Audio menu (on-board computer) .... 241
AUTO lights
Display message ............................ 268
see Lights
Automatic engine start (ECO start/
stop function) .................................... 150
Automatic engine switch-off (ECO
start/stop function) .......................... 150 Automatic front-passenger front
airbag deactivation
Display message ............................ 264
Automatic front-passenger front
airbag deactivation system
Operation ......................................... 45
Problems ......................................... 49
System self-test ............................... 47
Automatic headlamp mode .............. 115
Automatic transmission
Accelerator pedal position ............. 156
Changing gear ............................... 156
DIRECT SELECT lever ..................... 154
Display message ............................ 281
Drive program display .................... 154
Drive programs .............................. 158
Driving tips .................................... 156
DYNAMIC SELECT controlle r......... 153
Emergency running mode .............. 161
Engaging drive position .................. 156
Engaging neutral ............................ 155
Engaging park position automati-
cally ............................................... 155
Engaging reverse gear ................... 155
Engaging the park position ............ 154
Gliding mod e................................. 157
Kickdown ....................................... 157
Manual shifting .............................. 158
Oil temperature (on-board com-
puter, Mercedes-AMG vehicles) ..... 250
Overview ........................................ 154
Problem (fault) ............................... 161
Pulling away ................................... 149
Starting the engine ........................ 148
Steering wheel gearshift paddle s... 158
Trailer towing ................................. 157
Transmission position display ........ 154
Transmission positions .................. 156
Automatic transmission emer-
gency running mode ......................... 161
Auxiliary heating
Setting ........................................... 247
Auxiliary heating/ventilation
Display message ............................ 284
Important safety notes .................. 138
Problem (display message) ............ 142
Remote control .............................. 139
Setting the departure time ............. 140 4
Index
Page 21 of 393
Suspension settings
AMG RIDE CONTROL sports sus-
pension .......................................... 198
SETUP (on-board computer) ..........2 50
Switching the auxiliary heating/
ventilation
On/off .......................................... .138 T
Tailgate Display message ............................ 282
Emergency unlocking ....................... 92
Important safety notes .................... 88
Limiting the opening angle .............. .91
Opening dimensions ......................3 81
Opening/closing (automatically
from inside) ...................................... 91
Opening/closing (automatically
from outside) ................................... 89
Opening/closing (from outside) ....... 89
Technical data
Capacities ...................................... 374
Emergency spare wheel ................. 371
Information ................................... .372
Trailer loads ................................... 385
Tyres/wheels ................................. 361
Vehicle data ................................... 381
Telephone
Accepting a call (multifunction
steering wheel) .............................. 242
Display message ............................ 284
Menu (on-board computer) ............ 242
Number from the phone book ....... .243
Redialling ....................................... 243
Rejecting/ending a call ................. 242
Telephone compartment ................ 300
Temperature
Coolant (display in the instrumentcluster) .......................................... 236
Coolant (on-board computer,
Mercedes-AMG vehicles) .............. .250
Engine oil (on-board computer,
Mercedes-AMG vehicles) .............. .250
Outside temperature ..................... .236
Setting (climate control) ................ 132
Transmission oil (on-board com-
puter, Mercedes-AMG vehicles) ..... 250 TEMPOMAT
Function/notes ............................ .178
Through-loading ................................ 302
Time
see Separate Owner's manual
Timing (RACETIMER) ......................... 250
TIREFIT kit .......................................... 334
Important safety notes .................. 334
Storage location ............................ 332
Tyre pressure not reached ............. 336
Tyre pressure reached ................... 336
Top Tether ............................................ 54
Total distance recorder .................... 238
Tow-away protection
Activating ......................................... 75
Deactivating ..................................... 76
Function .......................................... .75
Tow-starting
Emergency engine starting ............ 346
Important safety notes .................. 343
Towing
Important safety notes .................. 343
Notes for 4MATIC vehicles ............ 345
Transporting the vehicle ................ 345
Towing a trailer
Active Blind Spot Assist ................. 224
Active Lane Keeping Assist ............ 226
Axle load, permissibl e.................... 385
ESP ®
(Electronic Stability Pro-
gram) ............................................... 71
Failure check for LEDs ................... 232
Pulling away with a traile r.............. 149
Swinging out the ball coupling ....... 228
Swinging the ball coupling in ......... 231
Trailer tow hitch display message .. 283
Towing away
Fitting the towing ey e.................... 344
Removing the towing eye ............... 344
With both axles on the ground ....... 345
Towing eye ......................................... 332
Traffic Sign Assist
Activating/deactivating the warn-ing function .................................... 244
Display message ............................ 274
Function/note s............................. 216
Important safety notes .................. 216
Instrument cluster display ............. 217 18
Index
Page 81 of 393
Useful information
i This Owner's Manual describes all models,
series and optional equipment for your vehi-
cle that were available at the time of going to
press. National variations are possible. Note
that your vehicle may not be equipped with all
of the functions described. This is also the
case for systems and functions relevant to
safety.
i Read the information on qualified specialist
workshops: (Y page 25). Key
Important safety notes
United Kingdom only: G
WARNING
When the double locks are activated, the
doors can no longer be opened from the
inside. People in the vehicle can no longer get out, e.g. in hazardous situations. There is a
risk of injury.
Therefore, do not leave any people unsuper-
vised in the vehicle, particularly children, eld-
erly people or people in need of special assis-
tance. Do not activate the double lock when
people are in the vehicle.
All countries: G
WARNING
If children are left unsupervised in the vehicle, they can:
R open doors and endanger other persons or
road users
R climb out and be injured by the traffic
R operate vehicle equipment and, for exam-
ple, trap themselves.
Children could also set the vehicle in motion, for example by:
R releasing the parking brake
R shifting the automatic transmission out of
park position P
R starting the engine. There is a risk of an accident and injury.
When leaving the vehicle, always take the key
with you and lock the vehicle. Never leave
children unattended in the vehicle. Always
keep the key out of reach of children. G
WARNING
If you attach heavy or large objects to the key, the key could be unintentionally turned in the
ignition lock. This could cause the engine to
be switched off. There is a risk of an accident.
Do not attach any heavy or large objects to the
key. Remove any bulky keyrings before insert-
ing the key into the ignition lock.
! Keep the key away from strong magnetic
fields. Otherwise, the remote control function could be affected.
Strong magnetic fields can occur in the vicin-
ity of powerful electrical installations.
Do not keep the key: R with electronic devices, e.g. a mobile phone
or another key
R with metallic objects, e.g. coins or metal film
R inside metallic objects, e.g. a metal case
This can affect the key's functionality.
Do not keep the KEYLESS-GO or KEYLESS-GO
Start function key in the temperature-controlled
cup holder. Otherwise, the KEYLESS-GO or KEY- LESS-GO Start function key will not be detected.
Vehicles with KEYLESS-GO start function: do
not keep the key in the luggage compartment.
Otherwise, the key may not be detected, e.g.
when starting the engine using the Start/Stop
button.
Only for the United Kingdom: if the vehicle
has been locked with the key from the outside,
the double lock function is activated as stand-
ard. It is then not possible to open the doors
from inside the vehicle. 78
KeyOpening and closing
Page 153 of 393
Important safety notes
G
WARNING
If the engine is switched off automatically and you exit the vehicle, the engine is restarted
automatically. The vehicle may begin moving. There is a risk of accident and injury.
If you wish to exit the vehicle, always turn off
the ignition and secure the vehicle against
rolling away.
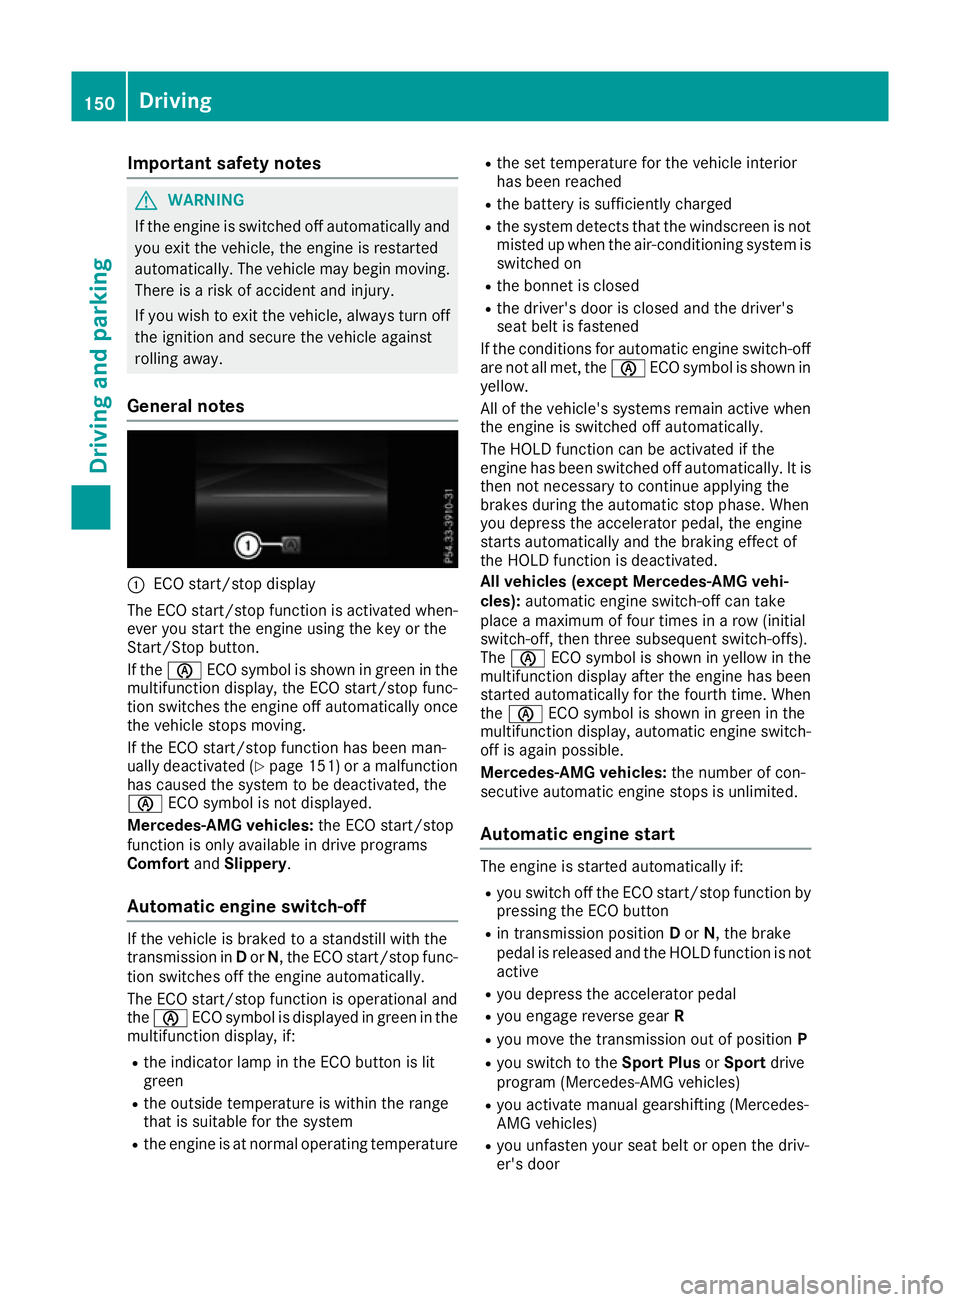
General notes :
ECO start/stop display
The ECO start/stop function is activated when-
ever you start the engine using the key or the
Start/Stop button.
If the è ECO symbol is shown in green in the
multifunction display, the ECO start/stop func-
tion switches the engine off automatically once
the vehicle stops moving.
If the ECO start/stop function has been man-
ually deactivated (Y page 151) or a malfunction
has caused the system to be deactivated, the
è ECO symbol is not displayed.
Mercedes-AMG vehicles: the ECO start/stop
function is only available in drive programs
Comfort andSlippery.
Automatic engine switch-off If the vehicle is braked to a standstill with the
transmission in Dor N, the ECO start/stop func-
tion switches off the engine automatically.
The ECO start/stop function is operational and
the è ECO symbol is displayed in green in the
multifunction display, if:
R the indicator lamp in the ECO button is lit
green
R the outside temperature is within the range
that is suitable for the system
R the engine is at normal operating temperature R
the set temperature for the vehicle interior
has been reached
R the battery is sufficiently charged
R the system detects that the windscreen is not
misted up when the air-conditioning system isswitched on
R the bonnet is closed
R the driver's door is closed and the driver's
seat belt is fastened
If the conditions for automatic engine switch-off are not all met, the èECO symbol is shown in
yellow.
All of the vehicle's systems remain active when the engine is switched off automatically.
The HOLD function can be activated if the
engine has been switched off automatically. It is
then not necessary to continue applying the
brakes during the automatic stop phase. When
you depress the accelerator pedal, the engine
starts automatically and the braking effect of
the HOLD function is deactivated.
All vehicles (except Mercedes-AMG vehi-
cles): automatic engine switch-off can take
place a maximum of four times in a row (initial
switch-off, then three subsequent switch-offs).
The è ECO symbol is shown in yellow in the
multifunction display after the engine has been
started automatically for the fourth time. When
the è ECO symbol is shown in green in the
multifunction display, automatic engine switch- off is again possible.
Mercedes-AMG vehicles: the number of con-
secutive automatic engine stops is unlimited.
Automatic engine start The engine is started automatically if:
R
you switch off the ECO start/stop function by
pressing the ECO button
R in transmission position Dor N, the brake
pedal is released and the HOLD function is not active
R you depress the accelerator pedal
R you engage reverse gear R
R you move the transmission out of position P
R you switch to the Sport PlusorSport drive
program (Mercedes-AMG vehicles)
R you activate manual gearshifting (Mercedes-
AMG vehicles)
R you unfasten your seat belt or open the driv-
er's door 150
DrivingDriving and pa
rking
Page 154 of 393
R
the vehicle starts to roll
R the brake system requires this
R the temperature in the vehicle interior devi-
ates from the set range
R the system detects moisture on the wind-
screen when the air-conditioning system is
switched on
R the battery's charge status is too low
Shifting the transmission to position Pdoes not
start the engine.
If you shift the transmission from Rto D, the
ECO start/stop function is available again once the è ECO symbol reappears in green in the
multifunction display.
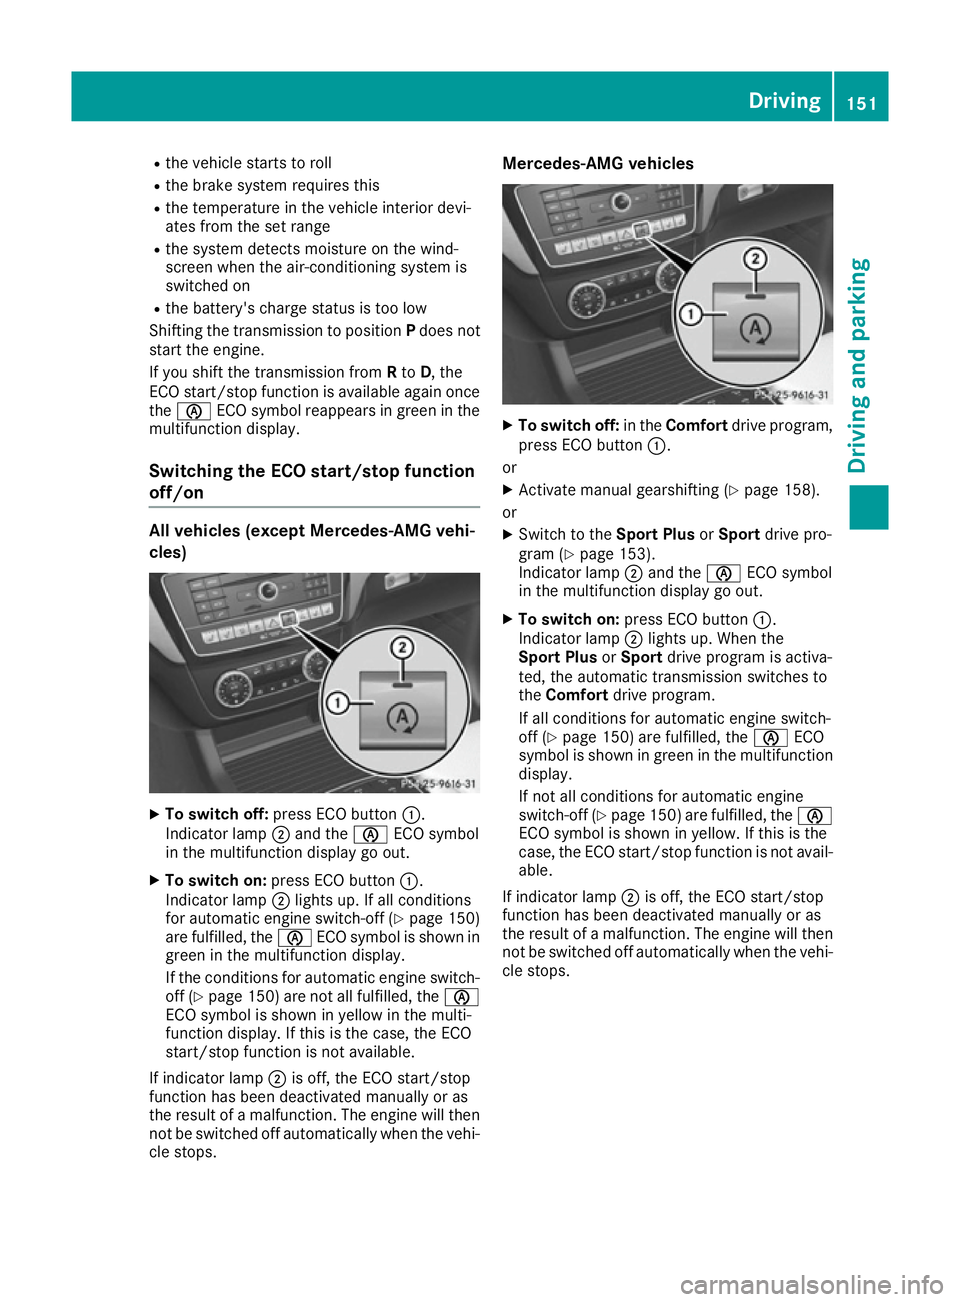
Switching the ECO start/stop function
off/on All vehicles (except Mercedes-AMG vehi-
cles) X
To switch off: press ECO button :.
Indicator lamp ;and the èECO symbol
in the multifunction display go out.
X To switch on: press ECO button :.
Indicator lamp ;lights up. If all conditions
for automatic engine switch-off (Y page 150)
are fulfilled, the èECO symbol is shown in
green in the multifunction display.
If the conditions for automatic engine switch-
off (Y page 150) are not all fulfilled, the è
ECO symbol is shown in yellow in the multi-
function display. If this is the case, the ECO
start/stop function is not available.
If indicator lamp ;is off, the ECO start/stop
function has been deactivated manually or as
the result of a malfunction. The engine will then
not be switched off automatically when the vehi-
cle stops. Mercedes-AMG vehicles
X
To switch off: in theComfort drive program,
press ECO button :.
or X Activate manual gearshifting (Y page 158).
or X Switch to the Sport PlusorSport drive pro-
gram (Y page 153).
Indicator lamp ;and the èECO symbol
in the multifunction display go out.
X To switch on: press ECO button :.
Indicator lamp ;lights up. When the
Sport Plus orSport drive program is activa-
ted, the automatic transmission switches to
the Comfort drive program.
If all conditions for automatic engine switch-
off (Y page 150) are fulfilled, the èECO
symbol is shown in green in the multifunction display.
If not all conditions for automatic engine
switch-off (Y page 150)are fulfilled, the è
ECO symbol is shown in yellow. If this is the
case, the ECO start/stop function is not avail- able.
If indicator lamp ;is off, the ECO start/stop
function has been deactivated manually or as
the result of a malfunction. The engine will then
not be switched off automatically when the vehi-
cle stops. Driving
151Driving and parking Z
Page 160 of 393
Kickdown
Use kickdown for maximum acceleration:
X Depress the accelerator pedal beyond the
pressure point.
The transmission shifts to a lower gear
depending on the engine speed.
X Ease off the accelerator pedal once the
desired speed is reached.
The automatic transmission shifts back up.
Gliding mode All vehicles (except Mercedes-AMG vehi-
cles)
Gliding mode is characterised by the following:
R the combustion engine is disconnected from
the drive train
R the engine speed is equal to the engine idling
speed
R the gear indicated after the transmission
position Ddisappears in the multifunction
display (Y page 154)
Gliding mode can be activated under the follow-
ing conditions:
R you select the "ECO" setting for the drive sys-
tem within the Individualdrive program. You
can find information about this in the Digital
Owner's Manual
R the speed is within a suitable range
R the type of road is suitable, e.g. no steep gra-
dients
R you are no longer depressing the accelerator
pedal
Gliding mode is deactivated under the following
conditions:
R you depress the accelerator pedal
R you depress the brake pedal
R you use the DIRECT SELECT lever to switch
the transmission position (Y page 154)
R you use the DYNAMIC SELECT controller to
change the drive program (Y page 153)
R you activate manual gearshifting
(Y page 158)
R you leave the suitable speed range Mercedes-AMG vehicles
Gliding mode is characterised by the following:
R the combustion engine is disconnected from
the drive train
R the engine speed is equal to the engine idling
speed
R in the multifunction display, the gliding sym-
bol appears in the drive program display
Gliding mode can be activated under the follow-
ing conditions:
R the Comfort drive program is activated or you
select the "Comfort" setting for the drive sys-
tem within the Individualdrive program. You
can find information about this in the Digital
Owner's Manual
R the ECO start/stop function is activated
R you are driving carefully with low acceleration
of the vehicle
R the engine is at normal operating temperature
R the speed is within a suitable range
R the type of road is suitable, e.g. no steep gra-
dients
R you are no longer depressing the accelerator
pedal
Gliding mode is deactivated under the following
conditions:
R you have deactivated the ECO start/stop
function
R you depress the accelerator pedal
R you depress the brake pedal
R you use the DIRECT SELECT lever to switch
the transmission position (Y page 154)
R you use the DYNAMIC SELECT controller to
change the drive program (Y page 153)
R you activate manual gearshifting
(Y page 158)
R you leave the suitable speed range
Towing a trailer X
Drive in the middle of the engine speed range
on uphill gradients.
X Depending on the uphill or downhill gradient,
use left-hand steering wheel gearshift paddle
(Y page 158) to select a lower gear, even if
cruise control, DISTRONIC PLUS, or SPEED-
TRONIC are activated. Automatic trans
mission
157Driving an d parking Z
Page 161 of 393
Drive programs
Slippery drive program The
Slippery drive program has the following
characteristics:
R reduced engine and transmission settings for
optimum propulsion on slippery or snow-cov-
ered roads.
R optimised ESP ®
stability control on slippery
or snow-covered roads.
R the vehicle has improved driving stability on
slippery or snow-covered roads, for example.
Comfort drive program The
Comfort drive program has the following
characteristics:
R comfort-orientated engine and transmission
settings.
R optimal fuel consumption resulting from the
automatic transmission shifting up sooner.
R the vehicle pulling away more gently in
forward and reverse gears unless the accel-
erator pedal is depressed fully.
R the automatic transmission shifting up
sooner. This results in the vehicle being driven
at lower engine speeds and the wheels being less likely to spin.
Sport drive program The
Sport drive program has the following char-
acteristics:
R sporty engine and transmission settings.
R the automatic transmission shifting up later.
As a result of the later automatic transmission
shift points, the fuel consumption possibly
being higher.
R the suspension exhibits sporty damping (vehi-
cles with AIRMATIC).
Sport Plus drive program The
Sport Plus drive program has the following
characteristics:
R the vehicle exhibits particularly sporty driving
characteristics.
R the vehicle pulling away in first gear.
R the automatic transmission shifting up later.
As a result of the later automatic transmission shift points, the fuel consumption possibly
being higher.
R the suspension exhibits particularly firm
springing and damping settings (vehicles with
AIRMATIC).
R the ECO start/stop function is deactivated, it
can, however, be activated again using the
ECO button (Y page 151).
Individual drive program In the
Individual drive program, the following
properties of the drive program can be selected:
R the drive (engine and transmission manage-
ment)
R the transmission
R the suspension
R all vehicles (except Mercedes-AMG vehicles):
the steering
R all vehicles (except Mercedes-AMG vehicles):
availability of the ECO start/stop function
To select the gears in the Individualdrive pro-
gram permanently using the steering wheel pad- dles, select the permanent manual gearshift
program.
Information about configuring the Individual
drive program with the multimedia system can
be found in the Digital Owner's Manual. Manual gearshifting
General notes You can change gear yourself using the steering
wheel gearshift paddles. The transmission must be in position D.
Depending on which gearshift paddle is pulled,
the automatic transmission immediately shifts
into the next gear up or down, if permitted.
To use manual shifting, you have two options:
R temporary setting
R permanent setting
If you activate manual gearshifting, the multi-
function display will show the current gear
instead of transmission position D.
If manual gearshifting is deactivated, the gears
will be selected automatically. 158
Automatic transmissionDriving and pa
rking
Page 172 of 393
X
Release the brake pedal.
X Release the electric parking brake.
X Switch off the ignition and leave the key in the
ignition lock.
i The engine can be switched off while the
vehicle is in motion by pressing and holding
the Start/Stop button for about three sec-
onds. This function operates independently of
the ECO start/stop automatic engine switch-
off function. Electric parking brake
General notes G
WARNING
If you leave children unattended in the vehi-
cle, they may be able to set the vehicle in
motion if, for example, they:
R release the parking brake
R shift the automatic transmission out of park
position P
R start the engine
In addition, they may operate vehicle equip-
ment and become trapped. There is a risk of
an accident and injury.
When leaving the vehicle, always take the key
with you and lock the vehicle. Never leave
children unattended in the vehicle.
The function of the electric parking brake is
dependent on the on-board voltage. If the on-
board voltage is low or if there is a malfunction
in the system, it may not be possible to apply the
released parking brake.
X If this is the case, only park the vehicle on
level ground and secure it to prevent it from
rolling away.
X Shift the automatic transmission to position
P.
It may not be possible to release an applied
parking brake if the on-board voltage is low or if there is a malfunction in the system. Contact a
qualified specialist workshop.
i The electric parking brake carries out a func-
tion check at regular intervals when the engine is switched off. Noises that occur are
normal.
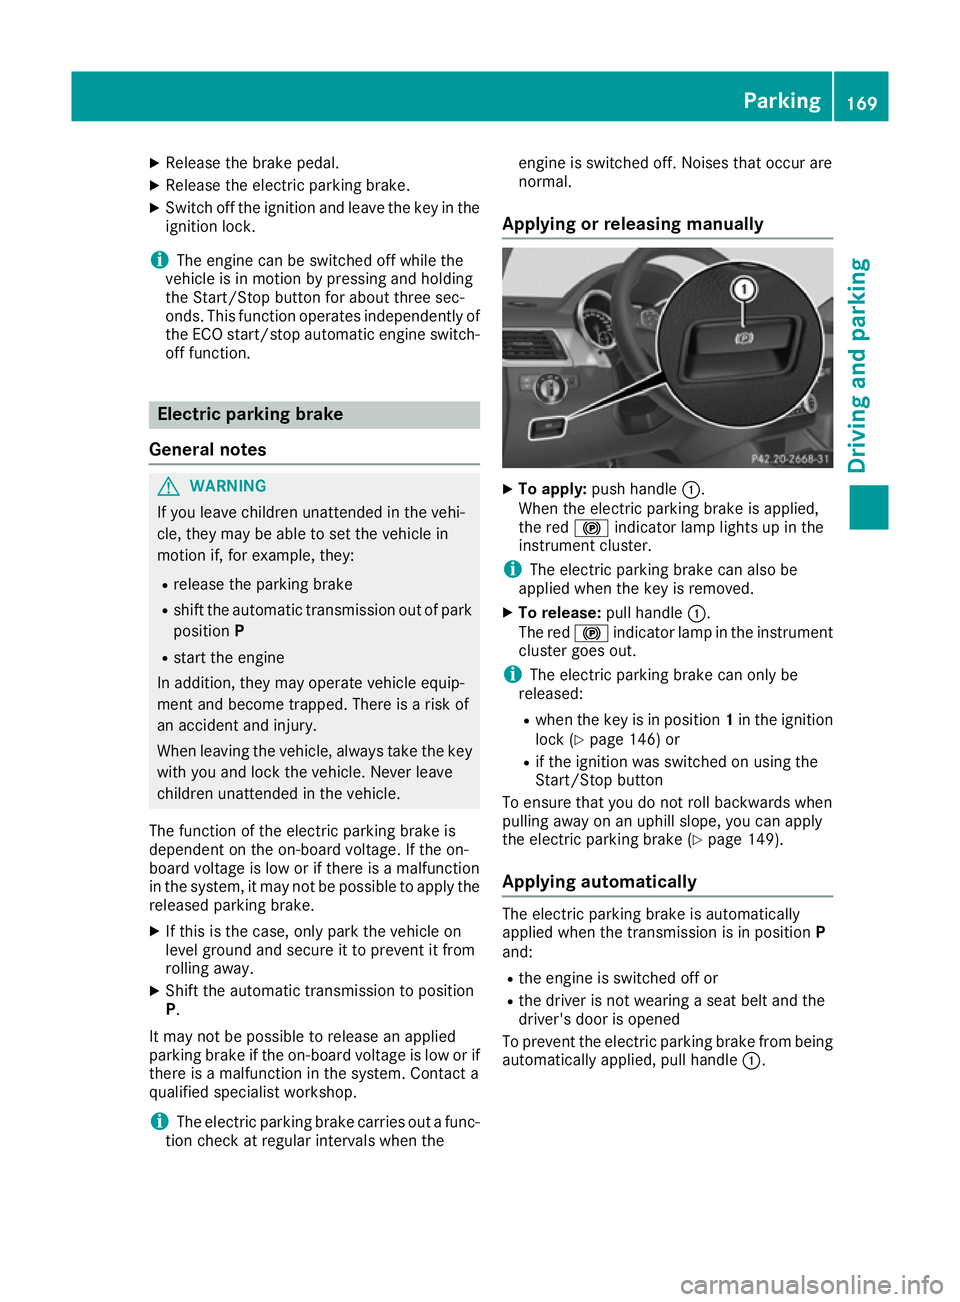
Applying or releasing manually X
To apply: push handle :.
When the electric parking brake is applied,
the red !indicator lamp lights up in the
instrument cluster.
i The electric parking brake can also be
applied when the key is removed.
X To release: pull handle:.
The red !indicator lamp in the instrument
cluster goes out.
i The electric parking brake can only be
released:
R when the key is in position 1in the ignition
lock (Y page 146) or
R if the ignition was switched on using the
Start/Stop button
To ensure that you do not roll backwards when
pulling away on an uphill slope, you can apply
the electric parking brake (Y page 149).
Applying automatically The electric parking brake is automatically
applied when the transmission is in position
P
and:
R the engine is switched off or
R the driver is not wearing a seat belt and the
driver's door is opened
To prevent the electric parking brake from being
automatically applied, pull handle :. Parking
169Driving and pa rking Z
Page 196 of 393
On steep uphill or downhill inclines or if there is
a malfunction, the transmission may also be
automatically shifted into position P.4MATIC
4MATIC ensures that all four wheels are perma-
nently driven. Together with ESP ®
and 4ETS, it
improves the traction of your vehicle whenever
a drive wheel spins due to insufficient grip.
If you fail to adapt your driving style, 4MATIC can
neither reduce the risk of an accident nor over-
ride the laws of physics. 4MATIC cannot take
account of road, weather and traffic conditions. 4MATIC is only an aid. You are responsible for
the distance to the vehicle in front, for vehicle
speed, for braking in good time and for staying in
lane.
! Never tow the vehicle with one axle raised.
This may damage the transfer case. Damage
of this sort is not covered by the Mercedes-
Benz implied warranty. All wheels must
remain either on the ground or be fully raised.
Observe the instructions for towing the vehi-
cle with all wheels in full contact with the
ground.
! A function or performance test should only
be carried out on a twin-axle dynamometer.
Before you operate the vehicle on such a
dynamometer, please consult a qualified
workshop. You could otherwise damage the
drive train or the brake system.
i In wintry driving conditions, the maximum
effect of 4MATIC can only be achieved if you
use winter tyres (M+S tyres), with snow
chains if necessary. DSR (Downhill Speed Regulation)
General notes DSR is an aid to assist you when driving down-
hill. It keeps the speed of travel at the speed
selected on the on-board computer. The steeper
the downhill gradient, the greater the DSR brak-
ing effect on the vehicle. When driving on flat
stretches of road or on an uphill gradient, the
DSR braking effect is minimal or non-existent.
DSR controls the vehicle’s speed when it is acti- vated and the transmission is in position D,Ror
N. By accelerating or braking, you can always drive at a higher or a lower speed than that set
on the on-board computer.
Important safety notes G
WARNING
If the speed driven and the set speed deviate and you activate DSR on a slippery road sur-
face, the wheels may lose traction. This
increases the risk of skidding and having an
accident.
Before switching DSR on, please take into
consideration the road surface and the differ-
ence between driving speed and the set
speed.
If you fail to adapt your driving style, DSR can
neither reduce the risk of accident nor override the laws of physics. DSR cannot take account ofroad, weather and traffic conditions. DSR is only
an aid. You are responsible for the distance to
the vehicle in front, for vehicle speed, for brak-
ing in good time and for staying in lane.
You are always responsible for keeping control
of the vehicle and for assessing whether the
downhill gradient can be managed. DSR may not
always be able to keep to the set speed, depend-
ing on road surface and tyre conditions. Select a set speed suitable for the prevailing conditions
and when necessary, apply the brakes manually.
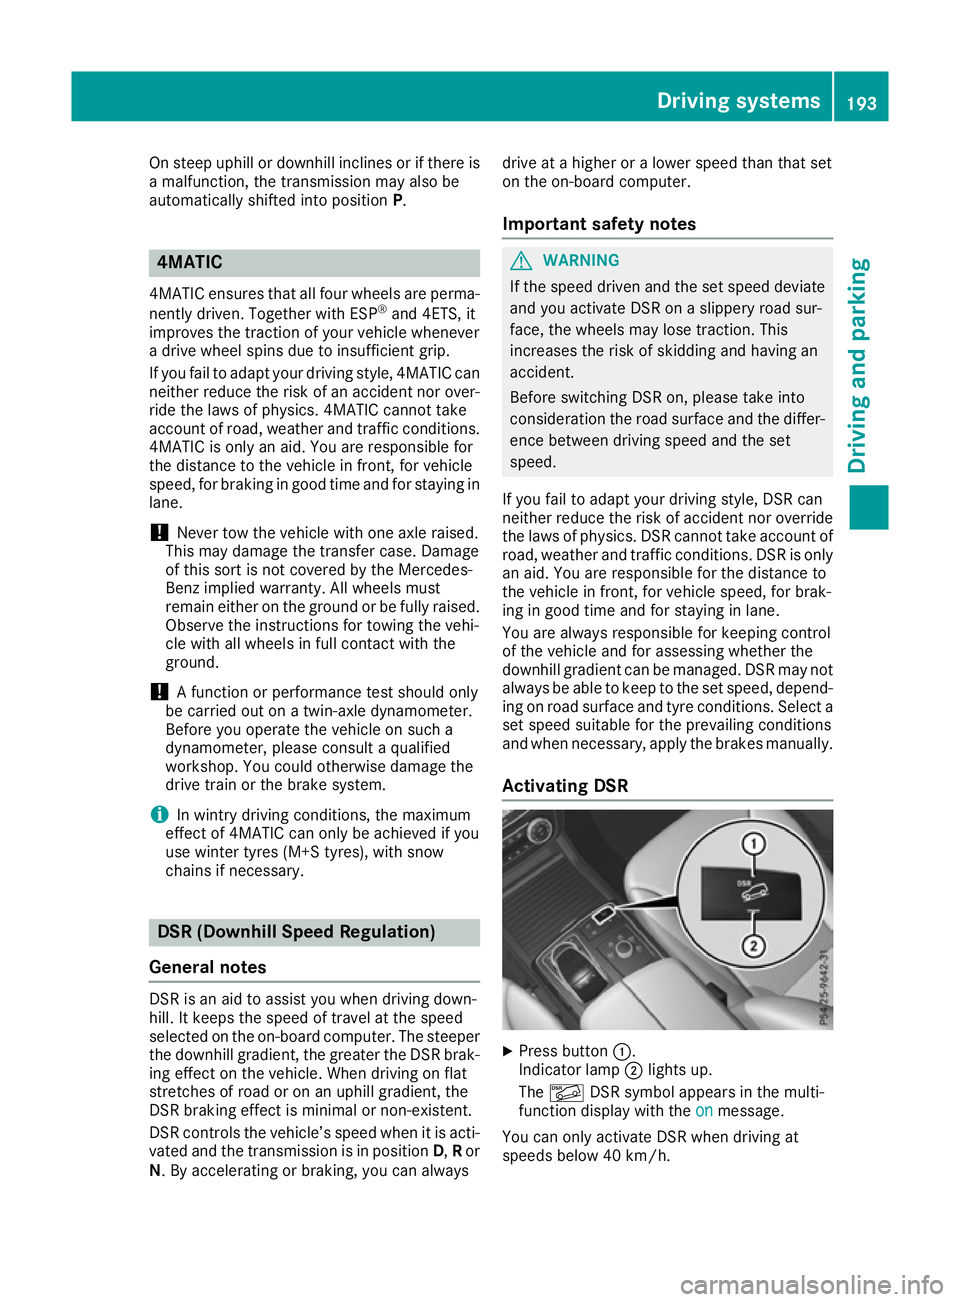
Activating DSR X
Press button :.
Indicator lamp ;lights up.
The à DSR symbol appears in the multi-
function display with the on onmessage.
You can only activate DSR when driving at
speeds below 40 km/h. Driving systems
193Driving and parking Z
Page 210 of 393
The emblem closes again when:
R you have finished the manoeuvring process
R you switch off the engine
R you open the boot
See the notes on cleaning (Y page 328).
For technical reasons, the emblem may
remain open briefly after the reversing cam-
era has been deactivated.
Activating/deactivating the reversing
camera X
To activate: make sure that the key is in
position 2in the ignition lock.
X Make sure that the Activation by R gear
Activation by R gear
function is selected in the multimedia system; see the Digital Owner's Manual.
X Engage reverse gear.
The reversing camera flap opens. The multi-
media system shows the area behind the vehi-
cle with guide lines.
The image from the reversing camera is avail-
able throughout the manoeuvring process.
X To switch the function mode for vehicles
with trailer tow hitch: using the controller,
select symbol :for the "Reverse parking"
function or symbol ;for "Coupling up a
trailer".
The symbol of the selected function is high-
lighted.
To deactivate: the reversing camera deacti-
vates if you shift the transmission to Por after
driving forwards a short distance. Displays in the multimedia system The reversing camera may show a distorted view
of obstacles or show them incorrectly or not at
all. Obstacles are not shown by the reversing
camera in the following locations:
R very close to the rear bumper
R under the rear bumper
R in the area immediately above the tailgate
handle
! Objects not at ground level may appear to
be further away than they actually are, e.g.:
R the bumper of a parked vehicle
R the drawbar of a trailer
R the ball coupling of a trailer tow hitch
R the rear section of an HGV
R a slanted post
Use the guidelines only for orientation.
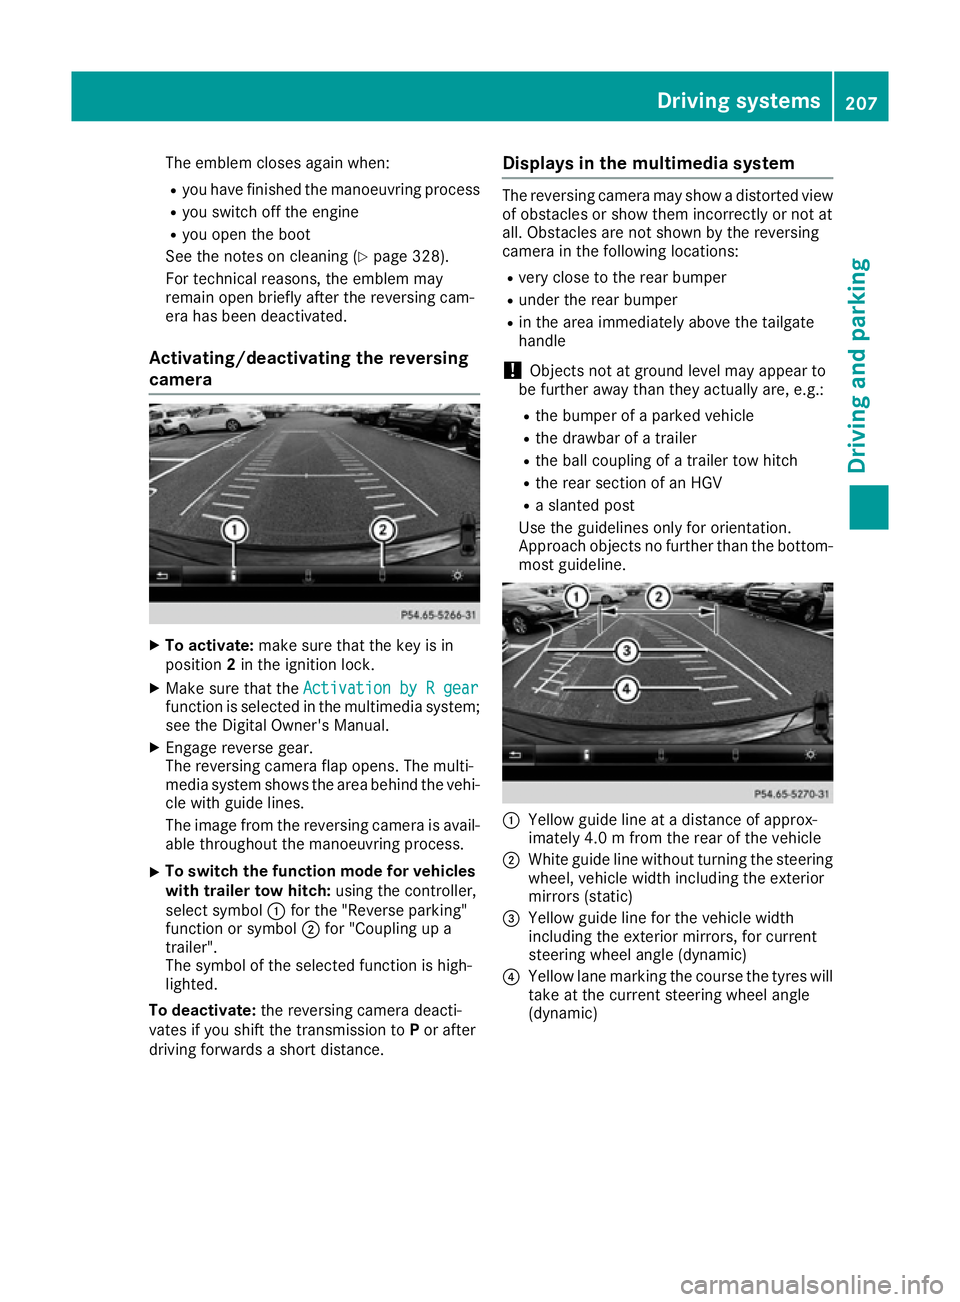
Approach objects no further than the bottom- most guideline. :
Yellow guide line at a distance of approx-
imately 4.0 m from the rear of the vehicle
; White guide line without turning the steering
wheel, vehicle width including the exterior
mirrors (static)
= Yellow guide line for the vehicle width
including the exterior mirrors, for current
steering wheel angle (dynamic)
? Yellow lane marking the course the tyres will
take at the current steering wheel angle
(dynamic) Driving systems
207Driving and parking Z