sensor MERCEDES-BENZ GLE COUPE 2017 C292 User Guide
[x] Cancel search | Manufacturer: MERCEDES-BENZ, Model Year: 2017, Model line: GLE COUPE, Model: MERCEDES-BENZ GLE COUPE 2017 C292Pages: 366, PDF Size: 8.61 MB
Page 66 of 366
In such cases, Adaptive Brake Assist can:
Rintervene unnecessarily
Rnot intervene
There is a risk of an accident.
Always pay careful attention to the traffic sit- uation and be ready to brake. Terminate the
intervention in a non-critical driving situation.
GWARNING
Adaptive Brake Assist does not react:
Rto people or animals
Rto oncoming vehicles
Rto crossing traffic
Rwhen cornering
As a result, the Adaptive Brake Assist may not
intervene in all critical conditions. There is a
risk of an accident.
Always pay careful attention to the traffic sit- uation and be ready to brake.
Due to the nature of the system, particularly
complicated but non-critical driving conditions
may also cause Brake Assist to intervene.
If adaptive Brake Assist is not available due to a
malfunction in the radar sensor system, the
brake system remains available with full brake
boosting effect and BAS.
ESP®(Electronic Stability Program)
General notes
iObserve the "Important safety notes" sec-
tion (Ypage 60).
ESP
®monitors driving stability and traction, i.e.
power transmission between the tires and the
road surface.
If ESP
®detects that the vehicle is deviating from
the direction desired by the driver, one or more
wheels are braked to stabilize the vehicle. The
engine output is also modified to keep the vehi-
cle on the desired course within physical limits.
ESP
®assists the driver when pulling away on
wet or slippery roads. ESP®can also stabilize
the vehicle during braking.
4ETS (Electronic Traction System)
4ETS traction control is part of ESP®.
Traction control brakes the drive wheels indi-
vidually if they spin. This enables you to pull
away and accelerate on slippery surfaces, for
example if the road surface is slippery on one
side. In addition, more drive torque is transfer-
red to the wheel or wheels with traction.
Traction control remains active, even if you
deactivate ESP
®.
Important safety notes
GWARNING
If ESP
®is malfunctioning, ESP®is unable to
stabilize the vehicle. Additionally, further driv-
ing safety systems are deactivated. This
increases the risk of skidding and an accident.
Drive on carefully. Have ESP
®checked at a
qualified specialist workshop.
!Only operate the vehicle for a maximum of
ten seconds on a brake test dynamometer.
Switch off the ignition.
Application of the brakes by ESP
®may oth-
erwise destroy the brake system.
!A function or performance test should only
be carried out on a two-axle dynamometer.
Before you operate the vehicle on such a
dynamometer, please consult a qualified
workshop. You could otherwise damage the
drive train or the brake system.
!Do not tow vehicles with 4MATIC with the
front or rear axle raised.
ESP
®is only deactivated if the åwarning
lamp is lit continuously.
If the ÷ warning lamp and the åwarning
lamp are lit continuously, ESP
®is not available
due to a malfunction.
Observe the information on warning lamps
(
Ypage 255) and display messages which may
be shown in the instrument cluster
(
Ypage 222).
iOnly use wheels with the recommended tire
sizes. Only then will ESP®function properly.
64Driving safety systems
Safety
Page 69 of 366
ADAPTIVE BRAKE
ADAPTIVEBRAKE enhance sbraking safet yand
offers increased braking comfort .In addition to
th ebraking function ,ADAPTIV EBRAKE also has
th eHOLD function (
Ypage 167) and hill start
assist (Ypage 128).
Active Brake Assist with cross-traffic
function
Gene ral inform ation
iPay attention to th eimportant safet ynote s
in th e"Drivin gsafet ysystems "section
(
Ypage 60) .
Active Brake Assis twit hcross-traffic function
can help you to minimiz eth eris kof acollision
wit h a vehicl ein fron tor apedestrian and reduce
th eeffects of suc h acollision .If th eActive Brake
Assis twit hcross-traffic function detects aris k
of collision ,you will be warned visually and
acoustically and ,if necessary, your brak eappli-
cation will be assisted according to th esitua-
tion .If you do no treact, th esystem can also
reac tby braking automatically. In th eevent of a
detecte dris kof collision due to crossing traffic,
you will also be visually and acoustically warned
as well as assisted by th ebrak eboosting effec t
according to th esituation .
Active Brake Assis twit hcross-traffic function is
only available in vehicles wit hth eDrivin gAssis -
tance Plus package.
Fo rActive Brake Assis twit hcross-traffic func-
tion to assist you when driving, th eradar sensor
system and th ecamera system mus tbe opera-
tional.
If th eradar sensor system or th ecamera system
is malfunctioning ,Active Brake Assis twit h
cross-traffic function is restr icte
d or no longer
available. The brak esystem is still available wit h
complete brak eboosting effec tand BAS.
The radar sensor system and camera system
help Active Brake Assis twit hcross-traffic func-
tion to detec tobstacles that are in th epat hof
your vehicl efor an extended period of time.
In addition ,pedestrian sin th epat hof your vehi-
cle can be detected.
Active Brake Assis twit hcross-traffic function
detects pedestrian susin gtypical characteris -
tics suc has body contours and th epostur eof a
person standing upright .
iObserveth erestriction sdescribed in th e
"Importan tsafet ynotes" section
(
Ypage 67).
Import ant safety notes
GWARNIN G
Active Brake Assis twit hcross-traffic function
will initially brak eyour vehicl eby apartial
application of th ebrakes if adanger of colli-
sion is detected. There may be acollision
unless you brak eyourself .Even after subse-
quen tfull application of th ebrakes acollision
canno talways be avoided, particularly when
approachin gat to ohigh aspeed. There is a
ris kof an accident.
Always apply th ebrakes yourself and tr yto
tak eevasive action ,provided it is saf eto do
so.
In th eevent of apartial application of th ebrakes,
th evehicl eis braked wit hup to 50 %of th efull
braking pressure.
GWARNIN G
Active Brake Assis twit hcross-traffic function
canno talways clearly identify objects and
comple xtraffic situations.
In suc hcases, Active Brake Assis twit hcross -
traffic function might :
Rissue an unnecessary warning or engage
Rneither give awarning no rinterven e
There is aris kof an accident.
Always pay particular attention to th etraffic
situation and be prepare dto brake, especially
if Active Brake Assis twit hcross-traffic func-
tion alerts you. Terminate th eintervention in a
non-critical drivin gsituation .
GWARNIN G
Active Brake Assis twit hcross-traffic function
canno talways clearly identify people, partic-
ularl yif they are moving .Active Brake Assis t
wit hcross-traffic function canno tinterven ein
these cases. There is aris kof an accident.
Always pay particular attention to th etraffic
situation and be prepare dto brake, especially
Driving safety systems67
Safety
Z
Page 70 of 366
if Active Brake Assist with cross-traffic func-
tion alerts you.
In order to maintain the appropriate distance to
the vehicle in front and thus prevent a collision,
you must apply the brakes yourself.
GWARNING
Active Brake Assist with cross-traffic function does not react:
Rto small people, e.g. children
Rto animals
Rto oncoming vehicles
Rwhen cornering
As a result, Active Brake Assist with cross-
traffic function may not warn you or engage in
all critical situations. There is a risk of an acci-
dent.
Always pay careful attention to the traffic sit- uation and be ready to brake.
In the event of snowfall or heavy rain, the rec-
ognition can be impaired.
Recognition by the radar sensor system is also
impaired if:
Rthere is dirt on the sensors or anything else
covering the sensors
Rthere is interference by other radar sources
Rthere are strong radar reflections, for exam-
ple in parking garages
Ra narrow vehicle is traveling in front, e.g. a
motorbike
Ra vehicle is traveling in front on a different line relative to the center of your vehicle
Rvehicles quickly move into the radar sensor
system detection range
Recognition by the camera system is also
impaired in the event of:
Rdirt on the camera or if the camera is covered
Rglare on the camera system, e.g. from the sun being low in the sky
Rdarkness
Ror if:
-pedestrians move quickly, e.g. into the path
of the vehicle
-the camera system no longer recognizes a
pedestrian as a person due to special cloth-ing or other objects
-a pedestrian is concealed by other objects
-the typical outline of a person is not distin-
guishable from the background
Following damage to the front end of the vehic le,
have t
he configuration and operation of the
radar sensors checked at a qualified specialist
workshop. This also applies to collisions at slow
speeds where there is no visible damage to the
front of the vehicle.
Following damage to the windshield, have the
configuration and operation of the camera sys-
tem checked at a qualified specialist workshop.
Function
XTo activate or deactivate: activate or deac-
tivate Active Brake Assist with cross-traffic
function using the on-board computer
(
Ypage 214).
If the Active Brake Assist with cross-traffic
function is deactivated, the æsymbol
appears in the multifunction display.
If you have activated DSR (
Ypage 168), the
Active Brake Assist with cross-traffic function is
deactivated.
Starting at a speed of around 4 mph (7 km/h),
this function warns you if you rapidly approach a
vehicle in front. An intermittent warning tone
will then sound and the ·distance warning
lamp will light up in the instrument cluster.
XBrake immediately to defuse the situation.
or
XTake evasive action provided it is safe to do
so.
Active Brake Assist with cross-traffic function
can also brake the vehicle automatically under
the following conditions:
Rthe driver and front-passenger have their seat
belts fastened
and
Rthe vehicle speed is between approximately
4 mph (7 km/h) and 124 mph (200 km/h)
68Driving safety systems
Safety
Page 71 of 366
Up to a speed of approximately 44 mph
(70 km/h), Active Brake Assist with cross-traffic
function may react to:
Rstationary objects in the path of your vehicle,
e.g. stopped or parked vehicles
Rpedestrians in the path of your vehicle
iIf there is an increased risk of a collision,
preventive passenger protection measures
(PRE-SAFE
®) are triggered (Ypage 53).
If the risk of collision with the vehicle in front
remains and you do not brake, take evasive
action or accelerate significantly, the vehicle
may perform automatic emergency braking, up
to the point of full brake application. Automatic
emergency braking is not performed until imme-
diately prior to an imminent accident.
If you apply the brake yourself in a critical sit-
uation or during autonomous braking, braking
assistance is provided according to the situa-
tion. If necessary, this increases the brake pres-
sure up to full brake application.
To avoid a collision, Active Brake Assist with
cross-traffic function calculates the brake force
necessary if:
Ryou approach an obstacle, and
RActive Brake Assist with cross-traffic function
has detected a risk of a collision
When driving at a speed
under20 mph(30 km/h): if you depress the
brake pedal, Active Brake Assist with cross-traf-
fic function is activated. The increase in brake
pressure from Active Brake Assist with cross-
traffic function is carried out at the last possible
moment.
When driving at a speed
above20 mph(30 km/h): if you depress the
brake pedal sharply, Active Brake Assist with
cross-traffic function automatically increases
the brake pressure to a degree suited to the
traffic situation.
Active Brake Assist with cross-traffic function
provides braking assistance in hazardous situa- tions with vehicles in front within a speed range
between 4 mph (7 km/h) and 155 mph
(250 km/h). Up to a speed of approximately 44 mph
(70 km/h) the Active Brake Assist with cross-
traffic function assists you with braking in haz-
ardous situations with:
Rstationary obstacles in the path of the vehicle,
e.g. stopped or parked vehicles
Rstationary pedestrians in the path of the vehi-
cle
Robstacles crossing your path that move in the
detection range of the sensors and are detec-
ted
XKeep the brake pedal depressed until the
emergency
braking situation is over.
ABS prevents the wheels from locking.
You can prevent the intervent
ion of Active Brake
Assist with cross-traffic function at any time by:
Rdepressing the accelerator pedal further
Ractivating kickdown
Rreleasing the brake pedal
The braking application of Active Brake Assist
with cross-traffic function is ended automati-
cally if:
Ryou maneuver to avoid the obstacle
Rthere is no longer a risk of collision
Rthere is no longer an obstacle detected in
front of your vehicle
STEER CONTROL
General information
STEER CONTROL helps you by transmitting a
noticeable steering force to the steering wheel
in the direction required for vehicle stabilization.
This steering assistance is provided in particular
if:
Rboth right wheels or both left wheels are on a wet or slippery road surface when you brake
Rthe vehicle starts to skid
Important safety notes
iObserve the "Important safety notes" sec-
tion (Ypage 60).
Driving safety systems69
Safety
Z
Page 74 of 366
If activated in the multimedia system, the loca-
tor lighting also lights up in the dark (see sepa-
rate operating instructions).
XTo open the tailgate automatically from
outside the vehicle:press and hold theF
button until the tailgate opens.
Vehicles with KEYLESS-GO:
XTo close the tailgate automatically from
outside the vehicle: if the SmartKey is loca-
ted in the immediate vicinity of the vehicle,
press the Fbutton on the SmartKey.
When the tailgate closes you can then release
the button.
KEYLESS-GO
General notes
Bear in mind that the engine can be started by
any of the vehicle occupants if there is a KEY-
LESS-GO key in the vehicle (
Ypage 127).
Locking/unlocking centrally
You can start, lock or unlock the vehicle using
KEYLESS-GO. To do this, you only need carry the
SmartKey with you. You can combine the func-
tions of KEYLESS-GO with those of a conven-
tional SmartKey. Unlock the vehicle by using
KEYLESS-GO, for instance, and lock it using the
& button on the SmartKey.
The driver's door and the door at which the han-
dle is used, must both be closed. The SmartKey
must be outside the vehicle. When locking or
unlocking with KEYLESS-GO, the distance
between the SmartKey and the corresponding
door handle must not be greater than 3 ft (1 m).
KEYLESS-GO checks whether a valid SmartKey
is in the vehicle by periodically establishing a
radio connection between the vehicle and the
SmartKey. This happens:
Rwhen starting the engine
Rwhile driving
Rwhen the external door handles are touched
Rduring convenience closing
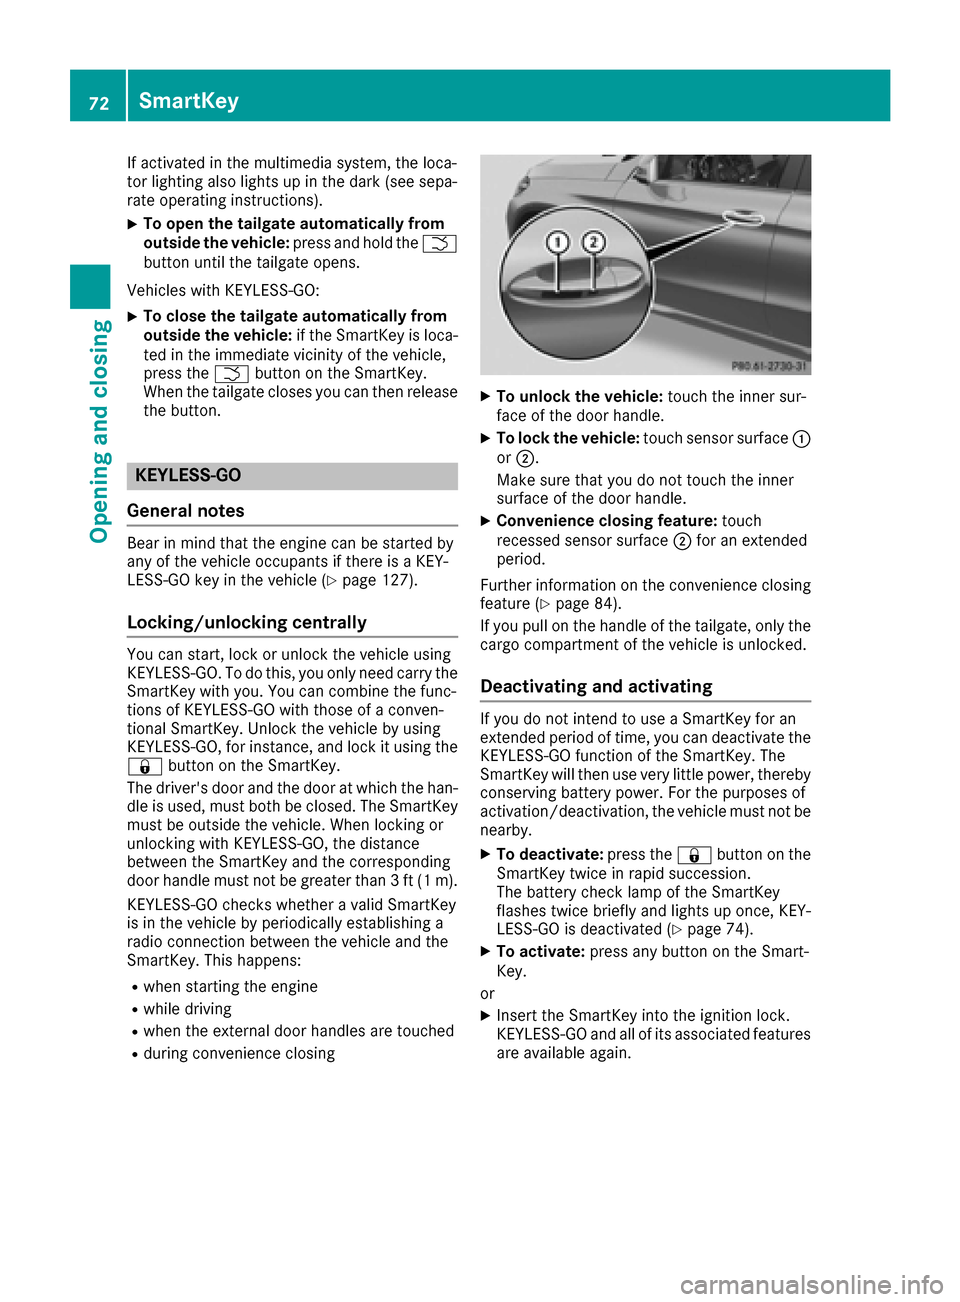
XTo unlock the vehicle: touch the inner sur-
face of the door handle.
XTo lock the vehicle: touch sensor surface :
or ;.
Make sure that you do not touch the inner
surface of the door handle.
XConvenience closing feature: touch
recessed sensor surface ;for an extended
period.
Further information on the convenience closing
feature (
Ypage 84).
If you pull on the handle of the tailgate, only the cargo compartment of the vehicle is unlocked.
Deactivating and activating
If you do not intend to use a SmartKey for an
extended period of time, you can deactivate the
KEYLESS-GO function of the SmartKey. The
SmartKey will then use very little power, thereby
conserving battery power. For the purposes of
activation/deactivation, the vehicle must not be
nearby.
XTo deactivate: press the&button on the
SmartKey twice in rapid succession.
The battery check lamp of the SmartKey
flashes twice briefly and lights up once, KEY-
LESS-GO is deactivated (
Ypage 74).
XTo activate: press any button on the Smart-
Key.
or
XInsert the SmartKey into the ignition lock.
KEYLESS-GO and all of its associated features
are available again.
72SmartKey
Opening and closing
Page 75 of 366
KEYLESS-GOstart function
Gene ral notes
Bear in min dthat th eengin ecan be started by
any of th evehicl eoccupant sif there is aSmart -
Key in th evehicl e (
Ypage 127).
Changing the settings ofthe locking
system
You can chang eth esetting sof th elocking sys-
tem. This mean sthat only th edriver's door and
th efuel filler flap are unlocke dwhen th evehicl e
is unlocked. This is useful if you frequentl ytravel
alone.
XTo change th esetting: press and hold down
th e% and& buttons simultaneousl y
for about six seconds until th ebattery indica-
to rlamp flashes twice (
Ypage 74).
If th esetting of th elocking system is changed
within th esignal range of th evehicle, pressing
th e& or% button:
Rlocks or
Runlocks th evehicl e
The SmartKey no wfunction sas follows :
XTo unlock: press the% buttononce .
XTo unlock centrally: press the% button
twice .
XTo lock centrally: press the& button.
The KEYLESS-GO function is changed as fol -
lows :
XTo unlock th edriver's door :touch th einner
surfac eof th edoor handle on th edriver's
door .
XTo unlock centrally: touch theinner surfac e
of th edoor handle on th efront-passenger
door or th erear door .
XTo lock centrally: touch theouter sensor
surfac eon on eof th edoor handles
(
Ypage 72) .
XTo restor eth efactory settings: press and
hold down th e% and& buttons simul-
taneously for approximately six seconds until
th ebattery chec klamp flashes twice
(
Ypage 74) .
Mechanical key
Gene ral notes
If th evehicl ecan no longer be locke dor
unlocke dwit hth eSmartKey or wit hKEYLESS -
GO, use th emechanical key.
If you use th emechanical ke yto unloc kand
open th edriver's door ,th eanti-thef talarm sys-
te m will be triggered .Switc hoff th ealarm
(
Ypage 70) .
If you unloc kth evehicl eusin gth emechanical
key, th efuel filler flap will no tbe unlocke dauto -
matically.
XTo unlock th efuel filler flap: insert the
SmartKey int oth eignition lock.
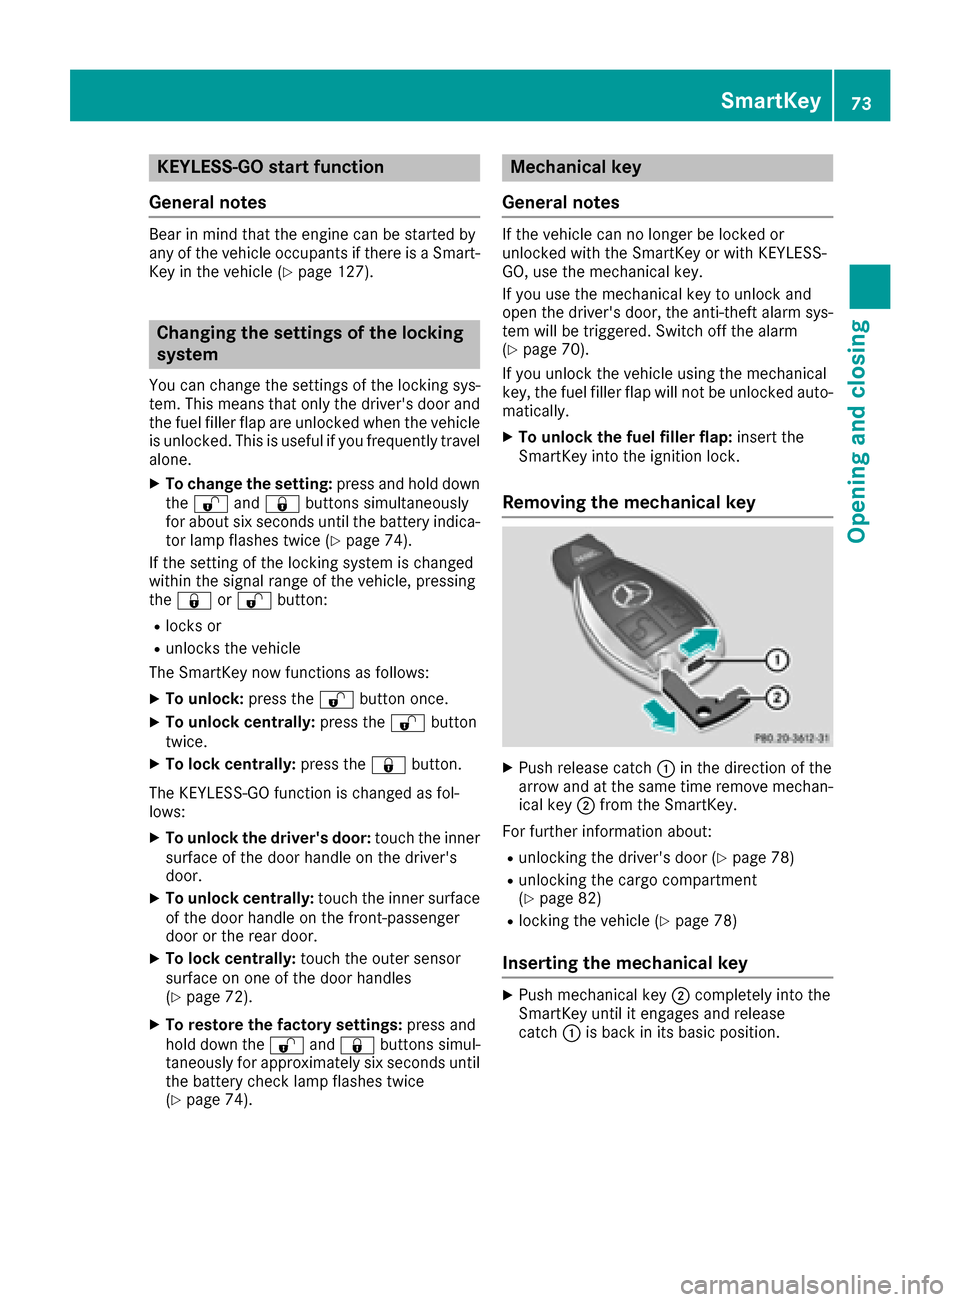
Removing the mechanical key
XPush release catch :in th edirection of th e
arrow and at th esam etime remove mechan -
ical ke y; from th eSmartKey.
Fo rfurther information about :
Runlocking thedriver's door (Ypage 78)
Runlocking thecargo compartmen t
(Ypage 82)
Rlocking th evehicl e (Ypage 78)
Inserting the mechanical key
XPush mechanical ke y; completely int oth e
SmartKey until it engage sand release
catch :is bac kin it sbasic position .
SmartKey73
Opening and closing
Z
Page 86 of 366
XTurn the SmartKey to position1or 2in the
ignition lock.
XTo open manually: press and hold the cor-
responding switch.
XTo open fully: press the switch beyond the
point of resistance and release it.
Automatic operation is started.
XTo close manually: pull the corresponding
switch and hold it.
XTo close fully: pull the switch beyond the
point of resistance and release it.
Automatic operation is started.
XTo interrupt automatic operation: press/
pull the corresponding switch again.
If you press the switch beyond the point of
resistance and release, automatic operation is
started in the corresponding direction. You can
stop automatic operation by pressing/pulling
the switch again.
You can continue to operate the side windows
after you switch off the engine or remove the
SmartKey. This function is available for up to five
minutes or until the driver's or front-passenger
door is opened.
The side windows cannot be operated from the
rear when the override feature for the side win-
dows is activated (
Ypage 60).
Convenience opening
General notes
Vehicles with KEYLESS-GO or KEYLESS-GO
start function: you can ventilate the vehicle
before you start driving.
To do this, the SmartKey is used to carry out the following functions simultaneously:
Runlock the vehicle
Ropen the side windows
Ropen the panorama roof with power tilt/slid-
ing panel and the roller sunblind
Rswitch on the seat ventilation for the driver's
seat
The convenience opening feature can only be
operated using the SmartKey. The SmartKey
must be close to the vehicle. For vehicles with-
out KEYLESS-GO, the SmartKey must be near
the driver's door handle.
The "convenience opening" feature is also avail-
able when the vehicle is unlocked.
Convenience opening
XVehicles without KEYLESS-GO: point the tip
of the SmartKey at the door handle on the
driver's door.
XPress and hold the %button until the side
windows and the panorama roof with power
tilt/sliding panel are in the desired position.
If the roller sunblind of the panorama roof
with power tilt/sliding panel is closed, the
roller sunblind is opened first.
XPress and hold the %button again until the
panorama roof with power tilt/sliding panel is
in the desired position.
XTo interrupt convenience opening: release
the % button.
Convenience closing feature
Important safety notes
GWARNING
When the convenience closing feature is oper- ating, parts of the body could become trapped
in the closing area of the side window and the
sliding sunroof. There is a risk of injury.
Observe the complete closing procedure
when the convenience closing feature is oper-
ating. Make sure that no body parts are in
close proximity during the closing procedure.
When you lock the vehicle, you can simultane-
ously:
Rclose the side windows
Rclose the panorama roof with power tilt/slid-
ing panel
On vehicles with a panorama roof with power
tilt/sliding panel, you can then close the roller
sunblind.
Proceed as follows if someone is trapped:
RRelease the &button to interrupt the clos-
ing procedure.
RPress and hold the %button to open.
Vehicles with KEYLESS-GO:
RRelease the sensor surfaces on the exterior
door handle to interrupt the closing proce-
dure.
RTo open, pull the same door handle immedi-
ately and hold it firmly. The door windows and
84Side windows
Opening and closing
Page 87 of 366
the sliding sunroof will open for as long as the
door handle is held but the door is not
opened.
Notes on the automatic reversing feature for:
Rthe side window (Ypage 83)
Rthe panorama roof with power tilt/sliding
panel (Ypage 87)
Using the SmartKey
The SmartKey must be close to the vehicle. For
vehicles without KEYLESS-GO, the SmartKey
must be near the driver's door handle.
XVehicles without KEYLESS-GO: point the tip
of the SmartKey at the door handle on the
driver's door.
XPress and hold the &button until the side
windows and the panorama roof with power
tilt/sliding panel are fully closed.
XMake sure that all the side windows and the
panorama roof with power tilt/sliding panel
are closed.
On vehicles with a panorama roof with power
tilt/sliding panel:
XPress and hold the &button again until the
roller sunblind of the panorama roof with
power tilt/sliding panel closes.
XTo interrupt convenience closing: release
the & button.
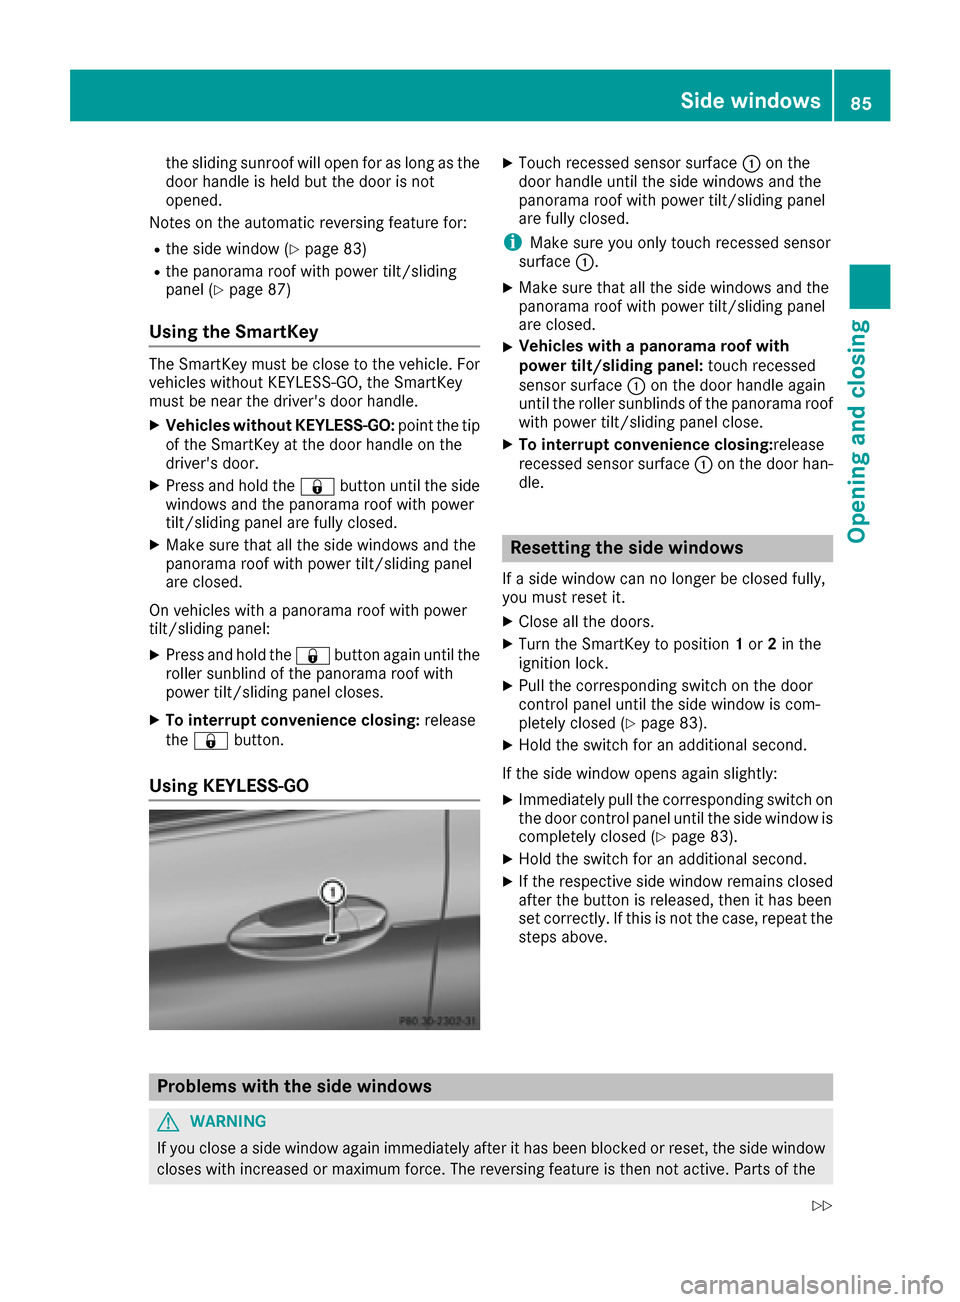
Using KEYLESS-GO
XTouch recessed sensor surface :on the
door handle until the side windows and the
panorama roof with power tilt/sliding panel
are fully closed.
iMake sure you only touch recessed sensor
surface :.
XMake sure that all the side windows and the
panorama roof with power tilt/sliding panel
are closed.
XVehicles with a panorama roof with
power tilt/sliding panel: touch recessed
sensor surface :on the door handle again
until the roller sunblinds of the panorama roof
with power tilt/sliding panel close.
XTo interrupt convenience closing: release
recessed sensor surface :on the door han-
dle.
Resetting the side windows
If a side window can no longer be closed fully,
you must reset it.
XClose all the doors.
XTurn the SmartKey to position 1or 2in the
ignition lock.
XPull the corresponding switch on the door
control panel until the side window is com-
pletely closed (
Ypage 83).
XHold the switch for an additional second.
If the side window opens again slightly:
XImmediately pull the corresponding switch on
the door control panel until the side window is
completely closed (
Ypage 83).
XHold the switch for an additional second.
XIf the respective side window remains closed
after the button is released, then it has been
set correctly. If this is not the case, repeat the
steps above.
Problems with the side windows
GWARNING
If you close a side window again immediately after it has been blocked or reset, the side window
closes with increased or maximum force. The reversing feature is then not active. Parts of the
Side windows85
Openin gan d closing
Z
Page 106 of 366
Exterior lighting
General notes
For reasons of safety, Mercedes-Benz recom-
mends that you drive with the lights switched on
even during the daytime. In some countries,
operation of the headlamps varies due to legal
requirements and self-imposed obligations.
Setting the exterior lighting
Setting options
Exterior lighting can be set using:
Rthe light switch
Rthe combination switch (Ypage 105)
Rthe on-board computer (Ypage 216)
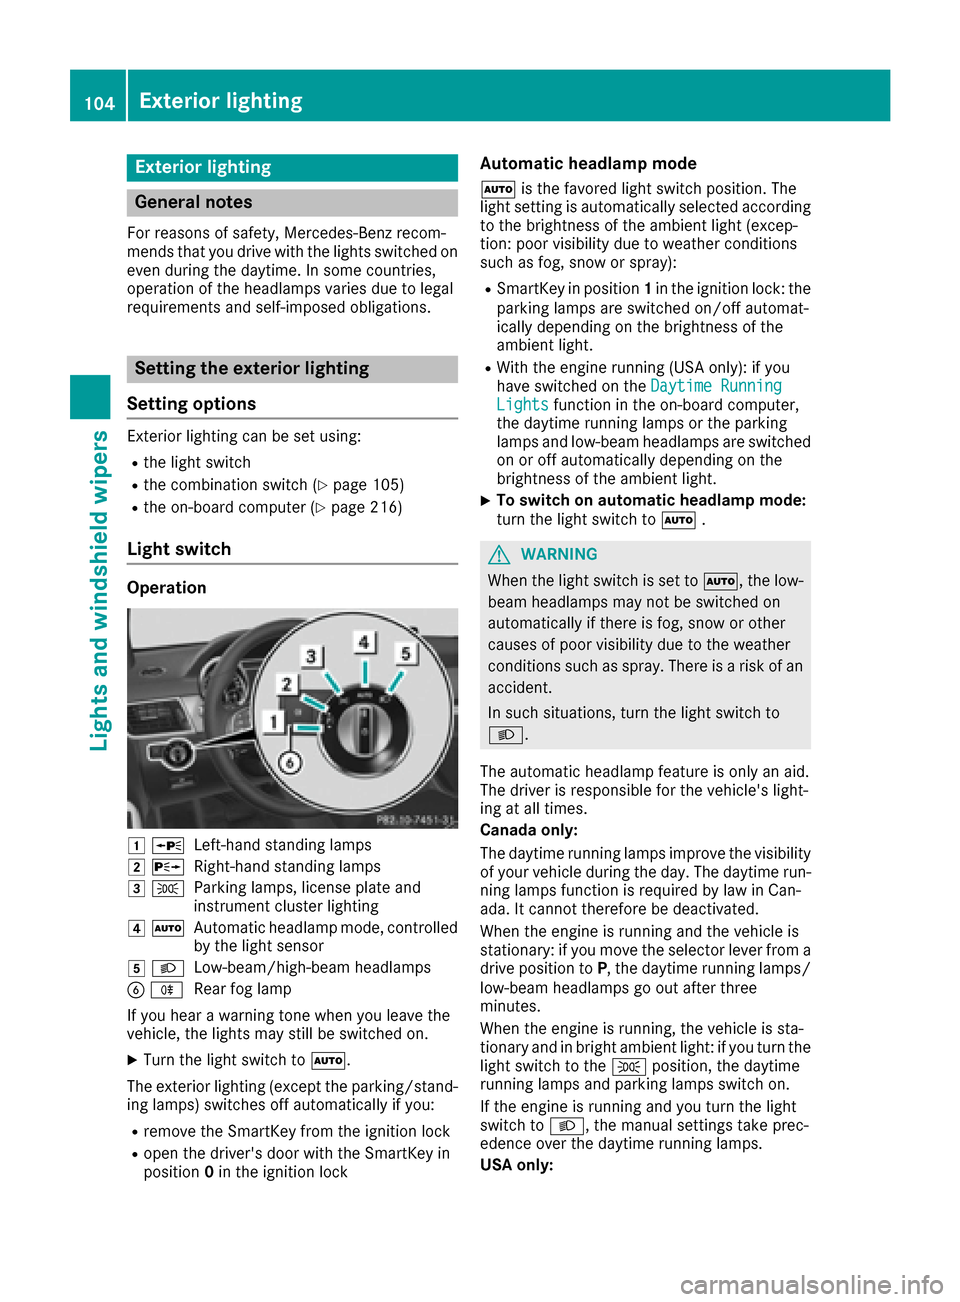
Light switch
Operation
1 WLeft-hand standing lamps
2XRight-hand standing lamps
3TParking lamps, license plate and
instrument cluster lighting
4ÃAutomatic headlamp mode, controlled
by the light sensor
5 LLow-beam/high-beam headlamps
BRRear fog lamp
If you hear a warning tone when you leave the
vehicle, the lights may still be switched on.
XTurn the light switch to Ã.
The exterior lighting (except the parking/stand-
ing lamps) switches off automatically if you:
Rremove the SmartKey from the ignition lock
Ropen the driver's door with the SmartKey in
position 0in the ignition lock
Automatic headlamp mode
à is the favored light switch position. The
light setting is automatically selected according
to the brightness of the ambient light (excep-
tion: poor visibility due to weather conditions
such as fog, snow or spray):
RSmartKey in position 1in the ignition lock: the
parking lamps are switched on/off automat-
ically depending on the brightness of the
ambient light.
RWith the engine running (USA only): if you
have switched on the Daytime Running
Lightsfunction in the on-board computer,
the daytime running lamps or the parking
lamps and low-beam headlamps are switched
on or off automatically depending on the
brightness of the ambient light.
XTo switch on automatic headlamp mode:
turn the light switch to Ã.
GWARNING
When the light switch is set to Ã, the low-
beam headlamps may not be switched on
automatically if there is fog, snow or other
causes of poor visibility due to the weather
conditions such as spray. There is a risk of an
accident.
In such situations, turn the light switch to
L.
The automatic headlamp feature is only an aid.
The driver is responsible for the vehicle's light-
ing at all times.
Canada only:
The daytime running lamps improve the visibility
of your vehicle during the day. The daytime run-
ning lamps function is required by law in Can-
ada. It cannot therefore be deactivated.
When the engine is running and the vehicle is
stationary: if you move the selector lever from a
drive position to P, the daytime running lamps/
low-beam headlamps go out after three
minutes.
When the engine is running, the vehicle is sta-
tionary and in bright ambient light: if you turn the
light switch to the Tposition, the daytime
running lamps and parking lamps switch on.
If the engine is running and you turn the light
switch to L, the manual settings take prec-
edence over the daytime running lamps.
USA only:
104Exterior lighting
Lights and windshield wipers
Page 107 of 366
The daytime running lamps improve the visibility
of your vehicle during the day. To do this, the
daytime running lamps function must be
switched on using the on-board computer
(
Ypage 216).
If the engine is running and you turn the light
switch to TorL, the manual settings
take precedence over the daytime running
lamps.
Low-beam headlamps
Even if the light sensor does not detect that it is
dark, the parking lamps and low-beam head-
lamps switch on when the ignition is switched on and the light switch is set to the Lposition.
This is a particularly useful function in the event
of rain and fog.
XTo switch on the low-beam headlamps:
turn the SmartKey in the ignition lock to posi- tion 2or start the engine.
XTurn the light switch to L.
The green Lindicator lamp in the instru-
ment cluster lights up.
Rear fog lamp
The rear fog lamp improves visibility of your
vehicle for the traffic behind in the event of thick
fog. Please take note of the country-specific
regulations for the use of rear fog lamps.
XTo switch on the rear fog lamp: turn the
SmartKey in the ignition lock to position 2or
start the engine.
XTurn the light switch to Lorà .
XPress the Rbutton.
The yellow Rindicator lamp in the instru-
ment cluster lights up.
XTo switch off the rear fog lamp: press the
R button.
The yellow Rindicator lamp in the instru-
ment cluster goes out.
Parking lamps
!If the battery charge is very low, the parking
lamps or standing lamps are automatically
switched off to enable the next engine start.
Always park your vehicle safely and in a well lit
area, in accordance with the relevant legal
stipulations. Avoid using the Tparking
lamps over a period of several hours. If pos-
sible, switch on the right-hand Xor left-
hand W standing lamps.
XTo switch on: turn the light switch to T.
The green Tindicator lamp in the instru-
ment cluster lights up.
Standing lamps
Switching on the standing lamps ensures the
corresponding side of the vehicle is illuminated.
XTo switch on the standing lamps: the
SmartKey should not be in the ignition lock or
it should be in position 0.
XTurn the light switch toW(left-hand side of
the vehicle) or X(right-hand side of the
vehicle).
Vehicles towing a trailer: both the right-hand
and left-hand standing lamps (tail lamps) are
always illuminated on the trailer.
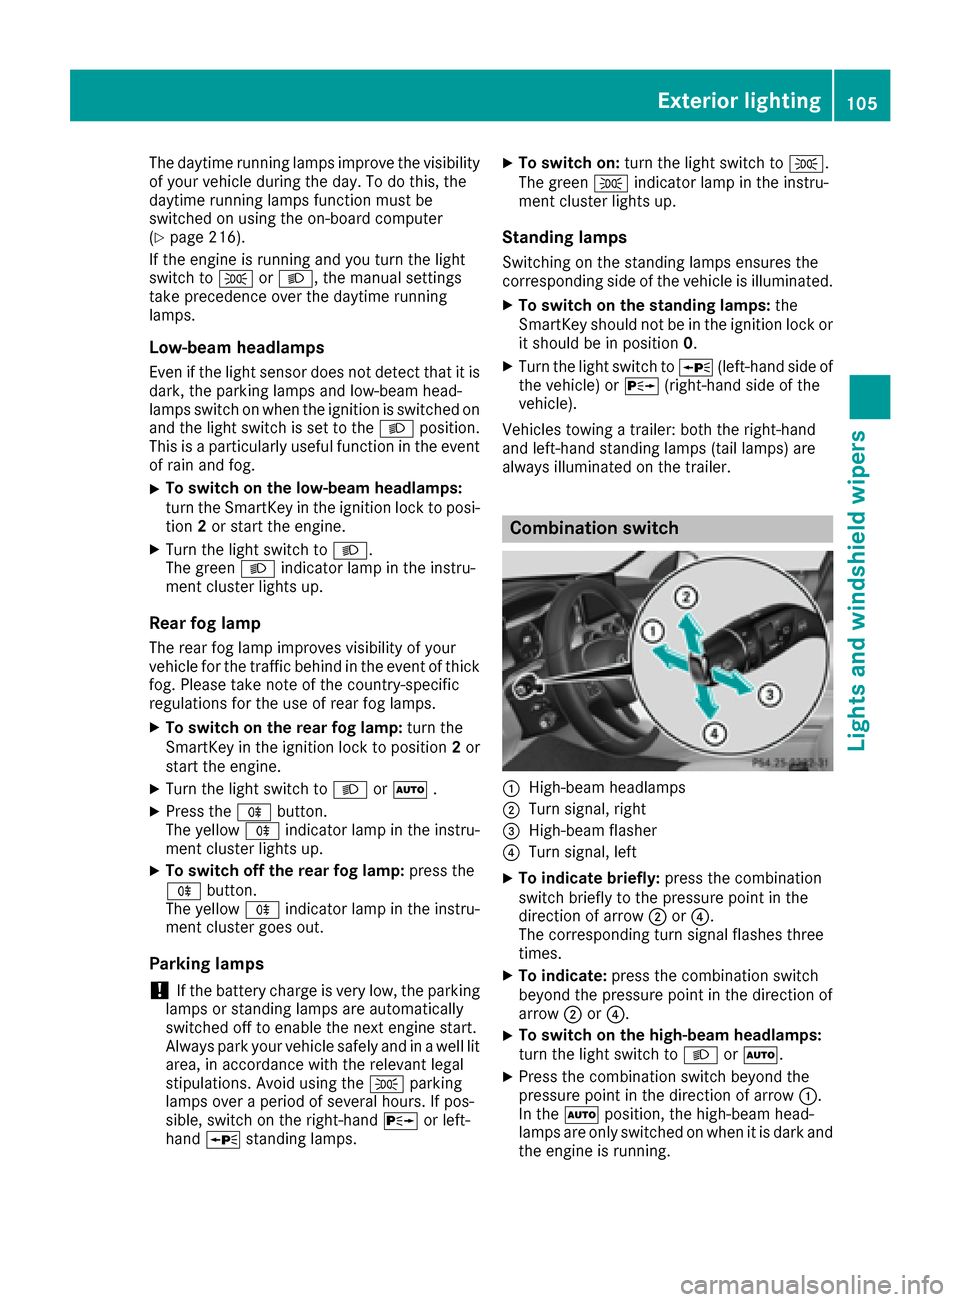
Combination switch
:High-beam headlamps
;Turn signal, right
=High-beam flasher
?Turn signal, left
XTo indicate briefly: press the combination
switch briefly to the pressure point in the
direction of arrow ;or?.
The corresponding turn signal flashes three
times.
XTo indicate: press the combination switch
beyond the pressure point in the direction of
arrow ;or?.
XTo switch on the high-beam headlamps:
turn the light switch to LorÃ.
XPress the combination switch beyond the
pressure point in the direction of arrow :.
In the Ãposition, the high-beam head-
lamps are only switched on when it is dark and
the engine is running.
Exterior lighting105
Lights and windshield wipers
Z