TIRE PRESSURES MERCEDES-BENZ GLE COUPE 2017 C292 Owner's Manual
[x] Cancel search | Manufacturer: MERCEDES-BENZ, Model Year: 2017, Model line: GLE COUPE, Model: MERCEDES-BENZ GLE COUPE 2017 C292Pages: 366, PDF Size: 8.61 MB
Page 23 of 366
PSI (pounds per square inch) (def-
inition) ...........................................340
Replacing ....................................... 341
Service life ..................................... 322
Sidewall (definition) ....................... 340
Snow chains .................................. 323
Speed rating (definition) ................ 339
Storing ...........................................3 41
Structure and characteristics
(definition) ..................................... 338
Summer tires in winter .................. 323
Temperature .................................. 335
TIN (Tire Identification Number)
(definition) ..................................... 340
Tire bead (definition) ......................3 40
Tire pressure (definition) ................ 340
Tire pressures (recommended) ...... 339
Tire size (data) ............................... 345
Tire size designation, load-bearing
capacity, speed rating .................... 335
Tire tread ....................................... 322
Tire tread (definition) ..................... 340
Total load limit (definition) ............. 340
Traction ......................................... 334
Traction (definition) ....................... 340
Tread wear ..................................... 334
TWR (permissible trailer drawbar
noseweight) (definition) ................. 340
Uniform Tire Quality Grading
Standards ...................................... 334
Uniform Tire Quality Grading
Standards (definition) .................... 339
Wear indicator (definition) ............. 340
Wheel and tire combination ........... 345
Wheel rim (definition) .................... 339
see Flat tire
Top Tether ............................................ 57
Tow-starting
Emergency engine starting ............ 318
Important safety notes .................. 316
Towing a trailer
Axle load, permissible .................... 361
Cleaning the trailer tow hitch ......... 304
Coupling up a trailer ...................... 202
Decoupling a traile r ....................... 204
Dri
ving tips .................................... 200
ESP
®(Electronic Stability Pro-
gram) ............................................... 66 Important safety notes .................. 199
Installing the ball coupling ............. 201
Lights display message .................. 233
Mounting dimensions .................... 361
Parking Assist PARKTRONIC .......... 174
Power supply ................................. 205
Pulling away with a trailer .............. 128
Removing the ball coupling ............ 205
Trailer loads ................................... 361
Towing away
Important safety guidelines ........... 316
Installing the towing eye ................ 317
Notes for 4MATIC vehicles ............ 318
Removing the towing eye ............... 317
Transporting the vehicle ................ 318
With both axles on the ground ....... 317
Towing eye ......................................... 306
Traffic reports
see also Digital Operator's Man-
ual .................................................. 263
Traffic Sign Assist
Display message ............................ 239
Function/notes ............................. 190
Important safety notes .................. 190
Instrument cluster display ............. 190
Trailer coupling
see Towing a trailer
Trailer loads and drawbar nose-
weights ............................................... 204
Trailer towing
Active Blind Spot Assist ................. 197
Active Lane Keeping Assist ............ 199
Blind Spot Assist ............................ 193
Permissible trailer loads and
drawbar noseweights ..................... 204
Transfer case ..................................... 139
Transmission
see Automatic transmission
Transmission position display ......... 134
Transporting the vehicle .................. 318
Traveling uphill
Brow of hill ..................................... 156
Driving downhill ............................. 157
Maximum gradient-climbing capa-
bility ............................................... 156
Trim pieces (cleaning instruc-
tions) .................................................. 305
Index21
Page 26 of 366
Protecting the environment
General notes
HEnvironmental note
Daimler's declared policy is one of compre-
hensive environmental protection.
The objectives are for the natural resources
that form the basis of our existence on this
planet to be used sparingly and in a manner
that takes the requirements of both nature
and humanity into account.
You too can help to protect the environment
by operating your vehicle in an environmen-
tally responsible manner.
Fuel consumption and the rate of engine,
transmission, brake and tire wear are affected by these factors:
Roperating conditions of your vehicle
Ryour personal driving style
You can influence both factors. You should
bear the following in mind:
Operating conditions:
Ravoid short trips as these increase fuel con-
sumption.
Ralways make sure that the tire pressures
are correct.
Rdo not carry any unnecessary weight.
Rremove roof racks once you no longer need
them.
Ra regularly serviced vehicle will contribute
to environmental protection. You should
therefore adhere to the service intervals.
Ralways have service work carried out at a
qualified specialist workshop.
Personal driving style:
Rdo not depress the accelerator pedal when
starting the engine.
Rdo not warm up the engine when the vehicle
is stationary.
Rdrive carefully and maintain a safe distance
from the vehicle in front.
Ravoid frequent, sudden acceleration and
braking.
Rchange gear in good time and use each gear
only up to Ôof its maximum engine speed.
Rswitch off the engine in stationary traffic.
Rkeep an eye on the vehicle's fuel consump-
tion.
Environmental concerns and recom-
mendations
Wherever the operating instructions require you
to dispose of materials, first try to regenerate or
re-use them. Observe the relevant environmen-
tal rules and regulations when disposing of
materials. In this way you will help to protect the
environment.
Genuine Mercedes-Benz parts
HEnvironmental note
Daimler AG also supplies reconditioned major
assemblies and parts which are of the same
quality as new parts. They are covered by the
same Limited Warranty entitlements as new
parts.
!Air bags and Emergency Tensioning Devi-
ces, as well as control units and sensors for
these restraint systems, may be installed in
the following areas of your vehicle:
Rdoors
Rdoor pillars
Rdoor sills
Rseats
Rcockpit
Rinstrument cluster
Rcenter console
Do not install accessories such as audio sys-
tems in these areas. Do not carry out repairs or welding. You could impair the operating
efficiency of the restraint systems.
Have aftermarket accessories installed at a
qualified specialist workshop.
You could jeopardize the operating safety of
your vehicle if you use parts, tires and wheels as
well as accessories relevant to safety which
have not been approved by Mercedes-Benz. This
could lead to malfunctions in safety-relevant
24Introduction
Page 180 of 366
Parking tips:
ROn narrow roads, drive as close to the parkingspace as possible.
RParking spaces that are littered or overgrown
might be identified or measured incorrectly.
RParking spaces that are partially occupied by
trailer drawbars might not be identified as
such or be measured incorrectly.
RSnowfall or heavy rain may lead to a parking
space being measured inaccurately.
RPay attention to the warning messages of
Parking Pilot PARKTRONIC during the parking
procedure (
Ypage 174)
RYou can intervene in the steering procedure
to correct it at any time. Parking Pilot will thenbe canceled.
RWhen transporting a load that protrudes fromyour vehicle, you must not use Parking Pilot
RNever use Parking Pilot when snow chains are
installed.
RMake sure that the tire pressures are always
correct. This has a direct influence on the
parking characteristics of the vehicle.
Use Parking Pilot for parking spaces that are:
Rparallel or at right angles to the direction of
travel
Rthat are on straight roads, not bends
Rthat are on the same level as the road, e.g. not
on the pavement
Detecting parking spaces
Objects located above the detection range of
Parking Pilot will not be detected when the park- ing space is measured. These are not taken into
account when the parking procedure is calcula-
ted, e.g. overhanging loads, tail sections or load-
ing ramps of trucks. Parking Pilot may therefore
guide you into the parking space too early.
GWARNING
If there are objects above the detection range:
RActive Park Assist may steer too early
Rthe vehicle may not stop in front of these
objects
You may cause a collision as a result. There is
a risk of an accident.
If objects are located above the detection
range, stop and deactivate Active Parking
Assist.
For further information on the detection range
(
Ypage 174).
Parking Pilot does not assist you parking in
spaces at a right angle to the direction of travel if:
Rtwo parking spaces are located directly next
to one another
Rthe parking space is directly next to a low
obstacle such as a low curb
Ryou park forwards
Parking Pilot does not assist you parking in
spaces parallel with or at a right angle to the
direction of travel if:
Rthe parking space is on a curb
Rthe system reads the parking space as being
blocked, for example by foliage or grass pav-
ing blocks
Rthe area is too small for the vehicle to maneu-
ver into
Rthe parking space is bordered by an obstacle,
e.g. a tree, a post or a trailer
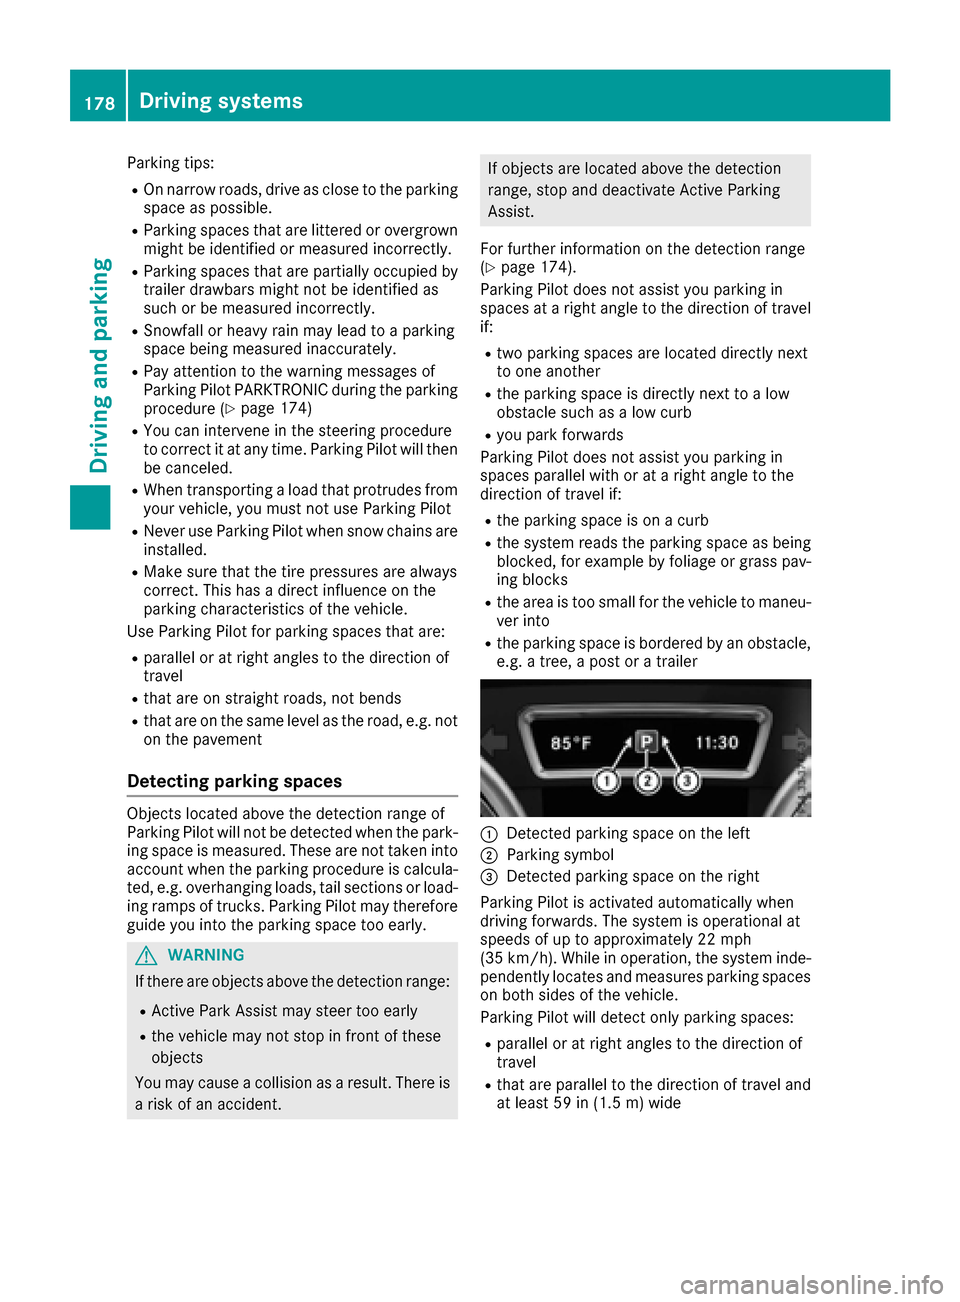
:Detected parking space on the left
;Parking symbol
=Detected parking space on the right
Parking Pilot is activated automatically when
driving forwards. The system is operational at
speeds of up to approximately 22 mph
(35 km/h). While in operation, the system inde-
pendently locates and measures parking spaces on both sides of the vehicle.
Parking Pilot will detect only parking spaces:
Rparallel or at right angles to the direction of
travel
Rthat are parallel to the direction of travel and
at least 59 in (1.5 m) wide
178Driving systems
Driving and parking
Page 246 of 366
Tires
Display messagesPossible causes/consequences andMSolutions
CheckTirePressureSoonThe tire pressure loss warning system has detected a significant loss
in pressure.
A warning tone also sounds.
Possible causes:
Ryou have changed the positions of the wheels and tires or installed
new wheels and tires.
Rthe tire pressure in one or more tires has dropped significantly
GWARNING
Tire pressures that are too low pose the following hazards:
Rthey may burst, especially as the load and vehicle speed increase.
Rthey may wear excessively and/or unevenly, which may greatly
impair tire traction.
Rthe driving characteristics, as well as steering and braking, may be
greatly impaired.
There is a risk of an accident.
XStop the vehicle without making any sudden steering or braking
maneuvers. Pay attention to the traffic conditions as you do so.
XSecure the vehicle against rolling away (Ypage 145).
XCheck the tires and, if necessary, follow the instructions for a flat
tire (Ypage 306).
XCheck the tire pressures and, if necessary, correct the tire pressure.
XRestart the tire pressure loss warning system when the tire pres-
sure is correct (Ypage 328).
CheckTirePressureThen Restart RunFlat Indicator
The tire pressure loss warning system generated a display message
and has not been restarted since.
XSet the correct tire pressure in all four tires.
XRestart the tire pressure loss warning system (Ypage 328).
Run Flat IndicatorInoperativeThe tire pressure loss warning system is faulty.
XVisit a qualified specialist workshop.
PleaseCorrectTirePressureThe tire pressure is too low in at least one of the tires, or the tire
pressure difference between the wheels is too great.
XCheck the tire pressures at the next opportunity (Ypage 328).
XIf necessary, correct the tire pressure.
XRestart the tire pressure monitor (Ypage 330).
244Displa y messages
On-board computer and displays
Page 247 of 366
Display messagesPossible causes/consequences andMSolutions
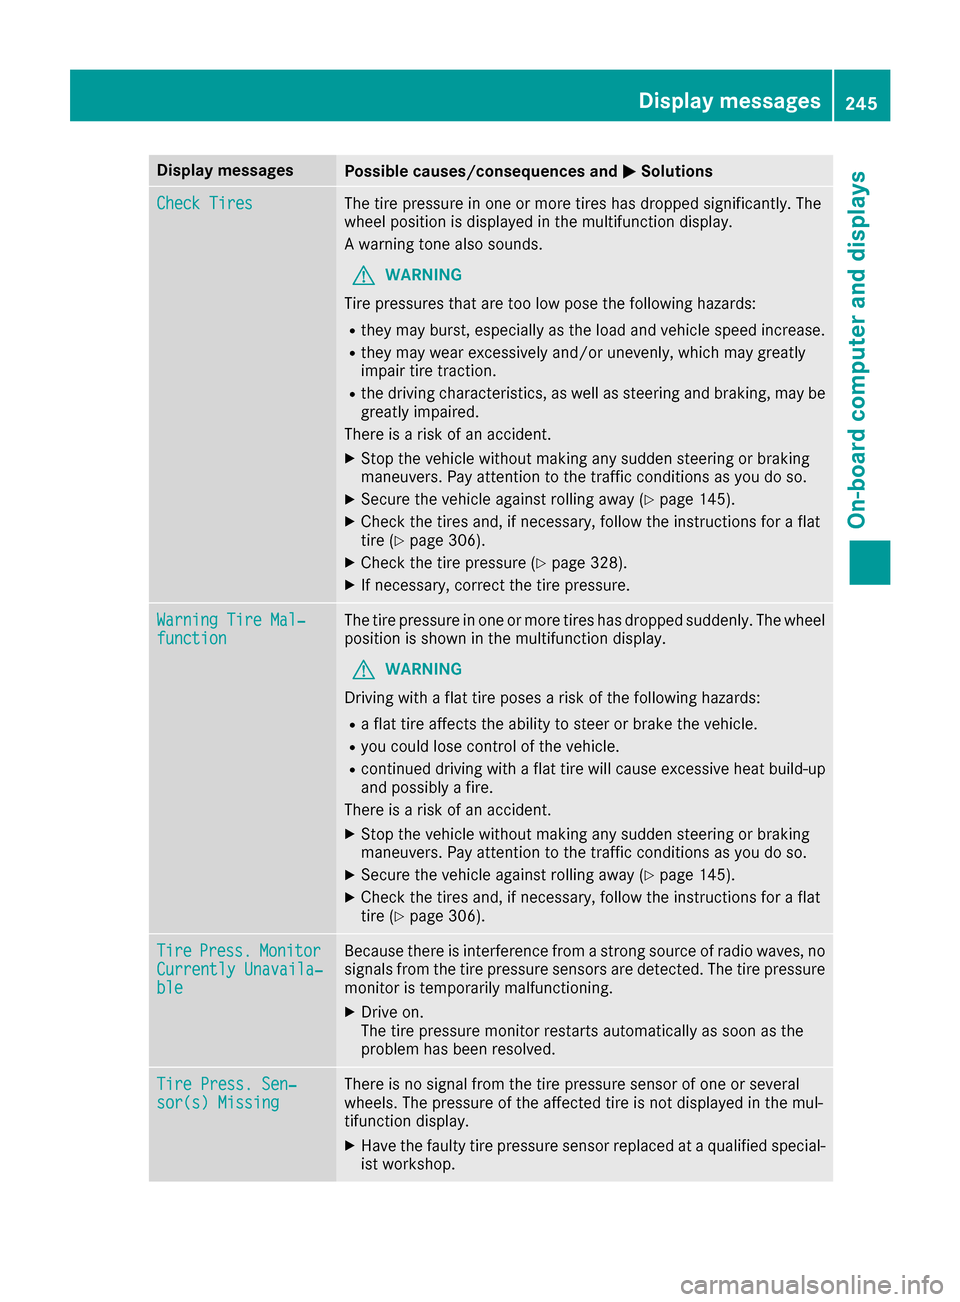
Check TiresThe tire pressurein on eor mor etires has dropped significantly. The
whee lposition is displayed in th emultifunction display.
A warning tone also sounds.
GWARNIN G
Tir epressures that are to olow pos eth efollowin ghazards :
Rthey may burst, especially as th eload and vehicl espeed increase.
Rthey may wear excessivel yand/o runevenly, whic hmay greatl y
impair tire traction .
Rthedrivin gcharacteristics ,as well as steering and braking ,may be
greatl yimpaired.
There is aris kof an accident.
XStop th evehicl ewithout making any sudden steering or braking
maneuvers .Pay attention to th etraffic condition sas you do so.
XSecur eth evehicl eagainst rollin gaway (Ypage 145).
XCheckth etires and ,if necessary, follow th einstruction sfor aflat
tire (Ypage 306).
XChec kth etire pressur e (Ypage 328).
XIf necessary, correc tth etire pressure.
Warnin gTir eMal ‐functionThe tire pressur ein on eor mor etires has dropped suddenly. The whee l
position is shown in th emultifunction display.
GWARNIN G
Drivin gwit h a flat tire poses aris kof th efollowin ghazards :
Raflat tire affects th eabilit yto steer or brak eth evehicle.
Ryou could lose control of th evehicle.
Rcontinued drivin gwit h a flat tire will caus eexcessive heat build-up
and possibl y afire.
There is aris kof an accident.
XStop th evehicl ewithout making any sudden steering or braking
maneuvers .Pay attention to th etraffic condition sas you do so.
XSecur eth evehicl eagainst rollin gaway (Ypage 145).
XCheckth etires and ,if necessary, follow th einstruction sfor aflat
tire (Ypage 306).
TirePress.Monito rCurrently Unavaila‐ble
Becausethere is interferenc efrom astron gsource of radi owaves, no
signals from th etire pressur esensor sare detected. The tire pressur e
monitor is temporarily malfunctioning .
XDrive on.
The tire pressur emonitor restarts automatically as soo nas th e
problem has been resolved.
Tir ePress. Sen ‐sor(s) Missin gThere is no signal from th etire pressur esensor of on eor several
wheels. The pressur eof th eaffecte dtire is no tdisplayed in th emul-
tifunction display.
XHav eth efault ytire pressur esensor replace dat aqualified special -
ist workshop .
Display messages245
On-board computer and displays
Z
Page 264 of 366
Tires
Warning/
indicator
lampNSignal type
Possible causes/consequences and M
Solutions
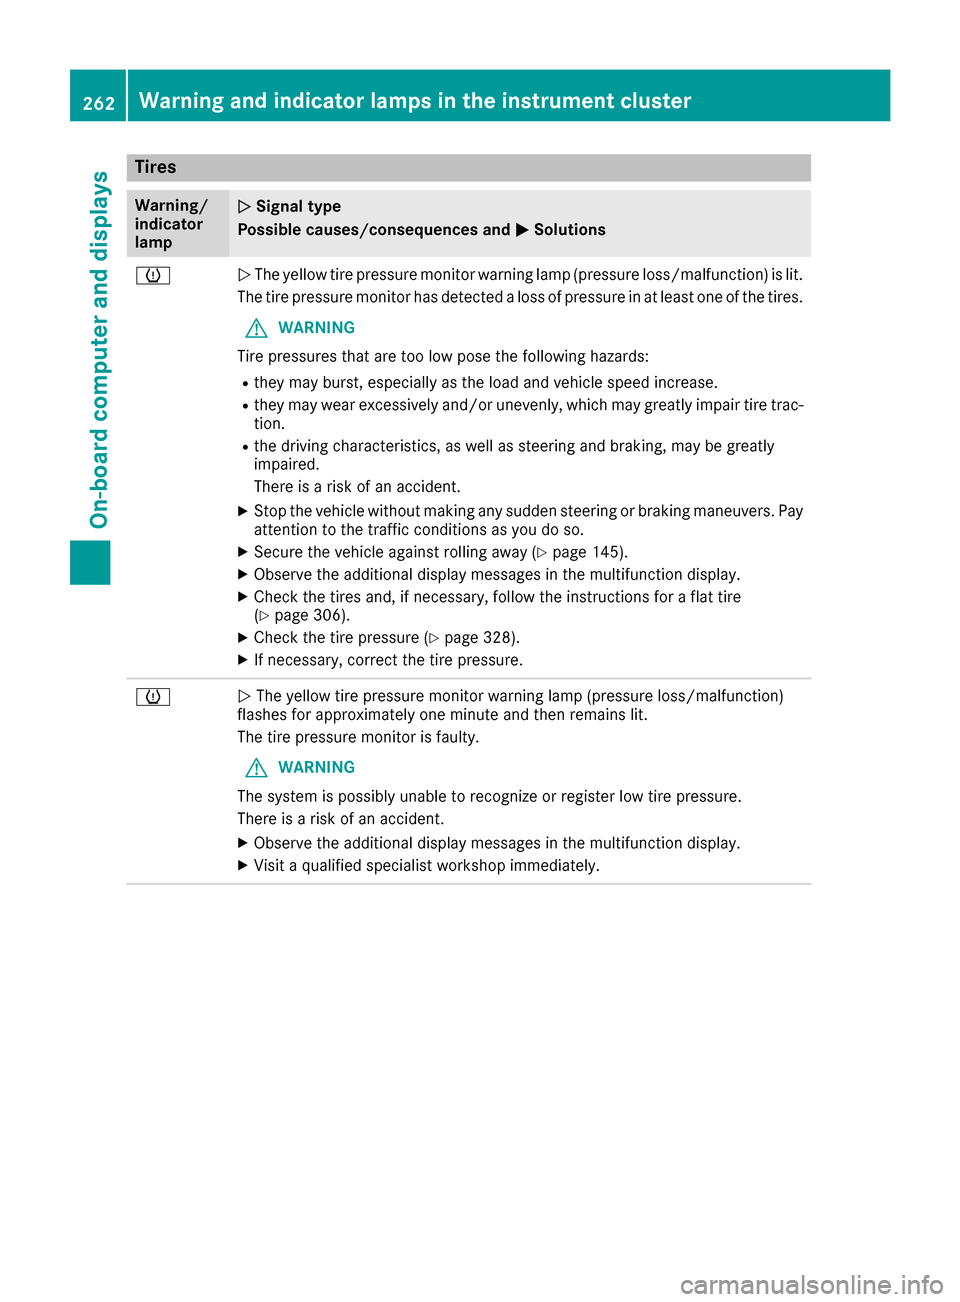
hNThe yellow tire pressure monitor warning lamp (pressure loss/malfunction) is lit.
The tire pressure monitor has detected a loss of pressure in at least one of the tires.
GWARNING
Tire pressures that are too low pose the following hazards:
Rthey may burst, especially as the load and vehicle speed increase.
Rthey may wear excessively and/or unevenly, which may greatly impair tire trac-
tion.
Rthe driving characteristics, as well as steering and braking, may be greatly
impaired.
There is a risk of an accident.
XStop the vehicle without making any sudden steering or braking maneuvers. Pay
attention to the traffic conditions as you do so.
XSecure the vehicle against rolling away (Ypage 145).
XObserve the additional display messages in the multifunction display.
XCheck the tires and, if necessary, follow the instructions for a flat tire
(Ypage 306).
XCheck the tire pressure (Ypage 328).
XIf necessary, correct the tire pressure.
hN The yellow tire pressure monitor warning lamp (pressure loss/malfunction)
flashes for approximately one minute and then remains lit.
The tire pressure monitor is faulty.
GWARNING
The system is possibly unable to recognize or register low tire pressure.
There is a risk of an accident.
XObserve the additional display messages in the multifunction display.
XVisit a qualified specialist workshop immediately.
262Warning and indicator lamps in the instrument cluster
On-board computer and displays
Page 310 of 366
Do not exceed the stated maximum speed.
Avoid abrupt steering and driving maneuvers,and driving over obstacles (curbs, potholes,
off-road). This applies in particular to a laden
vehicle.
Stop driving in emergency mode if:
Ryou hear banging noises.
Rthe vehicle starts to shake.
Ryou see smoke and smell rubber.
RESP®is intervening constantly.
Rthere are tears in the sidewalls of the tire.
After driving in emergency mode, have the
wheel rims checked at a qualified specialist
workshop with regard to their further use. The
defective tire must be replaced in every case.
TIREFIT kit
Important safety notes
TIREFIT is a tire sealant.
You can use TIREFIT to seal punctures of up to
0.16 in (4 mm), particularly those in the tire
tread. You can use TIREFIT at outside tempera-
tures down to Ò4 ‡ (Ò20 †).
GWARNING
In the following situations, the tire sealant is
unable to provide sufficient breakdown assis-
tance, as it is unable to seal the tire properly:
Rthere are cuts or punctures in the tire larger
than those mentioned above.
Rthe wheel rim is damaged.
Ryou have driven at very low tire pressures or on a flat tire.
There is a risk of an accident.
Do not drive the vehicle. Contact a qualified
specialist workshop.
GWARNING
The tire sealant is harmful and causes irrita-
tion. It must not come into contact with your
skin, eyes or clothing or be swallowed. Do not inhale TIREFIT fumes. Keep tire sealant away
from children. There is a risk of injury.
If you come into contact with the tire sealant,observe the following:
RRinse off the tire sealant from your skin
immediately with water.
RIf the tire sealant comes into contact with
your eyes, immediately rinse them thor-
oughly with clean water.
RIf tire sealant is swallowed, immediately
rinse your mouth out thoroughly and drink
plenty of water. Do not induce vomiting,
and seek medical attention immediately.
RImmediately change out of clothing which
has come into contact with tire sealant.
RIf an allergic reaction occurs, seek medical
attention immediately.
!Do not operate the tire inflation compressor
for longer than eight minutes at a time without a break. It may otherwise overheat.
The tire inflation compressor can be operated
again once it has cooled down.
Comply with the manufacturer’s safety instruc-
tions on the sticker on the tire inflation com-
pressor.
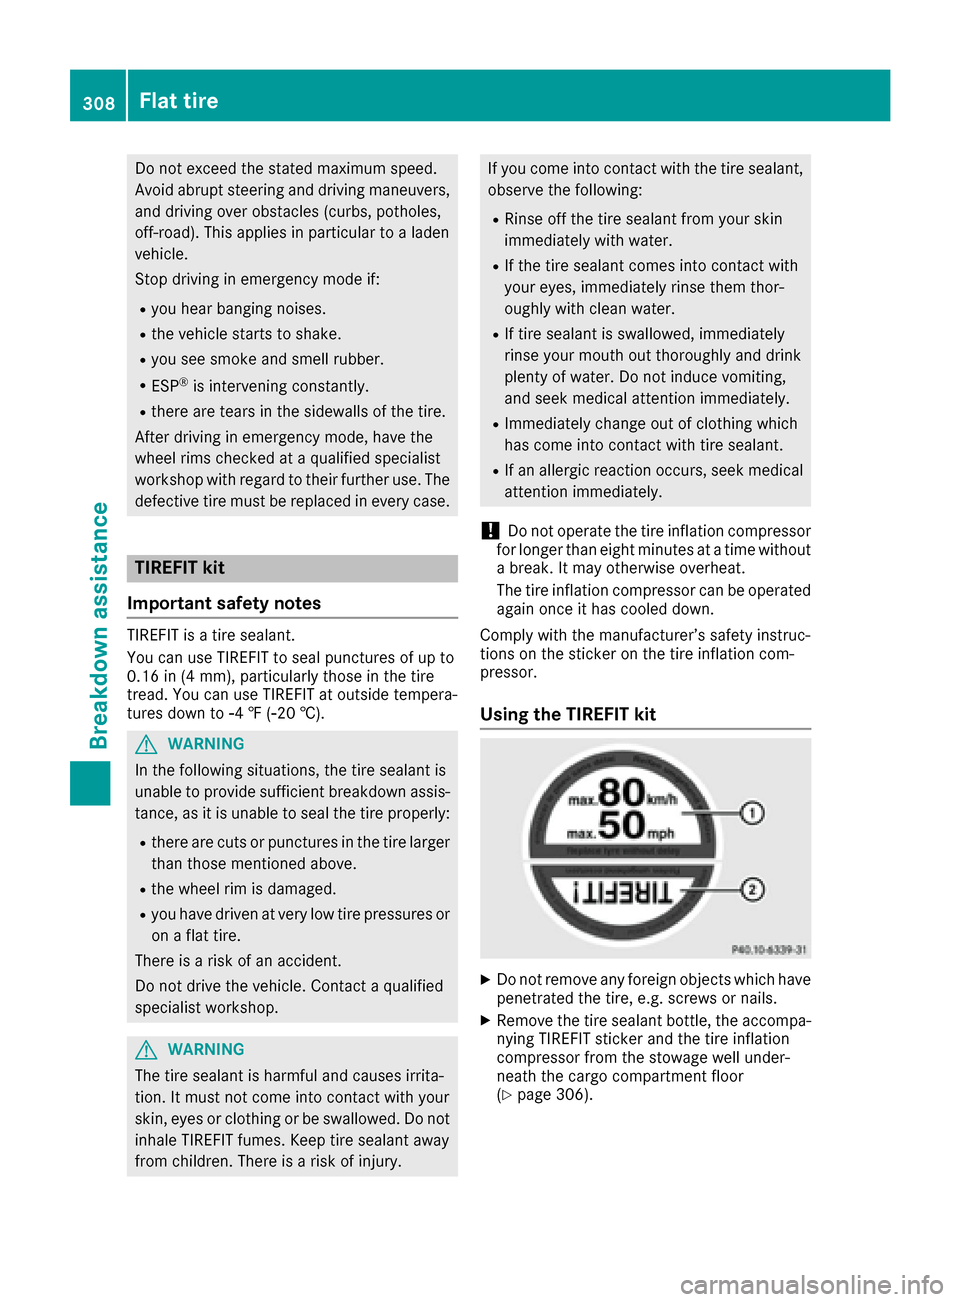
Using the TIREFIT kit
XDo not remove any foreign objects which have
penetrated the tire, e.g. screws or nails.
XRemove the tire sealant bottle, the accompa-
nying TIREFIT sticker and the tire inflation
compressor from the stowage well under-
neath the cargo compartment floor
(
Ypage 306).
308Flat tire
Breakdown assistance
Page 325 of 366
Observe the notes on the emergency spare
wheel (Ypage 346).
MOExtended tires (tires with run-flat
properties)
With MOExtended tires (tires with run flat char-
acteristics), you can continue to drive your vehi-
cle even if there is a total loss of pressure in one
or more tires.
MOExtended tires may only be used in conjunc-
tion with an active tire pressure loss warning
system or with an active tire pressure monitor
and on wheels specifically tested by Mercedes-
Benz.
Notes on driving with MOExtended tires with a
flat tire (
Ypage 307).
Vehicles equipped with MOExtended tires are
not equipped with a TIREFIT kit at the factory. It
is therefore recommended that you additionally
equip your vehicle with a TIREFIT kit if you mount
tires that do not feature run-flat properties, e.g.
winter tires. A TIREFIT kit can be obtained from
a qualified specialist workshop.
Winter operation
General notes
Have your vehicle winter-proofed at a qualified
specialist workshop at the onset of winter.
Observe the notes in the "Changing a wheel"
section (
Ypage 341).
Driving with summer tires
At temperatures below 45 ‡ (+7 †), the elas-
ticity of summer tires and therefore also the
traction and braking capability are reduced con- siderably. Change the tires on your vehicle to
M+S tires. Using summer tires at very cold tem-
peratures could cause cracks to form, thereby
damaging the tires permanently. Mercedes-
Benz cannot accept responsibility for this type
of damage.
GWARNING
Damaged tires can cause tire inflation pres-
sure loss. As a result, you could lose control of
your vehicle. There is a risk of accident.
Check the tires regularly for signs of damage
and replace any damaged tires immediately.
M+S tires
GWARNING
M+S tires with a tire tread depth of less than
ã in (4 mm) are not suitable for use in winter
and do not provide sufficient traction. There is
a risk of an accident.
M+S tires with a tread depth of less than ãin
(4 mm) must be replaced immediately.
At temperatures below 45 ‡(+7 †), use winter
tires or all-season tires. Both types of tire are
identified by the M+S marking.
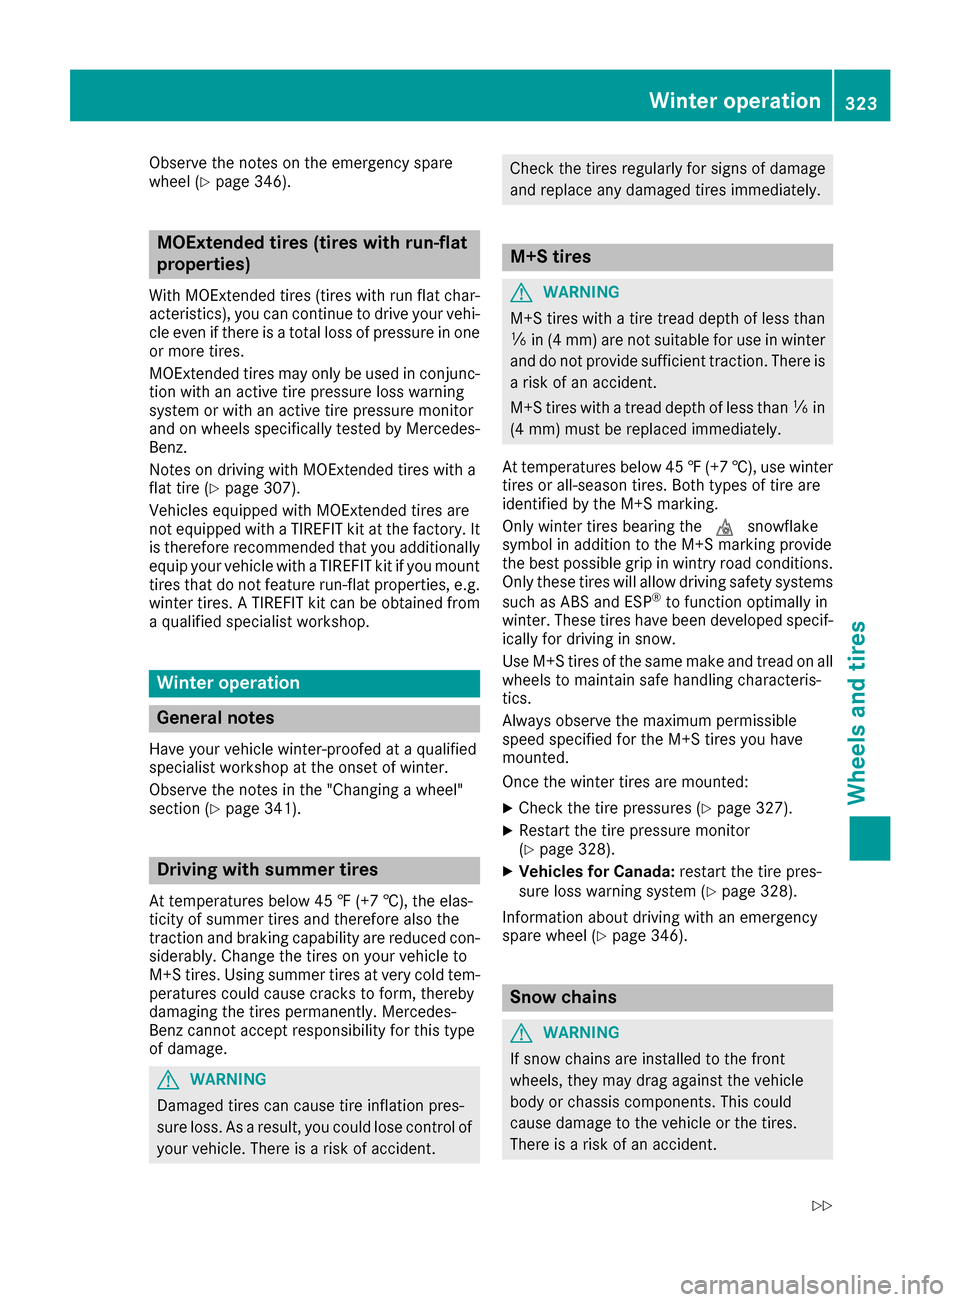
Only winter tires bearing the isnowflake
symbol in addition to the M+S marking provide
the best possible grip in wintry road conditions.
Only these tires will allow driving safety systems
such as ABS and ESP
®to function optimally in
winter. These tires have been developed specif-
ically for driving in snow.
Use M+S tires of the same make and tread on all
wheels to maintain safe handling characteris-
tics.
Always observe the maximum permissible
speed specified for the M+S tires you have
mounted.
Once the winter tires are mounted:
XCheck the tire pressures (Ypage 327).
XRestart the tire pressure monitor
(Ypage 328).
XVehicles for Canada: restart the tire pres-
sure loss warning system (Ypage 328).
Information about driving with an emergency
spare wheel (
Ypage 346).
Snow chains
GWARNING
If snow chains are installed to the front
wheels, they may drag against the vehicle
body or chassis components. This could
cause damage to the vehicle or the tires.
There is a risk of an accident.
Winter operation323
Wheels and tires
Z
Page 326 of 366
To avoid hazardous situations:
Rnever install snow chains to the front
wheels
Ralways install snow chains in pairs to the
rear wheels.
!You must drive at raised vehicle level (height
1) if snow chains have been installed. The
vehicle may otherwise be damaged.
!Vehicles with ADS (Adaptive Damping
System): do not use the sport mode when
driving with snow chains mounted. The vehi-
cle may otherwise be damaged.
For safety reasons, Mercedes-Benz recom-
mends that you only use snow chains that have
been specially approved for your vehicle by
Mercedes-Benz, or are of a corresponding
standard of quality. For more information,
please contact a qualified specialist workshop.
Install the snow chains on all driven wheels for
maximum tractive power and driving stability. If
you own snow chains for two driven wheels only,
install the snow chains to the wheels on the rear
axle. The vehicle then remains more stable
under braking.
If you intend to mount snow chains, please bear
the following points in mind:
RSnow chains may not be mounted on all
wheel/tire combinations. Permissible
wheel/tire combinations (
Ypage 345).
ROnly use snow chains when driving on roads
completely covered by snow. Remove the
snow chains as soon as possible when you
come to a road that is not snow-covered.
RLocal regulations may restrict the use of snow chains. Observe the appropriate regulations if
you wish to mount snow chains.
RDo not exceed the maximum permissible
speed of 30 mph (50 km/h).
RNever use Parking Pilot when snow chains are
installed (Ypage 177).
You may wish to deactivate ESP®when pulling
away with snow chains installed (Ypage 65).
You can thereby allow the wheels to spin in a
controlled manner, achieving an increased driv-
ing force (cutting action).
Information about driving with an emergency
spare wheel (
Ypage 346).
Tire pressure
Tire pressure specifications
Important safety notes
GWARNING
Underinflated or overinflated tires pose the
following risks:
Rthe tires may burst, especially as the load
and vehicle speed increase.
Rthe tires may wear excessively and/or
unevenly, which may greatly impair tire
traction.
Rthe driving characteristics, as well as steer-
ing and braking, may be greatly impaired.
There is a risk of an accident.
Follow recommended tire inflation pressures
and check the pressure of all the tires includ-
ing the spare wheel:
Rmonthly, at least
Rif the load changes
Rbefore beginning a long journey
Runder different operating conditions, e.g.
off-road driving
If necessary, correct the tire pressure.
The data on the Tire and Loading Information
placard and tire pressure table shown here are
examples. Tire pressure specifications are vehi-
cle-specific and may deviate from the data
shown here. The tire pressure specifications
that are valid for your vehicle can be found on
the Tire and Loading Information placard and
tire pressure table on the vehicle.
General notes
The recommended tire pressures for the tires
mounted at the factory can be found on the
labels described here.
Operation with emergency spare wheel:
Information on operation with the emergency
spare wheel can be found under "Emergency
spare wheel" (
Ypage 346).
Operation with a trailer: the applicable value
for the rear axle is the maximum tire pressure
value stated in the table inside the fuel filler flap.
324Tire pressure
Wheels and tires
Page 327 of 366
Further information on tire pressures can be
obtained at a qualified specialist workshop.
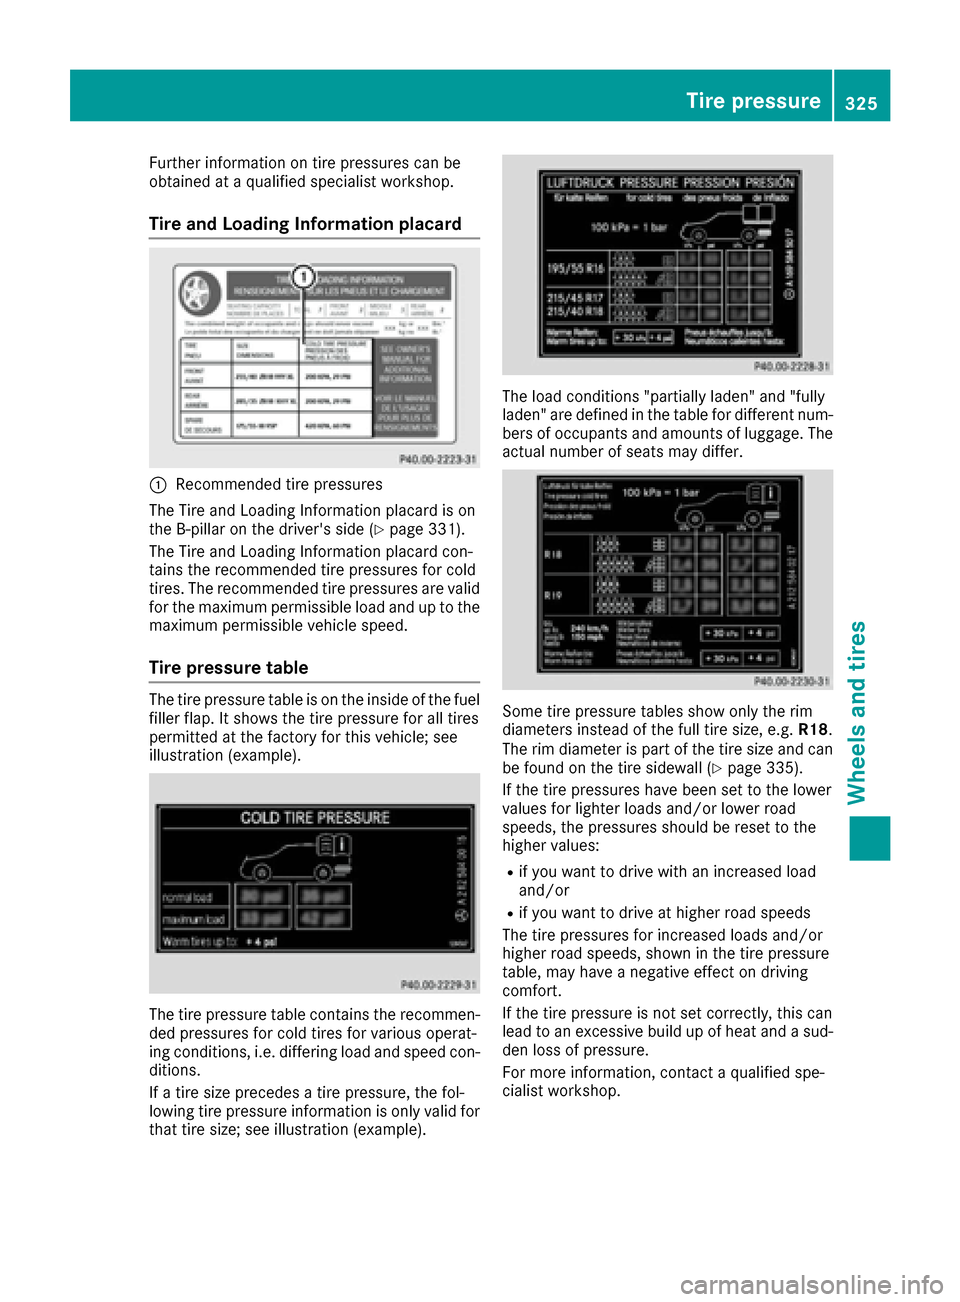
Tire and Loading Information placard
:Recommended tire pressures
The Tire and Loading Information placard is on
the B-pillar on the driver's side (
Ypage 331).
The Tire and Loading Information placard con-
tains the recommended tire pressures for cold
tires. The recommended tire pressures are valid
for the maximum permissible load and up to the
maximum permissible vehicle speed.
Tire pressure table
The tire pressure table is on the inside of the fuel
filler flap. It shows the tire pressure for all tires
permitted at the factory for this vehicle; see
illustration (example).
The tire pressure table contains the recommen-
ded pressures for cold tires for various operat-
ing conditions, i.e. differing load and speed con-
ditions.
If a tire size precedes a tire pressure, the fol-
lowing tire pressure information is only valid for that tire size; see illustration (example).
The load conditions "partially laden" and "fully
laden" are defined in the table for different num-
bers of occupants and amounts of luggage. The
actual number of seats may differ.
Some tire pressure tables show only the rim
diameters instead of the full tire size, e.g. R18.
The rim diameter is part of the tire size and can
be found on the tire sidewall (
Ypage 335).
If the tire pressures have been set to the lower
values for lighter loads and/or lower road
speeds, the pressures should be reset to the
higher values:
Rif you want to drive with an increased load
and/or
Rif you want to drive at higher road speeds
The tire pressures for increased loads and/or
higher road speeds, shown in the tire pressure
table, may have a negative effect on driving
comfort.
If the tire pressure is not set correctly, this can
lead to an excessive build up of heat and a sud-
den loss of pressure.
For more information, contact a qualified spe-
cialist workshop.
Tire pressure325
Wheels and tires
Z