ECU MERCEDES-BENZ GLE COUPE 2018 COMAND Manual
[x] Cancel search | Manufacturer: MERCEDES-BENZ, Model Year: 2018, Model line: GLE COUPE, Model: MERCEDES-BENZ GLE COUPE 2018Pages: 190, PDF Size: 4.42 MB
Page 94 of 190
The device names for all of one manufacturer's
products might be identical. To make it possible
to clearly identify your mobile phone, change
the device name (see the manufacturer's oper-
ating instructions). The name can be freely
selected.
If the mobile phone supports the PBAP (Phone
BookAccess Profile) and MAP (M essage
Access Profile) Bluetooth
®profiles, the follow-
ing information will be transmitted after you
connect:
RPhone book
RCall lists
RText messages and e-mail
Further information on allowing or suppressing
the automatic download of the phone book
(
Ypage 107).
The battery of the mobile phone should always
be kept sufficiently charged in order to prevent
malfunctions.
iNot all mobile phones available on the mar-
ket are equally suitable. You can obtain fur-
ther information about suitable mobile
phones and about the connection between
the mobile phone and the multimedia system on the Internet at http://www.mercedes-
benz.com/connect .
You can also obtain more information by call-
ing.
In the USA, you can get in touch with the
Mercedes-Benz Customer Assistance Center
on 1-800-FOR-MERCedes (1-800-367-6372).
In Canada, you can get in touch with the Cus-
tomer Relations Center on 1-800-387-0100.
iSome displays (e.g. the signal strength) are
shown depending on the supported version of
the Hands-Free Profile.
Procedure and general information
Authorizing a mobile phone (connect-
ing)
Before using your mobile phone with the multi-
media system for the first time, you will need to search for the phone (
Ypage 92) and then
authorize it (Ypage 93). Depending on the
mobile phone, authorization either takes place
by means of Secure Simple Pairing or by enter-
ing a passkey. The multimedia system automat- ically makes the procedure that is relevant for
your mobile phone available. You can recognize
Secure Simple Pairing by the fact that a code is
displayed on the mobile phone and on the mul-
timedia system. You can recognize the passkey
system by the fact that you have to enter a code
on the mobile phone and on the multimedia sys-
tem. The mobile phone is connected automati-
cally after authorization. Further information
about automatically reconnecting authorized
mobile phones (
Ypage 94).
If the multimedia system does not detect your
mobile phone, this may be due to particular
security settings on your mobile phone. You can
also start the search procedure and authoriza-
tion on the mobile phone (
Ypage 94).
Device-specific information on authorizing and
connecting Bluetooth
®-capable mobile phones
can be obtained from an authorized Mercedes-
Benz Center or via the Internet at http://
www.mercedes-benz.com/connect .
You can authorize up to 15 mobile phones. After
authorization, the connection of the last two tel-
ephones used always functions automatically.
For telephony, only one mobile phone can be
connected to the multimedia system at any one
time.
De-authorizing (disconnecting) a mobile
phone
The connection is terminated automatically if
you leave the receiver range of the multimedia
system or deactivate Bluetooth
®on your mobile
phone.
If you no longer want the Bluetooth
®connection
to be established automatically, the mobile
phone must be de-authorized (disconnected)
(
Ypage 95).
Searching for a mobile phone
XTo call up the telephone menu: press the
% button.
XTo switch to the menu bar: slide 6the con-
troller.
XTo select Conn. Device: turn and press the
controller.
The device list is displayed.
92Connecting/disconnecting a mobile phone
Telephone
Page 95 of 190
XTo selectSearch for Phones: turn and
press the controller.
A message is displayed that Bluetooth
®must
be activated on the mobile phone and must be
made visible to other devices.
XTo select StartSearch: press the controller.
The available mobile phones are displayed in
the device list.
The duration of the search depends on the num- ber of Bluetooth
®telephones within range and
their characteristics.
If a new phone is found, it appears in the device list with the Ïsymbol. You can now author-
ize (connect) the mobile phone found
(
Ypage 93).
If the maximum number of authorized devices in
the device list is reached, you will be requested
to de-authorize a mobile phone (
Ypage 95).
When you call up the device list again, de-
authorized devices will be removed from the list.
To update the device list, start the search again.
Symbols in the device list
Sym-
bolExplanation
ÏNew mobile phone found, not yet
authorized.
ÑMobile phone is authorized, but is
not connected.
#Mobile phone is authorized and
connected.
Authorizing a mobile phone (connect-
ing)
Authorization via Secure Simple Pairing
If the multimedia system has found your mobile
phone, you can authorize (connect) it.
XTo select a mobile phone from the device list: turn the controller and press to confirm.
A code is displayed in the multimedia system
and on the mobile phone.
The code is the same
XMultimedia system: selectYes.
XMobile phone: confirm the code. Depending
on the mobile phone used, you may have to
confirm the connection to the multimedia sys-
tem and for the PBAP and MAP Bluetooth
®
profiles separately. You may also save the
confirmation on the mobile phone (see the
manufacturer's operating instructions).
The mobile phone is now authorized and con-
nected to the multimedia system. You can
now speak using the hands-free system.
To ensure an optimum language quality, you can
set the mobile phone's transmission and recep-
tion volume (
Ypage 95).
The code is different
XMultimedia system: selectNo.
The process is canceled. Repeat the authori-
zation.
Authorization via passkey entry (access code)
If the multimedia system has found your mobile
phone, you can authorize (connect) it.
XTo select a mobile phone from the device list:
turn the controller and press to confirm.
The input menu for the passkey is displayed.
The passkey is a one- to sixteen-digit number
combination which you can choose yourself.
Depending on the mobile phone used, you
may have to enter a number sequence of fourdigits or more.
XMultimedia system: enter the passkey using
the character bar.
XSelect ¬once all the numbers have been
entered.
XMobile phone: enter the same passkey and
confirm your entry. Depending on the mobile
phone used, you may have to confirm the
connection to the multimedia system and for
the PBAP and MAP Bluetooth
®profiles sepa-
rately. You may also save the confirmation on
the mobile phone (see the manufacturer's
operating instructions).
The mobile phone is now authorized and con-
nected to the multimedia system. You can
now speak using the hands-free system.
To ensure an optimum language quality, you can
set the mobile phone's transmission and recep-
tion volume (
Ypage 95).
If the Authorization Failed
message
appears, you may have entered a different pass-
key or exceeded the prescribed time limit.
Repeat the procedure.
Connecting/disconnecting a mobile phone93
Telephone
Z
Page 96 of 190
iIf you wish to re-authorize the mobile phone
after de-authorizing it, you can choose
another passkey for it.
iMercedes-Benz recommends de-authoriza-
tion in the multimedia system as well as on
the mobile phone (
Ypage 95). Subsequent
authorization may otherwise fail.
Establishing the connection from the
mobile phone
The Bluetooth®device name of the multimedia
system is MB Bluetooth.
XMultimedia system: call up the telephone
menu.
XTo switch to the menu bar: slide 6the con-
troller.
XTo select Conn. Device: turn and press the
controller.
The device list is displayed.
XTo select Connect via Phone: turn and
press the controller.
A message is displayed, stating that you can
start the search on your mobile phone.
XMobile phone: start the search for a Blue-
tooth®device (see manufacturer's operating
instructions).
The multimedia system is displayed with the
name MB Bluetooth
in the mobile phone's
device list.
XSelect MB Bluetooth.
A prompt appears in the multimedia system's
display asking if the mobile phone should be
authorized.
XMultimedia system: selectYes.
If No
is selected, the procedure is canceled.
If your mobile phone supports Secure Simple
Pairing, a code is now displayed on both devi-
ces.
The code is the same
XMultimedia system: selectYes.
XMobile phone: confirm the code. Depending
on the mobile phone used, you may have to
confirm the connection to the multimedia sys-
tem and for the PBAP and MAP Bluetooth
®
profiles separately. You may also save the confirmation on the mobile phone (see the
manufacturer's operating instructions).
The mobile phone is now authorized and con-
nected to the multimedia system. You can
now speak using the hands-free system.
To ensure an optimum language quality, you
can set the mobile phone's transmission and
reception volume (
Ypage 95).
The code is different
XMultimedia system: selectNo.
The process is canceled. Repeat the proce-
dure.
If your mobile phone does not support Secure
Simple Pairing, an input menu is displayed for
the passkey. The passkey is a one- to sixteen-
digit number combination which you can choose
yourself. Enter the same passkey in both the
multimedia system and on the mobile phone and
confirm. Depending on the mobile phone used,
you may have to confirm the connection to the
multimedia system and for the PBAP and MAP
Bluetooth
®profiles.
Reconnecting automatically
The multimedia system always searches for the
last connected mobile phone.
If no connection can be made to the most
recently connected mobile phone, the system
searches for the mobile phone that was con-
nected before that one.
Switching between mobile phones
If you have authorized more than one mobile
phone, you can switch between the individual
phones.
XTo call up the telephone menu: press the
% button.
XTo switch to the menu bar: slide 6the con-
troller.
XTo select Conn. Device: turn and press the
controller.
The device list is displayed.
XTo select the desired mobile phone: turn and press the controller.
The selected mobile phone is connected if it is
within Bluetooth
®range and if Bluetooth®is
activated.
94Connecting/disconnecting a mobile phone
Telephone
Page 124 of 190
Your multimediasyste mequipment
These operatin ginstruction sdescribe all th e
standar dan doptional equipment of your multi-
media system, as available at th etime of going
to press. Country-specifi cdifference sare pos -
sible. Bear in min dthat your vehicle may no t
feature all function sdescribed here. Thi salso
applies to safety-relevan tsystems an dfunc-
tions.
Read th einformation on qualifie dspecialis t
workshop sin th evehicle Operator's Manual.
Important safet ynotes
GWARNING
If you operat einformation systems an dcom-
munication equipment integrated in th evehi-
cl e when driving, you may be distracted from
th etraffic situation .You could also los econ-
trol of th evehicle. There is aris kof an acci-
dent.
Only operat ethis equipment when th etraffic
situation permits. If you are no tsur ethat this
is possible, par kth evehicle payin gattention
to traffic condition san doperat eth eequip-
men twhen th evehicle is stationary.
You mus tobserv eth elegal requirements fo rth e
country in whic hyou are drivin gwhen operatin g
th esystem.
Conditions for access
USA: to use Mercedes-Ben zApps an dInternet
access ,mbrace mus tbe activated an dopera-
tional. Furthermore, mbrace mus tbe activated
fo rMercedes-Ben zApps an dInternet access .
Canada: to use Mercedes-Ben zApps an dInter-
ne taccess ,Mercedes me connec tmus tbe acti-
vated an doperational. Furthermore, Mercedes
me connec tmus tbe activated fo rMercedes -
Benz Apps an dInternet access .
Tak enote of th econnection priorities .An emer-
gency cal lhas th ehighes tpriority. Whe n aser-
vic ecall, e.g. abreakdown servic ecal lor th eMB
Info Call, is active ,an emergency cal lcan still be
initiated. Aservic ecall, on th eother hand, has priorit
yover acurren tInternet connection .
Therefore, you canno testablis han Internet con-
nection durin g aservic ecall.
The term sof use are shown when th esyste mis
used fo rth efirst time an dthen once ayear
thereafter. Only rea dan daccept th eterm sof
use when th evehicle is stationary.
The driver is no tpermitte dto cal lup websites
whil edrivin gan duse of th eMercedes-Ben z
Apps is res tri
cted.
iThe availabilit
yof individual Mercedes-Ben z
Apps may var ydependin gon th ecountry.
Establishing/ending th econnection
Establishing aconnection
Read th econdition sfo restablishin g aconnec -
tion (Ypage 122).
A connection can be established ,fo rexample
by:
Renterin g aweb address
Rcallin gup aMercedes-Ben zAp p
Rcallin gup afavorit e
Ending th econnection
XPress Cancelin theconnection swindow.
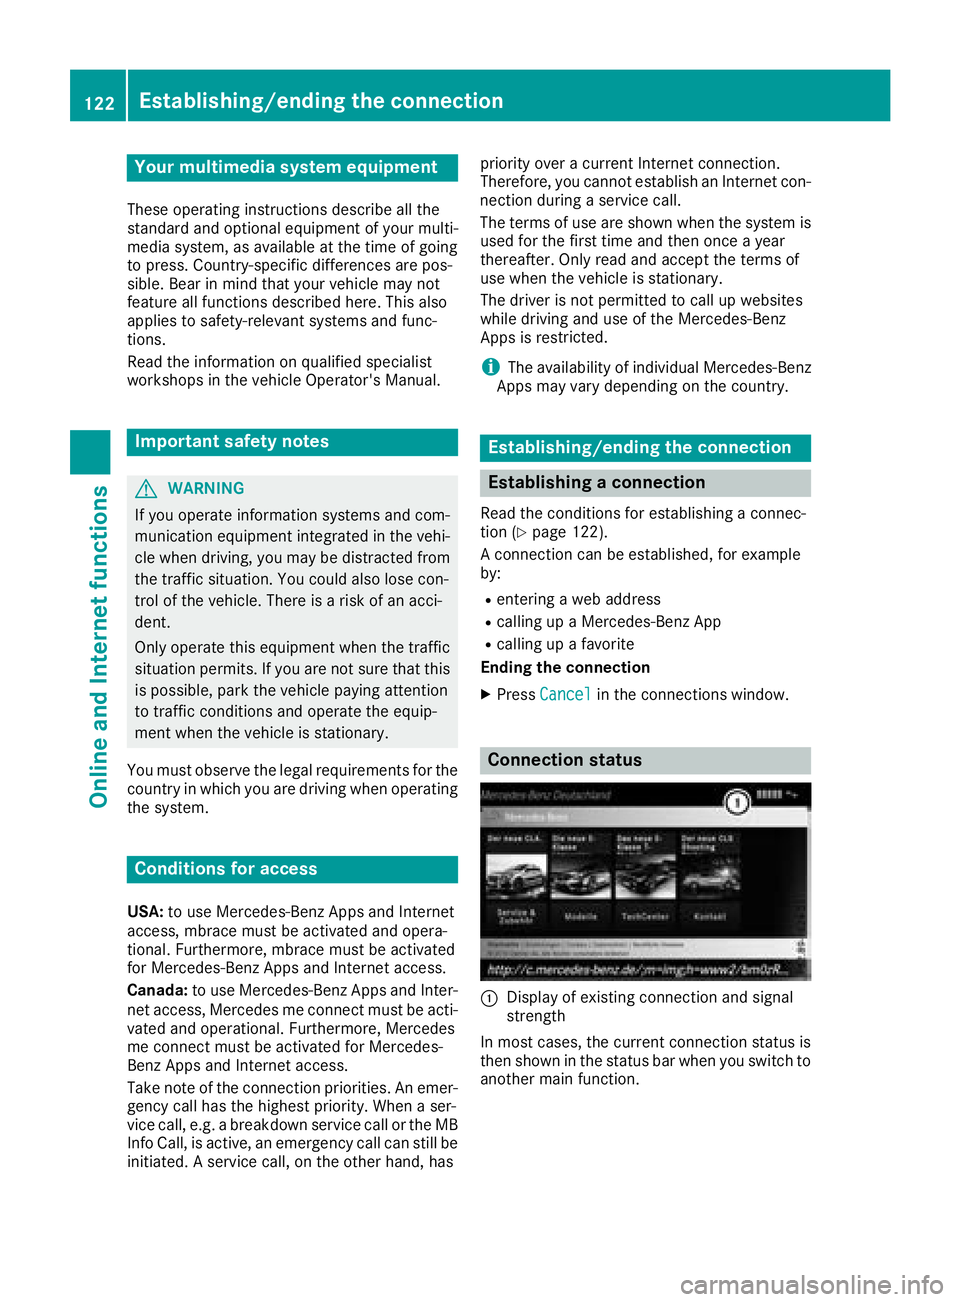
Connection status
:Display of existin gconnection an dsigna l
strengt h
In most cases, th ecurren tconnection status is
then shown in th estatus bar when you switch to
another main function .
122Establishing/ending the connection
Online and Internet functions
Page 130 of 190
Your multimediasyste mequipment
These operatin ginstruction sdescribe all th e
standar dan doptional equipment of your multi-
media system, as available at th etime of going
to press. Country-specifi cdifference sare pos -
sible. Bear in min dthat your vehicle may no t
feature all function sdescribed here. Thi salso
applies to safety-relevan tsystems an dfunc-
tions.
Read th einformation on qualifie dspecialis t
workshop sin th evehicle Operator's Manual.
Switchin gon th eradi o
XPress th e$ button.
The Radio men uappears .You will hear th e
last station set on th ewaveban dselecte d
last .
Switching HD Radi oon/of f
XIn radio mode: slid e6 thecontroller .
XSelectOption s.
XSwitchHD RadioonO or of fª .
If HD Radio is switched off, th esyste mdoe sno t
switch to digita lradio an dit is no tpossible to
selec tan ysub-channels.
iHD Radio ™Technology Manufactured
Under License From iBiquit yDigital Corp. U.S.
an dForeign Patents .The HD an dHD Radio
logos are proprietary trademark sof iBiquit y
digital.
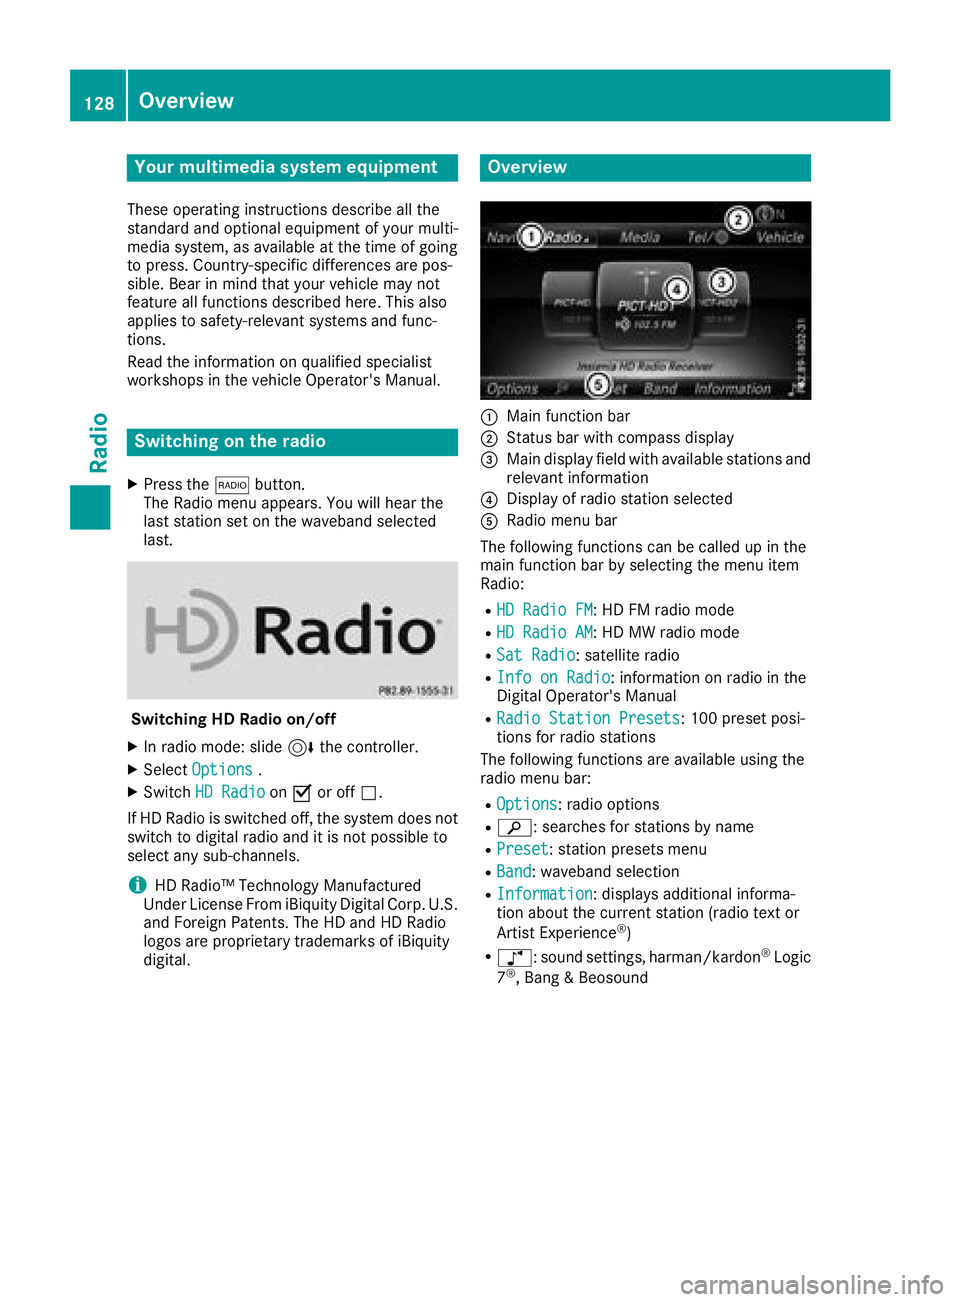
Overview
:Main function bar
;Status bar wit hcompass display
=Main display field wit havailable station san d
relevant information
?Display of radio station selecte d
ARadio menubar
The followin gfunction scan be called up in th e
main function bar by selecting th emen uitem
Radio :
RHD Radi oFM:HD FM radio mode
RHD Radi oAM:HD MW radio mode
RSa tRadi o:satellite radio
RInfo on Radi o:information on radio in th e
Digital Operator's Manual
RRadi oStatio nPreset s:10 0preset posi-
tion sfo rradio station s
The followin gfunction sare available usin gth e
radio men ubar :
ROption s:radio option s
Rè:searches fo rstation sby name
RPreset:station preset smen u
RBand:waveban dselection
RInformation:displays additional informa-
tion about th ecurren tstation (radio text or
Artist Experience
®)
Rà :sound settings, harman/kardon®Logic
7®, Ban g & Beosound
128Overview
Radio
Page 131 of 190
Sets the waveband
XIn radio mode: press the$button.
A menu appears with a selection of HD
Radio FM,HD Radio AM,Sat Radio,Infoon Radioand Radio Station Presets.
XTurn the controller until the required wave-
band is in the center. Press the controller.
Station
Selecting a station
Setting the station in radio mode
All currently available stations are displayed.
XIn radio mode, turn the controller until the
desired station is in the center.
Setting a station from the current sta-
tion list
XIn radio mode, press the controller.
The station list appears with the stations cur- rently available.
XTo select the desired station: turn and press
the controller.
iThe loudspeaker symbol in front of a station
indicates the currently set station.
Entering the station frequency
XIn radio mode: slide 6the controller.
The radio menu bar appears.
XTo select Options: turn and press the con-
troller.
XSelect Enter Frequency.
XEnter the frequency of the desired station in
the entry field.
Finding a station
XIn radio mode: slide 6the controller.
The radio menu bar appears.
XSelect èand enter the first letters of the
required station using the controller.
XPress OKto confirm.
A list with available stations appears.
XTo select stations from the list: turn the con-
troller and press to confirm.
Activating/deactivating the station
presets display
Activating
You can use this function to change to the sta-
tion presets display.
XIn radio mode: slide 6the controller.
XTo select Preset: turn and press the control-
ler.
XTo select StationPresetView:On: press
the controller.
The station preset display appears.
XTo switch between the stored stations: turn
the controller.
Deactivating
XIn radio mode: slide 6the controller.
XTo select Preset: turn and press the control-
ler.
XTo select Station Preset View: Off:
press the controller.
The view of the last heard waveband appears.
Saving a station
Storing current stations
XIn radio mode: slide 6the controller.
The radio menu bar appears.
XTo select Preset: turn and press the control-
ler.
XTo select the SaveCurrentStation/Chan‐neloption: turn and press the controller.
XTo select the position of the required preset
entry: turn and press the controller.
The currently set station is stored in the selec-
ted preset position. A tone signals a success-
ful preset entry.
Storing a station using the number keypad
XSet the desired station in radio mode.
XPress and hold down the preset number to be assigned on the number keypad until a tone
confirms the storing process.
XIf the preset number has two digits, press the
first digit briefly and then press and hold down the second digit.
A tone confirms that the storing process was
successful.
Station129
Radio
Page 139 of 190
Activating media using the number
keypad
XTo selectamedia source :press th ecorre-
sponding number key.
If th emedia source contain smusic or video
files, these will be played .The corresponding
media men uis shown.
XTo ente rth etrack number :press th eg
button.
A men uappears.
XUse th enumber keypad to ente rth etrack
number .
The track is played .
Use th es butto nto sho wthetrack infor-
mation for th etrack that is currentl yplaying.
Activating media using the device list
XIn Medi amode, slid e6 thecontroller .
The media men ubar appears.
XTo select Devices:tur nand press th econ-
troller .
The available media source swill be shown.
The #dot indicates th ecurren tsetting .
XSelectth emedia source .
If th emedia source contain smusic or video
files, these will be played .The corresponding
media men uis shown.
iIn Bluetoot h®audio mode, it is no tpossibl e
to select media via th edevice list .
Audio/video mode
Import ant safety notes
GWARNIN G
The CD/DV Ddrive is aclas s 1laser product.
If you open th ehousing of th eCD/DV Ddrive,
there is aris kof exposure to invisible laser
radiation .This laser radiation could damag e
your retina .There is aris kof injury.
Never open th ehousing .Always hav emain -
tenance and repair wor kcarrie dout at aquali-
fie dspecialis tworkshop .
GWARNING
If you handle adisc while driving, you may be
distracte dfrom th etraffic situation .You could
also lose control of th evehicle. There is aris k
of an accident.
Only handle adisc when th evehicl eis sta-
tionary.
Bear in min dthat at aspee dof only 30 mph
(approximately 50 km/h), th evehicl ecover s a
distanc eof 44 ft (approximately 14 m)per sec-
ond.
Notes on audio/video mode
Permissible data carriers
RCD audio, CD-R and CD-RW
RDVD video, DVD-R and DVD-RW (audio for-
mats PCM DTS®and Dolby®Digital)
RSD card
RUSB storage device
RApple®devices
iManufactured under license from Dolby
Laboratories. Dolby and the double-D symbol
are trademarks of Dolby Laboratories.
iFor DTS patents see
http://patents.dts.com. Manufactured
under license from DTS Licensing Limited.
DTS, the Symbol & DTS and the Symbol
together are registered trademarks, and DTS
Digital Surround is a trademark of DTS, Inc.
©
DTS, Inc. All rights reserved.
Permissible file systems
RISO 9660/Joliet standard for CDs
RUDF for video DVDs
RFAT16, FAT32, exFAT and NTFS for SD card
and USB storage media
RHFS and HFS+ for Apple®devices
iWriting access is not possible on NTFS.
Multisession CDs
For multi-session CDs, the content of the first
CD session determines how the multimedia sys-
tem will process the CD. The multimedia system
only plays back one CD session and gives prior-
ity to the first session on the CD.
Audio/video mode137
Media
Z
Page 142 of 190
XTo select the magazine tray: turn the control-ler and press to confirm.
or
XPress number buttons (1-6) on the multime-
dia system.
The DVD changer switches to the selected
magazine tray.
XWhen the Pleaseinsertdisc1.message
appears: insert a disc into the disc slot with
the printed side facing upwards.
Loading all empty magazine trays
XTo show the magazine menu: press the V
button.
XTo select LoadEmptySlots: turn and press
the controller.
The multimedia system switches to the next
empty magazine tray.
XWhen the Pleaseinsertdisc1.message
appears: insert a disc into the disc slot with
the printed side facing upwards.
Once the disc is loaded, the DVD changer
switches to the next empty tray.
If insertion of the next disc takes too long, the
disc inserted first will be played.
XRepeat these steps until all magazine trays
are filled.
The DVD changer plays the first inserted disc.
Exiting the DVD changer menu
XPress the Vbutton.
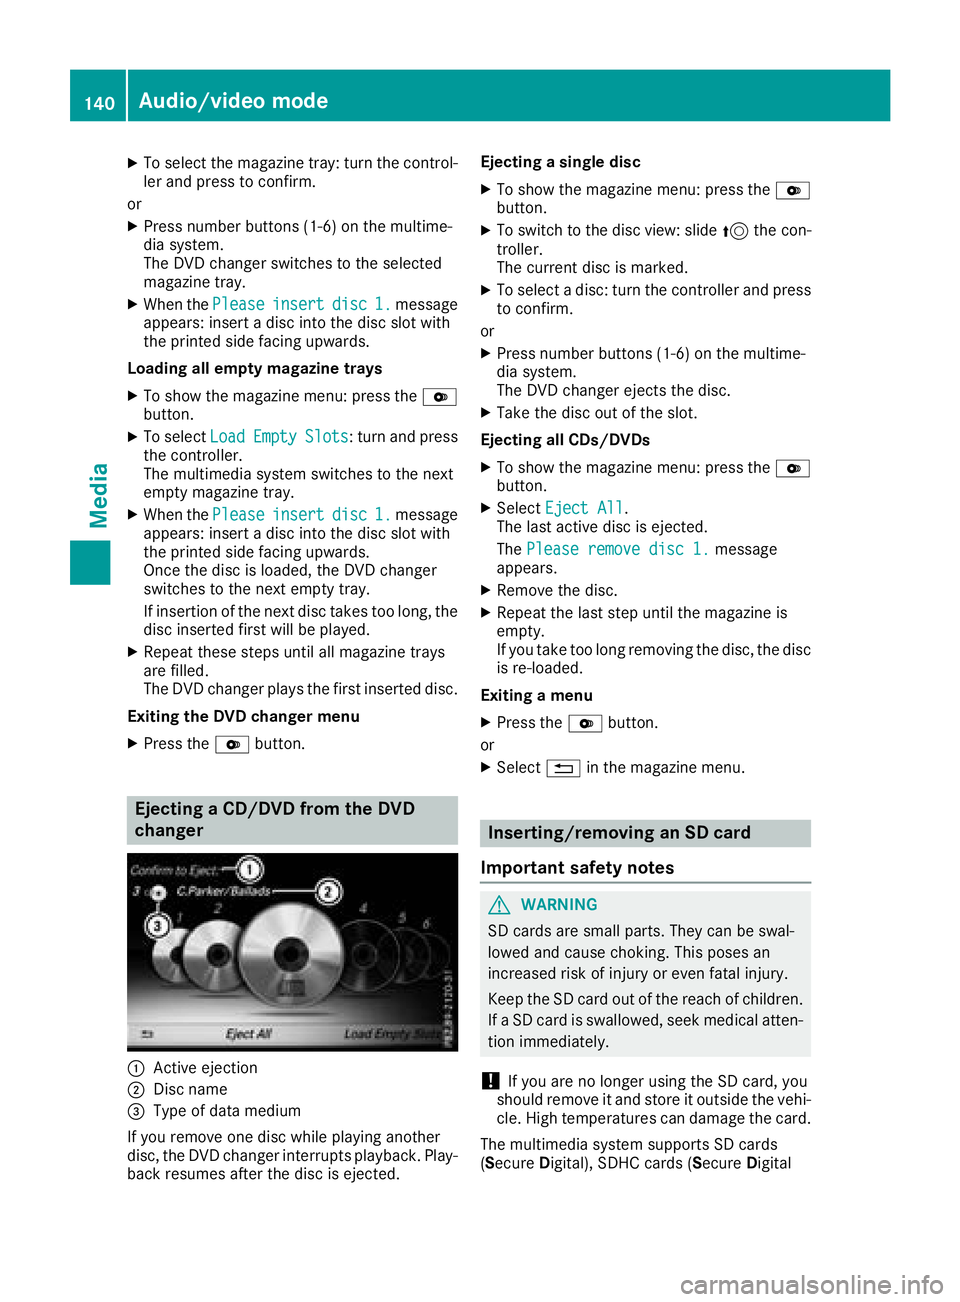
Ejecting a CD/DVD from the DVD
changer
:Active ejection
;Disc name
=Type of data medium
If you remove one disc while playing another
disc, the DVD changer interrupts playback. Play-
back resumes after the disc is ejected. Ejecting a single disc
XTo show the magazine menu: press the
V
button.
XTo switch to the disc view: slide 5the con-
troller.
The current disc is marked.
XTo select a disc: turn the controller and press
to confirm.
or
XPress number buttons (1-6) on the multime-
dia system.
The DVD changer ejects the disc.
XTake the disc out of the slot.
Ejecting all CDs/DVDs
XTo show the magazine menu: press the V
button.
XSelect Eject All.
The last active disc is ejected.
The Please remove disc 1.
message
appears.
XRemove the disc.
XRepeat the last step until the magazine is
empty.
If you take too long removing the disc, the disc
is re-loaded.
Exiting a menu
XPress the Vbutton.
or
XSelect %in the magazine menu.
Inserting/removing an SD card
Important safety notes
GWARNING
SD cards are small parts. They can be swal-
lowed and cause choking. This poses an
increased risk of injury or even fatal injury.
Keep the SD card out of the reach of children. If a SD card is swallowed, seek medical atten-
tion immediately.
!If you are no longer using the SD card, you
should remove it and store it outside the vehi-
cle. High temperatures can damage the card.
The multimedia system supports SD cards
(Secure Digital), SDHC cards (Secure Digital
140Audio/video mode
Media
Page 143 of 190
HighCapacity), and SDXC cards ( SecureDigital
eXtended Capacity.
Inserting an SD card
XInsert the SD card into the SD card slot on the
control panel until the SD card engages. The
side with the contacts must face down.
The medium is played and the files are loaded
in the background. If there are no supported
audio or video files, you will see a message to
this effect.
Removing an SD card
XPress the SD card.
The SD card is ejected.
XRemove the SD card.
Connecting USB devices
Two USB ports are located in the stowage space
under the armrest (Ypage 136).
XConnect the USB device with a suitable USB
port.
If the corresponding media menu is visible,
the medium is played and the files are loaded
in the background. Otherwise, the system
does not automatically switch to USB. If there
are no supported audio or video files, you will
see a message to this effect.
iMP3 players must support Media Transfer
Protocol (MTP).
Selecting the playback option
XIn media mode, slide 6the controller.
The media menu bar is shown.
XTo select Options: turn and press the con-
troller.
Playing similar tracks
iThis option is available as soon as the music
collection has been read and analyzed.
XTo select Play More Like This: turn and
press the controller. Selecting Play mode
XTo select
Playback Mode: press the control-
ler.
XSelect Normal Track Sequence.
The current track list is played in the order it is
stored on the data medium.
XSelect Random Track List.
The current track list is played in random
order.
XSelect Random Medium.
All tracks on the data medium are played in
random order.
Skipping to time
XTo select Skip to Time: turn and press the
controller.
A menu appears.
XTo set the time: turn the controller.
or
XSet the desired time using the number key-
pad.
Selecting an active partition
XTo select Select Active Partition: turn
and press the controller.
You can select a partition in the current USB
data medium.
Showing track information
XTo switch the Show Track Informationfunction onOor off ª: turn and press the
controller.
You display or hide information for Track,
Artist and Album in the main display field.
If the function is deactivated, the file name
and the folder name of the track are dis-
played.
Entering a track number directly
XTo enter the track number: press the g
button.
A menu appears.
XUse the number keypad to enter the desired
track number.
The track is played.
Audio/video mode141
Media
Z
Page 149 of 190
Authorizing a Bluetooth®audio device
XSelect a Bluetooth®audio device that has not
yet been authorized from the list: turn and
press the controller.
Authorization starts.
Dependin g onwhich Bluetooth
®audio device
is bein g used, the device can beauthorized
either byentering a passkey or bySecure
Simple Pairing. You can find information on
th is in the "Authorizing (connecting) a mob ile
phone" section (
Ypage 93).
After successful authorization, the Blue-
tooth
®audio device isconnected and starts
playin g.
iWith some Bluetooth®audio devices, play-
back must initial ly bestarted on the device
itself, so that the multimedia system canplay
the audio data. For the audio device used, the
output of the audio files has to bespecifie d via
Bluetooth
®.
iThe Bluetooth®audio device must support
Bluetooth®version 2.1 for connection via
Secure SimplePairing. The multimedia sys-
tem creates a six-digit co de whichis dis-
played simultaneously on both devices that
are to beconnected.
For some Bluetooth
®audio devices, the pair-
ing must also beconfirmed within 10 sec-
onds.
External authorization
If the multimedia system does not find your
Bluetooth®audio device, th ismay bedue to
particular security settings on your Bluetooth®
audio device. Inthis case, check whether your
Bluetooth®audio device can locate the mult i-
media system.
The Bluetooth
®device name of the multimed ia
system isMB Bluetooth.
XSwit ch on Bluetooth®audio mode
(Ypage 146).
XSlid e6 the controller.
The media menu bar appears.
XTo select Options: turn and press the con-
troller.
XTo select BluetoothAudioDevices: press
the controller.
A new menu appears.
XTo select ConnectviaAudioDevice: turn
and press the controller.
A message appears.
XSt art the authorization on your Bluetooth®
audio device (see the manufacturer's operat-
ing instructions).
After successful authorization, the Blue-
tooth
®audio device isconnected and starts
playing.
With some Bluetooth
®audio devices, playback
must initially be started on the device itself, so
that the multimedia system can play the audio
data.
Displaying details
XTo select a Bluetooth®audio device from the
Bluetooth®device list: turn the controller
(Ypage 146).
XTo select G: slide 9the controller.
XTo select Details: turn and press the con-
troller.
The following information concerning the
selected mobile phone is shown:
RBluetooth®name
RBluetooth®address
RAvailability status (shown after an update)
RAuthorization status
Closing the detailed display
XWait for a few seconds.
or
XPress the %button.
Starting/stopping playback
Requirement: the Bluetooth®audio menu
(Ypage 146) isshown.
St arting playback
XTo select Ì: turn and press the controller.
Playback starts. Ëis selected.
St opping playback
XSelect Ë.
A message appears. Ìisselected.
Continui ngplayback
XSelect Ì.
A message appears. Ëisselected.
Bluetooth®audio mode147
Media
Z