oil temperature MERCEDES-BENZ GLE COUPE 2019 Owner's Manual
[x] Cancel search | Manufacturer: MERCEDES-BENZ, Model Year: 2019, Model line: GLE COUPE, Model: MERCEDES-BENZ GLE COUPE 2019Pages: 370, PDF Size: 11.22 MB
Page 8 of 370
Engaging reverse gear ................... 135
Engaging the park position ............ 135
Important safety note
s.................. 135
Kickdown ....................................... 138
Manual shifting .............................. 139
Oil temperature (on-board com-
puter, Mercedes-AMG vehicles) ..... 220
Overview ........................................ 135
Problem (malfunction) ................... 141
Pulling away ................................... 130
Starting the engine ........................ 129
Steering wheel paddle shifters ...... 139
Trailer towing ................................. 138
Transmission position display ........ 136
Transmission positions .................. 137
Automatic transmission emer-
gency mode ....................................... 141
AUX jacks
CD/DVD drive ............................... 271
Axle load, permissible (trailer tow-
ing) ...................................................... 367 B
Back button ....................................... 265
Bag hook ............................................ 277
Ball coupling
Installing ........................................ 201
Removing ....................................... 205
BAS (Brake Assist System) ................. 65
Battery (SmartKey)
Checking .......................................... 77
Important safety notes .................... 77
Replacing ......................................... 77
Battery (vehicle)
Charging ........................................ 317
Display message ............................ 237
Important safety notes .................. 315
Jump starting ................................. 318
Overview ........................................ 315
Replacing ....................................... 317
Belt warning ......................................... 46
Bicycle rack ....................................... 205
Blind Spot Assist
Activating/deactivating ................. 217
Display message ............................ 241
Notes/function .............................. 191
Trailer towing ................................. 193 see Active Blind Spot Assist
Bluetooth ®
Searching for a mobile phone ........ 268
Searching for a mobile phone
(device manager) ........................... 269
see also Digital Operator's Man-
ual .................................................. 264
Telephony ...................................... 268
Brake Assist System
see BAS (Brake Assist System)
Brake fluid
Display message ............................ 229
Notes ............................................. 362
Brake force distribution
see EBD (electronic brake force
distribution)
Brake lamps
Display message ............................ 235
Brake linings
Display message ............................ 229
Brakes
ABS .................................................. 64
BAS .................................................. 65
Brake fluid (notes) ......................... 362
Braking assistance appropriate to
the situation ..................................... 66
Display message ............................ 224
Hill start assist ............................... 130
Important safety notes .................. 149
Maintenance .................................. 150
Parking brake ................................ 145
Riding tips ...................................... 149
Warning lamp ................................. 253
Braking assistance appropriate to
the situation
Function/note s................................ 66
Breakdown assistance
Where will I find...? ........................ 309
see Flat tire
see Towing away
Brightness control (instrument
cluster lighting) ................................... 36 C
California Important notice for retail cus-
tomers and lessees .......................... 27 6
Index
Page 13 of 370
Engine oil
Adding .......................................... .298
Additives ........................................ 362
Checking the oil level ..................... 297
Checking the oil level using the
dipstick .......................................... 298
Display message ............................ 238
Filling capacity ............................... 362
Notes about oil grades ................... 361
Notes on oil level/consumption .... 297
Temperature (on-board computer, Mercedes-AMG vehicles) .............. .220
Engine switch-off
see ECO start/stop function
Entering an address
see also Digital Operator's Man-
ual ................................................. .264
ESP ®
(Electronic Stability Pro-
gram)
AMG menu (on-board computer) ... 220
Characteristics ................................. 68
Deactivating/activating ................... 68
Display message ............................ 224
Function/notes ................................ 67
General notes .................................. 67
Important safety information ........... 68
Warning lamp ................................. 256
ETS/4ETS (Electronic Traction Sys-
tem) ...................................................... 67
Exhaust check ................................... 147
Exhaust pipe (cleaning instruc-
tions) ................................................. .306
Exterior lighting
see Lights
Exterior mirrors
Adjusting ....................................... 102
Dipping (automatic) ....................... 103
Folding in when locking (on-boardcomputer) ...................................... 219
Folding in/out (automatically) ....... 103
Folding in/out (electrically) ........... 103
Out of position (troubleshooting) ... 103
Setting ........................................... 103
Storing settings (memory func-
tion) ............................................... 105
Storing the parking position .......... 104
Eyeglasses compartment ................. 274 F
Favorites Overview ........................................ 266
Filler cap
see Refueling
Flat tire
MOExtended tire s.......................... 311
Preparing the vehicle ..................... 310
TIREFIT kit ...................................... 312
see Emergency spare wheel
Floormats ........................................... 295
Fog lamps (extended range) ............. 109
Folding the rear bench seat for-
wards/back ....................................... 275
Fording
Off-road ......................................... 151
On flooded roads ........................... 151
Frequencies
Mobile phone ................................. 357
Two-way radio ................................ 357
Fuel
Additives ........................................ 361
Consumption statistics .................. 211
Displaying the current consump-
tion ................................................ 212
Displaying the range ...................... 212
Driving tips .................................... 147
Fuel gaug e....................................... 36
Grade (gasoline )............................ 360
Important safety notes .................. 360
Problem (malfunction) ................... 143
Refueling ........................................ 142
Tank content/reserve fue l............. 360
Fuel filler flap
Opening ......................................... 143
Fuel level
Calling up the range (on-board
computer) ...................................... 212
Fuel tank
Capacity ........................................ 360
Problem (malfunction) ................... 143
Fuses
Allocation chart ............................. 324
Before changing ............................. 324
Dashboard fuse box ....................... 325
Fuse box in the engine compart-
ment .............................................. 325 Index
11
Page 17 of 370
N
Navigation Entering a destination .................... 266
Menu (on-board computer) ............ 212
see also Digital Operator's Man-
ua l.................................................. 264
Notes on breaking-in a new vehi-
cle ....................................................... 126 O
Occupant Classification System
(OCS) Conditions ....................................... 50
Faults ............................................... 53
Operation ......................................... 50
System self-test ............................... 52
Occupant safety
Air bags ........................................... 47
Automatic measures after an acci-
dent ................................................. 57
Belt warning ..................................... 46
Children in the vehicle ..................... 57
Important safety notes .................... 42
Introduction to the restraint sys-
tem .................................................. 42
Occupant Classification System
(OCS) ............................................... 49
PASSENGER AIR BAG indicator
lamps ............................................... 43
Pets in the vehicle ........................... 63
PRE-SAFE ®
(anticipatory occu-
pant protection) ............................... 56
PRE-SAFE ®
PLUS (anticipatory
occupant protection PLUS) .............. 57
Restraint system warning lamp ........ 43
Seat belt .......................................... 43
OCS
Faults ............................................... 53
Operation ......................................... 50
Odometer ........................................... 211
Off-road driving
Approach/departure angle ............ 366
Checklist after driving off-road ...... 154
Checklist before driving off-road .... 153
General information ....................... 153
Important safety notes .................. 152 Maximum gradient climbing abil-
ity .................................................. 367
Maximum water depth ................... 366
Traveling uphill ............................... 155
Off-road system
4MATIC .......................................... 167
DSR ............................................... 167
Oil
see Engine oil
On-board computer
Active Distance Assist
DISTRONIC .................................... 163
AMG menu ..................................... 220
Assistance menu ........................... 216
Audio menu ................................... 214
Convenience submenu .................. 219
Display messages .......................... 222
Displaying a service message ........ 300
Factory settings submenu ............. 220
Important safety notes .................. 208
Instrument cluster submenu .......... 218
Lighting submenu .......................... 218
Menu overview .............................. 211
Message memory .......................... 223
Navigation menu ............................ 212
Operation ....................................... 209
RACETIMER ................................... 221
Service menu ................................. 217
Settings menu ............................... 217
Standard display ............................ 211
Telephone menu ............................ 214
Trip menu ...................................... 211
Vehicle submenu ........................... 219
Video DVD operation ..................... 214
Operating safety
Declaration of conformity ................ 29
Important safety notes .................... 29
Operating system
see On-board computer
Operation
Digital Operator's Manua l................ 25
Operator's Manual
Overview .......................................... 27
Vehicle equipment ........................... 27
Outside temperature display ........... 208
Overhead control panel ...................... 40
Override feature
Rear side window s........................... 63 Index
15
Page 22 of 370
T
Tachometer ........................................ 208
Tailgate
Display message ............................ 248
Emergency unlocking ....................... 85
Important safety notes .................... 82
Limiting the opening angle ............... 85
Opening dimensions ...................... 364
Opening/closing (automatically
from inside) ...................................... 84
Opening/closing (automatically
from outside) ................................... 83
Opening/closing (from outside) ....... 82
Tank content
Fuel gauge ....................................... 36
Technical data
Capacities ...................................... 359
Drawbar load (maximum) ............... 367
Information .................................... 357
Tires/wheels ................................. 352
Trailer load s................................... 367
Vehicle data ................................... 364
Telephone
Accepting a call (multifunction
steering wheel) .............................. 215
Authorizing a mobile phone (con-
necting) ......................................... 268
Authorizing a mobile phone via the device manager (connecting )......... 269
Connecting a mobile phone
(device manager) ........................... 269
Connecting a mobile phone (gen-
eral information) ............................ 268
Display message ............................ 249
Menu (on-board computer) ............ 214
Number from the phone book ........ 215
Redialing ........................................ 215
Rejecting/ending a call ................. 215
see also Digital Operator's Man-
ual .................................................. 264
Temperature
Coolant (display in the instrumentcluster) .......................................... 209
Coolant (on-board computer,
Mercedes-AMG vehicles) ............... 220
Engine oil (on-board computer,
Mercedes-AMG vehicles) ............... 220 Outside temperature ...................... 208
Setting (climate control )................ 120
Transmission oil (on-board com-
puter, Mercedes-AMG vehicles) ..... 220
Through-loading feature ................... 275
Timing (RACETIMER) ......................... 221
Tire pressure
Calling up (on-board computer) ..... 334
Checking manually ........................ 333
Display message ............................ 245
Maximum ....................................... 333
Not reached (TIREFIT) .................... 313
Notes ............................................. 332
Reached (TIREFIT) .......................... 314
Recommended ............................... 330
Tire pressure loss warning system
General notes ................................ 333
Important safety notes .................. 334
Restarting ...................................... 334
Tire pressure monitor
Checking the tire pressure elec-
tronically ........................................ 336
Function/note s............................. 334
General notes ................................ 334
Important safety notes .................. 335
Radio type approval for the tire
pressure monitor ........................... 337
Restarting ...................................... 337
Warning lamp ................................. 263
Warning message .......................... 336
Tire pressure table ............................ 331
Tire-change tool kit ........................... 310
TIREFIT kit
Important safety notes .................. 312
Storage location ............................ 310
Tire pressure not reached .............. 313
Tire pressure reached .................... 314
Using ............................................. 312
Tires
Aspect ratio (definition) ................. 347
Average weight of the vehicle
occupants (definition) .................... 345
Bar (definition) ............................... 345
Changing a whee l.......................... 347
Characteristics .............................. 345
Checking ........................................ 327
Curb weight (definition) ................. 346
Definition of terms ......................... 345 20
Index
Page 76 of 370
SmartKey
Important safety notes
G
WARNING
If children are left unsupervised in the vehicle, they could:
R open the doors, thus endangering other
people or road users.
R get out and disrupt traffic.
R operate the vehicle's equipment.
Additionally, children could set the vehicle in
motion if, for example, they:
R release the parking brake.
R shifting the automatic transmission out of
park position P
R Start the engine.
There is a risk of an accident and injury.
When leaving the vehicle, always take the
SmartKey with you and lock the vehicle. Never
leave children or animals unattended in the
vehicle. Always keep the SmartKey out of
reach of children. G
WARNING
If you attach heavy or large objects to the
SmartKey, the SmartKey could be uninten-
tionally turned in the ignition lock. This could
cause the engine to be switched off. There is a risk of an accident.
Do not attach any heavy or large objects to the
SmartKey. Remove any bulky key rings before
inserting the SmartKey into the ignition lock.
! Keep the SmartKey away from strong mag-
netic fields. Otherwise, the remote control
function could be affected.
Strong magnetic fields can occur in the vicin- ity of powerful electrical installations.
Do not keep the SmartKey: R with electronic devices, e.g. a mobile phone
or another SmartKey.
R with metallic objects, e.g. coins or metal foil.
R inside metallic objects, e.g. a metal case.
This can affect the functionality of the Smart- Key. Do not keep the KEYLESS-GO or KEYLESS-GO
Start function key in the temperature-controlled
cup holder. Otherwise, the KEYLESS-GO or KEY- LESS-GO Start function key will not be detected.
Vehicles with KEYLESS-GO start function: do
not keep the SmartKey in the cargo compart-
ment. Otherwise, the SmartKey may not be
detected, e.g. when starting the engine using
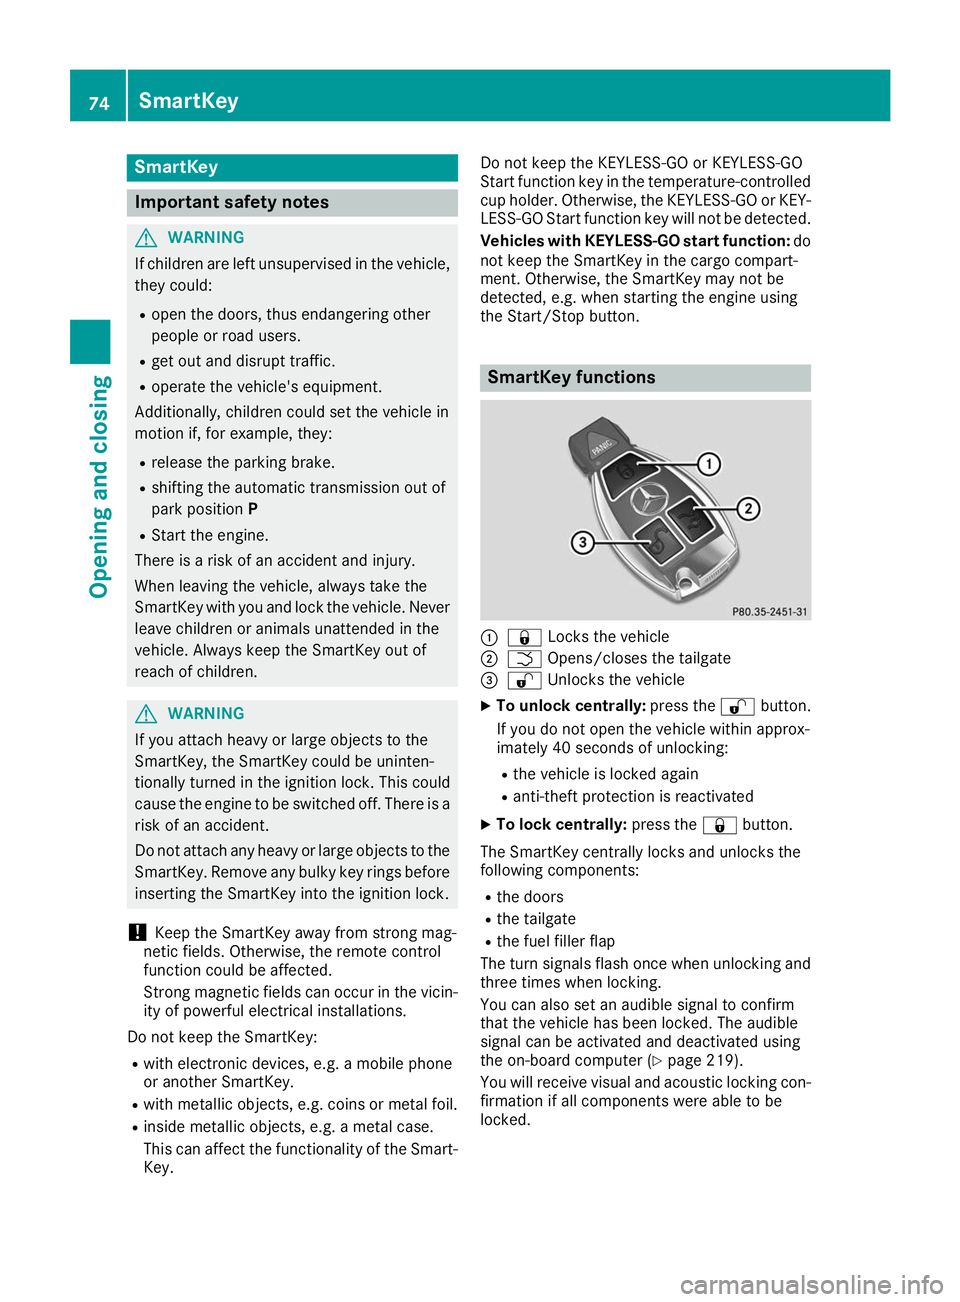
the Start/Stop button. SmartKey functions
0043
0037 Locks the vehicle
0044 0054 Opens/closes the tailgate
0087 0036 Unlocks the vehicle
X To unlock centrally: press the0036button.
If you do not open the vehicle within approx-
imately 40 seconds of unlocking:
R the vehicle is locked again
R anti-theft protection is reactivated
X To lock centrally: press the0037button.
The SmartKey centrally locks and unlocks the
following components:
R the doors
R the tailgate
R the fuel filler flap
The turn signals flash once when unlocking and three times when locking.
You can also set an audible signal to confirm
that the vehicle has been locked. The audible
signal can be activated and deactivated using
the on-board computer (Y page 219).
You will receive visual and acoustic locking con-
firmation if all components were able to be
locked. 74
SmartKeyOpening and closing
Page 129 of 370
!
Do not warm up the engine while stationary.
Pull away immediately. Avoid high engine
speeds and full throttle until the engine has
reached its operating temperature.
In vehicles with automatic transmission,
engage positions P and R only when the vehi-
cle is stationary.
Where possible, avoid spinning the drive
wheels when pulling away on slippery roads.
You could otherwise damage the drive train.
! Mercedes-AMG vehicles:
at low engine oil
temperatures below 68 ‡ (+20 †), the max-
imum engine speed is restricted in order to
protect the engine. To protect the engine and
maintain smooth engine operation, avoid driv-
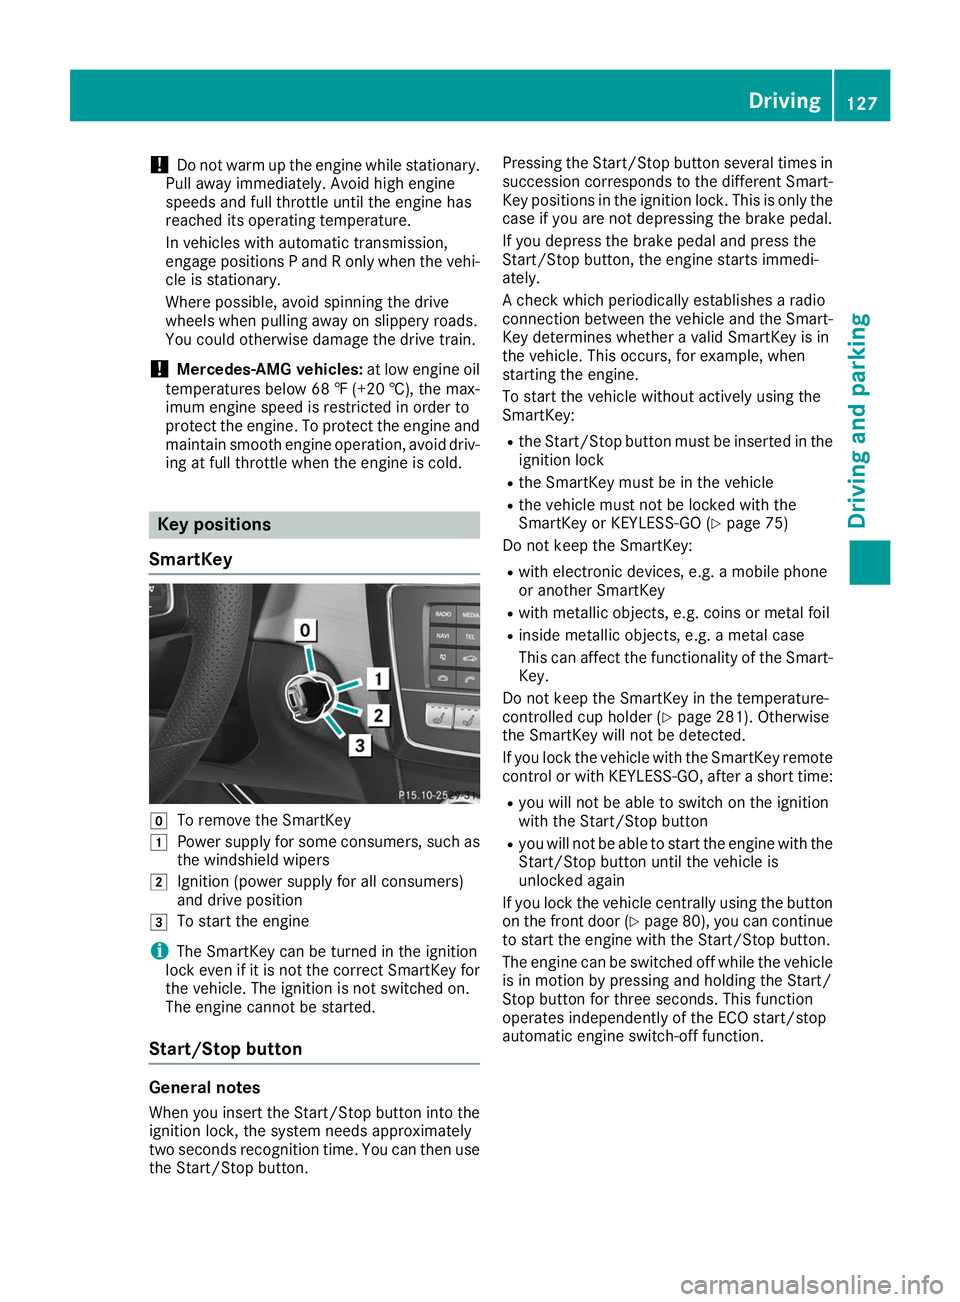
ing at full throttle when the engine is cold. Key positions
SmartKey 005A
To remove the SmartKey
0047 Power supply for some consumers, such as
the windshield wipers
0048 Ignition (power supply for all consumers)
and drive position
0049 To start the engine
i The SmartKey can be turned in the ignition
lock even if it is not the correct SmartKey for
the vehicle. The ignition is not switched on.
The engine cannot be started.
Start/Stop button General notes
When you insert the Start/Stop button into the
ignition lock, the system needs approximately
two seconds recognition time. You can then use the Start/Stop button. Pressing the Start/Stop button several times in
succession corresponds to the different Smart-
Key positions in the ignition lock. This is only the
case if you are not depressing the brake pedal.
If you depress the brake pedal and press the
Start/Stop button, the engine starts immedi-
ately.
A check which periodically establishes a radio
connection between the vehicle and the Smart-
Key determines whether a valid SmartKey is in
the vehicle. This occurs, for example, when
starting the engine.
To start the vehicle without actively using the
SmartKey:
R the Start/Stop button must be inserted in the
ignition lock
R the SmartKey must be in the vehicle
R the vehicle must not be locked with the
SmartKey or KEYLESS-GO (Y page 75)
Do not keep the SmartKey:
R with electronic devices, e.g. a mobile phone
or another SmartKey
R with metallic objects, e.g. coins or metal foil
R inside metallic objects, e.g. a metal case
This can affect the functionality of the Smart-
Key.
Do not keep the SmartKey in the temperature-
controlled cup holder (Y page 281). Otherwise
the SmartKey will not be detected.
If you lock the vehicle with the SmartKey remote control or with KEYLESS-GO, after a short time:
R you will not be able to switch on the ignition
with the Start/Stop button
R you will not be able to start the engine with the
Start/Stop button until the vehicle is
unlocked again
If you lock the vehicle centrally using the button
on the front door (Y page 80), you can continue
to start the engine with the Start/Stop button.
The engine can be switched off while the vehicle
is in motion by pressing and holding the Start/
Stop button for three seconds. This function
operates independently of the ECO start/stop
automatic engine switch-off function. Driving
127Driving and parking Z
Page 154 of 370
When driving in snow with or without snow
chains, select driving program Slippery
(Y page 134).
The outside temperature indicator is not
designed to serve as an ice-warning device and is therefore unsuitable for that purpose.
Changes in the outside temperature are dis-
played after a short delay.
Indicated temperatures just above the freezing
point do not guarantee that the road surface is
free of ice. The road may still be icy, especially in
wooded areas or on bridges. You should pay
special attention to road conditions when tem-
peratures are around the freezing point.
For more information on driving with snow
chains, see (Y page 329).
For more information on driving with summer
tires, see (Y page 329).
Observe the notes in the "Changing a wheel"
section (Y page 347). Off-road driving
Important safety notes G
WARNING
If you drive on a steep incline at an angle or
turn when driving on an incline, the vehicle
could slip sideways, tip and rollover. There is a risk of an accident.
Always drive on a steep incline in the line of
fall (straight up or down) and do not turn the
vehicle. G
WARNING
Flammable material such as leaves, grass or
twigs may ignite if they come into contact with hot parts of the exhaust system. There is a risk of fire.
When driving on an unpaved road or off-road,
check the vehicle underside regularly. In par-
ticular, remove trapped plant parts or other
flammable material. Contact a qualified spe-
cialist workshop immediately if damage is
detected. G
WARNING
If the vehicle level is high, the vehicle center of gravity is raised. This could cause the vehicleto tip over more easily on uphill or downhill
gradients. There is a risk of an accident.
Select the lowest possible vehicle level.
! There is a risk of damage to the vehicle if:
R the vehicle becomes stuck, e.g. on a high
curb or an unpaved road
R you drive too fast over an obstacle, e.g. a
curb, a speed bump or a pothole in the road
R a heavy object strikes the underbody or
parts of the chassis
In situations like this, the body, the under-
body, chassis parts, wheels or tires could be
damaged without the damage being visible.
Components damaged in this way can unex-
pectedly fail or, in the case of an accident, no
longer withstand the loads they are designed
to.
If the underbody paneling is damaged, com-
bustible materials such as leaves, grass or
twigs can gather between the underbody and
the underbody paneling. If these materials
come in contact with hot parts of the exhaust system, they can catch fire.
In such situations, have the vehicle checked
and repaired immediately at a qualified spe-
cialist workshop. If on continuing your jour-
ney you notice that driving safety is impaired,
pull over and stop the vehicle immediately,
paying attention to road and traffic condi-
tions. In such cases, consult a qualified spe-
cialist workshop.
When driving off-road, substances such as sand,
mud and water or water mixed with oil may get
into the brakes. This could result in a reduced
braking effect or in total brake failure and also in
increased wear and tear. The braking charac-
teristics change depending on the material
entering the brakes. Clean the brakes after driv-
ing off-road. If you detect a reduced braking
effect or grinding noises, have the brake system checked in a qualified specialist workshop as
soon as possible. Adapt your driving style to the
different braking characteristics.
Driving off-road increases the likelihood of dam- age to the vehicle, which, in turn, can lead to
failure of the mechanical assembly or systems.
Adapt your driving style to suit the terrain con-
ditions. Drive carefully. Have damage to the 152
Driving tipsDriving and parking
Page 222 of 370
X
Press the 0059or0065 button on the steering
wheel to select the Sett.
Sett. menu.
X Press the 0064or0063 button to select the
Convenience
Convenience submenu.
X Press 0076to confirm.
X Press the 0064or0063 button to select the
Auto. Mirror Folding
Auto. Mirror Folding function.
If the Auto. Mirror Folding
Auto. Mirror Folding function is
switched on, the multifunction display shows the exterior mirror in orange.
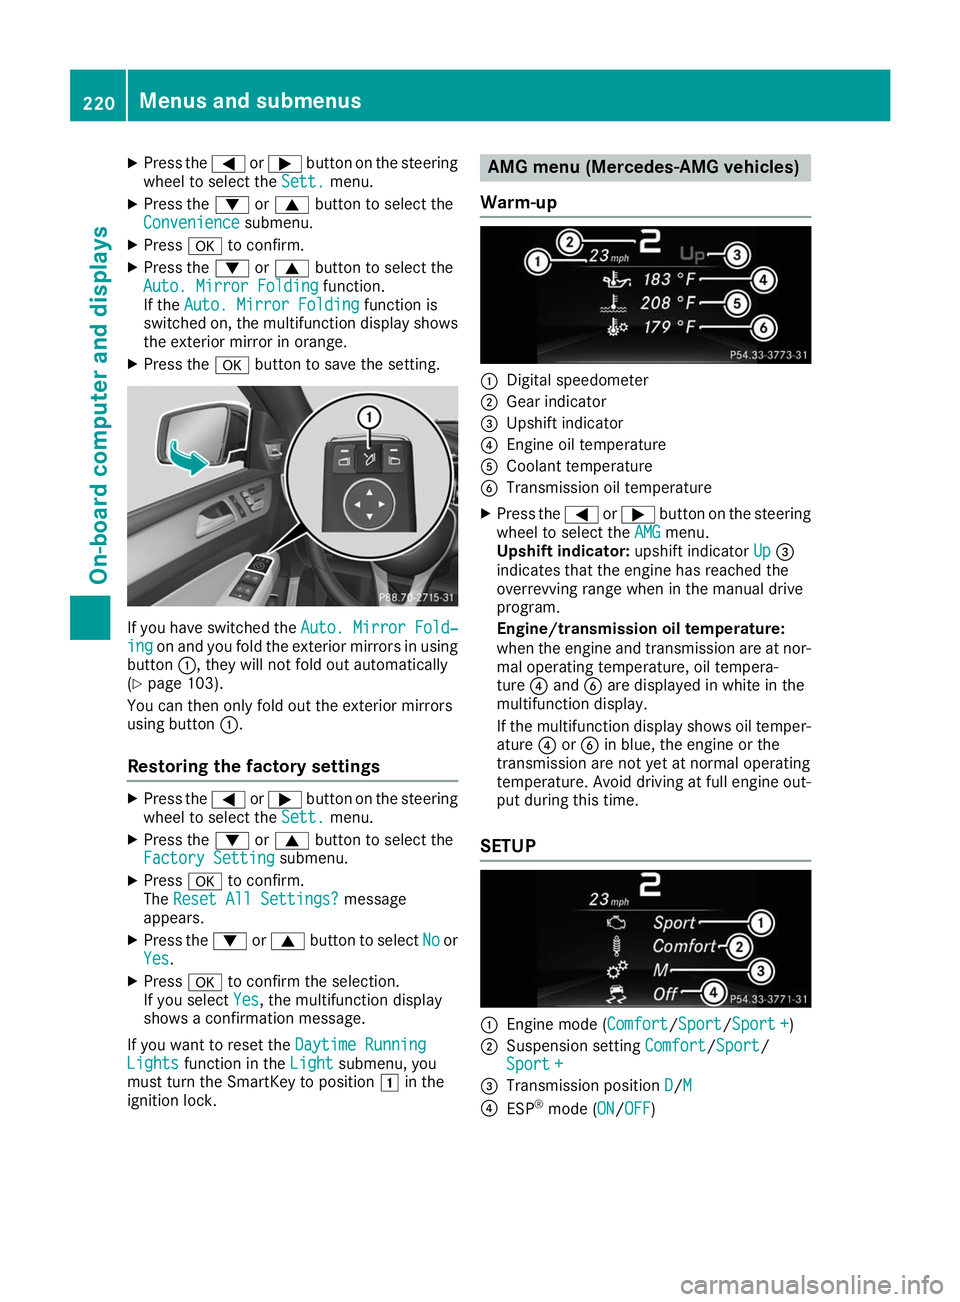
X Press the 0076button to save the setting. If you have switched the
Auto. Mirror Fold‐
Auto. Mirror Fold‐
ing
ing on and you fold the exterior mirrors in using
button 0043, they will not fold out automatically
(Y page 103).
You can then only fold out the exterior mirrors
using button 0043.
Restoring the factory settings X
Press the 0059or0065 button on the steering
wheel to select the Sett.
Sett. menu.
X Press the 0064or0063 button to select the
Factory Setting
Factory Setting submenu.
X Press 0076to confirm.
The Reset All Settings?
Reset All Settings? message
appears.
X Press the 0064or0063 button to select No
Noor
Yes
Yes.
X Press 0076to confirm the selection.
If you select Yes
Yes, the multifunction display
shows a confirmation message.
If you want to reset the Daytime Running
Daytime Running
Lights
Lights function in the Light
Light submenu, you
must turn the SmartKey to position 0047in the
ignition lock. AMG menu (Mercedes-AMG vehicles)
Warm-up 0043
Digital speedometer
0044 Gear indicator
0087 Upshift indicator
0085 Engine oil temperature
0083 Coolant temperature
0084 Transmission oil temperature
X Press the 0059or0065 button on the steering
wheel to select the AMG
AMGmenu.
Upshift indicator: upshift indicatorUp
Up0087
indicates that the engine has reached the
overrevving range when in the manual drive
program.
Engine/transmission oil temperature:
when the engine and transmission are at nor-
mal operating temperature, oil tempera-
ture 0085and 0084are displayed in white in the
multifunction display.
If the multifunction display shows oil temper- ature 0085or0084 in blue, the engine or the
transmission are not yet at normal operating
temperature. Avoid driving at full engine out-
put during this time.
SETUP 0043
Engine mode (Comfort Comfort/SportSport/Sport +Sport +)
0044 Suspension setting Comfort
Comfort/ Sport Sport/
Sport +
Sport +
0087 Transmission position D
D/MM
0085 ESP ®
mode (ON ON/OFFOFF) 220
Menus and submenusOn-board computer and displays
Page 300 of 370
When checking the oil level:
R
park the vehicle on a level surface.
R the engine should be switched off for approx-
imately five minutes if the engine is at normal
operating temperature.
R if the engine is not at normal operating tem-
perature, e.g. if the engine was only started
briefly, wait about 30 minutes before carrying
out the measurement.
Checking the engine oil level using the
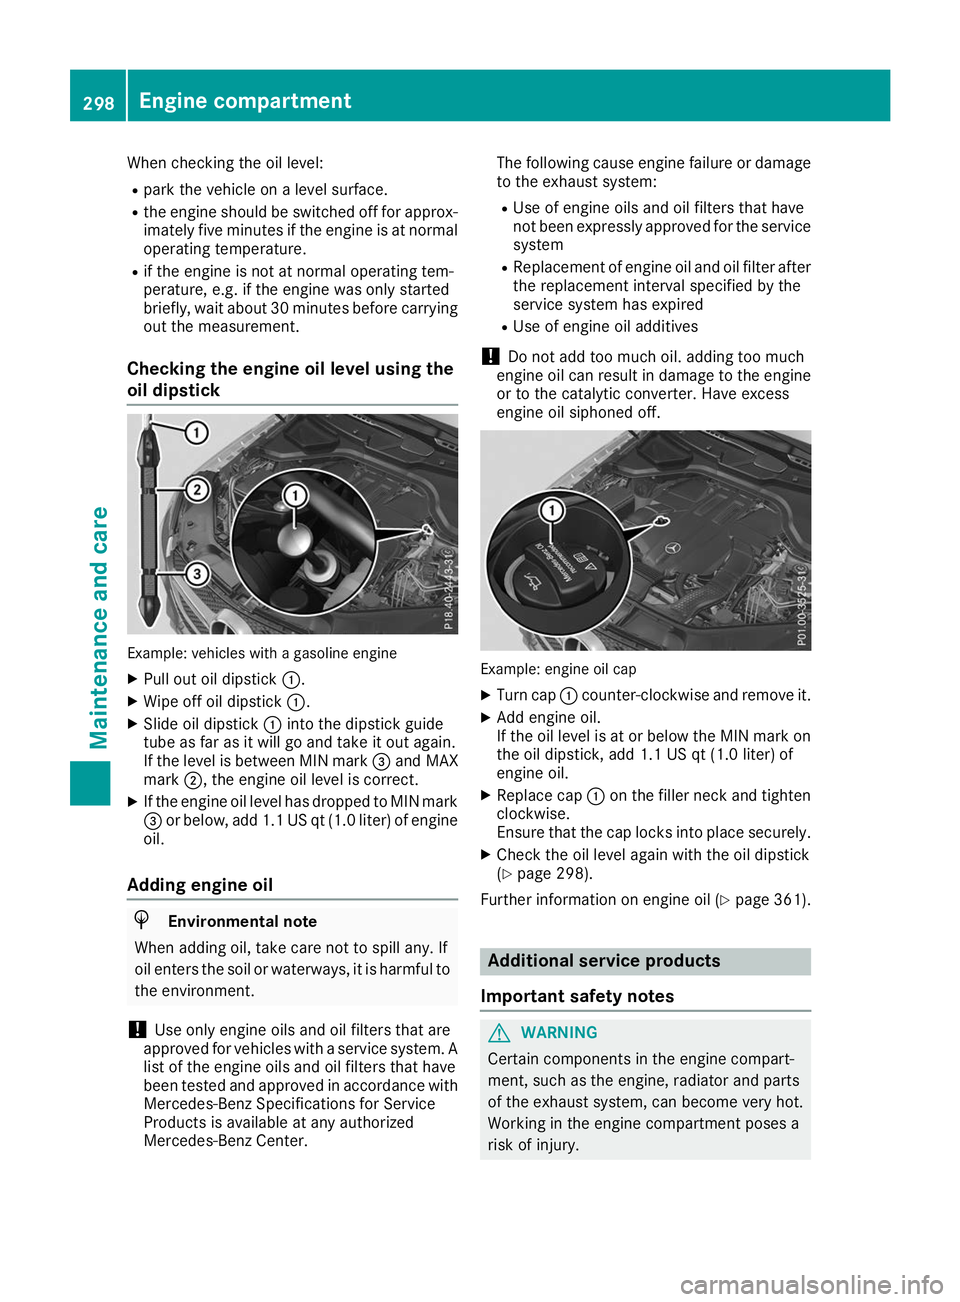
oil dipstick Example: vehicles with a gasoline engine
X Pull out oil dipstick 0043.
X Wipe off oil dipstick 0043.
X Slide oil dipstick 0043into the dipstick guide
tube as far as it will go and take it out again.
If the level is between MIN mark 0087and MAX
mark 0044, the engine oil level is correct.
X If the engine oil level has dropped to MIN mark
0087 or below, add 1.1 US qt (1.0 liter) of engine
oil.
Adding engine oil H
Environmental note
When adding oil, take care not to spill any. If
oil enters the soil or waterways, it is harmful to the environment.
! Use only engine oils and oil filters that are
approved for vehicles with a service system. A list of the engine oils and oil filters that have
been tested and approved in accordance with
Mercedes-Benz Specifications for Service
Products is available at any authorized
Mercedes-Benz Center. The following cause engine failure or damage
to the exhaust system:
R Use of engine oils and oil filters that have
not been expressly approved for the service
system
R Replacement of engine oil and oil filter after
the replacement interval specified by the
service system has expired
R Use of engine oil additives
! Do not add too much oil. adding too much
engine oil can result in damage to the engine or to the catalytic converter. Have excess
engine oil siphoned off. Example: engine oil cap
X Turn cap 0043counter-clockwise and remove it.
X Add engine oil.
If the oil level is at or below the MIN mark on
the oil dipstick, add 1.1 US qt (1.0 liter) of
engine oil.
X Replace cap 0043on the filler neck and tighten
clockwise.
Ensure that the cap locks into place securely.
X Check the oil level again with the oil dipstick
(Y page 298).
Further information on engine oil (Y page 361). Additional service products
Important safety notes G
WARNING
Certain components in the engine compart-
ment, such as the engine, radiator and parts
of the exhaust system, can become very hot.
Working in the engine compartment poses a
risk of injury. 298
Engine compartmentMaintenance and care
Page 305 of 370
Information about the correct distance is
available from the equipment manufacturer.
Move the power washer nozzle around when
cleaning your vehicle.
The water temperature of the power washer
must not exceed 140 ‡ (60 †).
Cleaning the paintwork !
Do not affix:
R stickers
R films
R magnetic plates or similar items
to painted surfaces. You could otherwise
damage the paintwork.
Scratches, corrosive deposits, areas affected by
corrosion and damage caused by inadequate
care cannot always be completely repaired. In
such cases, visit a qualified specialist workshop.
X Remove dirt immediately, where possible,
while avoiding rubbing too hard.
X Soak insect remains with insect remover and
rinse off the treated areas afterwards.
X Soak bird droppings with water and rinse off
the treated areas afterwards.
X Remove tree resin, oils, fuels and greases by
rubbing gently with a cloth soaked in petro-
leum ether or lighter fluid
X Remove coolant and brake fluid with a moist
cloth and clear water.
X Use tar remover to remove tar stains.
X Use silicone remover to remove wax.
If water no longer forms "beads" on the paint
surface, use the paint care products recommen- ded and approved by Mercedes-Benz. This is the
case approximately every three to five months,
depending on the climate conditions and the
care product used.
If dirt has penetrated the paint surface or if the
paint has become dull, the paint cleaner recom-
mended and approved by Mercedes-Benz
should be used.
Do not use these care products in the sun or on the hood while the hood is hot.
X Use a suitable touch-up stick, e.g. MB Touch-
Up Stick, to repair slight damage to the paint- work quickly and provisionally. Matte finish care !
Never polish the vehicle or the light alloy
wheels. Polishing causes the finish to shine.
! The following can give the paint a glossy
appearance and thus reduce the matt effect:
R Rubbing hard with unsuitable agents
R Washing the vehicle in direct sunlight
! Never use paint cleaner, buffing or polishing
products, or gloss preserver, e.g. wax, for the purpose of paintwork care. These products
are only suitable for high-gloss surfaces. Their
use on vehicles with matte paintwork leads to
considerable surface damage or, more spe-
cifically, to shiny, spotted areas.
Always have paintwork repairs carried out at a
qualified specialist workshop.
! Only use automatic car washes which cor-
respond to the latest technological stand-
ards. Never use wash programs which finish
by treating the vehicle with hot wax.
Observe these notes if your vehicle has a clear
matte finish. This will help you to avoid damage
to the paintwork due to incorrect treatment.
These notes also apply to light alloy wheels with
a clear matte finish.
i Use only insect remover and car shampoo
from the range of recommended and
approved Mercedes-Benz care products.
Cleaning the decorative film !
The following may have an effect on the ser-
vice life and color of decorative film:
R sunlight
R temperature, e.g. hot-air fan
R weather conditions
R stone impacts and dirt
R chemical cleaning agents
R greasy substances
! Do not use any types of polish on matt dec-
orative film. Polishing surfaces covered with
film gives it a shiny finish.
! Do not treat matt or structured decorative
film with wax. This may lead to marks that
cannot be removed.
Observe the notes in the matte finish paintwork
care and treatment chapter (Y page 303). Care
303Maintenance and care Z