wipers MERCEDES-BENZ GLE COUPE 2021 Owners Manual
[x] Cancel search | Manufacturer: MERCEDES-BENZ, Model Year: 2021, Model line: GLE COUPE, Model: MERCEDES-BENZ GLE COUPE 2021Pages: 525, PDF Size: 8.83 MB
Page 5 of 525
Symbols
........................................................ 5At
agl ance .................................................... 6
Cockpit ........................................................... 6
Indica tor and warning lamps ........................ .10
Overhead contro l panel ................................ 12
Door operating unit and seat adjustment ..... 14
Control settings in there ar passenger
compartment ................................................ 16
Emergencies and breakdowns ...................... 18Digital Owner's Manual
.............................20
Calling up the Digital Owner's Manual ..........20 Genera
l notes............................................. 22
Pr otection of the environment ......................22
Ta ke -ba ckof end-of-life vehicles ...................22
Mercedes-Benz GenuineParts ....................... 23
Owner's Manual ............................................ 24
Operating saf ety .......................................... .24
Declaration of conformity ............................. 26
Diagno stics connection ................................ 31
Qualified specialist workshop ....................... 33 Ve
hicle registration ....................................... 33
Cor rect use of theve hicle ............................33
Information on the REA CHregulation ........... 34
No tesfo r persons with electronic medi‐
cal aids ......................................................... 34
Implied warranty .......................................... .35
QR code forre scue card ...............................35
Data storage .................................................35
Copyright ...................................................... 38 Occupant saf
ety......................................... 39
Re stra int sy stem ...........................................39
Seat belts ...................................................... 41
Airbags ......................................................... 45
PRE-SAFE ®
sy stem ....................................... 52
Au tomatic measure s after an accident ......... 54
Safely transporting children in theve hi‐
cle ................................................................54
No tes on pets in theve hicle .........................73 Opening and closing
.................................. 75
Ke y .............................................................. .75
Doo rs............................................................ 78
Load compartment ....................................... 83 Side windo
ws............................................... 88
Sliding sunroof .............................................. 91
Anti-theft pr otection .....................................95 Seats and
stowing ..................................... 99
No tes on the cor rect driver's seat posi‐
tion ............................................................... 99
Seats ............................................................ 99
St eering wheel ............................................ 11 0
Easy entry and exitfeature .......................... 111
Memory function ......................................... 11 3
St ow age areas ............................................ .114
Cup holders ................................................ 127
Soc kets ....................................................... 12 8
Wi reless charging of the mobile phone
and connection with theex terior aerial ...... 13 0
Fitting/removing thefloor mats ................. 13 2 Light and sight
......................................... 13 3
Exterior lighting .......................................... 13 3
Interior lighting ........................................... 14 0
Wi ndsc reen wipers and windscreen
wa sher sy stem ............................................ 14 2
Mir rors ........................................................ 14 52
Contents
Page 145 of 525
Switching
the interior lighting switch-off
delay time on/off Multimedia sy
stem:
4 © 5
Settings 5
Lights
5 Int. light. del. sw. off #
Switch the switch-off delay time on or off.
When this function is active, the interior light‐
ing lights up for a short time af terth eve hicle
is loc ked. Wi
ndscreen wipers and windscreen washer
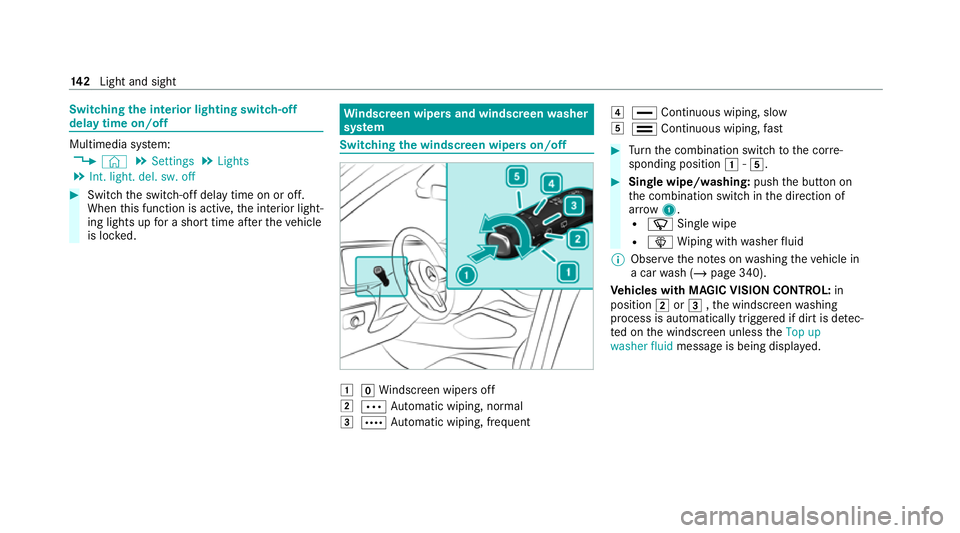
sy stem Switching
the windscreen wipers on/off 0047
005AWindsc reen wipers off
0048 0062 Automatic wiping, normal
0049 0063 Automatic wiping, frequent 004A
00AA Continuous wiping, slow
004B 00A9 Continuous wiping, fast #
Turn the combination switch tothe cor re‐
sponding position 0047-004B. #
Single wipe/washing: pushthe button on
th e combination switch in the direction of
ar row 1.
R 00D3 Single wipe
R 00D4 Wiping with washer fluid
% Obser vethe no tes on washing theve hicle in
a car wash (/ page 340).
Ve hicles with MAGIC VISION CONTROL: in
position 0048or0049 ,th e windscreen washing
process is automatically triggered if dirt is de tec‐
te d on the windscreen unless theTop up
washer fluid message is being displa yed. 14 2
Light and sight
Page 146 of 525
Re
placing the windsc reen wiper blades &
WARNING Risk of becoming trapped if
th e windscreen wipers are switched on
while wiper blades are being replaced
If th e windscreen wipers begin tomo vewhile
yo u are changing the wiper blades, you can
be trapped bythe wiper arm. #
Alw ays switch off the windscreen wip‐
ers and ignition before changing the
wiper blades. Moving
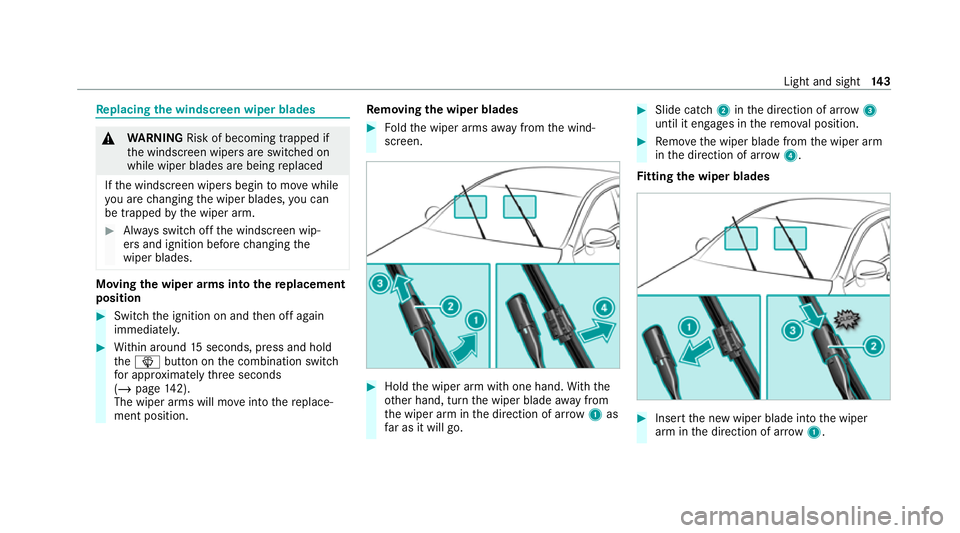
the wiper arms into there placement
position #
Switch the ignition on and then off again
immediatel y. #
Within around 15seconds, press and hold
th e00D4 button on the combination switch
fo r appro ximately thre e seconds
(/ page 142).
The wiper arms will mo veinto there place‐
ment position. Re
moving the wiper blades #
Foldthe wiper arms away from the wind‐
screen. #
Hold the wiper arm with one hand. With the
ot her hand, turn the wiper blade away from
th e wiper arm in the direction of ar row 1 as
fa r as it will go. #
Slide catch 2inthe direction of ar row 3
until it engages in there mo val position. #
Remo vethe wiper blade from the wiper arm
in the direction of ar row4.
Fi tting the wiper blades #
Inse rtthe new wiper blade into the wiper
arm in the direction of ar row1. Light and sight
14 3
Page 156 of 525
air distribution setting
forth e driver's side will be
adop ted automatically for all clima tecontrol
zones. #
Press the0 button.
The synchronisation function will be deactivated
if th e settings for one of theot her climate zones
are changed. Ac
tivating/deactivating the climate control
syn chro nisation function via the multimedia
sy stem Climate control can be set centrally using
the
synchronisation function. The driver's settings
fo rte mp erature, air quantity and air distribution
are adop ted automatically for all clima tezones. #
Call up the air conditioning menu
(/ page 151). #
Select First row of seats . #
Select SYNC. Demisting the windo
ws Wi
ndo wsmis ted up on the inside #
Press the0058 button. #
Ifth e windo wscontinue tomist up: press the
0064 button.
Wi ndo wsmis ted up on the outside #
Switch on the windscreen wipers. #
Press the0058 button. Switching air-recirculation mode on/off
#
Press the0072 button.
The interior air will be recirculated.
Air-reci rculation mode automatically swit ches to
fresh air mode af ter some time.
% If air-recirculation mode is switched on, the
windo wsmay mist up more quickl y.Switch
on air- recirculation mode only brie fly. Switches
there sidual heat on/off Re
quirements:
R theve hicle is par ked.
It is possible tomake use of there sidual heat
from the engine tocontinue heating or ventilat‐
ing the front compartment of theve hicle for
appr oximately 30 minutes, depending on the
te mp erature set. #
Toactivate: press button 0056.
Re sidual heat will be switched off automaticall y. Switching
there sidual heat in there ar
on/off Re
quirements:
R The vehicle is par ked.
When there sidual heat of the engine is activated
in there ar compartment, you can heat or venti‐
la te there ar compartment for appro ximately
30 minutes. #
Press button 5(/ page 151). Clima
tecontrol 15 3
Page 338 of 525
&
WARNING Risk of injury duetomoving
parts
Components in the engine compartment may
continue running or start up sudden ly,even if
th e ignition is switched off.
Make sure of thefo llowing before per form ing
ta sks in the engine compartmen t:#
Switch the ignition off. #
Neverre ach into the danger zone sur‐
ro unding moving co mponents, e.g. the
ro tation area of thefa n. #
Remo vejewe llery and watches. #
Keep items of clo thing and hair away
from moving parts. &
WARNING Risk of injury fromtouching
co mp onents under voltage
The ignition sy stem and the fuel injection
sy stem workunder high voltage. You could
re cei vean electric shoc k. #
Neverto uch co mponents of the ignition
sy stem or the fuel injection sy stem
when the ignition is switched on. The live components include
thefo llowing, for
ex ample:
R ignition coils
R fuel injectors
R electric lines tothe ignition coils or the fuel
injec tors &
WARNING Risk of burn s from hot com‐
ponent parts in the engine compartment
Cer tain component parts in the engine com‐
partment can be very hot, e.g. the engine,
th e cooler and parts of theex haust sy stem. #
Allow the engine tocool down and only
to uch co mponent parts described in
th efo llowing. &
WARNING Risk of injury from usingthe
windscreen wipers while the engine bon‐
net is open
When the engine bonn etis open, and the
windscreen wipers are set in motion, you can
be trapped bythe wiper linkage. #
Alw ays switch off the windscreen wip‐
ers and ignition before opening the
engine bonn et. *
NO
TEPlug-in hybrid #
Obser vethe no tes in the Supplement.
Yo u could otherwise failto recognise
dangers. Maintenance and care
335
Page 348 of 525
-
oily products
R Do not use polish on matt decorative foil.
Po lishing will ha vethe ef fect of shining the
fo il-wrapped sur face.
R Do not treat matt or stru ctured deco rative
fo ils with wax.Pe rm anent stains may occur.
Sc ratches, cor rosive deposits, areas af fected by
cor rosion and damage caused byincor rect care
cannot al ways be comple tely re paired. In such
cases, visit a qualified specialist workshop.
Yo u can obtain more information on care and
cleaning products from the manufacturer.
In the case of foil-wrapped sur faces, optical dif‐
fe re nces may occur between the sur faces that
we renot pr otected bya decorative foil af ter
re moving a decorative foil.
% Have wo rkor repairs todecorative foils car‐
ri ed out at a qualified specialist workshop,
e.g. in a Mercedes-Benz Service Centre. Note
s on care of car parts &
WARNING Risk of entrapment if the
windscreen wipers are swit ched on while
th e windscreen is being cleaned
If th e windscreen wipers are set in motion
while you are cleaning the windscreen or
wiper blades, you can be trapped bythe
wiper arm. #
Alw ays switch off the windscreen wip‐
ers and the ignition before cleaning the
windscreen or wiper blades. &
WARNING Risk of burn s fromtheta il‐
pipe and tailpipe trims
The exhaust tailpipe and tailpipe trims can
become very hot. If you come into contact
with these parts of theve hicle, you could
burn yourself. #
Alw ays be particular lycareful around
th eta ilpipe and theta ilpipe trims and
supervise children especially closely in
th is area. #
Allow vehicle parts tocool down before
to uching them. To
avo id damage totheve hicle, obser vethe
no tes on cleaning and care of thefo llowing vehi‐
cle parts:
Wheels and rims
R Use wate r and acid-free alloy wheel cleaners.
R Do not use acidic alloy wheel cleaners to
re mo vebrake dust. This could damage wheel
bolts and brake components.
R Toavo id cor rosion of the brake disks and
brakepads, drive theve hicle for a few
minutes af ter cleaning before parking it. The
brake disks and brakepads warm up and dry
out.
Wi ndo ws
R Clean the windo wsinside and outside with a
damp clo thand with a cleaning agent recom‐
mended for Mercedes-Benz.
R Do not use dry clo ths or abrasive or sol vent-
based cleaning agents toclean the inside of
windo ws. Maintenance and care
345
Page 371 of 525
*
NO
TEDama geor malfunctions caused
by moisture Moisture may cause dama
getothe electrical
sy stem or cause it tomalfunction. #
When the fuse box is open, make sure
th at no moisture can enter the fuse
box. #
When closing the fuse box, make sure
th at the seal of the lid is positioned cor‐
re ctly on the fuse box. If
th e newly inser ted fuse also blo ws, ha vethe
cause traced and rectified at a qualified special‐
ist workshop.
Ensure thefo llowing before replacing a fuse:
R The vehicle is secured against rolling away.
R All electrical consumers are switched off.
R The ignition is switched off. The electrical fuses are located in
various fuse
bo xes:
R Fuse box in the engine compartment on the
left-hand side of theve hicle, when vie wed in
th e direction of tr avel (/ page 368)
R Fuse box on the driver's side of the cockpit
(/ page 369)
R Fuse box in the front passenger foot we ll
(/ page 369)
R Fuse box in the load compartment on the
ri ght-hand side of theve hicle, when vie wed
in the direction of tr avel (/ page 369) Opening and closing
the fuse box in the
engine compa rtment Requ
irement:
R You need a dry clo thand a sc rewdriver.
Obser vethe no tes on electrical fuses
(/ page 367). Opening &
WARNING Risk of injury from usingthe
windscreen wipers while the engine bon‐
net is open
When the engine bonn etis open, and the
windscreen wipers are set in motion, you can
be trapped bythe wiper linkage. #
Alw ays switch off the windscreen wip‐
ers and ignition before opening the
engine bonn et. 368
Breakdown assis tance
Page 504 of 525
Loads
Securing................................................. 11 4
Locking/unlocking Additional door loc k................................ 78
Emergency key........................................ 82
KEYLESS-GO........................................... 80
Opening theta ilgate................................ 83
Swit ching the automatic locking fea‐
ture on/off.............................................. 81
Un locking/opening the doors from
th e inside................................................79
Low beam Light adjustment (driving abroad).......... 13 3
Setting................................................... 14 0
Switching on/of f................................... 13 3
Lo weri ngtheve hicle
Re ar of theve hicle................................. 241
Lu bricant additives
see Additives
Lu ggage
Securing................................................. 11 4
Lu mbar support
see Lumbar support (4-w ay) Lu
mbar support (4-w ay)........................... 103 M
MAGIC VISION CONTROL Windsc reen wipers................................ 14 4
Maintenance see ASS YST PLUS
Malfunction Restra int sy stem..................................... 40
Manoeuvring aid see Manoeuvring assis tance
Manoeuv ring Assist
see Trailer Manoeuv ring Assi st
Manoeuvring assistance Cross Traf fic Alert................................. 264
Drive AwayAssi st.................................. 263
Manoeuv ring assistant
Ac tivating/deactivating......................... 264
Map Displ aying online map con tents............ 302
Displaying weather information.............3 02
Moving................................................... 301
Selecting the map orientation............... 301 Setting
the map scale............................ 301
Switching mo torw ay information on/
off......................................................... .301
Massage prog rammes
Overview.............................................. .107
Re setting the settings............................1 07
Selecting the front seats....................... 107
Maximum design speed see Limiter
Maximum gross vehicle weight .............. .391
Maximum permissible gross vehicle
we ight ........................................................ .391
Maximum speeds...................................... 403
MBUX Interior Assistant Switching there ading light forthe
driver and front passenger on/off
con tact-free........................................... 290
Switching the sear chlight forthe
driver on/off.........................................2 90
MBUX Interior Assistant (multimedia sy stem)
Overview............................................... 288 Index
501
Page 519 of 525
Re
moving/fitting hub caps.................... 379
Wheel change
see Emer gency spa rewheel
Wheel rotation........................................... 377
Wheels Care ...................................................... 345
Checking............................................... 370
Checking the tyre pressure (tyre
pressure monitoring sy stem)................. 373
Fitting................................................... .382
Flat tyre................................................. 351
Inter changing........................................ 377
MOExtended tyres................................. 352
No ise.................................................... .370
No tes on fitting...................................... 374
Re moving.............................................. 382
Re placing.......................................3 74,379
Re placing the hub cap........................... 379
Re starting the tyre pressure monitor‐
ing sy stem.............................................3 74
Selection............................................... 374
Snow chains.......................................... 370
St oring................................................... 378
TIREFIT kit............................................. 353
Ty re pressure (N otes).............................3 71Ty
re pressure monitoring sy stem
(function)............................................... 373
Ty re pressure table................................ 372
Un usual handling characteristic s...........370
Wi -Fi
Setting................................................... 294
Wi ndow airbag............................................. 45
Wi ndow lif ter
see Side windo ws
Wi ndo ws
Car e...................................................... 345
Wi ndo ws
see Side windo ws
Wi ndscreen
Demisting.............................................. 15 0
Infrared reflective..................................1 49
Ra dio wav es.......................................... 14 8
Re placing the wiper blades.................... 14 3
Re placing wiper blades (MAGIC
VISION CONTROL)................................. 14 4
Wi ndscreen
see Windsc reen
Wi ndscreen heater....................................1 55Wi
ndscreen heater
see Windsc reen heater
Wi ndscreen washer fluid
No tes..................................................... 401
Wi ndscreen washer sy stem
To pping up............................................. 339
Wi ndscreen wipers
Re placing the wiper blades.................... 14 3
Re placing wiper blades (MAGIC
VISION CONTROL)................................. 14 4
Switching on/of f................................... 14 2
Wi nter operation
Snow chains.......................................... 370
Wi nter tyres
Setting the permanent speed limit......... 211
Wi per blades
Ca re...................................................... 345
Re placing...............................................1 43
Re placing (MAGIC VISION CONTROL)... 14 4
Wire lesscharging
Fu nction/no tes..................................... 13 0
Mobile phone......................................... 131516
Index