MERCEDES-BENZ GLE SUV 2015 Owners Manual
Manufacturer: MERCEDES-BENZ, Model Year: 2015, Model line: GLE SUV, Model: MERCEDES-BENZ GLE SUV 2015Pages: 453, PDF Size: 14.78 MB
Page 361 of 453
X
Make sure that the safety net and the luggage
compartment cover are rolled up.
X To remove: press button ;.
X Swing the combined luggage cover and net in
the direction of the arrow.
X First, detach the combined luggage cover and
net from left-hand catch :and then remove
it from right-hand fixture =.
X To install: push the combined luggage cover
and net up to the stop into right-hand fixture
=.
X Place the combined luggage cover and net
into the left-hand fixture and push it into
catch :until the combined luggage cover
and net engages audibly. X
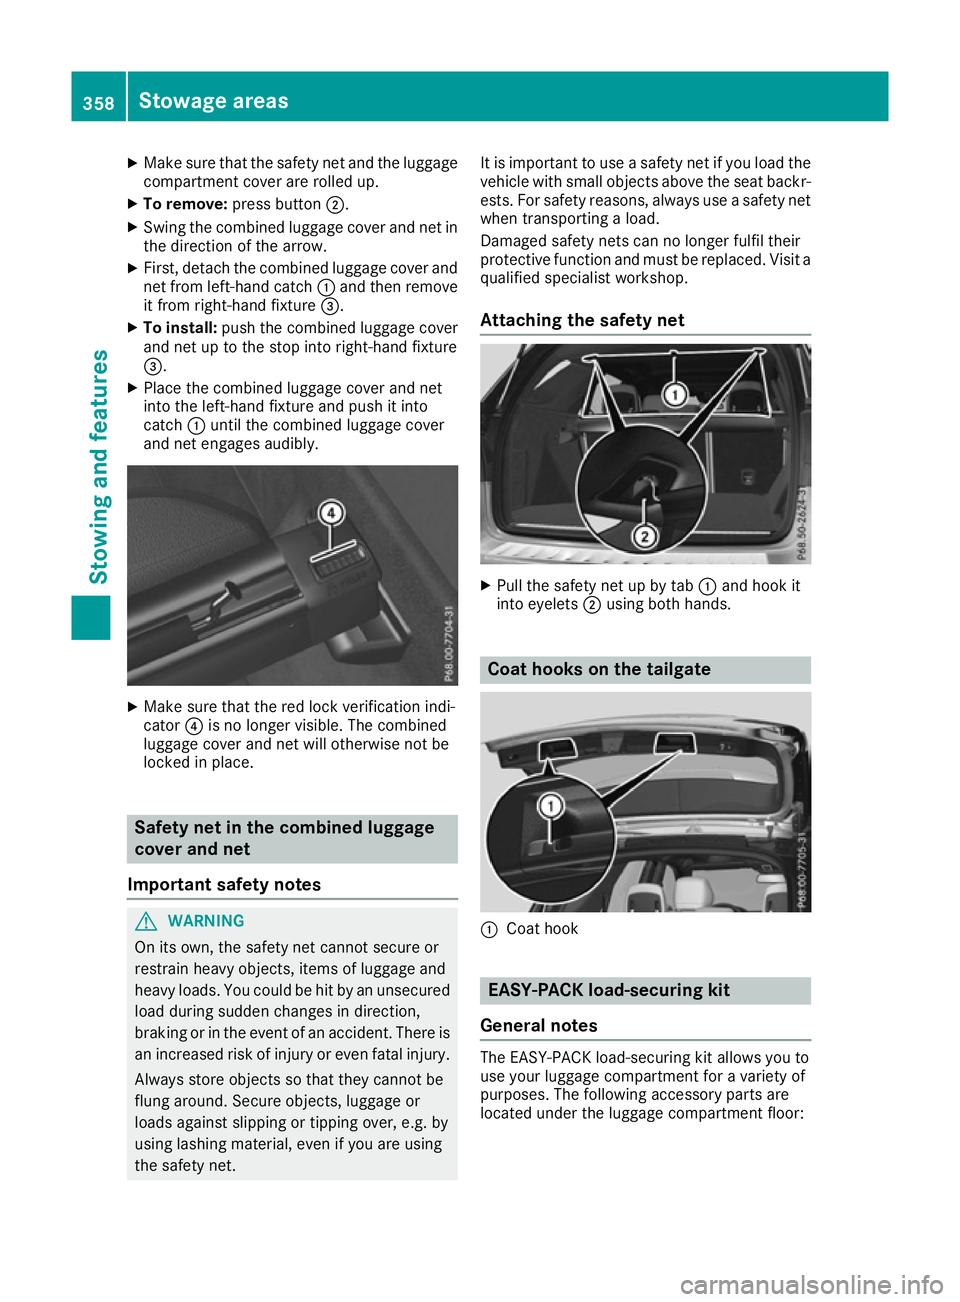
Make sure that the red lock verification indi-
cator ?is no longer visible. The combined
luggage cover and net will otherwise not be
locked in place. Safety net in the combined luggage
cover and net
Important safety notes G
WARNING
On its own, the safety net cannot secure or
restrain heavy objects, items of luggage and
heavy loads. You could be hit by an unsecured load during sudden changes in direction,
braking or in the event of an accident. There isan increased risk of injury or even fatal injury.
Always store objects so that they cannot be
flung around. Secure objects, luggage or
loads against slipping or tipping over, e.g. by
using lashing material, even if you are using
the safety net. It is important to use a safety net if you load the
vehicle with small objects above the seat backr-
ests. For safety reasons, always use a safety net when transporting a load.
Damaged safety nets can no longer fulfil their
protective function and must be replaced. Visit a qualified specialist workshop.
Attaching the safety net X
Pull the safety net up by tab :and hook it
into eyelets ;using both hands. Coat hooks on the tailgate
:
Coat hook EASY-PACK load-securing kit
General notes The EASY-PACK load-securing kit allows you to
use your luggage compartment for a variety of
purposes. The following accessory parts are
located under the luggage compartment floor:358
Stowage areasStowing and features
Page 362 of 453
R
a telescopic rod
R two mounting elements
R two retaining feet
Important safety notes G
WARNING
If you drive when the luggage compartment
floor is open, objects could be flung around,
thus striking vehicle occupants. There is a risk of injury, especially when braking or abruptly
changing directions.
Always close the luggage compartment floor
before a journey.
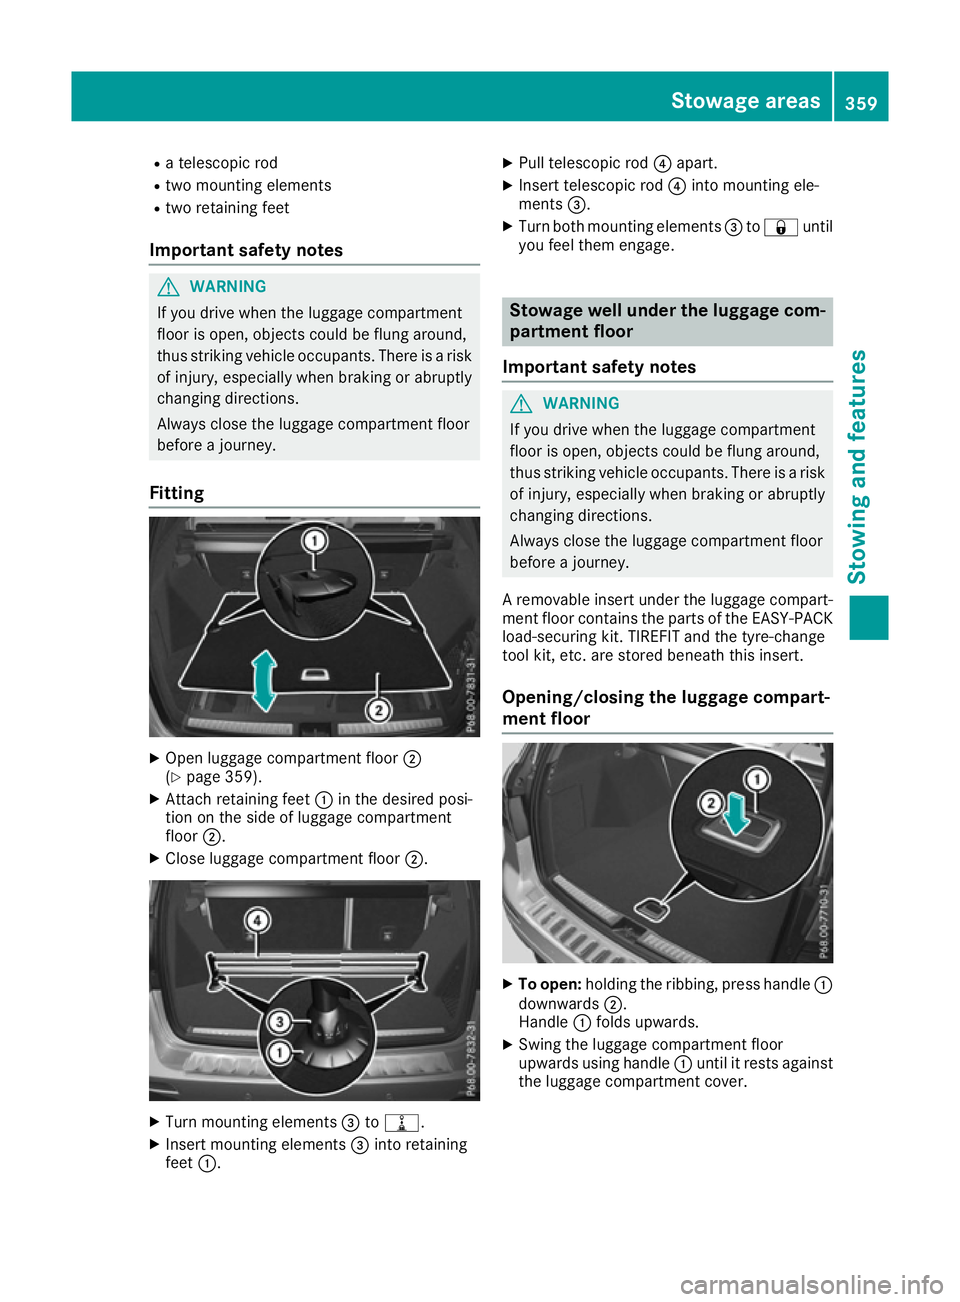
Fitting X
Open luggage compartment floor ;
(Y page 359).
X Attach retaining feet :in the desired posi-
tion on the side of luggage compartment
floor ;.
X Close luggage compartment floor ;.X
Turn mounting elements =to=.
X Insert mounting elements =into retaining
feet :. X
Pull telescopic rod ?apart.
X Insert telescopic rod ?into mounting ele-
ments =.
X Turn both mounting elements =to& until
you feel them engage. Stowage well under the luggage com-
partment floor
Important safety notes G
WARNING
If you drive when the luggage compartment
floor is open, objects could be flung around,
thus striking vehicle occupants. There is a risk of injury, especially when braking or abruptly
changing directions.
Always close the luggage compartment floor
before a journey.
A removable insert under the luggage compart-
ment floor contains the parts of the EASY-PACK load-securing kit. TIREFIT and the tyre-change
tool kit, etc. are stored beneath this insert.
Opening/closing the luggage compart-
ment floor X
To open: holding the ribbing, press handle :
downwards ;.
Handle :folds upwards.
X Swing the luggage compartment floor
upwards using handle :until it rests against
the luggage compartment cover. Stowage areas
359Stowing and features Z
Page 363 of 453
X
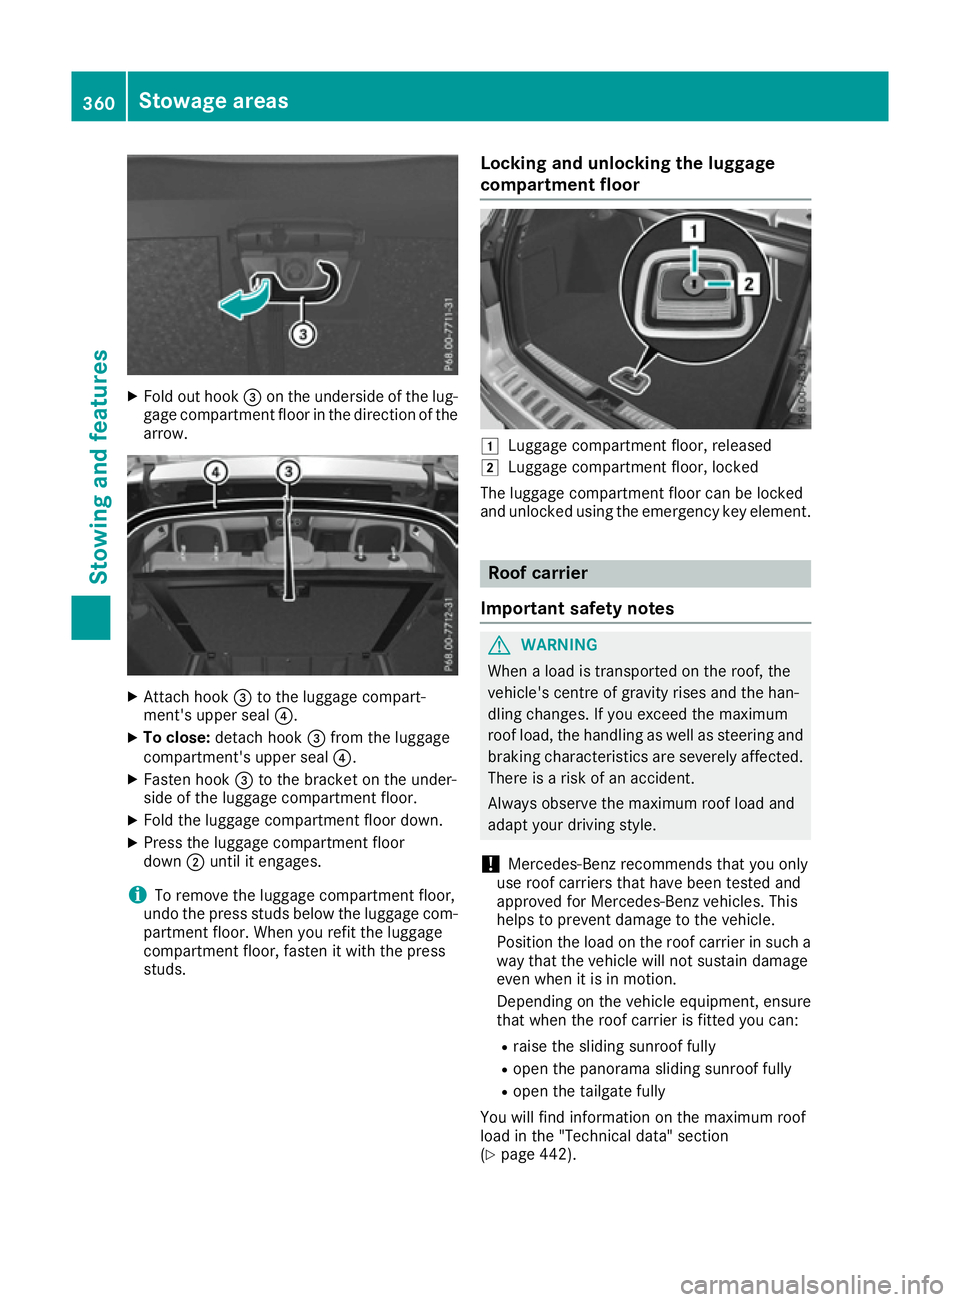
Fold out hook =on the underside of the lug-
gage compartment floor in the direction of the arrow. X
Attach hook =to the luggage compart-
ment's upper seal ?.
X To close: detach hook =from the luggage
compartment's upper seal ?.
X Fasten hook =to the bracket on the under-
side of the luggage compartment floor.
X Fold the luggage compartment floor down.
X Press the luggage compartment floor
down ;until it engages.
i To remove the luggage compartment floor,
undo the press studs below the luggage com-
partment floor. When you refit the luggage
compartment floor, fasten it with the press
studs. Locking and unlocking the luggage
compartment floor 1
Luggage compartment floor, released
2 Luggage compartment floor, locked
The luggage compartment floor can be locked
and unlocked using the emergency key element. Roof carrier
Important safety notes G
WARNING
When a load is transported on the roof, the
vehicle's centre of gravity rises and the han-
dling changes. If you exceed the maximum
roof load, the handling as well as steering and braking characteristics are severely affected.
There is a risk of an accident.
Always observe the maximum roof load and
adapt your driving style.
! Mercedes-Benz recommends that you only
use roof carriers that have been tested and
approved for Mercedes-Benz vehicles. This
helps to prevent damage to the vehicle.
Position the load on the roof carrier in such a way that the vehicle will not sustain damage
even when it is in motion.
Depending on the vehicle equipment, ensure
that when the roof carrier is fitted you can:
R raise the sliding sunroof fully
R open the panorama sliding sunroof fully
R open the tailgate fully
You will find information on the maximum roof
load in the "Technical data" section
(Y page 442). 360
Stowage areasStowing and features
Page 364 of 453
An incorrectly secured roof carrier or roof load
may become detached from the vehicle. You
must therefore ensure that you observe the roof
carrier manufacturer's installation instructions.
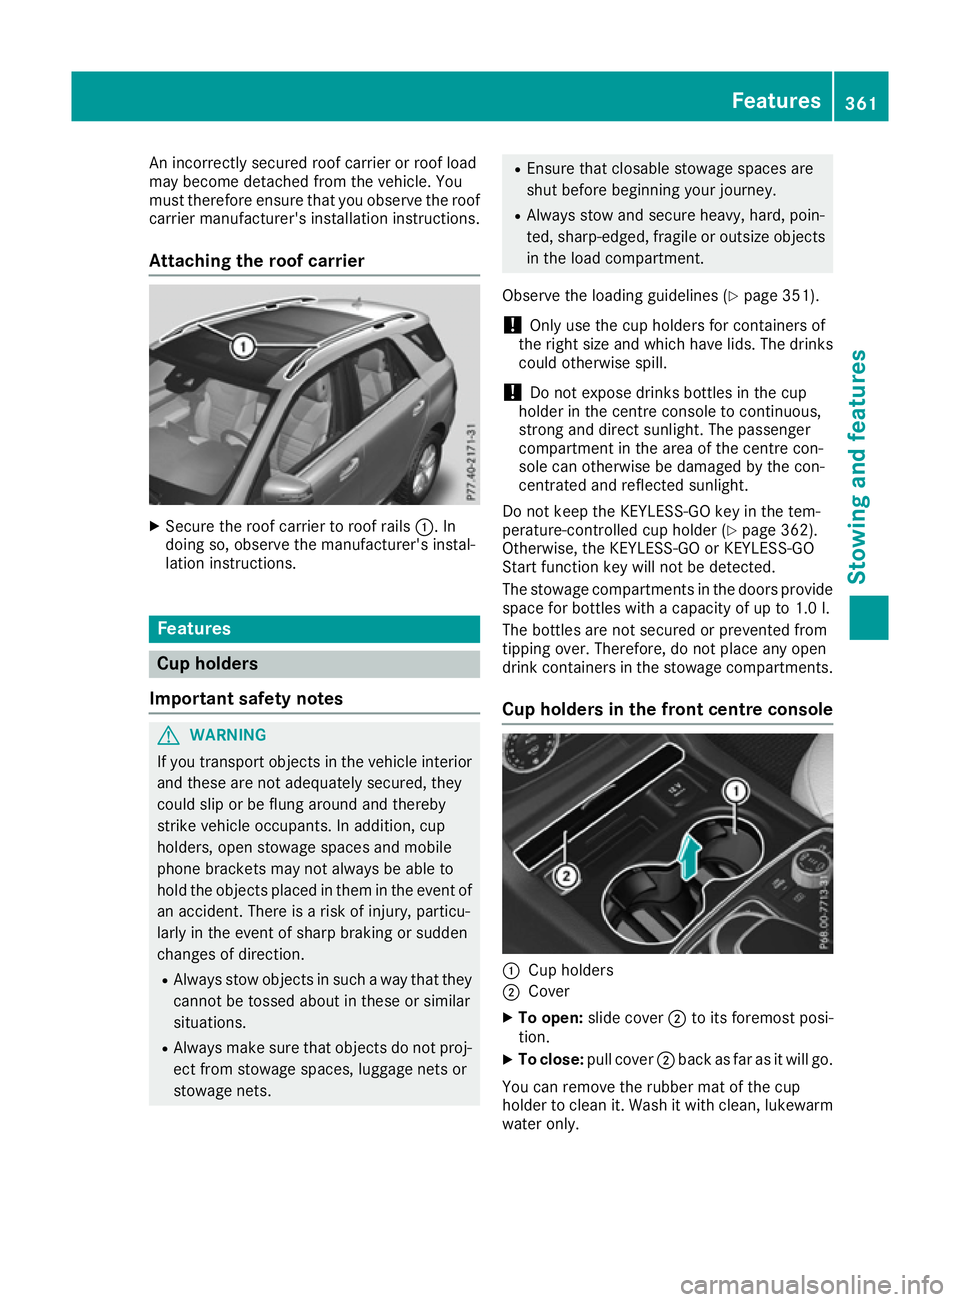
Attaching the roof carrier X
Secure the roof carrier to roof rails :. In
doing so, observe the manufacturer's instal-
lation instructions. Features
Cup holders
Important safety notes G
WARNING
If you transport objects in the vehicle interior and these are not adequately secured, they
could slip or be flung around and thereby
strike vehicle occupants. In addition, cup
holders, open stowage spaces and mobile
phone brackets may not always be able to
hold the objects placed in them in the event of an accident. There is a risk of injury, particu-
larly in the event of sharp braking or sudden
changes of direction.
R Always stow objects in such a way that they
cannot be tossed about in these or similar
situations.
R Always make sure that objects do not proj-
ect from stowage spaces, luggage nets or
stowage nets. R
Ensure that closable stowage spaces are
shut before beginning your journey.
R Always stow and secure heavy, hard, poin-
ted, sharp-edged, fragile or outsize objects
in the load compartment.
Observe the loading guidelines (Y page 351).
! Only use the cup holders for containers of
the right size and which have lids. The drinks
could otherwise spill.
! Do not expose drinks bottles in the cup
holder in the centre console to continuous,
strong and direct sunlight. The passenger
compartment in the area of the centre con-
sole can otherwise be damaged by the con-
centrated and reflected sunlight.
Do not keep the KEYLESS-GO key in the tem-
perature-controlled cup holder (Y page 362).
Otherwise, the KEYLESS-GO or KEYLESS-GO
Start function key will not be detected.
The stowage compartments in the doors provide
space for bottles with a capacity of up to 1.0 l.
The bottles are not secured or prevented from
tipping over. Therefore, do not place any open
drink containers in the stowage compartments.
Cup holders in the front centre console :
Cup holders
; Cover
X To open: slide cover ;to its foremost posi-
tion.
X To close: pull cover ;back as far as it will go.
You can remove the rubber mat of the cup
holder to clean it. Wash it with clean, lukewarm water only. Features
361Stowing and features Z
Page 365 of 453
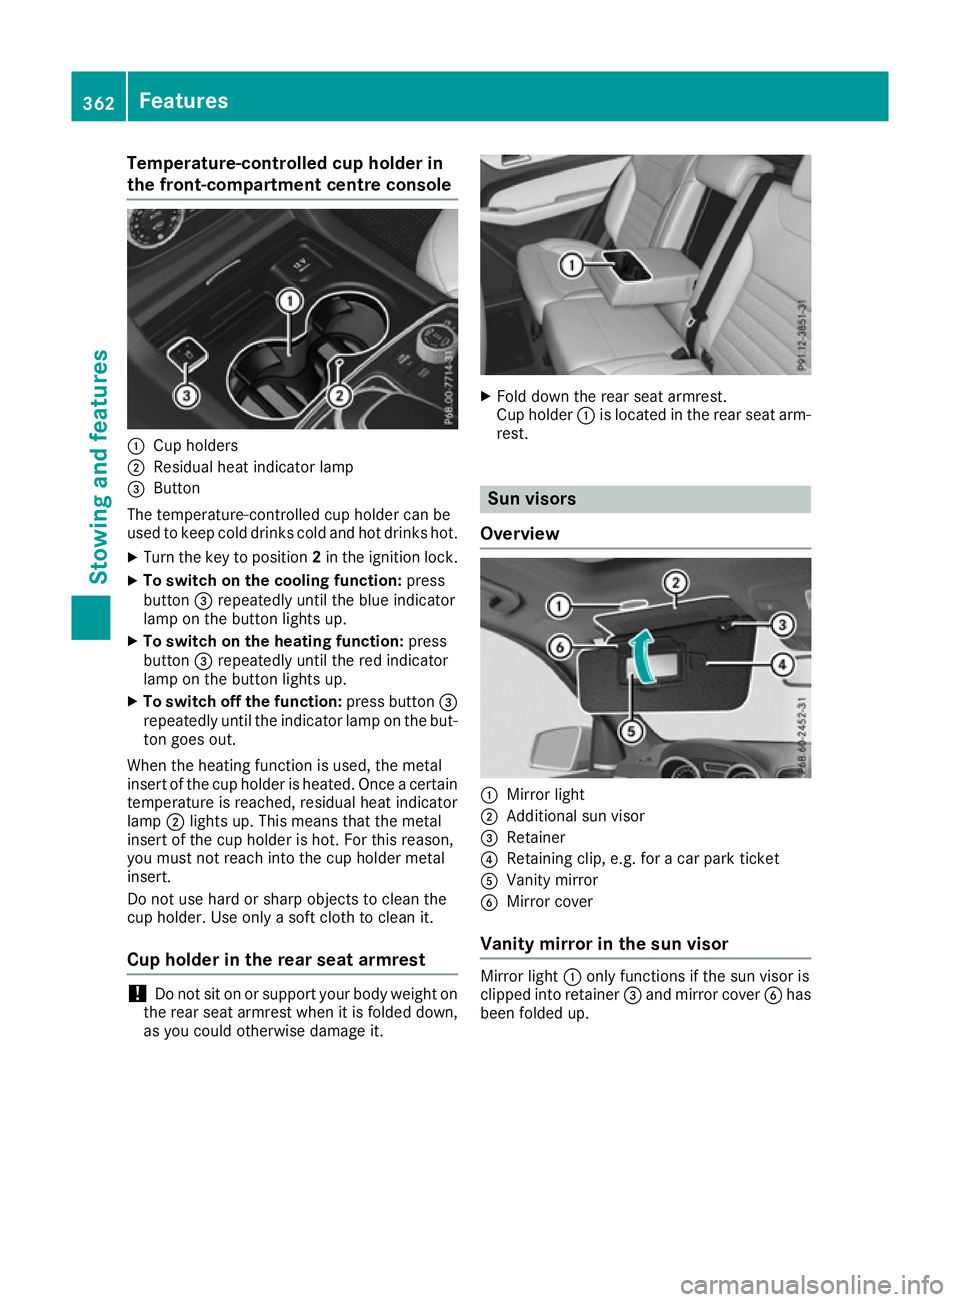
Temperature-controlled cup holder in
the front-compartment centre console :
Cup holders
; Residual heat indicator lamp
= Button
The temperature-controlled cup holder can be
used to keep cold drinks cold and hot drinks hot.
X Turn the key to position 2in the ignition lock.
X To switch on the cooling function: press
button =repeatedly until the blue indicator
lamp on the button lights up.
X To switch on the heating function: press
button =repeatedly until the red indicator
lamp on the button lights up.
X To switch off the function: press button=
repeatedly until the indicator lamp on the but-
ton goes out.
When the heating function is used, the metal
insert of the cup holder is heated. Once a certain temperature is reached, residual heat indicator
lamp ;lights up. This means that the metal
insert of the cup holder is hot. For this reason,
you must not reach into the cup holder metal
insert.
Do not use hard or sharp objects to clean the
cup holder. Use only a soft cloth to clean it.
Cup holder in the rear seat armrest !
Do not sit on or support your body weight on
the rear seat armrest when it is folded down,
as you could otherwise damage it. X
Fold down the rear seat armrest.
Cup holder :is located in the rear seat arm-
rest. Sun visors
Overview :
Mirror light
; Additional sun visor
= Retainer
? Retaining clip, e.g. for a car park ticket
A Vanity mirror
B Mirror cover
Vanity mirror in the sun visor Mirror light
:only functions if the sun visor is
clipped into retainer =and mirror cover Bhas
been folded up. 362
FeaturesSto
wing an d features
Page 366 of 453
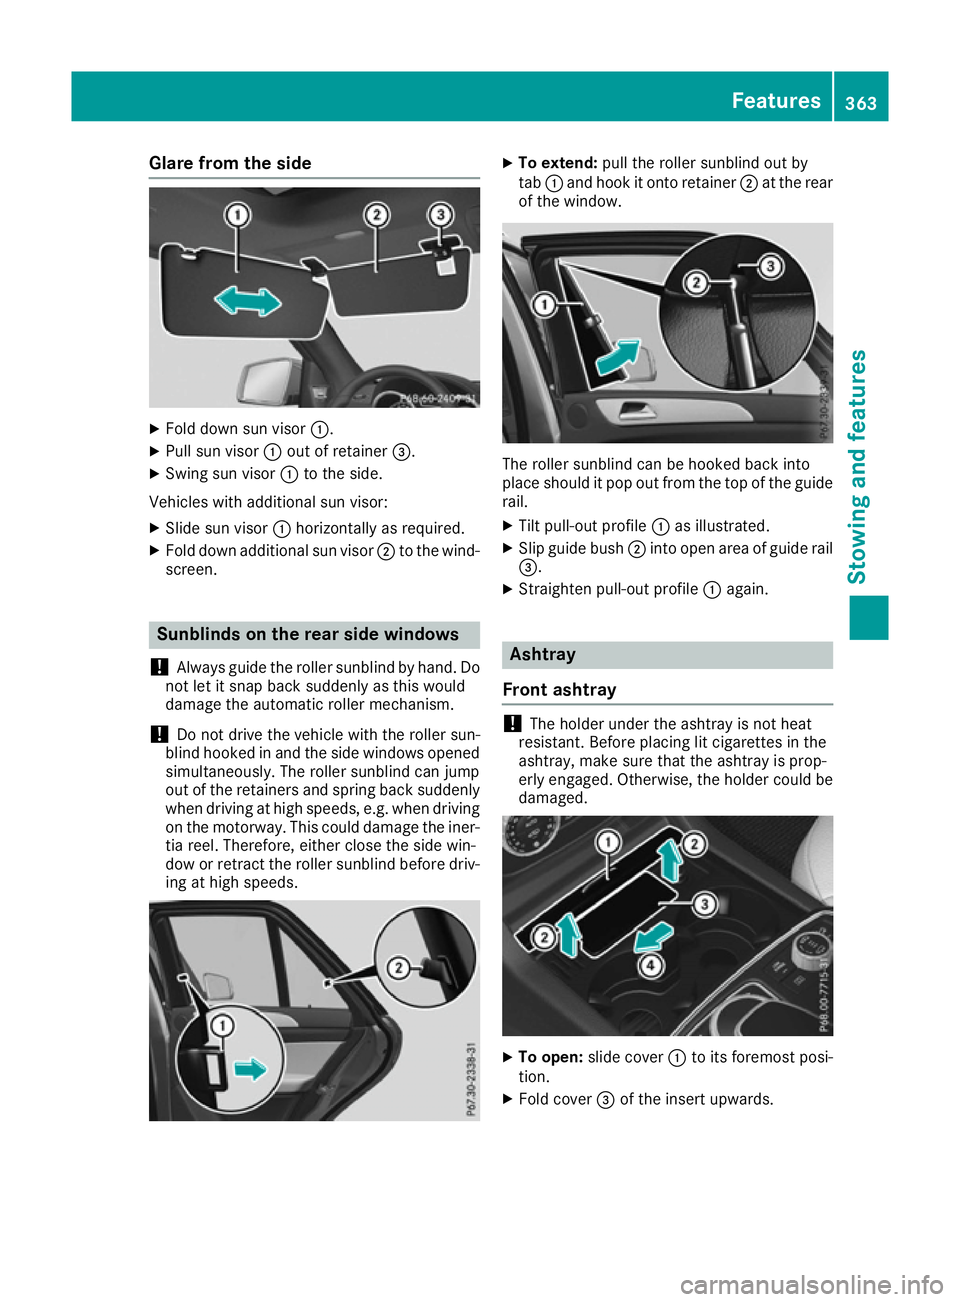
Glare from the side
X
Fold down sun visor :.
X Pull sun visor :out of retainer =.
X Swing sun visor :to the side.
Vehicles with additional sun visor:
X Slide sun visor :horizontally as required.
X Fold down additional sun visor ;to the wind-
screen. Sunblinds on the rear side windows
! Always guide the roller sunblind by hand. Do
not let it snap back suddenly as this would
damage the automatic roller mechanism.
! Do not drive the vehicle with the roller sun-
blind hooked in and the side windows opened simultaneously. The roller sunblind can jump
out of the retainers and spring back suddenly
when driving at high speeds, e.g. when driving on the motorway. This could damage the iner-
tia reel. Therefore, either close the side win-
dow or retract the roller sunblind before driv- ing at high speeds. X
To extend: pull the roller sunblind out by
tab :and hook it onto retainer ;at the rear
of the window. The roller sunblind can be hooked back into
place should it pop out from the top of the guide
rail.
X Tilt pull-out profile :as illustrated.
X Slip guide bush ;into open area of guide rail
=.
X Straighten pull-out profile :again. Ashtray
Front ashtray !
The holder under the ashtray is not heat
resistant. Before placing lit cigarettes in the
ashtray, make sure that the ashtray is prop-
erly engaged. Otherwise, the holder could be
damaged. X
To open: slide cover :to its foremost posi-
tion.
X Fold cover =of the insert upwards. Features
363Stowing and features Z
Page 367 of 453
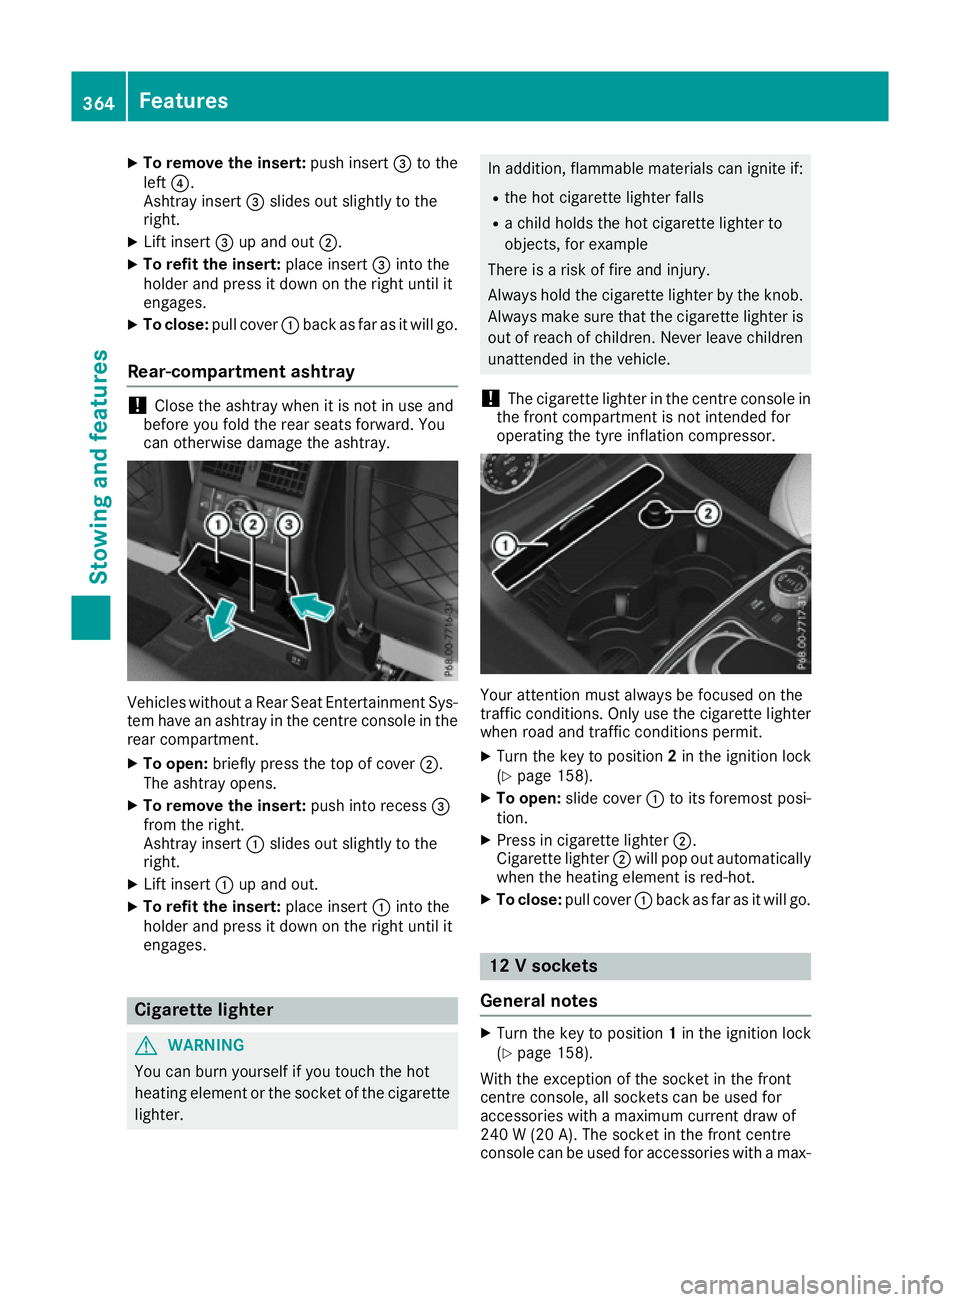
X
To remove the insert: push insert=to the
left ?.
Ashtray insert =slides out slightly to the
right.
X Lift insert =up and out ;.
X To refit the insert: place insert=into the
holder and press it down on the right until it
engages.
X To close: pull cover :back as far as it will go.
Rear-compartment ashtray !
Close the ashtray when it is not in use and
before you fold the rear seats forward. You
can otherwise damage the ashtray. Vehicles without a Rear Seat Entertainment Sys-
tem have an ashtray in the centre console in the rear compartment.
X To open: briefly press the top of cover ;.
The ashtray opens.
X To remove the insert: push into recess=
from the right.
Ashtray insert :slides out slightly to the
right.
X Lift insert :up and out.
X To refit the insert: place insert:into the
holder and press it down on the right until it
engages. Cigarette lighter
G
WARNING
You can burn yourself if you touch the hot
heating element or the socket of the cigarette lighter. In addition, flammable materials can ignite if:
R the hot cigarette lighter falls
R a child holds the hot cigarette lighter to
objects, for example
There is a risk of fire and injury.
Always hold the cigarette lighter by the knob.
Always make sure that the cigarette lighter is
out of reach of children. Never leave children unattended in the vehicle.
! The cigarette lighter in the centre console in
the front compartment is not intended for
operating the tyre inflation compressor. Your attention must always be focused on the
traffic conditions. Only use the cigarette lighter
when road and traffic conditions permit.
X Turn the key to position 2in the ignition lock
(Y page 158).
X To open: slide cover :to its foremost posi-
tion.
X Press in cigarette lighter ;.
Cigarette lighter ;will pop out automatically
when the heating element is red-hot.
X To close: pull cover :back as far as it will go. 12 V sockets
General notes X
Turn the key to position 1in the ignition lock
(Y page 158).
With the exception of the socket in the front
centre console, all sockets can be used for
accessories with a maximum current draw of
240 W (20 A). The socket in the front centre
console can be used for accessories with a max- 364
FeaturesSto
wing an d features
Page 368 of 453
imum current draw of 180 W (15 A). Accessories
include such items as mobile phone chargers.
If you use the sockets for long periods when the engine is switched off, the battery may dis-
charge.
i An emergency cut-off ensures that the on-
board voltage does not drop too low. If the on-
board voltage is too low, the power to the
sockets is automatically cut. This ensures
that there is sufficient power to start the
engine.
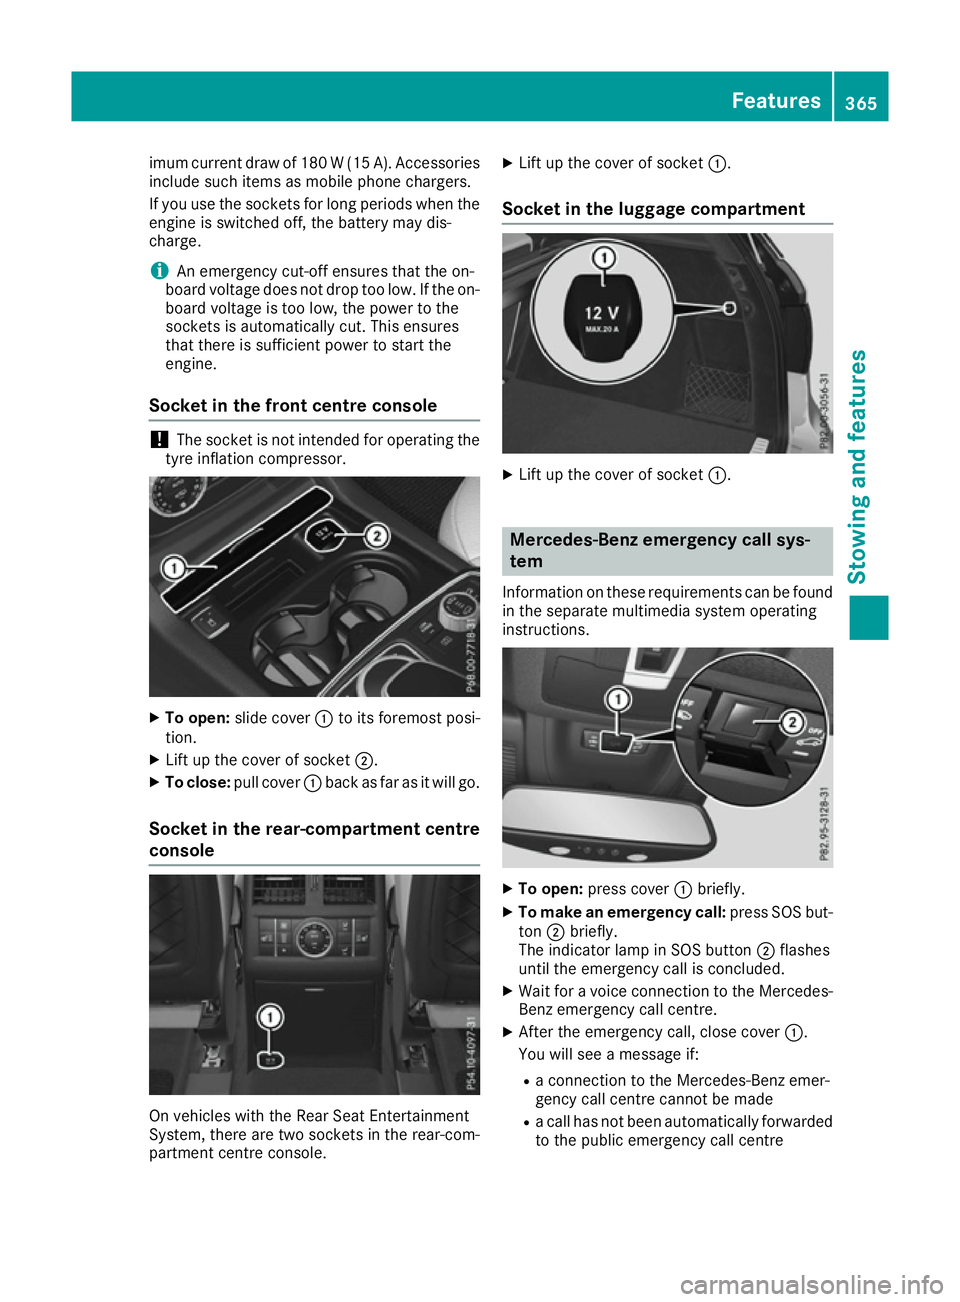
Socket in the front centre console !
The socket is not intended for operating the
tyre inflation compressor. X
To open: slide cover :to its foremost posi-
tion.
X Lift up the cover of socket ;.
X To close: pull cover :back as far as it will go.
Socket in the rear-compartment centre
console On vehicles with the Rear Seat Entertainment
System, there are two sockets in the rear-com-
partment centre console. X
Lift up the cover of socket :.
Socket in the luggage compartment X
Lift up the cover of socket :. Mercedes-Benz emergency call sys-
tem
Information on these requirements can be found in the separate multimedia system operating
instructions. X
To open: press cover :briefly.
X To make an emergency call: press SOS but-
ton ;briefly.
The indicator lamp in SOS button ;flashes
until the emergency call is concluded.
X Wait for a voice connection to the Mercedes-
Benz emergency call centre.
X After the emergency call, close cover :.
You will see a message if:
R a connection to the Mercedes-Benz emer-
gency call centre cannot be made
R a call has not been automatically forwarded
to the public emergency call centre Features
365Stowing and features Z
Page 369 of 453
In this case, dial the
112emergency number
on your mobile phone.
You can find more information on the Mercedes- Benz emergency call system in the separate
multimedia system operating instructions. Mobile phone
Important safety notes G
WARNING
Operating mobile communications equip-
ment while driving distracts you from paying
attention to traffic conditions. This could also cause you to lose control of the vehicle. There
is a risk of an accident.
Use this device only when the vehicle is sta-
tionary.
You must observe the legal requirements for the country in which you are currently driving when
operating mobile communications equipment in the vehicle.
If it is permitted by law to operate communica-
tions equipment while the vehicle is in motion,
you may only do so if the traffic situation per-
mits. You may otherwise be distracted from the
traffic conditions, cause an accident and injure
yourself and others.
Excessive levels of electromagnetic radiation
may cause damage to your health and to the
health of others. The use of an exterior aerial
takes into consideration the scientific discus-
sion surrounding the possible health risk posed
by electromagnetic fields.
Mercedes-Benz recommends the use of an
approved exterior aerial. This ensures:
R optimal mobile phone reception quality in the
vehicle
R that mutual interference between the vehicle
electronics and mobile phones is minimised
An exterior aerial has the following advantages:
R it conducts the electromagnetic fields gener-
ated by a wireless device to the exterior
R the field strength in the vehicle interior is
lower than in a vehicle that does not have an exterior aerial
Information on retrofitting two-way radios and
mobile phones (RF transmitters) (Y page 433).General notes There are various mobile phone brackets that
may be fitted in your vehicle; in some cases,
these are country-specific.
More information on suitable mobile phones,
mobile phone brackets and on connecting Blue-
tooth ®
-capable mobile phones with the multi-
media system can be obtained:
R at your Mercedes-Benz Service Centre
R on the Internet at http://www.mercedes-
benz.com/connect
The functions and services available when you
use the phone depend on your mobile phone
model and service provider.
Using a mobile phone To connect a mobile phone to the exterior aerial
and charge it, insert it into the mobile phone
bracket.
X Open the telephone compartment
(Y page 352).
X Place the mobile phone bracket into the pre-
installed fitting; see the separate installation
instructions for the mobile phone fitting.
X Insert the mobile phone into the mobile phone
bracket; see the separate installation instruc-
tions for the mobile phone fitting.
i The mobile phone can also be operated
without being in the bracket. However, the
charging function and aerial function are not
available.
In order to use Bluetooth ®
(SAP profile) on your
telephone module, you must first insert the tele-
phone module into the pre-installed fitting. This connects it to the exterior aerial. If you wish to
charge the mobile phone, then you must con-
nect it to a USB port.
Further information on the telephone module
with Bluetooth ®
(SAP profile) can be found in the
Digital Owner's Manual.
Operating the mobile phone You can operate the telephone using the
6
and ~ buttons on the multifunction steering
wheel. You can operate other mobile phone
functions via the on-board computer
(Y page 288).
When you remove the key from the ignition lock, the mobile phone is disconnected from the vehi- 366
FeaturesStowing and features
Page 370 of 453
cle. You can then no longer make calls using the
hands-free system.
If a call is active and you remove the key from
the ignition lock, the conversation is transferred over to the mobile phone. It is then possible to
continue the conversation on the mobile phone. Garage door opener
General notes The HomeLink
®
garage door opener integrated
in the rear-view mirror allows you to operate up
to three different door and gate systems.
Once programmed, the integrated garage door
opener in the rear-view mirror will assume the
function of the garage door system's remote
control. Please also read the operating instruc-
tions for the garage door system.
When programming a garage door opener, park
the vehicle outside the garage. Do not run the
engine while programming.
The garage door opener is only available for cer- tain countries. Observe the legal requirements
for each individual country.
The HomeLink ®
garage door opener is compat-
ible with most European garage and gate opener
drives. More information on HomeLink ®
and/or
compatible products is available:
R at a qualified specialist workshop
R via the HomeLink ®
Hotline
(0) 08000 466 354 65 or alternatively
+49 (0) 6838 907-277
R on the Internet at http://www.homelink.com
Important safety notes G
WARNING
When you operate or program the garage door with the integrated garage door opener, per-
sons in the range of movement of the garage
door can become trapped or struck by the
garage door. There is a risk of injury.
When using the integrated garage door
opener, always make sure that nobody is
within the range of movement of the garage
door. G
WARNING
Combustion engines emit poisonous exhaust
gases such as carbon monoxide. Inhaling
these exhaust gases leads to poisoning. There is a risk of fatal injury. Therefore never leave
the engine running in enclosed spaces with-
out sufficient ventilation.
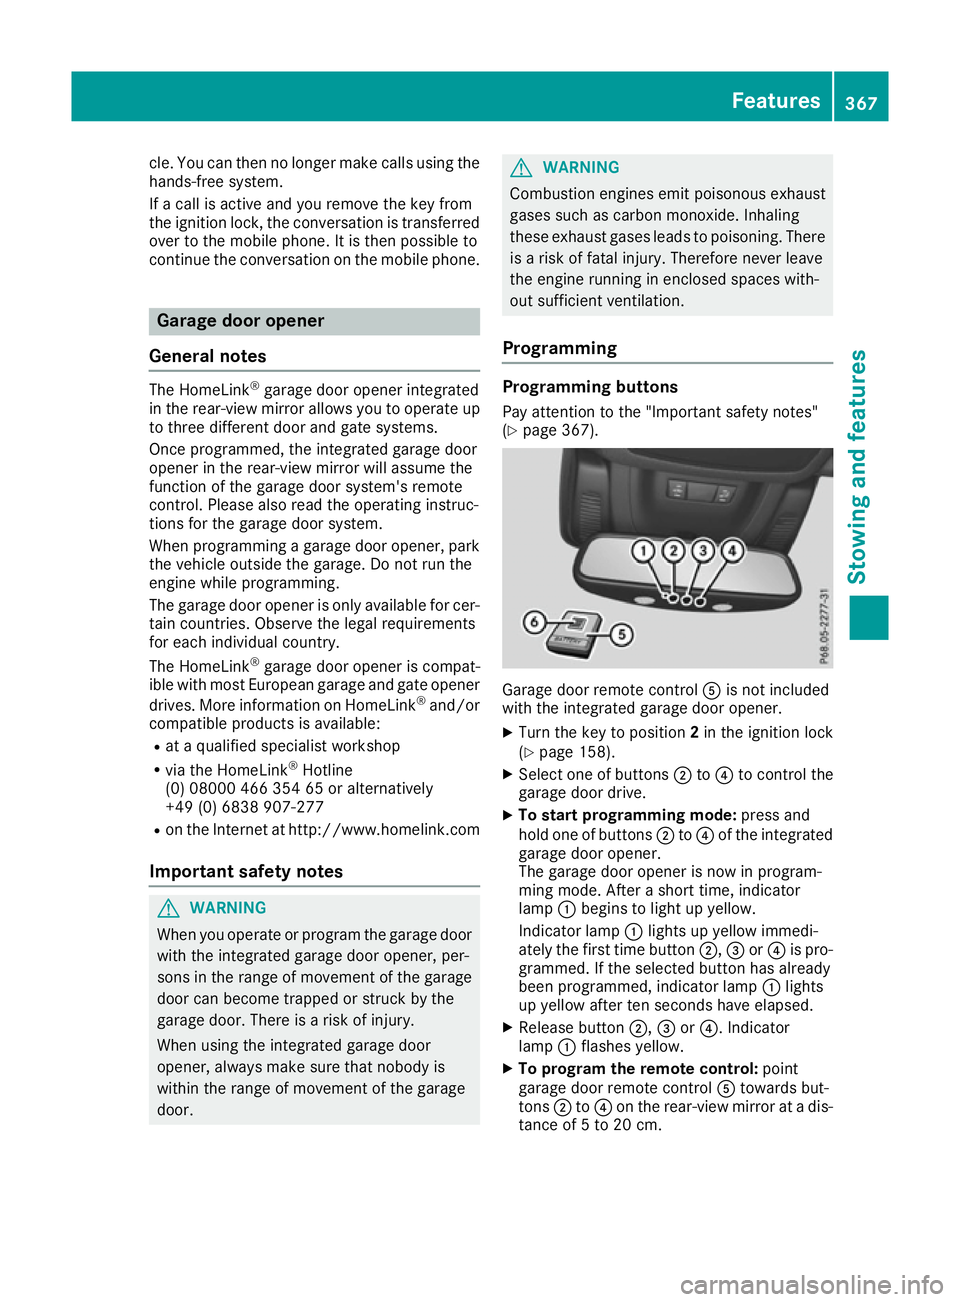
Programming Programming buttons
Pay attention to the "Important safety notes"
(Y page 367). Garage door remote control
Ais not included
with the integrated garage door opener.
X Turn the key to position 2in the ignition lock
(Y page 158).
X Select one of buttons ;to? to control the
garage door drive.
X To start programming mode: press and
hold one of buttons ;to? of the integrated
garage door opener.
The garage door opener is now in program-
ming mode. After a short time, indicator
lamp :begins to light up yellow.
Indicator lamp :lights up yellow immedi-
ately the first time button ;,=or? is pro-
grammed. If the selected button has already
been programmed, indicator lamp :lights
up yellow after ten seconds have elapsed.
X Release button ;,=or?. Indicator
lamp :flashes yellow.
X To program the remote control: point
garage door remote control Atowards but-
tons ;to? on the rear-view mirror at a dis-
tance of 5 to 20 cm. Features
367Stowing and features Z