manual transmission MERCEDES-BENZ GLE SUV 2017 W166 User Guide
[x] Cancel search | Manufacturer: MERCEDES-BENZ, Model Year: 2017, Model line: GLE SUV, Model: MERCEDES-BENZ GLE SUV 2017 W166Pages: 390, PDF Size: 9.43 MB
Page 194 of 390
The flap closes again when:
Ryou have finished the maneuvering process
Ryou switch off the engine
Ryou open the cargo compartment
Observe the notes on cleaning (
Ypage 323).
For technical reasons, the flap may remain
open briefly after the rear view camera has
been deactivated.
Activating/deactivating the rear view
camera
XTo activate: make sure that the SmartKey is
in position 2in the ignition lock.
XMake sure that the Activation by R gearfunction is selected in the multimedia system;
see the Digital Operator's Manual.
XEngage reverse gear.
The rear view camera flap opens. The multi-
media system shows the area behind the vehi-
cle with guide lines.
The image from the rear view camera is avail-
able throughout the maneuvering process.
To deactivate: the rear view camera deacti-
vates if you shift the transmission to Por after
driving forwards a short distance.
Displays in the multimedia system
The rear view camera may show a distorted view
of obstacles, show them incorrectly or not at all.
The rear view camera does not show objects in
the following positions:
Rvery close to the rear bumper
Runder the rear bumper
Rin the area immediately above the tailgate
handle
!Objects not at ground level may appear to
be further away than they actually are, e.g.:
Rthe bumper of a parked vehicle
Rthe drawbar of a trailer
Rthe ball coupling of a trailer tow hitch
Rthe rear section of an HGV
Ra slanted post
Use the guidelines only for orientation.
Approach objects no further than the bottom-
most guideline.
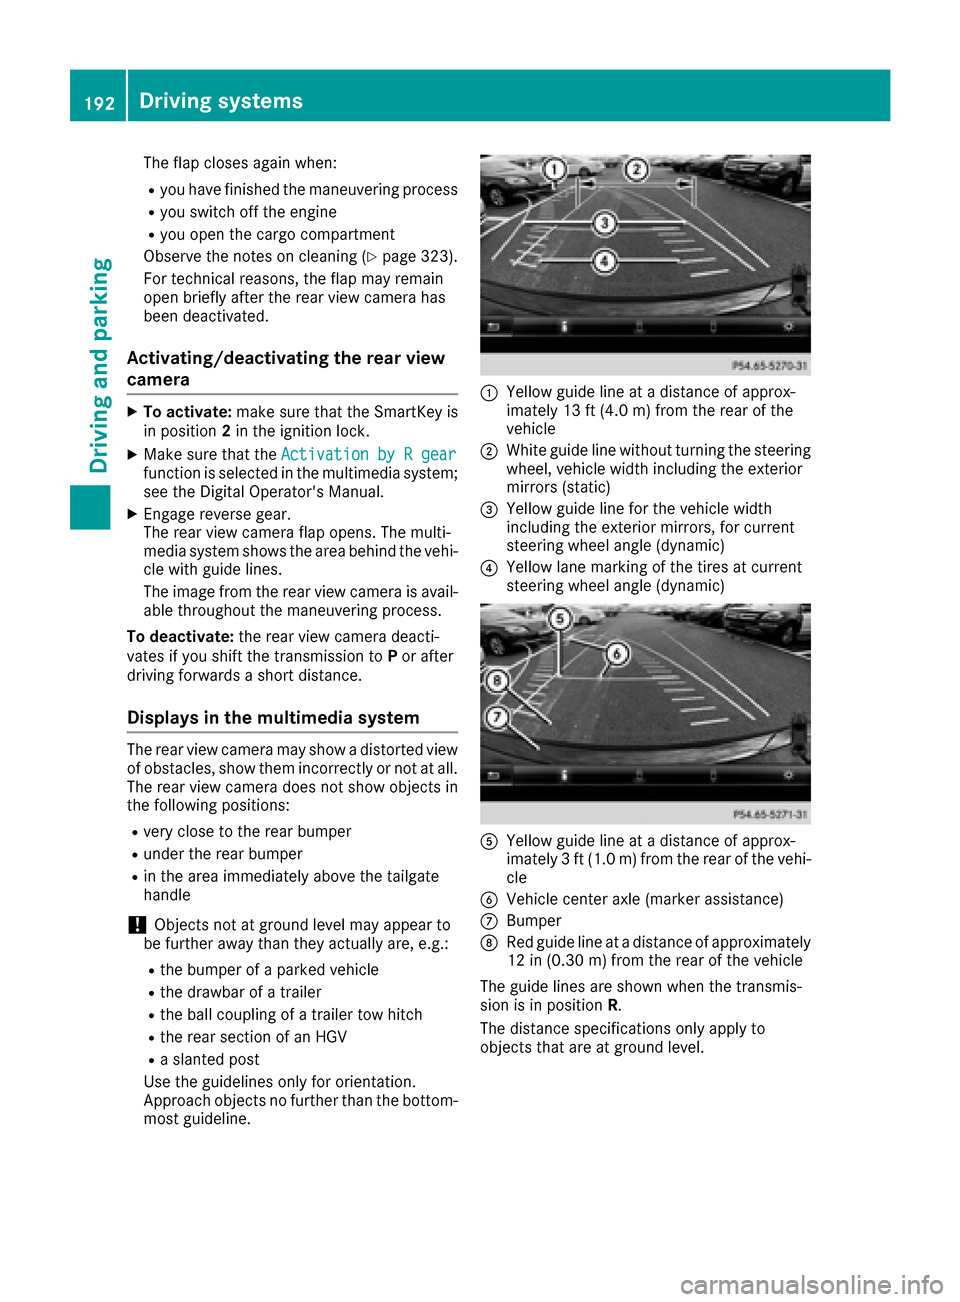
:Yellow guide line at a distance of approx-
imately 13 ft (4.0 m) from the rear of the
vehicle
;White guide line without turning the steering
wheel, vehicle width including the exterior
mirrors (static)
=Yellow guide line for the vehicle width
including the exterior mirrors, for current
steering wheel angle (dynamic)
?Yellow lane marking of the tires at current
steering wheel angle (dynamic)
AYellow guide line at a distance of approx-
imately 3 ft (1.0 m) from the rear of the vehi-
cle
BVehicle center axle (marker assistance)
CBumper
DRed guide line at a distance of approximately
12 in (0.30 m) from the rear of the vehicle
The guide lines are shown when the transmis-
sion is in position R.
The distance specifications only apply to
objects that are at ground level.
192Driving systems
Driving and parking
Page 212 of 390
!A function or performance test should only
be carried out on a two-axle dynamometer.
Before you operate the vehicle on such a
dynamometer, please consult a qualified
workshop. You could otherwise damage the
drive train or the brake system.
iIn wintry driving conditions, the maximum
effect of 4MATIC can only be achieved if you
use winter tires (M+S tires), with snow chains
if necessary.
Further information about "Driving off-road"
(
Ypage 162).
DSR (Downhill Speed Regulation)
General notes
DSR is an aid to assist you when driving down-
hill. It keeps the speed of travel at the speed
selected on the on-board computer. The steeper
the downhill gradient, the greater the DSR brak- ing effect on the vehicle. When driving on flat
stretches of road or on an uphill gradient, the
DSR braking effect is minimal or nonexistent.
DSR controls the vehicle’s speed when it is acti-
vated and the transmission is in position D,Ror
N. You can drive at a higher or a lower speed
than that set on the on-board computer at any
time by accelerating or braking.
Important safety notes
GWARNING
If the speed driven and the set speed deviate and you activate DSR on a slippery road sur-
face, the wheels may lose traction. There is an
increased danger of skidding and accidents.
Before switching DSR on, please take into
consideration the road surface and the differ- ence between driving speed and the set
speed.
If you fail to adapt your driving style, DSR can
neither reduce the risk of accident nor override the laws of physics. DSR cannot take account of
road, weather and traffic conditions. DSR is only
an aid. You are responsible for the distance to
the vehicle in front, for vehicle speed, for brak-
ing in good time and for staying in your lane.
You are always responsible for keeping control
of the vehicle and for assessing whether the
downhill gradient can be managed. DSR may not always be able to keep to the set speed, depend- ing on road surface and tire conditions. Select a
set speed suitable for the prevailing conditions
and when necessary, apply the brakes manually.
Activating DSR
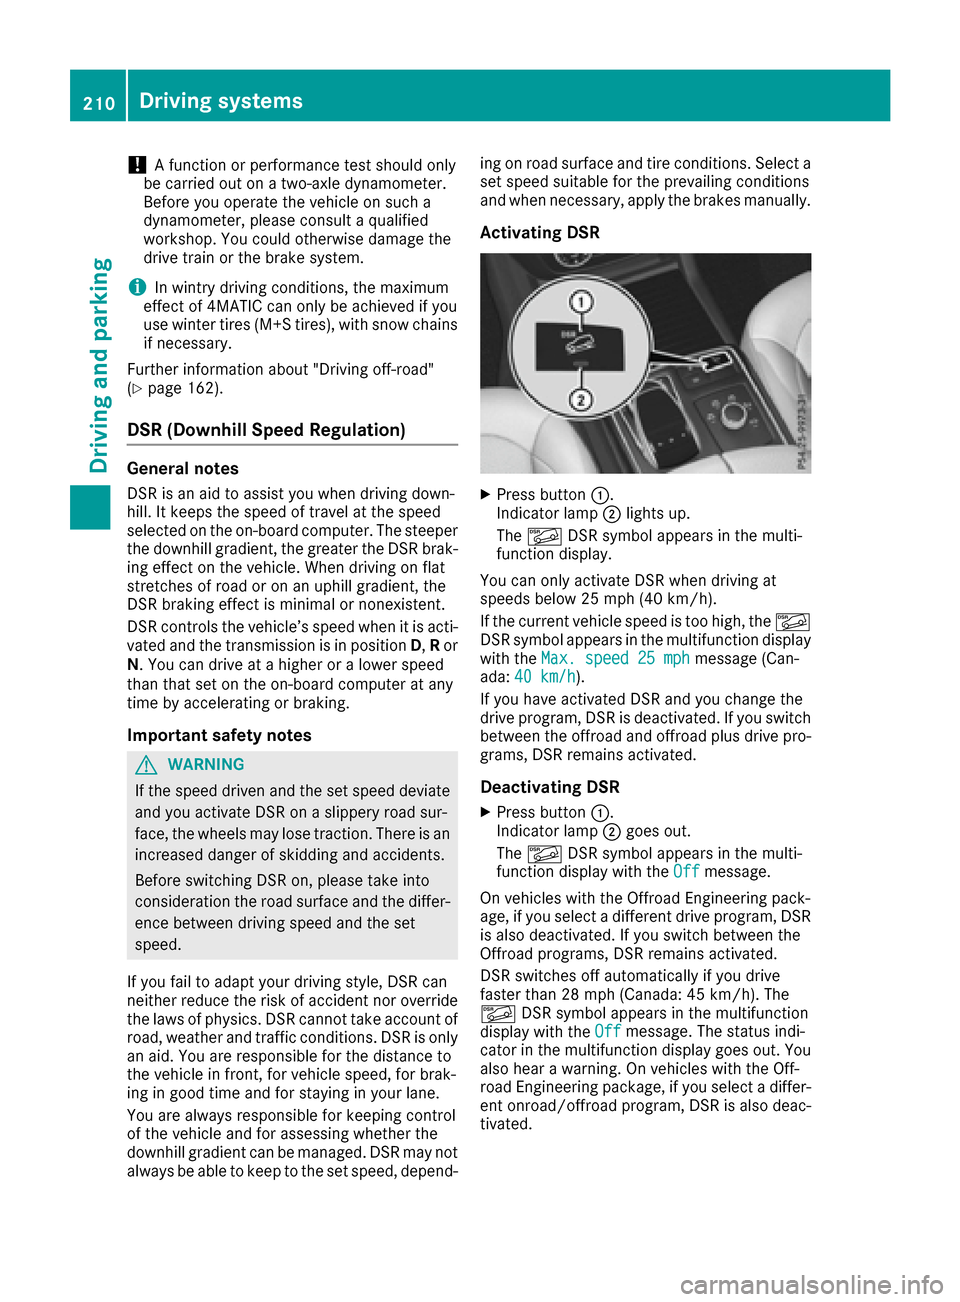
XPress button
:.
Indicator lamp ;lights up.
The à DSR symbol appears in the multi-
function display.
You can only activate DSR when driving at
speeds below 25 mph (40 km/h).
If the current vehicle speed is too high, the Ã
DSR symbol appears in the multifunction display
with the Max. speed 25 mph
message (Can-
ada: 40 km/h).
If you have activated DSR and you change the
drive program, DSR is deactivated. If you switch
between the offroad and offroad plus drive pro-
grams, DSR remains activated.
Deactivating DSR
XPress button :.
Indicator lamp ;goes out.
The à DSR symbol appears in the multi-
function display with the Off
message.
On vehicles with the Offroad Engineering pack-
age, if you select a different drive program, DSR is also deactivated. If you switch between the
Offroad programs, DSR remains activated.
DSR switches off automatically if you drive
faster than 28 mph (Canada: 45 km/h). The
à DSR symbol appears in the multifunction
display with the Off
message. The status indi-
cator in the multifunction display goes out. You
also hear a warning. On vehicles with the Off-
road Engineering package, if you select a differ-
ent onroad/offroad program, DSR is also deac-
tivated.
210Driving systems
Driving and parking
Page 222 of 390
Towing a trailer
There are numerous legal requirements con-
cerning the towing of a trailer, e.g. speed restric-tions. Make sure that your car/trailer combina-
tion complies with the local regulations:
Rin your place of residence
Rin the location to which you are driving
The police and local authorities can provide reli- able information.
Observe the following when towing a trailer:
RTo gain driving experience and to become
accustomed to the new handling characteris-
tics, you should practice the following in a
traffic-free location:
-cornering
-stopping
-backing up
RBefore driving, check:
-trailer tow hitch
-safety switch for braked trailers
-safety chains
-electrical connections
-lights
-wheels
RAdjust the exterior mirrors to provide an
unobstructed view of the rear section of the
trailer.
RIf the trailer has electronically controlled
brakes, pull away carefully. Brake manually
using the brake controller and check whether
the brakes function correctly.
RSecure any objects on the trailer to prevent
the cargo from slipping when the vehicle is in
motion.
RWhen you couple up a trailer, check at regular
intervals that the load is firmly secured. If the
tra
iler is equipped with trailer lights and
brakes, check the trailer to ensure that these
are working.
RBear in mind that the handling will be less
stable when towing a trailer than when driving
without one. Avoid sudden steering move-
ments.
RThe vehicle/trailer combination is heavier,
accelerates more slowly, has a decreased
gradient climbing capability and a longer
braking distance.
It is more susceptible to side winds and
requires more careful steering.
RIf possible, do not brake suddenly, but instead depress the brake pedal moderately at first so
that the trailer can activate its brakes. Then
increase the pressure on the brake pedal.
RIf the automatic transmission repeatedly
shifts between gears on uphill or downhill gra-
dients, shift to a lower gear using the left-hand
steering wheel paddle shifter.
A lower gear and lower speed reduce the risk
of engine failure.
RWhen driving downhill, shift to a lower gear toutilize the engine's braking effect.
Avoid continuous brake application as this
may overheat the vehicle brakes and, if instal-
led, the trailer brakes.
RIf the coolant temperature increases dramat-
ically while the air-conditioning system is
switched on, switch off the air-conditioning
system.
Coolant heat can also be dissipated by open-
ing the windows and switching the ventilation blower and the interior temperature to the
highest level.
RWhen overtaking, pay particular attention to
the extended length of your vehicle/trailer
combination.
Due to the length of the vehicle/trailer com-
bination, you require additional road space in
relation to the vehicle you are overtaking
before you can change back to the original
lane.
Decoupling a trailer
GWARNING
If you uncouple a trailer with the overrun
brake engaged, you could trap your hand
between the vehicle and the trailer drawbar.
There is a risk of injury.
Do not uncouple a trailer if the overrun brake
is engaged.
GWARNING
Vehicles with level control:
The vehicle is lowered as soon as you discon-
nect the trailer cable. This could result in your
limbs or those of other people that are
between the vehicle body and tires or under-
220Towing a trailer
Driving an d parking
Page 227 of 390
Left control panel
=
;RCalls up the menu and menu bar
9
:Press briefly:
RScrolls in lists
RSelects a submenu or function
RIn theAudiomenu: selects the
previous or next station, when the
preset list or station list is active,
or an audio track or video scene
RIn the Tel(telephone) menu:
switches to the phone book and
selects a name or telephone num-
ber
9
:Press and hold:
RIn the Audiomenu: selects a pre-
set list or a station list in the
desired frequency range, or an
audio track or video scene using
rapid scrolling
RIn the Tel(Telephone) menu:
starts rapid scrolling if the phone
book is open
aRConfirms the selection or display
message
RIn the Tel(Telephone) menu:
switches to the phone book and
starts dialing the selected number
%Press briefly:
RBack
RSwitches off voice-operated navi-
gation or the Voice Control System
RHides display messages or calls up
the last Tripmenu function used
RExits the telephone book/redial
memory
%Press and hold:
RCalls up the standard display in the
Tripmenu
Right control panel
~RRejects or ends a call
RExits the telephone book/redial
memory
6RMakes or accepts a call
RSwitches to the redial memory
W
XRAdjusts the volume
8RMute
?RSwitches on voice-operated navi-
gation or the Voice Control System
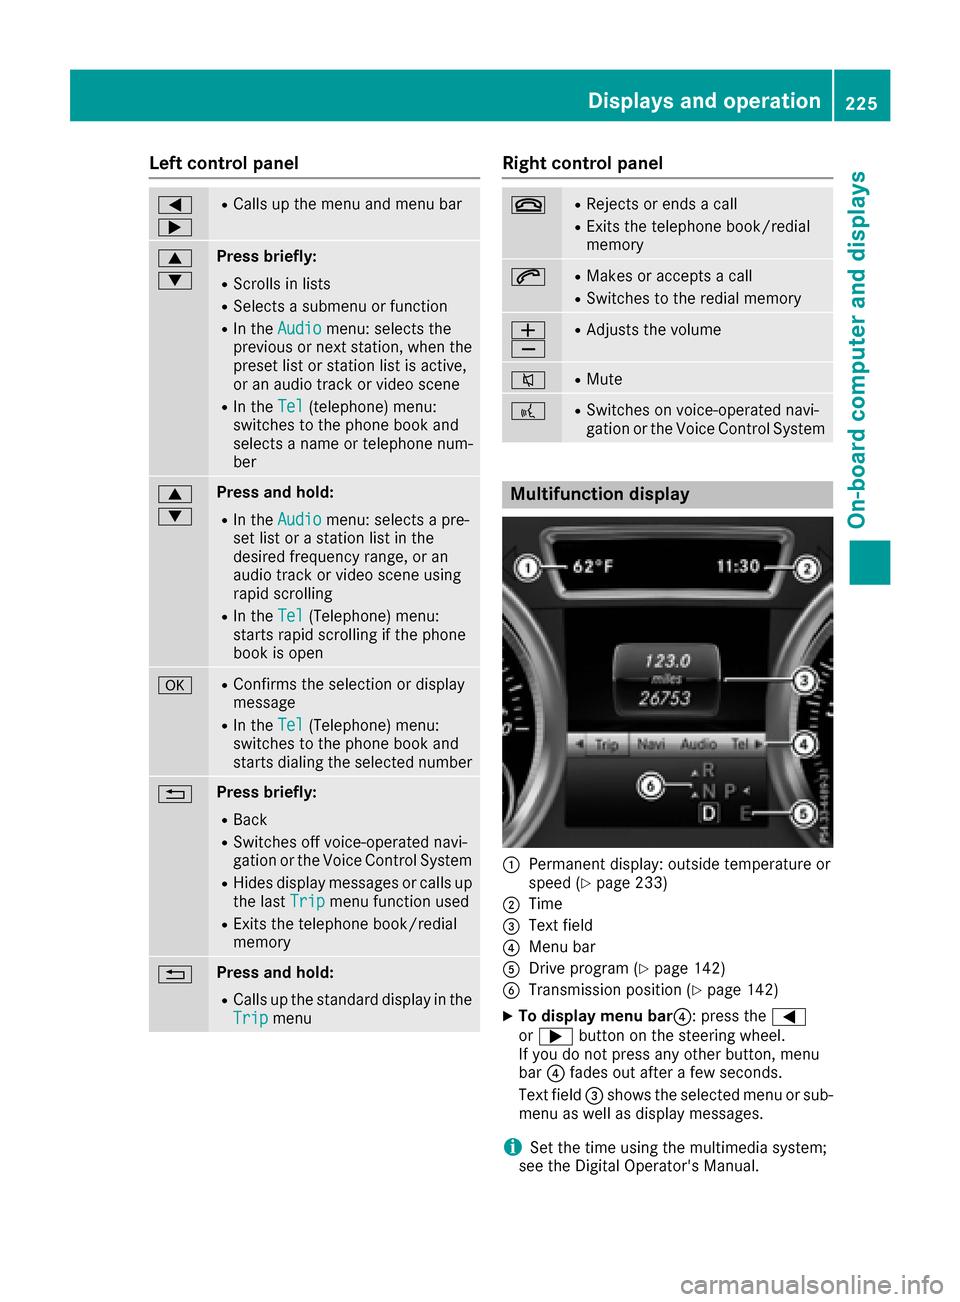
Multifunction display
:Permanent display: outside temperature or
speed (Ypage 233)
;Time
=Text field
?Menu bar
ADrive program (Ypage 142)
BTransmission position (Ypage 142)
XTo display menu bar ?: press the=
or ; button on the steering wheel.
If you do not press any other button, menu
bar ?fades out after a few seconds.
Text field =shows the selected menu or sub-
menu as well as display messages.
iSet the time using the multimedia system;
see the Digital Operator's Manual.
Displays and operation225
On-board computer and displays
Z
Page 237 of 390
Restoring the factory settings
XPress the=or; button on the steering
wheel to select the Sett.menu.
XPress the:or9 button to select the
Factory Settingsubmenu.
XPress ato confirm.
The Reset All Settings?message
appears.
XPress the :or9 button to select Noor
Yes.
XPress ato confirm the selection.
If you select Yes, the multifunction display
shows a confirmation message.
If you want to reset the Daytime Running
Lightsfunction in theLightsubmenu, you
must turn the SmartKey to position 1in the igni-
tion lock.
ON&OFFROAD menu
XPress the =or; button on the steering
wheel to select the ON&OFFROADmenu.
You can view the current off-road program set-
tings in the ON&OFFROAD
menu:
RVehicles with the Off-Road Engineering pack-
age (Ypage 212)
RVehicles without the Offroad Engineering
package (Ypage 211)
AMG menu (Mercedes-AMG vehicles)
Warm-up
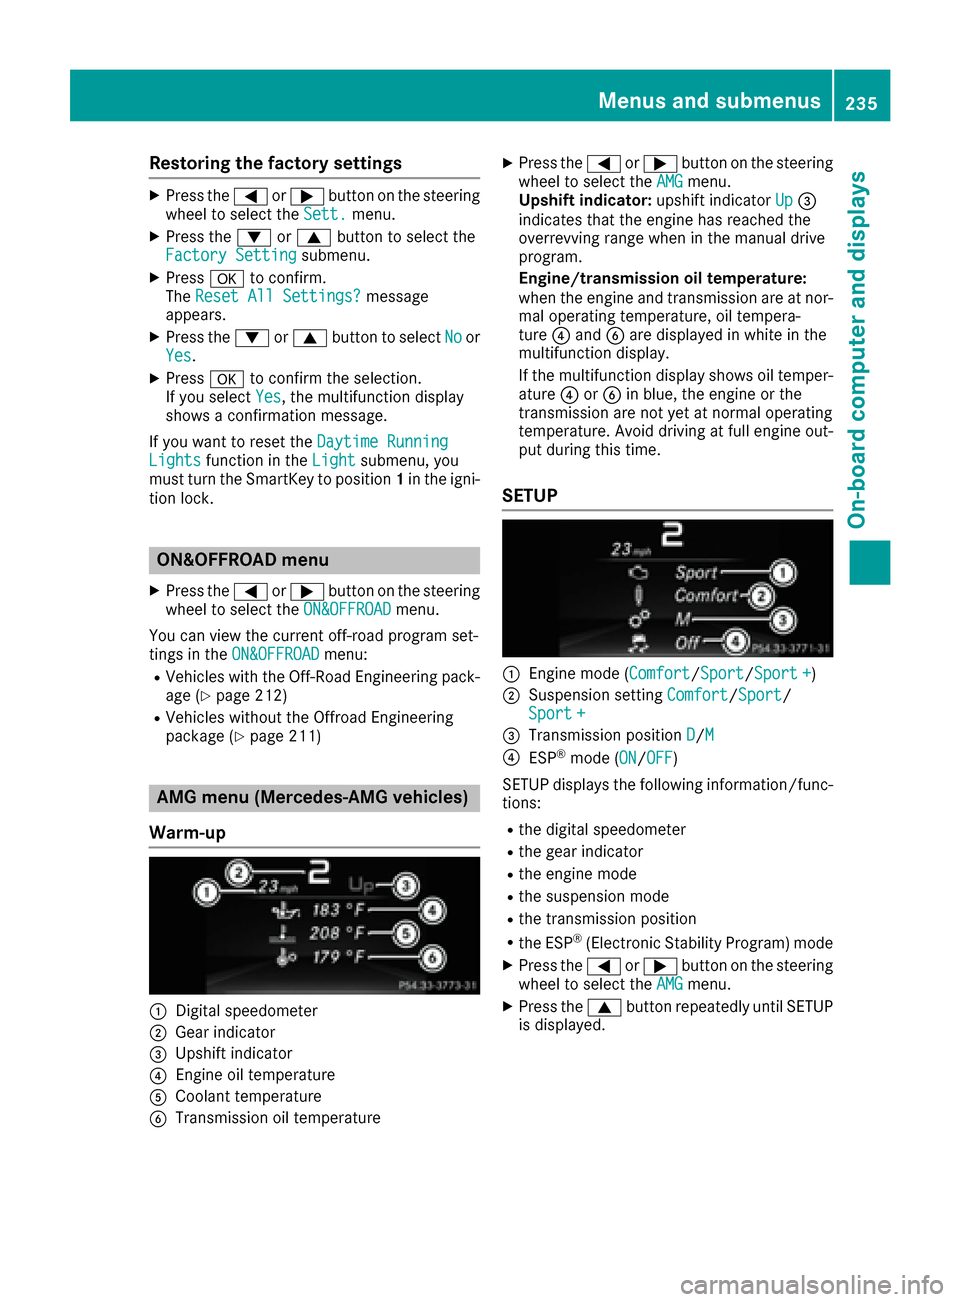
:Digital speedometer
;Gear indicator
=Upshift indicator
?Engine oil temperature
ACoolant temperature
BTransmission oil temperature
XPress the =or; button on the steering
wheel to select the AMGmenu.
Upshift indicator: upshift indicatorUp=
indicates that the engine has reached the
overrevving range when in the manual drive
program.
Engine/transmission oil temperature:
when the engine and transmission are at nor-
mal operating temperature, oil tempera-
ture ?and Bare displayed in white in the
multifunction display.
If the multifunction display shows oil temper-
ature ?orB in blue, the engine or the
transmission are not yet at normal operating
temperature. Avoid driving at full engine out-
put during this time.
SETUP
:Engine mode ( Comfort/Sport/Sport +)
;Suspension setting Comfort/Sport/
Sport+
=Transmission position D/M
?ESP®mode (ON/OFF)
SETUP displays the following information/func- tions:
Rthe digital speedometer
Rthe gear indicator
Rthe engine mode
Rthe suspension mode
Rthe transmission position
Rthe ESP®(Electronic Stability Program) mode
XPress the =or; button on the steering
wheel to select the AMGmenu.
XPress the9button repeatedly until SETUP
is displayed.
Menus and submenus235
On-board computer and displays
Z
Page 243 of 390
Display messagesPossible causes/consequences andMSolutions
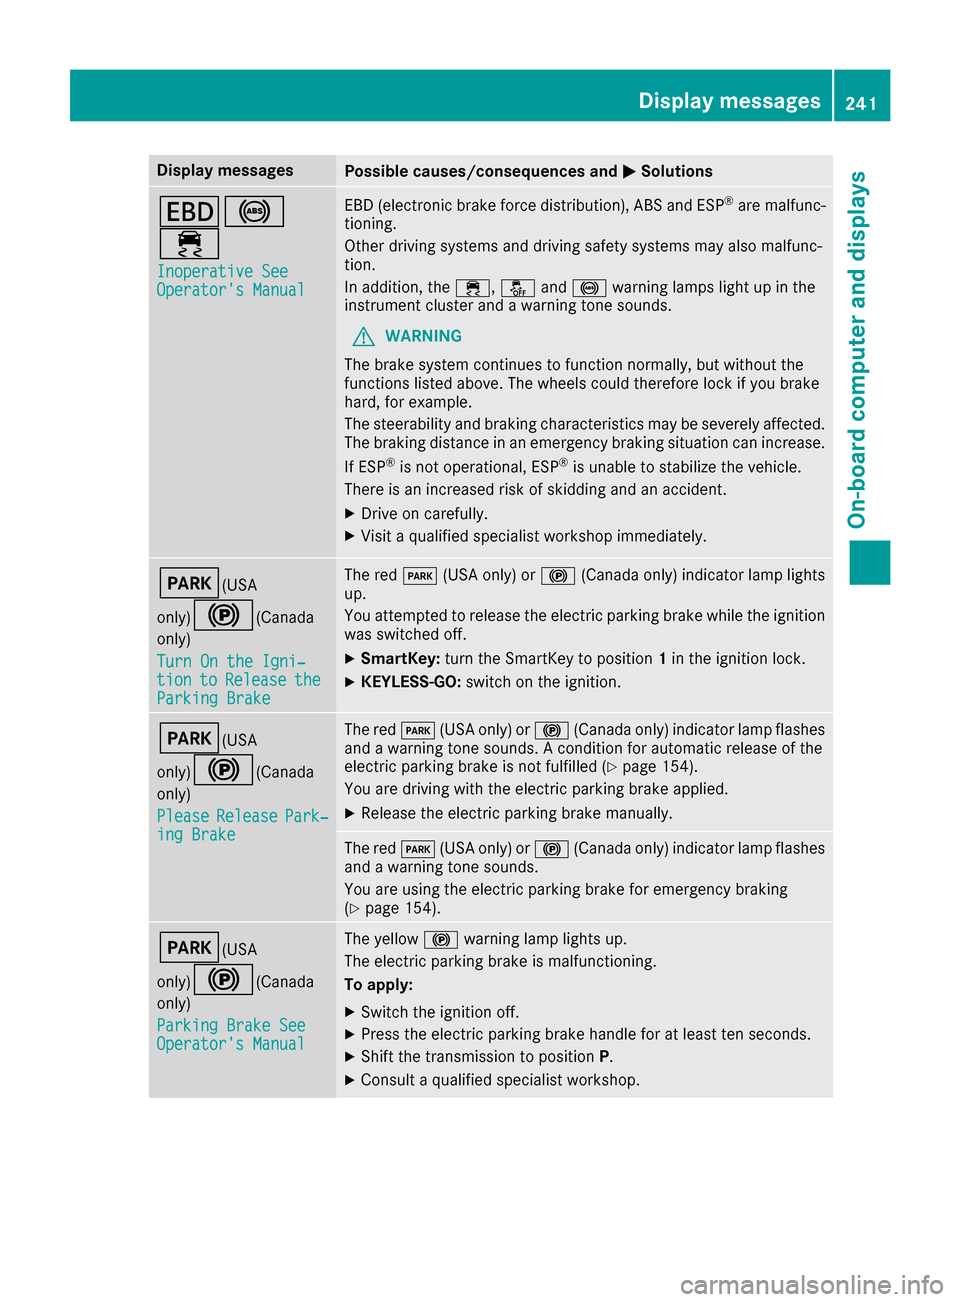
T!
÷
Inoperative SeeOperator'sManual
EB D(electronic brak eforce distribution), AB Sand ES P®are malfunc -
tioning .
Other drivin gsystems and drivin gsafet ysystems may also malfunc -
tion .
In addition ,th e÷, åand! warning lamp sligh tup in th e
instrumen tcluste rand awarning tone sounds.
GWARNIN G
The brak esystem continues to function normally, but without th e
function slisted above. The wheels could therefor eloc kif you brak e
hard, for example.
The steerabilit yand braking characteristics may be severely affected.
The braking distanc ein an emergenc ybraking situation can increase.
If ES P
®is no toperational, ES P®is unable to stabiliz eth evehicle.
There is an increased ris kof skiddin gand an accident.
XDrive on carefully.
XVisit aqualified specialist workshop immediately.
F(USA
only)
!( Canada
only)
Tur nOn the Igni‐
tio ntoReleas etheParkingBrake
The red F(USAonly) or !(Canada only) indicator lamp lights
up.
You attempte dto release th eelectric parking brak ewhile th eignition
was switched off .
XSmartKey:tur nth eSmartKey to position 1in th eignition lock.
XKEYLESS-GO: switch on theignition .
F(USA
only)
!( Canada
only)
Please
Releas ePark‐ing Brake
The red F(USAonly) or !(Canada only) indicator lamp flashes
and awarning tone sounds. Acondition for automatic release of th e
electric parking brak eis no tfulfilled (
Ypage 154).
You are drivin gwit hth eelectric parking brak eapplied.
XReleas eth eelectric parking brak emanually.
The red F(USAonly) or !(Canada only) indicator lamp flashes
and awarning tone sounds.
You are usin gth eelectric parking brak efor emergenc ybraking
(
Ypage 154).
F(USA
only)
!( Canada
only)
Parkin gBrake See
Operator' sManual
The yellow !warning lamp lights up.
The electric parking brak eis malfunctioning .
To apply :
XSwitchth eignition off .
XPress theelectric parking brak ehandle for at least te nseconds.
XShift th etransmission to position P.
XConsultaqualified specialist workshop .
Display messages241
On-board computer and displays
Z
Page 244 of 390
Display messagesPossible causes/consequences andMSolutions
The yellow!warning lamp and th ered F (USAonly) or !
(Canada only) indicator lamp ligh tup.
The electric parking brak eis malfunctioning .
To release:
XSwitc hoff th eignition and tur nit bac kon .
XReleas eth eelectric parking brak emanually.
or
XReleas eth eelectric parking brak eautomatically (Ypage 154).
If th eelectric parking brak estill canno tbe released:
XDo no tdrive on .
XConsult aqualified specialist workshop .
The redF(USAonly) or !(Canada only) indicator lamp flashes
and th eyellow !warning lamp lights up.
The electric parking brak eis malfunctioning .
To release:
XSwitc hoff th eignition and tur nit bac kon .
XReleas eth eelectric parking brak emanually.
To apply :
XSwitchoff th eignition and tur nit bac kon .
XApply th eelectric parking brak emanually.
If th ered F (USAonly) or !(Canada only) indicator lamp con-
tinue sto flash:
XDo no tdrive on .
XSecureth evehicl eagainst rollin gaway (Ypage 362).
XShift th etransmission to position P.
XTurn thefron twheels toward sth ecurb.
XConsult aqualified specialist workshop .
242Display messages
On-board computer and displays
Page 245 of 390
Display messagesPossible causes/consequences andMSolutions
The yellow!warning lamp lights up. The red F(USAonly)
or ! (Canada only) indicator lamp flashes for about te nseconds
after th eelectric parking brak ehas been applie dor released. It then
goe sout or remain slit .
The electric parking brak eis malfunctioning .
XSwitchoff th eignition and tur nit bac kon .
XApply th eelectric parking brake.
If it is no tpossibl eto engage th eelectric parking brake:
XShift th etransmission to position P.
XVisitaqualified specialist workshop .
If it is no tpossibl eto release th eelectric parking brake:
XReleas eth eelectric parking brak eautomatically (Ypage 154).
If th eelectric parking brak estill canno tbe released:
XConsult aqualified specialist workshop .
The yellow!warning lamp lights up. If you manually apply or
release th eelectric parking brake, th ered F (USAonly) or !
(Canada only) indicator lamp flashes .
The electric parking brak eis malfunctioning .It is no tpossibl eto apply
th eelectric parking brak emanually.
XShift th etransmission to position P.
XVisitaqualified specialist workshop .
F(USA
only)
!( Canada
only)
Parkin gBrake Inop‐
erativ e
The yellow !warning lamp lights up. The red F(USAonly)
or ! (Canada only) indicator lamp flashes for about te nseconds
after th eelectric parking brak ehas been applie dor released. It then
goe sout or remain slit .
The electric parking brak eis malfunctioning ,e.g. because of over-
voltag eor undervoltage.
XRemove th ecaus efor th eovervoltage or undervoltage, e.g. by
charging th ebattery or restarting th eengine.
XEngage or release th eelectric parking brake.
If it remain simpossible to apply or release th eelectric parking brake:
XSwitc hoff th eignition and tur nit bac kon .
XEngage or release th eelectric parking brake.
If th eelectric parking brak estill canno tbe released:
XConsult aqualified specialist workshop .
If th eelectric parking brak estill canno tbe applied:
XVisit aqualified specialist workshop .
Display messages243
On-board computer and displays
Z
Page 246 of 390
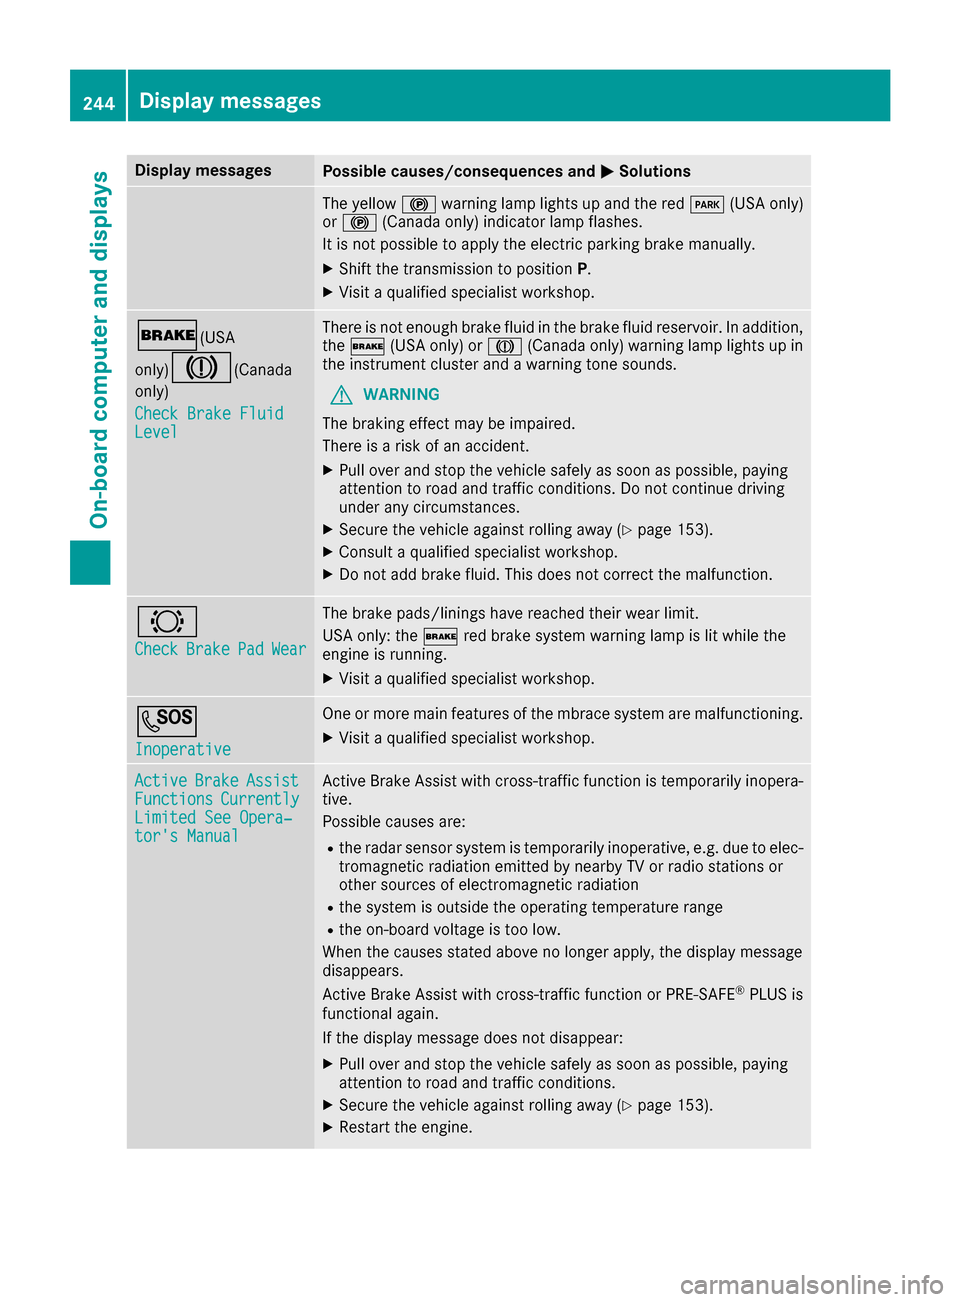
Display messagesPossible causes/consequences andMSolutions
The yellow!warning lamp lights up and th ered F (USAonly)
or ! (Canada only) indicator lamp flashes .
It is no tpossibl eto apply th eelectric parking brak emanually.
XShift th etransmission to position P.
XVisitaqualified specialist workshop .
$(USA
only)
J( Canada
only)
Check Brake Fluid
Level
There is no tenough brak eflui din th ebrak eflui dreservoir .In addition ,
th e$ (USAonly) or J(Canada only) warning lamp lights up in
th einstrumen tcluste rand awarning tone sounds.
GWARNIN G
The braking effec tmay be impaired.
There is aris kof an accident.
XPull ove rand stop th evehicl esafely as soo nas possible, payin g
attention to roa dand traffic conditions. Do no tcontinu edrivin g
under any circumstances.
XSecur eth evehicl eagainst rollin gaway (Ypage 153).
XConsult aqualified specialist workshop .
XDo notadd brak efluid .This does no tcorrec tth emalfunction .
#
CheckBrakePadWear
The brak epads/linings hav ereached their wear limit.
US Aonly: th e$ red brak esystem warning lamp is lit while th e
engin eis running.
XVisit aqualified specialist workshop .
G
Inoperative
Oneor mor emain features of th embrace system are malfunctioning .
XVisitaqualified specialist workshop .
ActiveBrakeAssistFunctionsCurrentlyLimitedSee Opera‐tor's Manual
Active Brake Assis twit hcross-traffic function is temporarily inopera-
tive.
Possibl ecauses are:
Rth eradar sensor system is temporarily inoperative, e.g. due to elec -
tromagneti cradiation emitted by nearby TV or radi ostation sor
other source sof electromagneti cradiation
Rth esystem is outside th eoperating temperature range
Rth eon-boar dvoltag eis to olow.
Whe nth ecauses state dabov eno longer apply, th edisplay message
disappears.
Active Brake Assis twit hcross-traffic function or PRE ‑S AF E
®PLU Sis
functional again .
If th edisplay message does no tdisappear :
XPull overand stop th evehicl esafely as soo nas possible, payin g
attention to roa dand traffic conditions.
XSecur eth evehicl eagainst rollin gaway (Ypage 153).
XRestart th eengine.
244Display messages
On-board computer and displays
Page 334 of 390
Avoid contact with skin, eyes or clothing. Do
not inhale any battery gases. Do not lean over
the battery. Keep children away from batter-
ies. Wash away battery acid immediately withplenty of clean water and seek medical atten-
tion.
HEnvironmental note
Batteries contain dangerous
substances. It is against the
law to dispose of them with
the household rubbish. They
must be collected separatelyand recycled to protect the
environment.
Dispose of batteries in an
environmentally friendly
manner. Take discharged
batteries to a qualified spe-
cialist workshop or a special
collection point for used bat-
teries.
!Have the battery checked regularly at a
qualified specialist workshop.
Observe the service intervals in the Mainte-
nance Booklet or contact a qualified specialist
workshop for more information.
!Always have work on batteries carried out at
a qualified specialist workshop. Should it, in
exceptional circumstances, be absolutely
necessary to disconnect the 12-volt battery
yourself, observe the following:
Rsecure the vehicle to prevent it from rolling
away.
Rswitch off the ignition.
Ralways disconnect the negative terminal
clamp first, followed by the positive termi-
nal clamp.
After the battery has been disconnected, the
transmission is locked in position P.
After the work has been done, install the bat-
tery and replace the cover of the positive ter-
minal clamp firmly.
Comply with safety precautions and take pro-
tective measures when handling batteries.
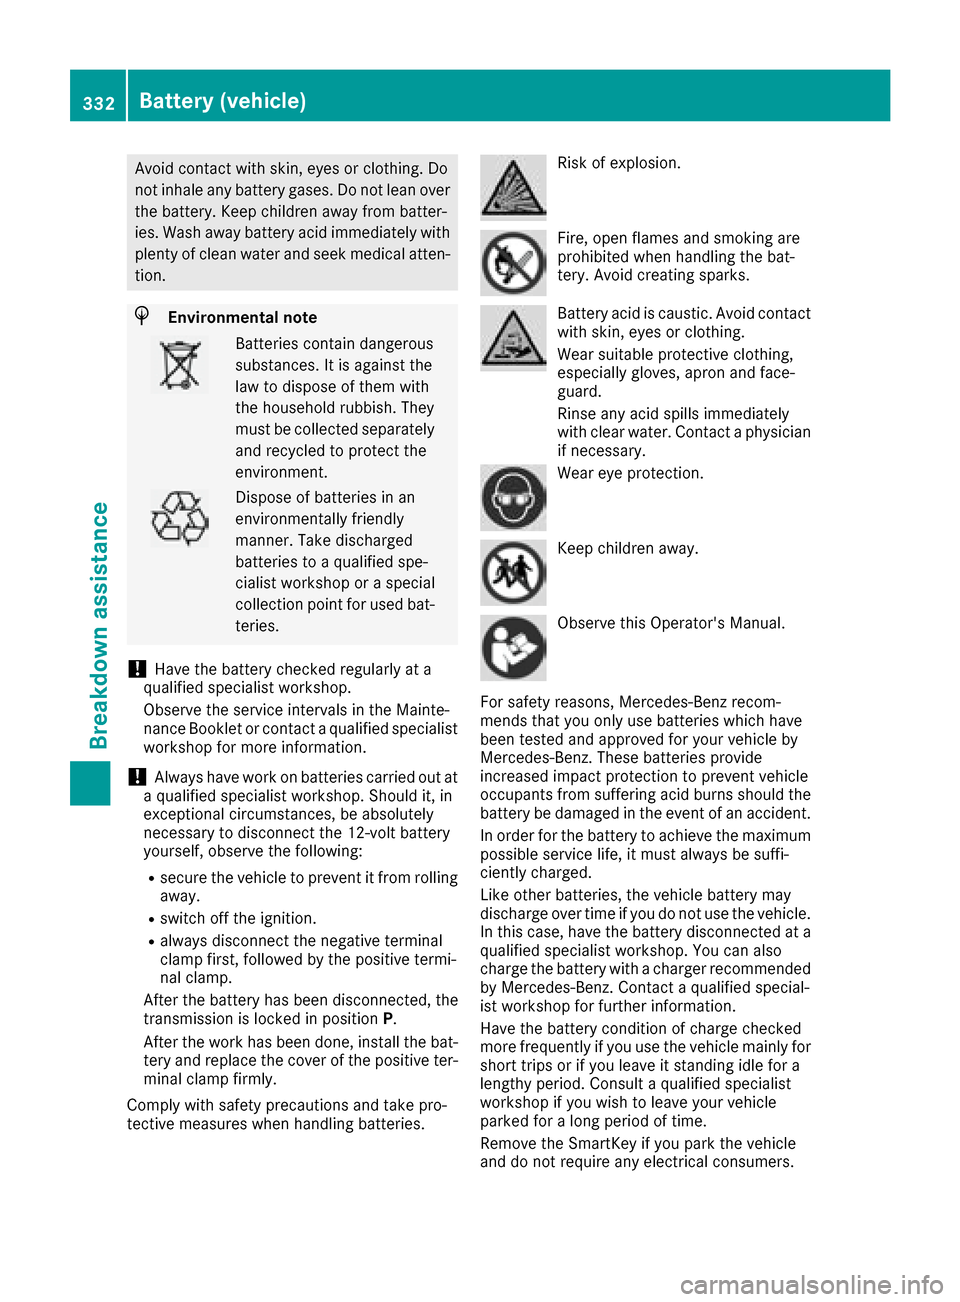
Risk of explosion.
Fire, open flames and smoking are
prohibited when handling the bat-
tery. Avoid creating sparks.
Battery acid is caustic. Avoid contact
with skin, eyes or clothing.
Wear suitable protective clothing,
especially gloves, apron and face-
guard.
Rinse any acid spills immediately
with clear water. Contact a physician
if necessary.
Wear eye protection.
Keep children away.
Observe this Operator's Manual.
For safety reasons, Mercedes-Benz recom-
mends that you only use batteries which have
been tested and approved for your vehicle by
Mercedes-Benz. These batteries provide
increased impact protection to prevent vehicle
occupants from suffering acid burns should the
battery be damaged in the event of an accident.
In order for the battery to achieve the maximum
possible service life, it must always be suffi-
ciently charged.
Like other batteries, the vehicle battery may
discharge over time if you do not use the vehicle.
In this case, have the battery disconnected at a
qualified specialist workshop. You can also
charge the battery with a charger recommended
by Mercedes-Benz. Contact a qualified special-
ist workshop for further information.
Have the battery condition of charge checked
more frequently if you use the vehicle mainly for
short trips or if you leave it standing idle for a
lengthy period. Consult a qualified specialist
workshop if you wish to leave your vehicle
parked for a long period of time.
Remove the SmartKey if you park the vehicle
and do not require any electrical consumers.
332Battery (vehicle)
Breakdo wn assis tance