Cup holder MERCEDES-BENZ GLE SUV 2017 W166 Owner's Manual
[x] Cancel search | Manufacturer: MERCEDES-BENZ, Model Year: 2017, Model line: GLE SUV, Model: MERCEDES-BENZ GLE SUV 2017 W166Pages: 390, PDF Size: 9.43 MB
Page 10 of 390
CockpitOverview .......................................... 33
see Instrument cluster
Collapsible spare wheel
Inflating ........................................ .369
see Emergency spare wheel
COMAND
Driving dynamics display ............... 215
Switching on/off ........................... 282
COMAND display
Cleaning ......................................... 324
Combination switch .......................... 108
Combined cargo cover and net ........ 294
Connecting a USB device
see also Digital Operator's Man-
ual .................................................. 281
Consumption statistics (on-board
computer) .......................................... 226
Controller ........................................... 282
Convenience closing feature .............. 87
Convenience opening feature ............ 86
Coolant (engine)
Checking the level ......................... 317
Display message ............................ 251
Filling capacity ............................... 379
Important safety notes .................. 378
Temperature (on-board computer,
Mercedes-AMG vehicles) ............... 235
Temperature gauge ........................ 224
Warning lamp ................................. 277
Cooling
see Climate control
Copyright ............................................. 32
Cornering light function
Display message ............................ 250
Crash-responsive emergency light-
ing ....................................................... 112
Crosswind Assist ................................. 69
Crosswind driving assistance ............ 69
Cruise control
Activating ....................................... 167
Activation conditions ..................... 167
Cruise control lever ....................... 166
Deactivating ................................... 167
Display message ............................ 261
Driving system ............................... 166
Function/notes ............................. 166 Important safety notes .................. 166
Storing and maintaining current
speed ............................................. 167
Cup holder
Center console .............................. 298
Imp
ortant safety notes .................. 298
Rear compartment ......................... 299
Temperature controlled ................. 298
Customer Assistance Center
(CAC) ..................................................... 29
Customer Relations Department ....... 29
D
Dashboard
see Instrument cluster
Data
see Technical data
Data carrier
Selecting ........................................ 229
Daytime running lamps
Display message ............................ 250
Function/notes ............................. 107
Switching on/off (on-board com-
puter) ............................................. 233
Declarations of conformity ................. 28
DEF
Adding ........................................... 150
Display message ............................ 254
Filling capacity ............................... 377
Important safety notes .................. 376
Diagnostics connection ...................... 29
Differential lock (display mes-
sage) ................................................... 257
Digital speedometer ......................... 227
DIRECT SELECT lever
Automatic transmission ................. 140
Display messages
ASSYST PLUS ................................ 318
Calling up (on-board computer) ..... 238
Driving systems ............................. 255
Engine ............................................ 251
General notes ................................ 237
Hiding (on-board computer) ........... 238
KEYLESS-GO .................................. 267
Lights ............................................. 250
Safety systems .............................. 239
SmartKey ....................................... 267
8Index
Page 39 of 390
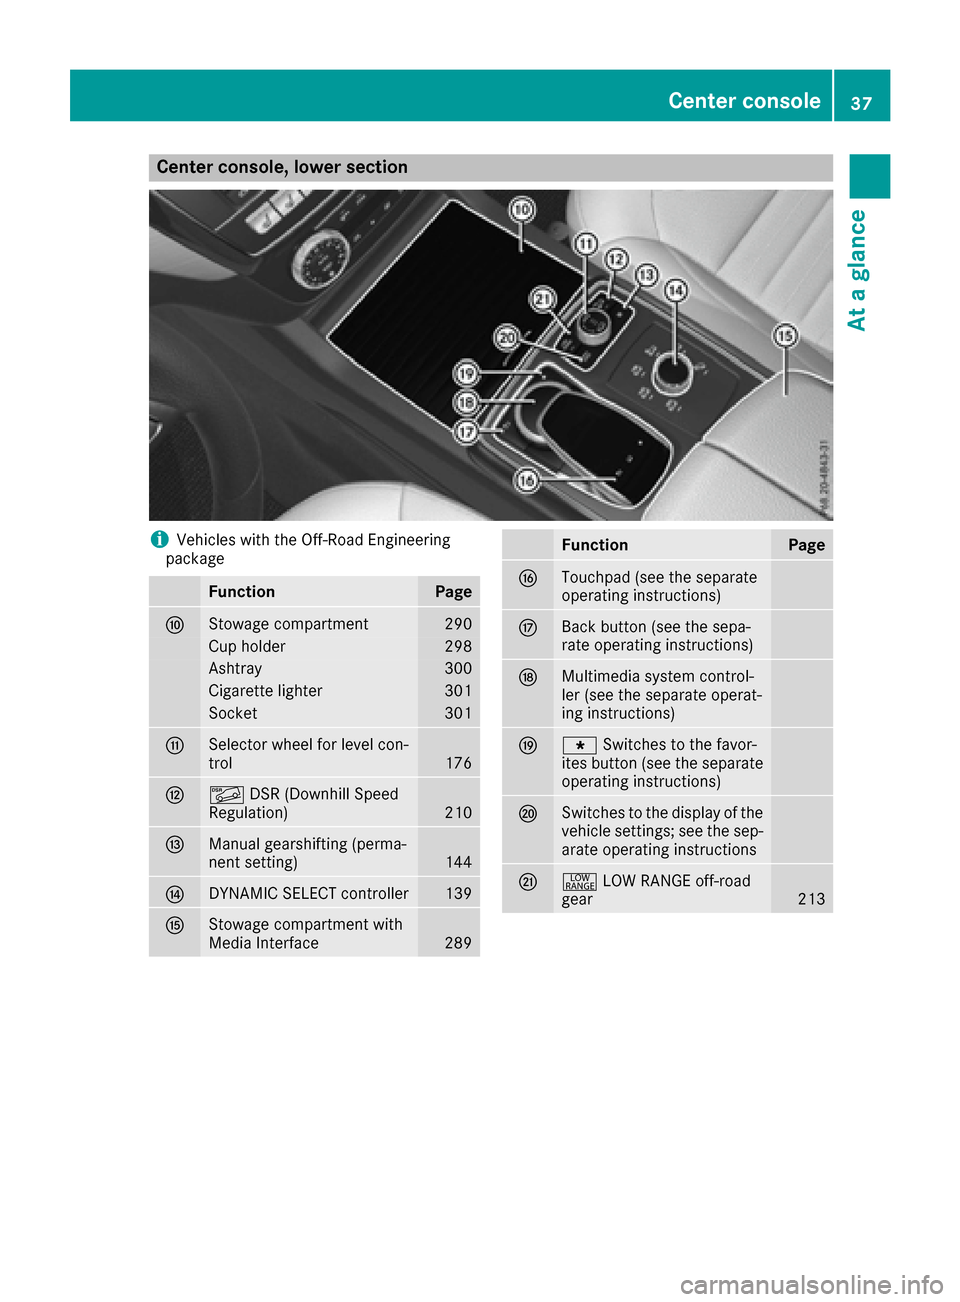
Center console, lower section
iVehicles with the Off-Road Engineering
package
FunctionPage
FStowage compartment290
Cup holder298
Ashtray300
Cigarette lighter301
Socket301
GSelector wheel for level con-
trol176
HÃ DSR (Downhill Speed
Regulation)210
IManual gearshifting (perma-
nent setting)144
JDYNAMIC SELECT controller139
KStowage compartment with
Media Interface289
FunctionPage
LTouchpad (see the separate
operating instructions)
MBack button (see the sepa-
rate operating instructions)
NMultimedia system control-
ler (see the separate operat-
ing instructions)
Og Switches to the favor-
ites button (see the separate
operating instructions)
PSwitches to the display of the
vehicle settings; see the sep-
arate operating instructions
Q+ LOW RANGE off-road
gear213
Center console37
At a glance
Page 40 of 390
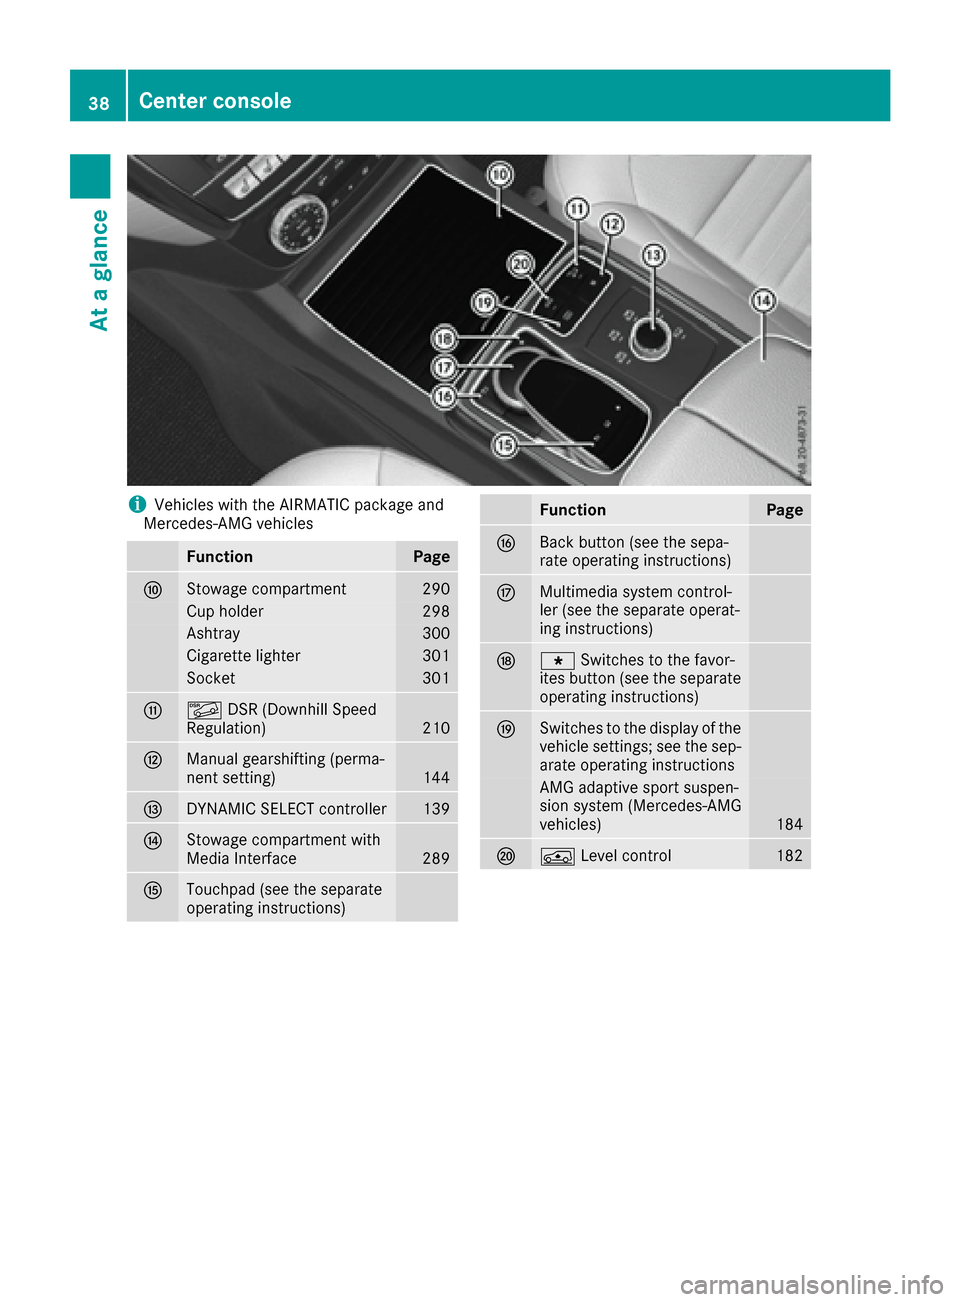
iVehicles with the AIRMATIC package and
Mercedes-AMG vehicles
FunctionPage
FStowage compartment290
Cup holder298
Ashtray300
Cigarette lighter301
Socket301
GÃ DSR (Downhill Speed
Regulation)210
HManual gearshifting (perma-
nent setting)144
IDYNAMIC SELECT controller139
JStowage compartment with
Media Interface289
KTouchpad (see the separate
operating instructions)
FunctionPage
LBack button (see the sepa-
rate operating instructions)
MMultimedia system control-
ler (see the separate operat-
ing instructions)
Ng Switches to the favor-
ites button (see the separate
operating instructions)
OSwitches to the display of the
vehicle settings; see the sep-
arate operating instructions
AMG adaptive sport suspen-
sion system (Mercedes-AMG
vehicles)
184
PÁ Level control182
38Center console
At a glance
Page 49 of 390
Rno accessories, such as cup holders, are
attached to the vehicle within the deployment
area of an air bag, e.g. to doors, side windows,
rear side trim or side walls.
Rno heavy, sharp-edged or fragile objects are in
the pockets of your clothing. Store such
objects in a suitable place.
GWARNING
If you modify the air bag cover or affix objects
such as stickers to it, the air bag can no longer
function correctly. There is an increased risk
of injury.
Never modify an air bag cover or affix objects
to it.
GWARNING
Sensors to control the air bags are located in
the doors. Modifications or work not per-
formed correctly to the doors or door panel-
ing, as well as damaged doors, can lead to the
function of the sensors being impaired. The air
bags might therefore not function properly
anymore. Consequently, the air bags cannot
protect vehicle occupants as they are
designed to do. There is an increased risk of
injury.
Never modify the doors or parts of the doors.
Always have work on the doors or door pan-
eling carried out at a qualified specialist work-
shop.
Front air bags
!Do not place heavy objects on the front-
passenger seat. This could cause the system
to identify the seat as being occupied. In the
event of an accident, the restraint systems on
the front-passenger side may be triggered
and have to be replaced.
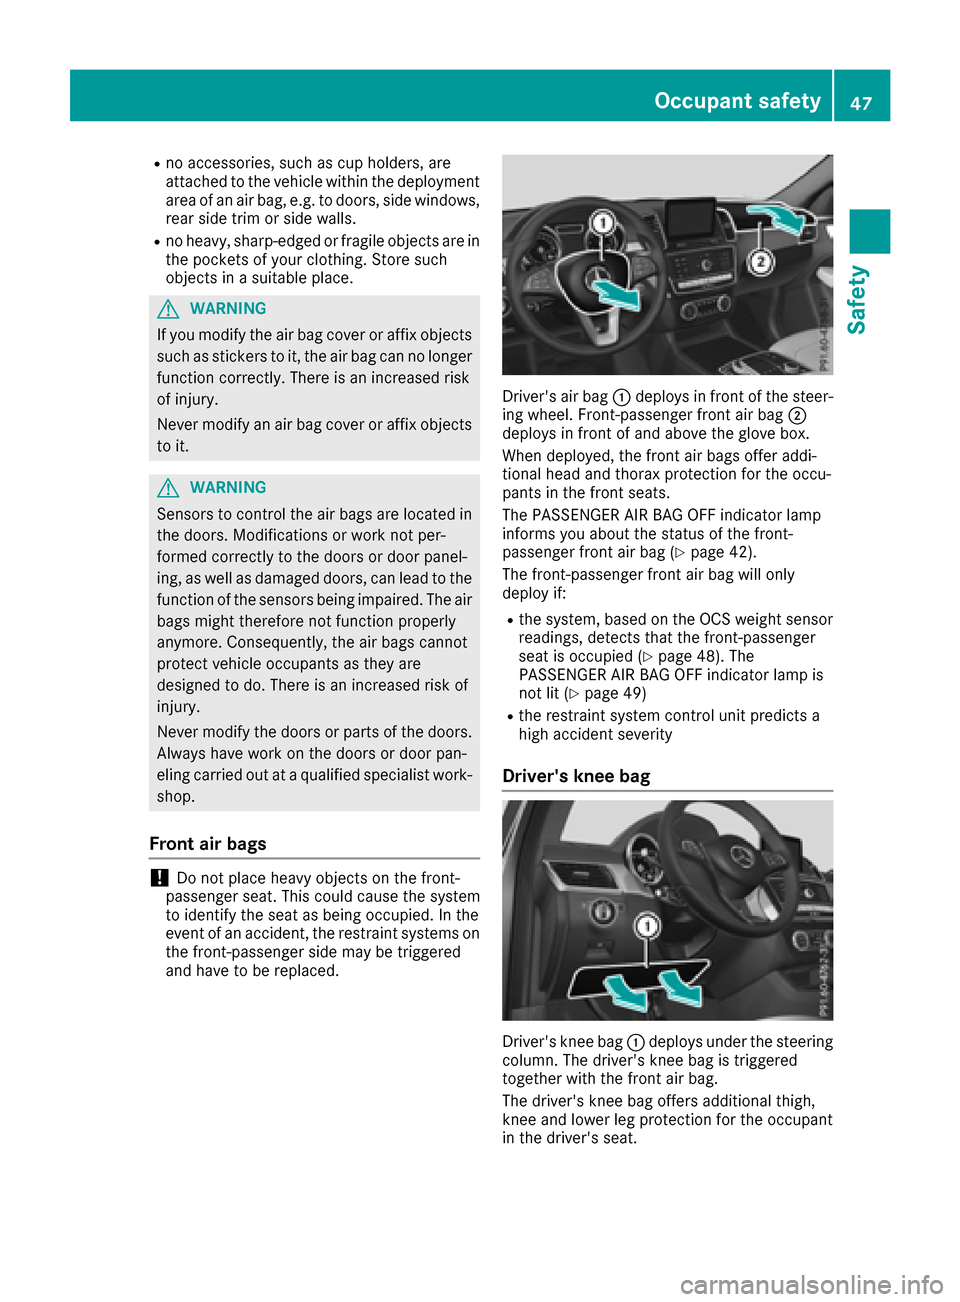
Driver's air bag :deploys in front of the steer-
ing wheel. Front-passenger front air bag ;
deploys in front of and above the glove box.
When deployed, the front air bags offer addi-
tional head and thorax protection for the occu-
pants in the front seats.
The PASSENGER AIR BAG OFF indicator lamp
informs you about the status of the front-
passenger front air bag (
Ypage 42).
The front-passenger front air bag will only
deploy if:
Rthe system, based on the OCS weight sensor
readings, detects that the front-passenger
seat is occupied (
Ypage 48). The
PASSENGER AIR BAG OFF indicator lamp is
not lit (
Ypage 49)
Rthe restraint system control unit predicts a
high accident severity
Driver's knee bag
Driver's knee bag :deploys under the steering
column. The driver's knee bag is triggered
together with the front air bag.
The driver's knee bag offers additional thigh,
knee and lower leg protection for the occupant
in the driver's seat.
Occupant safety47
Safety
Z
Page 76 of 390
SmartKey
Important safety notes
GWARNING
If children are left unsupervised in the vehicle,
they could:
Ropen the doors, thus endangering other
people or road users.
Rget out and disrupt traffic.
Roperate the vehicle's equipment.
Additionally, children could set the vehicle in
motion if, for example, they:
Rrelease the parking brake.
Rshifting the automatic transmission out of
park position P
RStart the engine.
There is a risk of an accident and injury.
When leaving the vehicle, always take the
SmartKey with you and lock the vehicle. Never
leave children or animals unattended in the
vehicle. Always keep the SmartKey out of
reach of children.
GWARNING
If you attach heavy or large objects to the
SmartKey, the SmartKey could be uninten-
tionally turned in the ignition lock. This could
cause the engine to be switched off. There is a risk of an accident.
Do not attach any heavy or large objects to the
SmartKey. Remove any bulky key rings before
inserting the SmartKey into the ignition lock.
!Keep the SmartKey away from strong mag-
netic fields. Otherwise, the remote control
function could be affected.
Strong magnetic fields can occur in the vicin-
ity of powerful electrical installations.
Do not keep the SmartKey:
Rwith electronic devices, e.g. a mobile phone
or another SmartKey.
Rwith metallic objects, e.g. coins or metal foil.
Rinside metallic objects, e.g. a metal case.
This can affect the functionality of the Smart- Key. Do not keep the KEYLESS-GO or KEYLESS-GO
Start function key in the temperature-controlled
cup holder. Otherwise, the KEYLESS-GO or KEY-
LESS-GO Start function key will not be detected.
Vehicles with KEYLESS-GO start function:
do
not keep the SmartKey in the cargo compart-
ment. Otherwise, the SmartKey may not be
detected, e.g. when starting the engine using
the Start/Stop button.
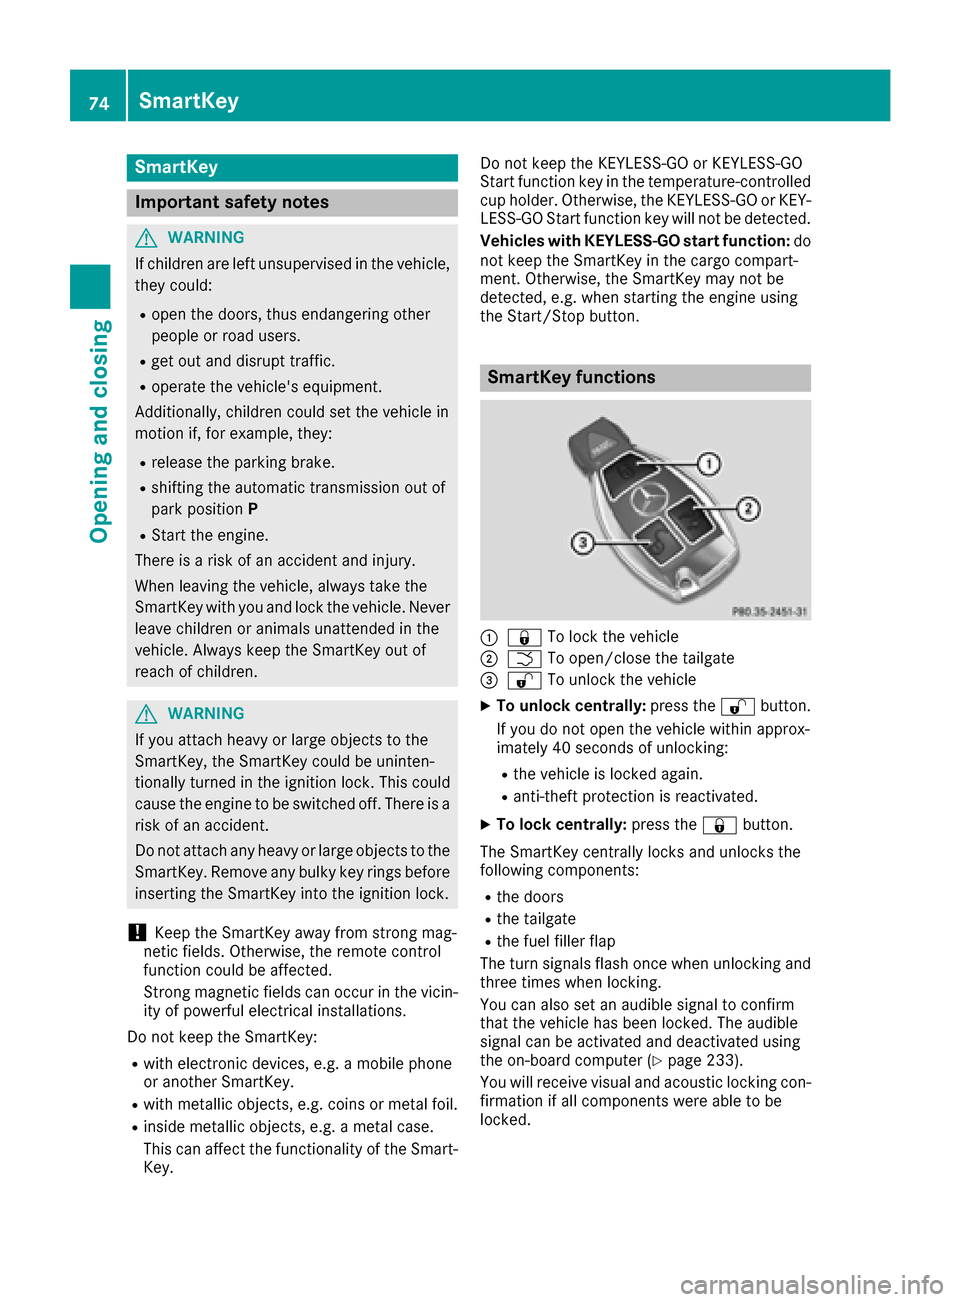
SmartKey functions
:& To lock the vehicle
;FTo open/close the tailgate
=%To unlock the vehicle
XTo unlock centrally: press the%button.
If you do not open the vehicle within approx-
imately 40 seconds of unlocking:
Rthe vehicle is locked again.
Ranti-theft protection is reactivated.
XTo lock centrally: press the&button.
The SmartKey centrally locks and unlocks the
following components:
Rthe doors
Rthe tailgate
Rthe fuel filler flap
The turn signals flash once when unlocking and
three times when locking.
You can also set an audible signal to confirm
that the vehicle has been locked. The audible
signal can be activated and deactivated using
the on-board computer (
Ypage 233).
You will receive visual and acoustic locking con-
firmation if all components were able to be
locked.
74SmartKey
Opening and closing
Page 135 of 390
Do not keep the SmartKey:
Rwith electronic devices, e.g. a mobile phone
or another SmartKey.
Rwith metallic objects, e.g. coins or metal foil.
Rinside metallic objects, e.g. a metal case.
This can impair the functionality of the KEY-
LESS-GO key.
Do not keep the KEYLESS-GO key in the tem-
perature-controlled cup holder (
Ypage 298).
Otherwise, the KEYLESS-GO key will not be rec-
ognized.
If you lock the vehicle with the SmartKey's
remote control or with KEYLESS-GO, after a
short time:
Ryou will not be able to switch on the ignition
with the Start/Stop button.
Ryou will not be able to start the engine with the
Start/Stop button until the vehicle is
unlocked again.
If you lock the vehicle centrally using the button
on the front door (
Ypage 80), you can continue
to start the engine with the Start/Stop button.
The engine can be switched off while the vehicle
is in motion by pressing and holding the Start/
Stop button for three seconds. This function
operates independently of the ECO start/stop
automatic engine switch-off function.
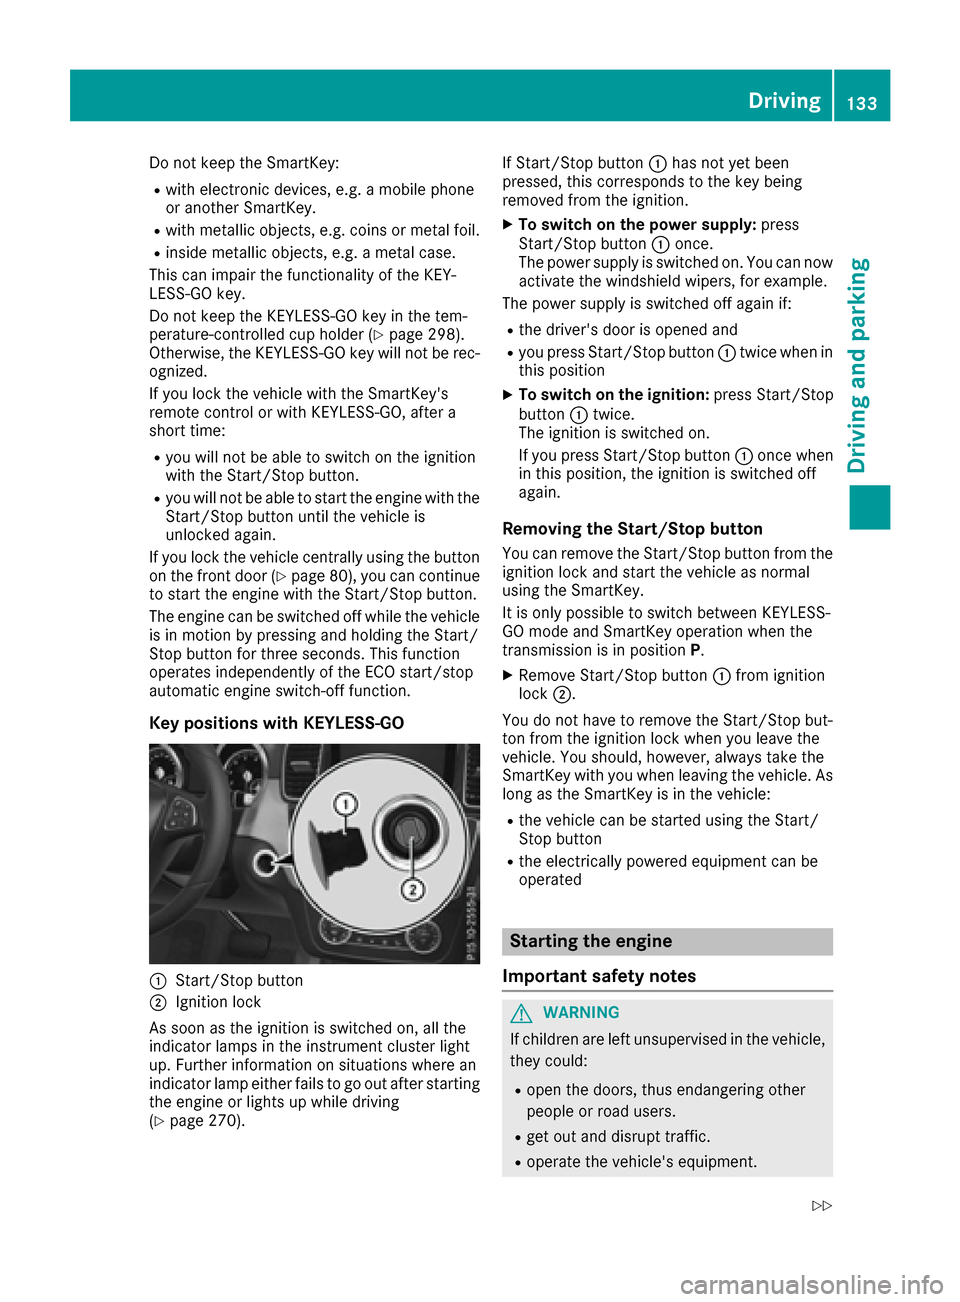
Key positions with KEYLESS-GO
:Start/Stop button
;Ignition lock
As soon as the ignition is switched on, all the
indicator lamps in the instrument cluster light
up. Further information on situations where an
indicator lamp either fails to go out after starting
the engine or lights up while driving
(
Ypage 270). If Start/Stop button
:has not yet been
pressed, this corresponds to the key being
removed from the ignition.
XTo switch on the power supply: press
Start/Stop button :once.
The power supply is switched on. You can now activate the windshield wipers, for example.
The power supply is switched off again if:
Rthe driver's door is opened and
Ryou press Start/Stop button :twice when in
this position
XTo switch on the ignition: press Start/Stop
button :twice.
The ignition is switched on.
If you press Start/Stop button :once when
in this position, the ignition is switched off
again.
Removing the Start/Stop button
You can remove the Start/Stop button from the
ignition lock and start the vehicle as normal
using the SmartKey.
It is only possible to switch between KEYLESS-
GO mode and SmartKey operation when the
transmission is in position P.
XRemove Start/Stop button :from ignition
lock ;.
Yo u d
o not have to remove the Start/Stop but-
ton from the ignition lock when you leave the
vehicle. You should, however, always take the
SmartKey with you when leaving the vehicle. As
long as the SmartKey is in the vehicle:
Rthe vehicle can be started using the Start/
Stop button
Rthe electrically powered equipment can be
operated
Starting the engine
Important safety notes
GWARNING
If children are left unsupervised in the vehicle,
they could:
Ropen the doors, thus endangering other
people or road users.
Rget out and disrupt traffic.
Roperate the vehicle's equipment.
Driving133
Dr iving an d parking
Z
Page 290 of 390
Stowage areas
Loading guidelines
GWARNING
If objects, luggage or loads are not secured or
not secured sufficiently, they could slip, tip
over or be flung around and thereby hit vehicle
occupants. There is a risk of injury, particu-
larly in the event of sudden braking or a sud-
den change in direction.
Always store objects so that they cannot be
flung around. Secure objects, luggage or
loads against slipping or tipping before the
journey.
GWARNING
Combustion engines emit poisonous exhaust
gases such as carbon monoxide. If the tailgate
is open when the engine is running, particu-
larly if the vehicle is moving, exhaust fumes
could enter the passenger compartment.
There is a risk of poisoning.
Turn off the engine before opening the tail-
gate. Never drive with the tailgate open.
GWARNING
The exhaust tail pipe and tail pipe trim can
become very hot. If you come into contact
with these parts of the vehicle, you could burn
yourself. There is a risk of injury.
Always be particularly careful around the
exhaust tail pipe and the tail pipe trim. Allow
these components to cool down before touch-
ing them.
The gross vehicle weight (GVW) is the vehicle
weight including fuel, vehicle tool kit, spare
wheel, installed accessories, vehicle occupants
and luggage/cargo.
Do not exceed the load limit or permitted gross
vehicle weight rating (GVWR) for your vehicle.
The gross load limit and the GVWR are specified
on the vehicle identification plate on the B-pillar
of the driver's door (
Ypage 351).
The load must also be distributed so that the
weight on each axle never exceeds the gross
axle weight rating (GAWR) for the front and rear
axles. The specifications for GVWR and GAWR are on the vehicle identification plate on the B-
pillar of the driver's door (
Ypage 351).
Observe the notes on loading the vehicle
(
Ypage 351).
The handling characteristics of a laden vehicle
are dependent on the distribution of the load
within the vehicle. For this reason, you should
observe the following notes when transporting a
load:
RNever exceed the maximum permissible
gross vehicle mass or the gross axle weight
rating for the vehicle (including occupants).
RThe cargo compartment is the preferred place to carry objects.
RPosition heavy loads as far forwards as pos-
sible and as low down in the cargo compart-
ment as possible.
RThe load must not protrude above the upper
edge of the seat backrests.
RAlways place the load against the rear or frontseat backrests. Make sure that the seat
backrests are securely locked into place.
RAlways place the load behind unoccupied
seats if possible.
RUse the cargo tie-down rings and the parcel
nets to transport loads and luggage.
RUse cargo tie-down rings and fastening mate-
rials appropriate for the weight and size of theload.
RHook in the cargo net when loading.
RSecure the load with sufficiently strong and
wear-resistant tie-downs. Pad sharp edges for
protection.
Stowage spaces
Important safety notes
GWARNING
If you transport objects in the vehicle interior
and these are not adequately secured, they
could slip or be flung around and thereby
strike vehicle occupants. In addition, cup
holders, open stowage spaces and mobile
phone brackets may not always be able to
hold the objects placed in them in the event of
an accident. There is a risk of injury, particu-
larly in the event of sharp braking or sudden
changes of direction.
288Stowage areas
Stowage and features
Page 300 of 390
XSecure the roof carrier to roof rails:. In
doing so, observe the manufacturer's instal-
lation instructions.
Features
Cup holder
Important safety notes
GWARNING
If you transport objects in the vehicle interior
and these are not adequately secured, they
could slip or be flung around and thereby
strike vehicle occupants. In addition, cup
holders, open stowage spaces and mobile
phone brackets may not always be able to
hold the objects placed in them in the event of
an accident. There is a risk of injury, particu-
larly in the event of sharp braking or sudden
changes of direction.
RAlways stow objects in such a way that they cannot be tossed about in these or similar
situations.
RAlways make sure that objects do not pro-
trude out of the stowage spaces, luggage
nets or stowage nets.
REnsure that closable stowage spaces are
shut before beginning your journey.
RAlways stow and secure heavy, hard, poin-
ted, sharp-edged, fragile or large objects in
the cargo compartment.
Observe the loading guidelines (
Ypage 288).
!Only use the cup holders for containers of
the right size and which have lids. The drinks
could otherwise spill.
!Do not expose drinks bottles in the cup
holder in the center console to continuous,
strong and direct sunlight. The passenger
compartment in the area of the center con-
sole can otherwise be damaged by the con-
centrated and reflected sunlight.
Do not keep the KEYLESS-GO key in the tem-
perature-controlled cup holder (
Ypage 298).
Otherwise, the KEYLESS-GO key will not be rec-
ognized. The stowage compartments in the doors provide
space for bottles with a capacity of up to
34 fl. oz. (1.0 l).
The bottles are not secured or prevented from
tipping over. Therefore, do not place any open
drink containers in the stowage compartments.
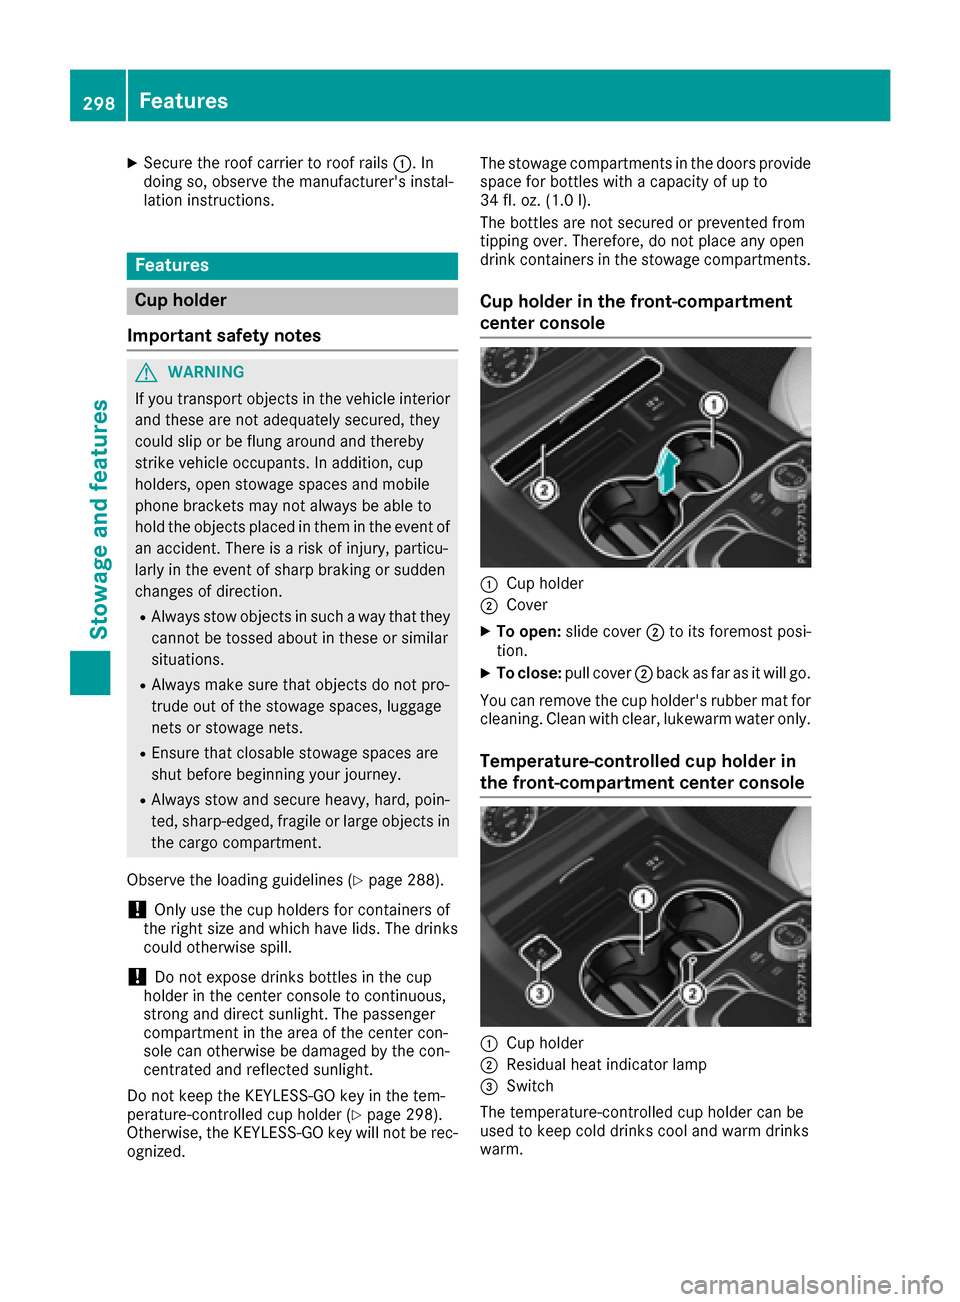
Cup holder in the front-compartment
center console
:Cup holder
;Cover
XTo open: slide cover ;to its foremost posi-
tion.
XTo close: pull cover ;back as far as it will go.
You can remove the cup holder's rubber mat for
cleaning. Clean with clear, lukewarm water only.
Temperature-controlled cup holder in
the front-compartment center console
:Cup holder
;Residual heat indicator lamp
=Switch
The temperature-controlled cup holder can be
used to keep cold drinks cool and warm drinks
warm.
298Features
Stowage and features
Page 301 of 390
XTurn the SmartKey to position2in the ignition
lock.
XTo switch on the cooling function: press
and hold button =until the blue indicator
lamp on the button lights up.
XTo switch on the heating function: press
and hold button =until the red indicator
lamp on the button lights up.
XTo switch off the function: press and hold
button =until the indicator lamp on the but-
ton goes out.
When the heating function is used, the metal
insert of the cup holder is heated. Once a certain
temperature is reached, residual heat indicator
lamp ;lights up. This means that the metal
insert of the cup holder is hot. For this reason,
you must not reach into the cup holder metal
insert.
Do not use hard or sharp objects to clean the
cup holder. Use only a soft cloth to clean it.
Cup holder in the rear seat armrest
!Do not sit on or support your body weight on
the rear seat armrest when it is folded down,
as you could otherwise damage it.
XFold down the rear seat armrest.
Cup holder :is located in the rear seat arm-
rest.
Sun visors
Overview
GWARNING
If the mirror cover of the vanity mirror is folded
up when the vehicle is in motion, you could be
blinded by incident light. There is a risk of an
accident.
Always keep the mirror cover folded down
while driving.
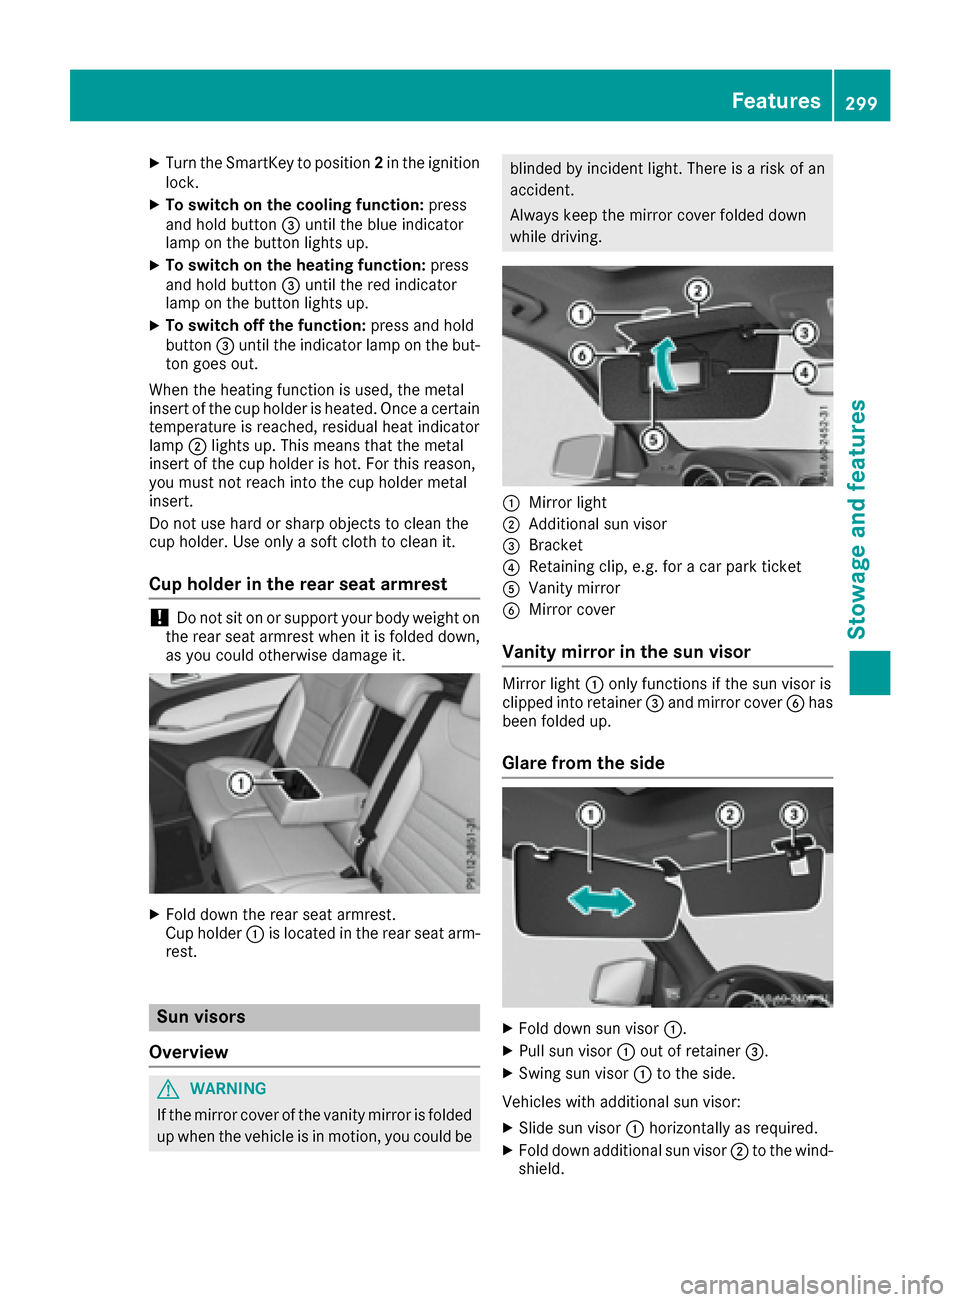
:Mirror light
;Additional sun visor
=Bracket
?Retaining clip, e.g. for a car park ticket
AVanity mirror
BMirror cover
Vanity mirror in the sun visor
Mirror light :only functions if the sun visor is
clipped into retainer =and mirror cover Bhas
been folded up.
Glare from the side
XFold down sun visor :.
XPull sun visor:out of retainer =.
XSwing sun visor :to the side.
Vehicles with additional sun visor:
XSlide sun visor :horizontally as required.
XFold down additional sun visor ;to the wind-
shield.
Features299
Stowage and features
Z