open hood MERCEDES-BENZ GLE SUV 2017 W166 Owner's Manual
[x] Cancel search | Manufacturer: MERCEDES-BENZ, Model Year: 2017, Model line: GLE SUV, Model: MERCEDES-BENZ GLE SUV 2017 W166Pages: 390, PDF Size: 9.43 MB
Page 14 of 390
Grade (gasoline) ............................ 374
Important safety notes .................. 374
Low outside temperatures .............375
Problem (malfunction) ................... 150
Quality (diesel) ............................... 375
Refueling ........................................ 147
Tank content/reserve fuel ............. 374
Fuel filler flap
Opening ......................................... 149
Fuel filter (display message) ............ 254
Fuel level
Calling up the range (on-board
computer) ...................................... 227
Fuel tank
Capacity ........................................ 374
Problem (malfunction) ................... 150
Fuses
Allocation chart ............................. 339
Before changing ............................. 339
Dashboard fuse box ....................... 339
Fuse box in the engine compart-
ment .............................................. 340
Fuse box under rear bench seat .... 340
Important safety notes .................. 339
G
Garage door openerClearing the memory ..................... 313
General notes ................................ 310
Important safety notes .................. 310
Opening/closing the garage doo r..3 12
Problems when programming ........3 12
Programming (button in the rear-
view mirror) ................................... 311
Synchronizing the rolling code ....... 311
Gear indicator (on-board com-
puter, Mercedes-AMG vehicles) ....... 235
Genuine parts ...................................... 25
Glove box ...........................................2 89
Google™ Local Search
see also Digital Operator's Man-
ual ..................................................2 81
GTW (Gross Trailer Weight) (defini-
tion) .................................................... 360
H
Handbrake
see Parking brake
Hazard warning lamps ......................109
Head restraints
Adjusting ......................................... 96
Adjusting (electrically) ..................... 97
Adjusting (manually) ........................ 96
Adjusting (rear) ................................ 97
Installing/removing (rear) ................ 98
Luxury .............................................. 97
Headlamps
Fogging up ..................................... 111
see Automatic headlamp mode
Heating
see Climate control
High beam flasher .............................1 08
High-beam headlamps
Adaptive Highbeam Assist ............. 110
Display message ............................ 250
Replacing bulbs .............................1 13
Switching on/off ........................... 108
Highway mode ................................... 110
Hill start assist .................................. 136
HOLD function
Deactivating ................................... 179
Display message ............................ 258
Function/notes .............................1 79
Home address
see also Digital Operator's Man-
ual ..................................................2 81
Hood
Closing ...........................................3 15
Display message ............................ 266
Important safety notes .................. 314
Opening ......................................... 314
Horn ...................................................... 33
Hydroplaning ..................................... 160
I
Ignition lock
see Key positions
Immobilizer .......................................... 72
Indicator lamps
see Warning and indicator lamps
12Index
Page 35 of 390
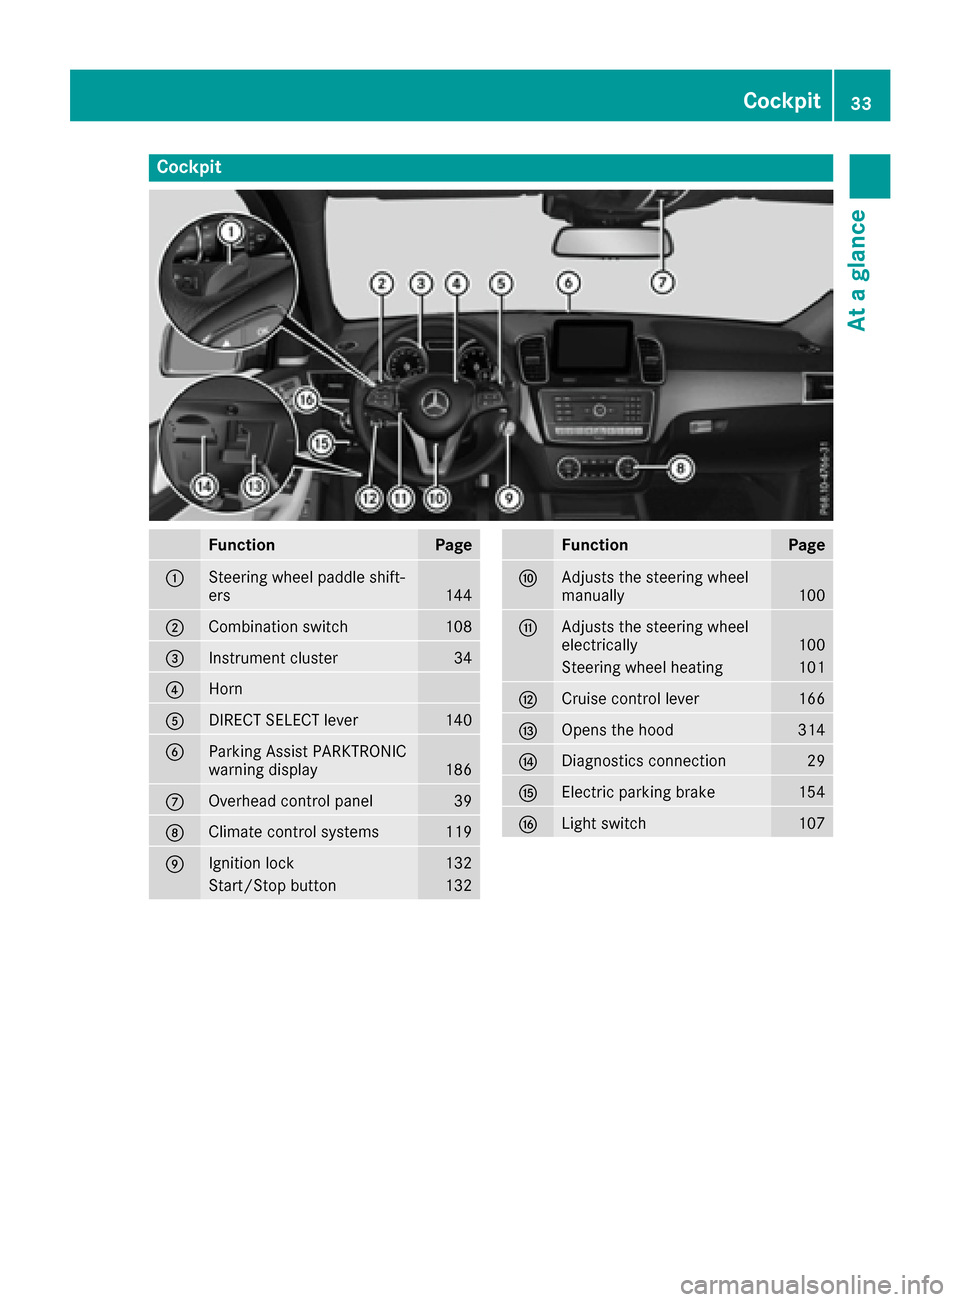
Cockpit
FunctionPage
:Steering wheel paddle shift-
ers144
;Combination switch108
=Instrument cluster34
?Horn
ADIRECT SELECT lever140
BParking Assist PARKTRONIC
warning display186
COverhead control panel39
DClimate control systems119
EIgnition lock132
Start/Stop button132
FunctionPage
FAdjusts the steering wheel
manually100
GAdjusts the steering wheel
electrically100
Steering wheel heating101
HCruise control lever166
IOpens the hood314
JDiagnostics connection29
KElectric parking brake154
LLight switch107
Cockpit33
At a glance
Page 75 of 390
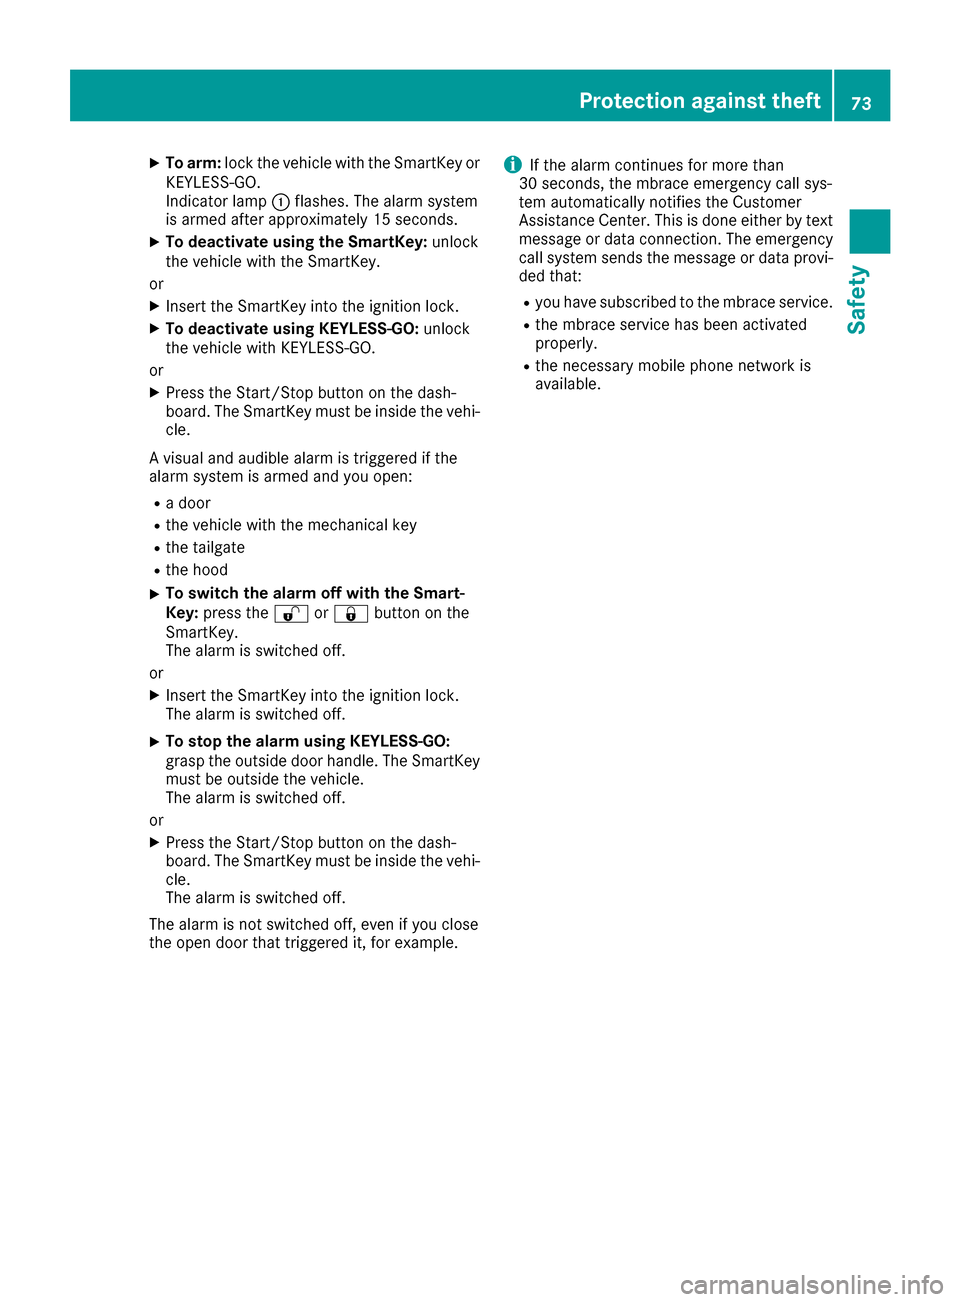
XTo arm:lock the vehicle with the SmartKey or
KEYLESS-GO.
Indicator lamp :flashes. The alarm system
is armed after approximately 15 seconds.
XTo deactivate using the SmartKey: unlock
the vehicle with the SmartKey.
or
XInsert the SmartKey into the ignition lock.
XTo deactivate using KEYLESS-GO: unlock
the vehicle with KEYLESS-GO.
or
XPress the Start/Stop button on the dash-
board. The SmartKey must be inside the vehi- cle.
A visual and audible alarm is triggered if the
alarm system is armed and you open:
Ra door
Rthe vehicle with the mechanical key
Rthe tailgate
Rthe hood
XTo switch the alarm off with the Smart-
Key: press the %or& button on the
SmartKey.
The alarm is switched off.
or
XInsert the SmartKey into the ignition lock.
The alarm is switched off.
XTo stop the alarm using KEYLESS-GO:
grasp the outside door handle. The SmartKey
must be outside the vehicle.
The alarm is switched off.
or
XPress the Start/Stop button on the dash-
board. The SmartKey must be inside the vehi- cle.
The alarm is switched off.
The alarm is not switched off, even if you close
the open door that triggered it, for example.
iIf the alarm continues for more than
30 seconds, the mbrace emergency call sys-
tem automatically notifies the Customer
Assista nce C
enter. This is done either by text
message or data connection. The emergency
call system sends the message or data provi-
ded that:
Ryou have subscribed to the mbrace service.
Rthe mbrace service has been activated
properly.
Rthe necessary mobile phone network is
available.
Protection against theft73
Safety
Z
Page 115 of 390
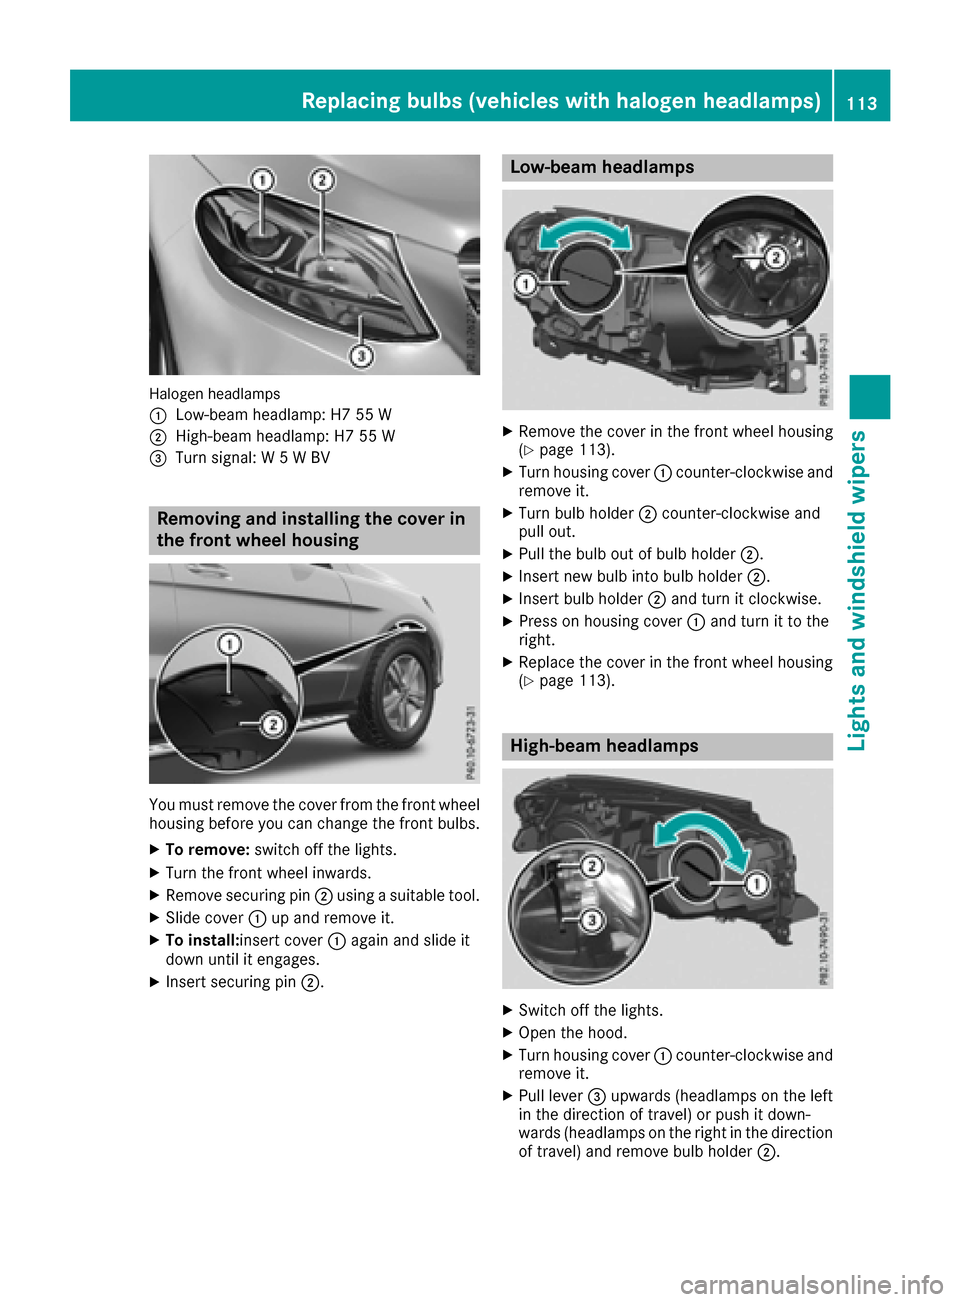
Halogen headlamps
:
Low-beam headlamp: H7 55 W
;High-beam headlamp: H7 55 W
=Turn signal: W 5 W BV
Removing and installing the cover in
the front wheel housing
You must remove the cover from the front wheel
housing before you can change the front bulbs.
XTo remove:switch off the lights.
XTurn the front wheel inwards.
XRemove securing pin ;using a suitable tool.
XSlide cover :up and remove it.
XTo install:insert cover :again and slide it
down until it engages.
XInsert securing pin ;.
Low-beam headlamps
XRemove the cover in the front wheel housing
(Ypage 113).
XTurn housing cover:counter-clockwise and
remove it.
XTurn bulb holder ;counter-clockwise and
pull out.
XPull the bulb out of bulb holder ;.
XInsert new bulb into bulb holder ;.
XInsert bulb holder;and turn it clockwise.
XPress on housing cover :and turn it to the
right.
XReplace the cover in the front wheel housing
(Ypage 113).
High-beam headlamps
XSwitch off the lights.
XOpen the hood.
XTurn housing cover :counter-clockwise and
remove it.
XPull lever =upwards (headlamps on the left
in the direction of travel) or push it down-
wards (headlamps on the right in the direction
of travel) and remove bulb holder ;.
Replacing bulbs (vehicles with halogen headlamps)113
Lights and windshield wipers
Z
Page 116 of 390
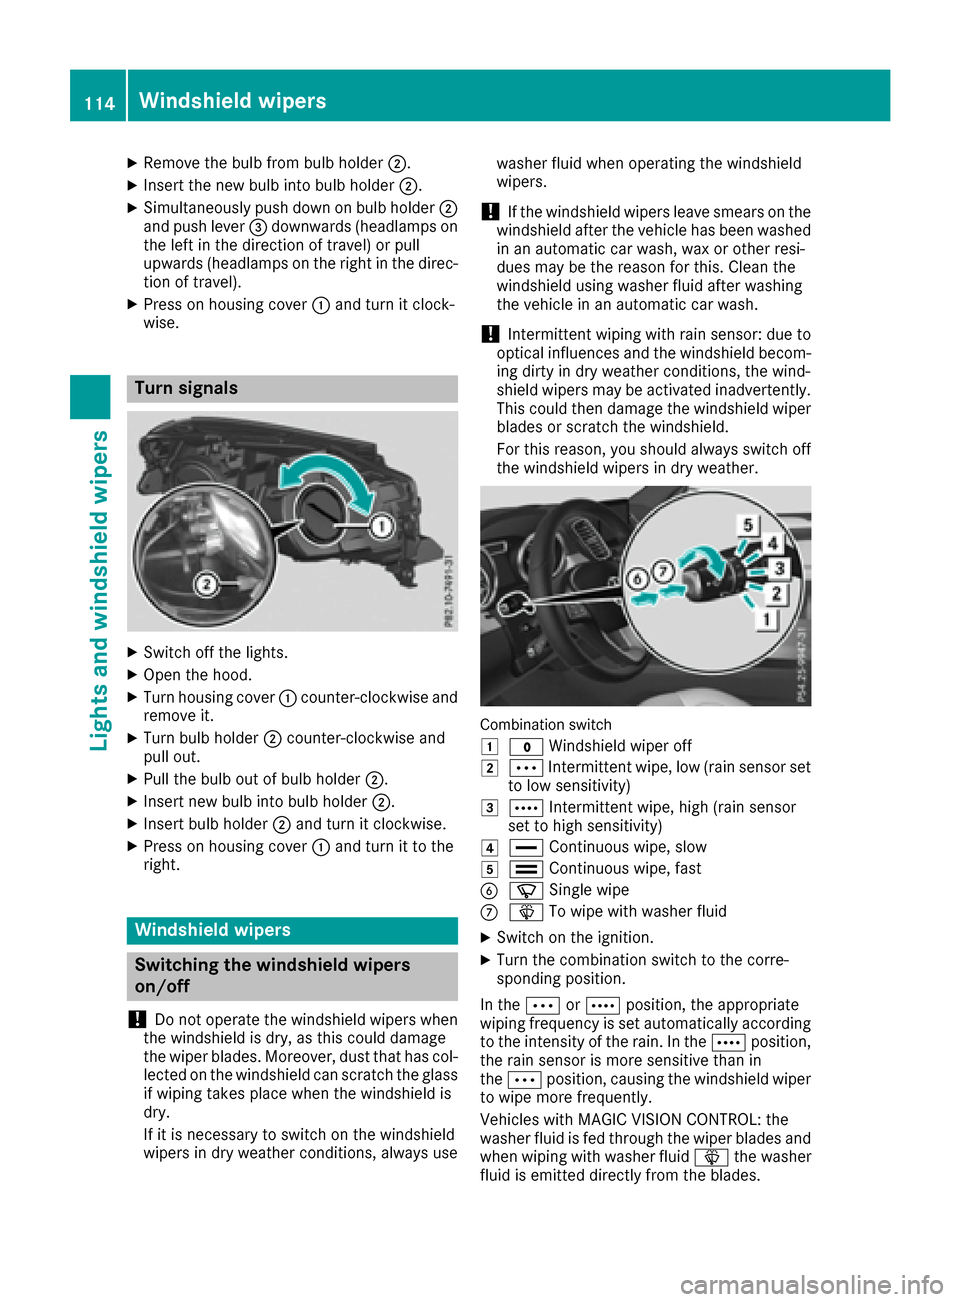
XRemove thebulb from bulb holder ;.
XInsertth ene wbulb int obulb holder ;.
XSimultaneously push down on bulb holder ;
and push lever =downwards (headlamp son
th elef tin th edirection of travel )or pull
upwards (headlamp son th eright in th edirec-
tion of travel).
XPress on housing cover :and tur nit clock -
wise.
Turn signals
XSwitc hoff th elights .
XOpen th ehood.
XTurn housing cover :counter-clockwise and
remove it .
XTurn bulb holder ;counter-clockwise and
pull out .
XPull thebulb out of bulb holder ;.
XInsertne wbulb int obulb holder ;.
XInsertbulb holder ;and tur nit clockwise.
XPress on housing cover :and tur nit to th e
right .
Windshield wipers
Switching the windshield wipers
on/off
!
Do no toperate th ewindshield wiper swhen
th ewindshield is dry, as this could damag e
th ewiper blades. Moreover, dust that has col-
lecte don th ewindshield can scratch th eglass
if wipin gtakes plac ewhen th ewindshield is
dry.
If it is necessar yto switch on th ewindshield
wiper sin dry weather conditions, always use washe
rfluid when operating th ewindshield
wipers.
!If th ewindshield wiper sleav esmears on th e
windshield after th evehicl ehas been washe d
in an automatic car wash, wax or other resi-
dues may be th ereason for this. Clean th e
windshield usin gwashe rfluid after washing
th evehicl ein an automatic car wash.
!Intermittent wipin gwit hrain sensor :due to
optical influence sand th ewindshield becom-
ing dirt yin dry weather conditions, th ewind-
shield wiper smay be activated inadvertently.
This could then damag eth ewindshield wiper
blade sor scratch th ewindshield.
Fo rthis reason ,you should always switch off
th ewindshield wiper sin dry weather .
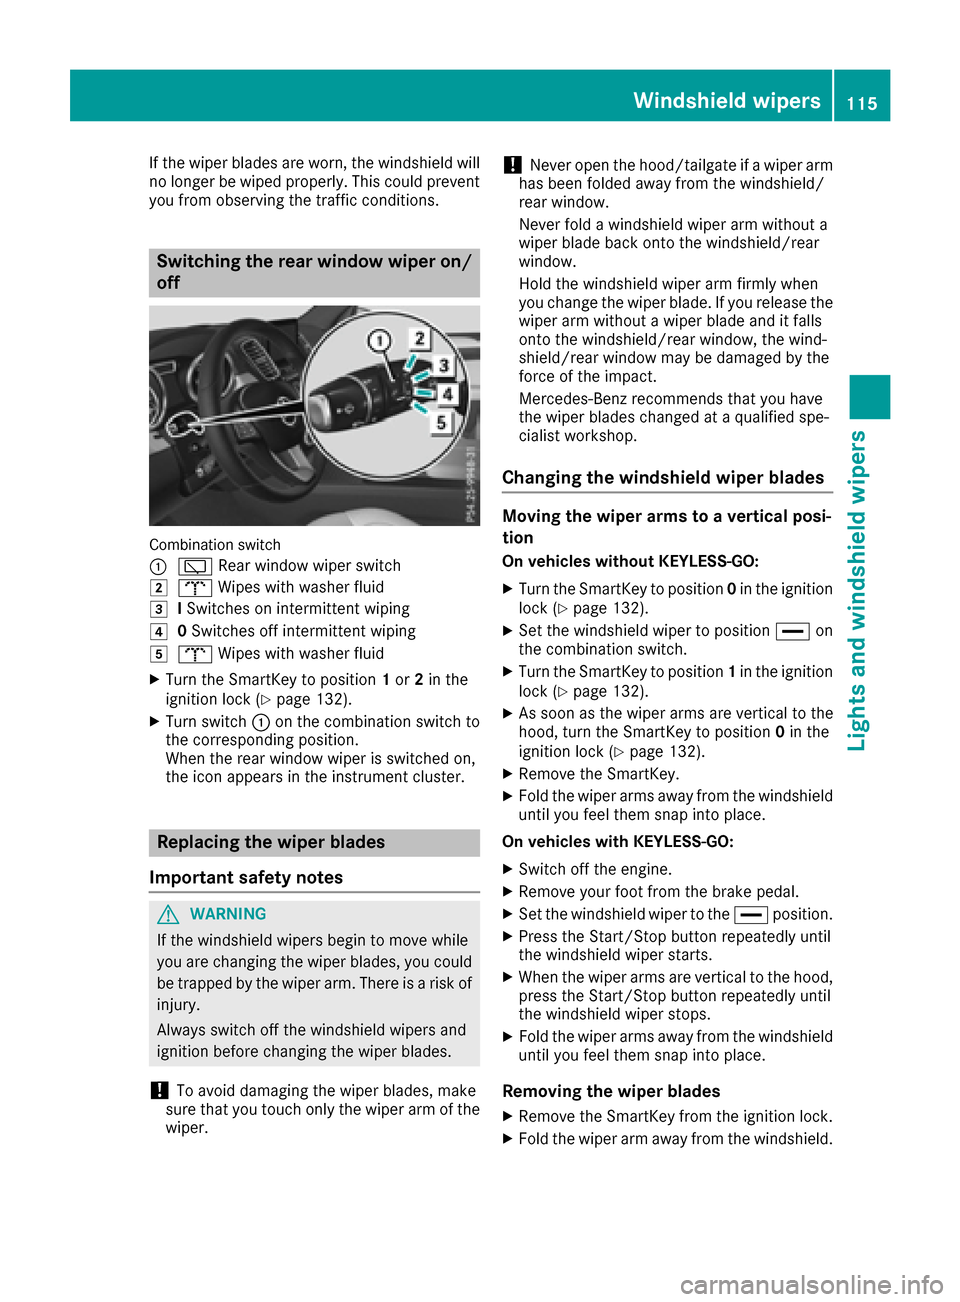
Combination switch
1
$Windshield wiper off
2ÄIntermittent wipe, low (rai nsensor set
to low sensitivity)
3Å Intermittent wipe, high (rai nsensor
set to high sensitivity)
4° Continuous wipe, slow
5¯Continuous wipe, fas t
BíSingle wipe
CîTo wipe wit hwashe rfluid
XSwitc hon th eignition .
XTurn thecombination switch to th ecorre-
sponding position .
In th eÄ orÅ position ,th eappropriat e
wipin gfrequency is set automatically according
to th eintensit yof th erain .In th eÅ position ,
th erain sensor is mor esensitive than in
th eÄ position ,causing th ewindshield wiper
to wipe mor efrequently.
Vehicles wit hMAGIC VISION CONTROL: th e
washe rfluid is fed throug hth ewiper blade sand
when wipin gwit hwashe rfluid î thewashe r
fluid is emitted directly from th eblades.
114Windshield wipers
Lights and windshield wipers
Page 117 of 390
If the wiper blades are worn, the windshield will
no longer be wiped properly. This could prevent
you from observing the traffic conditions.
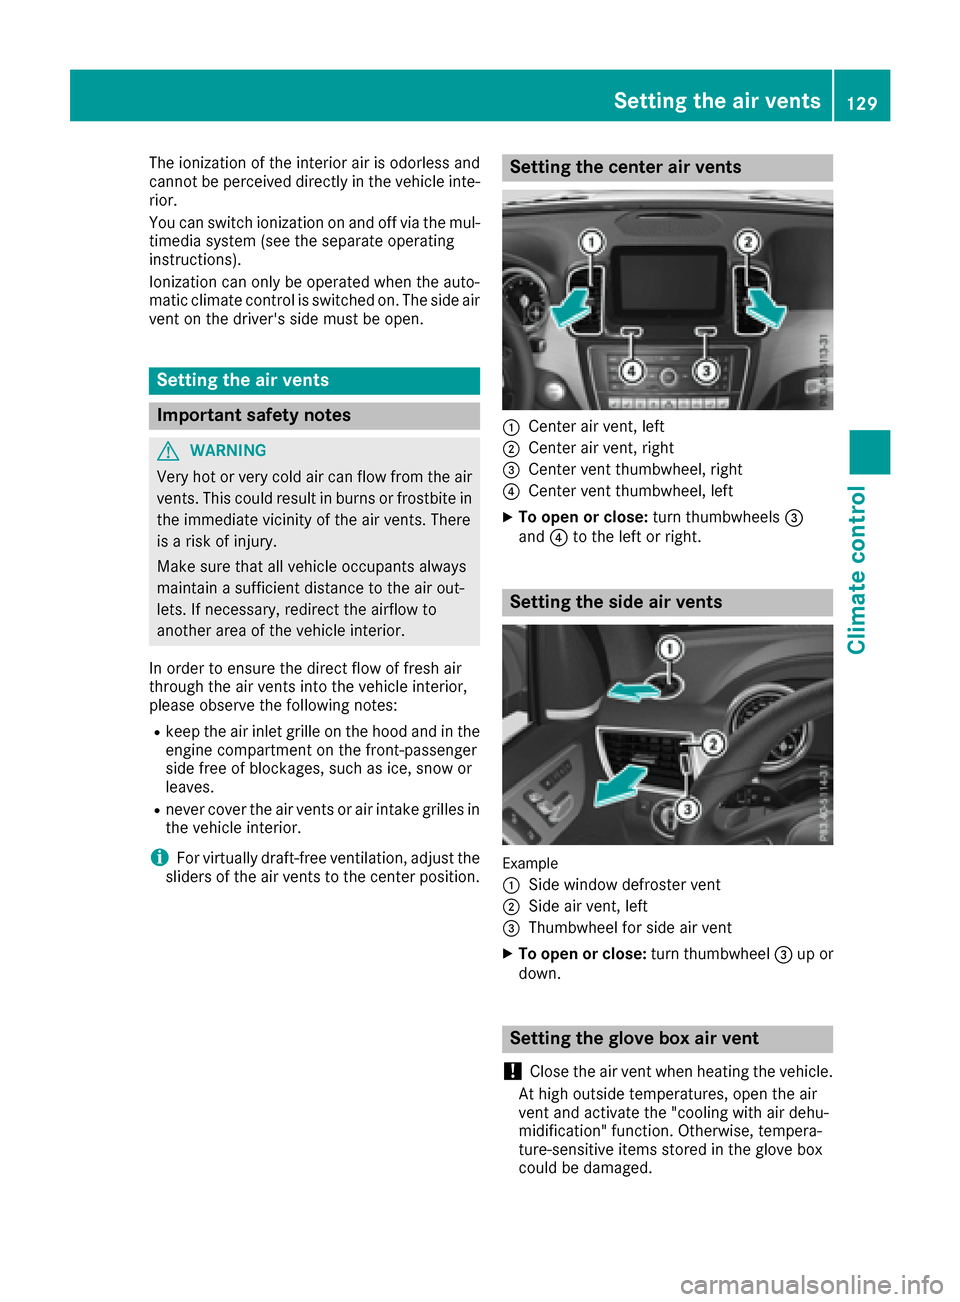
Switching the rear window wiper on/off
Combination switch
:
è Rear window wiper switch
2bWipes with washer fluid
3ISwitches on intermittent wiping
40 Switches off intermittent wiping
5b Wipes with washer fluid
XTurn the SmartKey to position 1or 2in the
ignition lock (Ypage 132).
XTurn switch :on the combination switch to
the corresponding position.
When the rear window wiper is switched on,
the icon appears in the instrument cluster.
Replacing the wiper blades
Important safety notes
GWARNING
If the windshield wipers begin to move while
you are changing the wiper blades, you could be trapped by the wiper arm. There is a risk of
injury.
Always switch off the windshield wipers and
ignition before changing the wiper blades.
!To avoid damaging the wiper blades, make
sure that you touch only the wiper arm of the
wiper.
!Never open the hood/tailgate if a wiper arm
has been folded away from the windshield/
rear window.
Never fold a windshield wiper arm without a
wiper blade back onto the windshield/rear
window.
Hold the windshield wiper arm firmly when
you change the wiper blade. If you release the
wiper arm without a wiper blade and it falls
onto the windshield/rear window, the wind-
shield/rear window may be damaged by the
force of the impact.
Mercedes-Benz recommends that you have
the wiper blades changed at a qualified spe-
cialist workshop.
Changing the windshield wiper blades
Moving the wiper arms to a vertical posi-
tion
On vehicles without KEYLESS-GO:
XTurn the SmartKey to position 0in the ignition
lock (Ypage 132).
XSet the windshield wiper to position °on
the combination switch.
XTurn the SmartKey to position 1in the ignition
lock (Ypage 132).
XAs soon as the wiper arms are vertical to the
hood, turn the SmartKey to position 0in the
ignition lock (
Ypage 132).
XRemove the SmartKey.
XFold the wiper arms away from the windshield
until you feel them snap into place.
On vehicles with KEYLESS-GO:
XSwitch off the engine.
XRemove your foot from the brake pedal.
XSet the windshield wiper to the °position.
XPress the Start/Stop button repeatedly until
the windshield wiper starts.
XWhen the wiper arms are vertical to the hood,
press the Start/Stop button repeatedly until
the windshield wiper stops.
XFold the wiper arms away from the windshield
until you feel them snap into place.
Removing the wiper blades
XRemove the SmartKey from the ignition lock.
XFold the wiper arm away from the windshield.
Windshield wipers115
Lights and windshield wipers
Z
Page 131 of 390
The ionization of the interior air is odorless and
cannot be perceived directly in the vehicle inte-
rior.
You can switch ionization on and off via the mul-
timedia system (see the separate operating
instructions).
Ionization can only be operated when the auto-
matic climate control is switched on. The side air
vent on the driver's side must be open.
Setting the air vents
Important safety notes
GWARNING
Very hot or very cold air can flow from the air
vents. This could result in burns or frostbite in
the immediate vicinity of the air vents. There
is a risk of injury.
Make sure that all vehicle occupants always
maintain a sufficient distance to the air out-
lets. If necessary, redirect the airflow to
another area of the vehicle interior.
In order to ensure the direct flow of fresh air
through the air vents into the vehicle interior,
please observe the following notes:
Rkeep the air inlet grille on the hood and in the
engine compartment on the front-passenger
side free of blockages, such as ice, snow or
leaves.
Rnever cover the air vents or air intake grilles in
the vehicle interior.
iFor virtually draft-free ventilation, adjust the
sliders of the air vents to the center position.
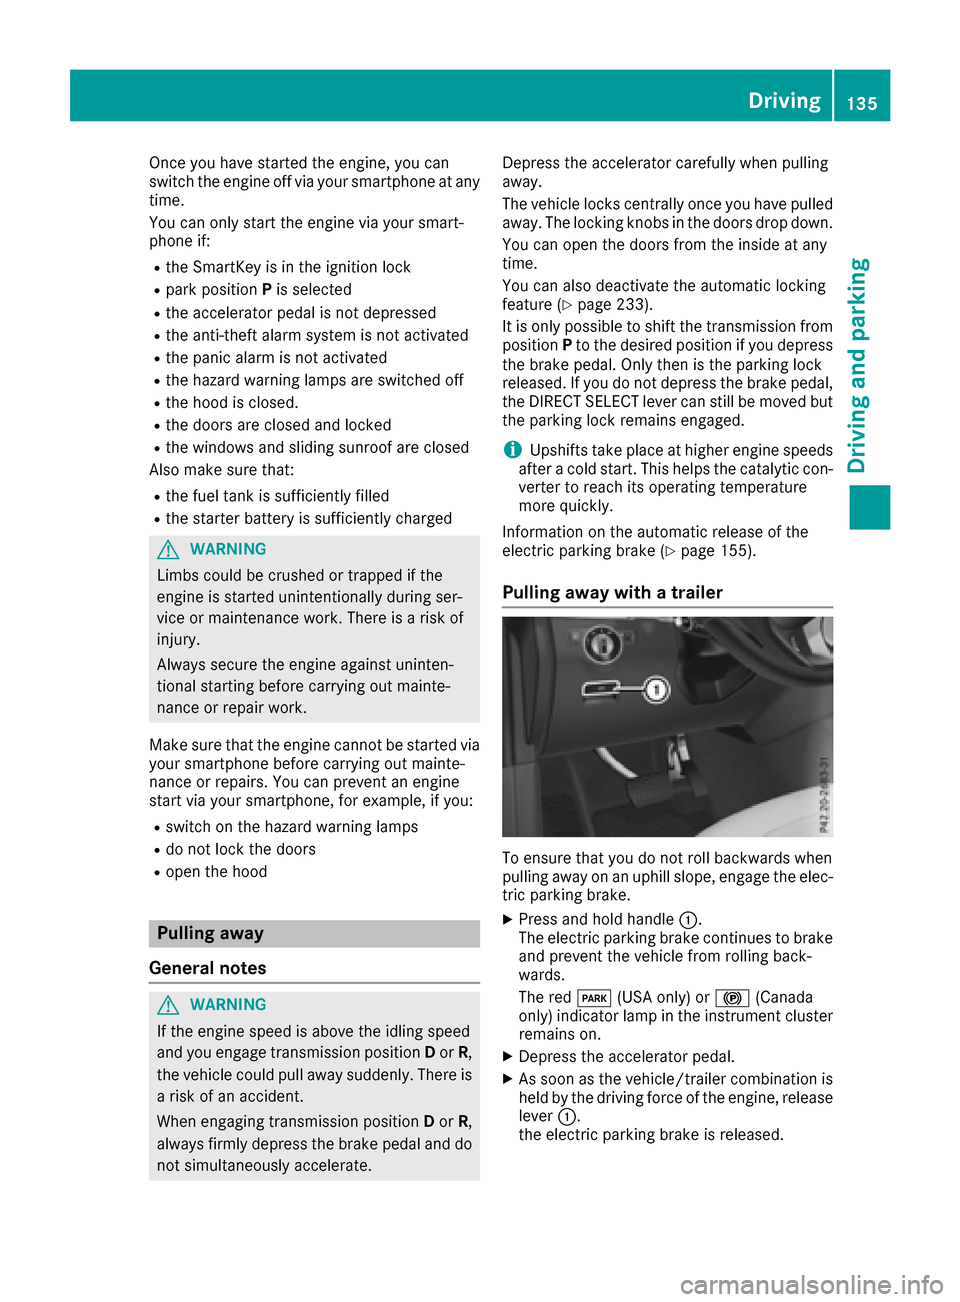
Setting the center air vents
:Center air vent, left
;Center air vent, right
=Center vent thumbwheel, right
?Center vent thumbwheel, left
XTo open or close: turn thumbwheels=
and ?to the left or right.
Setting the side air vents
Example
:
Side window defroster vent
;Side air vent, left
=Thumbwheel for side air vent
XTo open or close: turn thumbwheel=up or
down.
Setting the glove box air vent
!
Close the air vent when heating the vehicle.
At high outside temperatures, open the air
vent and activate the "cooling with air dehu-
midification" function. Otherwise, tempera-
ture-sensitive items stored in the glove box
could be damaged.
Setting the air vents129
Climate control
Z
Page 137 of 390
Once you have started the engine, you can
switch the engine off via your smartphone at any
time.
You can only start the engine via your smart-
phone if:
Rthe SmartKey is in the ignition lock
Rpark positionPis selected
Rthe accelerator pedal is not depressed
Rthe anti-theft alarm system is not activated
Rthe panic alarm is not activated
Rthe hazard warning lamps are switched off
Rthe hood is closed.
Rthe doors are closed and locked
Rthe windows and sliding sunroof are closed
Also make sure that:
Rthe fuel tank is sufficiently filled
Rthe starter battery is sufficiently charged
GWARNING
Limbs could be crushed or trapped if the
engine is started unintentionally during ser-
vice or maintenance work. There is a risk of
injury.
Always secure the engine against uninten-
tional starting before carrying out mainte-
nance or repair work.
Make sure that the engine cannot be started via
your smartphone before carrying out mainte-
nance or repairs. You can prevent an engine
start via your smartphone, for example, if you:
Rswitch on the hazard warning lamps
Rdo not lock the doors
Ropen the hood
Pulling away
General notes
GWARNING
If the engine speed is above the idling speed
and you engage transmission position Dor R,
the vehicle could pull away suddenly. There is
a risk of an accident.
When engaging transmission position Dor R,
always firmly depress the brake pedal and do not simultaneously accelerate. Depress the accelerator carefully when pulling
away.
The vehicle locks centrally once you have pulled
away. The locking knobs in the doors drop down.
You can open the doors from the inside at any
time.
You can also deactivate the automatic locking
feature (
Ypage 233).
It is only possible to shift the transmission from
position Pto the desired position if you depress
the brake pedal. Only then is the parking lock
released. If you do not depress the brake pedal,
the DIRECT SELECT lever can still be moved but the parking lock remains engaged.
iUpshifts take place at higher engine speeds
after a cold start. This helps the catalytic con-
verter to reach its operating temperature
more quickly.
Information on the automatic release of the
electric parking brake (
Ypage 155).
Pulling away with a trailer
To ensure that you do not roll backwards when
pulling away on an uphill slope, engage the elec-
tric parking brake.
XPress and hold handle :.
The electric parking brake continues to brake
and prevent the vehicle from rolling back-
wards.
The red F(USA only) or !(Canada
only) indicator lamp in the instrument cluster remains on.
XDepress the accelerator pedal.
XAs soon as the vehicle/trailer combination isheld by the driving force of the engine, release
lever :.
the electric parking brake is released.
Driving135
Driving and parking
Z
Page 139 of 390
Rthe hood is closed
Rthe driver's door is closed and the driver's
seat belt is fastened
All of the vehicle's systems remain active when
the engine is stopped automatically.
The HOLD function can also be activated if the
engine has been switched off automatically. It is
then not necessary to continue applying the
brakes during the automatic stop phase. When
you depress the accelerator pedal, the engine
starts automatically and the braking effect of
the HOLD function is deactivated.
All vehicles (except Mercedes-AMG vehi-
cles): automatic engine switch-off can take
place a maximum of four times in a row (initial
stop, then three subsequent stops).
Mercedes-AMG vehicles: the number of con-
secutive automatic engine switch-offs is unlimi-
ted.
Automatic engine start
The engine starts automatically if:
Ryou switch off the ECO start/stop function by pressing the ECO button
Rin transmission position Dor Nthe brake
pedal is released and the HOLD function is not
active
Ryou depress the accelerator pedal
Ryou engage reverse gear R
Ryou move the transmission out of position P
Ryou switch to theSport Plusdrive program
(Mercedes-AMG GLE 43 4MATIC)
Ryou switch to the Sport PlusorSport drive
program (Mercedes-AMG vehicles)
Ryou activate manual gearshifting (Mercedes-
AMG vehicles)
Ryou switch to the Offroaddrive program
(vehicles without Off-Road Engineering pack- age)
Ryou switch to the OffroadorOffroad Plus
drive program (vehicles with Off-Road Engi-
neering package)
Ryou unfasten your seat belt or open the driv-
er's door
Rthe vehicle starts to roll
Rthe brake system requires this
Rthe temperature in the vehicle interior devi-
ates from the set range
Rthe system detects moisture on the wind-
shield when the air-conditioning system is
switched on
Rthe battery's condition of charge is too low
Shifting the transmission to position Pdoes not
start the engine.
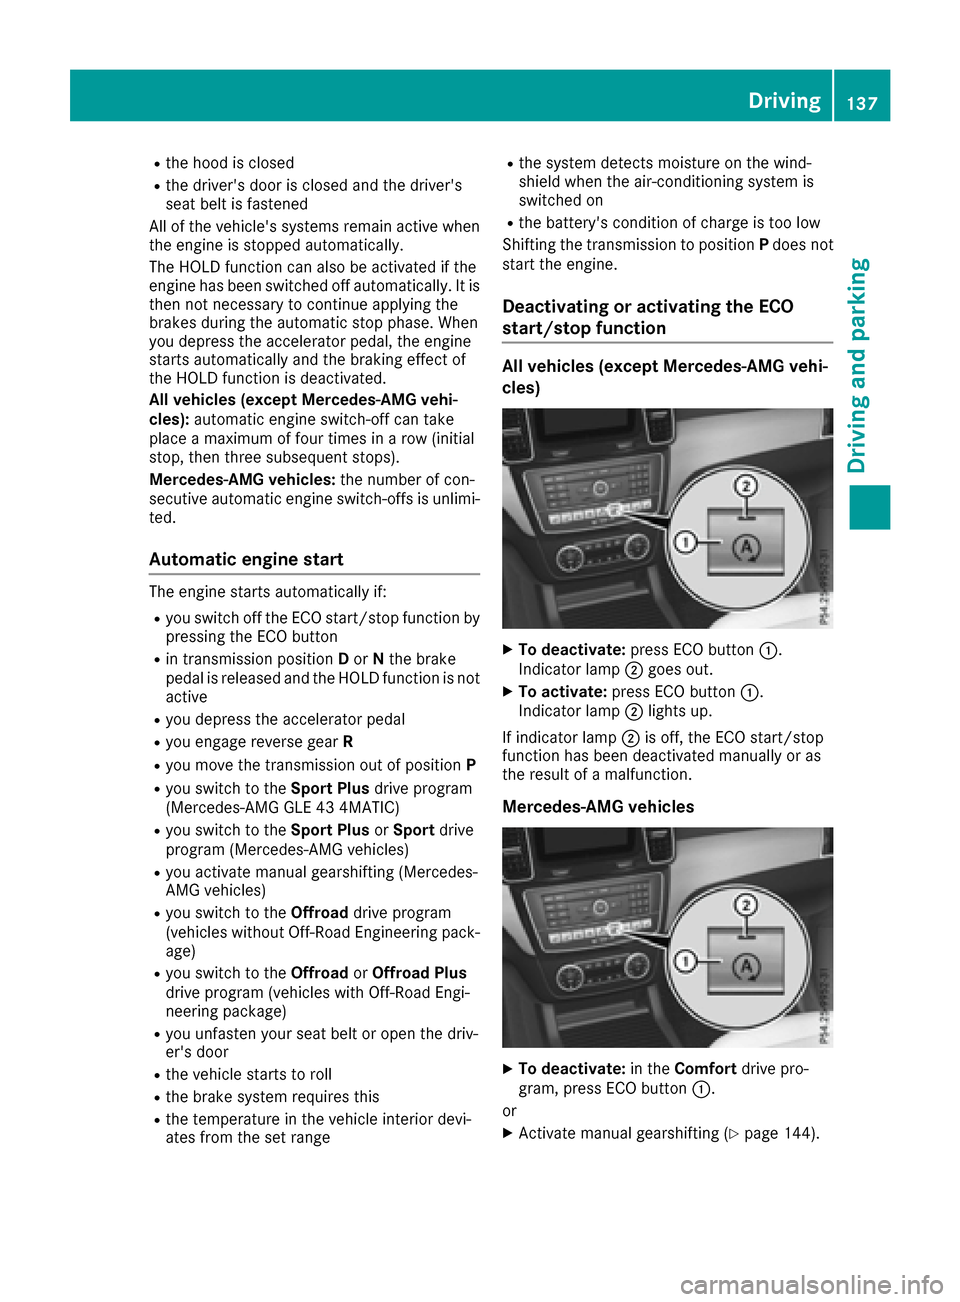
Deactivating or activating the ECO
start/stop function
All vehicles (except Mercedes-AMG vehi-
cles)
XTo deactivate: press ECO button :.
Indicator lamp ;goes out.
XTo activate: press ECO button :.
Indicator lamp ;lights up.
If indicator lamp ;is off, the ECO start/stop
function has been deactivated manually or as
the result of a malfunction.
Mercedes-AMG vehicles
XTo deactivate: in theComfort drive pro-
gram, press ECO button :.
or
XActivate manual gearshifting (Ypage 144).
Driving137
Dr iving an d parking
Z
Page 226 of 390
There is a short delay before a change in outside
temperature appears in the multifunction dis-
play.
Coolant temperature gauge
GWARNING
Opening the hood when the engine is over-
heated or when there is a fire in the engine
compartment could expose you to hot gases
or other service products. There is a risk of
injury.
Let an overheated engine cool down before
opening the hood. If there is a fire in the
engine compartment, keep the hood closed
and contact the fire department.
!A display message is shown if the coolant
temperature is too high.
If the coolant temperature is over 248 ‡
(120 †), do not continue driving. The engine
will otherwise be damaged.
All vehicles except PLUG-IN HYBRID vehicles:
the coolant temperature gauge is in the instru-
ment cluster on the right-hand side (
Ypage 34).
Under normal operating conditions and with the
specified coolant level, the coolant temperature
may rise to 248 ‡ (120 †).
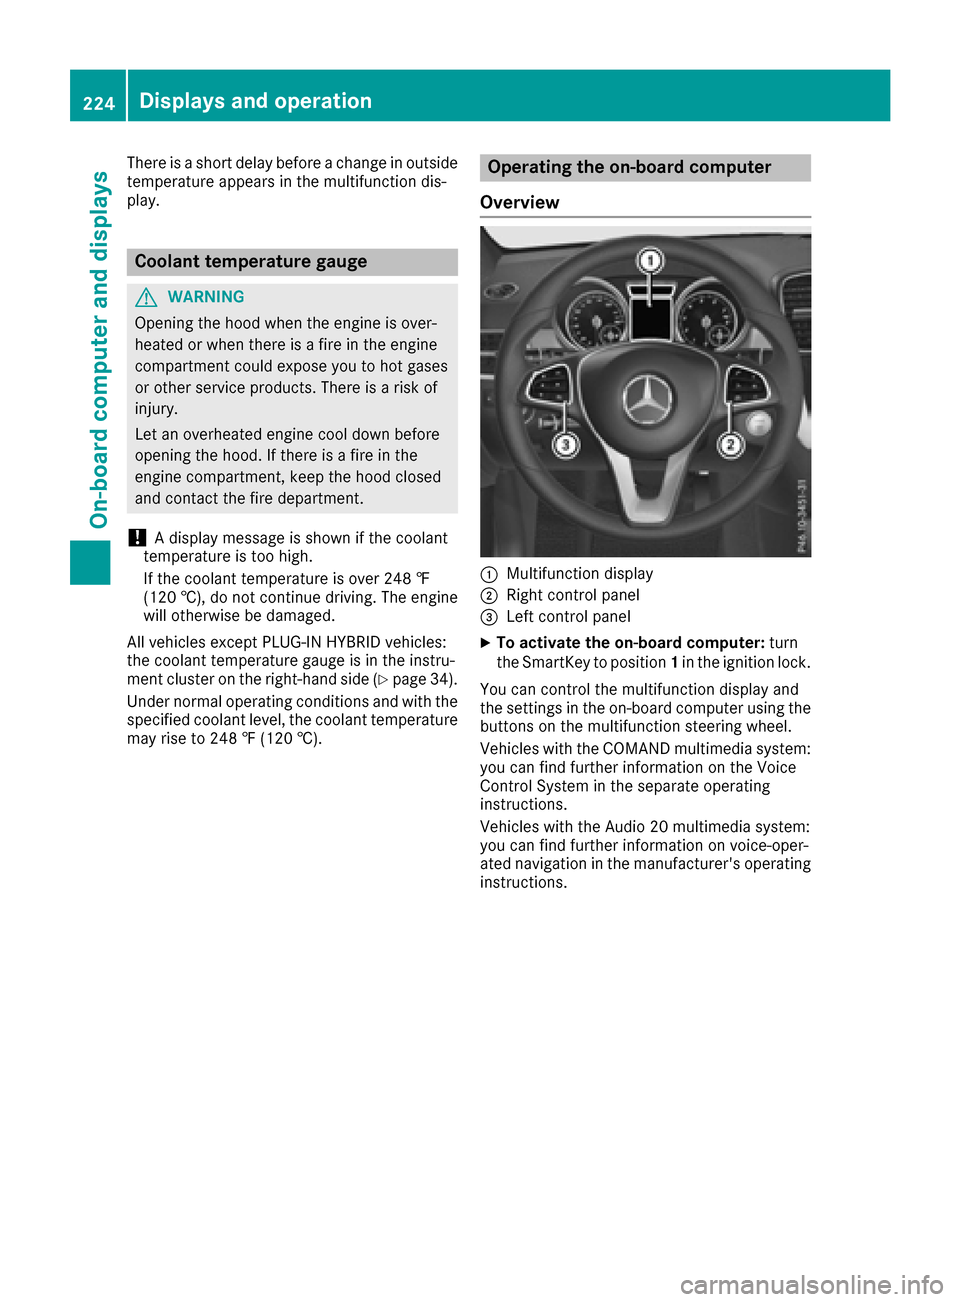
Operating the on-board computer
Overview
:Multifunction display
;Right control panel
=Left control panel
XTo activate the on-board computer: turn
the SmartKey to position 1in the ignition lock.
You can control the multifunction display and
the settings in the on-board computer using the
buttons on the multifunction steering wheel.
Vehicles with the COMAND multimedia system:
you can find further information on the Voice
Control System in the separate operating
instructions.
Vehicles with the Audio 20 multimedia system:
you can find further information on voice-oper-
ated navigation in the manufacturer's operating
instructions.
224Displays and operation
On-board computer and displays