sport mode MERCEDES-BENZ GLE SUV 2017 W166 Owner's Manual
[x] Cancel search | Manufacturer: MERCEDES-BENZ, Model Year: 2017, Model line: GLE SUV, Model: MERCEDES-BENZ GLE SUV 2017 W166Pages: 390, PDF Size: 9.43 MB
Page 7 of 390
Rear ...............................................130
Setting ...........................................1 29
Setting the center air vents ........... 129
Setting the side air vents ...............1 29
Air-conditioning system
see Climate control
AIRMATIC package
ADS (Adaptive Damping System) ... 180
Function/notes .............................1 80
Alarm
ATA (Anti-Theft Alarm system) ......... 72
Switching off (ATA) .......................... 72
Switching the function on/off
(ATA) ................................................ 72
Alarm system
see ATA (Anti-Theft Alarm system)
AMG
Adaptive sport suspension sys-
tem ................................................ 184
AMG menu (on-board computer) ..... 235
Anti-lock braking system
see ABS (Anti-lock Braking System)
Anti-Theft Alarm system
see ATA (Anti-Theft Alarm system)
Approach/departure angle .............. 165
Ashtray ............................................... 300
Assistance display (on-board com-
puter) ..................................................2 31
Assistance menu (on-board com-
puter) ..................................................2 30
ASSYST PLUS
Displaying a service message ........3 18
Hiding a service message .............. 318
Resetting the service interval dis-
play ................................................ 318
Service message ............................ 318
Special service requirements ......... 318
ATA (Anti-Theft Alarm system)
Activating/deactivating ................... 72
Function ...........................................7 2
Switching off the alarm .................... 72
ATTENTION ASSIST
Activating/deactivating ................. 231
Display message ............................ 255
Function/notes ............................. 199
Audio 20
Switching on/off ........................... 282 Audio menu (on-board computer)
.... 228
Audio system
see separate operating instructions
Authorized Mercedes-Benz Center
see Qualified speci
alist workshop
Authorized workshop
see Qualified specialist workshop
AUTO lights
Display message ............................ 250
see Lights
Automatic car wash (care) ............... 319
Automatic engine start (ECO start/
stop function) .................................... 137
Automatic engine switch-off (ECO
start/stop function) .......................... 136
Automatic headlamp mode .............. 107
Automatic transmission
Accelerator pedal position ............. 143
Changing gear ............................... 143
DIRECT SELECT lever ..................... 140
Display message ............................ 264
Drive program ................................ 143
Drive program display .................... 142
Driving tips .................................... 143
DYNAMIC SELECT controller ......... 139
Emergency running mode .............. 147
Engaging drive position .................. 142
Engaging neutral ............................ 141
Engaging park position automati-
cally ............................................... 141
Engaging reverse gear ................... 141
Engaging the park position ............ 140
Kickdown ....................................... 143
Manual shifting .............................. 144
Oil temperature (on-board com-
puter, Mercedes-AMG vehicles) ..... 235
Overview ........................................ 140
Problem (malfunction) ................... 147
Pulling away ................................... 135
Starting the engine ........................ 134
Steering wheel paddle shifters ...... 144
Trailer towing ................................. 143
Transmission position display ........ 142
Transmission positions .................. 142
Automatic transmission emer-
gency mode ....................................... 147
Index5
Page 22 of 390
SMSsee also Digital Operator's Man-
ual .................................................. 281
Snow chains
Information .................................... 343
Sockets
Center console .............................. 301
General notes ................................ 301
Luggage compartment ...................3 02
Rear compartment ......................... 301
Sound
Switching on/off ........................... 282
Special seat belt retractor .................. 57
Specialist workshop ............................ 29
Speed, controlling
see Cruise control
Speedometer
Digital ............................................ 227
In the Instrument cluster ................. 34
Segments ...................................... 223
Selecting the display unit ...............2 32
Standing lamps
Display message ............................ 250
Switching on/off ........................... 108
Start/Stop button
Starting the engine ........................ 134
Start/stop function
see ECO start/stop function
Starting (engine) ................................ 133
STEER CONTROL .................................. 72
Steering
Display message ............................ 266
Steering Pilot
Activating/deactivating ................. 231
Display message ............................ 261
Steering wheel
Adjusting (electrically) ................... 101
Adjusting (manually) ...................... 100
Button overview ............................... 35
Buttons (on-board computer) ......... 224
Cleaning ......................................... 324
Important safety notes .................. 100
Steering wheel heating .................. 101
Storing settings (memory func-
tion) ............................................... 105
Steering wheel heating
Problem (malfunction) ................... 101
Switching on/off ........................... 101 Steering wheel paddle shifters
........ 144
Stopwatch (RACETIMER) ................... 236
Stowage areas ................................... 288
Stowage compartments
Armrest (under) ............................. 289
Center console .............................. 290
Center console (rear) ..................... 290
C
up holders ................................... 298
Eyeglasses compartment ............... 290
Glove box ....................................... 289
Important safety information ......... 288
Stowage net ................................... 290
Stowage net ....................................... 290
Summer tires
In winter ........................................ 343
Sun visor ............................................ 299
Suspension setting
AMG adaptive sport suspension
system ........................................... 184
Suspension settings
SETUP (on-board computer) .......... 235
SUV
(Sport Utility Vehicle) ....................... 28
Switching air-recirculation mode
on/off ................................................. 128
Switching on media mode
Via the device list .......................... 286
T
Tachometer ........................................ 223
Tailgate
Display message ............................ 265
Emergency unlocking ....................... 85
Important safety notes .................... 81
Limiting the opening angle ............... 84
Opening dimensions ...................... 380
Opening/closing (automatically
from inside) ...................................... 84
Opening/closing (automatically
from outside) ................................... 83
Opening/closing (from outside) ....... 82
Power closing .................................. 81
Tank
see Fuel tank
Tank content
Fuel gauge ....................................... 34
20Index
Page 160 of 390
The ECO display consists of three sections, with
an inner and outer area. The sections corre-
spond to the following three categories:
:Acceleration(evaluation of all accel-
eration processes):
Rthe outer area fills up and the inner area lights up green: moderate
acceleration, especially at higher
speeds
Rthe outer area empties and the
inner area is gray: sporty acceler-
ation
;Coasting (evaluation of all decelera-
tion processes):
Rthe outer area fills up and the inner area lights up green: anticipatory
driving, keeping your distance and
early release of the accelerator.
The vehicle can coast without use
of the brakes.
Rthe outer area empties and the
inner area is gray: frequent heavy
braking
=Constant (continuous evaluation
over the entire journey):
Rthe outer area fills up and the inner area lights up green: constant
speed and avoidance of unneces-
sary acceleration and deceleration
Rthe outer area empties and the
inner area is gray: fluctuations in
speed
The three inner areas display the current driving
style and light up green as a result of a particu-
larly economical driving style. Depending on thedriving situation, up to two areas may light up
simultaneously.
At the beginning of the journey, the three outer
areas are empty and fill up as a result of eco-
nomical driving. A higher level indicates a more
economical driving style. If the three outer areas
are completely filled at the same time, the driver
has adopted the most economical driving style
for the selected settings and prevailing condi-
tions. The ECO display border lights up.
The ECO display does not indicate the actual fuel consumption. The additionally achieved range
displayed under Bonus fr. Start
does not
indicate a fixed consumption reduction. In addition to driving style, the actual consump-
tion is affected by other factors, such as:
Rload
Rtire pressure
Rcold start
Rchoice of route
Relectrical consumers switched on
These factors are not included in the ECO dis-
play.
An economical driving style specially requires
driving at moderate engine speeds.
Achieving a higher value in the categories
"Acceleration" and "Constant":
Robserve the gearshift recommendations.
Rdrive the vehicle in the Comfortdrive pro-
gram.
On long journeys at a constant speed, e.g. on the
highway, only the outer area for "constant" will
change.
The ECO display summarizes the driving style
from the start of the journey to its completion.
Therefore, there are more marked changes in
the outer areas at the start of a journey. On lon- ger journeys, there are fewer changes. For more
marked changes, perform a manual rest
(
Ypage 227).
For further information on the ECO display, see
(
Ypage 226).
Braking
Important safety notes
GWARNING
If you shift down on a slippery road surface in an attempt to increase the engine's braking
effect, the drive wheels could lose their grip.
There is an increased danger of skidding and
accidents.
Do not shift down for additional engine brak-
ing on a slippery road surface.
Downhill gradients
!On long and steep gradients, you must
reduce the load on the brakes by shifting to a
lower gear in good time. This allows you to
take advantage of the engine's braking effect.
158Driving tips
Driving and parking
Page 183 of 390
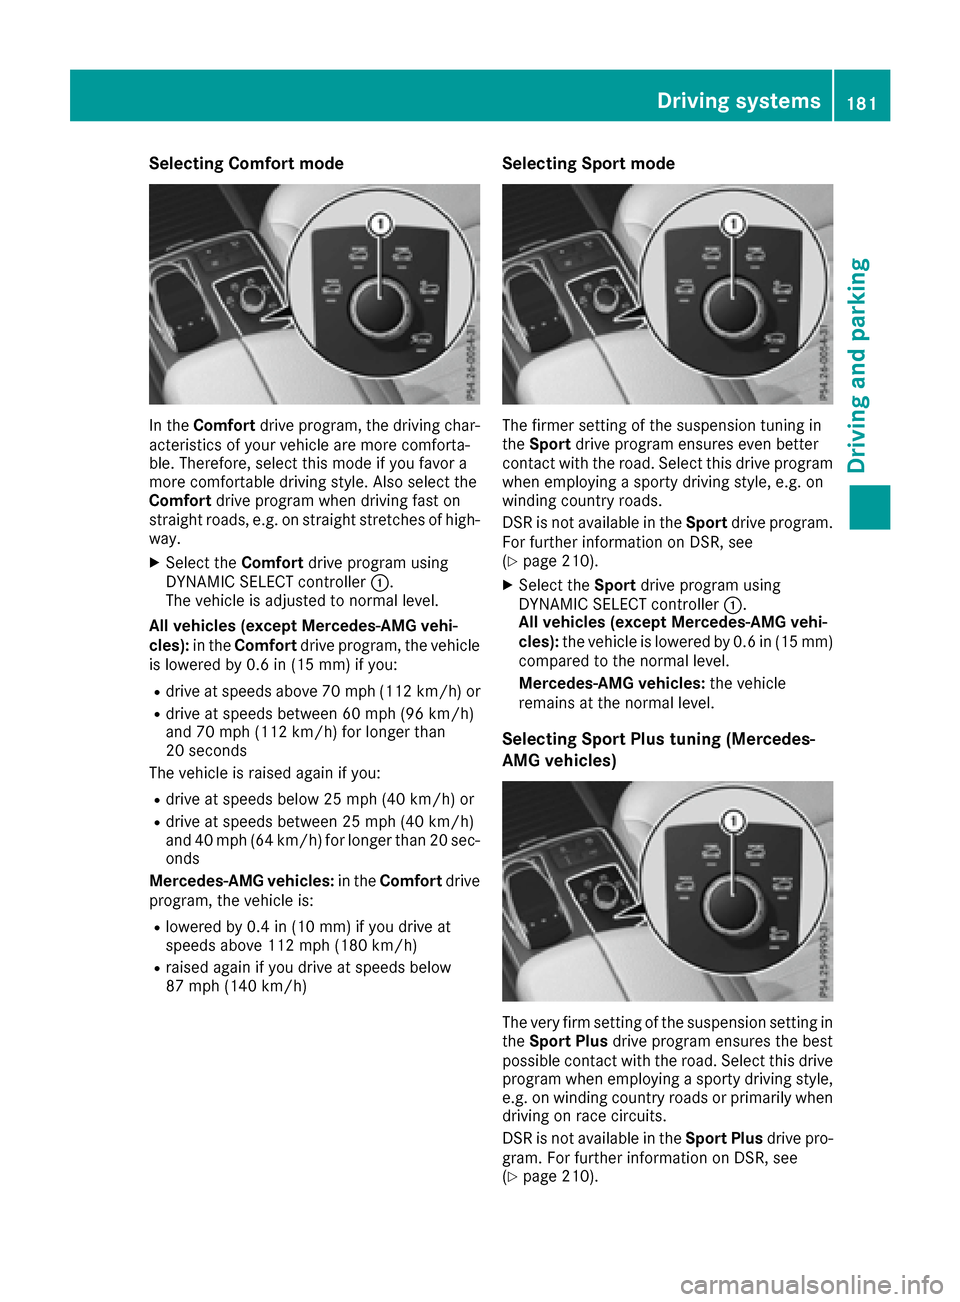
Selecting Comfort mode
In theComfort drive program, the driving char-
acteristics of your vehicle are more comforta-
ble. Therefore, select this mode if you favor a
more comfortable driving style. Also select the
Comfort drive program when driving fast on
straight roads, e.g. on straight stretches of high-
way.
XSelect the Comfortdrive program using
DYNAMIC SELECT controller :.
The vehicle is adjusted to normal level.
All vehicles (except Mercedes-AMG vehi-
cles): in theComfort drive program, the vehicle
is lowered by 0.6 in (15 mm) if you:
Rdrive at speeds above 70 mph (112 km/h) or
Rdrive at speeds between 60 mph (96 km/h)
and 70 mph (112 km/h) for longer than
20 seconds
The vehicle is raised again if you:
Rdrive at speeds below 25 mph (40 km/h) or
Rdrive at speeds between 25 mph (40 km/h)
and 40 mph (64 km/h) for longer than 20 sec- onds
Mercedes-AMG vehicles: in theComfort drive
program, the vehicle is:
Rlowered by 0.4 in (10 mm) if you drive at
speeds above 112 mph (180 km/h)
Rraised again if you drive at speeds below
87 mph (140 km/h)
Selecting Sport mode
The firmer setting of the suspension tuning in
the Sport drive program ensures even better
contact with the road. Select this drive program
when employing a sporty driving style, e.g. on
winding country roads.
DSR is not available in the Sportdrive program.
For further information on DSR, see
(
Ypage 210).
XSelect the Sportdrive program using
DYNAMIC SELECT controller :.
All vehicles (except Mercedes-AMG vehi-
cles): the vehicle is lowered by 0.6 in (15 mm)
compared to the normal level.
Mercedes-AMG vehicles: the vehicle
remains at the normal level.
Selecting Sport Plus tuning (Mercedes-
AMG vehicles)
The very firm setting of the suspension setting in
the Sport Plus drive program ensures the best
possible contact with the road. Select this drive
program when employing a sporty driving style, e.g. on winding country roads or primarily when
driving on race circuits.
DSR is not available in the Sport Plusdrive pro-
gram. For further information on DSR, see
(
Ypage 210).
Driving systems181
Driving and parking
Z
Page 186 of 390
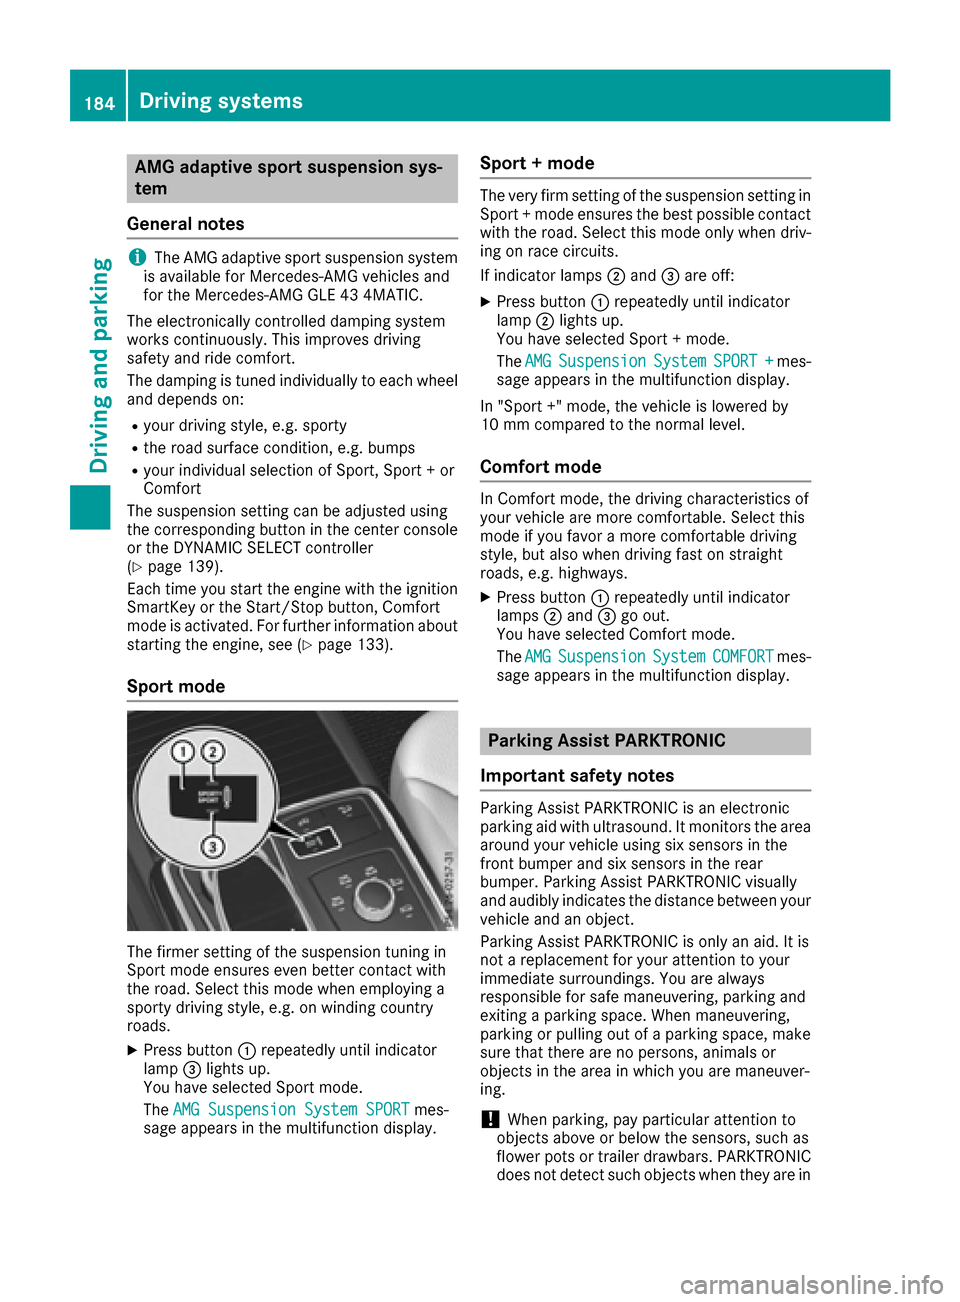
AMG adaptive sportsuspension sys-
tem
Gene ral notes
iThe AM Gadaptive sport suspension system
is available for Mercedes-AM Gvehicles and
for th eMercedes-AM GGLE 43 4MATIC.
The electronically controlled damping system
works continuously. This improves drivin g
safet yand rid ecomfort .
The damping is tuned individually to eac hwhee l
and depend son :
Ryour drivin gstyle, e.g. sport y
Rtheroad surfac econdition ,e.g. bump s
Ryour individual selection of Sport ,Sport +or
Comfort
The suspension setting can be adjusted usin g
th ecorresponding butto nin th ecenter console
or th eDYNAMIC SELECT controller
(
Ypage 139).
Eac htime you start th eengin ewit hth eignition
SmartKey or th eStart/Sto pbutton, Comfort
mod eis activated. Fo rfurther information about
starting th eengine, see (
Ypage 133).
Sport mode
The firmer setting of th esuspension tuning in
Sport mod eensures eve nbette rcontact wit h
th eroad .Selec tthis mod ewhen employin g a
sport ydrivin gstyle, e.g. on windin gcountry
roads.
XPress butto n: repeatedly until indicator
lamp =lights up.
You hav eselected Sport mode.
The AMG Suspensio nSystem SPORT
mes -
sage appear sin th emultifunction display.
Sport +mod e
The ver yfir m setting of th esuspension setting in
Sport +mod eensures th ebest possibl econtact
wit hth eroad .Selec tthis mod eonly when driv-
ing on rac ecircuits.
If indicator lamp s; and =are off :
XPress butto n: repeatedly until indicator
lamp ;lights up.
You hav eselected Sport +mode.
The AMG
Suspensio nSystemSPORT+mes-
sage appear sin th emultifunction display.
In "Sport +" mode, th evehicl eis lowered by
10 mm compared to th enormal level.
Comfort mode
In Comfort mode, th edrivin gcharacteristics of
your vehicl eare mor ecomfortable. Selec tthis
mod eif you favor amor ecomfortable drivin g
style, but also when drivin gfas ton straight
roads, e.g. highways.
XPress butto n: repeatedly until indicator
lamp s; and =go out .
You hav eselected Comfort mode.
The AMG
Suspensio nSystemCOMFORTmes-
sage appear sin th emultifunction display.
Park ing Assist PARKTRONIC
Import ant safety notes
Parking Assis tPARKTRONI Cis an electronic
parking aid wit hultrasound. It monitors th earea
around your vehicl eusin gsix sensor sin th e
fron tbumper and six sensor sin th erear
bumper. Parking Assis tPARKTRONI Cvisually
and audibly indicates th edistanc ebetween your
vehicl eand an object.
Parking Assis tPARKTRONI Cis only an aid. It is
no t a replacemen tfor your attention to your
immediat esurroundings. You are always
responsibl efor saf emaneuvering, parking and
exiting aparking space. When maneuvering,
parking or pullin gout of aparking space, mak e
sur ethat there are no persons, animals or
objects in th earea in whic hyou are maneuver-
ing .
!When parking ,pay particular attention to
objects abov eor belo wthesensors, suc has
flower pot sor trailer drawbars .PARKTRONI C
does no tdetec tsuc hobjects when they are in
184Driving systems
Driving and parking
Page 201 of 390
Exiting 360° camera display mode
The 360° camera display is stopped:
Rwhen you select transmission positionP, or
Rwhen you are driving at moderate speeds
The previous display appears in the multimedia
system. You can also switch the display by
selecting the &symbol in the display and
pressing the controller to confirm.
ATTENTION ASSIST
General notes
ATTENTION ASSIST helps you during long,
monotonous journeys, such as on highways. It is
active in the 37 mph (60 km/h) to 125 mph
(200 km/h) range. If ATTENTION ASSIST
detects typical indicators of fatigue or increas-
ing lapses in concentration on the part of the
driver, it suggests taking a break.
Important safety notes
ATTENTION ASSIST is only an aid to the driver. It
might not always recognize fatigue or increasing
inattentiveness in time or fail to recognize them
at all. The system is not a substitute for a well-
rested and attentive driver.
The functionality of ATTENTION ASSIST is
restricted and warnings may be delayed or not
occur at all:
Rif the length of the journey is less than approx-
imately 30 minutes
Rif the road condition is poor, e.g. if the surface
is uneven or if there are potholes
Rif there is a strong side wind
Rif you have adopted a sporty driving style with high cornering speeds or high rates of accel-
eration
Rif you are predominantly driving slower than
37 mph (60 km/ h)or faster than 125 mph
(200 km/h)
Rif you are driving with the Steering Pilot of
Distance Pilot DISTRONIC activated
Rif the time has been set incorrectly
Rin active driving situations, such as when you
change lanes or change your speed The attention level evaluation is deleted and
restarts when the journey is continued, if:
Ryou switch off the engine
Ryou take off your seat belt and open the driv-
er's door, e.g. for a change of drivers or to
take a break
Displaying the attention level
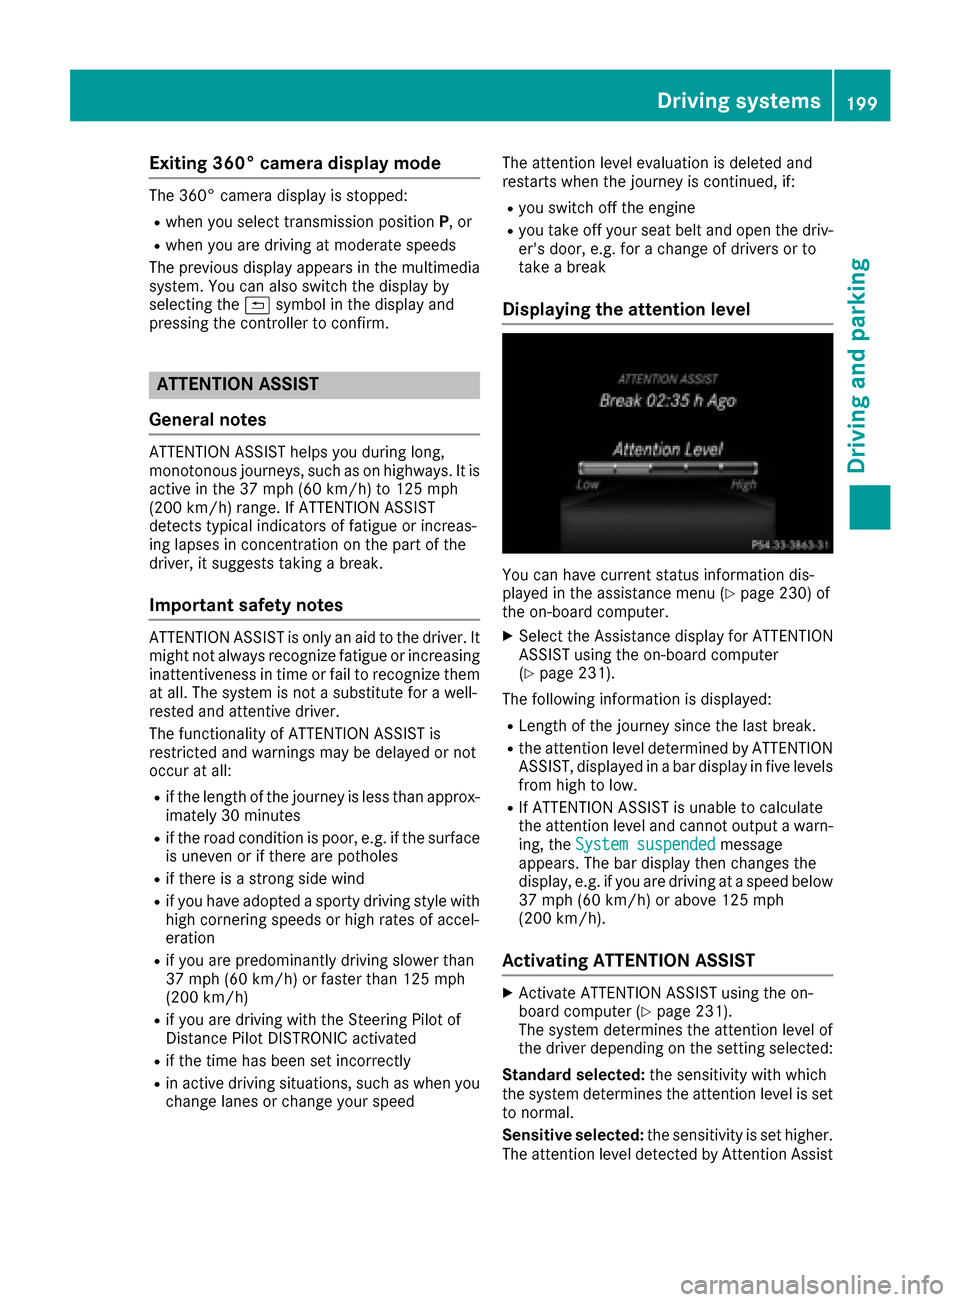
You can have current status information dis-
played in the assistance menu (Ypage 230) of
the on-board computer.
XSelect the Assistance display for ATTENTION
ASSIST using the on-board computer
(
Ypage 231).
The following information is displayed:
RLength of the journey since the last break.
Rthe attention level determined by ATTENTION
ASSIST, displayed in a bar display in five levels
from high to low.
RIf ATTENTION ASSIST is unable to calculate
the attention level and cannot output a warn-
ing, the System suspended
message
appears. The bar display then changes the
display, e.g. if you are driving at a speed below
37 mph (60 km/h) or above 125 mph
(200 km/h).
Activating ATTENTION ASSIST
XActivate ATTENTION ASSIST using the on-
board computer (Ypage 231).
The system determines the attention level of
the driver depending on the setting selected:
Standard selected: the sensitivity with which
the system determines the attention level is set
to normal.
Sensitive selected: the sensitivity is set higher.
The attention level detected by Attention Assist
Driving systems199
Driving and parking
Z
Page 237 of 390
Restoring the factory settings
XPress the=or; button on the steering
wheel to select the Sett.menu.
XPress the:or9 button to select the
Factory Settingsubmenu.
XPress ato confirm.
The Reset All Settings?message
appears.
XPress the :or9 button to select Noor
Yes.
XPress ato confirm the selection.
If you select Yes, the multifunction display
shows a confirmation message.
If you want to reset the Daytime Running
Lightsfunction in theLightsubmenu, you
must turn the SmartKey to position 1in the igni-
tion lock.
ON&OFFROAD menu
XPress the =or; button on the steering
wheel to select the ON&OFFROADmenu.
You can view the current off-road program set-
tings in the ON&OFFROAD
menu:
RVehicles with the Off-Road Engineering pack-
age (Ypage 212)
RVehicles without the Offroad Engineering
package (Ypage 211)
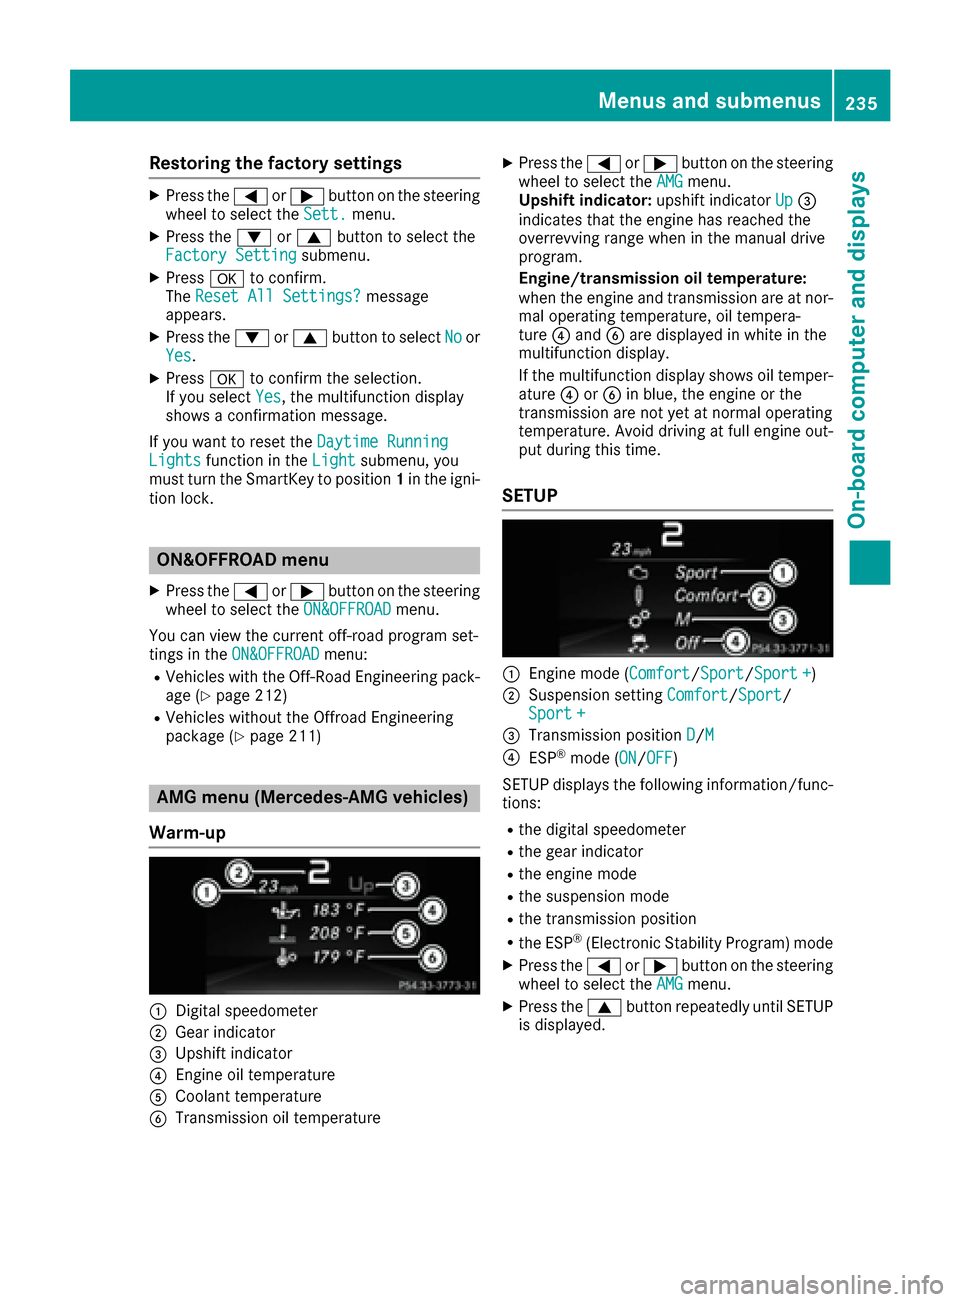
AMG menu (Mercedes-AMG vehicles)
Warm-up
:Digital speedometer
;Gear indicator
=Upshift indicator
?Engine oil temperature
ACoolant temperature
BTransmission oil temperature
XPress the =or; button on the steering
wheel to select the AMGmenu.
Upshift indicator: upshift indicatorUp=
indicates that the engine has reached the
overrevving range when in the manual drive
program.
Engine/transmission oil temperature:
when the engine and transmission are at nor-
mal operating temperature, oil tempera-
ture ?and Bare displayed in white in the
multifunction display.
If the multifunction display shows oil temper-
ature ?orB in blue, the engine or the
transmission are not yet at normal operating
temperature. Avoid driving at full engine out-
put during this time.
SETUP
:Engine mode ( Comfort/Sport/Sport +)
;Suspension setting Comfort/Sport/
Sport+
=Transmission position D/M
?ESP®mode (ON/OFF)
SETUP displays the following information/func- tions:
Rthe digital speedometer
Rthe gear indicator
Rthe engine mode
Rthe suspension mode
Rthe transmission position
Rthe ESP®(Electronic Stability Program) mode
XPress the =or; button on the steering
wheel to select the AMGmenu.
XPress the9button repeatedly until SETUP
is displayed.
Menus and submenus235
On-board computer and displays
Z
Page 339 of 390
shift to positionPwhen the driver's or front-
passenger door are opened, which could lead
to damage to the transmission.
!Do not tow with sling-type equipment. This
could damage the vehicle.
!Vehicles with differential locks: make sure
the differential locks are in automatic mode.
When towing, the differential locks must not
be switched on. The transmission may other- wise be damaged.
!The vehicle can be towed a maximum of
30 miles (50km). The towing speed of 30 mph
(50 km/h) must not be exceeded.
If the vehicle has to be towed more than
30 miles (50km), the entire vehicle must be
raised and transported.
It is better to have the vehicle transported than
to have it towed away.
If the vehicle has suffered transmission damage,
have it transported on a transporter or trailer.
The automatic transmission must be in position
N when the vehicle is being towed.
The battery must be connected and charged.
Otherwise, you:
Rcannot turn the SmartKey to position 2in the
ignition lock
Rcannot release the electric parking brake
Rcannot shift the automatic transmission to
position N
Disarm the automatic locking feature before the vehicle is towed (
Ypage 233). You could other-
wise be locked out when pushing or towing the
vehicle.
If the vehicle is in a dangerous area, it can be
towed out of that area with both axles on the
ground. In this case, the towing distance must
not be greater than 165 ft (50 m)and must not
exceed a towing speed of 6 mph (10 km/h). For
longer distances, have the vehicle loaded and
transported.
Installing/removing the towing eye
Installing the towing eye
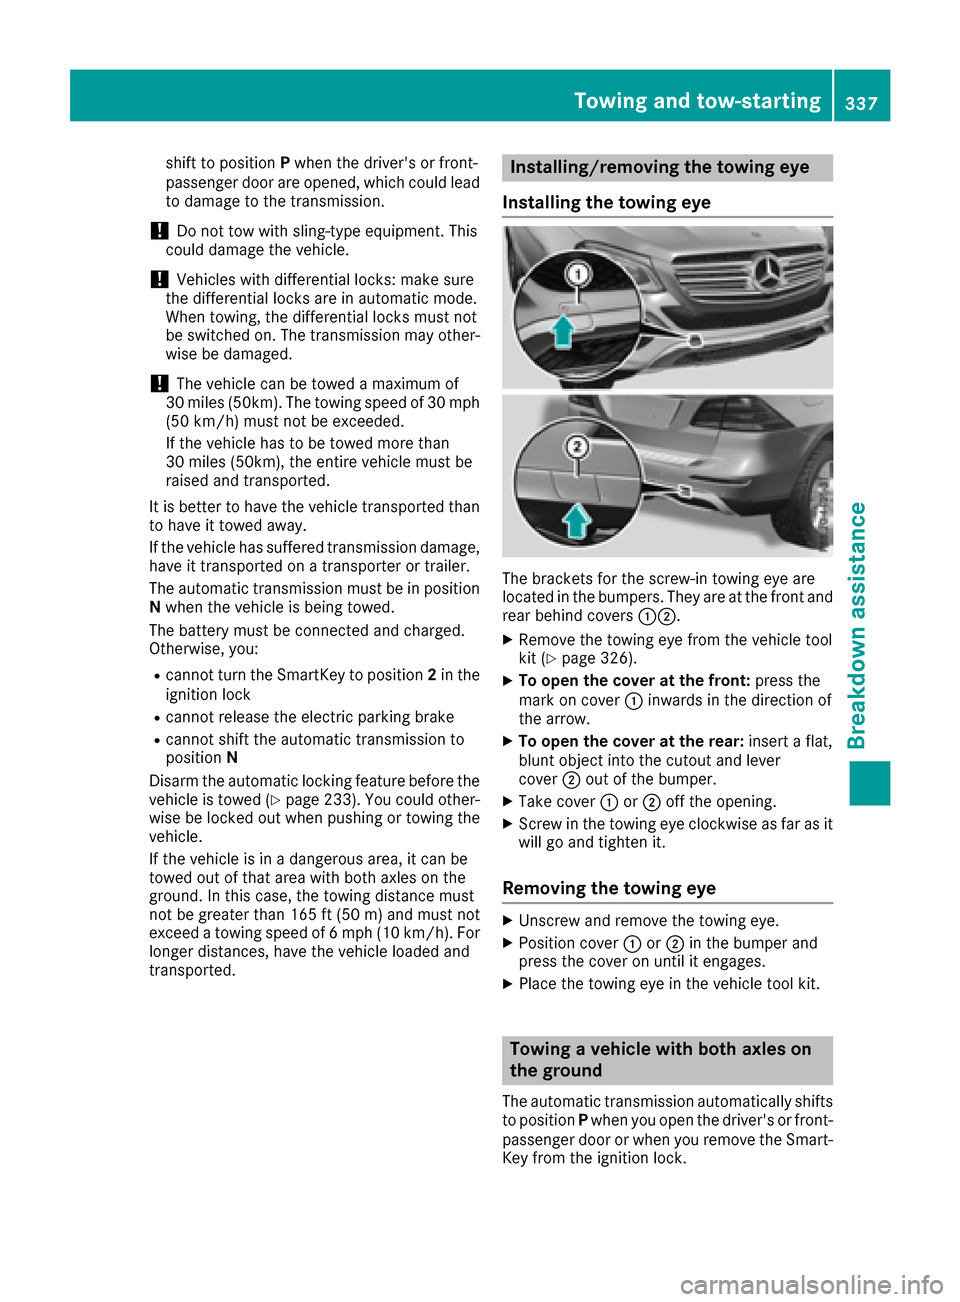
The brackets for the screw-in towing eye are
located in the bumpers. They are at the front and
rear behind covers :;.
XRemove the towing eye from the vehicle tool
kit (Ypage 326).
XTo open the cover at the front: press the
mark on cover :inwards in the direction of
the arrow.
XTo open the cover at the rear: insert a flat,
blunt object into the cutout and lever
cover ;out of the bumper.
XTake cover :or; off the opening.
XScrew in the towing eye clockwise as far as it
will go and tighten it.
Removing the towing eye
XUnscrew and remove the towing eye.
XPosition cover :or; in the bumper and
press the cover on until it engages.
XPlace the towing eye in the vehicle tool kit.
Towing a vehicle with both axles on
the ground
The automatic transmission automatically shifts
to position Pwhen you open the driver's or front-
passenger door or when you remove the Smart-
Key from the ignition lock.
Towing and tow-starting337
Breakdown assistance
Z
Page 346 of 390
To avoid hazardous situations:
Rnever install snow chains to the front
wheels
Ralways install snow chains in pairs to the
rear wheels.
!You must drive at raised vehicle level (height
1) if snow chains have been installed. The
vehicle may otherwise be damaged.
!Vehicles with ADS (Adaptive Damping
System): do not use the sport mode when
driving with snow chains mounted. The vehi-
cle may otherwise be damaged.
For safety reasons, Mercedes-Benz recom-
mends that you only use snow chains that have
been specially approved for your vehicle by
Mercedes-Benz, or are of a corresponding
standard of quality. For more information,
please contact a qualified specialist workshop.
Install the snow chains on all driven wheels for
maximum tractive power and driving stability. If
you own snow chains for two driven wheels only,
install the snow chains to the wheels on the rear
axle. The vehicle then remains more stable
under braking.
If you intend to mount snow chains, please bear
the following points in mind:
RSnow chains may not be mounted on all
wheel/tire combinations. Permissible
wheel/tire combinations (
Ypage 366).
ROnly use snow chains when driving on roads
completely covered by snow. Remove the
snow chains as soon as possible when you
come to a road that is not snow-covered.
RLocal regulations may restrict the use of snow chains. Observe the appropriate regulations if
you wish to mount snow chains.
RDo not exceed the maximum permissible
speed of 30 mph (50 km/h).
RNever use Parking Pilot when snow chains are
installed (Ypage 187).
You may wish to deactivate ESP®when pulling
away with snow chains installed (Ypage 67).
You can thereby allow the wheels to spin in a
controlled manner, achieving an increased driv-
ing force (cutting action).
Information about driving with an emergency
spare wheel (
Ypage 366).
Tire pressure
Tire pressure specifications
Important safety notes
GWARNING
Underinflated or overinflated tires pose the
following risks:
Rthe tires may burst, especially as the load
and vehicle speed increase.
Rthe tires may wear excessively and/or
unevenly, which may greatly impair tire
traction.
Rthe driving characteristics, as well as steer-
ing and braking, may be greatly impaired.
There is a risk of an accident.
Follow recommended tire inflation pressures
and check the pressure of all the tires includ-
ing the spare wheel:
Rmonthly, at least
Rif the load changes
Rbefore beginning a long journey
Runder different operating conditions, e.g.
off-road driving
If necessary, correct the tire pressure.
The data on the Tire and Loading Information
placard and tire pressure table shown here are
examples. Tire pressure specifications are vehi-
cle-specific and may deviate from the data
shown here. The tire pressure specifications
that are valid for your vehicle can be found on
the Tire and Loading Information placard and
tire pressure table on the vehicle.
General notes
The recommended tire pressures for the tires
mounted at the factory can be found on the
labels described here.
Operation with emergency spare wheel:
Information on operation with the emergency
spare wheel can be found under "Emergency
spare wheel" (
Ypage 367).
Operation with a trailer: the applicable value
for the rear axle is the maximum tire pressure
value stated in the table inside the fuel filler flap.
344Tire pressure
Wheels and tires
Page 358 of 390
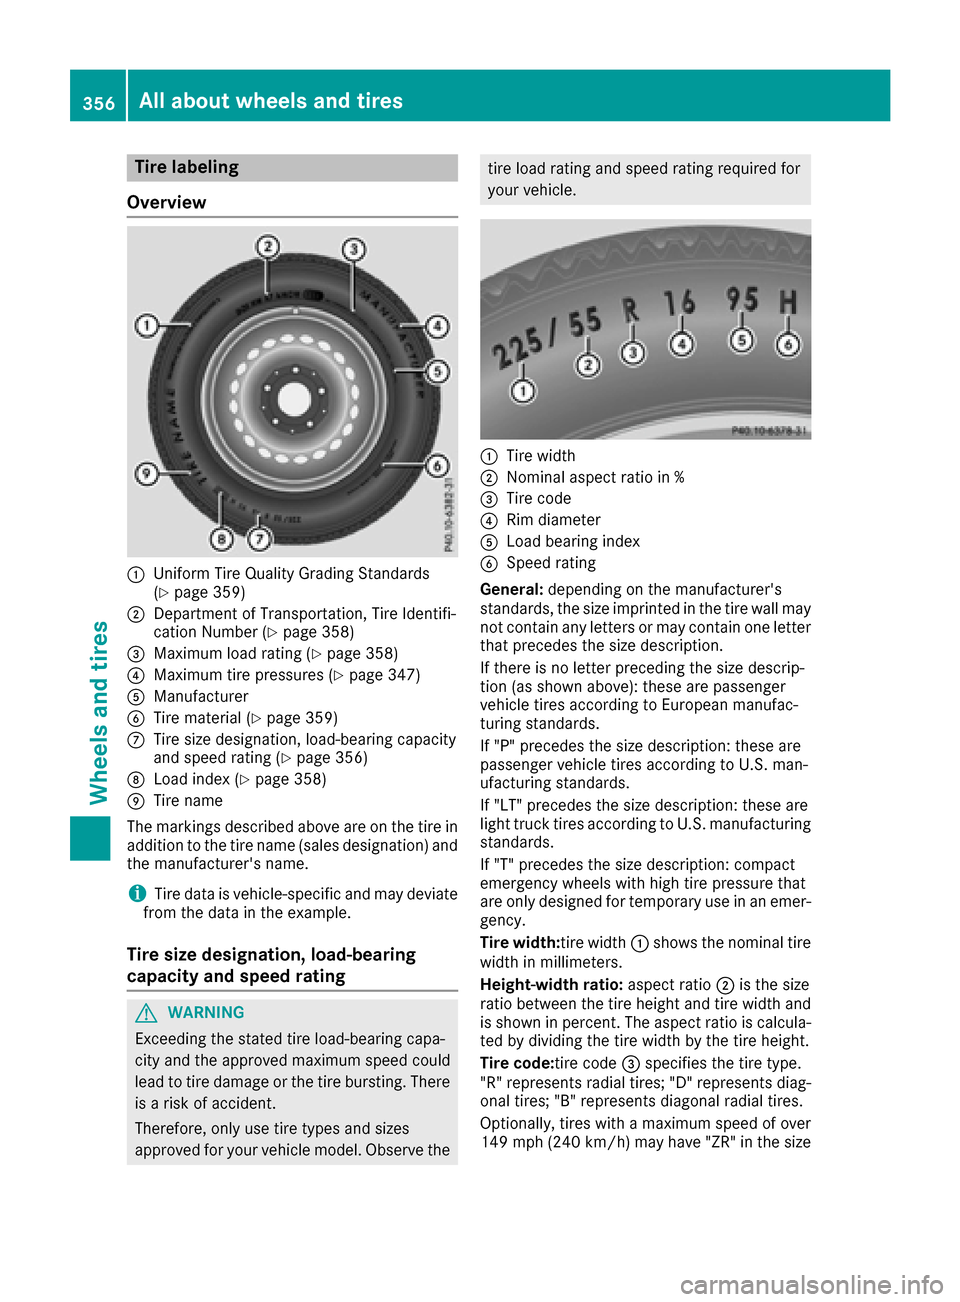
Tire labeling
Overview
:Uniform Tire Quality Grading Standards
(Ypage 359)
;Department of Transportation, Tire Identifi-
cation Number (Ypage 358)
=Maximum load rating (Ypage 358)
?Maximum tire pressures (Ypage 347)
AManufacturer
BTire material (Ypage 359)
CTire size designation, load-bearing capacity
and speed rating (Ypage 356)
DLoad index (Ypage 358)
ETire name
The markings described above are on the tire in
addition to the tire name (sales designation) and
the manufacturer's name.
iTire data is vehicle-specific and may deviate
from the data in the example.
Tire size designation, load-bearing
capacity and speed rating
GWARNING
Exceeding the stated tire load-bearing capa-
city and the approved maximum speed could
lead to tire damage or the tire bursting. There is a risk of accident.
Therefore, only use tire types and sizes
approved for your vehicle model. Observe the
tire load rating and speed rating required for
your vehicle.
:Tire width
;Nominal aspect ratio in %
=Tire code
?Rim diameter
ALoad bearing index
BSpeed rating
General: depending on the manufacturer's
standards, the size imprinted in the tire wall may
not contain any letters or may contain one letter
that precedes the size description.
If there is no letter preceding the size descrip-
tion (as shown above): these are passenger
vehicle tires according to European manufac-
turing standards.
If "P" precedes the size description: these are
passenger vehicle tires according to U.S. man-
ufacturing standards.
If "LT" precedes the size description: these are
light truck tires according to U.S. manufacturing
standards.
If "T" precedes the size description: compact
emergency wheels with high tire pressure that
are only designed for temporary use in an emer-
gency.
Tire width: tire width:shows the nominal tire
width in millimeters.
Height-width ratio: aspect ratio;is the size
ratio between the tire height and tire width and
is shown in percent. The aspect ratio is calcula-
ted by dividing the tire width by the tire height.
Tire code:tire code =specifies the tire type.
"R" represents radial tires; "D" represents diag-
onal tires
; "B" represents diagonal radial tires.
Optionally, tires with a maximum speed of over
149 mph (240 km/h) may have "ZR" in the size
356All about wheels an d tires
Wheels and tires