heating MERCEDES-BENZ GLE SUV 2019 User Guide
[x] Cancel search | Manufacturer: MERCEDES-BENZ, Model Year: 2019, Model line: GLE SUV, Model: MERCEDES-BENZ GLE SUV 2019Pages: 398, PDF Size: 12.25 MB
Page 106 of 398

The steering wheel can also be adjusted when
the")
Adjusting the steering wheel electri-
cally 0043
Adjusts the steering wheel height
0044 Adjusts the steering wheel position (fore-
and-aft adjustment)
The steering wheel can also be adjusted when
the SmartKey is removed from the ignition lock.
i Further related subjects:
R EASY-ENTRY/EXIT feature (Y page 104)
R Storing settings (Y page 108) Steering wheel heating
Switching on/off X
Turn the SmartKey to position 0048in the igni-
tion lock (Y page 135).
X To switch on/off: turn the lever in the direc-
tion of arrow 0043or0044.
Indicator lamp 0087lights up or goes out.
Vehicles with KEYLESS-GO: when you switch off the ignition and open the driver's door, the
steering wheel heating is deactivated.
Vehicles without KEYLESS-GO: when you
remove the SmartKey from the ignition lock, the
steering wheel heating is deactivated.
Problems with the steering wheel heating Problem
Possible causes/consequences and
0050 0050Solutions The steering wheel heat-
ing has switched off pre-
maturely or cannot be
switched on. The on-board voltage is too low because too many electrical consum-
ers are switched on.
X Switch off electrical consumers that you do not need, such as the
rear window defroster or interior lighting. EASY-ENTRY/EXIT feature
Important safety notes G
WARNING
When the EASY-ENTRY/EXIT feature adjusts
the steering wheel, you and other vehicle
occupants – particularly children – could
become trapped. There is a risk of injury.
While the EASY-ENTRY/EXIT feature is mak-
ing adjustments, make sure that no one has
any body parts in the sweep of the steering
wheel. Move the steering wheel adjustment lever if
there is a risk of entrapment by the steering
wheel. The adjustment process is stopped.
Press one of the memory function position but-
tons. This function is only available on vehicles
with memory function. G
WARNING
If children activate the EASY-ENTRY/EXIT fea- ture, they can become trapped, particularly
when unattended. There is a risk of injury. 104
Steering wheelSeats
, steering wheel and mirrors
Page 125 of 398

0044 Defrosts the windshield (Y page 129)
0087 Switches the maximum cool")
Control panel for dual-zone automatic climate control
USA only
Front control panel
0043 Sets the temperature, left (Y page 128)
0044 Defrosts the windshield (Y page 129)
0087 Switches the maximum cooling MAX COOL on or off (Y page 130)
0085 Switches cooling with air dehumidification on/off (Y page 127)
0083 Switches the rear window defroster on/off (Y page 130)
0084 Sets the temperature, right (Y page 128)
006B Switches air-recirculation mode on/off (Y page 131)
006C Sets the air distribution (Y page 129)
006D Increases the airflow (Y page 129)
006E Reduces the airflow (Y page 129)
006F Activates/deactivates climate control (Y page 127)
0070 Sets climate control to automatic (Y page 128)
Rear control panel
0071 Sets rear-compartment climate control to automatic (Y page 128)
0072 Directs the air distribution through the rear air vents (Y page 129)
0073 Switches the seat heating on the right-hand side on/off (Y page 101)
0074 Directs the air distribution through the footwell vents (Y page 129)
0075 Switches the rear climate control on/off (Y page 127)
0076 Switches the seat heating on the left-hand side on/off (Y page 101) Overview of climate control systems
123Climate control
Page 126 of 398

0044 Defrosts the windshield (Y page 129)
0087 Switches the ZONE function on/off (Y page 129)
0085 Switches cooling with ai")
Canada only
Front control panel
0043 Sets the temperature, left (Y page 128)
0044 Defrosts the windshield (Y page 129)
0087 Switches the ZONE function on/off (Y page 129)
0085 Switches cooling with air dehumidification on/off (Y page 127)
Switches the residual heat on or off (Y page 131)
0083 Switches the rear window defroster on/off (Y page 130)
0084 Sets the temperature, right (Y page 128)
006B Switches air-recirculation mode on/off (Y page 131)
006C Sets the air distribution (Y page 129)
006D Increases the airflow (Y page 129)
006E Reduces the airflow (Y page 129)
006F Activates/deactivates climate control (Y page 127)
0070 Sets climate control to automatic (Y page 128)
Rear control panel
0071 Sets rear-compartment climate control to automatic (Y page 128)
0072 Directs the air distribution through the rear air vents (Y page 129)
0073 Switches the seat heating on the right-hand side on/off (Y page 101)
0074 Directs the air distribution through the footwell vents (Y page 129)
0075 Switches the rear climate control on/off (Y page 127)
0076 Switches the seat heating on the left-hand side on/off (Y page 101)124
Overview of climate control systemsClimate control
Page 127 of 398

0044 Defrosts the windshield (Y page 129)
0087 Switches the maximum cooling")
Control panel for 3-zone automatic climate control
USA only
Front control panel
0043 Sets the temperature, left (Y page 128)
0044 Defrosts the windshield (Y page 129)
0087 Switches the maximum cooling MAX COOL on or off (Y page 130)
0085 Switches cooling with air dehumidification on/off (Y page 127)
0083 Switches the rear window defroster on/off (Y page 130)
0084 Sets the temperature, right (Y page 128)
006B Switches the ZONE function on/off (Y page 129)
006C Activates/deactivates climate control (Y page 127)
006D Sets the air distribution (Y page 129)
006E Increases the airflow (Y page 129)
006F Reduces the airflow (Y page 129)
0070 Display
0071 Adjusts the climate mode settings (Y page 128)
0072 Switches air-recirculation mode on/off (Y page 131)
0073 Sets climate control to automatic (Y page 128)
Rear control panel
0074 Increases the airflow (Y page 129)
0075 Sets the temperature (Y page 128)
0076 Sets rear-compartment climate control to automatic (Y page 128)
0077 Directs the airflow through the rear air vents (Y page 129)
0078 Switches the seat heating on the right-hand side on/off (Y page 101)
0079 Directs the airflow through the footwell vents (Y page 129)
007A Switches the rear climate control on/off (Y page 127)
007B Reduces the airflow (Y page 129)
007C Switches the seat heating on the left-hand side on/off (Y page 101) Overview of climate control systems
125Climate control
Page 128 of 398

0044 Defrosts the windshield (Y page 129)
0087 Switches the residual heat on or off (Y page 131)
0085 Switches cooling with")
Canada only
Front control panel
0043 Sets the temperature, left (Y page 128)
0044 Defrosts the windshield (Y page 129)
0087 Switches the residual heat on or off (Y page 131)
0085 Switches cooling with air dehumidification on/off (Y page 127)
0083 Switches the rear window defroster on/off (Y page 130)
0084 Sets the temperature, right (Y page 128)
006B Switches the ZONE function on/off (Y page 129)
006C Activates/deactivates climate control (Y page 127)
006D Sets the air distribution (Y page 129)
006E Increases the airflow (Y page 129)
006F Reduces the airflow (Y page 129)
0070 Display
0071 Adjusts the climate mode settings (Y page 128)
0072 Switches air-recirculation mode on/off (Y page 131)
0073 Sets climate control to automatic (Y page 128)
Rear control panel
0074 Increases the airflow (Y page 129)
0075 Sets the temperature (Y page 128)
0076 Sets rear-compartment climate control to automatic (Y page 128)
0077 Directs the airflow through the rear air vents (Y page 129)
0078 Switches the seat heating on the right-hand side on/off (Y page 101)
0079 Directs the airflow through the footwell vents (Y page 129)
007A Switches the rear climate control on/off (Y page 127)
007B Reduces the airflow (Y page 129)
007C Switches the seat heating on the left-hand side on/off (Y page 101)126
Overview of climate control systemsClimate control
Page 133 of 398

Problems with the rear window defroster
Problem
Possible causes/consequences and
0050
0050Solutions The rear window
defroster has deactiva-
ted prematurely or can-
not be activated. The battery has not been sufficiently charged.
X Switch off any consumers that are not required, e.g. reading lamps,
interior lighting or the seat heating.
When the battery is sufficiently charged, the rear window defroster can be activated again. Switching air-recirculation mode
on/off
General notes You can deactivate the flow of fresh air if
unpleasant odors are entering the vehicle from
outside. The air already inside the vehicle will
then be recirculated.
If you switch on air-recirculation mode, the win-
dows can fog up more quickly, in particular at
low temperatures. Only use air-recirculation
mode briefly to prevent the windows from fog-
ging up.
Activating/deactivating X
Turn the SmartKey to position 0048in the igni-
tion lock (Y page 135).
X To activate: press the0089button.
The indicator lamp in the 0089button lights
up.
i In the event of high pollution levels (3-zone
automatic climate control only) or at high out-
side temperatures, air-recirculation mode is
automatically activated. When air-recircula-
tion mode is activated automatically, the indi-
cator lamp in the 0089button is not lit.
Outside air is added after about 30 minutes.
X To deactivate: press the0089button.
The indicator lamp in the 0089button goes
out.
i Air-recirculation mode deactivates auto-
matically:
R after approximately five minutes at outside
temperatures below approximately 41 ‡
(5 †)
R after approximately five minutes if cooling
with air dehumidification is deactivated
R after approximately 30 minutes at outside
temperatures above approximately 41 ‡ (5 †) if the "Cooling with air dehumidifi-
cation" function is activated Switching the residual heat on or off
General notes The residual heat function is only available on
vehicles for Canada.
It is possible to make use of the residual heat of
the engine to continue heating the stationary
vehicle for up to 30 minutes after the engine has been switched off. The heating time depends on
the set interior temperature.
Activating/deactivating X
To activate: press the004Bor0056 button.
The indicator lamp in the 004Bor0056 button
lights up.
i The blower will run at a low speed regardless
of the airflow setting.
i If you activate the residual heat function at
high temperatures, only the ventilation will be
activated. The blower runs at medium speed.
X To deactivate: press the004Bor0056 but-
ton.
The indicator lamp in the 004Bor0056 button
goes out.
Residual heat is deactivated automatically:
R after approximately 30 minutes
R when the ignition is switched on
R if the battery voltage drops Ionization
Ionization is used to purify the air in the vehicle interior and attain an improved interior climate. Operating the climate control systems
131Climate control
Page 134 of 398
The ionization of the interior air is odorless and
cannot be perceived directly in the vehicle inte- rior.
You can switch ionization on and off via the mul-
timedia system (see the Digital Operator's Man-
ual).
Ionization can only be operated when the auto-
matic climate control is switched on. The side air vent on the driver's side must be open. Setting the air vents
Important safety notes
G
WARNING
Very hot or very cold air can flow from the air vents. This could result in burns or frostbite in the immediate vicinity of the air vents. There
is a risk of injury.
Make sure that all vehicle occupants always
maintain a sufficient distance to the air out-
lets. If necessary, redirect the airflow to
another area of the vehicle interior.
In order to ensure the direct flow of fresh air
through the air vents into the vehicle interior,
please observe the following notes:
R keep the air inlet grille on the hood and in the
engine compartment on the front-passenger
side free of blockages, such as ice, snow or
leaves.
R never cover the air vents or air intake grilles in
the vehicle interior.
i For virtually draft-free ventilation, adjust the
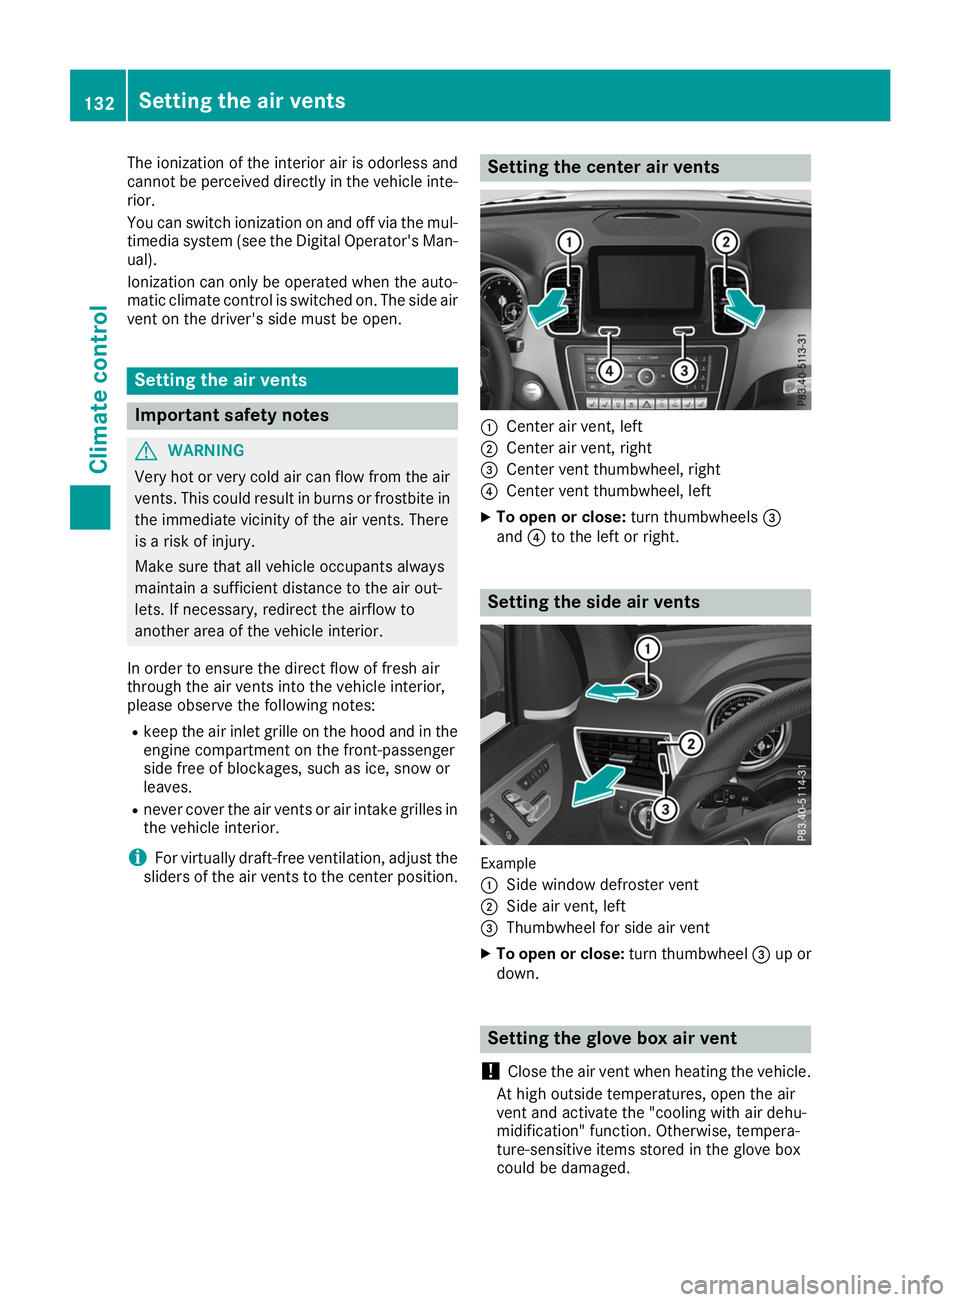
sliders of the air vents to the center position. Setting the center air vents
0043
Center air vent, left
0044 Center air vent, right
0087 Center vent thumbwheel, right
0085 Center vent thumbwheel, left
X To open or close: turn thumbwheels0087
and 0085to the left or right. Setting the side air vents
Example
0043
Side window defroster vent
0044 Side air vent, left
0087 Thumbwheel for side air vent
X To open or close: turn thumbwheel0087up or
down. Setting the glove box air vent
! Close the air vent when heating the vehicle.
At high outside temperatures, open the air
vent and activate the "cooling with air dehu-
midification" function. Otherwise, tempera-
ture-sensitive items stored in the glove box
could be damaged. 132
Setting the air ventsClimate control
Page 152 of 398

Problems with the transmission
Problem
Possible causes/consequences and
0050
0050Solutions The transmission has
problems shifting gear. The transmission is losing oil.
X Have the transmission checked at a qualified specialist workshop
immediately. 7G-TRONIC:
The acceleration ability
is deteriorating.
The transmission no lon-
ger changes gear. The transmission is in emergency mode.
It is only possible to shift into
secondgear and reverse gear.
X Stop the vehicle.
X Shift the transmission to position 005D.
X Switch off the engine.
X Wait at least ten seconds before restarting the engine.
X Shift the transmission to position 005Bor005E.
If 005B is selected, the transmission shifts to secondgear; if005Eis
selected, the transmission shifts to reverse gear.
X Have the transmission checked at a qualified specialist workshop
immediately. 9G-TRONIC:
The acceleration ability
is deteriorating.
The transmission no lon-
ger changes gear. The transmission is in emergency mode.
It is only partly possible to engage the gears, or the transmission is in
position 005C.
X Stop the vehicle.
X Shift the transmission to position 005D.
X Switch off the engine.
X Wait at least ten seconds before restarting the engine.
X Shift the transmission to position 005Bor005E.
X Have the transmission checked at a qualified specialist workshop
immediately. Transfer case
This section is only valid for vehicles with 4-
wheel drive (4MATIC). Power is always trans-
mitted to both axles.
! Performance tests may only be carried out
on a 2-axle dynamometer. The brake system
or transfer case could otherwise be damaged. Contact a qualified specialist workshop for a
performance test.
! Because ESP ®
is an automatic system, the
engine and ignition must be switched off
(SmartKey in position 0or 1or Start/Stop
button in position 0or 1) when the electric
parking brake is being tested on a brake dyna-
mometer (maximum 10 seconds).
Braking triggered automatically by ESP ®
may
seriously damage the brake system. !
Vehicles with 4MATIC must not be towed
with either the front or the rear axle raised, as
doing so will damage the transmission. Refueling
Important safety notes
G
WARNING
Fuel is highly flammable. Risk of fire and
explosion by improper handling of fuel.
You must avoid fire, open flames, smoking
and creating sparks. Switch off the ignition
before refueling and, if present, switch off the auxiliary heating. 150
RefuelingDriving and parking
Page 164 of 398

This helps you to avoid overheating the
brakes and wearing them out excessively.
When you take advantage of engine braking, a
drive wheel may not turn for some time, e.g.
on a slippery road surface. This could cause
damage to the drive train. This type of damage is not covered by the Mercedes-Benz war-
ranty.
Do not depress the brake pedal continuously
while the vehicle is in motion, e.g. causing the
brakes to rub by constantly applying light pres-
sure to the pedal. This results in excessive and
premature wear to the brake pads.
Use the left-hand steering wheel paddle shifter
to shift into a lower gear in good time on long
and steep downhill gradients. This is especially
important if the vehicle is laden.
This also applies if you have activated cruise
control, the limiter or Active Distance Assist
DISTRONIC.
This will use the braking effect of the engine, so
that less braking will be required to maintain the
speed. This relieves the load on the brake sys-
tem and prevents the brakes from overheating
and wearing too quickly.
Heavy and light loads G
WARNING
If you rest your foot on the brake pedal while
driving, the braking system can overheat. This increases the stopping distance and can even
cause the braking system to fail. There is a
risk of an accident.
Never use the brake pedal as a footrest. Never
depress the brake pedal and the accelerator
pedal at the same time.
! Depressing the brake pedal constantly
results in excessive and premature wear to
the brake pads.
If the brakes have been subjected to a heavy
load, do not stop the vehicle immediately. Drive on for a short while. This allows the airflow to
cool the brakes more quickly.
Wet roads If you have driven for a long time in heavy rain
without braking, there may be a delayed reac-
tion from the brakes when braking for the first time. This may also occur after the vehicle has
been washed or driven through deep water.
You then have to depress the brake pedal more
firmly. Maintain a greater distance from the
vehicle in front.
After driving on a wet road or having the vehicle
washed, brake firmly while paying attention to
the traffic conditions. This will warm up the
brake discs, thereby drying them more quickly
and protecting them against corrosion.
Limited braking performance on salt-
treated roads If you drive on salted roads, a layer of salt resi-
due may form on the brake discs and brake
pads. This can result in a significantly longer
braking distance.
R Brake occasionally to remove any possible
salt residue. Make sure that you do not
endanger other road users when doing so.
R Carefully depress the brake pedal and the
beginning and end of a journey.
R Maintain a greater distance to the vehicle
ahead.
Servicing the brakes !
The brake fluid level may be too low, if:
R if the red brake warning lamp lights up in
the instrument cluster and
R you hear a warning tone while the engine is
running
Observe additional warning messages in the
multifunction display.
The brake fluid level may be too low due to
brake pad wear or leaking brake lines.
Have the brake system checked immediately.
Consult a qualified specialist workshop to
arrange this.
! A function or performance test should only
be carried out on a 2-axle dynamometer. If
you wish to operate the vehicle on such a
dynamometer, please consult a qualified spe- cialist workshop in advance. You could oth-
erwise damage the drive train or the brake
system.
! Because ESP ®
is an automatic system, the
engine and ignition must be switched off
(SmartKey in position 0or 1or Start/Stop
button in position 0or 1) when the electric 162
Driving tipsDriving and parking
Page 166 of 398

Off-road fording
!
Under no circumstances should you accel-
erate before entering the water. The bow
wave could cause water to enter and damage
the engine and other assemblies.
! Do not open any of the vehicle's doors while
fording. Otherwise, water could get into the
vehicle interior and damage the vehicle's
electronics and interior equipment.
R Establish how deep the water is and the char-
acteristics of the body of water before ford-
ing.
R Select the highest possible vehicle level.
R Shift to a lower gear using the left-hand steer-
ing wheel paddle shifter.
R Avoid high engine speeds.
R Enter and exit the water at a flat place and at
a steady walking pace.
R Drive slowly and at an even speed through the
water.
R Ensure that a bow wave does not form as you
drive.
R Do not stop and do not switch off the engine.
Water offers a high degree of resistance, and the ground is slippery and in some cases
unstable. Therefore, it is difficult and danger-
ous to pull away in the water.
R Clean any mud from the tire tread after ford-
ing.
R Apply the brakes to dry them after fording.
Always observe the fording depth values
(Y page 392). Winter driving
G
WARNING
If you shift down on a slippery road surface in an attempt to increase the engine's braking
effect, the drive wheels could lose their grip.
There is an increased danger of skidding and
accidents.
Do not shift down for additional engine brak-
ing on a slippery road surface. G
DANGER
If the exhaust pipe is blocked or adequate
ventilation is not possible, poisonous gases such as carbon monoxide (CO) may enter the
vehicle. This is the case, e.g. if the vehicle
becomes trapped in snow. There is a risk of
fatal injury.
If you leave the engine or the auxiliary heating
running, make sure the exhaust pipe and area
around the vehicle are clear of snow. To
ensure an adequate supply of fresh air, open a window on the side of the vehicle that is not
facing into the wind.
! When scraping ice off the rear window, take
care not to damage the rear-window seal or
trim.
Have your vehicle winter-proofed at a qualified
specialist workshop at the onset of winter.
Drive particularly carefully on slippery road sur- faces. Avoid sudden acceleration, steering and
braking maneuvers. Do not use cruise control or
Active Distance Assist DISTRONIC.
If the vehicle threatens to skid or cannot be
stopped when moving at low speed:
X Shift the transmission to position 005C.
X Try to bring the vehicle under control using
corrective steering.
When driving in snow with or without snow
chains, select driving program Slippery
(Y page 142).
i Vehicles with a diesel engine:
do not
cover the radiator, e.g. with a protective
cover. The measuring function of the on-
board diagnosis system may otherwise pro-
vide inaccurate values. Some of these values
are required by law and must therefore always be accurate.
The outside temperature indicator is not
designed to serve as an ice-warning device and
is therefore unsuitable for that purpose.
Changes in the outside temperature are dis-
played after a short delay.
Indicated temperatures just above the freezing
point do not guarantee that the road surface is
free of ice. The road may still be icy, especially in wooded areas or on bridges. You should pay
special attention to road conditions when tem-
peratures are around the freezing point.
For more information on driving with snow
chains, see (Y page 353).164
Driving tipsDriving and parking