dimensions MERCEDES-BENZ GLE SUV 2019 Owner's Manual
[x] Cancel search | Manufacturer: MERCEDES-BENZ, Model Year: 2019, Model line: GLE SUV, Model: MERCEDES-BENZ GLE SUV 2019Pages: 398, PDF Size: 12.25 MB
Page 23 of 398
Stowage net
....................................... 297
Summer tires
In winter ........................................3 53
Sun visor ............................................ 305
Suspension setting
AIRMATIC ...................................... 183
AMG adaptive sport suspension
system .......................................... .187
Suspension tuning
SETUP (on-board computer,
Mercedes-AMG vehicles) .............. .242
SUV
(Sport Utility Vehicle) ....................... 30
Switching air-recirculation mode
on/off ................................................. 131
Switching on media mode
Via the device lis t.......................... 293 T
Tachometer ........................................ 229
Tailgate
Display message ............................ 271
Emergency unlocking ....................... 88
Important safety notes .................... 84
Limiting the opening angle ............... 88
Opening dimensions ...................... 390
Opening/closing (automatically
from inside) ...................................... 87
Opening/closing (automatically
from outside) ................................... 86
Opening/closing (from outside) ....... 85
Power closing .................................. 84
Tank
see Fuel tank
Tank content
Fuel gauge ....................................... 37
Technical data
Capacities ...................................... 383
Information .................................... 381
Tires/wheels ................................. 376
Trailer loads ................................... 394
Vehicle data ................................... 390
Telephone
Accepting a call (multifunction
steering wheel) .............................. 236
Authorizing a mobile phone (con-
necting) ......................................... 291 Authorizing a mobile phone via the
device manager (connecting) ......... 292
Connecting a mobile phone
(device manager) ........................... 292
Connecting a mobile phone (gen-
eral information) ............................ 291
Display message ............................ 272
Menu (on-board computer) ............ 236
Number from the phone book ........ 236
Redialing ........................................ 236
Rejecting/ending a call ................. 236
see also Digital Operator's Man-
ual .................................................. 287
Temperature
Coolant (display in the instrumentcluster) .......................................... 230
Coolant (on-board computer,
Mercedes-AMG vehicles) ............... 241
Engine oil (on-board computer,
Mercedes-AMG vehicles) ............... 241
Outside temperature ...................... 229
Setting (climate control )................ 128
Transmission oil (on-board com-
puter, Mercedes-AMG vehicles) ..... 241
Through-loading feature ................... 298
Timing (RACETIMER) ......................... 242
Tire pressure
Calling up (on-board computer) ..... 358
Checking manually ........................ 357
Display message ............................ 268
Maximum ....................................... 357
Not reached (TIREFIT) .................... 339
Notes ............................................. 356
Reached (TIREFIT) .......................... 339
Recommended ............................... 354
Tire pressure loss warning system
General notes ................................ 357
Important safety notes .................. 358
Restarting ...................................... 358
Tire pressure monitor
Checking the tire pressure elec-
tronically ........................................ 360
Function/note s............................. 358
General notes ................................ 358
Important safety notes .................. 359
Radio type approval for the tire
pressure monitor ........................... 361
Restarting ...................................... 361 Index
21
Page 25 of 398
Important safety notes .................. 345
Towing
Permitted towing methods ............ 347
Towing a trailer
Axle load, permissible .................... 394
Cleaning the trailer tow hitch .........3 31
Coupling up a trailer ..................... .223
Decoupling a trailer ....................... 225
Driving tips ................................... .221
Important safety notes .................. 220
Installing the ball coupling ............. 222
Lights display message .................. 256
Mounting dimensions .................... 394
Parking Assist PARKTRONIC .......... 188
Power supply ................................. 226
Pulling away with a trailer .............. 138
Removing the ball coupling ............ 225
Trailer loads ................................... 394
Towing away
Important safety guidelines ........... 345
Installing the towing eye ................ 347
Notes for 4MATIC vehicles ............ 348
Removing the towing eye .............. .347
Transporting the vehicle ................ 348
With both axles on the ground ....... 347
Towing eye ......................................... 335
Traffic reports
see also Digital Operator's Man-
ual ................................................. .287
Traffic Sign Assist
Activating/deactivating the warn-ing function ................................... .237
Display message ............................ 264
Function/notes ............................ .205
Important safety notes .................. 205
Instrument cluster display ............. 205
Trailer coupling
see Towing a trailer
Trailer loads and drawbar nose-
weights ............................................... 225
Trailer towing
Active Blind Spot Assist ................. 211
Active Lane Keeping Assist ............ 214
Blind Spot Assist ............................ 207
Permissible trailer loads and
drawbar noseweights ..................... 225
Transfer case ..................................... 150 Transmission
see Automatic transmission
Transmission position display ......... 145
Transporting the vehicle .................. 348
Traveling uphill
Brow of hill ..................................... 169
Driving downhill ............................ .169
Maximum gradient-climbing capa-
bility ............................................... 168
Trim pieces (cleaning instruc-
tions) ................................................. .332
Trip computer (on-board com-
puter) ................................................. .232
Trip odometer
Calling up ....................................... 232
Resetting (on-board computer) ...... 233
Trunk
see Tailgate
Turn signals
Display message ............................ 256
Replacing bulbs (front) ................... 117
Switching on/off ........................... 111
Two-way radio
Frequencies ................................... 381
Installation ..................................... 381
Transmission output (maximum ).... 381
TWR (Tongue Weight Rating) (defi-
nition) ................................................. 371
Type identification plate
see Vehicle identification plate U
Unlocking Emergency unlocking ....................... 84
From inside the vehicle (central
unlocking button) ............................. 83
Upshift indicator (on-board com-
puter, Mercedes-AMG vehicles) ....... 241
USB devices
Connecting to the Media Inter-
face ............................................... 294 V
Vanity mirror (in the sun visor) ........ 306
Vehicle
Correct use ...................................... 31 Index
23
Page 26 of 398
Data acquisition ............................... 32
Display message ............................ 270
Equipment ....................................... 28
Individual settings .......................... 239
Limited Warranty ............................. 32
Loading .......................................... 361
Locking (in an emergency) ............... 84
Locking (SmartKey) .......................... 77
Lowering ........................................ 375
Maintenance .................................... 29
Operating safety .............................. 30
Parking .......................................... 156
Parking for a long period ................ 159
Pulling away ................................... 138
Raising ........................................... 373
Reporting problems ........................ .31
Securing from rolling away ............ 372
Towing away .................................. 345
Transporting .................................. 348
Unlocking (in an emergency) ........... 84
Unlocking (SmartKey) ...................... 77
Vehicle data ................................... 390
Vehicle battery
see Battery (vehicle)
Vehicle data ....................................... 390
Vehicle data (off-road driving)
Approach/departure angle ............ 393
Fording depth ................................ 392
Maximum gradient climbing abil-
ity .................................................. 393
Vehicle dimensions ........................... 390
Vehicle emergency locking ................ 84
Vehicle identification number
see VIN
Vehicle identification plate .............. 382
Vehicle level
AIRMATIC ...................................... 185
Vehicle level (display message) ....... 261
Vehicle tool kit .................................. 335
Video
Operating the DVD ......................... 235
see also Digital Operator's Man-
ual .................................................. 287
VIN ...................................................... 382
Seat ............................................... 383
Type plate ...................................... 382 W
Warning and indicator lamps ABS ................................................ 277
Brake s........................................... 276
Coolant .......................................... 283
Distance warning ........................... 285
Engine diagnostics ......................... 283
ESP ®
.............................................. 279
ESP ®
OFF ....................................... 280
Fuel tank ........................................ 283
Overview .......................................... 37
Parking brake ................................ 282
PASSENGER AIR BAG ...................... 45
Reserve fuel ................................... 283
Restraint system ............................ 282
Seat belt ........................................ 274
Tire pressure monitor .................... 286
Warranty .............................................. 28
Washer fluid
Display message ............................ 272
Weather display (COMAND)
see also Digital Operator's Man-
ual .................................................. 287
Wheel and tire combinations
Tires ............................................... 376
Wheel bolt tightening torque ........... 375
Wheel chock ...................................... 372
Wheels
Changing a whee l.......................... 371
Checking ........................................ 351
Cleaning ......................................... 329
Emergency spare wheel ................. 376
Important safety notes .................. 351
Information on driving .................... 351
Interchanging/changing ................ 371
Mounting a new wheel ................... 374
Mounting a wheel .......................... 372
Overview ........................................ 351
Removing a whee l.......................... 374
Snow chains .................................. 353
Storing ........................................... 372
Tightening torque ........................... 375
Wheel size/tire size ....................... 376
Window curtain air bag
Display message ............................ 253
Operation ......................................... 51 24
Index
Page 87 of 398
G
WARNING
If objects, luggage or loads are not secured or not secured sufficiently, they could slip, tip
over or be flung around and thereby hit vehicle
occupants. There is a risk of injury, particu-
larly in the event of sudden braking or a sud-
den change in direction.
Always store objects so that they cannot be
flung around. Secure objects, luggage or
loads against slipping or tipping before the
journey.
! The tailgate swings upwards and to the rear
when opened. Therefore, make sure that
there is sufficient clearance above and behind
the tailgate.
The opening dimensions of the tailgate can be
found in the "Vehicle data" section
(Y page 390).
You should preferably place luggage or loads in the cargo compartment. Observe the loading
guidelines (Y page 295).
Do not leave the SmartKey in the cargo com-
partment. You could otherwise lock yourself
out.
Vehicles without the EASY-PACK tailgate:
the tailgate can be:
R opened and closed manually from outside
R unlocked from inside with the emergency
release
For vehicles with the EASY-PACK tailgate:
you can:
R close the tailgate manually from outside
R open the tailgate automatically from outside
R open and close the tailgate automatically
from inside
R unlock the tailgate from inside with the emer-
gency release
R limit the opening angle of the tailgate Tailgate reversing feature
On vehicles with the tailgate remote closing fea- ture, the tailgate is equipped with automatic
obstacle recognition with a reversing feature. If a solid object blocks or restricts the tailgate
when automatically opening or closing, this pro-
cedure is stopped. If the tailgate is stopped dur- ing the closing procedure, it will open again automatically. The automatic obstacle recogni-
tion with reversing feature is only an aid. It is not
a substitute for your attentiveness when open-
ing and closing the tailgate. G
WARNING
The reversing feature does not respond:
R to soft, light and thin objects, e.g. fingers
R over the last 00C2in (8 mm) of the closing
movement
The reversing feature cannot prevent some-
one from becoming trapped in these situa-
tions in particular. There is a risk of injury.
Make sure that no body parts are in close
proximity during the closing procedure.
If somebody becomes trapped:
R press the 0054button on the SmartKey, or
R pull or press the remote operating switch
on the driver's door or
R press the closing or locking button on the
tailgate or
R pull the handle on the tailgate Opening and closing manually from
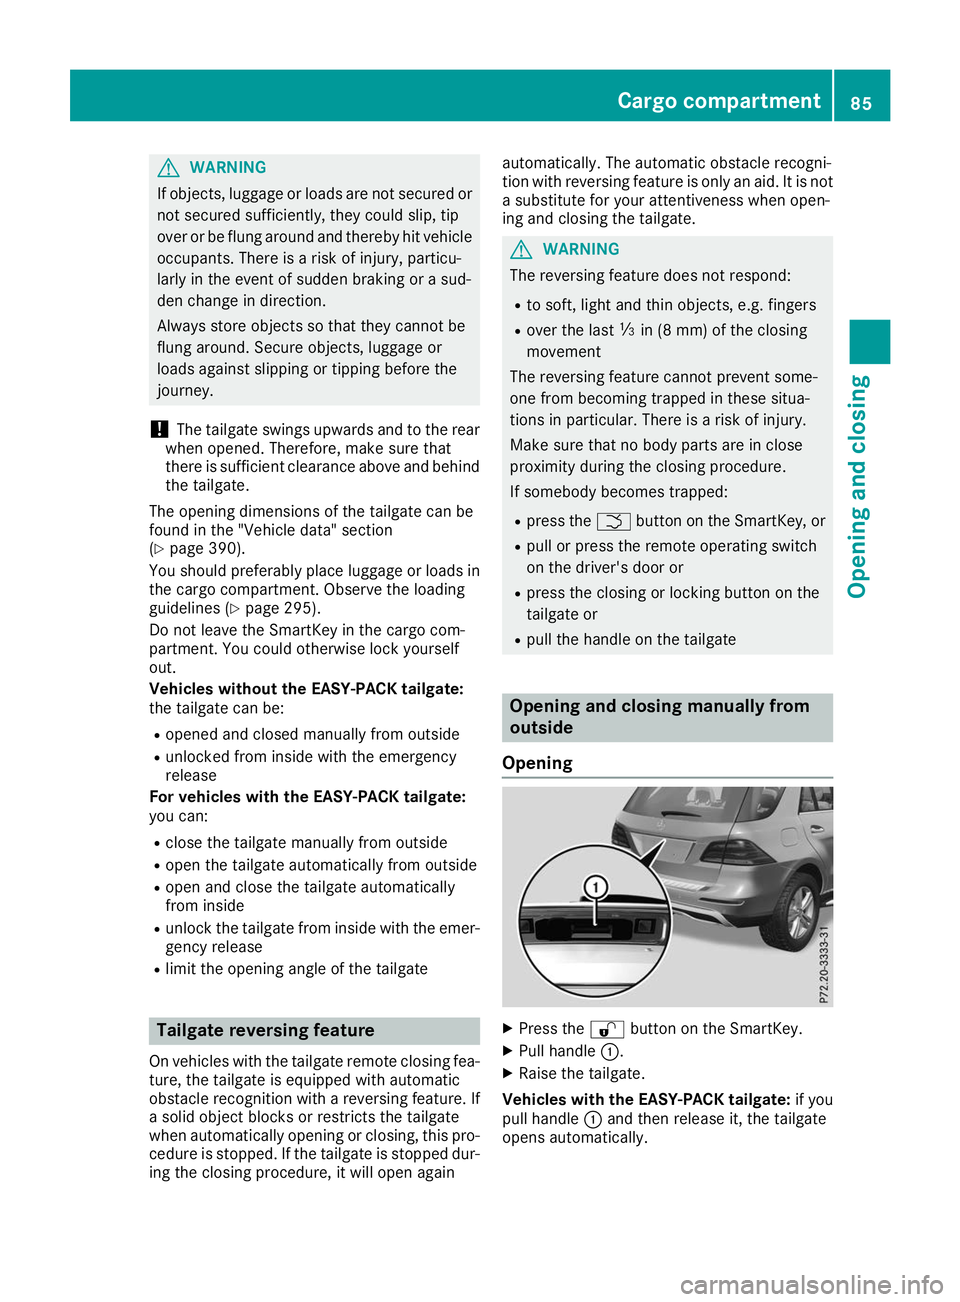
outside
Opening X
Press the 0036button on the SmartKey.
X Pull handle 0043.
X Raise the tailgate.
Vehicles with the EASY-PACK tailgate: if you
pull handle 0043and then release it, the tailgate
opens automatically. Cargo compartment
85Opening and closing Z
Page 88 of 398
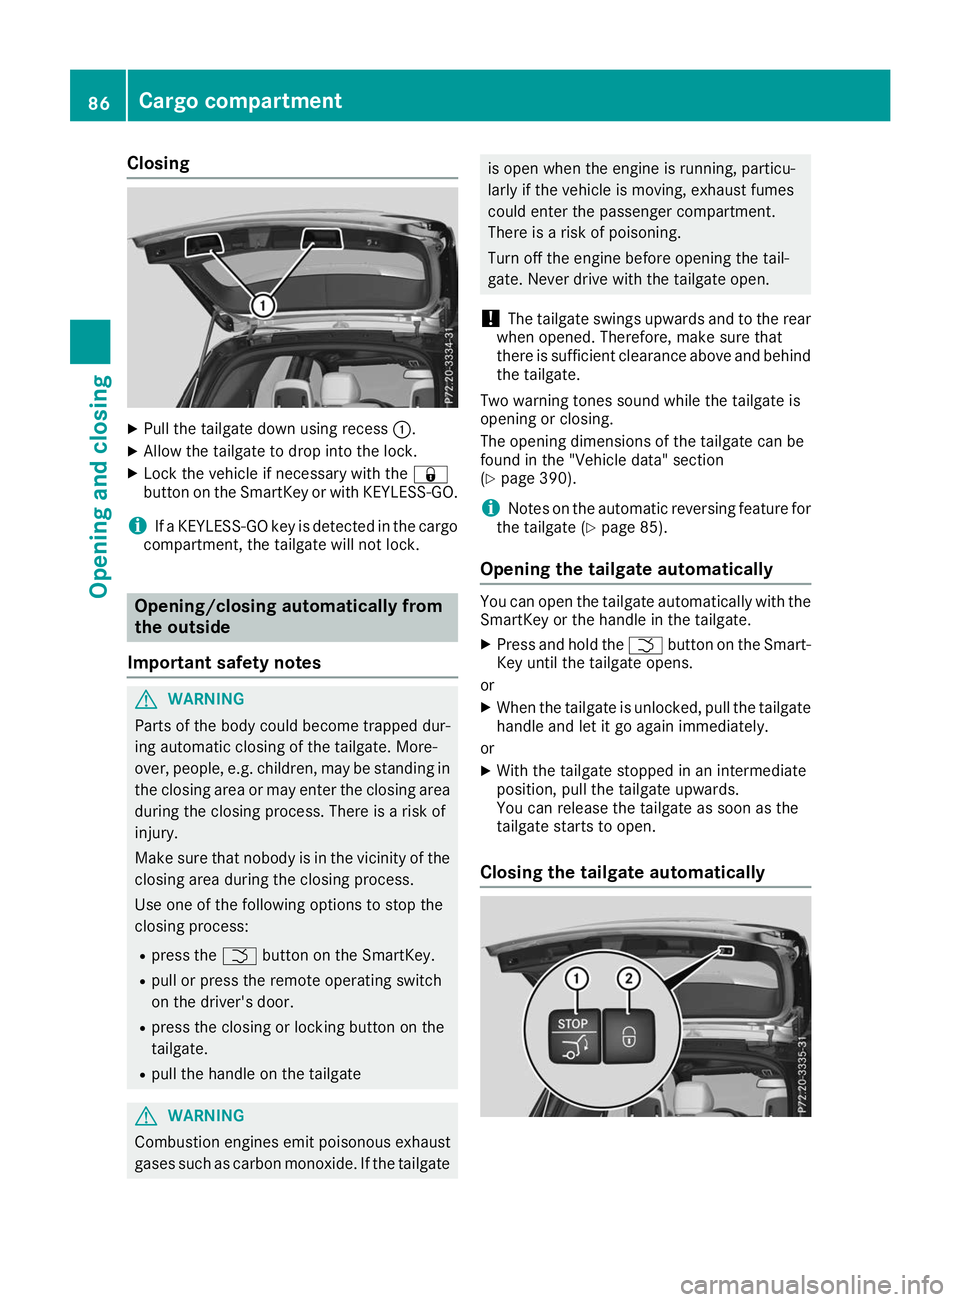
Closing
X
Pull the tailgate down using recess 0043.
X Allow the tailgate to drop into the lock.
X Lock the vehicle if necessary with the 0037
button on the SmartKey or with KEYLESS-GO.
i If a KEYLESS-GO key is detected in the cargo
compartment, the tailgate will not lock. Opening/closing automatically from
the outside
Important safety notes G
WARNING
Parts of the body could become trapped dur-
ing automatic closing of the tailgate. More-
over, people, e.g. children, may be standing in the closing area or may enter the closing area
during the closing process. There is a risk of
injury.
Make sure that nobody is in the vicinity of the closing area during the closing process.
Use one of the following options to stop the
closing process:
R press the 0054button on the SmartKey.
R pull or press the remote operating switch
on the driver's door.
R press the closing or locking button on the
tailgate.
R pull the handle on the tailgate G
WARNING
Combustion engines emit poisonous exhaust
gases such as carbon monoxide. If the tailgate is open when the engine is running, particu-
larly if the vehicle is moving, exhaust fumes
could enter the passenger compartment.
There is a risk of poisoning.
Turn off the engine before opening the tail-
gate. Never drive with the tailgate open.
! The tailgate swings upwards and to the rear
when opened. Therefore, make sure that
there is sufficient clearance above and behind
the tailgate.
Two warning tones sound while the tailgate is
opening or closing.
The opening dimensions of the tailgate can be
found in the "Vehicle data" section
(Y page 390).
i Notes on the automatic reversing feature for
the tailgate (Y page 85).
Opening the tailgate automatically You can open the tailgate automatically with the
SmartKey or the handle in the tailgate.
X Press and hold the 0054button on the Smart-
Key until the tailgate opens.
or X When the tailgate is unlocked, pull the tailgate
handle and let it go again immediately.
or
X With the tailgate stopped in an intermediate
position, pull the tailgate upwards.
You can release the tailgate as soon as the
tailgate starts to open.
Closing the tailgate automatically 86
Cargo compartmentOpening and closing
Page 89 of 398
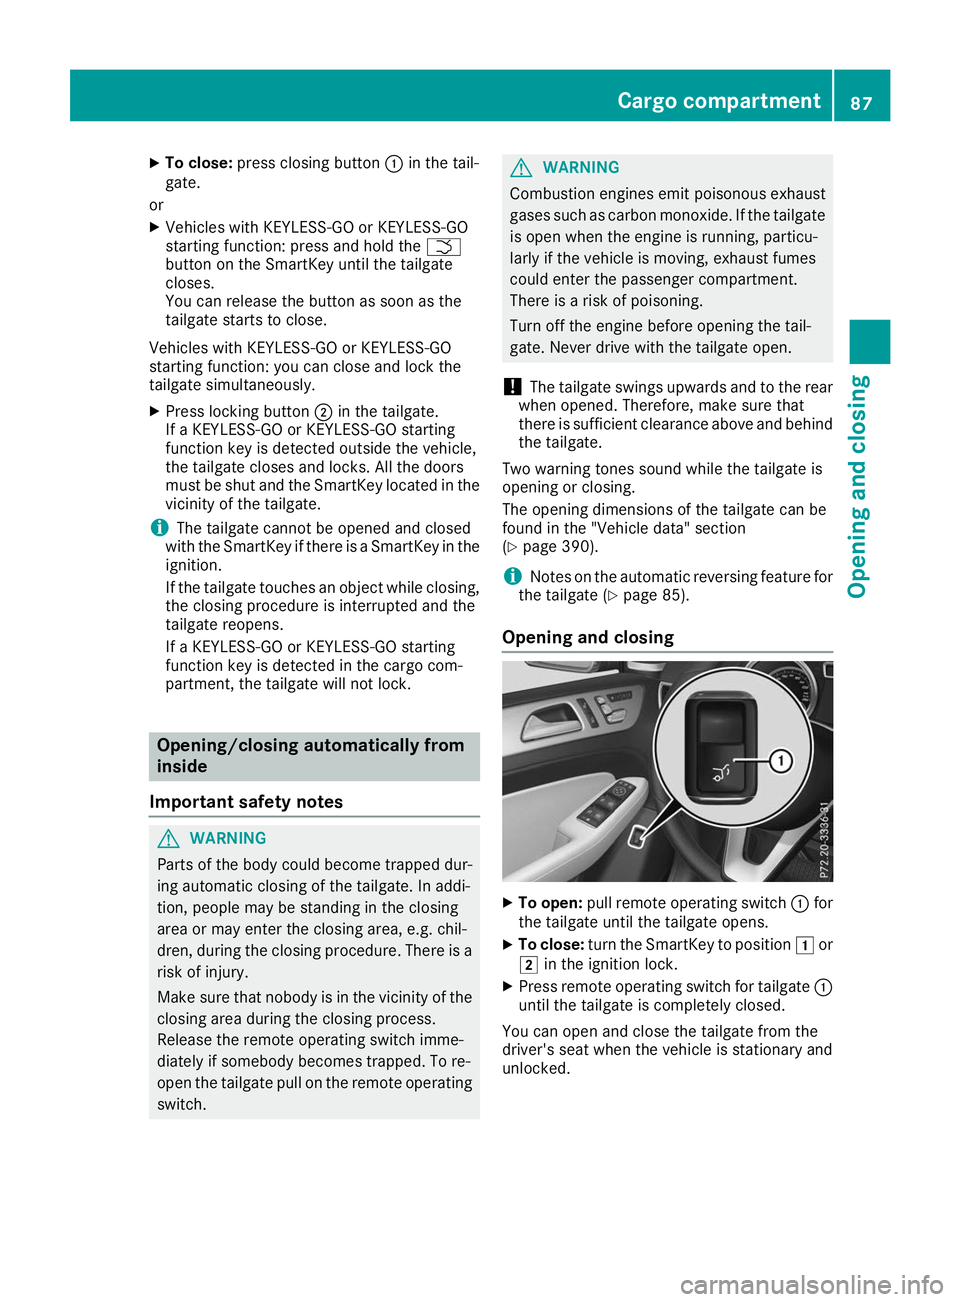
X
To close: press closing button 0043in the tail-
gate.
or X Vehicles with KEYLESS-GO or KEYLESS-GO
starting function: press and hold the 0054
button on the SmartKey until the tailgate
closes.
You can release the button as soon as the
tailgate starts to close.
Vehicles with KEYLESS-GO or KEYLESS-GO
starting function: you can close and lock the
tailgate simultaneously.
X Press locking button 0044in the tailgate.
If a KEYLESS-GO or KEYLESS-GO starting
function key is detected outside the vehicle,
the tailgate closes and locks. All the doors
must be shut and the SmartKey located in the vicinity of the tailgate.
i The tailgate cannot be opened and closed
with the SmartKey if there is a SmartKey in the
ignition.
If the tailgate touches an object while closing, the closing procedure is interrupted and the
tailgate reopens.
If a KEYLESS-GO or KEYLESS-GO starting
function key is detected in the cargo com-
partment, the tailgate will not lock. Opening/closing automatically from
inside
Important safety notes G
WARNING
Parts of the body could become trapped dur-
ing automatic closing of the tailgate. In addi-
tion, people may be standing in the closing
area or may enter the closing area, e.g. chil-
dren, during the closing procedure. There is a risk of injury.
Make sure that nobody is in the vicinity of theclosing area during the closing process.
Release the remote operating switch imme-
diately if somebody becomes trapped. To re-
open the tailgate pull on the remote operating
switch. G
WARNING
Combustion engines emit poisonous exhaust
gases such as carbon monoxide. If the tailgate is open when the engine is running, particu-
larly if the vehicle is moving, exhaust fumes
could enter the passenger compartment.
There is a risk of poisoning.
Turn off the engine before opening the tail-
gate. Never drive with the tailgate open.
! The tailgate swings upwards and to the rear
when opened. Therefore, make sure that
there is sufficient clearance above and behind
the tailgate.
Two warning tones sound while the tailgate is
opening or closing.
The opening dimensions of the tailgate can be
found in the "Vehicle data" section
(Y page 390).
i Notes on the automatic reversing feature for
the tailgate (Y page 85).
Opening and closing X
To open: pull remote operating switch 0043for
the tailgate until the tailgate opens.
X To close: turn the SmartKey to position 0047or
0048 in the ignition lock.
X Press remote operating switch for tailgate 0043
until the tailgate is completely closed.
You can open and close the tailgate from the
driver's seat when the vehicle is stationary and
unlocked. Cargo compartment
87Opening and closing Z
Page 90 of 398
Limiting the opening angle of the tail-
gate
General notes !
Make sure there is sufficient clearance to
open the tailgate fully when setting the open- ing angle. The tailgate could otherwise be
damaged. Ideally, set the opening angle out-
side.
Activating You can limit the opening angle of the tailgate.
This is possible in the top half of its opening
range, up to approximately 4 in (10 cm) before
the stop.
X To open the tailgate: pull the handle on the
tailgate.
X To stop the opening procedure at the
desired position: press the closing button in
the tailgate or pull the handle on the outside
of the tailgate again.
X To save the position: press and hold the
closing button in the tailgate until two short
tones sound.
The opening angle limiter is activated. The
tailgate will now stop in the stored position
when opening.
Deactivating X
Press and hold the closing button in the tail-
gate until you hear a short tone. Tailgate emergency release
General notes !
The tailgate swings upwards and to the rear
when opened. Therefore, make sure that
there is sufficient clearance above and behind
the tailgate.
The opening dimensions of the tailgate can be
found in the "Vehicle data" section
(Y page 390).
If the tailgate can no longer be unlocked:
R using the SmartKey, or
R using the remote operating switch in the door
control panel:
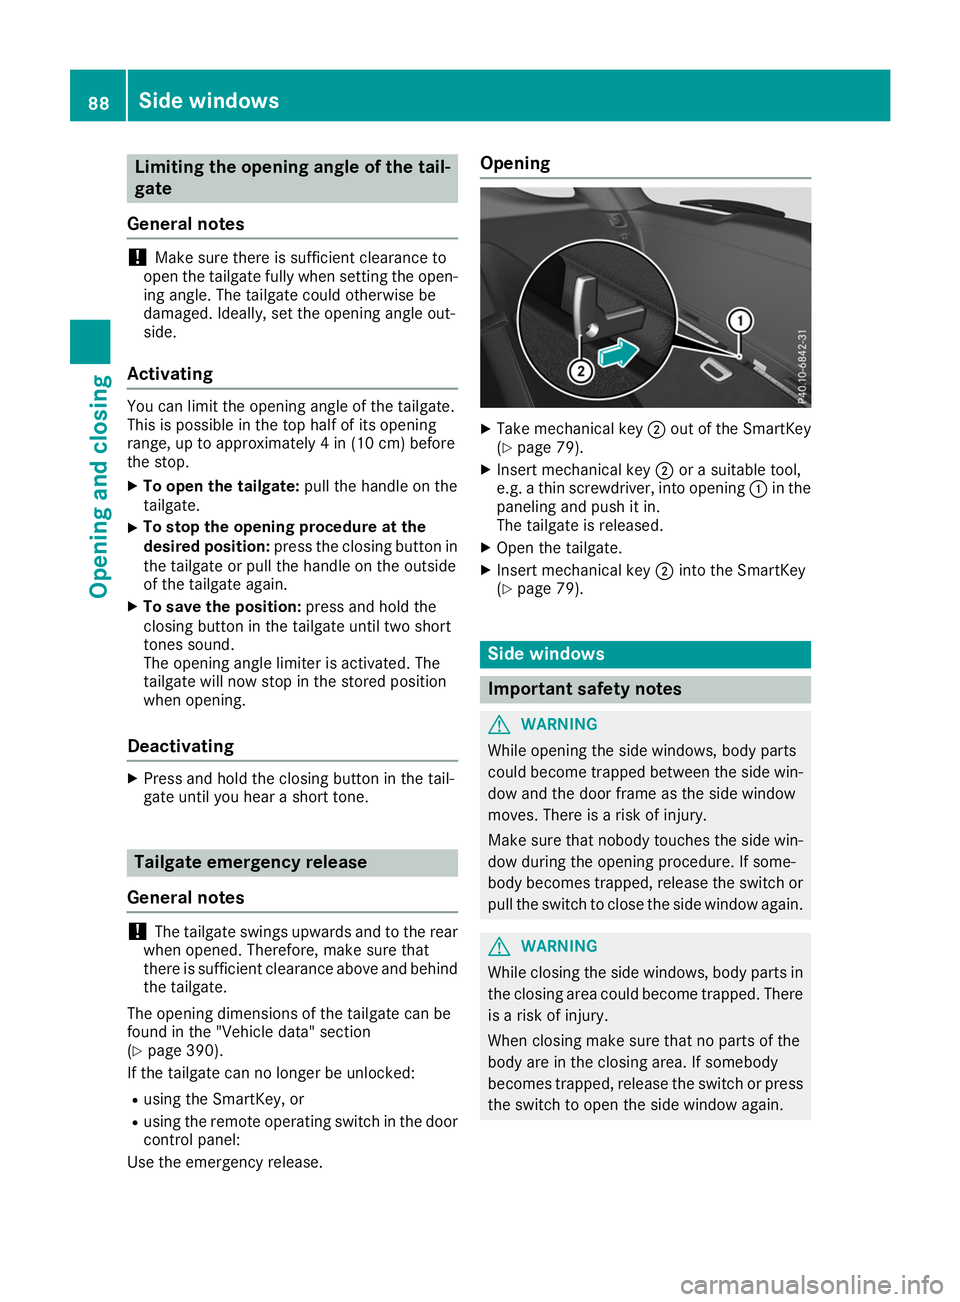
Use the emergency release. Opening
X
Take mechanical key 0044out of the SmartKey
(Y page 79).
X Insert mechanical key 0044or a suitable tool,
e.g. a thin screwdriver, into opening 0043in the
paneling and push it in.
The tailgate is released.
X Open the tailgate.
X Insert mechanical key 0044into the SmartKey
(Y page 79). Side windows
Important safety notes
G
WARNING
While opening the side windows, body parts
could become trapped between the side win- dow and the door frame as the side window
moves. There is a risk of injury.
Make sure that nobody touches the side win-
dow during the opening procedure. If some-
body becomes trapped, release the switch or pull the switch to close the side window again. G
WARNING
While closing the side windows, body parts in the closing area could become trapped. There is a risk of injury.
When closing make sure that no parts of the
body are in the closing area. If somebody
becomes trapped, release the switch or press
the switch to open the side window again. 88
Side windowsOpening and closing
Page 222 of 398
006D
Level control
006E Compass with angle scale
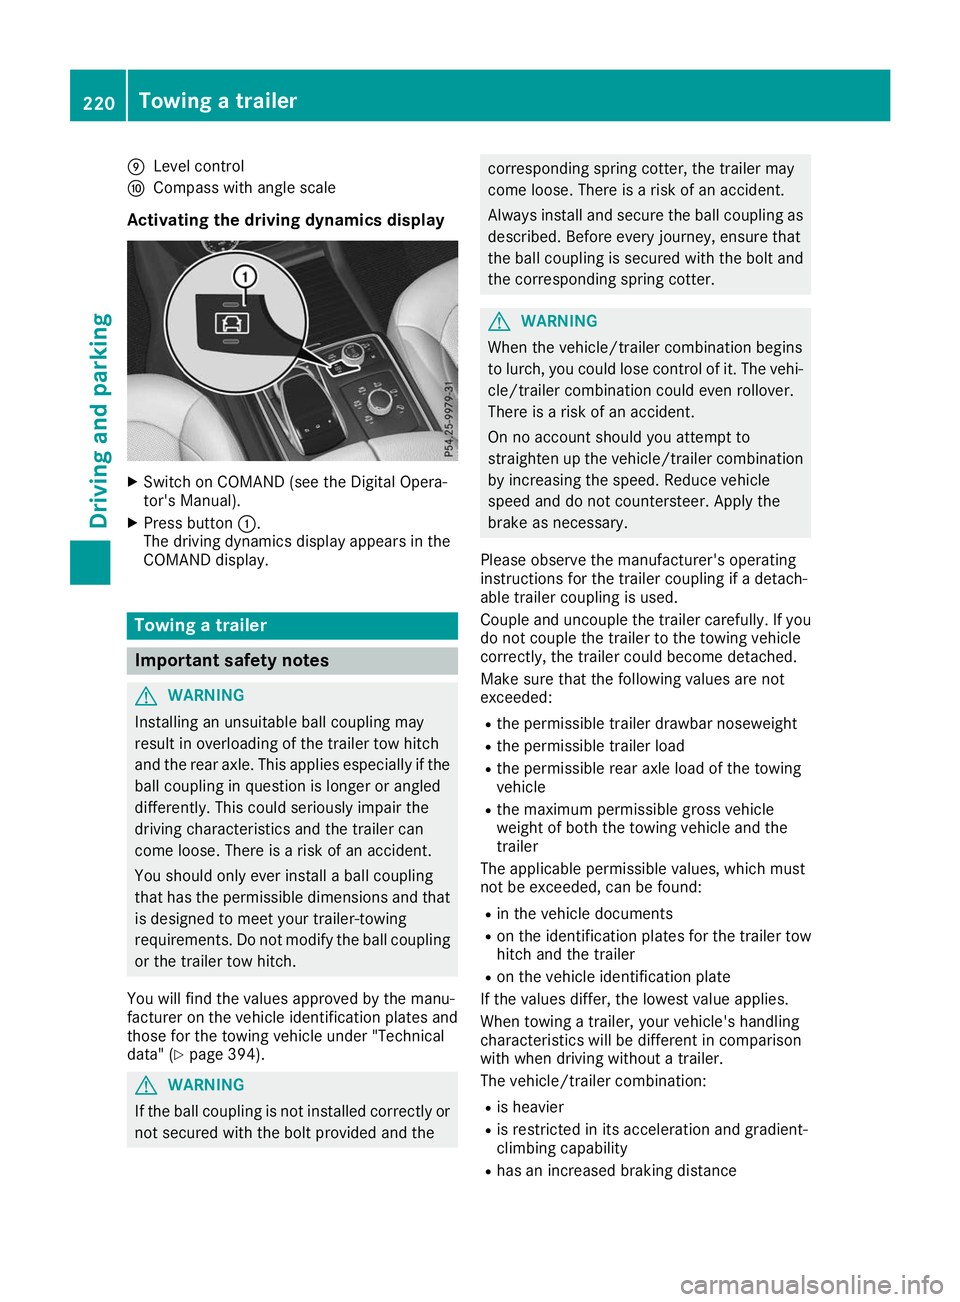
Activating the driving dynamics display X
Switch on COMAND (see the Digital Opera-
tor's Manual).
X Press button 0043.
The driving dynamics display appears in the
COMAND display. Towing a trailer
Important safety notes
G
WARNING
Installing an unsuitable ball coupling may
result in overloading of the trailer tow hitch
and the rear axle. This applies especially if the ball coupling in question is longer or angled
differently. This could seriously impair the
driving characteristics and the trailer can
come loose. There is a risk of an accident.
You should only ever install a ball coupling
that has the permissible dimensions and that
is designed to meet your trailer-towing
requirements. Do not modify the ball coupling
or the trailer tow hitch.
You will find the values approved by the manu-
facturer on the vehicle identification plates and
those for the towing vehicle under "Technical
data" (Y page 394). G
WARNING
If the ball coupling is not installed correctly or not secured with the bolt provided and the corresponding spring cotter, the trailer may
come loose. There is a risk of an accident.
Always install and secure the ball coupling as described. Before every journey, ensure that
the ball coupling is secured with the bolt and
the corresponding spring cotter. G
WARNING
When the vehicle/trailer combination begins
to lurch, you could lose control of it. The vehi- cle/trailer combination could even rollover.
There is a risk of an accident.
On no account should you attempt to
straighten up the vehicle/trailer combination
by increasing the speed. Reduce vehicle
speed and do not countersteer. Apply the
brake as necessary.
Please observe the manufacturer's operating
instructions for the trailer coupling if a detach-
able trailer coupling is used.
Couple and uncouple the trailer carefully. If you do not couple the trailer to the towing vehicle
correctly, the trailer could become detached.
Make sure that the following values are not
exceeded:
R the permissible trailer drawbar noseweight
R the permissible trailer load
R the permissible rear axle load of the towing
vehicle
R the maximum permissible gross vehicle
weight of both the towing vehicle and the
trailer
The applicable permissible values, which must
not be exceeded, can be found:
R in the vehicle documents
R on the identification plates for the trailer tow
hitch and the trailer
R on the vehicle identification plate
If the values differ, the lowest value applies.
When towing a trailer, your vehicle's handling
characteristics will be different in comparison
with when driving without a trailer.
The vehicle/trailer combination:
R is heavier
R is restricted in its acceleration and gradient-
climbing capability
R has an increased braking distance 220
Towing a trailerDriving and parking
Page 223 of 398
R
is affected more by strong crosswinds
R demands more sensitive steering
R has a larger turning circle
This could impair the handling characteristics.
When towing a trailer, always adjust your speed to the current road and weather conditions. Do
not exceed the maximum permissible speed for
your vehicle/trailer combination. Notes on towing a trailer
General notes !
If you have a trailer tow hitch retrofitted,
changes to the cooling system and drive train may be necessary, depending on the vehicle
type.
If you have a trailer tow hitch retrofitted,
observe the anchorage points on the chassis
frame.
R Do not exceed the legally prescribed maxi-
mum speed for vehicle/trailer combinations
in the relevant country.
This lowers the risk of an accident.
R Only install an approved trailer coupling on
your vehicle.
More information on availability and installa-
tion can be obtained at any qualified special-
ist workshop.
R The bumpers of your vehicle are not suitable
for installing detachable trailer couplings.
R Do not install hired trailer couplings or other
detachable trailer couplings on the bumpers
of your vehicle.
R If you no longer need the ball coupling,
remove it from the ball coupling recess. This
will reduce the risk of damage to the ball cou-
pling.
When towing a trailer, set the tire pressure on
the rear axle of the towing vehicle for the max-
imum load. You will find the values in the tire
pressure table in the fuel filler flap of the vehicle (Y page 369).
Please note that when towing a trailer, the fol-
lowing driving systems have limited availability
or are not available at all:
R Parking Assist PARKTRONIC (Y page 188)
R Blind Spot Assist (Y page 206)
R Active Lane Keeping Assist (Y page 211)On vehicles without level control, the height of
the ball coupling will alter according to the load
placed on the vehicle. If necessary, use a trailer
with a height-adjustable drawbar.
You will find installing dimensions and loads
under "Technical data" (Y page 394).
Driving tips Also observe the notes on pulling away with a
trailer (Y
page 138).
The maximum permissible speed for vehicle/
trailer combinations depends on the type of
trailer. Before beginning the journey, check the
trailer's documents to see what the maximum
permissible speed is for your trailer. Observe the
legally permissible maximum speed in the rele-
vant country.
For certain Mercedes-Benz vehicles, the maxi-
mum permissible rear axle load is increased
when towing a trailer. See "Technical data" to
find out whether this applies to your vehicle
(Y page 394). If you utilize any of the added
maximum rear axle load when towing a trailer,
the vehicle/trailer combination may not exceed
a maximum speed of 60 mph (100 km/h) for
reasons concerning the operating permit. This
also applies in countries in which the maximum
permissible speed for car/trailer combinations
is greater than 60 mph (100 km/h).
When towing a trailer, your vehicle's handling
characteristics will be different in comparison
with when driving without a trailer.
Use the left-hand steering wheel paddle shifter
to shift into a lower gear in good time on long
and steep downhill gradients.
This also applies if you have activated cruise
control or Active Distance Assist DISTRONIC.
This will use the braking effect of the engine, so that less braking will be required to maintain the
speed. This relieves the load on the brake sys-
tem and prevents the brakes from overheating
and wearing too quickly. If you need additional
braking, depress the brake pedal repeatedly
rather than continuously.
Driving tips If the trailer swings from side to side:
X Do not accelerate.
X Do not counter-steer.
X Brake if necessary. Towing a trailer
221Driving and parking Z
Page 225 of 398
X
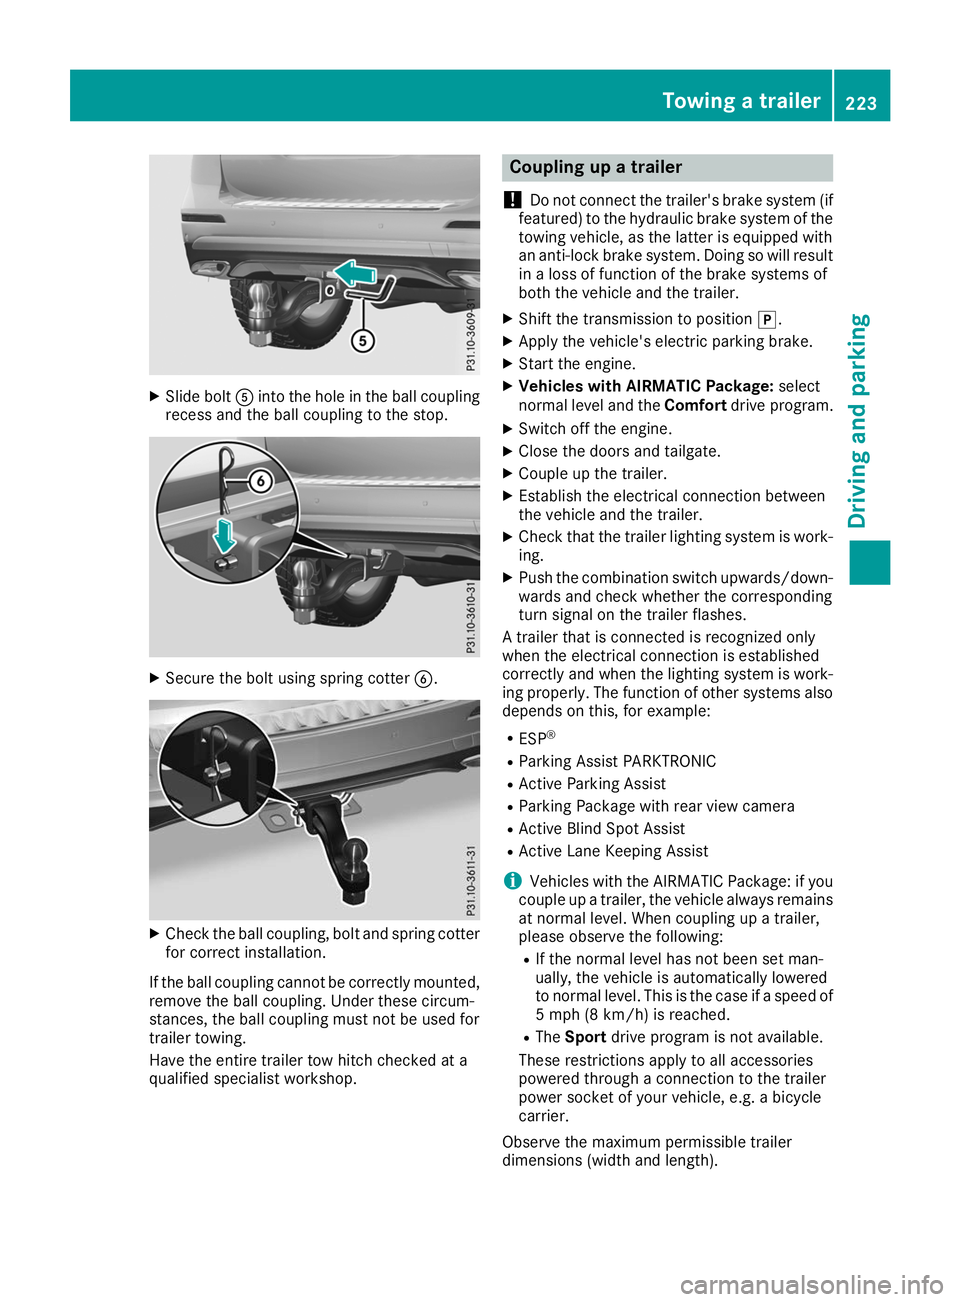
Slide bolt 0083into the hole in the ball coupling
recess and the ball coupling to the stop. X
Secure the bolt using spring cotter 0084.X
Check the ball coupling, bolt and spring cotter
for correct installation.
If the ball coupling cannot be correctly mounted,
remove the ball coupling. Under these circum-
stances, the ball coupling must not be used for
trailer towing.
Have the entire trailer tow hitch checked at a
qualified specialist workshop. Coupling up a trailer
! Do not connect the trailer's brake system (if
featured) to the hydraulic brake system of the towing vehicle, as the latter is equipped with
an anti-lock brake system. Doing so will result
in a loss of function of the brake systems of
both the vehicle and the trailer.
X Shift the transmission to position 005D.
X Apply the vehicle's electric parking brake.
X Start the engine.
X Vehicles with AIRMATIC Package: select
normal level and the Comfortdrive program.
X Switch off the engine.
X Close the doors and tailgate.
X Couple up the trailer.
X Establish the electrical connection between
the vehicle and the trailer.
X Check that the trailer lighting system is work-
ing.
X Push the combination switch upwards/down-
wards and check whether the corresponding
turn signal on the trailer flashes.
A trailer that is connected is recognized only
when the electrical connection is established
correctly and when the lighting system is work-
ing properly. The function of other systems also depends on this, for example:
R ESP ®
R Parking Assist PARKTRONIC
R Active Parking Assist
R Parking Package with rear view camera
R Active Blind Spot Assist
R Active Lane Keeping Assist
i Vehicles with the AIRMATIC Package: if you
couple up a trailer, the vehicle always remains
at normal level. When coupling up a trailer,
please observe the following:
R If the normal level has not been set man-
ually, the vehicle is automatically lowered
to normal level. This is the case if a speed of
5 mph (8 km/h) is reached.
R The Sport drive program is not available.
These restrictions apply to all accessories
powered through a connection to the trailer
power socket of your vehicle, e.g. a bicycle
carrier.
Observe the maximum permissible trailer
dimensions (width and length). Towing a trailer
223Driving and parking Z