wiper blades MERCEDES-BENZ GLE SUV 2019 Owners Manual
[x] Cancel search | Manufacturer: MERCEDES-BENZ, Model Year: 2019, Model line: GLE SUV, Model: MERCEDES-BENZ GLE SUV 2019Pages: 681, PDF Size: 11.7 MB
Page 160 of 681
#
Switching intermittent wiping on or off:
press button 2.
Ve hicles with rain sensor: the wipe inter val
automatically adapts tothe driving condi‐
tions.
The è symbol will appear on the instru‐
ment clus ter when there ar wind owwiper is
swit ched on. Re
placing the windsc reen wiper blades &
WARNING Risk of becoming trapped if
th e windscreen wipers are switched on
while wiper blades are being replaced
If th e windscreen wipers begin tomo vewhile
yo u are changing the wiper blades, you can
be trapped bythe wiper arm. #
Alw ays switch off the windscreen wip‐
ers and ignition before changing the
wiper blades. Moving
the wiper arms tothech ange posi‐
tion #
Switch the ignition on and switch off again
immediatel y. #
Within around 15seconds, press button
î onthe combination switch for appro x‐
ima tely thre e seconds (→ page156).
The wiper arms will mo veinto thech ange
position.
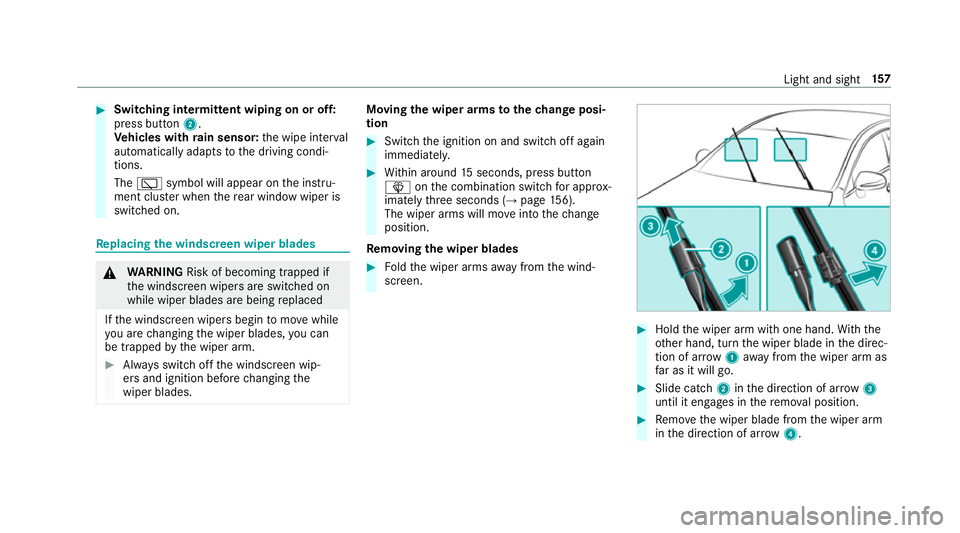
Re moving the wiper blades #
Foldthe wiper arms away from the wind‐
screen. #
Hold the wiper arm with one hand. With the
ot her hand, turn the wiper blade in the direc‐
tion of ar row1away from the wiper arm as
fa r as it will go. #
Slide catch 2inthe direction of ar row 3
until it engages in there mo val position. #
Remo vethe wiper blade from the wiper arm
in the direction of ar row4. Light and sight
157
Page 161 of 681
Fi
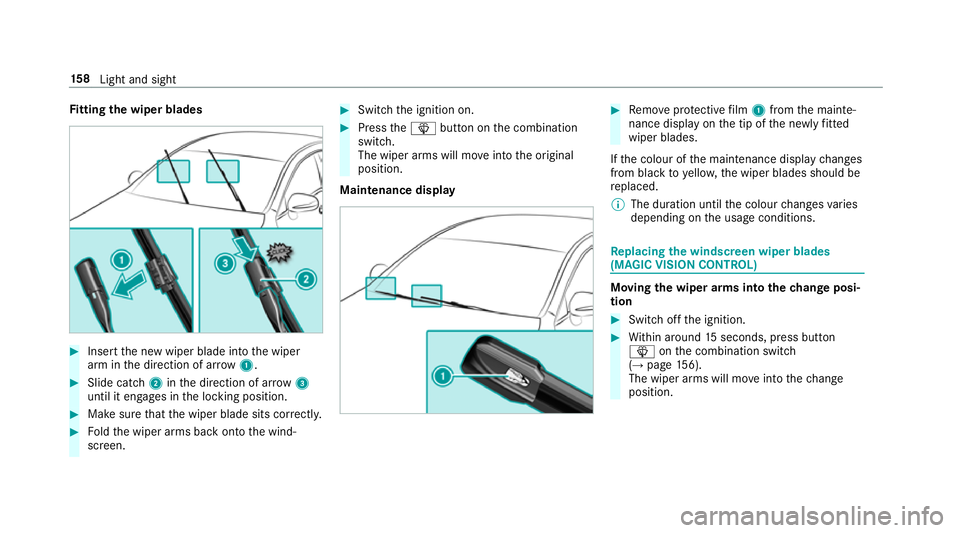
tting the wiper blades #
Inse rtthe new wiper blade into the wiper
arm in the direction of ar row1. #
Slide catch 2inthe direction of ar row 3
until it engages in the locking position. #
Make sure that the wiper blade sits cor rectly. #
Foldthe wiper arms back onto the wind‐
screen. #
Switch the ignition on. #
Press theî button on the combination
switch.
The wiper arms will mo veinto the original
position.
Maintenance display #
Remo veprotective film 1 from the mainte‐
nance display on the tip of the newly fitted
wiper blades.
If th e colour of the maintenance display changes
from black to yellow, the wiper blades should be
re placed.
% The duration until the colour changes varies
depending on the usage conditions. Re
placing the windsc reen wiper blades
(MAGIC VISION CONT ROL) Moving
the wiper arms into thech ange posi‐
tion #
Switch off the ignition. #
Within around 15seconds, press button
î onthe combination switch
(→ page 156).
The wiper arms will mo veinto thech ange
position. 15 8
Light and sight
Page 162 of 681
Re
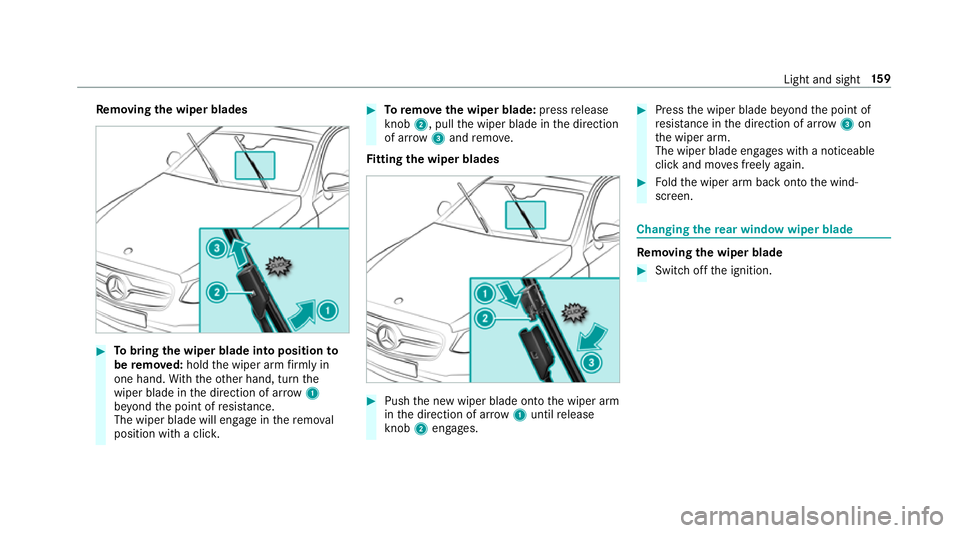
moving the wiper blades #
Tobring the wiper blade into position to
be remo ved: hold the wiper arm firm ly in
one hand. With th eot her hand, turn the
wiper blade in the direction of ar row1
be yond the point of resis tance.
The wiper blade will engage in there mo val
position with a clic k. #
Toremo vethe wiper blade: pressrelease
knob 2, pull the wiper blade in the direction
of ar row3and remo ve.
Fi tting the wiper blades #
Push the new wiper blade onto the wiper arm
in the direction of ar row1until release
knob 2engages. #
Press the wiper blade be yond the point of
re sis tance in the direction of ar row3on
th e wiper arm.
The wiper blade engages with a noticeable
click and mo ves freely again. #
Foldthe wiper arm back onto the wind‐
screen. Changing
there ar window wiper blade Re
moving the wiper blade #
Switch off the ignition. Light and sight
15 9
Page 502 of 681
Note
s on care of car parts &
WARNING Risk of entrapment if the
windscreen wipers are swit ched on while
th e windscreen is being cleaned
If th e windscreen wipers are set in motion
while you are cleaning the windscreen or
wiper blades, you can be trapped bythe
wiper arm. #
Alw ays switch off the windscreen wip‐
ers and the ignition before cleaning the
windscreen or wiper blades. &
WARNING Risk of bu rns from tailpipes
and tailpipe trim
The tailpipe and tailpipe trim can become
ve ry hot. If you come into contact with these
parts of theve hicle, you could burn yourself. #
Alw ays be particular lycareful around
th eta ilpipe and theta ilpipe trim. #
Allow theve hicle parts tocool down
before youto uch them. Obser
vethefo llowing information: Note
s on cleaning and car eA voiding vehicle damage
Wheels/rims Usewate r and acid-free wheel cleaners. R
Do not use acidic wheel cleaners toremo vebrake dust.
This could damage wheel bolts and brake components.
R Toavoid cor rosion of the brake discs and brakepads, drive
th eve hicle for a few minutes af ter cleaning before parking
it. The brake discs and brakepads warm up and dry out.
Wi ndo ws
Cleanthe windo wsonthe inside and outside using a damp
clo thand cleaning agents recommended byMercedes-Benz. Do not use dry clo
ths or abrasive or sol vent-based cleaning
agents toclean the inside of windo ws.
Wi per blades
Fold out the wiper blades and clean them using a damp clo th.D o not clean the wiper blades too of ten. Maintenance and care
499
Page 676 of 681
Wi
ndo ws
see Side windo ws
Wi ndo ws(Care) ...................................... .499
Wi ndscreen ...................................... 158, 16 5
Defrosting ............................................ 16 5
Infrared reflective ................................ 16 4
Re placing wiper blades (MAGIC
VISION CONTROL) ............................... 15 8
Wi ndscreen
see Windsc reen
see Windshield
Wi ndscreen heating ................................ 17 0
Wi ndscreen heating
see Windsc reen heating
Wi ndscreen washer fluid ........................ 559
No tes .................................................. 559
Wi ndscreen washer sy stem
To pping up ...........................................4 93
Wi ndscreen wipers
Changing the wiper blades .................. 157
Re placing wiper blades (MAGIC
VISION CONTROL) ............................... 15 8
Switching on/off ................................. 15 6Wi
ndshield ............................................... 157
Changing the wiper blades .................. 157
Wi nter operation
Snow chains ........................................ 525
Wi nter tyres
Setting the permanent speed limita‐
tion ...................................................... 231
Wi per blades
Ca re .................................................... 499
Re placing .............................................1 57
Re placing (MAGIC VISION CONTROL)
.............................................................1 58
Wire lesscharging
Fu nction/no tes ................................... 14 3
Mobile phone ....................................... 14 5
Wire lessvehicle comp onents
Declaration of con form ity ...................... 26
Wo rkout prog ram
Overview ..............................................1 15
Wo rkshop
see Qualified specialist workshop Index
673