start stop button MERCEDES-BENZ GLK-Class 2012 X204 Owner's Manual
[x] Cancel search | Manufacturer: MERCEDES-BENZ, Model Year: 2012, Model line: GLK-Class, Model: MERCEDES-BENZ GLK-Class 2012 X204Pages: 316, PDF Size: 13.21 MB
Page 13 of 316
K
Key see SmartKey
KEYLESS-GO
Convenience closing feature ............84
Display message ............................ 198
Locking ............................................ 69
Start/Stop button .......................... 131
Starting the engine ........................132
Unlocking ......................................... 69
Key positions
KEYLESS-GO .................................. 131
SmartKey ....................................... 131
Kickdown
Driving tips .................................... 137
Knee bag .............................................. 42
L
Lamps see Warning and indicator lamps
LATCH-type (ISOFIX) child seat
anchors ................................................ 58
License plate lamp Changing bulbs .............................. 113
License plate lamp (display
message) ............................................ 190
Lighting see Lights
Lights
Activating/deactivating the
interior lighting delayed switch-off . 177
Active light function .......................106
Automatic headlamp mode ............104
Cornering light function .................106
Display message ............................ 188
Driving abroad ............................... 102
Fog lamps ...................................... 104
Hazard warning lamps ...................105
High beam flasher .......................... 105
High-beam headlamps ...................105
Light switch ................................... 102
Low-beam headlamps ....................103
Parking lamps ................................ 102
Rear fog lamp ................................ 104
Switching the daytime running
lamps on/off (on-board
computer) ...................................... 176
Switching the daytime running
lamps on/off (switch) ....................103
Switching the exterior lighting
delayed switch-off on/off (on-
board computer) ............................ 176
Switching the surround lighting
on/off (on-board computer) ..........176
Turn signals ................................... 105
see Changing bulbs
see Interior lighting
Light sensor (display message) ....... 191
LIM indicator lamp Cruise control ................................ 151
Loading guidelines ............................ 212
Locking see Central locking
Locking (doors)
Automatic ........................................ 76
Emergency locking ........................... 77
From inside (central locking
button) ............................................. 76
Locking centrally
see Central locking
Locking verification signal (on-
board computer) ............................... 177
Low-beam headlamps Changing bulbs .............................. 110
Display message ............................ 188
Setting for driving abroad
(symmetrical) ................................. 102
Switching on/off ........................... 103
Lumbar support
Adjusting ......................................... 94
Adjusting the 4-way lumbar
support ............................................ 95
M
M+S tires ............................................ 272
Maintenance see ASSYST PLUS service interval
display
Malfunction message
see Display messages
Index11
Page 30 of 316
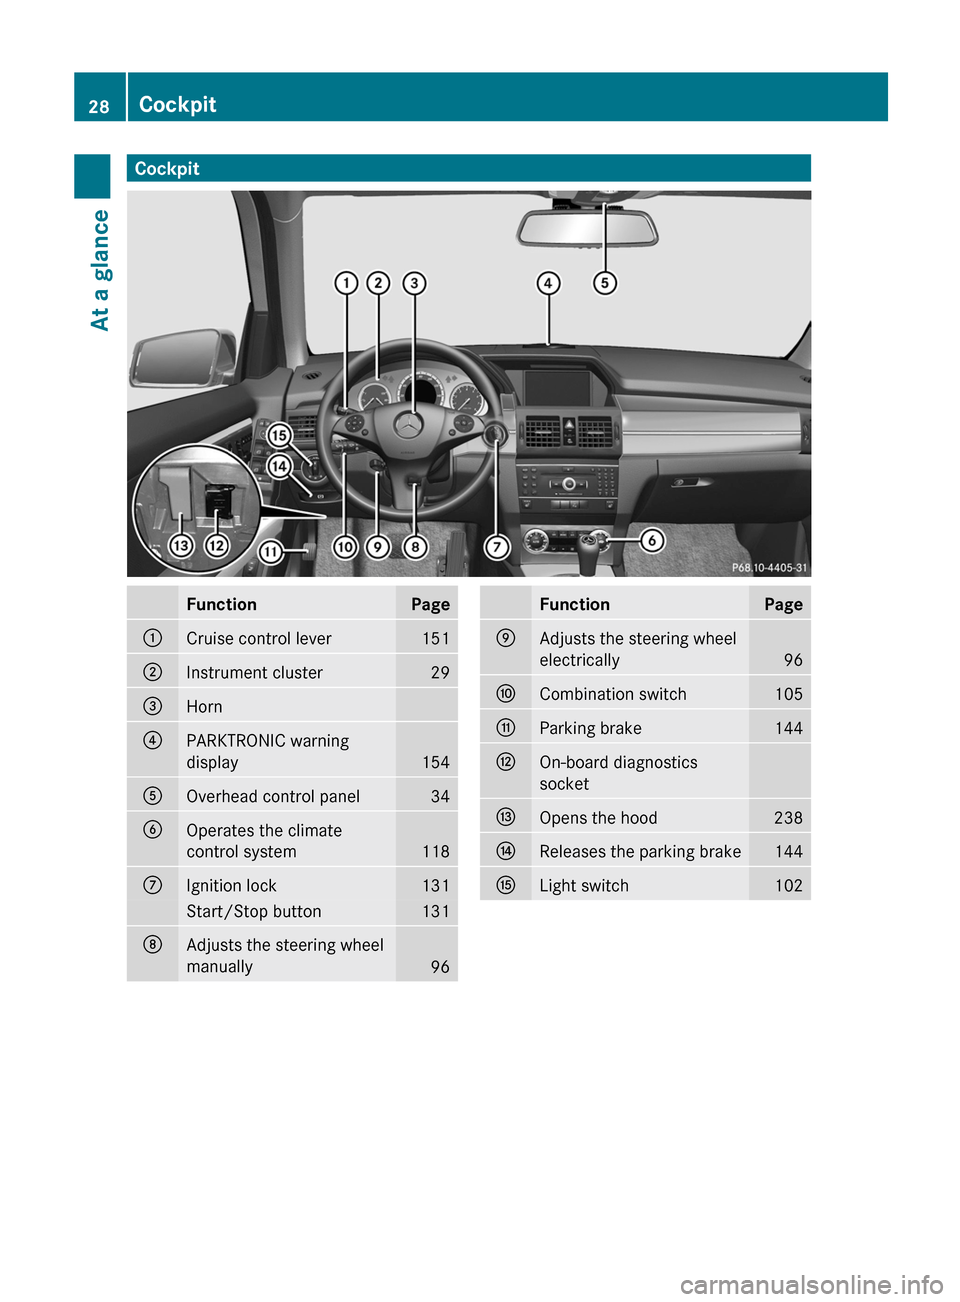
CockpitFunctionPage:Cruise control lever151;Instrument cluster29=Horn?PARKTRONIC warning
display
154
AOverhead control panel34BOperates the climate
control system
118
CIgnition lock131Start/Stop button131DAdjusts the steering wheel
manually
96
FunctionPageEAdjusts the steering wheel
electrically
96
FCombination switch105GParking brake144HOn-board diagnostics
socketIOpens the hood238JReleases the parking brake144KLight switch10228CockpitAt a glance
Page 49 of 316
RIf you place a child in a forward-facing child
restraint on the front-passenger seat:
- move the seat as far back as possible
- use the proper child restraint
recommended for the age, size and
weight of the child
- secure child restraint with the vehicle's
seat belt according to the child seat
manufacturer's instructions
R For children larger than the typical 12-
month-old child, the front-passenger front
air bag may or may not be activated.
If the driver's air bag deploys, this does not
mean that the front-passenger front air bag
also has to deploy.
The OCS may have detected that the seat:
R was empty or occupied by a person with a
weight of up to or less than that of a typical
12-month-old child seated in a standard
child restraint
R was occupied by a small individual, such as
a young teenager or a small adult
R was occupied by a child in a child restraint
system, whose weight is greater than that
of a typical 12-month-old child.
These are examples of when the OCS
deactivates the front-passenger front air bag.
Deactivation takes place although the
collision fulfills the criteria for deploying the
driver's air bag.
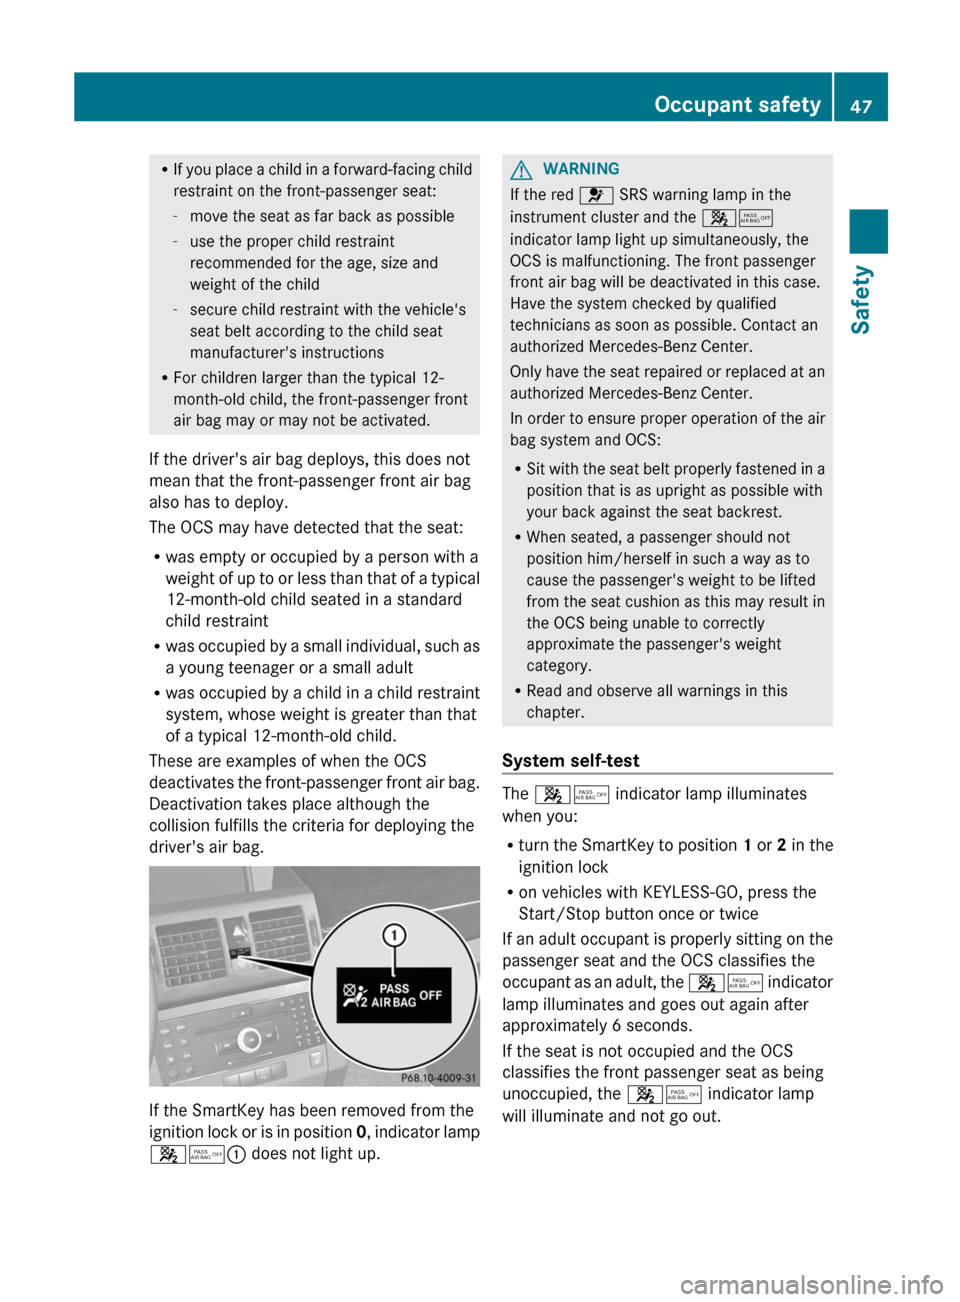
If the SmartKey has been removed from the
ignition lock or is in position 0, indicator lamp
45 : does not light up.
GWARNING
If the red 6 SRS warning lamp in the
instrument cluster and the 45
indicator lamp light up simultaneously, the
OCS is malfunctioning. The front passenger
front air bag will be deactivated in this case.
Have the system checked by qualified
technicians as soon as possible. Contact an
authorized Mercedes-Benz Center.
Only have the seat repaired or replaced at an
authorized Mercedes-Benz Center.
In order to ensure proper operation of the air
bag system and OCS:
R Sit with the seat belt properly fastened in a
position that is as upright as possible with
your back against the seat backrest.
R When seated, a passenger should not
position him/herself in such a way as to
cause the passenger's weight to be lifted
from the seat cushion as this may result in
the OCS being unable to correctly
approximate the passenger's weight
category.
R Read and observe all warnings in this
chapter.
System self-test
The 45 indicator lamp illuminates
when you:
R turn the SmartKey to position 1 or 2 in the
ignition lock
R on vehicles with KEYLESS-GO, press the
Start/Stop button once or twice
If an adult occupant is properly sitting on the
passenger seat and the OCS classifies the
occupant as an adult, the 45 indicator
lamp illuminates and goes out again after
approximately 6 seconds.
If the seat is not occupied and the OCS
classifies the front passenger seat as being
unoccupied, the 45 indicator lamp
will illuminate and not go out.
Occupant safety47SafetyZ
Page 56 of 316
Using the rear center seat belt
If the left-hand rear seat backrest is folded
down and back up again, the rear center seat
belt may lock. The seat belt can then not be
pulled out.
XTo release the rear center seat belt: pull
out the seat belt by the belt outlet on the
backrest approximately 1 in (25 mm) and
release it again.
The seat belt is retracted and released.
Releasing seat belts
XPress release button ?(Y page 53) and
guide belt tongue ; back towards belt
sash guide :.
!
Make sure that the seat belt is fully rolled
up. Otherwise, the seat belt or belt tongue
will be trapped in the door or in the seat
mechanism. This could damage the door,
the door trim panel and the seat belt.
Damaged seat belts can no longer fulfill
their protective function and must be
replaced. Consult an authorized Mercedes-
Benz Center.
Belt warning for the driver and front
passenger
Regardless of whether the driver and front
passenger have fastened their seat belts
already, the 7 seat belt warning lamp
lights up for 6 seconds after every engine
start. It then goes out if the driver and the
front passenger have fastened their seat
belts.
If the driver's seat belt is not fastened after
the engine is started, an additional warning
tone will sound. The warning tone goes out
after approximately six seconds or once the
driver's seat belt is fastened.
If the driver or front passenger have not
fastened their seat belt after 6 seconds and
the doors are closed, the 7 seat belt
warning lamp lights up.
R until the driver or the front passenger have
fastened their seat belts
R if a vehicle speed of 15 mph(25 km/h) is
exceeded once, a warning tone with
increasing intensity sounds additionally for
a maximum of 60 seconds or until the driver
or front passenger have fastened their seat
belts.
If the driver or front passenger undo their seat
belts during the journey, the 7 seat belt
warning lamp lights up and the warning tone
sounds again.
The warning tone ceases even if the driver or
front passenger have still not fastened their
seat belt after 60 seconds. The 7 seat belt
warning lamp stops flashing but continues to
be lit.
Once the vehicle is stationary, the warning
tone is reactivated and the 7 seat belt
warning lamp starts to flash again if the
vehicle speed exceeds 15 mph(25 km/h)
once.
The 7 seat belt warning lamp only goes
out if:
R both the driver and the front passenger
have fastened their seat belts.
or
R the vehicle is stationary and a door is open.
i For more information on the 7 seat
belt warning lamp, see "Warning and
indicator lamps in the instrument cluster,
seat belt" ( Y page 200).
Emergency Tensioning Devices, belt
force limiters
The front seat belts and the outer seat belts
in the rear are equipped with ETDs and seat
belt force limiters.
The ETDs tighten the seat belts in an accident,
pulling them close against the body.
54Occupant safetySafety
Page 62 of 316
hot, and the child could be burned on these
parts.
Child-proof locks for the rear doorsGWARNING
Children could open a rear door from inside
the vehicle. This could result in serious
injuries or an accident. Therefore, when
children ride in the rear always secure the rear
doors with the child-proof locks.
You secure each door individually with the
child-proof locks on the rear doors. A door
secured with a child-proof lock cannot be
opened from inside the vehicle. When the
vehicle is unlocked, the door can be opened
from the outside.
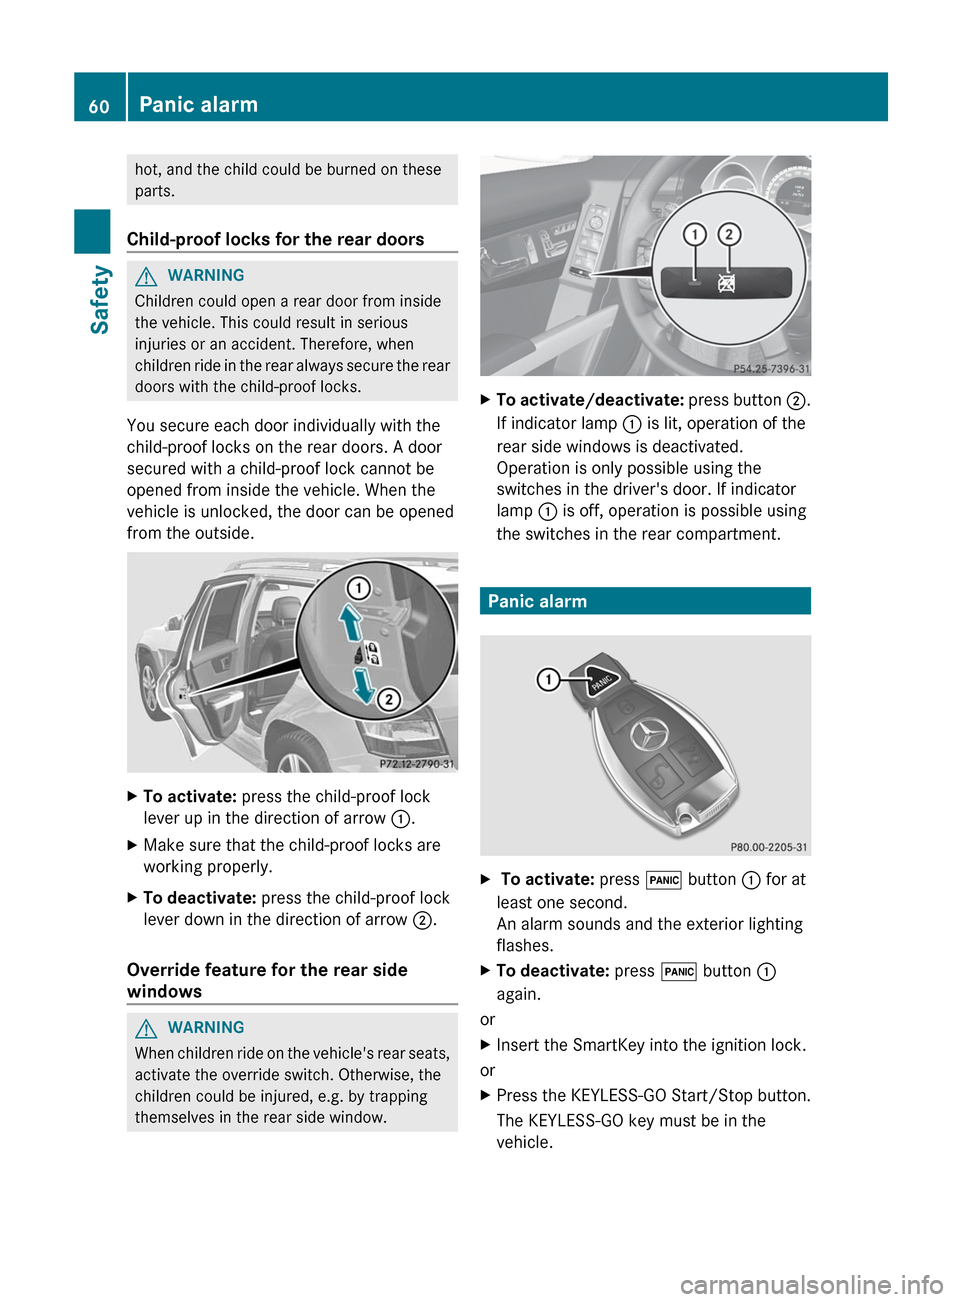
XTo activate: press the child-proof lock
lever up in the direction of arrow :.XMake sure that the child-proof locks are
working properly.XTo deactivate: press the child-proof lock
lever down in the direction of arrow ;.
Override feature for the rear side
windows
GWARNING
When children ride on the vehicle's rear seats,
activate the override switch. Otherwise, the
children could be injured, e.g. by trapping
themselves in the rear side window.
XTo activate/deactivate: press button ;.
If indicator lamp : is lit, operation of the
rear side windows is deactivated.
Operation is only possible using the
switches in the driver's door. If indicator
lamp : is off, operation is possible using
the switches in the rear compartment.
Panic alarm
X To activate: press ! button : for at
least one second.
An alarm sounds and the exterior lighting
flashes.XTo deactivate: press ! button :
again.
or
XInsert the SmartKey into the ignition lock.
or
XPress the KEYLESS-GO Start/Stop button.
The KEYLESS-GO key must be in the
vehicle.60Panic alarmSafety
Page 67 of 316
GWARNING
If EBD has malfunctioned, the braking system
remains available with full brake boosting
effect. However, the rear wheels can still lock,
e.g. under full braking. This could cause you
to lose control of your vehicle and cause an
accident. You should therefore adapt your
driving style to the different handling
characteristics.
XObserve the notes on warning and indicator
lamps ( Y page 202) as well as display
messages ( Y page 182).
Theft deterrent locking systems
Immobilizer
The immobilizer prevents your vehicle from
being started without the correct SmartKey.
When leaving the vehicle, always take the
SmartKey with you and lock the vehicle. The
engine can be started by anyone with a valid
SmartKey that is left inside the vehicle.
XTo activate with the SmartKey: remove
the SmartKey from the ignition lock.XTo activate with KEYLESS-GO: switch the
ignition off and open the driver's door.XTo deactivate: switch on the ignition.
i
The immobilizer is always deactivated
when you start the engine.
In the event that the engine cannot be
started when the starter battery is fully
charged, the immobilizer may be faulty.
Contact an authorized Mercedes-Benz
Center or call 1-800-FOR-MERCedes (in
USA) or 1-800-387-0100 (in Canada).
ATA (Anti-Theft Alarm system)
A visual and audible alarm is triggered if the
alarm system is armed and you open:
R a door
R the vehicle with the mechanical key
R
the tailgate
R the hood
The alarm is not switched off, even if you
close the open door that has triggered it, for
example.
i If the alarm stays on for more than 30
seconds, the emergency call system
mbrace (USA only) or TELE AID (Canada
only) initiates a call to the Customer
Assistance Center automatically. The
emergency call system initiates the call
provided that:
R you have subscribed to the mbrace/
TELE AID service.
R the mbrace/TELE AID service has been
activated properly.
R the required mobile phone, power supply
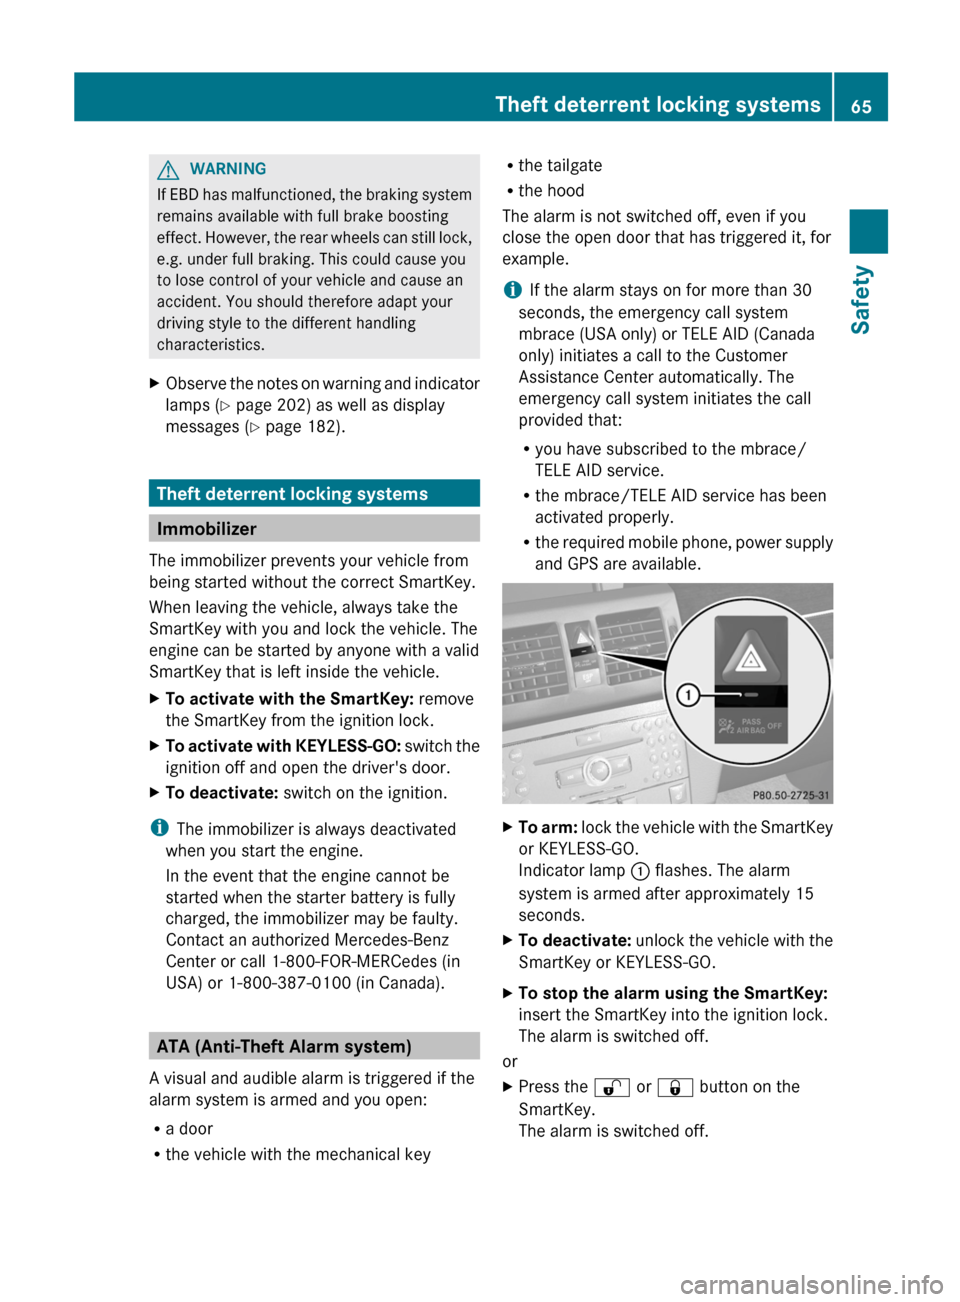
and GPS are available.XTo arm: lock the vehicle with the SmartKey
or KEYLESS-GO.
Indicator lamp : flashes. The alarm
system is armed after approximately 15
seconds.XTo deactivate: unlock the vehicle with the
SmartKey or KEYLESS-GO.XTo stop the alarm using the SmartKey:
insert the SmartKey into the ignition lock.
The alarm is switched off.
or
XPress the % or & button on the
SmartKey.
The alarm is switched off.Theft deterrent locking systems65SafetyZ
Page 68 of 316

XTo stop the alarm using KEYLESS-GO:
grasp the outside door handle. The
SmartKey must be outside the vehicle.
The alarm is switched off.
or
XPress the Start/Stop button on the
dashboard. The SmartKey must be inside
the vehicle.
The alarm is switched off.66Theft deterrent locking systemsSafety
Page 72 of 316
This device complies with RSS-210 of
Industry Canada. Operation is subject to
the following two conditions:
1. This device may not cause harmful
interference, and
2. this device must accept any interference
received, including interference that may
cause undesired operation.
Any unauthorized modification to this
device could void the user’s authority to
operate the equipment.
The Product label with FCC ID and IC
certification number can be found in the
battery case of the SmartKey.
Important notes on the use of KEYLESS-
GO
R The KEYLESS-GO key can be used like a
conventional key.
R You can combine KEYLESS-GO functions
with those of a conventional key, e.g.
unlock with KEYLESS-GO and lock with the
& button.
R Always carry your KEYLESS-GO key on your
person.
R Do not keep the KEYLESS-GO key together
with:
- electronic devices, e.g. a mobile phone
or another key
- metallic objects, e.g. coins or metal foil.
This can affect the functionality of
KEYLESS-GO.
R When locking and unlocking using
KEYLESS-GO, the distance between the
SmartKey and the corresponding door
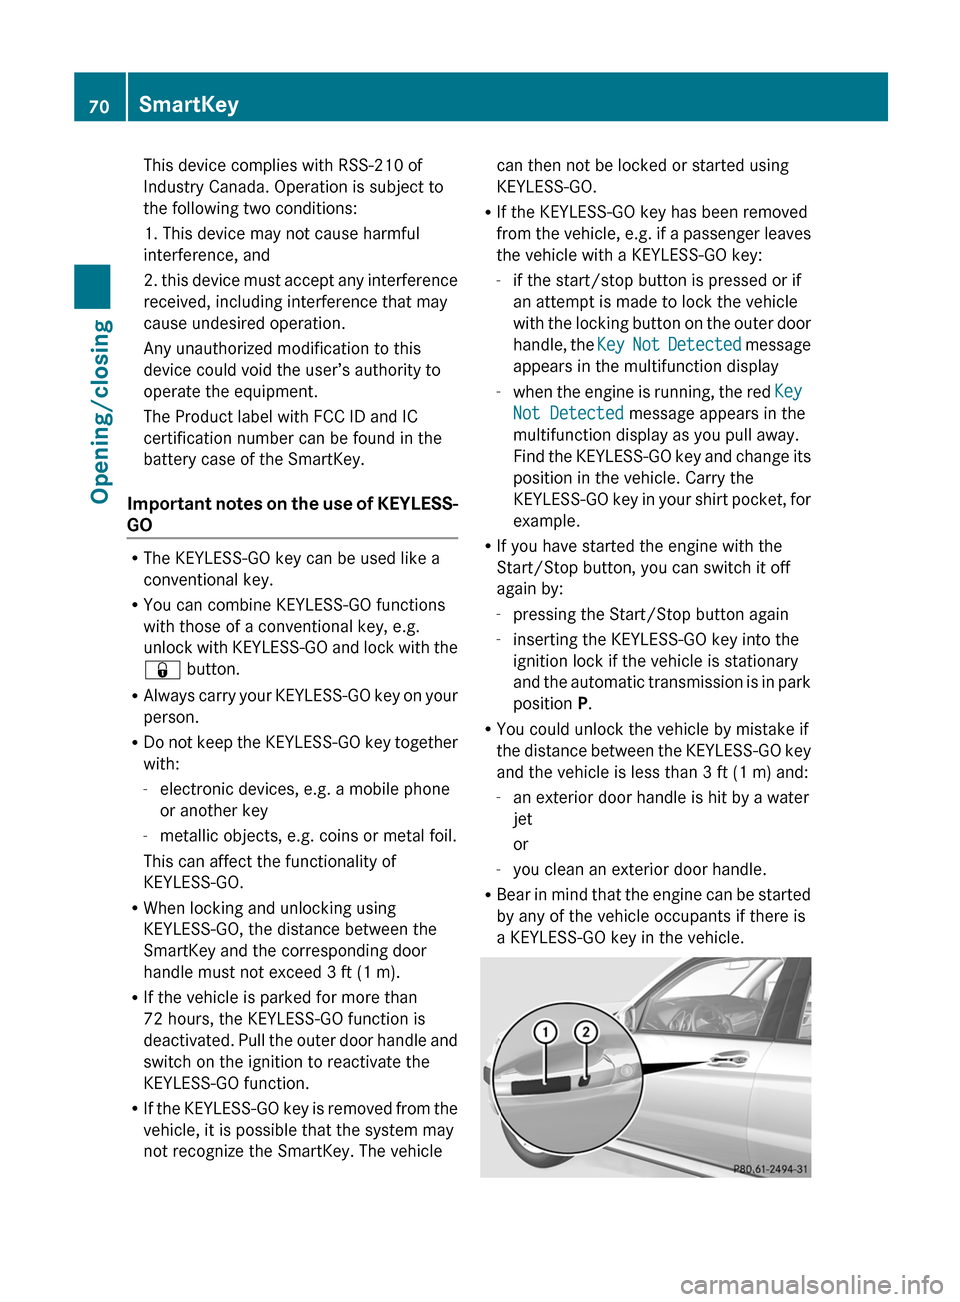
handle must not exceed 3 ft (1 m).
R If the vehicle is parked for more than
72 hours, the KEYLESS-GO function is
deactivated. Pull the outer door handle and
switch on the ignition to reactivate the
KEYLESS-GO function.
R If the KEYLESS-GO key is removed from the
vehicle, it is possible that the system may
not recognize the SmartKey. The vehicle
can then not be locked or started using
KEYLESS-GO.
R If the KEYLESS-GO key has been removed
from the vehicle, e.g. if a passenger leaves
the vehicle with a KEYLESS-GO key:
- if the start/stop button is pressed or if
an attempt is made to lock the vehicle
with the locking button on the outer door
handle, the Key Not Detected message
appears in the multifunction display
- when the engine is running, the red Key
Not Detected message appears in the
multifunction display as you pull away.
Find the KEYLESS-GO key and change its
position in the vehicle. Carry the
KEYLESS-GO key in your shirt pocket, for
example.
R If you have started the engine with the
Start/Stop button, you can switch it off
again by:
- pressing the Start/Stop button again
- inserting the KEYLESS-GO key into the
ignition lock if the vehicle is stationary
and the automatic transmission is in park
position P.
R You could unlock the vehicle by mistake if
the distance between the KEYLESS-GO key
and the vehicle is less than 3 ft (1 m) and:
- an exterior door handle is hit by a water
jet
or
- you clean an exterior door handle.
R Bear in mind that the engine can be started
by any of the vehicle occupants if there is
a KEYLESS-GO key in the vehicle.70SmartKeyOpening/closing
Page 73 of 316
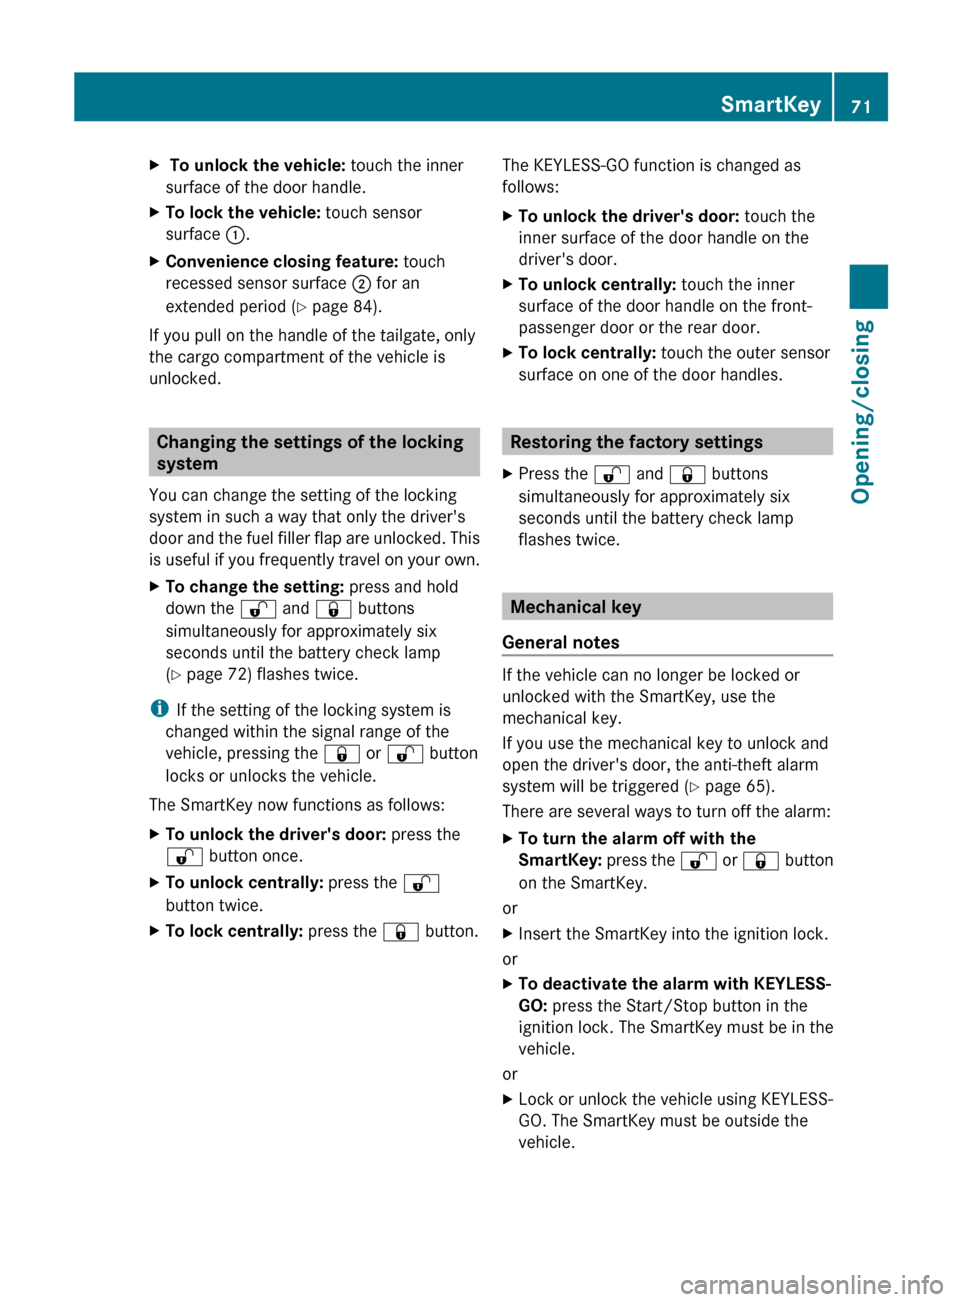
X To unlock the vehicle: touch the inner
surface of the door handle.XTo lock the vehicle: touch sensor
surface :.XConvenience closing feature: touch
recessed sensor surface ; for an
extended period ( Y page 84).
If you pull on the handle of the tailgate, only
the cargo compartment of the vehicle is
unlocked.
Changing the settings of the locking
system
You can change the setting of the locking
system in such a way that only the driver's
door and the fuel filler flap are unlocked. This
is useful if you frequently travel on your own.
XTo change the setting: press and hold
down the % and & buttons
simultaneously for approximately six
seconds until the battery check lamp
( Y page 72) flashes twice.
i
If the setting of the locking system is
changed within the signal range of the
vehicle, pressing the & or % button
locks or unlocks the vehicle.
The SmartKey now functions as follows:
XTo unlock the driver's door: press the
% button once.XTo unlock centrally: press the %
button twice.XTo lock centrally: press the & button.The KEYLESS-GO function is changed as
follows:XTo unlock the driver's door: touch the
inner surface of the door handle on the
driver's door.XTo unlock centrally: touch the inner
surface of the door handle on the front-
passenger door or the rear door.XTo lock centrally: touch the outer sensor
surface on one of the door handles.
Restoring the factory settings
XPress the % and & buttons
simultaneously for approximately six
seconds until the battery check lamp
flashes twice.
Mechanical key
General notes
If the vehicle can no longer be locked or
unlocked with the SmartKey, use the
mechanical key.
If you use the mechanical key to unlock and
open the driver's door, the anti-theft alarm
system will be triggered ( Y page 65).
There are several ways to turn off the alarm:
XTo turn the alarm off with the
SmartKey: press the % or & button
on the SmartKey.
or
XInsert the SmartKey into the ignition lock.
or
XTo deactivate the alarm with KEYLESS-
GO: press the Start/Stop button in the
ignition lock. The SmartKey must be in the
vehicle.
or
XLock or unlock the vehicle using KEYLESS-
GO. The SmartKey must be outside the
vehicle.SmartKey71Opening/closingZ
Page 82 of 316
! If you have opened the tailgate
automatically, you should wait a moment
before closing the tailgate manually.
ClosingGWARNING
Monitor the closing procedure carefully to
make sure no one is in danger of being
injured. To prevent possible personal injury,
always keep hands and fingers away from the
cargo compartment opening when closing the
tailgate. Be especially careful when small
children are around. To stop the closing
procedure, do one of the following:
R Press or pull the remote tailgate opening/
closing switch on the driver's door.
R Press the tailgate closing switch.
R Press the KEYLESS-GO locking/closing
switch.
R Pull outside handle on the tailgate.
R When no SmartKey is inserted in the starter
switch (vehicles with KEYLESS-GO: Make
sure the vehicle's on-board electronics
have status 0): Press button F on the
SmartKey.
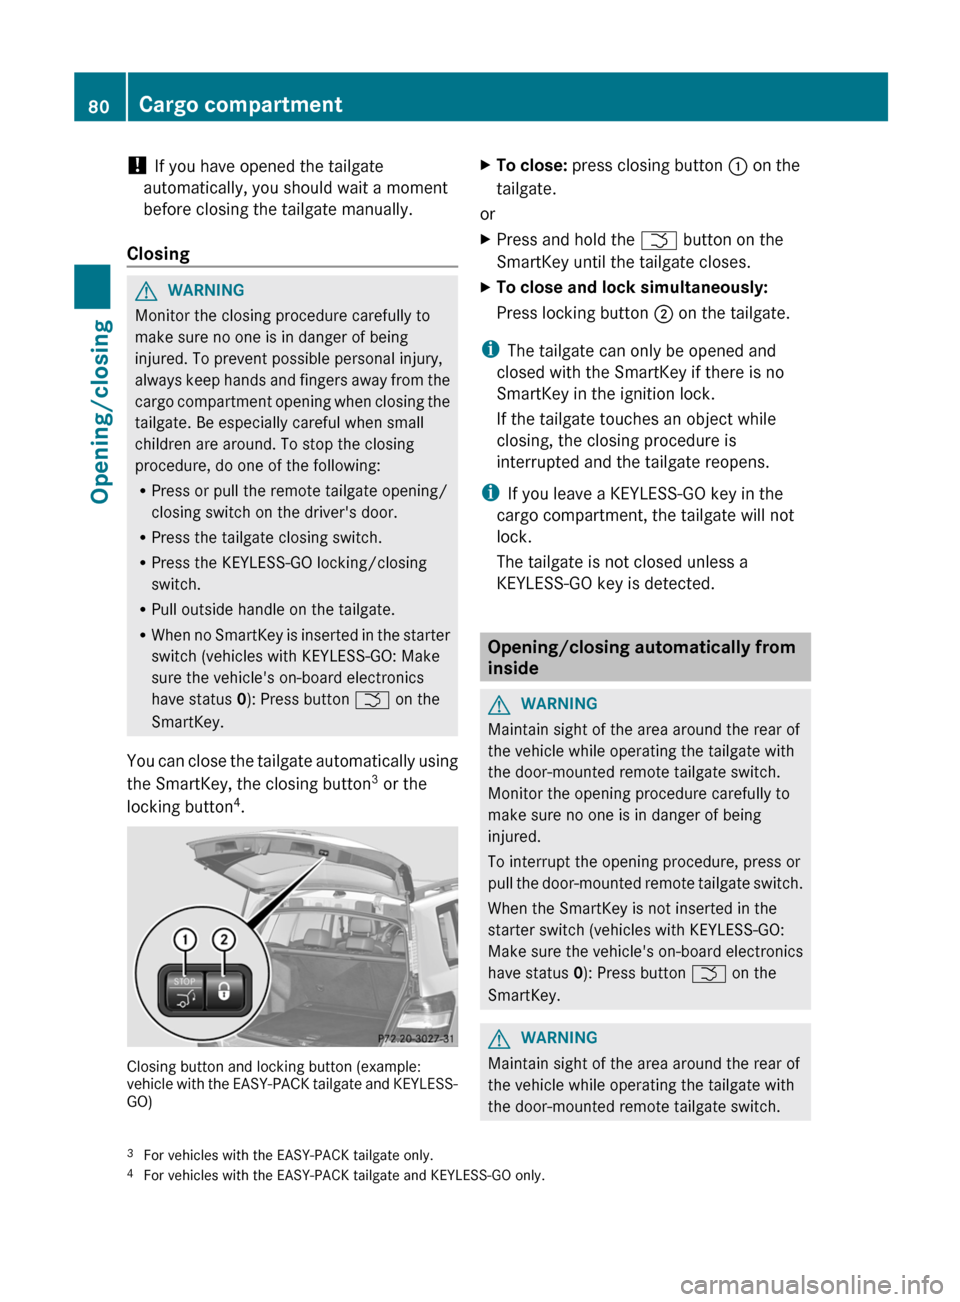
You can close the tailgate automatically using
the SmartKey, the closing button 3
or the
locking button 4
.
Closing button and locking button (example:
vehicle with the EASY-PACK tailgate and KEYLESS-
GO)
XTo close: press closing button : on the
tailgate.
or
XPress and hold the F button on the
SmartKey until the tailgate closes.XTo close and lock simultaneously:
Press locking button ; on the tailgate.
i
The tailgate can only be opened and
closed with the SmartKey if there is no
SmartKey in the ignition lock.
If the tailgate touches an object while
closing, the closing procedure is
interrupted and the tailgate reopens.
i If you leave a KEYLESS-GO key in the
cargo compartment, the tailgate will not
lock.
The tailgate is not closed unless a
KEYLESS-GO key is detected.
Opening/closing automatically from
inside
GWARNING
Maintain sight of the area around the rear of
the vehicle while operating the tailgate with
the door-mounted remote tailgate switch.
Monitor the opening procedure carefully to
make sure no one is in danger of being
injured.
To interrupt the opening procedure, press or
pull the door-mounted remote tailgate switch.
When the SmartKey is not inserted in the
starter switch (vehicles with KEYLESS-GO:
Make sure the vehicle's on-board electronics
have status 0): Press button F on the
SmartKey.
GWARNING
Maintain sight of the area around the rear of
the vehicle while operating the tailgate with
the door-mounted remote tailgate switch.
3 For vehicles with the EASY-PACK tailgate only.
4 For vehicles with the EASY-PACK tailgate and KEYLESS-GO only.80Cargo compartmentOpening/closing