washer fluid MERCEDES-BENZ GLK-Class 2012 X204 Owner's Manual
[x] Cancel search | Manufacturer: MERCEDES-BENZ, Model Year: 2012, Model line: GLK-Class, Model: MERCEDES-BENZ GLK-Class 2012 X204Pages: 316, PDF Size: 13.21 MB
Page 7 of 316
Automatic transmission
emergency mode ............................... 140
B
Back support see Lumbar support
Backup lamp
Changing bulbs .............................. 113
Display message ............................ 190
Bag hook ............................................ 216
Ball coupling Installing ........................................ 161
Removing ....................................... 164
Storing ........................................... 164
BAS (Brake Assist System) ................. 62
Basic settings see Settings
Battery (SmartKey)
Checking .......................................... 72
Important safety notes ....................72
Replacing ......................................... 72
Battery (vehicle)
Charging ........................................ 260
Display message ............................ 193
Important safety notes ..................259
Jump starting ................................. 262
Belt
see Seat belts
Brake Assist System
see BAS (Brake Assist System)
Brake fluid
Display message ............................ 183
Notes ............................................. 306
Brake fluid level ................................ 242
Brake lamps Changing bulbs .............................. 113
Display message ............................ 189
Brakes
ABS .................................................. 62
BAS .................................................. 62
Brake fluid (notes) .........................306
Display message ............................ 180
Driving tips .................................... 146
Important safety notes ..................146
Maintenance .................................. 147
Parking brake ........................ 144, 148
Warning lamp ................................. 201
Breakdown
see Flat tire
see Towing away/tow-starting
Bulbs
see Changing bulbs
C
California Important notice for retail
customers and lessees ....................21
Calling up a malfunction
see Display messages
Capacities
see Technical data
Car
see Vehicle
Care
Carpets .......................................... 249
Car wash ........................................ 244
Display ........................................... 248
Exterior lights ................................ 247
Gear or selector lever ....................248
Matte finish ................................... 245
Notes ............................................. 243
Paint .............................................. 245
Plastic trim .................................... 248
Power washer ................................ 244
Rear view camera .......................... 247
Roof lining ...................................... 249
Seat belt ........................................ 249
Seat cover ..................................... 249
Sensors ......................................... 247
Steering wheel ............................... 248
Tail pipes ....................................... 247
Trim pieces .................................... 248
Washing by hand ........................... 244
Wheels ........................................... 245
Windows ........................................ 246
Wiper blades .................................. 246
Wooden trim .................................. 248
Cargo compartment cover ............... 216
Cargo compartment enlargement ... 214
Cargo compartment floor Opening/closing ............................ 219
Stowage well (under) .....................219
Index5
Page 16 of 316
Rear lampsChanging bulbs .............................. 113
see Lights
Rear view camera
Cleaning instructions .....................247
Function/notes ............................. 157
Rear-view mirror
Anti-glare (manual) ..........................97
Dipping (automatic) .........................99
Rear window defroster
Problem (malfunction) ...................124
Rear window heating
Switching on/off ........................... 124
Rear window wiper
Replacing the wiper blade .............. 116
Switching on/off ........................... 114
Refueling
Fuel gauge ....................................... 29
Important safety notes ..................141
Refueling process ..........................141
see Fuel
Releasing the parking lock
manually (automatic
transmission) ..................................... 140
Remote control Garage door opener .......................231
Programming (garage door
opener) .......................................... 232
Removing/attaching the washer
fluid reservoir .................................... 110
Reporting Malfunctions relevant to safety ........ 24
Reserve (fuel tank)
see Fuel
Reserve fuel
Display message ............................ 194
Warning lamp ................................. 206
see Fuel
Residual heat (climate control) ........ 125
Restraint system see SRS (Supplemental Restraint
System)
Reverse gear
Engaging (automatic
transmission) ................................. 135
Roadside Assistance (breakdown) .... 21Roller blind
see Roller sunblind
Roller sunblind
Opening/closing .............................. 87
Panorama roof with power tilt/
sliding panel ..................................... 86
Roof carrier ........................................ 220
Roof lining and carpets (cleaning
guidelines) ......................................... 249
Roof load (maximum) ........................ 308
Route see Route guidance (navigation)
Route guidance (navigation) ............ 171
S
Safety Children in the vehicle .....................55
Child restraint systems ....................55
Occupant Classification System
(OCS) ............................................... 44
Overview of occupant safety
systems ........................................... 38
Safety systems
see Driving safety systems
Seat belts
Adjusting the height ......................... 53
Belt force limiters ............................ 54
center rear-compartment seat .........54
Cleaning ......................................... 249
Correct usage .................................. 51
Emergency Tensioning Devices ........ 54
Fastening ......................................... 53
Important safety guidelines .............51
Releasing ......................................... 54
Safety guidelines ............................. 39
Special seat belt retractor ...............57
Warning lamp ................................. 200
Warning lamp (function) ................... 54
Seats
Adjusting (electrically) .....................92
Adjusting lumbar support ................94
Adjusting the 4-way lumbar
support ............................................ 95
Adjusting the head restraint ............93
Cleaning the cover .........................249
Correct driver's seat position ........... 90
14Index
Page 17 of 316
Folding the backrest (rear
compartment) forwards/back .......215
Folding the rear bench seat
forwards/back ............................... 214
Important safety notes ....................91
Seat heating problem ......................95
Storing settings (memory
function) ........................................ 100
Switching seat heating on/off .........95
Sensors (cleaning instructions) ....... 247
Service see ASSYST PLUS service interval
display
Service interval display
Displaying service messages .........243
Hiding service messages ...............243
Notes ............................................. 243
Service messages ..........................242
Service menu (on-board computer) . 175
Service products Brake fluid ..................................... 306
Capacities ...................................... 304
Coolant (engine) ............................ 307
Engine oil ....................................... 305
Fuel ................................................ 304
Important safety notes ..................302
Refrigerant (air-conditioning
system) .......................................... 306
Washer fluid ................................... 307
Settings
Factory (on-board computer) .........178
On-board computer .......................175
Setting the air distribution ............... 122
Setting the airflow ............................ 123
Side impact air bag ............................. 42
Side marker lamp (display
message) ............................................ 190
Side marker lamps (changing
bulbs) ................................................. 112
Side windows Convenience closing feature ............83
Convenience opening feature ..........83
Important safety information ...........82
Opening/closing .............................. 82
Problem (malfunction) .....................85
Resetting ......................................... 84Sliding sunroof
see Panorama roof with power
tilt/sliding panel
SmartKey
Changing the battery .......................72
Changing the programming .............71
Checking the battery .......................72
Convenience closing feature ............83
Convenience opening feature ..........83
Display message ............................ 198
Door central locking/unlocking .......68
Important safety notes ....................68
Loss ................................................. 74
Mechanical key ................................ 71
Positions (ignition lock) .................131
Problem (malfunction) .....................74
Starting the engine ........................132
Snow chains ...................................... 272
Sockets Center console .............................. 223
Luggage compartment ...................224
Points to observe before use .........223
Rear compartment .........................224
Spare wheel
Notes/data .................................... 297
Storage location ............................ 252
Stowing .......................................... 253
see Emergency spare wheel
Specialist workshop ............................ 23
Speed, controlling see Cruise control
Speedometer
Digital ............................................ 170
In the Instrument cluster .................29
Segments ...................................... 167
Selecting the unit of
measurement ................................ 175
see Instrument cluster
SRS (Supplemental Restraint
System) Display message ............................ 184
Introduction ..................................... 38
Warning lamp ................................. 205
Warning lamp (function) ................... 38
Standing lamps
Changing bulbs .............................. 111
Display message ............................ 190
Switching on/off ........................... 102Index15
Page 21 of 316
W
Warning and indicator lamps ABS ................................................ 202
Brakes ........................................... 201
Check Engine ................................. 206
Coolant .......................................... 207
Cruise control ................................ 151
ESP ®
.............................................. 203
ESP ®
OFF ....................................... 204
Fuel tank ........................................ 206
Overview .......................................... 30
PASSENGER AIRBAG OFF
indicator lamp .................................. 44
Reserve fuel ................................... 206
Seat belt ........................................ 200
SRS ................................................ 205
Tire pressure monitor ....................209
Warranty ............................................ 301
Washer fluid Display message ............................ 198
see Windshield washer system
Wheel bolt tightening torque ........... 258
Wheel chock ...................................... 254
Wheels Changing a wheel .......................... 254
Checking ........................................ 271
Cleaning ......................................... 245
Important safety notes ..................270
Interchanging/changing ................294
Mounting a wheel .......................... 256
Removing a wheel ..........................256
Storing ........................................... 295
Tightening torque ........................... 258
Wheel size/tire size .......................295
Window curtain air bag
Display message ............................ 185
Operation ......................................... 44
Windows
Cleaning ......................................... 246
see Side windows
Windshield
Defrosting ...................................... 123
Windshield washer system .............. 241
Notes ............................................. 307
Windshield wipers
Problem (malfunction) ...................116
Rear window wiper ........................114Replacing the wiper blades ............114
Switching on/off ........................... 113
Winter driving
Important safety notes ..................272
Slippery road surfaces ...................149
Snow chains .................................. 272
Winter tires
M+S tires ....................................... 272
Wiper blades
Cleaning ......................................... 246
Important safety notes ..................114
Replacing (rear window) ................116
Replacing (windshield) ...................115
Wooden trim (cleaning
instructions) ...................................... 248Index19
Page 107 of 316
XPress the R button.
The yellow R indicator lamp in the
instrument cluster lights up.XTo switch off the rear fog lamp: press the
R button.
The yellow R indicator lamp in the
instrument cluster goes out.
Headlamp cleaning system
The headlamps are cleaned automatically if
the "Wipe with washer fluid" function is
operated ten times while the lights are on and
the engine is running (Y page 113). When you
switch off the ignition, the automatic
headlamp cleaning system is reset and
counting is resumed from 0.
Combination switch
Turn signals
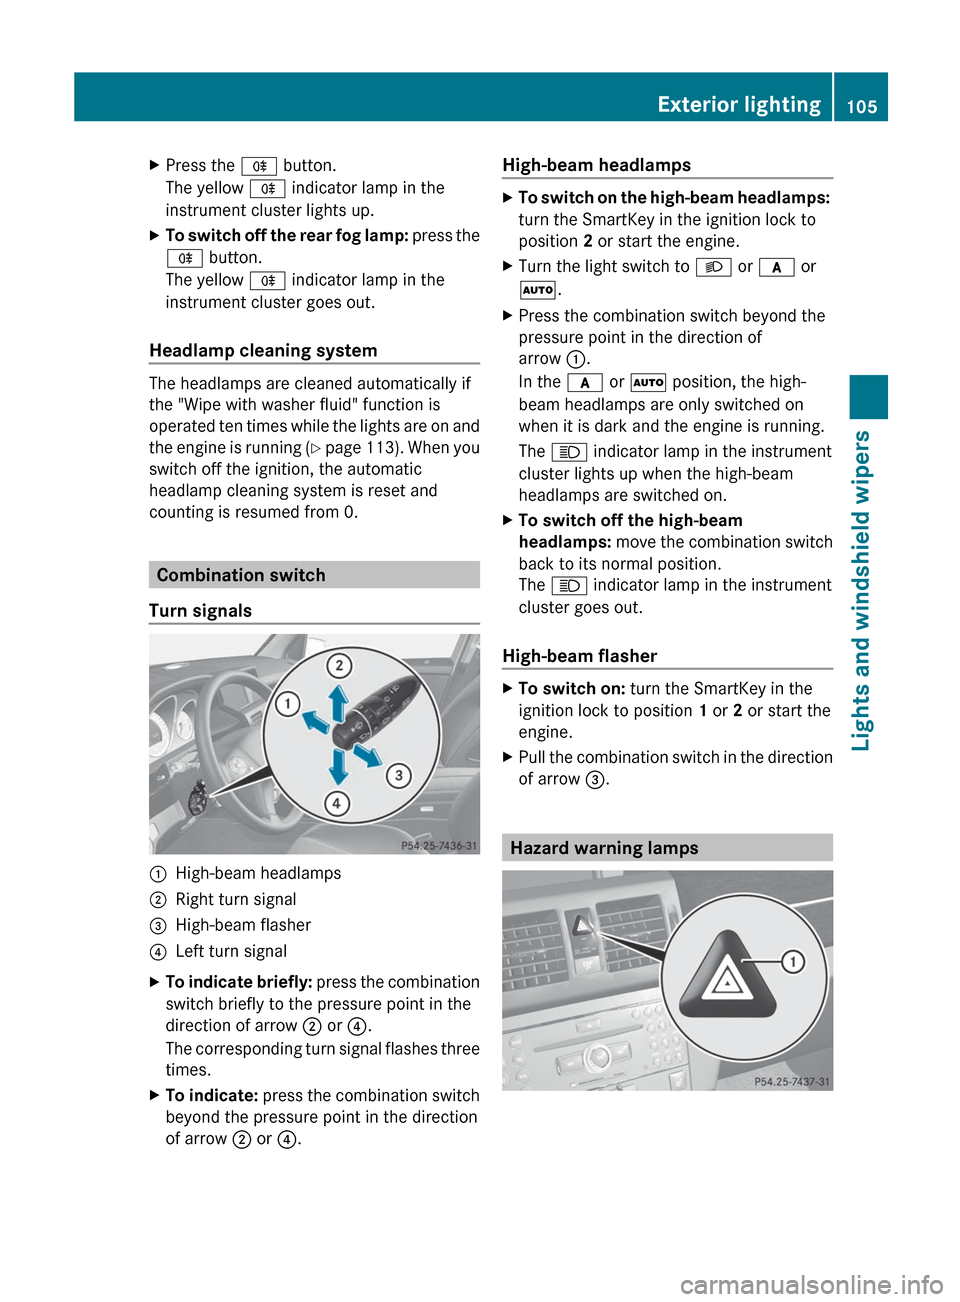
:High-beam headlamps;Right turn signal=High-beam flasher?Left turn signalXTo indicate briefly: press the combination
switch briefly to the pressure point in the
direction of arrow ; or ?.
The corresponding turn signal flashes three
times.XTo indicate: press the combination switch
beyond the pressure point in the direction
of arrow ; or ?.High-beam headlampsXTo switch on the high-beam headlamps:
turn the SmartKey in the ignition lock to
position 2 or start the engine.XTurn the light switch to L or c or
à .XPress the combination switch beyond the
pressure point in the direction of
arrow :.
In the c or à position, the high-
beam headlamps are only switched on
when it is dark and the engine is running.
The K indicator lamp in the instrument
cluster lights up when the high-beam
headlamps are switched on.XTo switch off the high-beam
headlamps: move the combination switch
back to its normal position.
The K indicator lamp in the instrument
cluster goes out.
High-beam flasher
XTo switch on: turn the SmartKey in the
ignition lock to position 1 or 2 or start the
engine.XPull the combination switch in the direction
of arrow =.
Hazard warning lamps
Exterior lighting105Lights and windshield wipersZ
Page 112 of 316
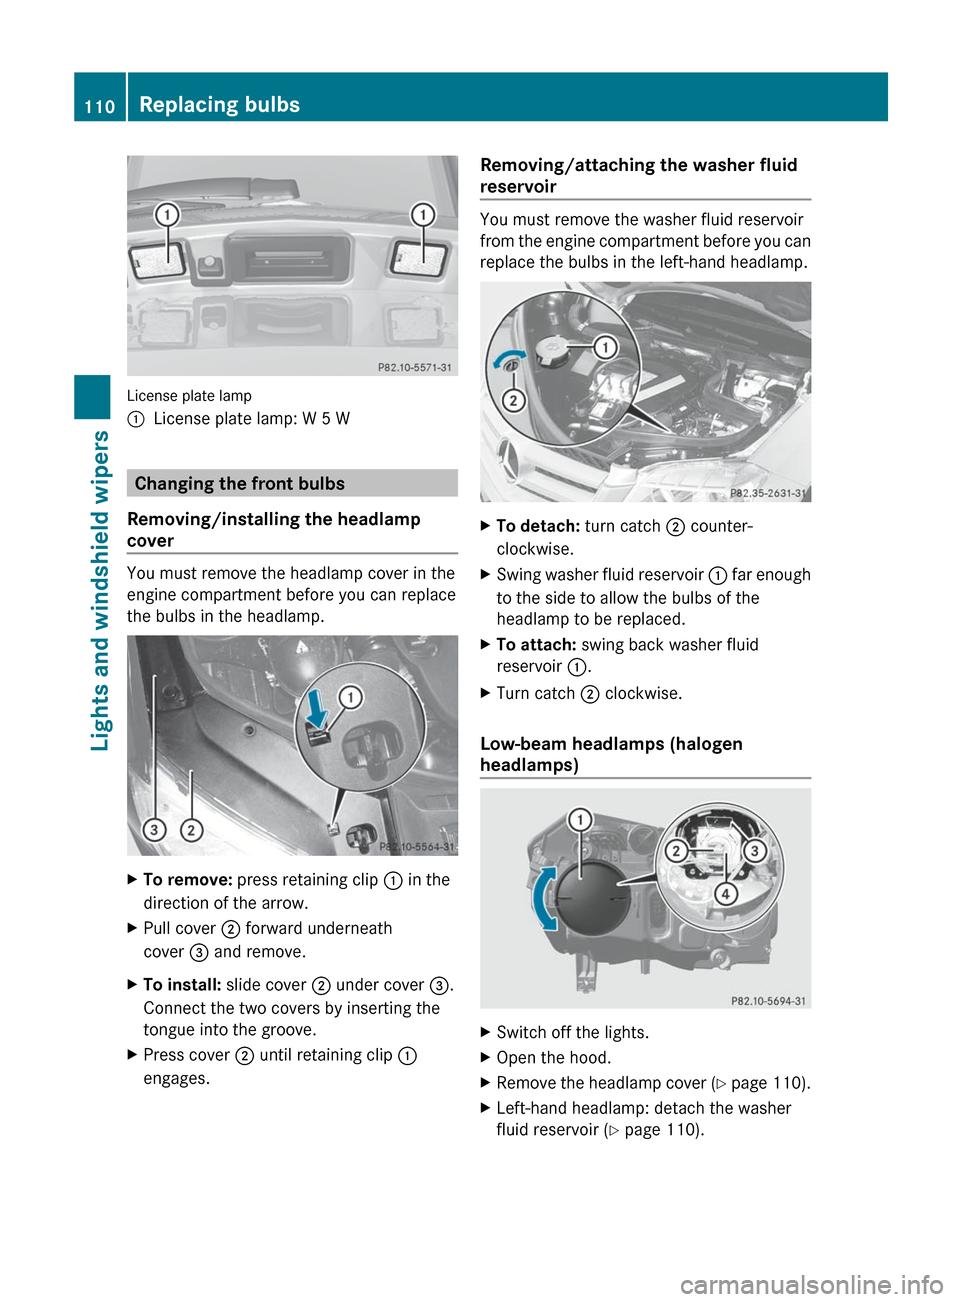
License plate lamp
:License plate lamp: W 5 W
Changing the front bulbs
Removing/installing the headlamp
cover
You must remove the headlamp cover in the
engine compartment before you can replace
the bulbs in the headlamp.
XTo remove: press retaining clip : in the
direction of the arrow.XPull cover ; forward underneath
cover = and remove.XTo install: slide cover ; under cover =.
Connect the two covers by inserting the
tongue into the groove.XPress cover ; until retaining clip :
engages.Removing/attaching the washer fluid
reservoir
You must remove the washer fluid reservoir
from the engine compartment before you can
replace the bulbs in the left-hand headlamp.
XTo detach: turn catch ; counter-
clockwise.XSwing washer fluid reservoir : far enough
to the side to allow the bulbs of the
headlamp to be replaced.XTo attach: swing back washer fluid
reservoir :.XTurn catch ; clockwise.
Low-beam headlamps (halogen
headlamps)
XSwitch off the lights.XOpen the hood.XRemove the headlamp cover (Y page 110).XLeft-hand headlamp: detach the washer
fluid reservoir ( Y page 110).110Replacing bulbsLights and windshield wipers
Page 113 of 316
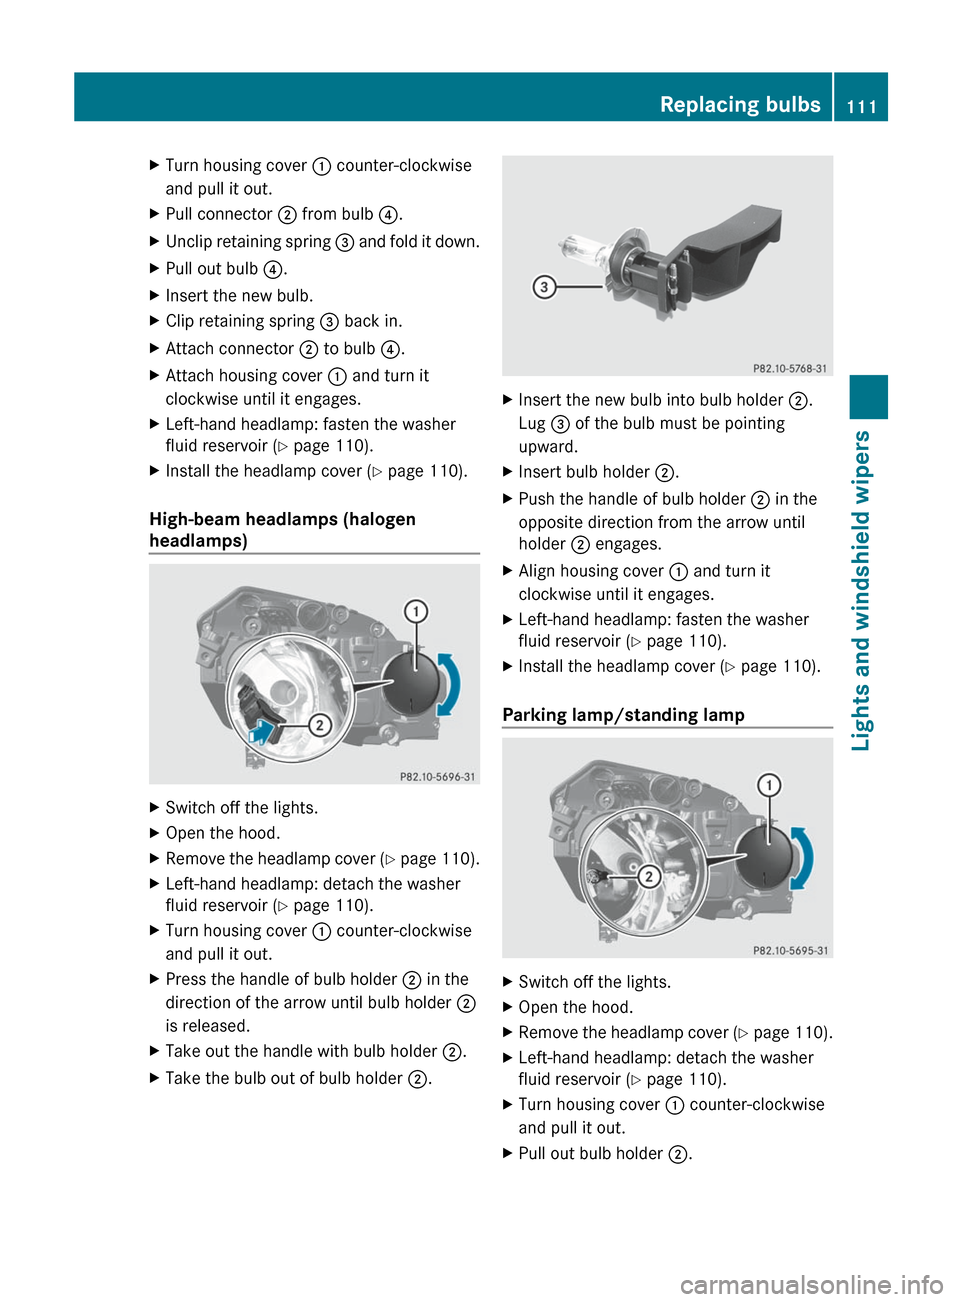
XTurn housing cover : counter-clockwise
and pull it out.XPull connector ; from bulb ?.XUnclip retaining spring = and fold it down.XPull out bulb ?.XInsert the new bulb.XClip retaining spring = back in.XAttach connector ; to bulb ?.XAttach housing cover : and turn it
clockwise until it engages.XLeft-hand headlamp: fasten the washer
fluid reservoir ( Y page 110).XInstall the headlamp cover ( Y page 110).
High-beam headlamps (halogen
headlamps)
XSwitch off the lights.XOpen the hood.XRemove the headlamp cover (Y page 110).XLeft-hand headlamp: detach the washer
fluid reservoir ( Y page 110).XTurn housing cover : counter-clockwise
and pull it out.XPress the handle of bulb holder ; in the
direction of the arrow until bulb holder ;
is released.XTake out the handle with bulb holder ;.XTake the bulb out of bulb holder ;.XInsert the new bulb into bulb holder ;.
Lug = of the bulb must be pointing
upward.XInsert bulb holder ;.XPush the handle of bulb holder ; in the
opposite direction from the arrow until
holder ; engages.XAlign housing cover : and turn it
clockwise until it engages.XLeft-hand headlamp: fasten the washer
fluid reservoir ( Y page 110).XInstall the headlamp cover ( Y page 110).
Parking lamp/standing lamp
XSwitch off the lights.XOpen the hood.XRemove the headlamp cover (Y page 110).XLeft-hand headlamp: detach the washer
fluid reservoir ( Y page 110).XTurn housing cover : counter-clockwise
and pull it out.XPull out bulb holder ;.Replacing bulbs111Lights and windshield wipersZ
Page 114 of 316
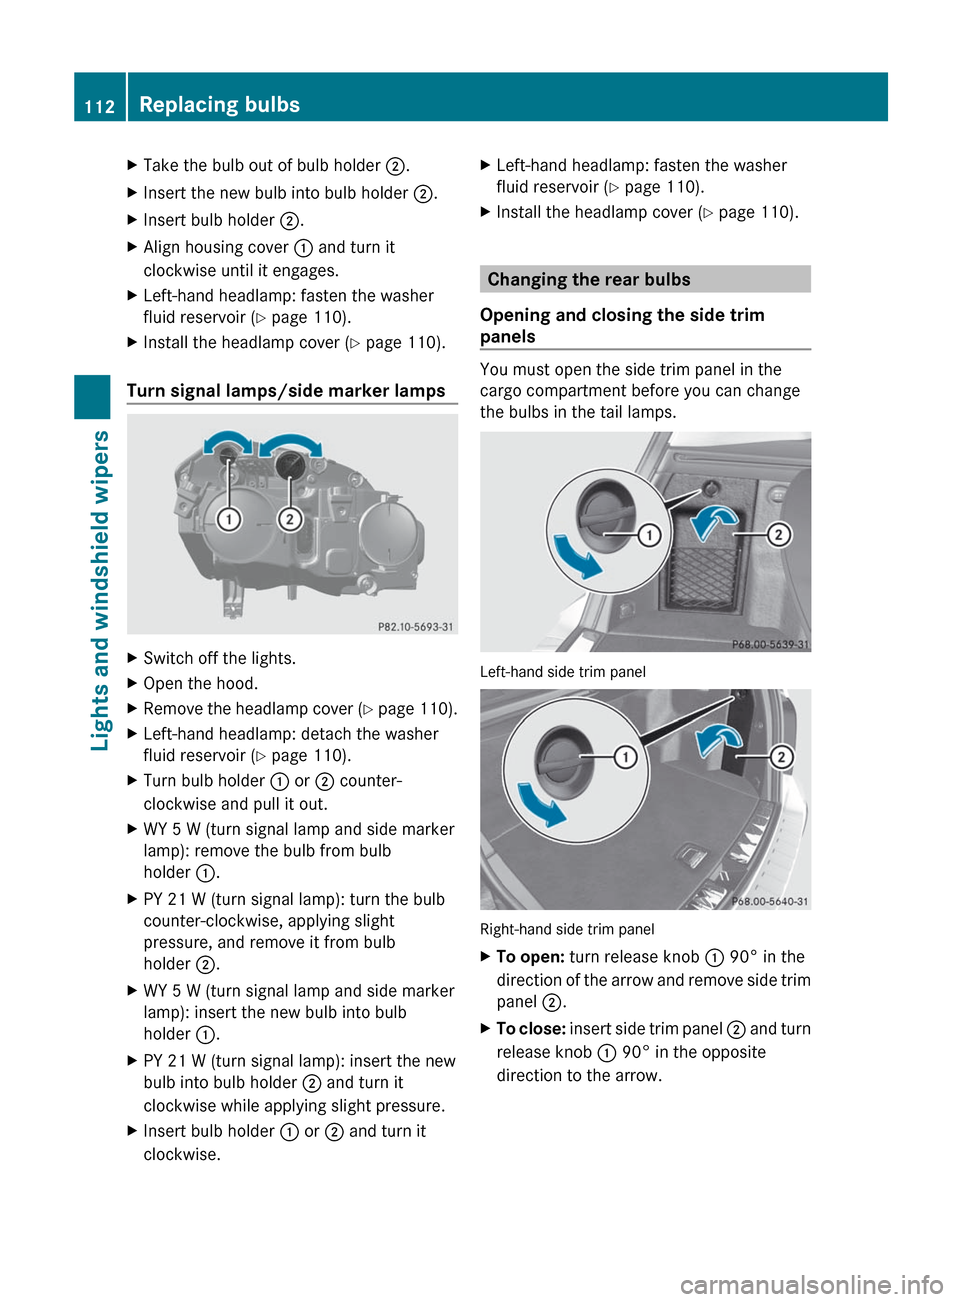
XTake the bulb out of bulb holder ;.XInsert the new bulb into bulb holder ;.XInsert bulb holder ;.XAlign housing cover : and turn it
clockwise until it engages.XLeft-hand headlamp: fasten the washer
fluid reservoir ( Y page 110).XInstall the headlamp cover ( Y page 110).
Turn signal lamps/side marker lamps
XSwitch off the lights.XOpen the hood.XRemove the headlamp cover (Y page 110).XLeft-hand headlamp: detach the washer
fluid reservoir ( Y page 110).XTurn bulb holder : or ; counter-
clockwise and pull it out.XWY 5 W (turn signal lamp and side marker
lamp): remove the bulb from bulb
holder :.XPY 21 W (turn signal lamp): turn the bulb
counter-clockwise, applying slight
pressure, and remove it from bulb
holder ;.XWY 5 W (turn signal lamp and side marker
lamp): insert the new bulb into bulb
holder :.XPY 21 W (turn signal lamp): insert the new
bulb into bulb holder ; and turn it
clockwise while applying slight pressure.XInsert bulb holder : or ; and turn it
clockwise.XLeft-hand headlamp: fasten the washer
fluid reservoir ( Y page 110).XInstall the headlamp cover ( Y page 110).
Changing the rear bulbs
Opening and closing the side trim
panels
You must open the side trim panel in the
cargo compartment before you can change
the bulbs in the tail lamps.
Left-hand side trim panel
Right-hand side trim panel
XTo open: turn release knob : 90° in the
direction of the arrow and remove side trim
panel ;.XTo close: insert side trim panel ; and turn
release knob : 90° in the opposite
direction to the arrow.112Replacing bulbsLights and windshield wipers
Page 116 of 316
! If the windshield wipers leave smears on
the windshield after the vehicle has been
washed in an automatic car wash, wax or
other residues may be the reason for this.
Clean the windshield using washer fluid
after washing the vehicle in an automatic
car wash.
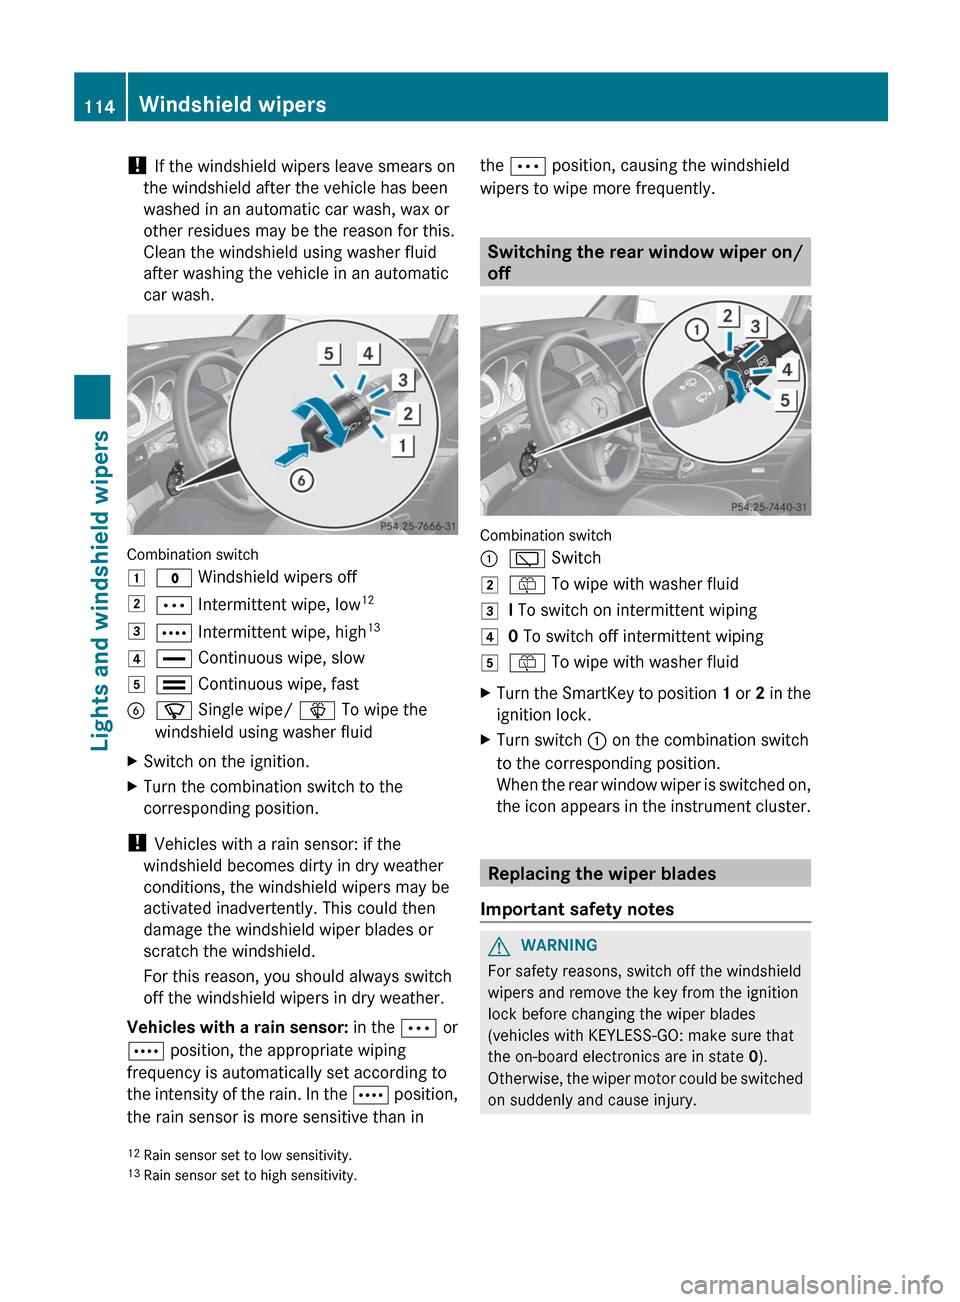
Combination switch
1$ Windshield wipers off2Ä Intermittent wipe, low 123Å
Intermittent wipe, high 134°
Continuous wipe, slow5¯ Continuous wipe, fastBí Single wipe/ î To wipe the
windshield using washer fluidXSwitch on the ignition.XTurn the combination switch to the
corresponding position.
! Vehicles with a rain sensor: if the
windshield becomes dirty in dry weather
conditions, the windshield wipers may be
activated inadvertently. This could then
damage the windshield wiper blades or
scratch the windshield.
For this reason, you should always switch
off the windshield wipers in dry weather.
Vehicles with a rain sensor: in the Ä or
Å position, the appropriate wiping
frequency is automatically set according to
the intensity of the rain. In the Å position,
the rain sensor is more sensitive than in
the Ä position, causing the windshield
wipers to wipe more frequently.
Switching the rear window wiper on/
off
Combination switch
:è Switch2ô To wipe with washer fluid3I To switch on intermittent wiping40 To switch off intermittent wiping5ô To wipe with washer fluidXTurn the SmartKey to position 1 or 2 in the
ignition lock.XTurn switch : on the combination switch
to the corresponding position.
When the rear window wiper is switched on,
the icon appears in the instrument cluster.
Replacing the wiper blades
Important safety notes
GWARNING
For safety reasons, switch off the windshield
wipers and remove the key from the ignition
lock before changing the wiper blades
(vehicles with KEYLESS-GO: make sure that
the on-board electronics are in state 0).
Otherwise, the wiper motor could be switched
on suddenly and cause injury.
12 Rain sensor set to low sensitivity.
13 Rain sensor set to high sensitivity.114Windshield wipersLights and windshield wipers
Page 118 of 316
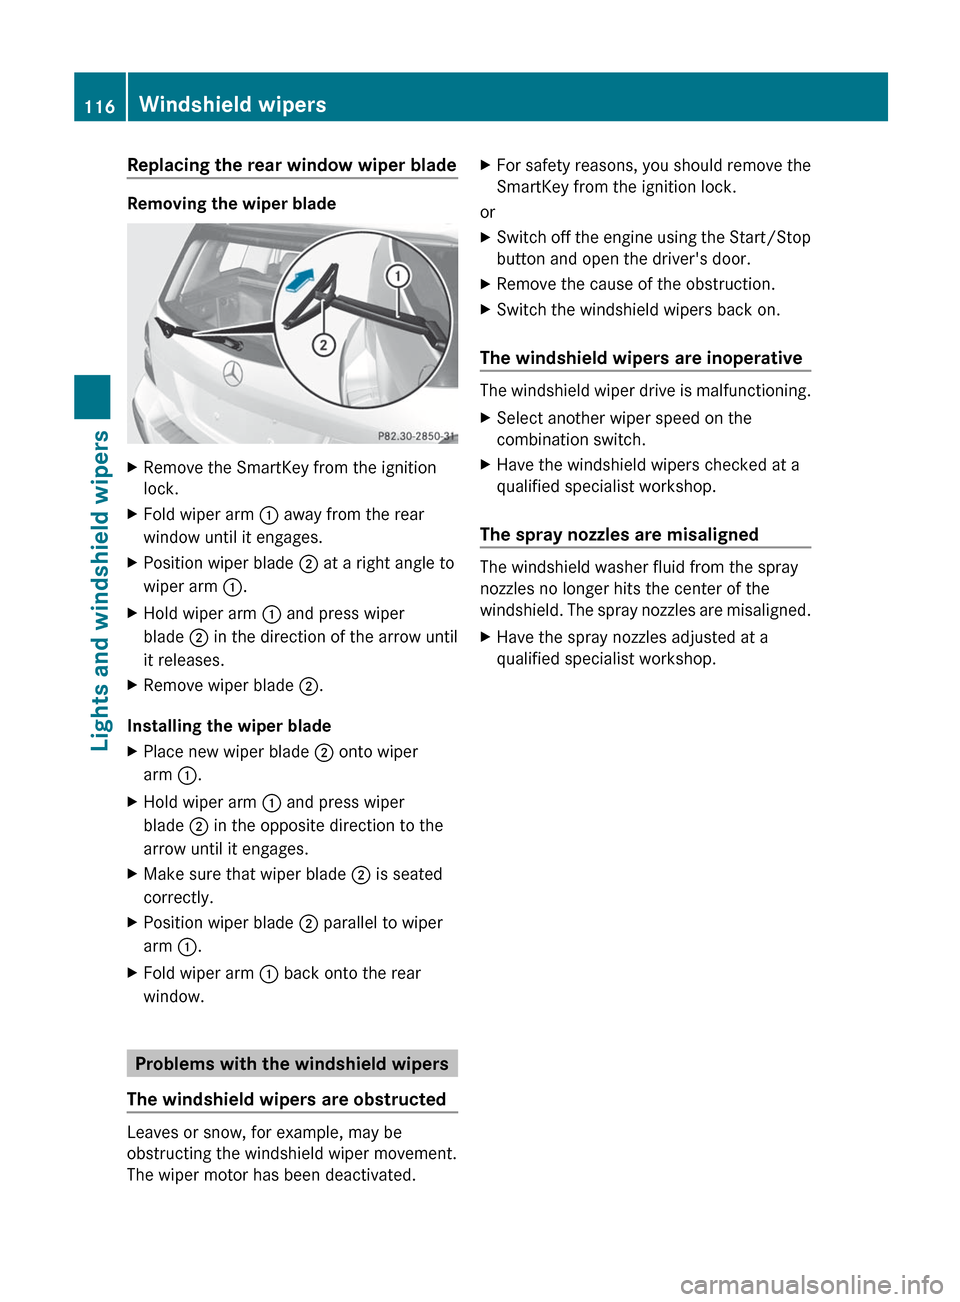
Replacing the rear window wiper blade
Removing the wiper blade
XRemove the SmartKey from the ignition
lock.XFold wiper arm : away from the rear
window until it engages.XPosition wiper blade ; at a right angle to
wiper arm :.XHold wiper arm : and press wiper
blade ; in the direction of the arrow until
it releases.XRemove wiper blade ;.
Installing the wiper blade
XPlace new wiper blade ; onto wiper
arm :.XHold wiper arm : and press wiper
blade ; in the opposite direction to the
arrow until it engages.XMake sure that wiper blade ; is seated
correctly.XPosition wiper blade ; parallel to wiper
arm :.XFold wiper arm : back onto the rear
window.
Problems with the windshield wipers
The windshield wipers are obstructed
Leaves or snow, for example, may be
obstructing the windshield wiper movement.
The wiper motor has been deactivated.
XFor safety reasons, you should remove the
SmartKey from the ignition lock.
or
XSwitch off the engine using the Start/Stop
button and open the driver's door.XRemove the cause of the obstruction.XSwitch the windshield wipers back on.
The windshield wipers are inoperative
The windshield wiper drive is malfunctioning.
XSelect another wiper speed on the
combination switch.XHave the windshield wipers checked at a
qualified specialist workshop.
The spray nozzles are misaligned
The windshield washer fluid from the spray
nozzles no longer hits the center of the
windshield. The spray nozzles are misaligned.
XHave the spray nozzles adjusted at a
qualified specialist workshop.116Windshield wipersLights and windshield wipers