warning light MERCEDES-BENZ GLK-Class 2013 X204 Service Manual
[x] Cancel search | Manufacturer: MERCEDES-BENZ, Model Year: 2013, Model line: GLK-Class, Model: MERCEDES-BENZ GLK-Class 2013 X204Pages: 378, PDF Size: 5.03 MB
Page 118 of 378
0020
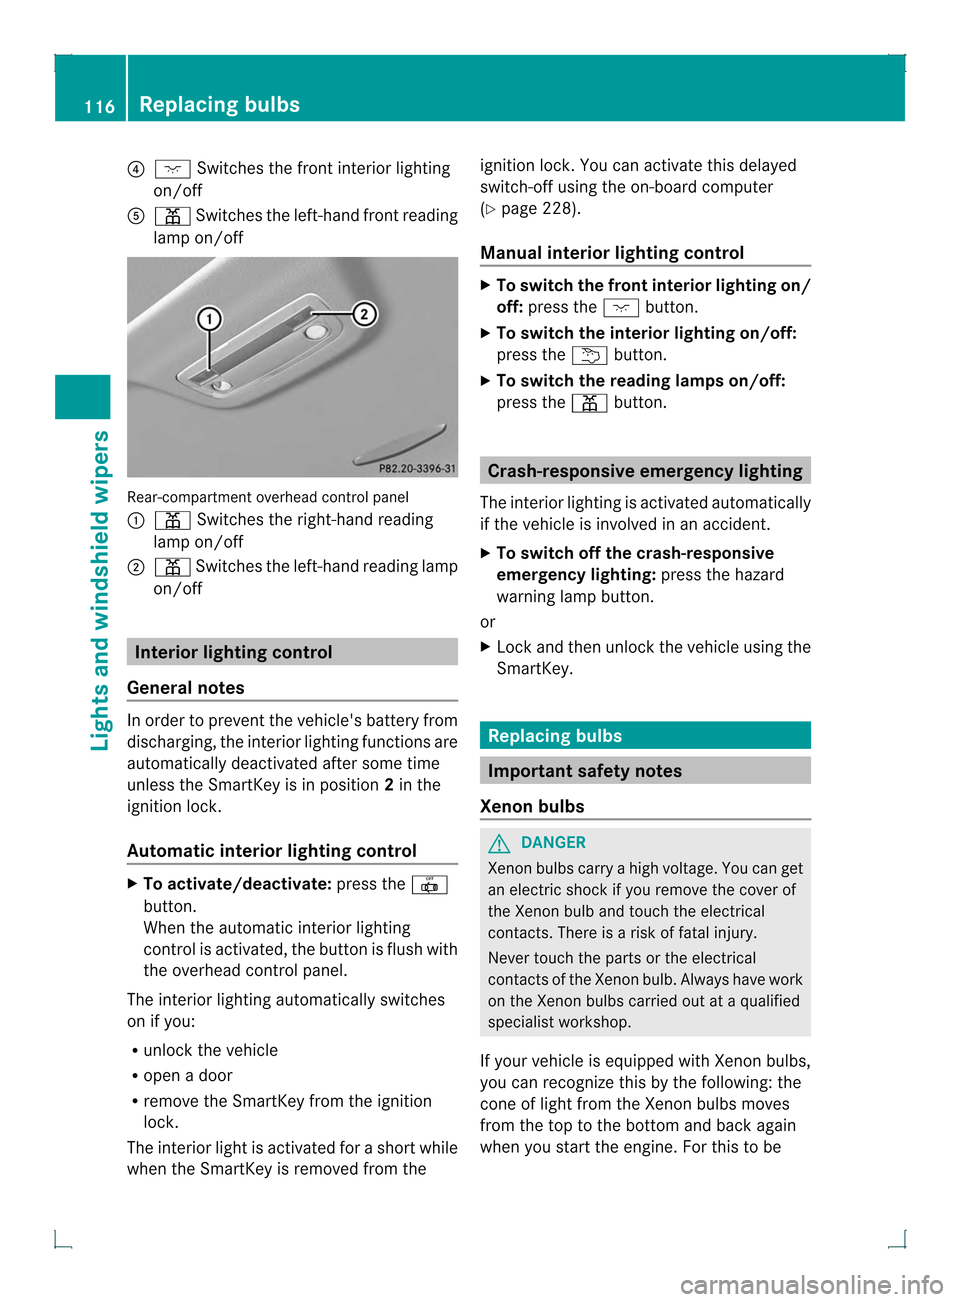
0005 Switches the front interior lighting
on/off
001E 0015 Switches the left-hand front reading
lamp on/off Rear-compartment overhead control panel
0002
0015 Switches the right-hand reading
lamp on/off
0003 0015 Switches the left-hand reading lamp
on/off Interior lighting control
General notes In order to prevent the vehicle's battery from
discharging, the interio
rlighting functions are
automatically deactivated after some time
unless the SmartKey is in position 2in the
ignition lock.
Automatic interior lighting control X
To activate/deactivate: press the001E
button.
When the automatic interior lighting
control is activated, the button is flush with
the overhead control panel.
The interior lighting automatically switches
on if you:
R unloc kthe vehicle
R open a door
R remove the SmartKey from the ignition
lock.
The interior light is activated for a short while
when the SmartKey is removed from the ignition lock. You can activate this delayed
switch-off using the on-board computer
(Y
page 228).
Manual interior lighting control X
To switch the front interior lighting on/
off: press the 0005button.
X To switch the interior lighting on/off:
press the 0002button.
X To switch the reading lamps on/off:
press the 0015button. Crash-responsive emergency lighting
The interior lighting is activated automatically
if the vehicle is involved in an accident.
X To switch off the crash-responsive
emergency lighting: press the hazard
warning lamp button.
or
X Lock and then unlock the vehicle using the
SmartKey. Replacing bulbs
Important safety notes
Xenon bulbs G
DANGER
Xenon bulbs carry a high voltage. You can get
an electric shock if you remove the cover of
the Xenon bulb and touch the electrical
contacts. There is a risk of fatal injury.
Never touch the parts or the electrical
contacts of the Xenon bulb. Always have work
on the Xenon bulbs carried out at a qualified
specialist workshop.
If your vehicle is equipped with Xenon bulbs,
you can recognize this by the following: the
cone of light from the Xenon bulbs moves
from the top to the bottom and back again
when you start the engine. For this to be 116
Replacing bulbsLights and windshield wipers
Page 119 of 378
observed, the lights must be switched on
before starting the engine.
Bulbs and lamps are an important aspect of
vehicle safety. You must therefore make sure
that these function correctly at all times.
Have the headlamp setting checked regularly.
Other bulbs G
WARNING
Bulbs, lamps and connectors can get very hot
when operating. If you change a bulb, you
could burn yourself on these components.
There is a risk of injury.
Allow these components to cool down before
changing a bulb.
There are bulbs other than the Xenon bulbs
that you cannot replace. Replace only the
bulbs listed (Y page 117). Have the bulbs that
you cannot replace yourself changed at a
qualified specialist workshop.
If you require assistance changing bulbs,
consult a qualified specialist workshop.
Do not touch the glass tube of new bulbs with
your bare hands. Even minor contamination
can burn into the glass surface and reduce
the service life of the bulbs. Always use a lint-
free cloth or only touch the base of the bulb
when installing.
Only use bulbs of the correc ttype.
If the new bulb still does no tlight up, consult
a qualified specialist workshop.
Bulbs and lamps are an importan taspect of
vehicle safety. You must therefore make sure
that these function correctly at all times.
Have the headlamp setting checked regularly. Overview:c
hanging bulbs/bulb types
You can change the following bulbs. The bulb
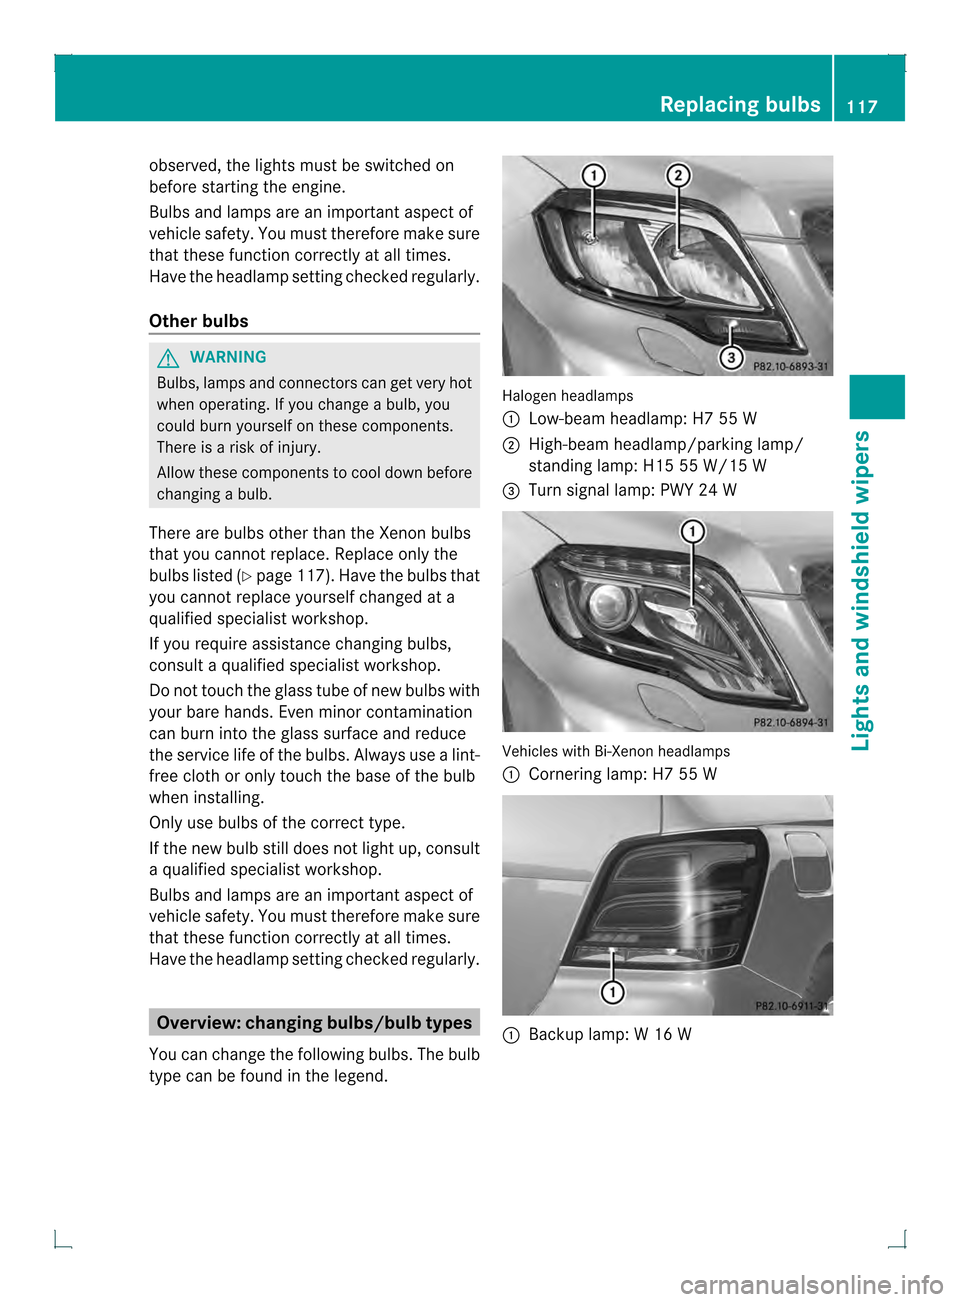
type can be found in the legend. Halogen headlamps
0002
Low-beam headlamp: H7 55 W
0003 High-beam headlamp/parking lamp/
standing lamp: H15 55 W/15 W
0021 Turn signal lamp: PWY 24 W Vehicles with Bi-Xenon headlamps
0002
Cornering lamp: H7 55 W 0002
Backup lamp: W 16 W Replacing bulbs
117Lights and windshield wipers Z
Page 120 of 378

Changing the front bulbs
Low-bea mheadlamps (halogen
headlamps) G
WARNING
These bulbs are pressurized.
They can explode when being changed if:
R they are still hot
R they hit an object when being removed
R they are dropped
There is a risk of injury.
You should wear eye protection and clean
gloves when you are changin gabulb. If
necessary, have bulbs changed at a qualified
specialist workshop. X
Switch off the lights.
X Open the hood.
X Turn housing cover 0002counter-clockwise
and pull it out.
X At the bulb holder, push the bulb upwards,
disconnec titand pull it ou tofbulb
holder 0003.
X Inser tthe new bulb into bulb holder 0003,
push it down and secure it in place.
X Attach housing cover 0002and turn it
clockwise until it engages.
High-beam headlamps, standing/
parking lamps (halogen headlamps) G
WARNING
These bulbs are pressurized. They can explode when being changed if:
R
they are still hot
R they hit an object when being removed
R they are dropped
There is a risk of injury.
You should wear eye protection and clean
gloves when you are changing a bulb. If
necessary, have bulbs changed at a qualified
specialist workshop. X
Switch off the lights.
X Open the hood.
X Turn housing cover 0002counter-clockwise
and pull it out.
X Turn bulb counter-clockwise and pull it out.
X Insert the new bulb into bulb holder 0003and
turn it clockwise.
X Align housing cover 0002and turn it
clockwise until it engages.
Cornering light function (Bi-Xenon
headlamps) G
WARNING
These bulbs are pressurized.
They can explode when being changed if:
R they are still hot
R they hit an object when being removed
R they are dropped
There is a risk of injury.
You should wear eye protection and clean
gloves when you are changing a bulb. If 118
Replacing bulbsLights and windshield wipers
Page 123 of 378

Combination switch
0004
0008 Windshield wiper off
0005 0001 Intermittent wipe, low 7
0006 0002 Intermittent wipe, high 8
000A 0018 Continuous wipe, slow
000B 0012 Continuous wipe, fast
001F 0006 Single wipe/ 0007To wipe the
windshield using washer fluid
X Switch on the ignition.
X Turn the combination switch to the
corresponding position.
! Vehicles with a rain sensor :ifthe
windshield becomes dirty in dry weather
conditions, the windshield wipers may be
activated inadvertently. This could then
damage the windshield wiper blades or
scratch the windshield.
For this reason, you should always switch
off the windshield wipers in dry weather.
If the wiper blades are worn, the windshield
will no longer be wiped properly. This could
prevent you from observing the traffic
conditions. Replace the wiper blades twice a
year, ideally in spring and fall. Switching the rear window wiper on/
off
Combination switch
0002
0001 Switch
0005 000E To wipe with washer fluid
0006 ITo switch on intermittent wiping
000A 0To switch off intermittent wiping
000B 000E To wipe with washer fluid
X Turn the SmartKey to position 1or 2in the
ignition lock.
X Turn switch 0002on the combination switch
to the corresponding position.
When the rear window wiper is switched on,
the icon appears in the instrumentc luster. Replacing the wiper blades
Important safety notes G
WARNING
If the windshield wipers begin to move while
you are changing the wiper blades, you could
be trapped by the wiper arm. There is a risk
of injury.
Always switch off the windshield wipers and
ignition before changing the wiper blades.
! Neve ropen the hood/tailgate if a wiper
arm has been folded away from the
windshield/rear window.
7 Rain senso rset to low sensitivity.
8 Rain sensor set to high sensitivity. Windshield wipers
121Lights and windshield wipers Z
Page 139 of 378

X
Turn the SmartKey to position 0in the
ignition lock (Y page 141) or remove it.
X To activate: press the0002button.
The indicator lamp in the 0002button lights
up.
i If the residual heat function is activated,
the windows may fog up on the inside.
X To deactivate: press the0002button.
The indicator lamp in the 0002button goes
out.
i Residual heat is deactivated
automatically:
R after approximately 30 minutes
R when the ignition is switched on
R if the battery voltage drops
R when the auxiliary heating is activated Setting the air vents
Important safety notes
G
WARNING
Very hot or very cold air can flow from the air
vents. This could result in burns or frostbite in
the immediate vicinity of the air vents. There
is a risk of injury.
Make sure that all vehicle occupants always
maintain a sufficient distance to the air
outlets. If necessary, redirect the airflow to
another area of the vehicle interior.
In order to ensure the direct flow of fresh air
through the air vents into the vehicle interior,
please observe the following notes:
R keep the air inlet between the windshield
and the hood free of blockages, such as ice,
snow or leaves.
R never cover the air vents or air intake grilles
in the vehicle interior.
i For virtually draft-free ventilation, adjust
the sliders of the air vents to the center
position. Setting the center air vents
X
To open the center air vent: turn the
adjuster in one of center air vents 0002
counter-clockwise.
X To close the center air vent: turn the
adjuster in one of center air vents 0002
clockwise until it engages. Setting the side air vents
0002
Side window defroster vent
0003 Side air vent
X To open aside air vent: turn the adjuster
in side air vent 0003counter-clockwise.
X To close aside air vent: turn the adjuster
in side air vent 0003clockwise until it
engages. Setting the glove box air vent
When automatic climate control is activated,
the glove box can be ventilated, for instance Setting the air vents
137Climate control Z
Page 144 of 378
started with the Start/Stop button if the
SmartKey is in the vehicle. Electrically
powered equipment can be operated.
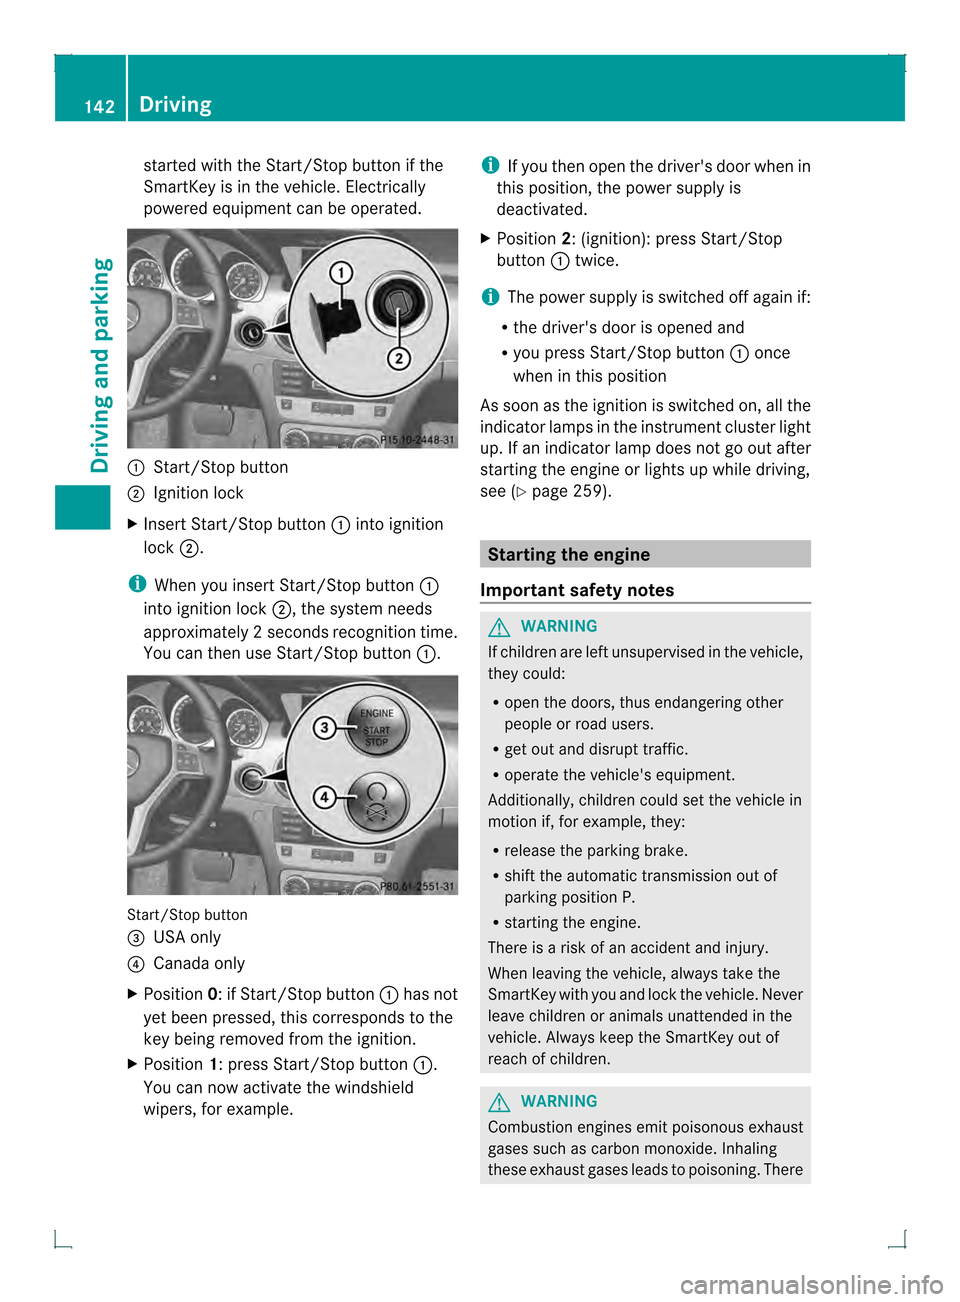
0002
Start/Stop button
0003 Ignition lock
X Insert Start/Stop button 0002into ignition
lock 0003.
i When you insert Start/Stop button 0002
into ignition lock 0003, the system needs
approximately 2seconds recognition time.
You can then use Start/Stop button 0002.Start/Stop button
0021 USA only
0020 Canada only
X Position 0: if Start/Stop button 0002has not
yet been pressed, this corresponds to the
key being removed from the ignition.
X Position 1: press Start/Stop button 0002.
You can now activate the windshield
wipers, for example. i
If you then open the driver's door when in
this position, the power supply is
deactivated.
X Position 2: (ignition): press Start/Stop
button 0002twice.
i The power supply is switched off again if:
R the driver's door is opened and
R you press Start/Stop button 0002once
when in this position
As soon as the ignition is switched on, all the
indicator lamps in the instrument cluster light
up. If an indicator lamp does not go out after
starting the engine or lights up while driving,
see (Y page 259). Starting the engine
Important safety notes G
WARNING
If children are left unsupervised in the vehicle,
they could:
R open the doors, thus endangering other
people or road users.
R get out and disrupt traffic.
R operate the vehicle's equipment.
Additionally, children could set the vehicle in
motion if, for example, they:
R release the parking brake.
R shift the automatic transmission out of
parking position P.
R starting the engine.
There is a risk of an accident and injury.
When leaving the vehicle, always take the
SmartKey with you and lock the vehicle. Never
leave children or animals unattended in the
vehicle. Always keep the SmartKey out of
reach of children. G
WARNING
Combustion engines emit poisonous exhaust
gases such as carbon monoxide. Inhaling
these exhaust gases leads to poisoning. There 142
DrivingDriving and parking
Page 145 of 378
is a risk of fatal injury. Therefore never leave
the engine running in enclosed spaces
without sufficient ventilation. G
WARNING
Flammable materials introduced through
environmental influence or by animals can
ignite if in contac twith the exhaus tsystem or
parts of the engine that heat up. There is a risk
of fire.
Carry out regular checks to make sure that
there are no flammable foreign materials in
the engine compartment or in the exhaust
system.
! Do no tdepress the accelerator pedal
when starting the engine.
General notes i
Vehicles with agasoline engine: the
catalytic converter is preheated for up to
30 seconds after a cold start. The sound of
the engine may change during this time.
Automatic transmission X
Shift the transmission to position P.
The transmission position displa yinthe
multifunction display shows P.
i You can also start the engine when the
transmission is in position N.
Starting procedure with the SmartKey i
To start the engine using the SmartKey
instead of KEYLESS-GO, pull the Start/
Stop button out of the ignition lock.
X To startag asoline engine: turn the
SmartKey to position 3in the ignition lock (Y
page 141) and release it as soon as the
engine is running.
X To start adiesel engine: turn the
SmartKey to position 2in the ignition lock
(Y page 141).
The 000C preglow indicator lamp in the
instrumen tcluster lights up.
X When the 000Cpreglow indicator lamp
goes out, tur nthe SmartKey to position
3(Y page 141) and release it as soon as the
engine is running.
i You can start the engine without preglow
if the engine is warm.
Using KEYLESS-GO to startt he engine You can start the engine if a valid SmartKey
with the integrated KEYLESS-GO function is
in the vehicle. Always take the SmartKey with
you whe
nleaving the vehicle, even if you only
leave it for a short time. Pay attention to the
important safety notes.
i The Start/Stop button can be used to
start the vehicle without inserting the
SmartKey into the ignition lock. The Start/
Stop button must be inserted in the ignition
lock and the SmartKey must be in the
vehicle.
X Depress the brake pedal and keep it
depressed.
X Press the Start/Stop button once
(Y page 141).
The engine starts. Pulling away
Automatic transmission G
WARNING
If the engine speed is above the idling speed
and you engage transmission position Dor
R, the vehicle could pull away suddenly. There
is a risk of an accident. Driving
143Driving and parking
Z
Page 150 of 378

Problem Possible causes/consequences and
0001 Solutions
The engine is not
running smoothly and
is misfiring. There is a malfunction in the engine electronics or in a mechanical
component of the engine management system.
X
Only depress the accelerator pedal slightly.
X Have the cause rectified immediately at a qualified specialist
workshop.
Otherwise, non-combusted fuel may get into the catalytic
converter and damage it. The coolant
temperature gauge
shows a value above
248 ‡ (120 †). The coolant level is too low. The coolant is too hot and the engine
is no longer being cooled sufficiently.
X
Stop as soon as possible and allow the engine and the coolant
to cool down.
X Check the coolant level (Y page 302). Observe the warning
notes as you do so and add coolant if necessary. Automatic transmission
Important safety notes
G
WARNING
If the engine speed is above the idling speed
and you engage transmission position Dor
R, the vehicle could pull away suddenly. There
is a risk of an accident.
When engaging transmission position Dor R,
always firmly depress the brake pedal and do
not simultaneously accelerate. G
WARNING
The automatic transmission switches to
neutral position Nwhen you switch off the
engine. The vehicle may roll away.T here is a
risk of an accident.
After switching off the engine, always switch
to parking position P. Prevent the parked
vehicle from rolling away by applying the
parking brake. DIRECTS
ELECT lever
Overview of transmission positions The DIRECT SELECT leve
ris on the right of the
steering column. 0010
Park position with parking lock
000D Reverse gear
000E Neutral
000F Drive
i The DIRECT SELECT lever always returns
to its original position. The current
transmission position P,R, Nor Dappears
in the transmission position display
(Y page 149) in the multifunction display. 148
Automatic transmissionDriving and parking
Page 158 of 378
To open
X
Switch the engine off.
X Remove the SmartKey from the ignition
lock.
X KEYLESS-GO: open the driver’s door.
This corresponds to key position 0: "key
removed".
The driver’s door can be closed again.
X Press the fuel fille rflap in the direction of
arrow 0002.
The fuel filler flap opens slightly.
X Open the fuel filler flap fully.
X Turn the fuel filler flap counter-clockwise
and remove it.
X Insert the fuel filler cap into the holder
bracket on the inside of filler flap 0003.
X Completely insert the filler nec kofthe fuel
pump nozzle into the tank, hook in place
and refuel.
X Only fill the tank until the pump nozzle
switches off.
i Do not add any more fuel after the pump
stops filling for the first time. Otherwise,
fuel may leak out.
To close X
Replace the cap on the filler neck and turn
clockwise until it engages audibly.
X Close the fuel filler flap.
i Close the fuel filler flap before locking the
vehicle.
i If you are driving with the fuel filler cap
open, the 0010reserve fuel warning lamp
flashes. Amessage appears in the
multifunction display (Y page 245).
In addition, the 000ECheck Engine warning
lamp may light up (Y page 264).
For further information on warning and
indicator lamps in the instrument cluster,
see (Y page 264). 156
RefuelingDriving and parking
Page 163 of 378

Vehicles with automatic transmission
X
Apply the parking brake firmly.
X Shift the transmission to position P.
Using the SmartKey
X Turn the SmartKey to position 0in the
ignition lock and remove it.
The immobilize ris activated.
i The SmartKey can only be removed if the
transmission is in position P.
Using KEYLESS-GO
X Press the Start/Stop button (Y page 141).
The engine stops and all the indicator
lamps in the instrument cluster go out.
i When the driver's door is closed, this
corresponds to key position 1. When the
driver's door is open, this corresponds to
key position 0:"key removed".
i In the event of an emergency, the engine
can be turned off while the vehicle is in
motion by pressing and holding the Start/
Stop button for three seconds. Parking brake
G
WARNING
If you must brake the vehicle with the parking
brake, the braking distance is considerably
longe rand the wheels could lock. There is an
increased danger of skidding and accidents.
Only use the parking brake to brake the
vehicle when the service brake is faulty .Do
not apply the parking brake too firmly. If the
wheels lock, release the parking brake until
the wheels begi nturning again. G
WARNING
If you leave children unsupervised in the
vehicle, they could set it in motion by, for
example:
R releasing the parking brake
R shifting the automatic transmission out of
the parking position P
R starting the engine.
They could also operate the vehicle's
equipment. There is a ris kofanaccident and
injury.
Whe nleaving the vehicle, always take the
SmartKey with you and lock the vehicle. Never
leave children unsupervised in the vehicle.
If you brake the vehicle with the parking
brake, the brake lamps will not light up. X
To apply: depress parking brake 0003firmly.
When the engine is running, the 000D(USA
only) or 0006(Canada only) indicator lamp
lights up in the instrument cluster.
X To release: depress the brake pedal and
keep it depressed.
X Pull release handle 0002.
When the ignition is switched on or the
engine is running, the 000D(USA only) or
0006 (Canada only) indicator lamp goes out
in the instrument cluster. Parking the vehicle for
along period
If you leave the vehicle parked for longer than
four weeks, the battery may be damaged by
exhaustive discharging. Parking
161Driving and parking Z